思科设备基本开局配置实验教程
思科交换机配置教程

思科交换机配置教程首先,我们需要登录到交换机的控制台界面。
可以通过串口连接,或者通过网络连接,例如通过SSH协议进行连接。
登录后,我们进入到交换机的命令行界面。
接下来,我们需要进行基本的配置。
思科交换机的配置是通过命令行界面进行的,配置的命令是不同的,但是有一些通用的配置信息,我们可以先进行配置。
首先,我们要为交换机设置一个主机名。
可以使用如下命令进行配置:```Switch(config)# hostname Switch1```这样就为交换机设置了一个名字为"Switch1"的主机名。
接下来,我们可以配置交换机的管理IP地址。
可以使用如下命令进行配置:```Switch(config)# interface vlan 1Switch(config-if)# ip address 192.168.1.1 255.255.255.0Switch(config-if)# no shutdown```这样就为交换机的VLAN1接口配置了一个IP地址为192.168.1.1,子网掩码为255.255.255.0,并且启用了这个接口。
除了基本配置信息,我们还需要进行一些其他的配置,例如VLAN的配置。
VLAN是虚拟局域网的意思,可以将交换机的端口划分到不同的VLAN中,实现不同VLAN之间的隔离。
可以使用如下命令进行VLAN的配置:```Switch(config)# vlan 10Switch(config-vlan)# name VLAN10Switch(config-vlan)# exitSwitch(config)# interface fastEthernet 0/1Switch(config-if)# switchport access vlan 10Switch(config-if)# exit```这样就创建了一个编号为10的VLAN,名称为"VLAN10"。
实验一网络设备的基本配置
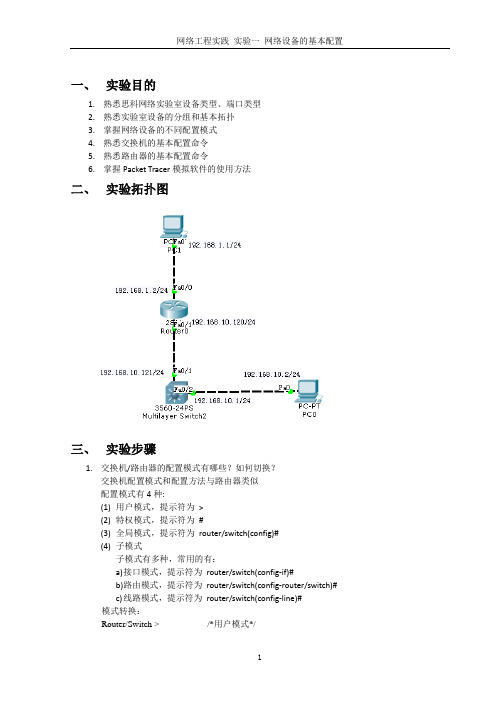
一、实验目的1.熟悉思科网络实验室设备类型、端口类型2.熟悉实验室设备的分组和基本拓扑3.掌握网络设备的不同配置模式4.熟悉交换机的基本配置命令5.熟悉路由器的基本配置命令6.掌握Packet Tracer模拟软件的使用方法二、实验拓扑图三、实验步骤1.交换机/路由器的配置模式有哪些?如何切换?交换机配置模式和配置方法与路由器类似配置模式有4种:(1)用户模式,提示符为>(2)特权模式,提示符为#(3)全局模式,提示符为router/switch(config)#(4)子模式子模式有多种,常用的有:a)接口模式,提示符为router/switch(config-if)#b)路由模式,提示符为router/switch(config-router/switch)#c)线路模式,提示符为router/switch(config-line)#模式转换:Router/Switch > /*用户模式*/Router/Switch >enableRouter/Switch # /*特权模式*/Router/Switch # configure terminalRouter/Switch (config) # /*全局模式*/Router/Switch (config) # interface f0/0 /*进入子模式,接口模式*/Router/Switch (config-if) #Router/Switch (config) #line console 0 /*进入子模式,线路模式*/Router/Switch (config-line) #从模式中退出,有两种方法(1)Router/Switch (config-if) # exit /*从子模式,接口模式退出到全局模式*/Router/Switch (config) # /*从全局模式退出到特权模式*/Router/Switch # /*从特权模式退出到用户模式*/Router/Switch >(2)Router/Switch (config-if) # end(或按Ctrl+Z) /*从子模式(或模式)退出到特权模式*/ Router/Switch #Router/Switch #disable /*从特权模式退出到用户模式*/Router/Switch >2.交换机/路由器的帮助命令在任何一个模式下,例如特权模式Router/Switch# ?3.配置交换机名为computer在全局模式下命名路由器/交换机Router/Switch(config)#hostname 名字Switch(config)#hostname computer4.配置交换机/路由器接口的IP地址为192.168.10.120/24进入接口模式后Router (config-if) # ip address 192.168.10.120 255.255.255.0二层交换机不能配置IP地址,只能在vlan中管理IP,三层交换机中可以通过vlan配置IP Switch(config)#int f0/1Switch(config-if)#int vlan 1Switch(config-if)#ip add 192.168.10.121 255.255.255.05.查看以太网端口支持的连线类型,并解释以太网端口支持直通线和交叉线不同设备之间连接交叉线相同设备之间连接直通线6.配置端口速率和双工模式,并解释Router(config-if)#duplex fullRouter(config-if)#speed 100得到interface FastEthernet0/0ip address 192.168.1.1 255.255.255.0duplex fullspeed 100!7.配置端口的状态:打开或关闭Router(config-if)#no shut /*打开* /Router(config-if)#shut /*关闭*/四、思考题1. 熟悉一下命令的操作,并给出命令的解释和输出信息。
思科路由器配置教程
引言概述:在现代网络中,路由器是连接计算机网络的关键设备之一。
其中思科路由器是业界认可的品牌,并且广泛应用于企业和家庭网络中。
本文将详细介绍如何配置思科路由器,帮助读者了解和掌握路由器配置的基本知识和技巧。
正文内容:一、连接路由器1.检查硬件连接:确保所有线缆正确插入路由器和计算机的相应端口。
2.配置本地网络:通过计算机的网络设置,将本地IP地质和子网掩码设置为与路由器相同的网段。
二、路由器基本设置1.登录路由器:通过输入默认的IP地质(一般为192.168.1.1或192.168.0.1)在浏览器中访问路由器的登录页面,输入管理员用户名和密码。
2.修改管理员密码:为了增加路由器的安全性,第一次登录时应该修改管理员密码。
3.更新路由器固件:使用最新的路由器固件可以提供更好的性能和安全性。
4.配置时间和日期:确保路由器的时间和日期正确,这对于日志记录和网络安全非常重要。
三、WAN设置1.配置接入类型:根据网络服务提供商的要求,选择正确的接入类型,例如DHCP、静态IP等。
2.配置PPPoE连接:如果使用PPPoE方式拨号上网,需要输入提供商提供的用户名和密码进行配置。
3.配置动态DNS:如果需要使用动态DNS功能,可以在此处输入相应的信息。
四、LAN设置1.设置局域网IP地质:为路由器设置一个唯一的IP地质,在同一网段内没有重复的IP。
2.配置DHCP服务器:启用DHCP服务器功能,为连接到路由器的设备动态分配IP地质。
3.设置无线网络:为无线网络设置SSID和安全密码,并配置其他相关选项,如频段、通道等。
五、高级设置1.配置端口转发:如果需要将外部访问域名映射到内部服务器,可以在此处进行端口转发配置。
2.配置虚拟专用网络(VPN):为用户提供远程访问网络的安全通道。
3.设置防火墙规则:根据网络需求设置适当的防火墙规则来保护网络安全。
4.配置质量服务(QoS):可以通过设置QoS规则提高特定应用程序或设备的网络性能。
思科基础实验(中英文对照)CCNA,CCNP实验
目录实验一路由器基本配置 (1)实验二静态路由 (3)实验三缺省路由 (5)实验四静态路由&缺省路由&CDP协议 (7)实验五三层交换机实现VLAN间通信 (9)实验六Vtp (11)实验七生成树STP (13)实验八RIP路由协议1 (17)实验九RIP路由协议2 (19)实验十OSPF单区域1 (21)实验十一OSPF单区域2 (22)实验十二OSPF单区域3 (24)实验十三EIGRP (26)实验十四ACL标准访问控制列表 (29)实验十五扩展ACL -1 (31)实验十六扩展ACL -2 (33)实验十七专家级访问控制列表 (36)实验十八动态NAT (37)实验十九NAT地址转换 (39)实验二十单臂路由 (41)实验二十一PPP chap认证 (43)实验二十二研究应用层和传输层协议 (44)实验二十三检查路由 (45)实验二十四研究ICMP 数据包 (47)实验二十五研究第2 层帧头 (49)实验二十六地址解析协议(ARP) (50)实验二十七中间设备用作终端设备 (52)实验二十八管理设备配置 (54)实验一路由器基本配置一、实验设备一台路由器,一台PC,配置线一条。
二、实验要求1.更改路由器名称为RA2.设置password为cisco1,secret为cisco2,vty为cisco3,并要求所有密码都加密。
3.关闭域名查找,命令输入同步。
4.配置以太网口的IP为202.119.249.2195.设置登陆提示信息6.对串行口进行描述(描述信息为:welcome to lixin lab)7.将上述信息保存到tftp server8.将实验过程配置写在记事本中进行粘贴。
9.配置VTY访问权限。
10.禁止路由器进行域名解析。
三、实验步骤Router>enableRouter#configure terminalRouter(config)#hostname RA 设置路由器名RA(config)#enable password cisco1 设置密码RA(config)#enable secret cisco2 设置加密密码RA (config)#no ip domain-lookup关闭域名查找(当我们打错命令时,不会去查找DNS,造成延时)RA (config)#line console 0RA (config-line)#logging synchronous命令输入达到同步(信息提示不会打断你的输入)RA (config-line)#exec-timeout 0 0 设置永久不超时RA (config-line)#exitRA(config)#line vty 0 4RA(config-line)#(enable)password cisco3 设置vty密码RA(config-line)#exitRA(config)#service password-encryption 对密码加密RA(config)#int fastEthernet 0/0RA(config-if)#ip address 202.119.249.1 255.255.255.0 对以太网口fa0/0配置IP RA(config-if)#no shutdown 开启端口RA(config-if)#exitRA(config)#banner motd & welcome welcome to ccna lab & 设置登陆提示信息RA(config)#int fa0/1RA(config-if)#description this is a fast port 描述端口信息RA(config-if)#exitRA(config)#copy running-config tftp 把信息保存到tftp实验二静态路由一、实验设备两台28系列型号路由器通过串口相连。
思科配置详细教程

思科6个路由3个交换机组建3个网络拓扑结构详细配置教程本想录制动画的在配置6个路由3个交换机分配12个网络地址自己被搞脑乱加上又困经常把IP看错搞了大半天晕懒得录了这个虽然有点复杂但并不难只是重复分配些IP 只是看错就会配错呵呵 6个路由还可以连好多线也就是说不只能分12个网络分的越多越容易乱纯命令下配置其实大家在图形界面下会快点教程分成3个实验来讲这样能照故到对这方面什么都不懂的新手从简单到复杂实验编号:实验一 VLAN配置(一)(交换机划分虚网)实验目的:在交换机上进行VLAN划分的基本方法;划分两虚网。
如下图把SWITCH2上的PC1和PC8划分在同一虚网(名称DIY) PC2和PC3同一虚网配置过程:步骤不一定非得按老师的我按照我认为快的方法来配目的达到就是好方法我习惯对于PC1 使用F0/1 PCX呢就使用F0/X 这样配置的时候就比较方便了1 给各PC 分配IPPC1就分为192.168.1.1 依此类推这样分的目的是不容易乱K8vlan2PC1:192.168.1.1PC8:192.168.1.8K8vlan3PC2:192.168.1.2PC3:192.168.1.32 进入交换机划分虚网两个虚网Switch>enSwitch#vlan databaseSwitch(vlan)#vlan 2 name k8vlan2Switch(vlan)#vlan 3 name k8vlan3Switch(vlan)#exit 完事后退出VLAN模式下一步进入全局模式把PC所在端口分配到指定VLAN Switch#conf t3 PC1 和PC8分配到k8vlan2 虚网Switch(config)#int f0/1Switch(config-if)#switchport access vlan 2 Switch(config-if)#int f0/8Switch(config-if)#switchport access vlan 24 PC2 和PC3分配到k8vlan3 虚网Switch(config-if)#int f0/2Switch(config-if)#switchport access vlan 3Switch(config-if)#int f0/3Switch(config-if)#switchport access vlan 3Switch(config-if)#exitSwitch(config)#exitSwitch#回到特权模式Switch#show vlan 查看下自己的端口分配是否正确效果显示如下绿色部分我们所分配的端口 OKVLAN Name Status Ports---- -------------------------------- --------- -------------------------------上面这里省略你懂的。
思科交换机的基本配置
思科交换机的基本配置随着Internet的高速发展,网络规模不断膨胀,对于从事网络专业的学生熟练掌握路由器和交换机的配置已显得十分重要。
接下来是小编为大家收集的思科交换机的基本配置方法,希望能帮到大家。
思科交换机的基本配置的方法一、交换机的基本配置Author:chenchao in ZJNU从本篇文章开始,将连载大概8-9篇自己学习交换与路由的实验报告,但是怕自己能力不行,会出现错误,所以,先载两篇文章,依次为:交换机的基本配置;路由器基本配置。
本篇为交换机的基本配置,使用的仿真软件是Cisco的一款免费软件:Cisco Packet Tracer。
想学习的可以在百度自行下载。
下面开始附上实验过程:实验环境:Cisco 2950交换机1台,Console电缆1根,PC机一台,网线1根。
连接如下图所示:实验步骤:一、交换机的带外配置;1、在用户模式、特权模式、全局模式、接口模式之间转换;Switch>enableSwitch#configure terminalEnter configuration commands, one perline. End with CNTL/Z.Switch(config)#interface FastEthernet 0/1Switch(config-if)#exitSwitch(config)#exitSwitch#%SYS-5-CONFIG_I: Configured from console byconsoleSwitch#exitSwitch con0 is now availablePress RETURN to get started.Switch>2、将交换机的名称改为“student”;Switch(config)#hostname studentstudent(config)#3、为交换机各个模式设置密码“cisco”;特权模式下的密码保护student#enablestudent#configure tEnter configuration commands, one perline. End with CNTL/Z.student(config)#enable password ciscostudent(config)#enable secret cisco1远程登录口令设置student#configure tEnter configuration commands, one perline. End with CNTL/Z.student(config)#line console 0student(config-line)#line vty 0 4student(config-line)#password cisco2student(config-line)#loginstudent(config-line)#student#4、为交换机制定一个IP地址10.10.10.X/24;student#configConfiguring from terminal, memory, ornetwork [terminal]?Enter configuration commands, one perline. End with CNTL/Z.student(config)#interface vlan 1student(config-if)#ip address 10.10.10.1255.0.0.05、开启交换机的Telnet服务功能,建立Telnet用户admin,口令cisco,并制定只能从10.10.10.y/24登录Telnet服务器;student#student#configure tEnter configuration commands, one perline. End with CNTL/Z.student(config)#user admin password 0 ciscostudent(config)#6、查看配置情况;student>enablePassword:student#show running-cBuilding configuration...hostname student!enable secret 5$1$mERr$q.MA2tj.WFptzvbifq/1i.enable password cisco!!username admin password 0 ciscointerface Vlan1ipaddress 10.10.10.1 255.0.0.0!!line con 0!line vty 0 4password cisco2loginline vty 5 15login!!End二、交换机的端口配置:1、配置接口的描述、关闭借口、启动接口、配置接口的速度为100Mbps、配置接口工作模式为全双工、配置接口的流程控制;student#configure terminalEnter configuration commands, one perline. End with CNTL/Z.student(config)#interface FastEthernet0/1student(config-if)#shutdown%LINK-5-CHANGED: Interface FastEthernet0/1,changed state to administratively down%LINEPROTO-5-UPDOWN: Line protocol onInterface FastEthernet0/1, changed state to down%LINEPROTO-5-UPDOWN: Line protocol onInterface Vlan1, changed state to downstudent(config-if)#student(config-if)#exitstudent(config)#interface FastEthernet0/1student(config-if)#no shutdown%LINK-5-CHANGED: Interface FastEthernet0/1,changed state to up%LINEPROTO-5-UPDOWN: Line protocol onInterface FastEthernet0/1, changed state to up%LINEPROTO-5-UPDOWN: Line protocol onInterface Vlan1, changed state to upstudent(config-if)#speed 100student(config-if)#duplex full%LINK-5-CHANGED: Interface FastEthernet0/1,changed state to down%LINEPROTO-5-UPDOWN: Line protocol onInterface FastEthernet0/1, changed state to down%LINEPROTO-5-UPDOWN: Line protocol onInterface Vlan1, changed state to downstudent(config-if)#2、配置接口FastEthernet0/10为Access口;student#student#configure terminalEnter configuration commands, one perline. End with CNTL/Z.student(config)#interface FastEthernet0/10student(config-if)#switchport mode accessstudent(config-if)#3、配置接口FastEthernet0/12为Trunk口;student#student#configure tEnter configuration commands, one perline. End with CNTL/Z.student(config)#interface fastethernet0/12student(config-if)#switchport mode Trunkstudent(config-if)#end4、查看配置情况;!interface FastEthernet0/1duplex fullspeed100!!interface FastEthernet0/9!interface FastEthernet0/10switchport mode access!interface FastEthernet0/11!interface FastEthernet0/12switchport mode trunk!student#show running-cBuilding configuration...Current configuration : 1275 bytes!version 12.1no service timestamps log datetime msecno service timestamps debug datetime msec no service password-encryption!hostname student!enable secret 5$1$mERr$q.MA2tj.WFptzvbifq/1i. enable password cisco!!username admin password 0 cisco!!duplex fullspeed 100!interface FastEthernet0/2 !interface FastEthernet0/3 !interface FastEthernet0/4 !interface FastEthernet0/5 !interface FastEthernet0/6 !interface FastEthernet0/7 !interface FastEthernet0/8 !interface FastEthernet0/9 !interface FastEthernet0/10 switchport mode access !interface FastEthernet0/11 !interface FastEthernet0/12 switchport mode trunk!interface FastEthernet0/13 !!interface FastEthernet0/15!interface FastEthernet0/16!interface FastEthernet0/17!interface FastEthernet0/18!interface FastEthernet0/19!interface FastEthernet0/20!interface FastEthernet0/21!interface FastEthernet0/22!interface FastEthernet0/23!interface FastEthernet0/24!interface GigabitEthernet1/1 !interface GigabitEthernet1/2 !interface Vlan1ipaddress 10.10.10.1 255.0.0.0 !!line con 0!line vty 0 4password cisco2loginline vty 5 15login!!end看了“思科交换机的基本配置”还想看:。
CCNA思科配置实验

CCNA思科配置实验思科配置实验(适用于CCNA)1. 设置计算机ip地址设置PCA 的IP地址为:10.65.1.1 255.255.0.0 网关:10.65.1.2 设置PCB 的IP地址为:10.66.1.1 255.255.0.0 网关:10.66.1.2 设置ROA f0/0 IP 为:10.65.1.2 255.255.0.0设置ROA f0/1 IP 为:10.66.1.2 255.255.0.0设置计算机PCA的ip地址和网关的操作:[rootPCA root]# ifconfig eth0 10.65.1.1 netmask 255.255.0.0 [rootPCA root]# ifconfig[rootPCA root]# route add default gw 10.65.1.2[rootPCA root]# route设置计算机PCB的ip地址和网关的操作:[rootPCB root]# ifconfig eth0 10.66.1.1 netmask 255.255.0.0 [rootPCB root]# ifconfig[rootPCA root]# route add default gw 10.66.1.2[rootPCA root]# route2. 双击Router A,配置路由器的接口IP地址:router>enrouter#conf trouter(config)#hostname roaroa(config)int f0/0roa(config-if)#ip address 10.65.1.2 255.255.0.0roa(config-if)#no shutdown (默认是shutdown)roa(config-if)#exitroa(config)int f0/1roa(config-if)#ip address 10.66.1.2 255.255.0.0roa(config-if)#no shutroa(config)int s0/0roa(config-if)#ip address 10.67.1.2 255.255.0.0roa(config-if)#no shutroa(config-if)#clock rate 64000roa(config)int s0/1roa(config-if)#ip address 10.68.1.2 255.255.0.0roa(config-if)#no shutroa(config-if)#exitroa(config)#ip routing (默认是关闭的)3.检查网络联通情况[rootPCA root]# ping 10.65.1.2 (通) (ping自己的网关) [rootPCA root]# ping 10.66.1.2 (通) (ping f0/1) [rootPCA root]# ping 10.66.1.1 (通) (ping PCB) [rootPCA root]# ping 10.67.1.2 (不通) (端口空时down) [rootPCA root]# ping 10.68.1.2 (不通) (端口空时down)[rootPCB root]# ping 10.66.1.2 (通) (ping自己的网关) [rootPCB root]# ping 10.65.1.2 (通) (ping f0/0) [rootPCB root]# ping 10.65.1.1 (通) (ping PCA) [rootPCB root]# ping 10.67.1.2 (不通) (端口s0/0空时down) [rootPCB root]# ping 10.68.1.2 (不通) (端口s0/1空时down)roa#ping 10.65.1.1 (通) (ping PCA)roa#ping 10.65.1.2 (通) (ping f0/0)roa#ping 10.66.1.1 (通) (ping PCB)roa#ping 10.66.1.2 (通) (ping f0/1)roa#ping 10.67.1.2 (不通) (端口s0/0空时down)roa#ping 10.68.1.2 (不通) (端口s0/1空时down)下面我们做这个几个小实验:(1) 将路由器的接口f0/0关闭roa#conf troa(config)#int f0/0roa(config-if)#shutdownroa(config-if)#endroa#ping 10.65.1.2 (不通,端口down掉)roa#show int f0/0 (f0/0 is down,line proto is down) [rootPCA root]# ping 10.65.1.2 (不通)激活f0/0端口:roa(config)#int f0/0roa(config-if)#no shutroa(config-if)#endroa#ping 10.65.1.2 (通)去掉PCA与f0/0的连线roa#sh int f0/0 (f0/0 is up,line proto is down)roa#ping 10.65.1.2 (不通)roa#sh int s0/0 (s0/0 is down,line proto is down)roa#sh int s0/1 (s0/1 is down,line proto is down) serial口当没有连线时(2) 关闭路由器的路由roa#conf troa(config)#no ip routing[rootPCA root]# ping 10.65.1.2 (通) (ping 自己的网关)[rootPCA root]# ping 10.66.1.1 (不通)(路由器不能转发了)[rootPCB root]# ping 10.66.1.2 (通) (ping 自己的网关)[rootPCB root]# ping 10.65.1.1 (不通)(路由器不能转发了)计算机可以ping与其相连的端口,但不能ping通下面的计算机,因为no ip routing后不具备转发的功能了。
思科交换机简单配置(通用教程)

• 双工模式: Switch(config-if)#duplex ? auto Enable AUTO duplex configuration full Force full duplex operation half Force half-duplex operation
Switch(config-if)#duplex auto Switch(config-if)# • 端口描述 Switch(config-if)#description vlan 10 trunk Switch(config-if)#
配置ip地址的命令格式: ip address {ip-address} {netmask}
测试常用端口类型Acce来自s / trunk将此端口设置为vlan10 的access口 Switch(config-if)#switchport mode access Switch(config-if)#switchport access vlan 10 Switch(config-if)# 将此端口设置为vlan10 的trunk口 Switch(config-if)#switchport trunk encapsulation dot1q Switch(config-if)#switchport mode trunk Switch(config-if)#switchport trunk allowed vlan 10
Vlan设置
• Vlan设置范围:1---4094 • 在全局模式下配置vlan Switch#conf t Switch(config)#vlan 10 Switch(config-vlan)#name vlan10 Switch(config-vlan)#vlan 20 Switch(config-vlan)#name vlan20 Vlan名称可以自行定义
- 1、下载文档前请自行甄别文档内容的完整性,平台不提供额外的编辑、内容补充、找答案等附加服务。
- 2、"仅部分预览"的文档,不可在线预览部分如存在完整性等问题,可反馈申请退款(可完整预览的文档不适用该条件!)。
- 3、如文档侵犯您的权益,请联系客服反馈,我们会尽快为您处理(人工客服工作时间:9:00-18:30)。
思科设备基本开局配置实验教程
Cisco交换机Dot1x支持情况简述Cisco交换机支持标准的基于端口的802.1x认证,在网络上搜寻了一下好像还不支持基于MAC的802.1x认证。
接下来是小编为大家收集的思科设备基本开局配置实验教程方法,希望能帮到大家。
思科设备基本开局配置实验教程:
配置项目:
1、主机名
2、管理IP地址
3、远程管理开启
4、安全密码
实验拓扑图:
操作步骤:
1、配置主机名
R1#conf t 进入全局配置模式
R1(config)#hostname R1-test 改主机名为R1-test
2、给路由器配置管理IP地址
R1-test(config)#int fa0/0
R1-test(config-if)#ip add 202.106.1.1 255.255.255.252
R1-test(config-if)#no shut
3、开启设备的远程管理功能
R1-test(config)#line vty 0 4 进入虚拟控制台端口(一般设置最多允许5个用户同时在线就够了)
R1-test(config-line)#password abc 设置密码
R1-test(config-line)#login 开启验证
R1-test(config-line)#enable secret 123abc 配置特权查模式密码
4、给交换机配置管理IP地址
SW1(config)#int vlan 1 交换机配IP是要进vlan1配
SW1(config-if)#ip add 202.106.1.2 255.255.255.252
SW1(config-if)#no shut
SW1(config)#no ip routing 关闭路由功能
SW1(config)#ip default-gateway 202.106.1.1 给交换机指网关,使之连接外网
5、开启交换机远程管理
SW1(config)#line vty 0 4
SW1(config-line)#login local 使用本地用户名和密码进行验证,不使用接口密码验证
SW1(config-line)#username test privilege 15 password abc 加一个用户为test,密码abc , 权限设为15级
(注:使用这种方法验证不需要设置特权模式密码)
6、分别在SW1和R1上做远程管理测试
SW1 telnet R1:
R1 telnet sw1:
7、配置控制台密码
SW1(config)#line console 0
SW1(config-line)#password abc
SW1(config-line)#login
SW1(config-line)#enable secret 123abc
看了“思科设备基本开局配置实验教程”还想看:
1.思科交换机基本配置实例讲解
2.思科路由器基本配置教程
3.思科模拟器交换机的基本配置方法
4.思科交换机配置教程详解
5.利用脚本配置思科路由器教程
6.思科如何配置ACE。