安装、维护说明书
强制通风燃气燃烧器RIELLO 40 FS 10安装, 使用以及维护说明书
TYPE - 类型
564 T30
20013746 (2) - 07/2009
INFORMATION ABOUT THE INSTRUCTION MANUAL
INTRODUCTION
The instruction manual supplied with the burner: - is an integral and essential part of the product and must not be sepa-
..................................................................................
- the address and telephone number of the nearest Assistance Centre;
If necessary replace them with the fixing screws (6, fig. 1) supplied as equipment.
1.1 BURNER EQUIPMENT
Insulating gasket . . . . . . . . . . . . No. 1 Cable grommet . . . . . . . . . . . . . . No. 1 Hinge . . . . . . . . . . . . . . . . . . . . . No. 1
Screws and nuts for flange to be fixed to boiler . . . No. 4 Screws for fixing the cover . . . . . . . . . . . . . . . . . . No. 3 7 pin plug . . . . . . . . . . . . . . . . . . . . . . . . . . . . . . . No. 1
vat 168 系列 大型摆阀 安装、操作与维护手册说明书

安装、操作与维护说明书大型摆阀带双作用气动驱动器168系列公称直径DN 400 – 500 mm (内径 16" – 20")本产品手册适用于以下产品订购编号:168..-….-….样品图603171CA 2018-09-19版168系列2/29 2018-09-19版 603171CA版本说明制造商: VAT Vakuumventile AG, CH-9469 Haag, Switzerland官网:电话:传真: 电子邮件: +41 81 771 61 61 +41 81 771 48 30 ***************发行方 VAT Vakuumventile AG, CH-9469 Haag, Switzerland编辑 VAT Vakuumventile AG, CH-9469 Haag, Switzerland印制 VAT Vakuumventile AG, CH-9469 Haag, Switzerland版权 © VAT Vakuumventile AG 2018未经VAT 书面许可,严禁以复印、缩微胶片等途径或利用任何其它复制工艺复制本说明书的任何部分,或通过电子系统处理、复制或分发本说明书的任何部分。
违者将赔付损害赔偿金。
VAT 原装固件以及更新后的最新款VAT 固件适用于VAT 产品。
VAT 固件含范围有限但无期限限制的用户使用许可。
除预期用途外或经许可复制VAT 固件,不得以任何其它形式复制VAT 固件或将之用于任何其它用途。
特别是,严禁将VAT 固件的复制品提供给他人。
尽管本说明书中使用了各种商品名称、品牌名称和商标等信息,但第三方不得认为这些名称不受保护且无权随意使用这些名称。
此规定符合相关品牌名称与商标法及法案的规定。
168系列目录1产品描述 (5)1.1产品标识 (5)1.2产品用途 (5)1.3相关文件 (5)1.4重要注意事项 (5)1.5技术数据 (5)2安全性 (6)2.1必读资料 (6)2.2危险等级 (6)2.3人员资质 (7)2.4安全标签 (7)3设计与功能 (8)3.1设计 (8)3.2功能 (8)4安装 (9)4.1开箱 (9)4.2将阀门装入系统 (9)4.2.1允许力度与弯矩 (11)4.3压缩空气连接 (12)4.4电气连接 (12)5操作 (13)5.1正常操作 (13)5.2升温状态下操作 (13)5.3压缩空气发生压降时的阀门特性 (13)5.4断电时的阀门特性 (13)5.4.1应急手动操作 (13)5.5三位置驱动器 (选配件) (15)5.5.1三位置驱动器的控制逻辑 (15)5.5.2调整第三位置 (15)5.6故障排除 (16)6维护 (17)6.1维护间隔时间 (17)6.2所需工具 (18)6.3更换阀板/机构单元 (18)7维修 (21)8拆装与储存 (22)8.1拆装 (23)8.2储存 (23)603171CA 2018-09-19版3/29168系列9包装与运输 (24)9.1包装 (25)9.2运输 (25)10处理 (26)11备品备件 (27)12附录 (28)12.1组装图 (28)12.2阀板机构组装图 (29)4/292018-09-19版603171CA168系列 产品描述603171CA 2018-09-19版5/291产品描述1.1产品标识制造号和订单号直接印在产品上或标示牌上。
产品安装、操作与维护手册说明书

I NSTALLATION,FAILURE TO FOLLOW THE INSTRUCTIONS ANDWARNINGS IN THE MANUAL MAY RESULT INSERIOUS OR FATAL INJURY AND/OR PROPERTYDAMAGE, AND WILL VOID THE PRODUCT WARRANTY. THIS PRODUCT MUST BE INSTALLED BY A LICENSED PROFESSIONAL. FOLLOW ALL APPLICABLE LOCAL AND STATE CODES AND REGULATIONS, IN THE ABSENCE OF SUCH CODES, FOLLOW THE CURRENT EDITIONS OF THE NATIONAL PLUMBING CODE AND NATIONAL ELECTRIC CODE,causing serious or fatal injury, leaking or flooding and/or property damage. To minimize risk, a licensed professional must install and periodically inspect and service the product. A drip pan connected to an adequate drain must be installed if leaking or flooding could cause property damage. Do not locate in an area where leaking could cause property damage to the area adjacent to the appliance or to lower floorssystem in this condition presents the risk of damageand leaks.Do not expose temperatures in excess of 140°F . Failure to properly size the product or follow these instructions may result in excessive strain on the system and may lead to product failure, serious or fatal personal injury, leakage and/or property damage. USE ONLY WITHworking pressure of 150 psig, whichever is less. At least once every 3 years or if discharge is present, a licensed professional should inspect the temperature and pressure relief valve and replace if corrosion is evident or the valve does not function. FAILURE TO INSPECT THIS VALVE AS DIRECTED COULD RESULT IN UNSAFE TEMPERATURE OR PRESSURE BUILD-UP WHICH CAN RESULT IN PRODUCT FAILURE, SERIOUS INJURY OR DEATH AND/OR SEVERE PROPERTY DAMAGEThe water quality canshould test for corrosive elements, acidity, total solids and other relevant contaminants, including chlorine and treat your water appropriately to insure satisfactory performance and prevent premature failure.NOTE: Inspect for shipping damage. Notify freight carrier or store where purchased immediately if damage is present. To avoid risk of personal injury and property damage, if the product appears to be malfunctioning or shows signs of corrosion, call a qualified professional immediately. Current copies of the product manual can be viewed at . Use proper safety equipment when installing.THIS IS THE SAFETY ALERT SYMBOL. IT IS USED TO ALERT YOU TO POTENTIAL PERSONAL INJURY AND OTHER HAZARDS. OBEY ALL SAFETY MESSAGES THAT FOLLOW THIS SYMBOL TO REDUCE THE RISK OF PERSONAL INJURY AS WELL AS PROPERTY DAMAGE.Model ST-1ApplicationThe ST-1 expansion tank is for use on tankless, residential on-demand water heaters with a total water content of 2 gallons or less and a maximum set point of 140°F. Do not use with larger storage-type water heaters, as these will exceed the capacity of the ST-1.Installation1. Install the expansion tank on the cold watersupply line to the water heater at a point between the water heater and backflow preventer or other one-way device (Figure 1).2. Once the expansion tank is installed, checkthe cold water supply line for any leakage.Make repairs if necessary.3. Before the initial firing of the water heater,open a hot water fixture and draw for one minute to purge air. Next, close and open the fixture in 30 second intervals, repeating three thimes to flush the tank and piping.Finally, turn the water heater temperature control to desired ending temperature (see water heater instructions). Do not set temperature higher than the expansion tank maximum.4. To relieve initial thermal expansion, slightlyopen a hot water faucet. Continue until water heater temperature is satisfied. Once heater is at its operating range, no further bleeding of expanded water is required.5. The water heater and expansion tank willnow be operational. The expansion tank will control pressure increases caused by thermal expansion to a level below the water heater relief valve setting. FOR USE ON TANKLESS RESIDENTIAL ON DEMAND WATER HEATERS WITH A TOTAL WATER CONTENT OF 2 GALLONS OR LESS ANDA MAXIMUM SET POINT OF 140° F. NON-ADJUSTABLE PRECHARGE.PSI Volume (cu.in.)Weight (lb.).000.00.8720.00 3.92 1.0140.00 5.77 1.0760.007.43 1.1380.008.17 1.16100.008.63 1.18120.009.00 1.19140.009.27 1.20150.009.27 1.20 MaintenanceA licensed professional should check the complete system, including the expansion tank, yearly and more frequently as the system ages. WarrantyST-1 Model: Seven (7) Year Limited Warranty Visit for complete warranty details.PLEASE READ THE FOLLOWING INSTRUCTIONS CAREFULLYI MPORTANT GENERAL SAFETY INFORMATION -ADDITIONAL SPECIFIC SAFETY ALERTS APPEAR IN THE FOLLOWING INSTRUCTIONS.1400 Division Road, West Warwick, RI 02893 USA T: 800.426.8765© 2020 Worthington Industries Inc. Part #: 9013-017 (01/21) One or more features of this product are covered by U.S. patents, visit /patents for more information.。
TYCD系列超高效三相永磁同步电动机使用维护说明书

TYCD(IP54)系列超高效永磁三相同步电动机安装使用维护说明书丹东吉尔电子有限责任公司TYCD(IP54)系列超高效三相永磁同步电动机安装使用维护说明书一、概述:TYCD系列超高效三相同步电动机,是大连钰霖电机有限公司研发设计的新型超高效永磁TYCD系列三相永磁同步电动机。
电机出线盒置于电机壳顶部(根据用户需求,也可做成侧出线)、整机结构紧凑、外形美观大方,安装尺寸符合IEC标准,具有高效、节能、起动转矩大,使用维护方便等特点。
绝缘等级提高到F级,防护等级提高到IP54,技术标准符合JB/T27744-2011《超高效三相永磁同步电动机技术条件》要求,产品与国内外同类产品相比较,处于领先水平。
TYCD系列电动机广泛应用于无特殊要求的机械设备、农业机械、食品机械、风机、水泵、机床、搅拌机、石油机械、空气压缩机等。
该电机为超高效三相交流永磁同步电动机,可与多种变频器相匹配,适用于各种机械装备的驱动。
1、电动机为防护型结构,外壳防护等级为IP54,冷却方式为IC411,安装结构为IMB3、IMB6、IMB7、IMB8、IMB35、IMVI、IMV3、IMV5、IMV15、IMV36.2、电动机采用F级绝缘,绕组温升限值(电阻法):F级绝缘不超过105K。
工作方式为连续工作制S1。
3、电动机在下列条件下使用时,能够保证额定运行。
*使用场所:不含有腐蚀性气体,或爆炸性气体,较为清洁的自然场所。
*环境温度:随季节而变化,但最高不得超过40℃,最低不得低于-15℃。
湿度要求:最高月月平均最高相对湿度为90%,同时该月月平均最低湿度不高于25%.海拔:不超过1000m频率:50HZ电压:380V接法:星接法。
二、安装前的准备:1、电动机开箱前应检查包装是否完整无损,有无受潮的迹象。
2、电动机开箱后应小心消除电机上的尘土及防锈层。
3、检查电动机的名牌数据是否符合要求。
4、仔细检查电动机在运输过程中,有无变形或损坏。
达诺工业电机安装、维护和零件手册说明书

For other service manuals visit our website at:/service_manuals.aspDORNER MFG. CORP .INSIDE THE USA OUTSIDE THE USA P .O. Box 20 • 975 Cottonwood Ave.TEL: 1-800-397-8664TEL: 262-367-7600Hartland, WI 53029-0020 USA FAX: 1-800-369-2440FAX: 262-367-58272100, 2200, 4100, 6200 & MPB Series Bottom Mount Drive Pack. for Heavy Load 90° Industrial 60 Hz GearmotorsInstallation, Maintenance & Parts ManualTable of ContentsIntroduction (2)Warnings − General Safety (3)Product Description (4)Specifications (4)Installation (9)Required Tools (9)Mounting (9)Preventive Maintenance and Adjustment (13)Required Tools (13)Timing Belt Tensioning (13)Timing Belt Replacement (13)Drive or Driven Pulley Replacement (14)Gear Reducer Replacement (14)Motor Replacement (16)Service Parts (18)2100, 2200, 4100, 6200 Series (All) and MPBSeries (Flat Belt) Bottom Mount Drive Package (18)MPB Series Cleated Belt Bottom MountDrive Package (20)4100 Series Adapter Package (22)Gear Motor (22)Notes (23)Return Policy (24)IntroductionUpon receipt of shipment:•Compare shipment with packing slip. Contact factory regarding discrepancies.•Inspect packages for shipping damage. Contact carrier regarding damage.•Accessories may be shipped loose. See accessory instruc-tions for installation.Dorner 2100 Series conveyors are covered by the following patent numbers: 5131529, 5174435, and corresponding patents and patent applications in other countries.Dorner 2200 and MPB Series conveyors are covered by patent number 5174435 and corresponding patents and patent applications in other countries.Dorner 4100 Series conveyors are covered by patent number 3923148 and corresponding patents and patent applications in other countries.Dorner 6200 Series conveyors are covered by patent numbers: 6685009, 5174435, 6109427 and corresponding patents and patent applications in other countries. Dorner’s Limited Warranty applies.Dorner reserves the right to make changes at any time without notice or obligation.Dorner has convenient, pre−configured kits of Key Service Parts for all conveyor products. These time saving kits are easy to order, designed for fast installation, and guarantee you will have what you need when you need it. Key Parts and Kits are marked in the Service Parts section of this manual with the Performance Parts Kits logoIMPORTANTSome illustrations may show guards removed. Do NOT operate equipment without guards.Warnings − General SafetyA WARNINGThe safety alert symbol, black triangle with white exclamation, is used to alert you to potential personal injury hazards.Climbing, sitting, walking or riding on conveyor will cause severe injury.KEEP OFF CONVEYORS.DO NOT OPERATE CONVEYORS IN AN EXPLOSIVE ENVIRONMENT.A WARNINGExposed moving parts can cause severe injury.LOCK OUT POWER before removing guards or performing maintenance.A WARNINGGearmotors may be HOT.DO NOT TOUCH Gearmotors.A WARNINGExposed moving parts can cause severe injury.REPLACE ALL GUARDS BEFORE RUNNING CONVEYOR.A WARNINGDorner cannot control the physicalinstallation and application of conveyors. Taking protective measures is the responsibility of the user.When conveyors are used in conjunction with other equipment or as part of a multiple conveyor system, CHECK FOR POTENTIAL PINCH POINTS and other mechanical hazards before system start-up.A WARNINGMPB Series Conveyors are not reversible. Reversing creates pinch points which can cause severe injury.DO NOT REVERSE MPB SERIES CONVEYORS.Product DescriptionRefer to Figure 1 for typical conveyor components.Figure 1SpecificationsGearmotor Mounting Package Models:Example:A ConveyorB Mounting BracketC GearmotorD Timing Belt TensionerE CoverF Timing BeltG Drive Pulley HDriven PulleyABCDEHFGSpecificationsTable 1: Gearmotor SpecificationsTable 2: Belt Speeds for Heavy Load Fixed Speed 90° 60 Hz Gearmotors on 2100, 2200 (Gang Drive), 4100 and 6200 Series Conveyors(vp) = voltage and phase:11 = 115 V , 1-phase 23 = 230V , 3-phase (n) = reversing capability:N = no reversing switchR = with reversing switch (115V , 1 phase only)Single PhaseThree PhaseDC Variable SpeedVFD Variable SpeedOutput Power 0.50 hp (0.37 kw)Input Voltage 115 VAC 208– 230 / 460 VAC 90 VDC 230 VAC Input Frequency 60 Hz N/A10 – 60 Hz Input Current 7.4 Amperes2.1 – 2/ 1 Amperes 5.0 Amperes 1.6 AmperesMotor RPM1725 25001725Gearmotor Ratios 5:1, 10:1, 20:1, 40:1, 60:1Frame Size NEMA 56CMotor TypeT otally enclosed, Fan-cooledGearmotorsBelt Speed DrivePulley Driven Pulley Part NumberGear RatioRPMIn-lbN-m Ft/minM/min32M060HS4(vp)F(n) 60:129 270 30.5 6 1.7223232M060HS4(vp)F(n) 60:129 27030.58 2.4 323232M060HS4(vp)F(n) 60:1 29 270 30.5 12 3.7 483232M040HS4(vp)F(n) 40:1 43 247 27.912 3.7 32 3232M040HS4(vp)F(n) 40:1 43247 27.9 18 5.5 48 3232M020HS4(vp)F(n)20:1 8690 10.2257.6 323232M020HS4(vp)F(n) 20:1 8690 10.237 11.3 48 3232M010HS4(vp)F(n) 10:1 173 45 5.1 49 14.9 323232M010HS4(vp)F(n)10:1 173 45 5.1 74 22.6483232M005HS4(vp)F(n)5:1 345 25 2.8 9930.2 32 3232M005HS4(vp)F(n)5:1 34525 2.8148 45.148 3232M005HS4(vp)F(n) 5:1 34525 2.8169 51.548 2832M005HS4(vp)F(n)5:134525 2.8197 60.044 2232M005HS4(vp)F(n) 5:1 34525 2.8215 65.5482232M005HS4(vp)F(n)5:1345252.8249 75.948 19SpecificationsTable 3: Belt Speeds for Heavy Load Fixed Speed 90° 60 Hz Gearmotors on 2200 Series Conveyors (Excluding Gang Drive)(vp) = voltage and phase:11 = 115 V , 1-phase 23 = 230V , 3-phase(n) = reversing capability:N = no reversing switchR = with reversing switch (115V , 1 phase only)Table 4: Belt Speeds for Heavy Load Fixed Speed 90° 60 Hz Gearmotors onMPB Series Conveyors(vp) = voltage and phase 11 = 115 V , 1-phase 23 = 230V , 3-phase (n) = reversing capability N = no reversing switchR = with reversing switch (115V , 1 phase only)GearmotorsBelt Speed DrivePulleyDriven Pulley Part NumberGear RatioRPMIn-lbN-mFt/minM/min32M060HS4(vp)F(n) 60:1 29270 30.5 6 1.7 193232M060HS4(vp)F(n) 60:1 29 270 30.5 10 3.0 282832M040HS4(vp)F(n) 40:1 43 247 27.9 15 4.6 282832M060HS4(vp)F(n) 60:1 29 270 30.5 16 4.9 44 2832M040HS4(vp)F(n)40:14324727.924 7.3 442832M020HS4(vp)F(n) 20:186 90 10.2 309.1 28 2832M020HS4(vp)F(n) 20:1 8690 10.2 4814.6 44 2832M010HS4(vp)F(n) 10:1 173 145 5.1 6118.6 282832M010HS4(vp)F(n) 10:1 173 45 5.195 29.0 44 2832M010HS4(vp)F(n) 10:1173455.1104 31.7482832M005HS4(vp)F(n) 5:1345 25 2.8 121 36.928 2832M005HS4(vp)F(n) 5:1 345 25 2.8 13842.1 32 2832M005HS4(vp)F(n) 5:1345252.8176 53.6 32 2232M005HS4(vp)F(n)5:134525 2.8208 63.4 482832M005HS4(vp)F(n)5:1 34525 2.8 24273.8 44 2232M005HS4(vp)F(n)5:1345252.8264 80.54822GearmotorsBelt Speed Drive PulleyDriven Pulley Part NumberGear RatioRPMIn-lbN-mFt/minM/min32M060HS4(vp)F(n) 60:1 29 270 30.5 13 4.0 223232M060HS4(vp)F(n) 60:1 29 270 30.5 20 6.0 282832M040HS4(vp)F(n) 40:1 43 247 27.9 29 8.9 282832M040HS4(vp)F(n) 40:1 43 24727.9 44 13.4 48 3232M020HS4(vp)F(n) 20:1 8690 10.2 59 17.9 28 28SpecificationsTable 5: Belt Speeds for Heavy Load Variable Speed 90° VFD Gearmotors on 2100, 4100 and 6200 Series Conveyors* At 60 HzTable 6: Belt Speeds for Heavy Load Variable Speed 90° VFD Gearmotors on2200 Series Conveyors (Excluding Gang Drive)Table 7: Belt Speeds for Heavy Load Variable Speed 90° VFD Gearmotors onMPB Series Conveyors* At 60 HzGearmotorsBelt Speed DrivePulley Driven Pulley Part Number Gear RatioRPMIn-lbN-m Ft/minM/min 32M060HS423EN 60:1 29 22635.50.6−5.6 0.2−1.7223232M060HS423EN 60:1 29 22635.5 0.8−8.20.3−2.532 3232M040HS423EN 40:1 43 247 27.91.2−12 0.4−3.8282832M020HS423EN 20:1 86 24827.92.5−25 0.8−7.5323232M010HS423EN 10:1 173 15617.64.9−49 1.5−15323232M005HS423EN 5:1 345 819.1 9.9−99 3−3032 3232M005HS423EN 5:1 345 81 9.1 14−148 4.5−45483232M005HS423EN 5:1345 58 6.5 19−197 6−6044 2232M005HS423EN5:1 345586.524−249 7.6−76 4819GearmotorsBelt Speed DrivePulley Driven Pulley Part Number Gear RatioRPMIn-lbN-m Ft/minM/min32M060HS423EN 60:1 29 27030.50.6−6 0.2−1.8 193232M060HS423EN 60:1 29 27030.51−10 0.3−3.1 282832M040HS423EN 40:1 43 24727.9 1.5−15 0.5−4.628 2832M020HS423EN 20:1 86 16718.93−300.9−9.2282832M010HS423EN 10:1 173115136−60 1.8−18282832M010HS423EN 10:1 1731151310−104 3.2−32482832M005HS423EN 5:1 345 58 6.512−121 3.7−37282832M005HS423EN5:1 345 58 6.526−264 8.1−814822GearmotorsBelt Speed Drive Pulley Driven Pulley Part Number Gear RatioRPM In-lb N-m Ft/min M/min 32M060HS423EN 60:12927030.5 1.3−13.4 0.4−4.1223232M060HS423EN 60:12927030.52−190.9−5.9282832M040HS423EN 40:14324727.9 2.9−290.9−8.9282832M020HS423EN 20:18616718.9 5.9−59 1.8−18282832M010HS423EN 10:11731151311−117 3.6−36282832M010HS423EN 10:11731151317−175 5.4−54483232M005HS423EN5:1345586.523−2347.1−712828SpecificationsTable 8: Belt Speeds for Heavy Load Variable Speed 90° DC Gearmotors on 2100, 2200 (Gang Drive), 4100 and 6200 Series ConveyorsTable 9: Belt Speeds for Heavy Load Variable Speed 90° DC Gearmotors on 2200 Series Conveyors (Excluding Gang Drive)Table 10: Belt Speeds for Heavy Load Variable Speed 90° DC Gearmotors on MPB Series Conveyors* = Cleated and Sidewall Cleated belts operate at a maximum of 150 Ft/min (45.7 m/min)GearmotorsBelt Speed Drive Pulley Driven Pulley Part Number Gear RatioRPM In-lb N-m Ft/min M/min 32M060PSD3DEN 60:14227030.5 1.0−8.20.3−2.5223232M060PSD3DEN 60:14227030.5 1.4−120.4−3.6323232M040PSD3DEN 40:16321524.3 2.1−180.7−5.4323232M020PSD3DEN 20:11259010.2 4.3−36 1.3−11323232M010PSD3DEN 10:1250728.19−71 2.6−22323232M005PSD3DEN 5:150025 2.817−143 5.2−43323232M005PSD3DEN 5:150025 2.826−2147.8−65483232M005PSD3DEN5:1500252.829−2459.0−754828GearmotorsBelt Speed Drive Pulley Driven Pulley Part Number Gear RatioRPM In-lb N-m Ft/min M/min 32M060PSD3DEN 60:14227030.5 1.8−140.5−4.5282832M040PSD3DEN 40:16321524.3 2.6−220.8−6.7282832M060PSD3DEN 60:14227030.5 2.8−230.8−7442832M020PSD3DEN 20:11259010.2 5.3−44 1.6−13282832M010PSD3DEN 10:1250728.110−88 3.2−27282832M005PSD3DEN 5:150025 2.817−1385−42442832M005PSD3DEN 5:150025 2.821−176 6.4−54282832M005PSD3DEN5:1500252.833−27610−844428GearmotorsBelt Speed Drive Pulley Driven Pulley Part Number Gear RatioRPM In-lb N-m Ft/min M/min 32M060PSD3DEN 60:14227030.5 2.3−190.7−5.9223232M060PSD3DEN 60:14227030.5 3.4−281−8.6282832M040PSD3DEN 40:16321524.3 5.1−42 1.6−12.9282832M060PSD3DEN 60:14227030.5 5.3−44 1.6−13442832M020PSD3DEN 20:11259010.210−853−26282832M020PSD3DEN 20:11259010.215−127 4.7−39483232M010PSD3DEN 10:1250728.120−1706−52282832M010PSD3DEN10:1250728.131−2559−774832NOTEFor belt speed other than those listed, contact factory for details.InstallationRequired Tools •Hex key wrenches:2 mm, 2.5 mm,3 mm, 5 mm •Torque wrench MountingInstallation Component List:1.Typical components (Figure 2)Figure2Figure3A WARNINGExposed moving parts can cause severeinjury.LOCK OUT POWER before removing guardsor performing maintenance.A WARNINGMPB Series Conveyors are not reversible.Reversing creates pinch points which cancause severe injury.DO NOT REVERSE MPB SERIESCONVEYORS.I Bottom Mount AssemblyJ Drive PulleyK CoverL M4 Socket Head Screws (4x)M Driven PulleyN KeyO Timing BeltP M6 Socket Head Screws (2x)Q M6 Socket−Head Screws & Hard Washers (4x)R End Support BracketS Hex Support Posts (2x)T Gearhead/Conveyor Support PlateU Support Plate SpacerV M6 Socket Head Screws (2x)W M6 Socket Head Screws (2x)NOTE2100, 2200, MPB and 6200 2” & 3” (51mm &76mm) and 4100 1” through 6” (25mm –152mm) conveyors do not include (Figure2,item R through W).NOTEGearmotor may be operated in positions 1 &3 (Figure 3).OIMPJKLNQRT UWSVQInstallation2.If required, change gearmotor position by removing four screws (Figure 4,item X) from bottom mount assembly and two screws (Figure 5,item Y) from gear reducer support. Rotate gearmotor to other position and install screws. Tighten screws to 103 in-lb (12 Nm).Figure 4Figure 53.For your reference, the following figures show theattachment area of complete mounting packages for the various conveyor series.2200 Series Figure66200 SeriesFigure 74100 Series Figure 82100 SeriesFigure 9MPB Series Figure10XXYNOTE6200 conveyor shown, other Series similar.Installation4.Locate drive output shaft (Figure 11,item Z) and remove two screws (AA).Figure 11For 2100, 2200 and 6200 − 2” & 3” (51mm & 76mm) wide conveyors and 4100 − 1” through 6” (25mm – 152mm) wide conveyors:5.Attach bottom mount assembly (Figure 12,item I) with screws (P). Tighten to 80 in-lb (9 Nm). Proceed to step 10.Figure 12For 2100, 2200, 6200 and MPB − 4” (102mm) and wider conveyors and 4100 − 8” (203mm) and wider conveyors: 6.On side opposite drive output shaft, remove two screws (Figure 13,item AB).Figure 137.Attach bottom mount assembly (Figure 12,item I) with two screws (P). Tighten to 80 in-lb (9 Nm).8.Install hex support posts (Figure 14,item S). Tighten posts to 80 in-lb (9 Nm).Figure 149.Install spacer (Figure 15,item U) (2100 & 6200 Only) and gearhead/conveyor support plate (T) with screws (V). Install end support bracket (R) with screws (W). Tighten screws (V & W) to 80 in-lb (9 Nm).Figure 15NOTERefer to Figure 6 through Figure 10 whiledoing step 7.AAZIPADABA WARNINGDrive shaft keyway may be sharp.HANDLE WITH CARE.SURTVWInstallation10.Install key (Figure 16,item N).Figure 1611.Wrap timing belt (O) around driven pulley (M) anddrive pulley (J). Install driven pulley (M) onto conveyor shaft.12.Remove cam bearing and spacer (Figure 12,item AD).Place cam bearing and spacer (Figure 17,item AD) next to driven pulley (M). Ensure flanges of driven pulley are aligned with cam bearing. Tighten driven pulley set screws (AA). This will allow for proper belt alignment while conveyor is in use. Install cam bearing and spacer (AD).Figure 1713.Depending on direction of conveyor belt travel (1 or 2of Figure 18), position belt tensioner (AE) as shown. Tension belt to obtain 0.125¨ (3 mm) deflection for 1.0 lb (456 grams) of force at belt mid-point (AF). Tighten tensioner screw to 103 in-lb (12 Nm).Figure 1814.Install cover (Figure 19,item K) with four screws (L).Tighten to 35 in-lb (4 Nm).Figure 1915.Mount assembly to support structure with four hardwashers and screws (Figure 20,item Q). Tighten to 80 in-lb (9 Nm).Figure 20NOJMAAADM1AFAF2KLQPreventive Maintenance and AdjustmentRequired Tools•Hex key wrenches:2 mm, 2.5 mm,3 mm, 5 mm•Adjustable wrench (for hexagon head screws)•Torque wrenchTiming Belt Tensioning1.Remove four (4) screws (Figure 19,item L) and remove cover (K).2.Loosen tensioner (Figure 21,item AE).Figure 213.Depending on direction of conveyor belt travel (1 or 2 of Figure 18), position belt tensioner (AE) as shown. Tension belt to obtain 0.125¨ (3 mm) deflection for 1.0 lb (456 grams) of force at belt mid-point (AF). Tighten tensioner screw to 103 in-lb (12 Nm).4.Install cover (Figure 19,item K) with four (4) screws (L). Tighten to 35 in-lb (4 Nm).Timing Belt Replacement1.Remove four (4) screws (Figure 19,item L) and remove cover (K).2.Loosen tensioner (Figure 21,item AE).3.Remove timing belt (Figure 22,item O).Figure 224.Install new timing belt.5.Depending on direction of conveyor belt travel (1 or 2 of Figure 18), position belt tensioner (AE) as shown. Tension belt to obtain 0.125¨ (3 mm) deflection for 1.0 lb (456 grams) of force at belt mid-point (AF). Tighten tensioner screw to 103 in-lb (12 Nm).6.Install cover (Figure 19,item K) with four (4) screws (L). Tighten to 35 in-lb (4 Nm).A WARNINGExposed moving parts can cause severe injury.LOCK OUT POWER before removing guards or performing maintenance.AE OA WARNINGExposed moving parts can cause severe injury.LOCK OUT POWER before removing guards or performing maintenance.NOTEIf timing belt does not slide over pulley flange, loosen driven pulley set screws (Figure22,item AG) and remove pulley with belt (O). For re-installation, see steps 11 and Figure 16 on page 12.AGOPreventive Maintenance and AdjustmentDrive or Driven Pulley Replacementplete steps 1 through 3 of “Timing BeltReplacement” section on page 13.2.Loosen set screws and remove drive or driven pulley.3.Complete steps 11 through 14 of “Installation” section on page 12.Gear Reducer Replacement1.Remove four (4) screws (Figure 19,item L) and remove cover (K).2.Loosen tensioner (Figure 21,item AE).3.Loosen drive pulley set screws (Figure 23,item AG). Remove drive pulley (J) and timing belt (O).Figure 234.Remove screws (Figure 24,item V & W) and remove support bracket (R), support plate (T) and spacer (U).Figure 245.Remove hex support posts (Figure 25,item S).Figure 25A WARNINGExposed moving parts can cause severe injury.LOCK OUT POWER before removing guards or performing maintenance.NOTEIf drive pulley (Figure 23,item J) is replaced, wrap timing belt around drive pulley and complete step 3.A WARNINGExposed moving parts can cause severe injury.LOCK OUT POWER before removing guards or performing maintenance.OJAGURTVWSPreventive Maintenance and Adjustment 6.Remove two (2) bracket screws (Figure 26,item AL)and remove bracket (AM).Figure267.Remove four (4) gear reducer mounting screws (Figure27,item AN). Remove gearmotor.Figure278.Remove four screws (Figure 28,item AO). Detachmotor (AP) from gear reducer (AQ). Retain motor output shaft key (AR).Figure289.Remove two (2) screws (AS) and detach output shaftcover (AT).10.Remove gear reducer output shaft key (AU).11.Loosen six (6) set screws (Figure 29,item A V). Removedrive shaft (AW) and key (AX).Figure29AMALANAPAQATA SAOAOAUARAV AWAXPreventive Maintenance and Adjustment12.Apply grease (Figure 30,item AY) to shaft.Figure 3013.Replace the original shaft components into new gearreducer (see Figure 29). Tighten set screws (A V) to 26 in-lb (3 Nm).14.With key (Figure 28,item AR) in keyway, slide motor(AP) and gear reducer (AQ) together. Install screws (AO) and tighten.15.Reverse steps 4 through 7 beginning on page 14.plete steps 11 through 15 of “Installation” sectionon page 12.Motor Replacement1.For single phase motor, unplug power cord from outlet.2.For three phase and VFD variable speed motor:a.Loosen terminal box screws (Figure 31,item AZ) and remove cover (BA).Figure 31b.Record wire colors on terminals 1, 2 and 3. Loosen wire nuts and remove wires 1, 2 and 3.c.Loosen cord grip and remove cord.3.For DC variable speed motor, unplug motor cord at disconnect (Figure 32,item BB).Figure 32IMPORTANTBe extremely careful when coupling motor to gear reducer. Avoid misalignment and forcing the connection causing possible permanent gear reducer seal damage.NOTEDrive pulley (Figure 23,item J) is removed. Wrap timing belt around drive pulley and complete step 16.A WARNINGExposed moving parts can cause severe injury.LOCK OUT POWER before removing guards or performing maintenance.AYHazardous voltage will cause severe injury or death.LOCKOUT POWER BEFORE before wiring.AZBABBPreventive Maintenance and Adjustment4.Remove four screws (Figure 33,item AO). Detach motor (AP) from gear reducer (AQ). Retain motor output shaft key (AR).Figure 335.With key (Figure 34,item AR) in keyway, slide motor and gear reducer together. Install screws (AO) and tighten.Figure 346.Replace wiring:•For a single phase motor, reverse step 1 on page 16.•For a three phase and VFD variable speed motor, reverse step 2 on page 16.•For a DC variable speed motor, reverse step 3 on page 16.IMPORTANTBe extremely careful when coupling motor to gear reducer. Avoid misalignment and forcing the connection causing possible permanent gear reducer seal damage.APAOAQARARAOService PartsNOTEFor replacement parts other than those shown in this section, contact an authorized Dorner Service Center or the factory. Key Service Parts and Kits are identified by the Performance Parts Kits logo . Dorner recommends keeping these parts on hand.2100, 2200, 4100, 6200 Series (All) and MPB Series (Flat Belt) Bottom Mount Drive PackageService PartsItem Part NumberDescription1 202390MNut2920625M Socket Head Screw M6x25mm (2100 & 2200)920616M Socket Head Screw M6x16mm (4100)920630MSocket Head Screw M6x30mm (6200)3450375MCover Mounting Bracket4450445 Spacer 5802−046 Bearing 6920845M Socket Head Screw M8x45mm 7920410M Socket Head Screw M4x10mm 8920693M Socket Low Head Screw M6x16mm 9450443M Grove Mounting Plate 10980422M Square Key 4mm x 22mm 11912−084Square Key, 0.188 x 1.5”12450444M Grove Output Shaft 12mm 13300139Drive −Bearing Shaft Cover 14920616M Socket Head Screw M6x16mm 15920608M Socket Head Screw M6x8mm 16605279P Hard Washer17450441M Gearhead Support Bracket 184533WWM Gearhead Support Hex Post 19450440M End Support Bracket20450442M Gearhead/Conveyor Support Plate 697869MGearhead/Conveyor Support Plate w/Spacer (4100 Only)21450027M Drive Spacer [2100 − 4”−24” (102mm − 610mm) and All 6200]22807−952Grooved Pin [2100 − 4”−24” (102mm −610mm) and All 6200]23920620MSocket Head Screw M6x20mm24450376M Drive Guard 25807−226 Snap −out Plastic Plug 26920406M Socket Head Screw M4x6mm 27980422M Square Key 4mm x 22mm912−053 Square Key, 0.125 x 0.75” [4100 − 1”(25mm) Conveyor Only]28814-104 Timing Belt, 15mm W x 450mm L 814-105 Timing Belt, 15mm W x 460mm L 814-065 Timing Belt, 15mm W x 475mm L 814-112Timing Belt, 15mm W x 495mm L 814-101 Timing Belt, 15mm W x 500mm L 814-108 Timing Belt, 15mm W x 520mm L 814-064 Timing Belt, 15mm W x 535mm L 814-099Timing Belt, 15mm W x 565mm L 29450365MP Driven Pulley, 19Tooth, 12mm bore 450366MP Driven Pulley, 22Tooth, 12mm bore 450367MP Driven Pulley, 28Tooth, 12mm bore 450368MPDriven Pulley, 32Tooth, 12mm bore 30450365MP Drive Pulley, 19Tooth, 12mm bore 450366MP Drive Pulley, 22Tooth, 12mm bore 450367MP Drive Pulley, 28Tooth, 12mm bore 450368MP Drive Pulley, 32Tooth, 12mm bore 450369MP Drive Pulley, 44Tooth, 12mm bore 450370MPDrive Pulley, 48Tooth, 12mm boreWW = Conveyor width ref.: 01, 02, 03, 04, 06, 08, 10, 12, 18, 21, 24Item Part Number DescriptionService PartsMPB Series Cleated Belt Bottom Mount Drive Package27851-279 Rev. I21Dorner Mfg. Corp.2100, 2200, 4100, 6200 & MPB Series Bottom Mount Drive Pack. for Heavy Load 90° Industrial 60 Hz Gearmotors Service PartsItem Part Number Description1202390M Nut2920692M Socket Low Head Screw M6 x 12mm 3920625M Socket Head Screw M6x25mm 4802−046Bearing 5807−1133Washer6920845M Socket Head Screw M8x45mm 7450445Spacer8243402Cover Mounting Angle9920693M Socket Low Head Screw M6x16mm 10243401Mounting Plate11920416M Socket Head Screw M4x16mm 12980422M Square Key 4mm x 22mm 13912−084Square Key, 0.188 x 1.5”14450444M Grove Output Shaft 12mm 15300139Drive −Bearing Shaft Cover 16920616M Socket Head Screw M6x16mm 17605279P Hard Washer18450441M Gearhead Support Bracket 194533WWM Gearhead Support Hex Post 20450440MEnd Support Bracket21243403Gearhead/Conveyor Support Plate 22920620M Socket Head Screw M6x20mm 23300871M Drive Cover24920408M Socket Head Screw M4x8mm 25450367MP Driven Pulley, 28T ooth, 12mm bore 450368MP Driven Pulley, 32T ooth, 12mm bore 26450366MP Drive Pulley, 22Tooth, 12mm bore 450367MP Driven Pulley, 28T ooth, 12mm bore 450369MP Drive Pulley, 44Tooth, 12mm bore 450370MP Drive Pulley, 48Tooth, 12mm bore 27814-101Timing Belt, 15mm W x 500mm L 814-108Timing Belt, 15mm W x 520mm L 814-064Timing Belt, 15mm W x 535mm L 814-099Timing Belt, 15mm W x 565mm L 814-109Timing Belt, 15mm W x 580mm L 814-115Timing Belt, 15mm W x 600mm L 814-110Timing Belt, 15mm W x 615mm LWW = Conveyor width ref.: 04, 06, 12, 18, 24Item Part Number DescriptionDorner Mfg. Corp.22851-279 Rev. I2100, 2200, 4100, 6200 & MPB Series Bottom Mount Drive Pack. for Heavy Load 90° Industrial 60 Hz Gearmotors Service Parts4100 Series Adapter Package Gear MotorItem Part No.Part Description1609486Mounting Block 1” (25mm)609487Mounting Block 2” (51mm)609488Mounting Block 3” (76mm)609479Mounting Block 4” (102mm)609480Mounting Block 5” (127mm)609481Mounting Block 6” (152mm)609482Mounting Block 7” (178mm)609483Mounting Block 8” (203mm)609484Mounting Block 10” (254mm)609485Mounting Block 12” (305mm)2613602P Bolt & Flat Washer Assembly 3450374Drive Adapter Plate 4910−126Hex Nut with Lock Washer 5930612MFlat Head Screw M6 x 12mmItem Part No.Part Description162MH411FN Motor, 0.5 hp (0.37 Kw) 115/230 Volts,60 Hz, 1-Phase, non −reversing 62MH411FR Motor, 0.5 hp (0.37 Kw) 115/230 Volts, 60 Hz, 1-Phase, reversing62MHD9DEN Motor, 0.5 hp (0.37 Kw) 90 Volts DC 32MS423EN Motor, 0.5 hp (0.37 Kw) 230V , 10– 60Hz, Inverter Duty, 3 Phase62MH423Motor, 0.5 hp (0.37 Kw) 208−230/460 Volts, 60 Hz, 3-Phase 232M005HS Gear Reducer, 5:1, 56C 32M010HS Gear Reducer, 10:1, 56C 32M020HS Gear Reducer, 20:1, 56C 32M040HS Gear Reducer, 40:1, 56C 32M060HSGear Reducer, 60:1, 56C21Notes2100, 2200, 4100, 6200 & MPB Series Bottom Mount Drive Pack. for Heavy Load 90° Industrial 60 Hz Gearmotors 851-279 Rev. I23Dorner Mfg. Corp.Dorner Mfg. Corp. reserves the right to change or discontinue products without notice. Allproducts and services are covered in accordance with our standard warranty. All rights reserved. © Dorner Mfg. Corp. 2010DORNER MFG. CORP.975 Cottonwood Ave., PO Box 20Hartland, WI 53029-0020 USATEL 1-800-397-8664 (USA)FAX 1-800-369-2440 (USA)Internet: Outside the USA:TEL 1-262-367-7600FAX 1-262-367-5827Return PolicyReturns must have prior written factory authorization or they will not be accepted. Items that are returned to Dorner without authorization will not be credited nor returned to the original sender. When calling for authorization, please have the following information ready for the Dorner factory representative or your local distributor:1. Name and address of customer.2. Dorner part number(s) of item(s) being returned.3. Reason for return.4. Customer's original order number used when ordering the item(s).5. Dorner or distributor invoice number (if available, part serial number).A representative will discuss action to be taken on the returned items and provide a Returned Goods Authorization (RMA)number for reference. RMA will automatically close 30 days after being issued. To get credit, items must be new and undamaged. There will be a return charge on all items returned for credit, where Dorner was not at fault. It is the customer’s responsibility to prevent damage during return shipping. Damaged or modified items will not be accepted. The customer is responsible for return freight.Conveyors and conveyor accessoriesStandard catalog conveyors 30%MPB, 7200, 7300 Series, cleated and specialty belt50%AquaGard & AquaPruf Series conveyors non-returnable itemsEngineered to order products case by caseDrives and accessories30%Sanitary stand supports non-returnable itemsPartsStandard stock parts30%Plastic chain, cleated and specialty belts non-returnable itemsReturns will not be accepted after 60 days from original invoice date. The return charge covers inspection, cleaning, disassembly, disposal and reissuing of components to inventory. If a replacement is needed prior to evaluation of returned item, a purchase order must be issued. Credit (if any) is issued only after return and evaluation is complete.Dorner has representatives throughout the world. Contact Dorner for the name of your local representative. Our Customer Service Team will gladly help with your questions on Dorner products.For a copy of Dorner's Warranty, contact factory, distributor, service center or visit our website at .For replacement parts, contact an authorized Dorner Service Center or the factory.851-279 Rev. I Printed in U.S.A.。
GP46系列压力计与切换仪安装与维护手册说明书
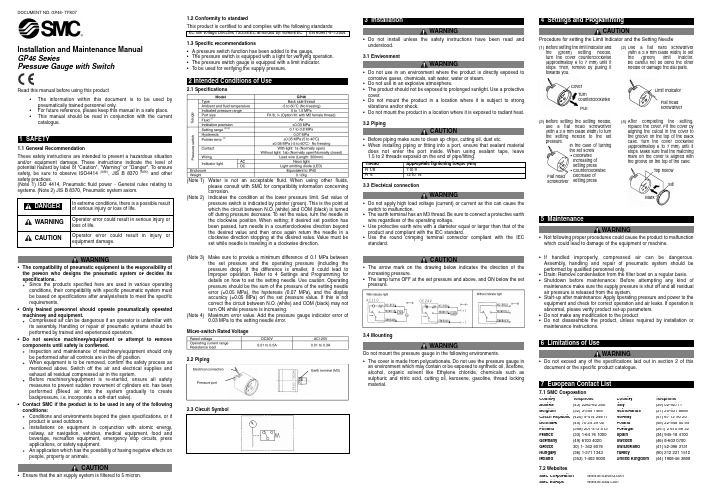
Installation and Maintenance ManualGP46 SeriesPressure Gauge with SwitchRead this manual before using this product•The information within this document is to be used bypneumatically trained personnel only.•For future reference, please keep this manual in a safe place.•This manual should be read in conjunction with the currentcatalogue.1SAFETY1.1 General RecommendationThese safety instructions are intended to prevent a hazardous situationand/or equipment damage.These instructions indicate the level ofpotential hazard by label of "Caution", "Warning" or "Danger".To ensuresafety, be sure to observe ISO4414 (Note1), JIS B 8370 (Note2)and othersafety practices.(Note 1) ISO 4414, Pneumatic fluid power - General rules relating tosystems.(Note 2) JIS B 8370, Pneumatic system axiom.DOCUMENT NO.GP46- TFK07WARNING•The compatibility of pneumatic equipment is the responsibility ofthe person who designs the pneumatic system or decides itsspecifications.Since the products specified here are used in various operatingconditions, their compatibility with specific pneumatic system mustbe based on specifications after analysis/tests to meet the specificrequirements.•Only trained personnel should operate pneumatically operatedmachinery and equipment.Compressed air can be dangerous if an operator is unfamiliar withits assembly.Handling or repair of pneumatic systems should beperformed by trained and experienced operators.•Do not service machinery/equipment or attempt to removecomponents until safety is confirmed.Inspection and maintenance of machinery/equipment should onlybe performed after all controls are in the off position.When equipment is to be removed, confirm the safety process asmentioned above.Switch off the air and electrical supplies andexhaust all residual compressed air in the system.Before machinery/equipment is re-started, ensure all safetymeasures to prevent sudden movement of cylinders etc.has beenperformed (Bleed air into the system gradually to createbackpressure, i.e.incorporate a soft-start valve).•Contact SMC if the product is to be used in any of the followingconditions:Conditions and environments beyond the given specifications, or ifproduct is used outdoors.Installations on equipment in conjunction with atomic energy,railway, air navigation, vehicles, medical equipment, food andbeverage, recreation equipment, emergency stop circuits, pressapplications, or safety equipment.An application which has the possibility of having negative effects onpeople, property or animals.CAUTION•Ensure that the air supply system is filtered to 5 micron.1.2 Conformity to standardThis product is certified to and complies with the following standards:1.3 Specific recommendations• A pressure switch function has been added to the gauge.•The pressure switch is equipped with a light for verifying operation.•The pressure switch gauge is equipped with a limit indicator.•T o be used for verifying the supply pressure.2 Intended Conditions of Use2.1 Specifications(Note 1)Water is not an acceptable fluid.When using other fluids,please consult with SMC for compatibility information concerningcorrosion.(Note 2)Indicates the condition at the lower pressure limit.Set value ofpressure switch is indicated by pointer (green).This is the point atwhich the circuit between N.O.(white) and COM (black) is turnedoff during pressure decrease.To set the value, turn the needle inthe clockwise position.When setting;if desired set position hasbeen passed, turn needle in a counterclockwise direction beyondthe desired value and then once again return the needle in aclockwise direction stopping at the desired value.Value must beset while needle is traveling in a clockwise direction.(Note 3)Make sure to provide a minimum difference of 0.1 MPa betweenthe set pressure and the operating pressure (including thepressure drop).If the difference is smaller, it could lead toimproper operation.Refer to 4 Settings and Programming fordetails on how to set the setting e caution:Operatingpressure should be the sum of the pressure of the setting needleerror (±0.05 MPa), the hysteresis (0.07 MPa), and the displayaccuracy (±0.05 MPa) on the set pressure value.If this is notcorrect the circuit between N.O.(white) and COM (black) may notturn ON while pressure is increasing.(Note 4)Maximum error value:Add the pressure gauge indicator error of0.03 MPa to the setting needle error.Micro-switch Rated Voltage2.2 Piping2.3 Circuit Symbol3 InstallationWARNING•Do not install unless the safety instructions have been read andunderstood.3.1 EnvironmentWARNING•Do not use in an environment where the product is directly exposed tocorrosive gases, chemicals, salt water, water or steam.•Do not use in an explosive atmosphere.•The product should not be exposed to prolonged e a protectivecover.•Do not mount the product in a location where it is subject to strongvibrations and/or shock.•Do not mount the product in a location where it is exposed to radiant heat.3.2 PipingCAUTION•Before piping make sure to clean up chips, cutting oil, dust etc.•When installing piping or fitting into a port, ensure that sealant materialdoes not enter the port inside.When using sealant tape, leave1.5 to 2 threads exposed on the end of pipe/fitting.3.3 Electrical connectionWARNING•Do not apply high load voltage (current) or current as this can cause theswitch to malfunction.•The earth terminal has an M3 thread.Be sure to connect a protective earthwire regardless of the operating voltage.•Use protective earth wire with a diameter equal or larger than that of theproduct and compliant with the IEC standard.•Use the round crimping terminal connector compliant with the IECstandard.CAUTION•The arrow mark on the drawing below indicates the direction of theincreasing pressure.•The lamp turns OFF at the set pressure and above, and ON below the setpressure.3.4 MountingWARNINGDo not mount the pressure gauge in the following environments.•The cover is made from polycarbonate.Do not use the pressure gauge inan environment which may contain or be exposed to synthetic oil, acetone,alcohol, organic solvent like Ethylene chloride, chemicals such assulphuric and nitric acid, cutting oil, kerosene, gasoline, thread lockingmaterial.•If handled improperly, compressed air can be dangerous.Assembly, handling and repair of pneumatic system should beperformed by qualified personnel only.•Drain:Remove condensation from the filter bowl on a regular basis.•Shutdown before maintenance:Before attempting any kind ofmaintenance make sure the supply pressure is shut off and all residualair pressure is released from the system.•Start-up after maintenance:Apply operating pressure and power to theequipment and check for correct operation and air leaks.If operation isabnormal, please verify product set-up parameters.•Do not make any modification to the product•Do not disassemble the product, unless required by installation ormaintenance instructions.6 Limitations of UseWARNING•Do not exceed any of the specifications laid out in section 2 of thisdocument or the specific product catalogue.7 European Contact List7.1 SMC Corporation7.2 Websites4 Settings and ProgrammingCAUTIONProcedure for setting the Limit Indicator and the Setting Needle5 MaintenanceWARNING•Not following proper procedures could cause the product to malfunctionwhich could lead to damage of the equipment or machine.In extreme conditions, there is a possible resultof serious injury or loss of life.WARNING Operator error could result in serious injury orloss of life.CAUTION Operator error could result in injury orequipment damage.DANGEREC low voltage Directive 73/23/EEC amended by:93/68/EEC EN 60947-5-1:2004Thread Appropriate tightening torque (Nm)R 1/87 to 9R ¼12 to 14Country Telephone Country TelephoneAustria(43) 2262-62 280Italy(39) 02-92711Belgium(32) 3-355 1464Netherlands(31) 20-531 8888Czech Republic(420) 5-414 24611Norway(47) 67 12 90 20Denmark(45) 70 25 29 00Poland(48) 22-548 50 85Finland(358) 207-513 513Portugal(351) 2 610 89 22France(33) 1-64 76 1000Spain(34) 945-18 4100Germany(49) 6103 4020Sweden(46) 8-603 0700Greece30) 1- 342 6076Switzerland(41) 52-396 3131Hungary(36) 1-371 1343Turkey(90) 212 221 1512Ireland(353) 1-403 9000United Kingdom(44) 1908-56 3888SMC Corporation SMC Europe (1)Before setting the limit indicator andthe (green) setting needle,turn the cover counterclockwise(approximately 6 to 7 mm) until itstops.Then, remove by pulling ittowards you.(3)Before setting the setting needle,use a flat head screwdriver(with a 2.9 mm blade width) to turnthe setting needle to the setpressure.(2)Use a flat hard screwdriver(with a 2.9 mm blade width) to setthe (green) limit indictor.Be careful not be bend the otherneedle or damage the dial plate.(4)After completing the setting,replace the cover.Fit the cover byaligning the cutout in the cover tothe groove on the top of the blackcase.Turn the cover clockwise(approximately 6 to 7 mm) until itstops.Make sure that the matchingmark on the cover is aligned withthe groove on the top of the case.CoverTurncounterclockwisePullIn the case of turningthe set screw•ClockwiseIncreasing ofsetting press•CounterclockwiseDecrease ofsetting pressFlat headscrewdriverLimit IndicatorFlat headscrewdriverTop hollowSlitMark。
德勒控股 电缆分支箱安装、使用与维护手册说明书
高压成套元器件High-voltage Components GLOBALElectrical SystemsD X N-Q德勒控股集团德勒控股集团德勒控股集团德勒控股集团L-3户内高压带电显示器JSY-Ⅰ注:反向电磁锁要定做CG5-10Q/95×130(130.140.145.150)4-M10VS1-3150A 触臂材料:紫铜硫化处理(注:该型触臂为加长型,适用于大电流隔离车)VS1-4000A 触臂材料:紫铜硫化处理E ECL2601488105240330962425C10-9X19C外形及安装尺寸型号规格L E C JN15-12/31.5-150JN15-12/31.5-210JN15-12/31.5-27553565581015021027539651664627527575810185软连接两孔距L=400mm20-9X19969696主轴母线解触头4060404-φ113271101736462025170701602303558858240R 277外形及安装尺寸主要技术参数外型及安装尺寸使用场所低压使用场所电容使用场所配电(S)注:1、虚线框为计数器显示部分的外形尺寸,此图为柜门正面图;2、只需在柜门上开三个安装孔(3-Φ3.4)和一个信号线插件孔Φ21;3、将计数器背面的三个安装孔与柜门上开的三个安装装孔一一对应,然后在柜门内侧用自攻螺丝拧紧,信号连接线插头通过Φ21的孔插入计数器背面的信号线插件孔中。
TBP系列三相四相组合式过电压保护器(组合式避雷器)6KV、10KV、35KV接线端子示意图24.724132LL10-W 安装支架外形尺寸138.325050138.320LL10-W 灯体LL10-W 安装支架装配好的LL10-W可通过卡脚或螺钉装配。
装配时先固定安装支架,外形及安装尺寸图外形图199139118单位:mm注意:本产品需在柜门上开具尺寸为179±0.5mm 图)作为固定本产品用。
小型直流电机安装、运行和维护手册说明书
Installation, Operation and Maintenance ManualSmall DC Motors •56 Frames2Small DC MotorsReceiving and HandlingAcceptance Unpack motor carefully and inspect for possible damage during shipment.Check packing materials and save any instruction tags or wiring diagrams found in the carton. Report any damages or shortages immediately to the local transportation agent.Installation MountingCheck nameplate data on motor before installing to assure the correct rating and that the available power supply agrees with the required motor power supply.Motor should be mounted on a firm foundation.If the foundation is not flat, use shims to prevent misalignment when tightening hold-down bolts. DC motors arc equipped with ball bearings and may be operated in any position.For any position other than base down,new drain holes should be provided so that condensation is allowed to run off. Location should be dry, clean and well ventilated for most satisfactory service. Be sure the possibility of oil seepage into the motor is prevented. Commutator end of the motor should be accessible so that brushes can be conveniently inspected.Mounting Instructions for 56C & 140TC Face Mounted MotorsBefore mounting a “C”face motor to a mating flange,be sure both surfaces and all mounting holes are smooth and free of debris.When mounting into a quill type reducer, make sure the input and output shafts are coated with an anti-seize compound suitable for the application.!ATTENTION:Only qualified electrical personnel familiar with the construction and operation of this equipment and the hazards involved should install,adjust,operate,and/or service this motor.Read and understand this manual in its entirety before proceeding. Failure to observe this precaution could result in personal injury or loss of life.!ATTENTION:High voltage and rotating parts can cause serious or fatal injury. The use of electric machinery, like all other utilization of concentrated power and rotating equipment, can be hazardous. Installation, operation, and maintenance of electric machinery should be performed by qualified personnel.Familiarization with NEMA safety standards, national electrical code and sound local practices is recommended.!ATTENTION:To guard against personal injury or death causedby contact with moving parts, guards (coupling, belt, chain, etc.)must be installed. Machines accessible to the public should be further guarded by screening, guard rails, etc.Small DC Motors 3When mounting through a flexible coupling, verify that there is adequate clearance between the driven equipment shaft, the coupling interface and the motor ck of clearance may result in binding of the shafting and premature bearing failure.Always slide the motor tenon into the mating flange to its full depth before tightening the mounting bolts. Do not allow the motor to hang by the shaft extension while assembling it to the driven equipment (i.e. quill input gear case). This may bend or crease the shaft and damage any seals that are present.Only use the proper mounting bolts. These should be 3/8”-16 threads per inch and sized for length such that engagement into the motor flange does not exceed 9/16”. For example, a gear case with a 3/8” flange thickness requires a bolt that is: 3/8” + 9/16” = 15/16” = Maximum Bolt Length Since 15/16” is not a standard bolt length, a 7/8” bolt or a 1” bolt with a lockwasher can be used.AlignmentShafts should be carefully aligned before tightening any couplings. Inspect couplings and shaft for paint, dirt or burrs. If necessary, remove withsandpaper for proper fit. Pulley or coupling should be carefully fitted. Do not hammer on shaft, pulley or coupling.ApplicationPermanent Magnet “PM”motors are not always designed for across the line starting. This may cause loss of flux resulting in an increase in speed and possibly instability. Wound field motors can be started across the line with full applied voltage. However, for frequent starting or reversing, voltage should be reduced for normal brush and commutator life.Dynamic or regenerative braking methods should not be used unlessprovisions are made to limit the maximum instantaneous current to a value not greater than the maximum allowable peak amperes shown on the nameplate. This also applies to plug reversing the PM motor.ConnectionsAll motors should be installed in accordance with the National Electric Code and local requirements. Fuses, thermal cutouts and other protective devices should be the proper size and rating to safely carry the load and to interrupt the circuit on overloads.!ATTENTION:To guard against motor damage such aspremature failure and/or a loose assembly, use only mountingbolts that are the correct length.A bolt that is too long may cause damage to the motor.4Small DC MotorsConnection diagrams are shown above. Care must be taken to ensure that the dual-voltage shunt field is properly connected.Some DC motors are equipped with a thermostat inside the motor. This thermostat has a normally closed (NC) contact which opens if the motor temperature exceeds design limits due to extended overload operation.Leads from the thermostat are labeled P1& P2and should be connected in series with the drive “STOP” button (refer to the previous figure).!ATTENTION:Ground the machine properly to avoid seriousinjury to personnel. Grounding should be in accordance with theNational Electrical Code and consistent with sound local practices.+A1High Voltage Connection 1, 2Low Voltage Connection 1, 2High VoltageConnection1, 2LowVoltageConnection 1, 2Permanent Magnet Thermostat (if furnished)GroundConnection Connect in Series with Control Stop DeviceEarth Ground Series A2S1+F1F11F2A1+A2S1+F1F11F2+A1A2S1–S2+F1F11F2A1+A2S1+F1F11F2S2F22S2F22F22–S2F22+A1TypeS h u n t S t a b i l i z e d S h u n t a n d C o m p o u n d CCW Rotation Facing Commutator End CW –A2+F1F11–F2+A1A2S1S2A1+A2S1S2F22+A1–A2–A1–A1+A2+F1F11–F2F22+A1A2+F1F11F2F22–A1+A2+F1F11F2F22+A2P1P21Motors with single voltage fields do not have leads F11 & F22. Leads F11 & F22 may be marked F3 & F4, respectively. Connect on low voltage field connection.2Consult motor nameplate to determine value of low and high voltage connection.Small DC Motors5Important:When motors are provided with thermal protection (typicallythermostats), it is important to properly connect and apply thedevices. This will ensure that the motor is properly protectedfrom being operated if thermal limits are reached and/orexceeded.The control system must be configured to reduce themotor load and/or shut down the motor control system to allowthe motor to cool to a level within acceptable operating ranges.If the motor is operated with the thermal protective devicestripped (indicating an over temperature condition), the motorinsulation could be damaged and complete failure of the motorinsulation is possible. In the event of motor failure due to anover temperature condition,Rockwell Automation requires thatmotor thermal protective devices (when supplied) beadequately monitored and incorporated into the motor controlsystem to maintain warranty. Failure on the part of theindividual installing this equipment to take these steps willresult in the factory warranty being voided.OperationThese motors are inherently capable of operating over a wide range ofspeeds and loads. If the motor is not operated on the type of power supplyfor which it was designed, performance will differ from nameplate valuesand applicable standards.The motor should start quickly.If it fails to start,the load may be too great,the applied voltage too low, or the motor improperly connected and/or thecontrol misadjusted (check particularly current (torque) limit adjustment).In any case, immediately disconnect the power and investigate the cause.While operating the motor, observe the performance. Any undue noise,overheating, sparking or erratic performance should be investigated andnecessary corrective action taken to prevent serious damage.Maintenance The fundamental principle of electrical maintenance is keep the apparatusclean and dry.This requires periodic inspection of the motor,the frequencyof inspection depending upon the type of motor and the service.!ATTENTION:Internal parts of this motor may be at line voltage even when motor is not rotating. Disconnect all AC line connections before contacting any internal part.6Small DC MotorsBearingsBall bearings are deep grooved, double shielded with sufficient lubricantpacked into the bearings by the manufacturer for “life lubrication.” Theinitial lubricant is supplemented by a supply packed into larger reservoirs inthe end shield at time of assembly. No grease fittings are provided. Theinitial lubrication is adequate for up to 5 years of operation under normalconditions.Should it become necessary to replace bearings,the bearing bore and cavityshould be thoroughly cleaned and repacked with approximately 1/2teaspoonful of recommended grease.Bearings should be removed with bearing pullers using a center insert in theend of the shaft to protect the shaft center. To reinstall ball bearings, eitherin a press or on the bench, pressure should be applied to the inner race byusing a square faced sleeve or piece of pipe that will fit over the shaft, toavoid damaging the bearing. If a press is not available and a hammer isused,the blows should be transmitted against the sleeve by a block of woodor fiber.BrushesCheck brushes to make certain that they move freely in the holders andmake proper contact with the commutator. Re-place worn brushes. Givecomplete motor identification when ordering parts. New brushes should bepre-radiused to fit the commutator curvature. Blow out the carbon dust.Short brush life and poor commutation may be due to a rough commutator,a shorted armature, or poor undercutting of mica. Dirt and chemicals in theair are common causes of trouble.CommutatorThe commutator should remain a polished surface.Blackening may indicaterough or eccentric commutator. Occasional wiping (power off) with drycanvas or non-linting cloth may suffice. If rough or excessively dirty,smooth with very fine (00) sandpaper lightly with armature rotating. Neveruse emery cloth. Never allow the brushes to wear so short that springtension is lost. The resultant sparking will seriously damage thecommutator.If frequent dressing is required,the cause should be found and corrected.Avery rough commutator should be turned in a lathe, at high speed, with asharp tool.Do not remove more copper than necessary.The mica should beundercut if necessary.An authorized service shop is recommended for this work.Small DC Motors 7General The following should be checked at regular intervals:•Windings should be dry and free of dust, grease, oil, and dirt. Windings may be cleaned by suction cleaners or by wiping. Nozzles on suction type cleaners should be non-metallic.Gummy deposits of dirt and grease may be removed by using a commercially available low volatile solvent.Do not use gasoline or other inflammable solvents.•Terminal connections, assembly screws, bolts and nuts should be tight.They may loosen if motor is not securely bolted and tends to vibrate.•Insulation resistance of motors in service should be checked periodically at approximately the same temperature and humidity conditions to determine possible deterioration of the insulation. When such measurements at regular intervals indicate a wide variation, the cause should be determined. Motor should be reconditioned if the motor has been subjected to excessive moisture, or by rewinding or reinsulating if necessary. Enclosed motors require very little attention. Be sure that external air chamber of fan cooled motors does not become clogged with foreign material which will restrict passage of air.Troubleshooting If trouble develops in operation of motor, verify that:1.The bearings are in normal condition and have been properly lubricated with a high grade,ball bearing lubricant,free of dirt or grit.If dirt enters bearing, flush and relubricate.2.There is no mechanical misadjustment to prevent free rotation of moving parts of motor and drive.3.All bolts and nuts are properly tightened.4.Motor instructions have been carefully carried out.5.The rated voltage is available at the motor terminals.6.The voltage corresponds to the value stamped on the nameplate.7.All connections are properly made in all circuits between motor and control.8.The overload and low voltage devices in control equipment, fuses or other protective devices are in proper working order.9.Brushes are in good condition and are making good con-tact with the commutator.10.The commutator is clean and has smooth polished surface.11.No excessive overload exists on the pare line amperes at full load with nameplate stamping.!ATTENTION:Internal parts of this motor may be at line voltage even when motor is not rotating. Disconnect all AC line connections before contacting any internal part.Online DocumentationThe latest motor information can be obtained from the Allen-BradleyDrives & Motors home page on the World Wide Web at:Publication1325R-UM001B-EN-P Ð A ugust, 2001Supersedes 1325R-UM001A-EN-P dated May, 2001Copyright © 2001 Rockwell Automation. All rights reserved. Printed in USA.。
Parker Zero Air Generator 1 安装、运行和维护手册说明书
Bulletin TI-ZAG3500E These instructions must be thoroughly read and understood before installing and operating this product. Failure to operate this product in accordance with these in-structions could present a safety hazard to the user and will void the safety certification of this product. Modification of the unit will result in voiding the warranty. If you have any questions or concerns, please call the Technical Services Department at 800-343-4048,*********************************************************. (North America only). For other locations, please contact your local representative. Please save product packaging for future use.General Description Parker Hannifin Corporation produces a zero air generator designed to remove hydrocarbonsfrom a supply of compressed air.The Parker zero air generator is capable of purifying an input source of air to produce azero-grade, hydrocarbon free output. The Model 3500 generator can produce 3500 cc/min(0.124 ft3/min) at 690 kPa (100 psig) and the Model 1000 can produce 1000 cc/min (0.035 ft3/min) at 690 kPa (100 psig). Each system is capable of producing an output gas that has atotal hydrocarbon content (THC) of less than 0.1 parts per million as methane. With this levelof purity, you can replace the high pressure gas cylinders rated as zero-grade or ultra-zero-grade air that you may currently be using.The system consists of three different functional areas to produce the purity level required.The inlet filter is a 0.01 micron coalescing filter that removes particles, oil and water thatmay be present in the inlet compressed air source. Hydrocarbons are removed when thecompressed air is passed through a converter containing a heated catalyst. After cooling, a0.01 final filter is used to remove any residual particulate material.Plumbing Connections InstallationSite Requirements All installation, operation, and maintenance activities for the Parker ChromGas Zero AirGenerator should be performed by suitable personnel using reasonable care.Installation of the Parker zero air generator is simply a matter of making the appropriateplumbing connections and supplying power to the system (for indoor use only).Your zero air generator should be located near the equipment using the zero-grade air, with apower source located nearby.The source of compressed air should be regulated to be greater than the requirements ofthe intended consumption. Pressure should range from 40 psig to 125 psig and flow shouldnot exceed 1000 cc/min (0.035 ft 3/min) for Model 1000, and 3500 cc/min (0.124 ft 3/min)for Model 3500. Maximum operating efficiency occurs if the quality of the compressed airsource is maintained at less than 100 ppm total hydrocarbon content (THC).This quality is achieved in most normal plant air systems equipped with an after cooler.Centrally located compressed air system filtration is normally sufficient for the zero airgenerator, but most compressed air piping systems contain some rust and condensedliquids. Parker Hannifin Corporation recommends a coalescing filter installed directlyupstream from the inlet to the zero air generator to ensure the removal of condensed liquidsand rust from the plant air system.If there is a risk that bulk contaminants may reach the generator inlet, use a secondary depthtype filter (such as Parker’s optional DX filter P/N 2002N-1B1-DX) in the source air line. Thiswill extend the life of the primary inlet filter.If your plant air system does not sufficiently dry the air, install P/N 64-01 (Parker’s membraneair dryer) directly upstream from the inlet of the zero air generator.The catalyst can become contaminated if compounds that contain lead, phosphorous,sulfur, silicates or halocarbons are present in the source air. If in doubt, use anactivated charcoal trap (such as Parker Hannifin’s optional Halogenated HydrocarbonScrubber P/N 76080 in the source air line to remove these chemical compounds.Source Air RequirementsConnect 1/4” tubing from your source of compressed air to the 1/4” NPT fitting on the inlet filter. As you face the generator from the rear, the inlet filter is located on the left (see Figure1).Note: Make gas connections using PTFE tape on all threaded fittings. Do not use othercompounds to seal the threads, as this can contaminate the purified air.When making connections from the zero air generator to your piece of equipment, be sureto use clean stainless steel or refrigeration grade copper tubing. Do not use plastic tubingfor the outlet line. Connect your 1/8” outlet tubing to the 1/4” NPT fitting on the outlet filter. As you face the generator from the rear, the outlet filter is located on the right for Model 3500(see Figure 1). For Model 1000, the filter is on the left side panel when facing the front of thegenerator (see Figure 2, page 3).To ensure flow rates within the capacity of the generator, a flow meter should be installed inthe outlet line between the generator and the instrument using the purified air.Figure 1. Front and Rear views of Model 3500Inlet FilterInlet Filter Outlet FilterPower Switch PowerReceptacle Figure 2. Front and Rear views of Model 1000OperationAfter the zero air generator is installed, operation is very simple. The operating procedure consists of turning on the generator, letting the catalyst heat up to operating temperature, and starting the compressed air flow.The following instructions take you step by step through the startup procedure:For Model 1000:1 Start the flow of compressed air through the system and allow it to stabilize.2 Supply power to the generator and turn on the power switch. A power light should illuminate indicating that power is supplied to the generator.3 Wait for the catalyst to heat up to its operating temperature (approximately 45 minutes).4 Begin using your instrument.For Model 3500:1 Supply power to the generator, and turn on the power switch. A power light should come on indicating that power is supplied to the generator. No air is needed at this time if you want a faster startup time.2 Wait for the catalyst to heat up to its operating temperature. This should take approximately 30 minutes. If you supplied compressed air to the unit, it will take approximately 45 minutes to reach operating temperature.3 For the fast start up, start the flow of compressed air through the system and allow it to stabilize.4 Begin using your instrument.Caution: Do not overflow the unit. Maintain a flow rate at or below the maximum flowrating, 3500 cc/min (0.124 ft3/min) for Model 3500, and 1000 cc/min (0.035 ft3/min) for Model 1000.Filters Routine maintenance procedures are described below to ensure an efficient flow of high quality, hydrocarbon free air.At least twice a year, the inlet and outlet filters should be checked. If either filter is visibly dirty, it should be replaced. In any event, both filters should be replaced each year. To remove the filters for maintenance, use the procedures detailed in this section. Replacement filters may be ordered from Parker Hannifin using the following part numbers:MaintenanceStandard Filters Parker P/NPrimary Inlet Filter Assembly A914D-BX(0.01 micron)Replaceable Filter Element (pkg. of 5) 5/050-05-BXE*Outlet Filter Assembly (0.01 micron) A914A-95Replaceable Filter Element (pkg. of 3) GS 3/050-05-95*Optional Filters Parker P/NSecondary Inlet Filter Assembly 2002N-1B-DX(0.01 micron)Replaceable Filter Element (pkg. of 3) 5/100-12-DXEHalogenated Hydrocarbon Scrubber 76080Membrane Air Dryer 64-01*Maintenance Kit, MKZA10000, includes (1) 050-05-BXE and (1) GS 050-05-95Service ScheduleInlet Filter 1 Turn off the air flow and the power to the generator.2 As you face the generator from the rear, the inlet filter (P/N A914D-BX) is located on theleft side of the back of the cabinet (for Model 3500 (see Fig. 1), and on the right side panelfor Model 1000 (see Fig. 2).3 Lift the bowl slightly and rotate the bowl portion of the filter clockwise 1/8 of a turn to remove it downward from the inlet filter assembly.4 Unscrew the filter from the filter assembly and replace.5 Thread the new filter onto the filter assembly and reassemble the bowl carefully onto theinlet filter. Turn the bowl counter clockwise on the filter assembly until it stops (1/8 turn).1 Turn off the air flow and the power to the generator.2 As you face the generator from the rear, the outlet filter (P/N A914A-95) is located on theright side of the back of the cabinet for Model 3500 (see Fig. 1). When facing the generatorfrom the front, the filter is on the left side panel for the Model 1000 (see Fig. 2).3 Lift the bowl slightly and rotate the bowl portion of the filter clockwise 1/8 of a turn to remove it downward from the inlet filter assembly.4 Unscrew the filter from the filter assembly and replace.5 Thread the new filter onto the filter assembly and reassemble the bowl carefully onto theinlet filter. Turn the bowl counter clockwise on the filter assembly until it stops (1/8 turn).Replacement of the filter element in the optional, secondary inlet filter kit is accomplished in the same way as described above for the primary inlet filter.The optional charcoal filter maintenance involves the complete replacement of the filter kitas necessary to protect the catalyst from contamination. If you have high concentrations oflead, phosphorous, sulfur, silicates or halocarbons in your air source, you should change thisfilter frequently.Outlet Filter Optional SecondaryInlet FilterOptional HalogenatedHydrocarbon Scrubber The catalyst bed should be replaced if contamination occurs due to the presence of lead,phosphorous, sulfur, silicates or halocarbons in the source air. If your instrumentation beginsto show signs of unpurified air, this may indicate a contaminated catalyst bed. Replacementshould be performed by qualified service personnel only. Contact Parker HannifinCorporation technical service to order a replacement catalyst tower. (For 110V: Model 1000P/N 75394 and Model 3500 P/N BO1-0020. For 220V units: Model 1000 P/N 75394-220and Model 3500 P/N B01-0020-220).High temperature components are found inside the cabinet, and should not require anyuser service. The temperature of the gas at the outlet port may reach as high as 45°C(113°F).The tubing and fittings connecting the generator to other sources and instruments areunder pressure. Be sure to relieve any pressure from the system before loosening orremoving any fittings or tubing.Catalyst BedPrecautionsSystem SpecificationsModel Number ZA1000 ZA10001 ZA3500 ZA35001Installation Category IIPollution Degree 2Protection Degree IP X0Flow1000 cc/min 1000 cc/min 3500 cc/min 3500 cc/min(0.035 ft3/min) (0.035 ft3/min) (0.124 ft3/min) (0.124 ft3/min)Min/Max Pressure 40 psig/125 psigAmbient Temperature40°-100°F 40°-100°F 40°-100°F 40°-100°F(4.4°-38°C) (4.4°-38°C) (4.4°-38°C) (4.4°-38°C)Relative Humidity Maximum 80% up to 31°C (50% at 40°C)Voltage / Hz100-125 VAC/60 Hz 200-250 VAC/60 Hz 100-125 VAC/60 Hz 200-250 VAC/60 HzAmperage 0.3 Amps 0.15 Amps 1.0 Amps 0.5 AmpsFuse Type S 0.5 Amp Type T 0.25 Amp Type S 1.5 Amp Type T 0.8 Amp125 V 250 V 125 V 250 VPower30 Watts 30 Watts 100 Watts 100 wattsWeight14 lbs. (6.4 kg) 14 lbs. (6.4 kg) 20 lbs. (9.1 kg) 20 lbs. (9.1 kg)Dimensions11.5”H x 6.5”W x 10”D 11.5”H x 6.5”W x 10”D 12”H x 6.75”W x 15”D 12”H x 6.75”W x 15”D(29cm x 17cm x 25cm) (29cm x 17cm x 25cm) (31cm x 17cm x 38cm) (31cm x 17cm x 38cm) WarrantyUnited States OnlyThank you for your recent purchase of a Parker gas generator. Parker Hannifin Corporationwarrants all new instrumentation of its manufacture to meet Parker Hannifin Corporationspecifications and to be free from defects in workmanship and material under normal use fortwelve (12) months from the date of shipment.During the warranty period, Parker Hannifin Corporation, at its option, shall repair or replacedefective parts at no charge to the customer.Modification or alteration of the instrument without prior approval of Parker HannifinCorporation, or damage from abuse, misuse, or accident will void this and all warranties.User serviceable components and consumables are not covered by this warranty. Peripheraldevices and software not manufactured by Parker Hannifin Corporation are subject to thewarranty of the original manufacturer. Parts on liquid handling systems which are in contactwith sample liquids, such as tubing, tip syringes and valves, are excluded from this warranty.Damage to detectors caused by contamination are excluded from this warranty.Except as expressly provided above, Parker Hannifin Corporation does not make any warrantyof any kind, either expressed or implied, including, but not limited to the implied warranties ofmerchantability and fitness for a particular purpose.Parker Hannifin Corporation shall not be liable for any direct, indirect, consequential, orincidental damages including damages from loss of business profits, business interruption, lossof business information, and the like arising out of the use of or inability to use the product.Caution, refer to accompanyingdocuments for explanation.Surface may be hot and couldcause burns to the skin (found oninside of some units).Symbol DescriptionExplanation of Warning SymbolsParker Hannifin (UK) Ltd Gas Separation & Filtration Division EMEA Dukesway, Team Valley Trading Estate Gateshead, Tyne and Wear, England NE11 0PZ Tel: +44 (0)191 402 9000 Fax: +44 (0)191 482 /gsfe ********************Parker Hannifin Corporation Industrial Gas Filtration and Generation Division 4087 Walden Avenue Lancaster, NY 14086Tel: 716-686-6400 Fax: 。
C型转子式翻车机的安装调试使用维护说明书
1 用途翻车机是用于电厂、港口、冶金、煤炭、化工等企业的大型自动卸车设备,可翻卸C61~C70高边铁路敞车所装载的散粒材料。
转子式和侧倾式翻车机适用于大型火力发电厂、化工厂、水泥厂、港口、冶金行业的焦化厂、烧结厂等用来翻卸装运煤炭、矿石、黄砂等散状物料的准轨铁路敞车。
主要由翻车机,重车调车机(拨车机),空车调车机(推车机),迁车台,夹轮器,止挡器,洒水除尘装置,二、规格、性能l、翻卸形式:2、翻卸车辆最大总重: 110t3、从最大倾翻角度:正常工作:160极限状态:1654.翻车机翻转速度:高速:1.126r/min低速:0.281r/min5.翻车机翻卸一次循环时间:〈60s6.翻车机平台尺寸:长:14520mm宽:329Omm7、翻卸车辆轨距: 1435mm8、翻卸车辆尺寸:长:10000-14500mm宽:3000-3200mm高:2400-3400mm9、驱动电动机功率: 2³110/27/45kW(S3,Fs40%)10、夹车机构形式:重力夹车机械锁紧11、外形尺寸:长:18414mm宽:8325mm高:890Omm12、总重量: 144.08t三、结构翻车机由下列各部分组成:l、传动装置;2、端盘;3、夹车机构;4、托车粱;5、平台;6、主轴承装配(一)传动装置传动装置有两套,左右对称布置,各由电动机、减速器、制动器、小齿轮、轴承座、联轴器和主令控制器等组成。
为了减少翻卸过程中的冲击以免损坏被翻卸的车辆和翻车机的零部件,翻车机必须实行双速传动,在翻车机起动、靠车及回零过程中低速运行,其余时间转入高速运行缩短翻卸周期。
本翻车机采用YZRDF355L1—l0/40冶金及起重用三相异步绕线转子双速电机作为驱动电动机来实现双速传动,高低速的速比为1:4已能满足翻车机平稳起动的要求,而且控制及维护保养简单可大幅度降低运行费用。
减速器是ZSY400-31.5型硬齿面三级圆柱齿轮减速器低速级中心距400mm,速比31.5。
- 1、下载文档前请自行甄别文档内容的完整性,平台不提供额外的编辑、内容补充、找答案等附加服务。
- 2、"仅部分预览"的文档,不可在线预览部分如存在完整性等问题,可反馈申请退款(可完整预览的文档不适用该条件!)。
- 3、如文档侵犯您的权益,请联系客服反馈,我们会尽快为您处理(人工客服工作时间:9:00-18:30)。
4. 责任免除
下列故障不属于保修范围 : 1) 操作不当。 2) 非本公司或本公司指定的其他公司对本产品进行的维修或改装。 3) 与非本公司指定的硬件或软件一起使用。 4) 因计算机病毒造成的本产品故障和包括基本软件在内的软件及数据 损坏。 5) 因停电或电压突然降低等电源故障引发的故障和包括基本软件在内 的软件及数据损坏。 6) 错误关机造成的故障和包括基本软件在内的软件及数据损坏。 7) 非产品本身原因造成的故障。 8) 因在高温高湿、腐蚀性气体或震动等恶劣环境中使用本产品而造成 的故障。 9) 因火灾、地震、其他自然灾害、放射性物质和有害物质的污染,以 及战争、暴乱和犯罪等不可抗拒事故造成的故障。 10) 安装后自行移动或运输产品时造成的故障。 11) 消耗品或等同于消耗品的零部件。 注意 : 软盘和 CD/DVD-ROM 等记录介质也属于消耗品。
3.3.1 3.3.2 3.3.3
3.4
未识别仪器 .........................................................................................................39
3.1.1 3.1.2
对各个仪器的系统配置进行注册 ....................................................................... 17 更改系统配置 .................................................................................................... 22 对 SPD-M30A 和 CBM-20A/CBM-20Alite 进行组设置 ......................................... 26 对 SPD-M20A 和 CBM-20A / CBM-20Alite 进行组设置 ................................... 27 对各个仪器的系统配置进行注册 ....................................................................... 32 更改所要连接的色谱柱 ..................................................................................... 36 更改 GC-2014 上的 DAFC 使用方式 ................................................................ 37 检查 PC 与 LC 之间的连接 ............................................................................... 39 检查 PC 和 PDA 检测器之间的连接 ................................................................. 41 检查 PC 与 GC 之间的连接 .............................................................................. 43 在启动 [ 分析 ] 程序时显示的信息 ...................................................................... 44
223-60324E Oct. 2014
LabSolutions
安装维护说明书
请仔细阅读本说明书,正确使用本产品。 请妥善保管本说明书以备今后使用。
前言
请在使用本产品前仔细阅读本说明 书。
感谢您购买 Shimadzu 分析仪器工作站 "LabSolutions" ( 下文指 " 本软件 " 或者 "LabSolutions")。 本说明书记载了本产品的操作程序。请在使用本产品前仔细阅 读本说明书并遵照说明书的内容正确使用本产品。 请妥善保管本说明书以备今后参考。 本说明书记载内容以用户拥有 Windows 的基本操作知识为前 提。有关 Windows 的操作,请参考该产品附带的使用说明书。 本说明书是英文版 《LabSolutions 安装维护说明书》 (22360094)( 修订版 G2014 年 10 月 ) 的译文。
SPD-M30A 和 SPD-M20A 组设置 ........................................................................26
3.2.1 3.2.2
GC 系统配置 ......................................................................................................32
[]
安装维护说明书 iii
保修
1. 保修期 2. 保修内容 3. 责任范围
本产品的保修内容如下 :
请咨询您所在区域内的岛津分公司。 对保修期内因本公司原因造成的故障将免费维修或免费更换零部件 ( 包 括 USB 加密锁 )。但对个人计算机及其外围设备、零部件等短寿命产品 可能无法提供同一型号的产品。 (1) 任何情况下本公司均不对用户的误工费、间接性损害和衍生性损害 负任何责任。也不对因第三方向用户提起的损坏赔偿负任何责任。 (2) 任何情况下本公司的最高赔偿金额均以出厂价格或销售价格为限。
* 如果产品附带保修单或单独签署了包括保修事项在内的合同,则应遵守该文件记载的保修内容。 * 对于具有特殊规格和系统的产品,保修期将另行规定。 * 如果软件附带的 USB 加密锁丢失,将不再重新颁发许可证。
iv 安装维护说明书
目录
1
安装 LabSolutions
1.1 1.2
安装软件 ..............................................................................................................1 卸载软件 ..............................................................................................................6
ii 安装维护说明书
使用说明书
使用说明书的目录
名称 入门指南 操作说明书 内容 本指南按照实际的数据采集程序为新用户描述基本操作方法。 阅读本指南了解本软件的基本操作。 本说明书更详细地描述了总体操作和便利功能,例如,软件 的系统配置、数据处理、批处理、数据采集结果的确认以及 报告功能。 本说明书描述了本软件的系统管理和数据管理。请在必要时 参阅本说明书。 本说明书描述了本软件的安装和维护。 本说明书描述了样品成分的峰检测和定量。 请在必要时参阅本说明书。 单击屏幕上的 [ 帮助 ] 按钮,或者按下 [F1] 键,显示屏幕参数 的描述、具体问题的回答或者各种难题的解决方法。此外, 在错误信息窗口上单击 [ 帮助 ] 按钮,可以显示该错误的详情 或者该错误的解决方法。咨询前,建议您先参阅该信息。
管理说明书 安装维护说明书 理论说明书 帮助
使用说明书的标记
在本说明书中使用下列标记表示注意和注释,同时在本说明书中使用了下列符号 : 标记 ! 注意 含义 具有潜在危险,操作不当可能导致人身轻微或中度损害以及 设备损坏。 正确使用本产品的附加说明。
^ 参考
标注参考页数。 表示显示在窗口中的按钮、菜单选项、设置选项、窗口 / 窗 口以及图标的名称。 举例 : 单击 [ 确定 ]。
安装维护说明书 i
声明
·本说明书内容如有改动恕不另行通知。 ·本说明书内容力求准确,如有错误或遗漏敬请原谅。 ·本说明书版权归株式会社岛津制作所所有。未经本公司许可不 得转载、复制部分或全部内容。 · Microsoft、 Windows、 Windows 7 和 Windows XP 是美国 Microsoft Corporation 在美国及其他国家的注册商标。 Adobe、 Adobe 标志和 Adobe Reader 是美国 Adobe Systems incorporated 在美国及其他国家的注册商标。 在本说明书中记载的其他公司名及产品名是各公司的商标及注 册商标。此外,本说明书中不对 TM、 标记做明确说明。 · Microsoft Windows7 操作系统被称作 "Windows 7"。 MicrosoftWindowsXP 专业版被称作 "Windows XP"。 ·本产品备件的供货期为产品停产后七年。其后可能无法提供备 件,敬请谅解。但非本公司生产备件的供货期请参照有关厂家 的规定。
2
硬件连接
2.1
将 PC 与 LC 仪器进行连接 ..................................................................................9
2.1.1 2.1.2 2.1.3 2.1.4 2.1.5 2.1.6
将 PC 连接至 CBM-20A / CBM-20Alite .............................................................. 9 将 PC 连接至 SCL-10Avp................................................................................. 10 将 PC 连接至 LC-2010 ..................................................................................... 12 将 PC 连接至 LC-2030/LC-2040 ...................................................................... 12 将 PC 连接至 SPD-M10Avp ............................................................................. 14 将 PC 连接至 ELSD-LTII .................................................................................. 14 将 PC 连接至 GC-2010、 GC-2014 或 GC-2025 ............................................. 15 将 PC 连接至 GC-2010、 GC-2014 和 GC-2025 之外的其他型号 ................... 16