(精选)RGRAP210无线接入点硬件安装手册V1.02文档名称
Ruijie RG-AP180系列接入点硬件安装及参考指南

Ruijie RG-AP180 Series Access Points Hardware Installation and Reference Guide V1.00Copyright statementRuijie Networks©2020Ruijie Networks reserves all copyrights of this document. Any reproduction, excerption, backup, modification, transmission, translation or commercial use of this document or any portion of this document, in any form or by any means, without the prior written consent of Ruijie Networks is prohibited.Exemption statementThis document is provided “as is”. The contents of this document are subject to change without any notice. Please obtain the latest information through the Ruijie Networks website. Ruijie Networks endeavors to ensure content accuracy and will not shoulder any responsibility for losses and damages caused due to content omissions, inaccuracies or errors.·PrefaceThank you for using our products. This manual will guide you through the installation of the access point.ScopeIt is intended for the users who have some experience in installing and maintaining network hardware. At the same time, itis assumed that the users are already familiar with the related terms and concepts.Obtaining Technical Assistance●Ruijie Networks Website: https:///●Technical Support Website: https:///support●Case Portal: https://●Community: https://●Technical Support Email: *****************************●Skype: *****************************Related DocumentsDocuments DescriptionConfiguration Guide Describes network protocols and related mechanisms that supported by the product, with configuration examples.Command Reference Describes the related configuration commands, including command modes, parameter descriptions, usage guides, and related examples.Documentation ConventionsThe symbols used in this document are described as below:This symbol brings your attention to some helpful suggestions and references.This symbol means that you must be extremely careful not to do some things that may damage the device or cause data loss.·1 Product OverviewRuijie RG-AP180 AP is designed for indoor scenarios in campuses, hotels, offices and residential buildings. Featuring aconcise design and easy deployment, the AP enables zero disruption to the interior finishes and offers the best solutionfor scenarios with delicate interior design.The dual-radio, dual-band AP supports the latest 802.11ax. And it delivers data rates of up to 574Mbps at 2.4G and1.2Gbps at 5G with the maximum delivery rate totaling 1.77Gbps. The Wall AP provides four 10/100/1000Base-T LANports and one 10/100/1000Base-T WAN port, delivering optimal wireless network coverage. RG-AP180 supports security,radio frequency (RF) control, mobile access, Quality of Service (QoS) and seamless roaming. Plus, two power supplymodes are provided, so you can choose to power up the AP either by local or PoE power supply.Teaming up with Ruijie RG-WS Wireless Controller Series, wireless data forwarding, high performance security andaccess control can be accomplished with ease.1.1 Technical SpecificationsTable 1-1 Technical Specifications of RG-AP180Hardware SpecificationsRadio 2.4G: 2 x 2MIMO 5G: 2 x 2MIMOTransmission Protocol 2.4G : 802.11b/g/n/ac/ax5G: 802.11a/n/ac/axSupport concurrent operation of 802.11ax and 802.11a/b/g/n/ac.Operating Bands 802.11b/g/n/ac/ax: 2.4 GHz to 2.483 GHz802.11a/n/ac/ax: 5G: 5.150 GHz to 5.350 GHz, 5.47 GHz to 5.725 GHz, 5.725 GHz to 5.85GHz (Country-specific)Antenna Built-in antennaSpatial Streams 4 streamsMax Throughput 2.4G: up to 574Mbps5G: up to 1.2GbpsUp to 1.77Gbps per APModulation DSSS:DBPSK@1Mbps,DQPSK@2Mbps,**********/11MbpsOFDM: BPSK@6/9Mbps, QPSK@12/18Mbps, 16-QAM@24Mbps, 64-QAM@48/54MbpsMIMO-OFDM: QPSK, 16QAM, 64QAM, 256QAM and1024QAMReceive Sensitivity 11a: -91dBm(1Mbps), -90dBm(5Mbps), -87dBm(11Mbps)11b/g: -89dBm(6Mbps), -82dBm(24Mbps), -78dBm(36Mbps), -72dBm(54Mbps) 11n: -85dBm@MCS0, -67dBm@MCS7, -67dBm@MCS711ac: VHT20: -85dBm(MCS0), -62dBm(MCS8)11ac: VHT40: -82dBm(MCS0), -57dBm(MCS9)11ac: VHT80: -79dBm(MCS0), -53dBm(MCS9)·11ax: HE80: -79dBm(MCS0), -53dBm(MCS9),-52dBm(MCS11)Max Transmit Power ≤100mw (20dBm)(Depending on the country of use, laws and regulations.)Transmit PowerAdjustment1 dBmDimensions(W x D x H)86mm x 116mm x 40mm Weight ≤0.3kgService Ports Four 10/100/1000Base-T LAN portsOne 10/100/1000Base-T WAN port (PoE and PoE+ capable)Management Ports One Micro USB port for console management LED Indicators One indicatorPower Supply Local power supply: DC 12V/1APoE: IEEE 802.3af/802.3at-compliant (compatible). Power Consumption < 10WBluetooth Bluetooth 4.0iBeaconTemperature Operating: -10°C to 45°C (14°F to 113°F) Storage: -40°C to 70°C (-40°F to 158°F)Humidity Operating: 5% to 95% RH (non-condensing) Storage: 5% to 95% RH (non-condensing)Installation Wall mount IP Rating IP41Safety Standards GB4943EN/IEC 60950-1EMC Standards GB9254 EN301489 EN50121 EN50155Radio China Radio Transmission Equipment Type Approval Certificate EN300 328EN301 893MTBF > 250,000H1.2 Product ImageThe AP provides two radio ports, one 10/100/1000Base-T Ethernet WAN port, and four 10/100/1000Base-T Ethernet LAN ports.Figure 1-1 Image of RG-AP180·Figure 1-2 Bottom View of RG-AP180Note1. Four 10/100/1000Base-T LAN portsFigure 1-3 Side View of RG-AP180Note1. Micro USB management port (Console)2. Reset button3. Port for local power supply·Figure 1-4 Rear View of RG-AP180Note1. 10/100/1000Base-T Ethernet WAN port1.3 LED IndicatorsFigure 1-5 Indicator on the APFat AP Mode State Frequency MeaningOffN/A The AP is powered off. Or the AP is in Silent mode, which can be disabled via software.Fast blinking green before solid green 2.5Hz (fast blinking green)Initialization is in progress. The AP is operational.Fast blinking red2.5HzFirmware upgrade in progress. Do not power off the AP.Blinking orange 1Hz AP is operational.Fit AP Mode State Frequency Meaning OffN/AThe AP is powered off. Or the AP is in Silent mode, which can be disabled via·software.Fast blinking green before solid green 2.5Hz (fast blinking green)Initialization is in progress. The AP is operational.Fast blinkingred2.5Hz Firmware upgrade in progress. Do not power off the AP.Blinking orange 1Hz AP is operational and Ethernet link is down.Blinking green 1Hz AP is operational and Ethernet link is up. CAPWAP error.Slow blinkinggreen0.4Hz AP is operational and CAPWAP connection is established. At least one client isassociated.1.4 Reset ButtonTo reset the AP, you need to keep the reset button pressed for 2s or less.To restore default settings, you need to keep the reset button pressed for 3s or more.1.5 Power SourcesRG-AP180 supports two power supply modes: PoE and DC power supply.PoE power supply:●Input voltage range: 44-57V●Rated current: 0.3AWhen adopting PoE power supply, make sure the peer end also supports 802.3af/802.3at.DC power supply:●Input voltage range: 12V●Rated current: 1A1.6 Cooling SolutionThe AP adopts fanless design. Keep enough space around the device to guarantee airflow for proper ventilation.·2 Preparing for Installation2.1 Safety SuggestionsTo prevent device damage and bodily injury, please read carefully the safety recommendations described in this chapter.The recommendations do not cover all possible hazardous situations.2.2 Installation●Do not expose the AP to high temperature, dusts, or harmful gases.●Do not install the AP in an inflammable or explosive environment.●Keep the AP away from EMI sources such as large radar stations, radio stations, and substations.●Do not subject the AP to unstable voltage, vibration, and noises.●Keep the installation site dry. Installing the device near sea is not recommended.●Keep the AP at least 500 meters away from the seaside and do not face it toward the wind from the sea.●The installation site should be free from water flooding, seepage, dripping, or condensation.●The installation site shall be selected according to network planning and features of communications equipment, andconsiderations such as climate, hydrology, geology, earthquake, electric power, and transportation.2.3 Temperature and HumidityRequired temperature and humidity are as follows:●Operating temperature: -10°C to 45°C (14°F to 113°F)●Operating humidity: 5% to 95% RH (non-condensing)2.4 CleannessDust poses a serious threat to device operation. Dust that falls onto the surface of the device can be absorbed onto metalcontact points by static electricity, resulting in poor contact. Electrostatic absorption of dust occurs more easily when therelative humidity is low, which may shorten the service life of the device and cause communication failures. Table 2-2shows the maximum concentration and diameter of dust allowed in the equipment room.Table 2-1Maximum diameter (μm) 0.5 1 3 5Maximum concentration1.4×1077×1052.4×105 1.3×10⁵(Particles/m3)·Besides, the contents of salts, acids and sulfides in the air are also strictly limited for the equipment room. Thesesubstances can accelerate metal corrosion and the aging of some parts. Table 2-3 describes the limit of some hazardousgases such as SO2, H2S, NO2 and Cl2 in the equipment room.Table 2-2Gas Average (mg/m3) Maximum (mg/m3)SO20.2 1.5H2S 0.006 0.03NO20.04 0.15NH30.05 0.15Cl20.01 0.32.5 Power Supply●PoE injector: IEEE 802.3at/af compliant●DC power adapter:Input voltage: 12VRated current: 1.0ATechnical Specifications of the DC ConnectorInner Diameter Outer Diameter Insertion Depth Polarity2.1mm 5.5mm 10mmInner pole: positive Outer pole: negativeThe DC input power should be greater than the power actually consumed by the system. The input power for the RG-AP180 should not be lower than 10W.Use DC power adapters with specifications recommended by Ruijie.Please use Ruijie certified PoE injectors.2.6 EMI ConsiderationVarious interference sources, from either outside or inside the equipment or application system, affect the system in the conductive ways such as capacitive coupling, inductive coupling, and electromagnetic radiation. There are two types of electromagnetic interferences: radiated interference and conducted interference, depending on the type of the propagation path. When the energy, often RF energy, from a component arrives at a sensitive component via the space,·the energy is known as radiated interference. The interference source can be both a part of the interfered system and acompletely electrically isolated unit. Conducted interference results from the electromagnetic wire or signal cableconnection between the source and the sensitive component, along the cable the interference conducts from one unit toanother. Conducted interference often affects the power supply of the equipment, but can be controlled by a filter.Radiated interference may affect any signal path in the equipment, and is difficult to shield.●Effective measures should be taken for the power system to prevent the interference from the electric grid.●The working ground of the routers should be properly separated and kept as far as possible from the groundingdevice of the power equipment or the anti-lightning grounding device.●Keep the equipment away from high-power radio transmitter, radar transmitting station, and high-frequencylarge-current device.●Measures must be taken to isolate static electricity.2.7 Installation ToolsCommon Tools Phillips (crosshead) screwdriver, copper and fiber cables, bolts, diagonal pliers, cable ties straight screwdriver (for the removal of the cover)Special Tools Wire stripper, crimping pliers, RJ-45 crimping pliers, punch down tool, anti-static tools Meter Multimeter, bit error rate tester (BERT)The listed tools, apart from bolts, are customer supplied.·3 Installing the Access PointMake sure you have carefully read Chapter 2, and be sure that the requirements set forth in Chapter 2 have beenmet.3.1 Installation Flowchart3.2 Before You BeginTo ensure normal operation and a prolonged useful life of the equipment, observe the following safety precautions:●Install the device in a well-ventilated location.●Do not subject the device to high temperatures.●Keep away from high voltage cables.●Install the device indoors.●Do not expose the device in a thunderstorm or strong electric field.●Keep the device clean and dust-free.●Disconnect the device before cleaning it.●Do not wipe the device with a damp cloth.●Do not wash the device with liquid.●Do not open the enclosure when the AP is working.●Fasten the device tightly.3.3 Installing the Access PointDisconnect the device before installing or moving it.Make sure that the screws are of fine quality.Be sure that the equipment is installed in a place where it is easy to be observed.·1) Loosen screws on the 86-type faceplate that is mounted on the wall. (Skip this step if the faceplate has not beenmounted.)Figure 3-1 Loosen Screws on the Faceplate2) Connect the uplink cable to the UpLNK port.Figure 3-2 Connect Cables to Ports3) Align screw holes on both sides of the device over those on the faceplate. And then tighten screws with ascrewdriver.Figure 3-3 Tighten Screws with a Screwdriver4) Install the plate cover in the way as shown in the following figure.Figure 3-4 Install the Cover5) Compete the installation.Figure 3-5 Cover for RG-AP1803.4 Removing the Plate CoverYou can use a straight screwdriver to remove the plate cover as constructed in the following figure. Figure 3-6 Removing the Plate Cover·Hardware Installation and Reference Guide System Debugging4 System Debugging4.1 Setting up a Debugging EnvironmentUse a power adapter or PoE to power the AP.Setting up the Environment● Verify that the AP is properly connected to the power source. ● Connect the AP to a wireless controller through a twisted pair cable.● When the AP is connected to a PC for debugging, verify that the PC and PoE switch are properly grounded.4.2 Powering Up the AP4.2.1 Checking before power-up● Verify that the power supply is properly connected.● Verify that the input voltage matches the specification of the AP.4.2.2 Checking after power-up (recommended)After powering up, it is recommended that you check the following to ensure normal operation of the AP.● Check if any message is displayed on the Web-based configuration interface for the wireless controller. ● Check if the LED works normally.4.3 Reset/Restore Default SettingsThe reset button is hidden in a hole and used by technical support personnel. To avoid abnormal operation, do not use this button without consultation with technical support personnel.4.3.1 System ResetRemove the cover. Insert an iron stick, 1mm or less in diameter, into the hole, and slightly press it. After hearing a click, keep the stick in the same position for 2s. The system reset is complete.4.3.2 Restore Default SettingsRemove the cover. Insert an iron stick, 1mm or less in diameter, into the hole, and slightly press it. After hearing a click, keep the stick in the same position for 3s. Default settings are restored.5 Monitoring and Maintenance5.1 MonitoringYou can observe the LED to monitor the AP in operation.●Fast blinking green followed by solid green: The AP is being initialized and is operational.●Blinking red: The AP is upgrading programs firmware. Do not power off the AP.●Blinking orange: The AP is operational. The Ethernet link is down.●Blinking green (1Hz): The AP is operational, and the Ethernet link is up. But the CAPWAP connection is faulty.●Blinking green (0.4Hz): The AP is operational. The CAPWAP connection is OK. At least one client is associated withthe AP.●Blinking green (one flash every 4 seconds): The AP is operational. No clients are associated with the AP. Thesystem is in the low consumption mode.5.2 Remote Maintenance●If the AP operates as a Fat AP, you can login in to the AP remotely for maintenance.●If the AP operates as a Fit AP, you can use the wireless controller to centrally manage and maintain the AP.5.3 Hardware Maintenance●If the hardware is faulty, please contact our Technical Assistance Center (TAC) for help.6 Troubleshooting6.1 Troubleshooting Flowchart6.2 TroubleshootingLED does not light up after the AP is powered onVerify that the power source is IEEE 802.11af compliant. And then verify that the cable is connected properly.Orange LED blinks after the Ethernet cable is connectedVerify that the device at the other end of the Ethernet cable is working properly. And then verify that the Ethernet cable is capable of providing the required data rate and is properly connected.Wireless client cannot find the AP1) Follow the above-mentioned two steps.2) Verify that the AP is configured correctly.3) Adjust the transmit power.4) Move the client device to adjust the distance between the client and the AP.The installation instruction above is based on RG-AP180. The actual product prevails.·Hardware Installation and Reference Guide Appendix A Connectors and MediaAppendix A Connectors and Media1000BASE-T/100BASE-TX/10BASE-TThe 1000BASE-T/100BASE-TX/10BASE-T is a 10/100/1000 Mbps auto-negotiation port that supports auto MDI/MDIX. Compliant with IEEE 802.3ab, 1000BASE-T requires Category 5e 100-ohm UTP or STP (STP is recommended) with a maximum distance of 100 meters (328 feet).1000BASE-T requires all four pairs of wires be connected for data transmission, as shown in Figure A-1.Figure A-1 1000BASE-T Connection10BASE-T uses Category 3, 4, 5 100-ohm UTP/STP and 1000BASE-T uses Category 5 100-ohm UTP/STP forconnections. Both support a maximum length of 100 meters. Table A-1 shows 100BASE-TX/10BASE-T pin assignments. Table A-1 100BASE-TX/10BASE-T Pin AssignmentsFigure A-2 shows wiring of straight-through and crossover cables for 100BASE-TX/10BASE-T.Figure A-2 100BASE-TX/10BASE-T Connection。
RG-AP220系列无线接入点快速安装手册

快速安装手册RG-AP220系列无线接入点版权声明星网锐捷网络有限公司©2000-2010锐捷网络有限公司版权所有,并保留对本手册及本声明的一切权利。
未得到锐捷网络有限公司的书面许可,任何人不得以任何方式或形式对本手册内的任何部分进行复制、摘录、备份、修改、传播、翻译成其他语言、将其全部或部分用于商业用途。
、、、、、、、、、、都是星网锐捷网络有限公司的注册商标,不得仿冒。
免责声明本手册依据现有信息制作,其内容如有更改,恕不另行通知,请关注锐捷网络有限公司网站提供的最新信息。
锐捷网络有限公司在编写本手册时已尽力保证其内容准确可靠,但对于本手册中的遗漏、不准确或错误,以及由此导致的损失和损害,锐捷网络有限公司不承担责任目录1AP快速安装手册 (4)1.1安装无线AP (4)1.1.1安全注意事项 (4)1.1.2安装无线AP (4)1.2检验设备状况 (6)1.2.1采用POE供电方式 (6)1.2.2采用适配器供电 (6)1.2.3检验设备上电状况 (6)1.2.4常见故障分析 (7)1 AP快速安装手册1.1 安装无线AP1.1.1 安全注意事项为保证无线AP正常工作和延长使用寿命,请遵从以下的注意事项:1. 请将设备放置于通风处;2. 避免设备处于高温环境;3. 请将设备信号远离高压电缆;4. 请将设备安装在室内;5. 请将设备远离强雷暴、强电场环境;6. 请将设备保持清洁,防止灰尘污染;7. 在清洁设备前,请将电源拔下;8. 禁用湿布擦拭设备、禁用液体清洗;9. 请不要在设备工作时打开机壳;10. 确保电源与设备电压相符;11. 请将设备固定牢固;12. 本设备符合国家及行业标准。
1.1.2 安装无线APa注意1. 在安装或移动无线AP的时候,请确保断开电源。
2. 请确保安装螺钉牢固可靠。
3. 请确保无线AP的安装位置以便于观察指示灯状态。
1.1.2.1 安装导管及螺钉安装时请使用推荐尺寸的螺钉和安装导管,具体推荐尺寸:直通膨胀管:M7x¢4.5x28 (mm)螺钉:4*20PABC (mm)图 1.螺钉示意图图 2.导管示意图1.1.2.2 安装步骤安装过程如下:在墙上所打的四个壁挂孔的大小及深度,请您根据所选安装导管及螺钉的尺寸自行判断,需确保安装导管能够置入孔内,仅留安装导管外沿在墙外,且拧入螺钉后可以将螺钉紧固在墙上。
锐捷网络RG-FC系列光纤收发器硬件安装手册说明书

RG-FC 系列光纤收发器文档版本 :V1.10版权声明copyright © 2020锐捷网络保留对本文档及本声明的一切权利。
未得到锐捷网络的书面许可,任何单位和个人不得以任何方式或形式对本文档的部分内容或全部进行复制、摘录、备份、修改、传播、翻译成其他语言、将其全部或部分用于商业用途。
以上均为锐捷网络的商标。
本文档提及的其他所有商标或注册商标,由各自的所有人拥有。
免责声明您所购买的产品、服务或特性等应受商业合同和条款的约束,本文档中描述的全部或部分产品、服务或特性可能不在您的购买或使用范围之内。
除非合同另有约定,锐捷网络对本文档内容不做任何明示或默示的声明或保证。
由于产品版本升级或其他原因,本文档内容会不定期进行更新。
锐捷网络保留在没有任何通知或者提示的情况下对文档内容进行修改的权利。
本手册仅作为使用指导。
锐捷网络在编写本手册时已尽力保证其内容准确可靠,但并不确保手册内容完全没有错误或遗漏,本手册中的所有信息也不构成任何明示或暗示的担保。
前言感谢您使用锐捷网络产品,本手册为您提供了详细的硬件安装指南。
使用范围本手册主要介绍了产品在功能上和物理上的一些特性,提供了安装步骤、故障排除、技术规格,以及电缆和连接器的规格和使用准则。
适用于想对上述内容进行了解且在安装和维护网络硬件方面具有一定经验的用户。
同时假定该款产品的用户熟知相关术语和概念。
技术支持⏹锐捷睿易官方网站:https:///⏹锐捷睿易在线客服:/?p=smb⏹锐捷网络官方网站服务与支持版块:https:///service.aspx⏹7天无休技术服务热线:4001-000-078⏹锐捷睿易技术论坛:/⏹常见问题搜索:/service/know.aspx⏹锐捷睿易技术支持与反馈信箱:*********************.cn⏹锐捷网络服务公众号:【锐捷服务】扫码关注文档格式约定本书采用各种醒目标志来表示在操作过程中应该特别注意的地方,这些标志的意义如下:注意、警告、提醒操作中应注意的事项。
无线AP安装、配置手册

安装时将天线馈源引出电缆N头(阳性)和放大器的ToAntena天线端口(阴性)连接;将放大器的ToDc INJECTOR端口(阴头)和馈线连接;馈线下端和电源插入器的输出端口连接;输入端口和设备用转换电缆连接。
阴头和阴头连接则需要加阳-阳转换头。
功放在天线和设备没有连接好之前,不要加电。
正常状态下,电源插入器和功放绿灯常亮,红灯闪烁。
当红灯常亮或闪烁不规则时,一般是干扰所致。
(当有以太网数据发送时红灯闪烁频繁,好象常亮) * 当红灯不亮时,则是设备没有输出或连接不好。
当绿灯不亮时,则表示没有电或功放有问题。
如何计算功放的输入功率来实现你的配置1. 使用"功率与dbm的对照表",将输出功率由 Watts (或者 milliwatts) 转换成 dBm。
YDI 的 2440 型号的功放可以工作在输入功率从3.2mW~100mW (5dB~18dB)。
2. 计算你的电缆衰减。
首先,弄清楚电缆在 2.4 GHz的衰减,使用电缆厂家的指标,或者可以参考表B的典型值。
3. 计算在功放输入端可获得的功率为: 设备输出功率(dB) –电缆衰减 (dB) –连接头衰减 (1 dB) =功放输入端的信号水平 (dB)例一:设备输出是 50mW (+17dBm) ,75米LMR400电缆的衰减是 6 dB,标准功放线性发射功率增益是14dB.功放输入端的信号为: +17 dBm - 6 dB - 1dB = +10 dBm =10 mW功放输出功率为: +10dBm + 14dB增益 = +24dBm 输出功率(250 mW)第二:设备输出仍为64mW (18dBm),10 米 LMR400电缆的衰减是 2.2 dB。
则功放输入端的信号功率为: 18 dBm- 2.2 dB - 1 dB = 14.8 dBm ≈32 mW功放的输入信号超过了20 dB (100 mW) ,必须在设备和直流电源插入器之间加入一个衰减器。
RG-AP5280系列无线接入点硬件安装手册
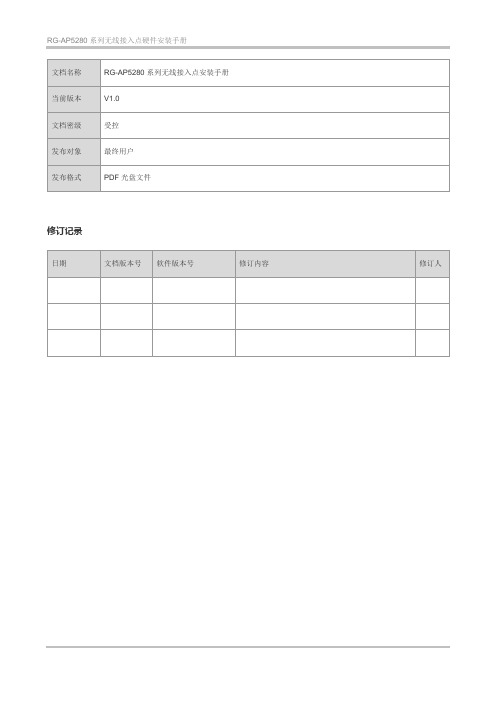
RG-AP5280系列无线接入点硬件安装手册文档名称RG-AP5280系列无线接入点安装手册当前版本V1.0文档密级受控发布对象最终用户发布格式PDF光盘文件修订记录日期文档版本号软件版本号修订内容修订人1 产品综述1.1 产品简介RG-AP5280是锐捷网络继智分二代之后,面向校联网宿舍网络、医疗病房网络等密集建筑场景推出的新一代高速无线网络的无线接入点产品。
本产品采用802.11N协议标准,通过集成8路USB接口,将一台CPU延伸出8个Radio模块,支持8个房间的单频双流性能,每个房间享有32M的带宽资源,整套接入点享有256M的无线吞吐能力,满足宿舍环境等高性能接入的需求。
同时RG-AP5280产品充分考虑的无线网络安全、射频控制、移动访问、服务质量保证、无缝漫游等重要因素,完成无线用户的数据转发、安全和访问控制。
RG-AP5280产品主要由以下几个组件组成:RG-AP5280-M:主机模块,配有高性能CPU模块,内含8个USB协议接口,可基于实时功率监控进行对各个Radio相关参数的动态调整和吞吐速率动态控制,支持频谱扫描功能,以及各单元模块的统一管理功能;RG-AP5280-N:Radio模块,完成各个接入点的无线转发功能;RG-Cab-UPS-5m:主机模块与Radio模块的近距离衔接,提供数据转发和供电通道;RG-Cab-UPS-10m:主机模块与Radio模块的近距离衔接,提供数据转发和供电通道;RG-Cab-UPS-15m:主机模块与Radio模块的近距离衔接,提供数据转发和供电通道;RG-Cab-UPS-20m:主机模块与Radio模块的近距离衔接,提供数据转发和供电通道;1.2 无线接入点组件介绍1.2.1 RG-AP5280-M1.2.1.1 RG-AP5280-M产品主要技术指标产品型号RG-AP5280M服务特性最大支持划分64个SSID虚拟服务每个SSID可配置单独的认证方式、加密机制、VLAN属性公平占用技术支持IP地址支持静态IP地址支持通过DHCP获取IP地址路由协议支持静态路由ACL 支持带宽限制支持本地转发支持IEEE 802.1p 支持IEEE 802.1Q 支持安全特性SSID隐藏支持用户隔离支持无线用户间的二层转发隔离Radius 支持帧过滤白名单静态黑名单动态黑名单认证Web 认证PSK认证802.1X认证加密支持WPA(TKIP)、WPA2(AES)、WPA-PSK、WEP(64/128位)CPU保护策略支持基础网络保护策略支持管理特性网络管理支持SNMP v1/v2C/v3;支持通过Telnet、SSH、TFTP、FTP管理日志支持本地日志、日志主机告警支持故障检测支持统计信息支持Fat/Fit模式切换当工作在Fit(瘦)模式时,可通过WS系列无线控制器切换为Fat模式;当工作在Fat(胖)模式时,可通过本地控制口、Telnet方式切换为Fit模式物理特性尺寸220mm×220mm×58mm(长×宽×高)重量 1.0kg(净重[含挂架])安装方式壁挂业务端口1个10/100/1000Base-T以太网上联端口(支持POE+供电)管理端口1个console口电源支持增强型PoE以太网供电(802.3at标准),兼容802.3af模式供电环境通过IP41防水防尘认证工作温度:-10°C~50°C存储温度:-40°C~70°C工作湿度:5%~95%(无凝结)存储湿度:0%~100%(无凝结)最大功耗25.5W安全法规GB4943、EN/IEC 60950-1 EMC法规GB9254、EN301 489Health EN 623111.2.1.2 RG-AP5280-M产品外观RG-AP5280-M包含1个电口、1个Console接口、1个千兆以太网接口以及8个RJ11接口。
Ruijie RG-EAP602系列接入点硬件安装及参考指南说明书

Ruijie RG-EAP602 Series Access Points Hardware Installation and Reference Guide·Copyright statementRuijie Networks©2021Ruijie Networks reserves all copyrights of this document. Any reproduction, excerption, backup, modification, transmission, translation or commercial use of this document or any portion of this document, in any form or by any means,without the prior written consent of Ruijie Networks is prohibited.Exemption statementThis document is provided “as is”. The contents of this docu ment are subject to change without any notice. Please obtainthe latest information through the Ruijie Networks website. Ruijie Networks endeavors to ensure content accuracy and willnot shoulder any responsibility for losses and damages caused due to content omissions, inaccuracies or errors.·PrefaceThank you for using our products. This manual will guide you through the installation of the access point.ScopeIt is intended for the users who have some experience in installing and maintaining network hardware. At the same time, itis assumed that the users are already familiar with the related terms and concepts.Obtaining Technical Assistance●Ruijie Networks Website: https:///●Technical Support Website: https:///support●Case Portal: https://●Community: https://●Technical Support Email: *****************************●Skype: *****************************Related DocumentsDocuments DescriptionConfiguration Guide Describes network protocols and related mechanisms that supported by the product, with configuration examples.Command Reference Describes the related configuration commands, including command modes, parameter descriptions, usage guides, and related examples.Documentation ConventionsThe symbols used in this document are described as below:This symbol brings your attention to some helpful suggestions and references.This symbol means that you must be extremely careful not to do some things that may damage the device or cause data loss.·1 Product OverviewThe RG-EAP602, adhering to the latest 802.11ac Wave2 standard, delivers up to 866Mbps@5G + ************access rate. EAP602 supports security, radio frequency (RF) control, mobile access, Quality of Service (QoS) andseamless roaming. Teaming up with Ruijie RG-WS Wireless Controller Series, wireless data forwarding, highperformance security and access control can be accomplished with ease. EAP602 supports PoE to take over challengesin a wide variety of deployment scenarios, including large-scaled campuses, enterprises, hospitals and WIFI hotspots.1.1 Technical SpecificationsTable 1-1 RG-EAP602 Technical SpecificationsModel RG-EAP602Dimensions 222 mm × 200 mm × 166 mmAccess Rate Built-in antenna:1166Mbps 2.4GHz: up to 300Mbp5GHz: up to 866MbpsOperating Frequency 802.11b/g/n: 2.4 GHz to 2.483 GHz802.11a/n/ac: 5.150 GHz to 5.350 GHz, 5.47 GHz to 5.725 GHz, 5.725 GHz to 5.850 GHz (Country-Specific)Maximum TransmitPower500mWAntenna Type Built-in omnidirectional antennaAntenna Gain 2.4 GHz: 3 dBi 5 GHz: 4 dBiCoverage Angle 2.4G: E:30°; H:360°5G: E:30°; H:360°Ports One 10/100/1000 Base-T uplink Ethernet port One 10/100/1000 Base-T Ethernet portFIT/FAT Mode Not supportLED System and port status indicators PoE Power Supply IEEE 802.3afPower Consumption Maximum: 12.95WTemperature Operating: -40°C to 65°C (-40°F to 149°F) Storage: -40°C to 85°C (-40°F to 185°F)Humidity Operating: 0% to 100% (non-condensing) Storage: 0% to 100% (non-condensing)IP Rating IP68 Weight < 1kg (host)Safety Standards GB4943EN60601-1-2 UL/CSA 60950-1 EN/IEC 60950-1·EN/IEC 60950-22 EMC StandardsGB9254-2008 EN301 489EN 55022 FCC Part15 RSS-210Table 1-2 LEDs of RG-EAP602 IndicatorStatus MeaningWiFi (Blue)Blinking Data is transmitted by WiFi.Solid on WiFi is enabled and no data is transmitted. OffWiFi is disabled.WARN(Red)BlinkingInitialization: blinking at a rate of 1Hz (on for 505ms and off for 505ms).Restore factory settings: blinking at a rate of 14Hz (on for 20ms and off for 50ms).System upgrade: blinking at a rate of 10Hz (on for 40ms and off for 60ms). Solid on CWMP is not connected.Off Powered off or initialization test is normal. LAN 1(Blue)BlinkingThe port is up and data is transmitted. Solid on The port is up and no data is transmitted. Off The port is not connected.LAN 2(Blue)BlinkingThe port is up and data is transmitted. Solid on The port is up and no data is transmitted. OffThe port is not connected.1.2 Product AppearanceFigure 1-1 Product Appearance of the RG-EAP602·Figure 1-2 Ports of RG-EAP602Note1. 10/100/1000BASE-T Ethernet port2. DC power supply port3. 10/100/1000BASE-T Ethernet port/PoE port4. Reset button5. Waterproof cap1.3 Power SupplyThe AP supports 802.3af PoE or 12V DC power supply (If needed, you can buy the adapter from Ruijie).When PoE power supply is adopted, please make sure the peer end support 802.3af too. The lowest current output requirement for a DC power supply is 1.5A.·2 Preparing for InstallationTo prevent device damage and physical injury, please read carefully the safety recommendations described in thischapter.Recommendations do not cover all possible hazardous situations.2.1 Grounding and Lightning Protection●Ensure that both the power-receiving end and the power-supplying end are well-grounded.●Keep the grounding connection within 30 m, and use a 40mm x 4mm or 50mm x 5mm ground bar of hot-dipzinc-coated flat steel sheet.●When the connection cable between the main grounding conductor and local equipotential earthing terminal board(LEB) on each floor is shorter than 2 meters, use a stranded copper wire with a sectional area not less than 1.318mm2 (16 AWG) for the connection cable.●Use a shielded network cable if possible, ensure that devices connected to both ends of the shielded network cableare reliably grounded, and make sure that the sheath of the shielded network cable is also grounded if possible. If noshielded network cable is available, wire the network cable through a steel pipe and bury the steel pipe for lead-in,and properly ground both ends of the steel pipe.●No additional lightning protector is required as a high-profile lightning protector is built in the RG-EAP602, and thepower port support 6kV lightning protection. If a lightning protector of a higher profile is available, configure thelightning protector optionally. Before the configuration, connect the lightning protector to the ground cable.●Use a power cable with the PE end to ground the power supply (AC). Ensure that the PE end is properly grounded,with a ground resistance less than 5 ohms. Do not use a two-wire power cable with only the live (L) wire and naught(N) wire. Do not connect the N wire to the protection ground cable of other communication devices, and ensure thatthe L wire and N wire are properly connected.●Ensure that the ground resistance is less than 5 ohms. In areas with high soil resistivity, reduce the soil resistivity viameasures such as spreading resistivity reduction mixture around the grounding conductor.2.2 Preparing the Installation Site●Do not expose the AP to high temperature, dust, or harmful gases.●Do not install the AP in an area prone to fire or explosions.●Keep the AP away from EMI sources such as large radar stations, radio stations, and substations.●Do not subject the AP to unstable voltage, vibration, and noises.●Keep the AP at least 500 meters away from the ocean and do not face it towards the sea breeze.●The installation site should be protected from water and flooding, seepage, dripping, or condensation.●The installation site should be selected according to network planning, communications equipment features andconsiderations such as climate, hydrology, geology, earthquake, electric power, and transportation.·2.2.1 Temperature and HumidityTable 2-1 Required Temperature and Humidity for the RG-EAP602 SeriesOperating Temperature -40°C to 65°C (-40°F to 149°F)Operating Humidity 0% to 100% (non-condensing)2.2.2 Outdoor InstallationThe AP can be mounted on a wall or a pole.2.2.3 WaterproofUse a seal plug to seal the unused ports.After using the reset button, please ensure that the cap is put back.Use a waterproof plug to connect cables to the AP. For details, see Chapter 3 “Installing the Access Point”.2.2.4 EMIAll interference sources (from outside or inside of the device or application system) affect the device by capacitivecoupling, inductive coupling, or electromagnetic waves.Electromagnetic interference (EMI) occurs due to electromagnetic radiation or conduction, depending on the transmissionpath.Radiation interference occurs when energy (usually radio frequency energy) is emitted from a device and propagatedthrough space to disrupt other devices. The interference source can be part of disrupted system or a fully electricallyisolated unit. Conduction interference occurs when interference is transferred from one unit to another through cables,which are usually electromagnetic wires or signal cables connected between the source and the device(s) experiencing interference. Conduction interference often affects the power supply of the device. It is eliminated by using filters.Radiation interference can influence the path of any signal from the device and is difficult to shield.●Take effective measures against interference from the power grid.●Keep the AP far away from the grounding or lightning protection devices for power equipment.●Keep the AP away from high-power radio stations, radar stations, and high-frequency high-current devices.●Take electrostatic shielding measures.2.3 Installation ToolsTable 2-2 Installation ToolsTools Marker, Phillips (crosshead) screwdriver, slotted screwdriver, drill, paper knife, crimping pliers, diagonal pliers, wire stripper, network cable tester, related power and fiber cables, wrench, hammer, cable ties, ESD tools, multimeter, waterproof duct tape, waterproof plasterThe tool kit and cables are customer supplied.·2.4 Checking before InstallationPlease check your materials carefully against the package contents. If there are any errors, please contact your distributor.·3 Installing the Access PointBefore installing the AP, make sure you have carefully read the requirements described in Chapter 2.3.1 Installation Flowchart3.2 Before You BeginBefore you install the AP, verify that all the parts in the package contents are there and make sure that:●The installation site meets temperature and humidity requirements.●The installation site is equipped with a proper power supply.●Network cables are in place.·3.3 PrecautionsRG-EAP602 can be mounted on a wall and a pole (diameter: 50mm to 70mm, thickness: ≥2.5mm). Otherwise, the APcould fall down and cause injuries. The installation site can vary due to on-the-spot surveys conducted by technicalpersonnel.Please make full preparations as described in Chapter 2 and observe the following precautions before installing the AP.●Before connecting the power supply, make sure the external power supply matches the power module inside the AP.●Before connecting the power cord, make sure the power switch is in the OFF position.●When connecting a wire to a binding post, make sure their colors are the same.●Make sure the power supply is properly connected.3.4 Installing the AP●Wall mountUse M8 x 60 screws to implement the wall mount.a. Attach the bracket to the wall and mark the screw hole locations.Figure 3-1 Installing the Bracketb. Align the host with bracket and mounting plate to the bracket on the wall, and tighten the M8×40 screws to completeinstallation.Figure 3-2 Mounting the Bracket on Wall·Pole mount (Vertical)a. Attach the bracket to a pole with hose clamps and fasten the clamps with screws and nuts.Figure 3-3 Mounting the Bracket on a Poleb. Align the host with bracket and mounting plate to the bracket on the pole, and tighten the M8×40 screws to completeinstallation.Figure 3-4 Vertical Pole Mounting·Pole mount (Horizontal)Figure 3-5 Mounting the Bracket on a PoleFigure 3-6 Horizontal Pole MountingThe horizontal pole mounting is the same with the vertical pole mounting.·3.5 Connecting CablesConnecting the network cableWaterproofing material is customer-supplied.1) Trim the network cable according to the distance between the AP and the power supply. And put the trimmed cablethrough the bracket.2) Thread the cable with an unprocessed RJ45 through the waterproof plug in the order shown in the Figure 3-7.Figure 3-7 Threading the Network Cable3) After the cable passes through the waterproof plug, process the RJ45.4) Connect the cable with the LAN1/PoE/uplink port of AP, and tighten the waterproof plug in the order of B, C and D tocomplete the installation.5) To install the waterproof port not connected with the network cable: Insert the waterproof rubber rod into the ring,and tighten them in order.Make sure the plug is correctly inserted. The plug can be damaged if the liquid-tight adapter is improperly tightened.Before removing the network cable, dismantle the waterproof plug first and then the plug.NoteThe product should not be installed in the place prone to water accumulation, seepage, dripping, and condensation.The product is recommended to be installed horizontally.If any requirement above can not be fulfilled, please use waterproof duct tape and waterproof plaster.·Appendix A Connectors and Media1000BASE-T/100BASE-TX/10BASE-TThe 1000BASE-T/100BASE-TX/10BASE-T is a 10/100/1000 Mbps auto-negotiation port that supports auto MDI/MDIX.Compliant with IEEE 802.3ab, 1000BASE-T requires Category 5e 100-ohm UTP or STP (STP is recommended) with amaximum distance of 100 meters (328 feet).1000BASE-T requires all four pairs of wires be connected for data transmission, as shown in Figure A-1.Figure A-1 1000BASE-T Connection10BASE-T uses Category 3, 4, 5 100-ohm UTP/STP and 1000BASE-T uses Category 5 100-ohm UTP/STP for connections. Both support a maximum length of 100 meters. Table A-1 shows 100BASE-TX/10BASE-T pin assignments.Table A-2 100BASE-TX/10BASE-T Pin AssignmentsFigure A-3 shows wiring of straight-through and crossover cables for 100BASE-TX/10BASE-T.Figure A-3 100BASE-TX/10BASE-T ConnectionFiber Connection·You can choose to use single mode or multimode fibers according to the transceiver module types. Figure A-4 showsconnection of fiber cables.Figure A-4 Fiber Connection··Hardware Installation and Reference Guide Appendix B Mini-GBIC Module SpecificationsAppendix B Mini-GBIC Module SpecificationsRuijie provides various Gigabit SFP transceivers (Mini-GBIC modules) for interfaces of wireless access controllers. You can select the most suitable SFP modules as needed. This appendix describes the models and specifications of some of the Gigabit SFP transceivers for your reference.Mini-GBIC (SFP) Models and SpecificationsTable B-1 Models and Specifications of SFP ModulesMini-GBIC(SFP) Wavelength (nm) Fiber Type Core Size (micron) Modal Bandwidth (MHz/km) Cable Distance Max Transmit (dBm) Max Receive (dBm)StandardsFE-SFP-LX-MM 13101310 MMF 1 62.5/ 125 — 2 km -14 -14 IEEE802.3FE-SFP-LH15-S M13101310SMF 29/ 125 — 15 km -8 -8MINI-GBIC-SX-MM850850MMF 162.562.5 50.0 50.0 160 200 400 500 220 m 275 m 500 m 550 m -4 -17MINI-GBIC-LX-S M1310 1310MMF 1 SMF 262.550.0 50.0 9/10 500 400 500 — 550 m 550 m 550 m 10 km -3 -20MINI-GBIC-LH40-SM1310 1310 SMF 29/ 125—40 km 3 -3 MINI-GBIC-ZX50-SM1550 1550 SMF 2 — — 50 km0 -22 MINI-GBIC-ZX80-SM1550 80 km 4.7 -22 MINI-GBIC-ZX100-SM1550 100 km5 -9 Mini-GBIC-GT —Cat 5 UTP— — 100 m——1 MMF=Multimode fiber2 SMF=Single mode fiberWhen using shorter distances of single-mode fiber for optical SFP transceivers with cable distance greater than 40km (including 40 km), you may need to insert an in-line optical attenuator in the link to avoid overloading the receiver.。
锐捷网络 RG-NBS6002 交换机 硬件安装手册说明书
RG-NBS6002 交换机文档版本V1.1归档日期2022-06-23copyright © 2021 锐捷网络版权声明copyright © 2021 锐捷网络保留对本文档及本声明的一切权利。
未得到锐捷网络的书面许可,任何单位和个人不得以任何方式或形式对本文档的部分或全部内容进行复制、摘录、备份、修改、传播、翻译成其他语言、将其部分或全部用于商业用途。
、、和其他锐捷网络商标均为锐捷网络的商标。
本文档提及的其他所有商标或注册商标,由各自的所有人拥有。
免责声明您所购买的产品、服务或特性等应受商业合同和条款的约束,本文档中描述的部分或全部产品、服务或特性可能不在您的购买或使用范围之内。
除非合同另有约定,锐捷网络对本文档内容不做任何明示或默示的声明或保证。
由于产品版本升级或其他原因,本文档内容会不定期进行更新。
锐捷网络保留在没有任何通知或者提示的情况下对文档内容进行修改的权利。
本手册仅作为使用指导。
锐捷网络在编写本手册时已尽力保证其内容准确可靠,但并不确保手册内容完全没有错误或遗漏,本手册中的所有信息也不构成任何明示或暗示的担保。
前言读者对象本书适合下列人员阅读●网络工程师●技术推广人员●网络管理员技术支持●锐捷睿易官方网站:https:///●锐捷睿易在线客服:https:///?p=smb●锐捷网络官方网站服务与支持版块:https:///service.aspx●7天无休技术服务热线:4001-000-078●锐捷睿易技术论坛:/●常见问题搜索:https:///service/know.aspx●锐捷睿易技术支持与反馈信箱:*********************.cn●锐捷网络服务公众号:【锐捷服务】扫码关注本书约定1. 各类标志本书还采用各种醒目标志来表示在操作过程中应该特别注意的地方,这些标志的意义如下:危险表示重要安全操作指导。
在对设备进行操作时,应注意此类信息并了解放置发生意外的标准做法,否则可能会造成人身伤害。
锐捷RG-EAP602系列接入点硬件安装和参考指南说明书
Ruijie RG-EAP602 Series Access Points Hardware Installation and Reference Guide·Copyright statementRuijie Networks©2021Ruijie Networks reserves all copyrights of this document. Any reproduction, excerption, backup, modification, transmission, translation or commercial use of this document or any portion of this document, in any form or by any means,without the prior written consent of Ruijie Networks is prohibited.Exemption statementThis document is provided “as is”. The contents of this docu ment are subject to change without any notice. Please obtainthe latest information through the Ruijie Networks website. Ruijie Networks endeavors to ensure content accuracy and willnot shoulder any responsibility for losses and damages caused due to content omissions, inaccuracies or errors.·PrefaceThank you for using our products. This manual will guide you through the installation of the access point.ScopeIt is intended for the users who have some experience in installing and maintaining network hardware. At the same time, itis assumed that the users are already familiar with the related terms and concepts.Obtaining Technical Assistance●Ruijie Networks Website: https:///●Technical Support Website: https:///support●Case Portal: https://●Community: https://●Technical Support Email: *****************************●Skype: *****************************Related DocumentsDocuments DescriptionConfiguration Guide Describes network protocols and related mechanisms that supported by the product, with configuration examples.Command Reference Describes the related configuration commands, including command modes, parameter descriptions, usage guides, and related examples.Documentation ConventionsThe symbols used in this document are described as below:This symbol brings your attention to some helpful suggestions and references.This symbol means that you must be extremely careful not to do some things that may damage the device or cause data loss.·1 Product OverviewThe RG-EAP602, adhering to the latest 802.11ac Wave2 standard, delivers up to 866Mbps@5G + ************access rate. EAP602 supports security, radio frequency (RF) control, mobile access, Quality of Service (QoS) andseamless roaming. Teaming up with Ruijie RG-WS Wireless Controller Series, wireless data forwarding, highperformance security and access control can be accomplished with ease. EAP602 supports PoE to take over challengesin a wide variety of deployment scenarios, including large-scaled campuses, enterprises, hospitals and WIFI hotspots.1.1 Technical SpecificationsTable 1-1 RG-EAP602 Technical SpecificationsModel RG-EAP602Dimensions 222 mm × 200 mm × 166 mmAccess Rate Built-in antenna:1166Mbps 2.4GHz: up to 300Mbp5GHz: up to 866MbpsOperating Frequency 802.11b/g/n: 2.4 GHz to 2.483 GHz802.11a/n/ac: 5.150 GHz to 5.350 GHz, 5.47 GHz to 5.725 GHz, 5.725 GHz to 5.850 GHz (Country-Specific)Maximum TransmitPower500mWAntenna Type Built-in omnidirectional antennaAntenna Gain 2.4 GHz: 3 dBi 5 GHz: 4 dBiCoverage Angle 2.4G: E:30°; H:360° 5G: E:30°; H:360°Ports One 10/100/1000 Base-T uplink Ethernet port One 10/100/1000 Base-T Ethernet portFIT/FAT Mode Not supportLED System and port status indicators PoE Power Supply IEEE 802.3afPower Consumption Maximum: 12.95WTemperature Operating: -40°C to 65°C (-40°F to 149°F) Storage: -40°C to 85°C (-40°F to 185°F)Humidity Operating: 0% to 100% (non-condensing) Storage: 0% to 100% (non-condensing)IP Rating IP68 Weight < 1kg (host)Safety Standards GB4943EN60601-1-2 UL/CSA 60950-1 EN/IEC 60950-1·EN/IEC 60950-22 EMC StandardsGB9254-2008 EN301 489EN 55022 FCC Part15 RSS-210Table 1-2 LEDs of RG-EAP602 IndicatorStatus MeaningWiFi (Blue)Blinking Data is transmitted by WiFi.Solid on WiFi is enabled and no data is transmitted. OffWiFi is disabled.WARN(Red)BlinkingInitialization: blinking at a rate of 1Hz (on for 505ms and off for 505ms).Restore factory settings: blinking at a rate of 14Hz (on for 20ms and off for 50ms).System upgrade: blinking at a rate of 10Hz (on for 40ms and off for 60ms). Solid on CWMP is not connected.Off Powered off or initialization test is normal. LAN 1(Blue)BlinkingThe port is up and data is transmitted. Solid on The port is up and no data is transmitted. Off The port is not connected.LAN 2(Blue)BlinkingThe port is up and data is transmitted. Solid on The port is up and no data is transmitted. OffThe port is not connected.1.2 Product AppearanceFigure 1-1 Product Appearance of the RG-EAP602·Figure 1-2 Ports of RG-EAP602Note1. 10/100/1000BASE-T Ethernet port2. DC power supply port3. 10/100/1000BASE-T Ethernet port/PoE port4. Reset button5. Waterproof cap1.3 Power SupplyThe AP supports 802.3af PoE or 12V DC power supply (If needed, you can buy the adapter from Ruijie).When PoE power supply is adopted, please make sure the peer end support 802.3af too. The lowest current output requirement for a DC power supply is 1.5A.·2 Preparing for InstallationTo prevent device damage and physical injury, please read carefully the safety recommendations described in thischapter.Recommendations do not cover all possible hazardous situations.2.1 Grounding and Lightning Protection●Ensure that both the power-receiving end and the power-supplying end are well-grounded.●Keep the grounding connection within 30 m, and use a 40mm x 4mm or 50mm x 5mm ground bar of hot-dipzinc-coated flat steel sheet.●When the connection cable between the main grounding conductor and local equipotential earthing terminal board(LEB) on each floor is shorter than 2 meters, use a stranded copper wire with a sectional area not less than 1.318mm2 (16 AWG) for the connection cable.●Use a shielded network cable if possible, ensure that devices connected to both ends of the shielded network cableare reliably grounded, and make sure that the sheath of the shielded network cable is also grounded if possible. If noshielded network cable is available, wire the network cable through a steel pipe and bury the steel pipe for lead-in,and properly ground both ends of the steel pipe.●No additional lightning protector is required as a high-profile lightning protector is built in the RG-EAP602, and thepower port support 6kV lightning protection. If a lightning protector of a higher profile is available, configure thelightning protector optionally. Before the configuration, connect the lightning protector to the ground cable.●Use a power cable with the PE end to ground the power supply (AC). Ensure that the PE end is properly grounded,with a ground resistance less than 5 ohms. Do not use a two-wire power cable with only the live (L) wire and naught(N) wire. Do not connect the N wire to the protection ground cable of other communication devices, and ensure thatthe L wire and N wire are properly connected.●Ensure that the ground resistance is less than 5 ohms. In areas with high soil resistivity, reduce the soil resistivity viameasures such as spreading resistivity reduction mixture around the grounding conductor.2.2 Preparing the Installation Site●Do not expose the AP to high temperature, dust, or harmful gases.●Do not install the AP in an area prone to fire or explosions.●Keep the AP away from EMI sources such as large radar stations, radio stations, and substations.●Do not subject the AP to unstable voltage, vibration, and noises.●Keep the AP at least 500 meters away from the ocean and do not face it towards the sea breeze.●The installation site should be protected from water and flooding, seepage, dripping, or condensation.●The installation site should be selected according to network planning, communications equipment features andconsiderations such as climate, hydrology, geology, earthquake, electric power, and transportation.·2.2.1 Temperature and HumidityTable 2-1 Required Temperature and Humidity for the RG-EAP602 SeriesOperating Temperature -40°C to 65°C (-40°F to 149°F)Operating Humidity 0% to 100% (non-condensing)2.2.2 Outdoor InstallationThe AP can be mounted on a wall or a pole.2.2.3 WaterproofUse a seal plug to seal the unused ports.After using the reset button, please ensure that the cap is put back.Use a waterproof plug to connect cables to the AP. For details, see Chapter 3 “Installing the Access Point”.2.2.4 EMIAll interference sources (from outside or inside of the device or application system) affect the device by capacitivecoupling, inductive coupling, or electromagnetic waves.Electromagnetic interference (EMI) occurs due to electromagnetic radiation or conduction, depending on the transmissionpath.Radiation interference occurs when energy (usually radio frequency energy) is emitted from a device and propagatedthrough space to disrupt other devices. The interference source can be part of disrupted system or a fully electricallyisolated unit. Conduction interference occurs when interference is transferred from one unit to another through cables,which are usually electromagnetic wires or signal cables connected between the source and the device(s) experiencing interference. Conduction interference often affects the power supply of the device. It is eliminated by using filters.Radiation interference can influence the path of any signal from the device and is difficult to shield.●Take effective measures against interference from the power grid.●Keep the AP far away from the grounding or lightning protection devices for power equipment.●Keep the AP away from high-power radio stations, radar stations, and high-frequency high-current devices.●Take electrostatic shielding measures.2.3 Installation ToolsTable 2-2 Installation ToolsTools Marker, Phillips (crosshead) screwdriver, slotted screwdriver, drill, paper knife, crimping pliers, diagonal pliers, wire stripper, network cable tester, related power and fiber cables, wrench, hammer, cable ties, ESD tools, multimeter, waterproof duct tape, waterproof plasterThe tool kit and cables are customer supplied.·2.4 Checking before InstallationPlease check your materials carefully against the package contents. If there are any errors, please contact your distributor.·3 Installing the Access PointBefore installing the AP, make sure you have carefully read the requirements described in Chapter 2.3.1 Installation Flowchart3.2 Before You BeginBefore you install the AP, verify that all the parts in the package contents are there and make sure that:●The installation site meets temperature and humidity requirements.●The installation site is equipped with a proper power supply.●Network cables are in place.·3.3 PrecautionsRG-EAP602 can be mounted on a wall and a pole (diameter: 50mm to 70mm, thickness: ≥2.5mm). Otherwise, the APcould fall down and cause injuries. The installation site can vary due to on-the-spot surveys conducted by technicalpersonnel.Please make full preparations as described in Chapter 2 and observe the following precautions before installing the AP.●Before connecting the power supply, make sure the external power supply matches the power module inside the AP.●Before connecting the power cord, make sure the power switch is in the OFF position.●When connecting a wire to a binding post, make sure their colors are the same.●Make sure the power supply is properly connected.3.4 Installing the AP●Wall mountUse M8 x 60 screws to implement the wall mount.a. Attach the bracket to the wall and mark the screw hole locations.Figure 3-1 Installing the Bracketb. Align the host with bracket and mounting plate to the bracket on the wall, and tighten the M8×40 screws to completeinstallation.Figure 3-2 Mounting the Bracket on Wall·Pole mount (Vertical)a. Attach the bracket to a pole with hose clamps and fasten the clamps with screws and nuts.Figure 3-3 Mounting the Bracket on a Poleb. Align the host with bracket and mounting plate to the bracket on the pole, and tighten the M8×40 screws to completeinstallation.Figure 3-4 Vertical Pole Mounting·Pole mount (Horizontal)Figure 3-5 Mounting the Bracket on a PoleFigure 3-6 Horizontal Pole MountingThe horizontal pole mounting is the same with the vertical pole mounting.·3.5 Connecting CablesConnecting the network cableWaterproofing material is customer-supplied.1) Trim the network cable according to the distance between the AP and the power supply. And put the trimmed cablethrough the bracket.2) Thread the cable with an unprocessed RJ45 through the waterproof plug in the order shown in the Figure 3-7.Figure 3-7 Threading the Network Cable3) After the cable passes through the waterproof plug, process the RJ45.4) Connect the cable with the LAN1/PoE/uplink port of AP, and tighten the waterproof plug in the order of B, C and D tocomplete the installation.5) To install the waterproof port not connected with the network cable: Insert the waterproof rubber rod into the ring,and tighten them in order.Make sure the plug is correctly inserted. The plug can be damaged if the liquid-tight adapter is improperly tightened.Before removing the network cable, dismantle the waterproof plug first and then the plug.NoteThe product should not be installed in the place prone to water accumulation, seepage, dripping, and condensation.The product is recommended to be installed horizontally.If any requirement above can not be fulfilled, please use waterproof duct tape and waterproof plaster.·Appendix A Connectors and Media1000BASE-T/100BASE-TX/10BASE-TThe 1000BASE-T/100BASE-TX/10BASE-T is a 10/100/1000 Mbps auto-negotiation port that supports auto MDI/MDIX.Compliant with IEEE 802.3ab, 1000BASE-T requires Category 5e 100-ohm UTP or STP (STP is recommended) with amaximum distance of 100 meters (328 feet).1000BASE-T requires all four pairs of wires be connected for data transmission, as shown in Figure A-1.Figure A-1 1000BASE-T Connection10BASE-T uses Category 3, 4, 5 100-ohm UTP/STP and 1000BASE-T uses Category 5 100-ohm UTP/STP for connections. Both support a maximum length of 100 meters. Table A-1 shows 100BASE-TX/10BASE-T pin assignments.Table A-2 100BASE-TX/10BASE-T Pin AssignmentsFigure A-3 shows wiring of straight-through and crossover cables for 100BASE-TX/10BASE-T.Figure A-3 100BASE-TX/10BASE-T ConnectionFiber Connection·You can choose to use single mode or multimode fibers according to the transceiver module types. Figure A-4 showsconnection of fiber cables.Figure A-4 Fiber Connection··Hardware Installation and Reference Guide Appendix B Mini-GBIC Module SpecificationsAppendix B Mini-GBIC Module SpecificationsRuijie provides various Gigabit SFP transceivers (Mini-GBIC modules) for interfaces of wireless access controllers. You can select the most suitable SFP modules as needed. This appendix describes the models and specifications of some of the Gigabit SFP transceivers for your reference.Mini-GBIC (SFP) Models and SpecificationsTable B-1 Models and Specifications of SFP ModulesMini-GBIC(SFP) Wavelength (nm) Fiber Type Core Size (micron) Modal Bandwidth (MHz/km) Cable Distance Max Transmit (dBm) Max Receive (dBm)StandardsFE-SFP-LX-MM 13101310 MMF 1 62.5/ 125 — 2 km -14 -14 IEEE802.3FE-SFP-LH15-S M13101310SMF 29/ 125 — 15 km -8 -8MINI-GBIC-SX-MM850850MMF 162.562.5 50.0 50.0 160 200 400 500 220 m 275 m 500 m 550 m -4 -17MINI-GBIC-LX-S M1310 1310MMF 1 SMF 262.550.0 50.0 9/10 500 400 500 — 550 m 550 m 550 m 10 km -3 -20MINI-GBIC-LH40-SM1310 1310 SMF 29/ 125—40 km 3 -3 MINI-GBIC-ZX50-SM1550 1550 SMF 2 — — 50 km0 -22 MINI-GBIC-ZX80-SM1550 80 km 4.7 -22 MINI-GBIC-ZX100-SM1550 100 km5 -9 Mini-GBIC-GT —Cat 5 UTP— — 100 m——1 MMF=Multimode fiber2 SMF=Single mode fiberWhen using shorter distances of single-mode fiber for optical SFP transceivers with cable distance greater than 40km (including 40 km), you may need to insert an in-line optical attenuator in the link to avoid overloading the receiver.。
锐捷 RG-EG310G-E 路由器 硬件安装手册说明书
RG-EG310G-E路由器文档版本V1.0归档日期2022-05-09copyright © 2022 锐捷网络版权声明copyright © 2022锐捷网络保留对本文档及本声明的一切权利。
未得到锐捷网络的书面许可,任何单位和个人不得以任何方式或形式对本文档的部分或全部内容进行复制、摘录、备份、修改、传播、翻译成其他语言、将其部分或全部用于商业用途。
、、和其他锐捷网络商标均为锐捷网络的商标。
本文档提及的其他所有商标或注册商标,由各自的所有人拥有。
免责声明您所购买的产品、服务或特性等应受商业合同和条款的约束,本文档中描述的部分或全部产品、服务或特性可能不在您的购买或使用范围之内。
除非合同另有约定,锐捷网络对本文档内容不做任何明示或默示的声明或保证。
由于产品版本升级或其他原因,本文档内容会不定期进行更新。
锐捷网络保留在没有任何通知或者提示的情况下对文档内容进行修改的权利。
本手册仅作为使用指导。
锐捷网络在编写本手册时已尽力保证其内容准确可靠,但并不确保手册内容完全没有错误或遗漏,本手册中的所有信息也不构成任何明示或暗示的担保。
前言读者对象本书适合下列人员阅读●网络工程师●技术推广人员●网络管理员技术支持●锐捷睿易官方网站:https:///●锐捷睿易在线客服:https:///?p=smb●锐捷网络官方网站服务与支持版块:https:///service.aspx●7天无休技术服务热线:4001-000-078●锐捷睿易技术论坛:/●常见问题搜索:https:///service/know.aspx●锐捷睿易技术支持与反馈信箱:*********************.cn●锐捷网络服务公众号:【锐捷服务】扫码关注本书约定1. 各类标志本书还采用各种醒目标志来表示在操作过程中应该特别注意的地方,这些标志的意义如下:危险表示重要安全操作指导。
在对设备进行操作时,应注意此类信息并了解放置发生意外的标准做法,否则可能会造成人身伤害。
RG-RAC64无线控制器硬件安装手册修订记录
修订记录1 产品介绍RG-RAC64是锐捷网络推出的面向下一代高速无线网络的无线控制器产品,主要应用于中大型无线局域网,提供强大的WLAN接入控制功能。
可突破三层网络保持与AP的通信,部署在任何2层或3层网络结构中,无需改动任何网络架构和硬件设备,从而提供无缝的安全无线网络控制。
RG-RAC64起始支持32个无线接入点的管理,通过license 的升级,最大可支持64个无线接入点的管理。
1.1 RG-RAC64规格参数产品型号RG-RAC64存储器DDR3 SDRAM:2GB BOOTROM:8MB FLASH :512MBI/O设置4个RJ45电口控制台口:1个USB接口:2个接口标准以太网:10Base-T/100Base-TX/1000Base-TX 配置口(控制台口):RS-232外型尺寸(宽×高×深)(单位:mm)440×43.6×200(不含脚垫)电压100-240V~,50-60Hz功耗小于40W工作温度温度:-10°~45℃工作湿度湿度:5%~95%(无凝结)由于U盘型号众多,不能保证系统支持所有的USB设备。
建议使用正品金斯顿U盘,并且U盘文件系统格式为FAT32。
请在搬运产品及使用过程中避免振动和冲击。
产品外观图1-1 RG-RAC64无线控制器产品前面板图1-2 RG-RAC64无线控制器产品后面板指示灯指示灯说明工作状态PWR 电源正常:绿色常亮电源关闭或故障:不亮SYS 上电初始化:绿色闪烁初始化完成:绿色常亮告警:红色常亮1-4电口link/ACT指示灯千/百/十兆Link:绿色常亮数据收发:绿色闪烁1-4电口speed指示灯千兆:橙色常亮百/十兆:不亮2 安装前的准备2.1 安全注意事项无线控制器承担着无线网络中的重要作用,其正常使用关系到整个无线网络是否能正常运作。
在无线控制器的安装和使用过程中特提出如下的安全建议:⏹请不要将设备放置在有水的地方,也不要让液体进入设备。
- 1、下载文档前请自行甄别文档内容的完整性,平台不提供额外的编辑、内容补充、找答案等附加服务。
- 2、"仅部分预览"的文档,不可在线预览部分如存在完整性等问题,可反馈申请退款(可完整预览的文档不适用该条件!)。
- 3、如文档侵犯您的权益,请联系客服反馈,我们会尽快为您处理(人工客服工作时间:9:00-18:30)。
修订记录1 产品介绍RG-RAP210是锐捷网络推出的802.11n无线网络的无线接入点产品,可以提供高达300Mbsp的接入速率。
RG-RAP210产品充分考虑了无线网络安全、射频控制、移动访问、服务质量保证、无缝漫游等重要因素,配合锐捷睿易RAC无线控制器产品,完成无线用户数据转发、安全和访问控制。
RG-RAP210采用内置天线设计,在提供更加美观的放装效果的同时,保证了无线信号覆盖范围,该产品呈壁挂式,可安全方便地安装于墙壁、天花板等各种位置。
RG-RAP210产品可支持本地供电与远程以太网供电模式,可根据客户现场供电环境进行灵活选择,特别适合部署办公、酒店、商业零售企业应用。
1.1 RG-RAP210硬件规格重量仅为主机和挂架的重量。
1.2 RG-RAP210产品外观及接口RG-RAP210包含包含1个LAN口,支持PoE功能、一个Reset孔,一个外接电源适配器的电源插座(DC12V)。
其外观如下图所示:图1-1备注:web界面登陆,各端口默认IPaddress及Password说明如下表Mode UpLINK PasswordFIT/FAT 192.168.110.1 admin1.3 RG-RAP210产品外观及接口Fit状态状态闪烁频率意义灭--- AP未上电绿色闪3Hz AP系统初始化过程中红色闪3Hz AP系统初始化完毕,但以太网Link down蓝色闪3Hz AP系统初始化完毕,有线口up,正在建立CAPWAP黄色闪3Hz AP正在更新程序,此时不能下电蓝常亮--- AP正常工作,CAPWAP状态正常,但无线口无用户接入Fat模式2 安装前的准备2.1安全建议为了避免对人和设备造成伤害,请在安装RG-RAP210前仔细阅读本书的安全建议。
以下的安全建议无法包含所有可能出现的危险情况。
2.2 安装安全⏹高温、多尘、有害气体、易燃、易爆、易受电磁干扰(大型雷达站、发射电台、变电站)及电压不稳、震动大或强噪声的环境不利于AP设备的工作,设备不要安装在这样的环境中。
⏹安装地应该干燥,不建议在距离海边很近的地方安装。
设备距离海边的距离要求大于500m,同时建议设备不要正对海风吹来的方向。
⏹严禁在易积水、渗水、滴漏、结露等地方进行设备安装。
在进行工程设计时,应根据通信网络规划和通信设备的技术要求,综合考虑气候、水文、地质、地震、电力、交通等因素,选择符合通信设备工程环境设计要求的地址。
请按照快速安装指南中描述的正确安装方式进行设备的安装与拆卸。
2.3 搬移安全⏹在设备安装完毕后,应避免频繁移动设备。
⏹移动或搬运之前请关闭所有电源,拔掉所有电源和电缆。
2.4 电气安全⏹进行电气操作时,必须遵守所在地的法规和规范。
相关工作人员必须具有相应的作业资格。
⏹请仔细检查工作区域内是否存在潜在的危险,比如地面是否潮湿等。
⏹在安装前,要知道所在室内的紧急电源开关的位置,当发生意外时,要先切断电源开关。
⏹需要关闭电源时,一定要仔细检查确认。
⏹请不要把设备放在潮湿的地方,也不要让液体进入设备体内。
⏹AP工作地最好不要与电力设备的接地装置和防雷接地装置合用,并尽可能相距远。
⏹远离无线发射台,雷达发射台,高频大电流设备,微波炉等强功率无线设备。
不规范、不正确的电气操作可能引起火灾或电击等意外事故,并对人体和设备造成严重、致命的伤害。
直接或通过潮湿物体间接接触高压、市电,可能带来致命危险。
2.5 安装场地的要求RG-RAP210必须在室内使用。
为保证设备正常工作和延长使用寿命,安装场所必须满足下列要求。
2.5.1 安装要求⏹尽量安装在敞开的环境中,如果安装在封闭的环境中,请确认具有很好的通风的散热系统。
⏹确认安装位置足够牢固,能够支撑RG-RAP210及其安装附件的重量。
⏹确认安装位置的尺寸适合RG-RAP210安装,前后左右要留有一定的空间,以利于散热。
2.5.2 通风要求RG-RAP210的为自然散热,在设备安装时应保证预留前后左右要留有一定的空间,以利于散热。
2.5.3 温度和湿度要求为保证RG-RAP210正常工作和使用寿命,工作环境需维持一定的温度和湿度。
如果工作环境长期处于不符合温、湿度要求的环境,将会对设备造成损坏。
⏹处于相对湿度过高的环境,易造成绝缘材料绝缘不良,甚至漏电。
有时也易发生材料机械性能变化、金属部件锈蚀等现象。
⏹处于相对湿度过低的环境,绝缘片会干缩,同时易产生静电,危害设备上的电路。
⏹处于温度过高的环境,则危害更大,会使设备的可靠性大大的降低,长期高温还会影响寿命,加速老化过程。
RG-RAP210设备对环境的温、湿度要求如下表:2.5.4 洁净度要求灰尘对设备运行是一大危害。
室内灰尘落在机体上,可以造成静电吸附,使金属接点接触不良,尤其是在室内相对湿度偏低的情况下,更易造成这种静电吸附,不但会影响设备寿命,而且容易造成通信故障。
对机房内灰尘含量及粒径要求如下表。
除灰尘外,设备所处的机房对空气中所含的盐、酸、硫化物也有严格的要求。
这些有害物会加速金属的腐蚀和某些部件的老化过程。
机房应防止有害气体(如:二氧化硫、硫化氢、二氧化氮、氯气等)的侵入,其具体限制值如下表。
硫化氢0.006 0.03二氧化氮0.04 0.15氨气0.05 0.15氯气0.01 0.32.5.5 电源要求⏹直流适配器直流输入电压:DC11.4-12.6V,功率大于12W。
适配器的接头规格见下图。
⏹PoE注入器:符合802.3af/802.3at标准的PoE注入器。
直流输入功率应大于整机系统实际消耗的电源功率。
RG-RAP210的直流输入功率应大于等于12W。
直流电源供电时,必须采用锐捷配置的电源。
PoE注入器必须采用经过锐捷认证的注入器。
2.5.6 EMI要求⏹无线接入点工作地最好不要与电力设备的接地装置和防雷接地装置合用,并尽可能相距远。
⏹远离无线发射台,雷达发射台,高频大电流设备,微波炉等强功率无线设备。
2.6 安装工具常用工具十字螺丝刀、相关的电缆、上架螺栓、斜口钳、捆扎带专用工具剥线钳、压线钳、水晶头压线钳、打线刀仪表万用表、误码仪RG-RAP210设备不附带工具包,工具需要用户自己准备。
2.7 开箱验货货物清点以上列举的是一般的发货情况,实际发货可能略有出入,一切以订货合同为准。
并请按照装箱清单或订货合同仔细核对您的货物。
如有疑问或差错,请与销售商联系。
3 产品的安装RG-RAP210放装式AP要求工作于室内,并且固定使用。
请确认您已经仔细阅读第二章的内容,且第二章所述的要求已经得到满足。
3.1 安装流程3.2 安装前的确认RG-RAP210安装前要对设备的安装位置、组网方式、供电及走线等进行周密的计划和安排。
安装前请确认以下几点:⏹安装处要提供足够空间以满足产品散热要求。
⏹安装处要满足设备对温度和湿度的环境要求。
⏹安装处要满足设备对电源和电流的要求。
⏹选用的电源,要满足系统功率的要求。
⏹安装处要满足设备对网络配线的要求。
⏹安装处要满足设备对安装选址的要求。
⏹对于特定用户的专供设备,在安装前请确认设备是否符合专供要求。
3.3 安装时的安全注意事项为保证无线AP正常工作和延长使用寿命,请遵从以下的注意事项:⏹设备安装时,请不要对设备供电。
⏹请将设备放置于通风处。
⏹请避免将设备放置于高温环境。
⏹请将设备远离高压电缆。
⏹请将设备安装在室内。
⏹请将设备远离强雷暴、强电场环境。
⏹请将设备保持清洁,防止灰尘污染。
⏹在清洁设备前,请先将电源拔下。
⏹请不要用湿布擦拭设备。
⏹请不要用液体清洗设备。
⏹请不要在设备工作时打开机壳。
⏹设备请固定牢固。
3.4 安装主机1) 用自攻螺丝将壁挂圈固定到天花板上,建议壁挂圈边缘和墙平行;图3-12) 确定AP主机LAN口朝向,将底壳挂钩对准主机支架挂扣,用手按照网口朝向用力推主机设备;图3-2在主机卡入挂架前,请先安装好网线。
3) 手推设备至底部,用手抚摸检查壁挂圈和AP底壳边缘平行;图3-34) 安装完成。
图3-3壁挂圈规格说明:RG-RAP210的挂架支持主机四个方向的安装。
在主机在装入挂架时,用户可根据网线布线的实况将主机朝四个方向安装。
安装时,必须沿着挂架上的安装导孔方向滑动扣紧。
请勿使用暴力强行将主机扣入挂架扣孔内。
安装完后,请仔细检查主机是否被卡紧,以免没有卡紧造成主机跌落。
3.5 主机拆卸1)请用手托住主机两侧,将其沿着红色箭头方向推出。
图3-43.6 线缆连接连接的简要步骤请用双绞线连接到AP的LAN/PoE接口上,AP支持的双绞线连接线序可参见附录A。
主机console接口默认波特率为9600、数据位为8,奇偶校验为无,停止位为1,流量控制为无。
仅在需对AP进行手动配置时使用。
应避免在接头处小曲率弯曲。
RG-RAP210不建议采用包有保护头套的网线,采用该类网线不便于RG-RAP210的网线装配。
3.7 捆扎电缆注意事项⏹捆扎电源线和电缆应注意美观。
⏹捆扎双绞线时,应使得插头处的双绞线处于自然弯曲或大曲率弯曲状态。
⏹捆扎双绞线时,不能扎的太紧,以免压迫线缆,影响线缆使用寿命和传输性能。
捆扎的简要步骤1) 将双绞线的下垂部分束起,并按方便程度引至主机LAN/PoE端口。
2) 将双绞线固定于安装挂架理线槽内部。
3) 双绞线捆扎时,应紧贴主机下方延伸,并尽量保持走直线。
3.8 安装后的检查主机检查⏹确认外部供电是否与机柜配电盘匹配。
⏹设备安装后,检查前、后机柜门是否能关上。
⏹确认机柜已完全固定,不会发生移动和倾倒。
⏹确认设备已在机柜内安装固定好,所有线缆也固定在机柜上。
线缆连接检查⏹确认双绞线与接口相匹配。
⏹确认线缆捆扎方式正确。
电源检查⏹确认电源线接触良好,并符合安全要求。
⏹打开电源给主机供电,确认AP可以正常工作。
4 系统调试4.1 搭建配置环境通过适配器或者PoE供电方式对AP上电。
搭建环境⏹通过适配器或者PoE供电方式对AP进行供电连接,需确认电源接触良好,并符合安全要求。
⏹通过双绞线将电源连接好的AP与RAC相连。
⏹当通过PC与AP串口互联调试时,需注意PC和PoE交换机均需接地良好。
4.2 上电启动上电前的检查⏹电源连接是否正确。
⏹供电电压是否与AP要求的一致。
上电后的检查(推荐)上电后,最好进行如下检查,以保证后面配置工作的正常进行:⏹AP上电之后,RAC端配置界面是否有打印信息。
⏹AP的指示灯是否正常。
5 监控与维护5.1 监控功能指示灯在RG-RAP210处于运行状态时,用户可以通过观察指示灯监控状态。
⏹绿色闪:AP系统初始化过程中。
⏹红色闪:AP系统初始化完毕,但以太网Link down。
⏹蓝色闪:AP系统初始化完毕,正在建立CAPWAP。
⏹黄色闪:AP正在更新程序,此时不能下电。
⏹蓝常常亮:AP正常工作,CAPWAP状态正常,但无线口处于shut down状态。