大区域海浪模式WAVEWATCH III(v2_22)的安装和使用方法
HiMAX海洋测量软件使用说明书

HiMAX 海洋测量软件使用说明书
目录
概述......................................................... 1 1.1 软件概述............................................. 2 1.2 技术参数............................................. 4 1.3 安装与卸载........................................... 4 1.4 本章小结 ............................................ 11
警告:警告提示的内容一般为非常重要的提示,如果没有按 照警告内容操作,将会造成仪器的损害,数据的丢 失,以及系统的崩溃,甚至会危及到人身安全。
责任免除
使用本软件之前,请您务必仔细阅读使用说明书,这会有助于您更好 地使用本软件。广州市中海达测绘仪器有限公司不对您未按照使用说明书 的要求而操作本软件,或未能正确理解使用说明书的要求而误操作本软件
项目管理.................................................... 17 3.1 项目设置 ............................................ 18 3.2 本章小结 ............................................ 19
坐标参数.................................................... 20 4.1 坐标转换参数设置 .................................... 21 4.2 本章小结 ............................................ 31
Wave Apps使用说明
Wave Apps使用说明功能及介绍1.功能介绍Wave Apps是一款功能强大的流量生成器/分析器,能够生成数以千计的独立客户端会话,每个会话代表网络中一个独特的用户。
完全自动化测试,可以基于测试为网络提供快速基准测试和漫游分析通过Wave Apps,可以准确,反复且精确地创建网络流量,对网络或网络组建进行测试,从而深入了解网络或网络组建的功能,质量和性能。
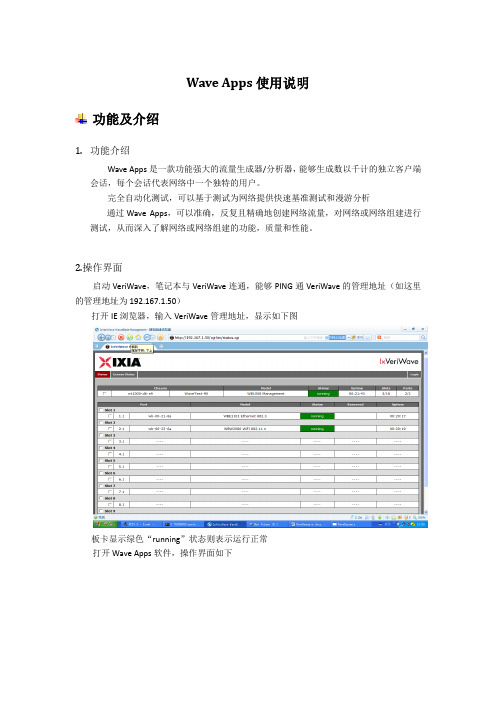
2.操作界面启动VeriWave,笔记本与VeriWave连通,能够PING通VeriWave的管理地址(如这里的管理地址为192.167.1.50)打开IE浏览器,输入VeriWave管理地址,显示如下图板卡显示绿色“running”状态则表示运行正常打开Wave Apps软件,操作界面如下在左侧的菜单栏中,Wave Apps软件根据不同的测试功能进行了分类,例如Throughput ;TCP Goodput; Wlan漫游;认证测试等功能,可根据测试要求进行选择(这里以TCP Goodput举例说明)使用方法1.连接V ERI W AVE打开WaveApps软件后,选择左侧菜单栏的“TCP Goodput”进行配置,在“Chassis”一栏中填入VeriWave管理地址,点击“Connect”或按“回车键”,如下图所示显示两快板卡信息,分别是有线端“192.167.1.50_card1_port1”与无线端“192.167.1.50_card2_port1”鼠标点击板卡,右侧会显示可修改信息,有线端默认配置即可,无线端则需要进行配置,首先鼠标点击无线端网卡“192.167.1.50_card2_port1”如下图所示在“Band”下选择AP工作频段,“Channel”选择AP发射SSID的信道,点击“Scan BSSIDs”进行信号扫描,这时WaveApps将扫描到AP发射出来的SSID,并会显示信号强度及SSID名称(这里显示的信号强度标准为-25db ~-35db之间,可通过修改AP发射功率进行调整,一般设置txpower=5);如下图所示利用WaveApps连接设备就完成了,但在连接前需要注意一下几点1.在调试AP设备前,检查衰减器及馈线连接完好2.将AP发射功率调至标准区间2.建立用户与配置客户端连接Veriwave完毕后,点击页面“Clients”进行用户创建操作选择左上角的“+”用于添加用户组“Name”——用户组名称便于观看可自行修改“Base IP Address”——设置无线端IP地址“Subnet Mask”——设置掩码“Gateway”——设置网关“#Clients”——选择客户端个数“Clients Steps”——客户端增长步长“Interface”——选择此用户组接入类型;其中无线客户端有两种802.11 a/b/g/n与802.11 a/b/g,有线端为802.3 Ethernet“Port”——选择无线端与有线段对应板卡“SSID”——扫描到的SSID名称(只有选择无线板卡时才可显示)(注:在修改时,由于没有确认按钮,直接按“回车”键即可)配置如下图所示设置无线端的IP地址时,也可选择“DHCP”enable选项;在下方的对话框中有三个可配置项“Security”——选择接入用户的加密方式,根据配置要求进行加密方式的选择“802.11 Client Options”——用户无线端属性配置配置用户模式,对应天线个数,short GI,AMPDU等参数“Advanced Options”——用户高级配置可以指定客户MAC地址及802.11 MAC层的设置,服务器点击“+”继续添加用户组,将“Interface”选项选择“802.3 Ethernet”有线端即可,在“Port”一栏中也会自动变成有线板卡,如下图所示可配置服务器的IP地址及MAC地址,勾选“DHCP”选项也可自动获取IP地址对于有线端与无线端不同的是,在有线端下方有两个可配项“Security”——有线端的加密方式,可根据实际环境进行选择“Advanced Options”——有线端高级配置,有线端的MAC地址,及VLAN设置3.建立测试规则无线用户组与有线用户组建立完毕后,点击主页面左侧“Test”进行测试规则的建立“Test Parameters”——配置测试规则的基本信息,包括测试时间,TCP端口设置等“Advanced Test Parameters”——配置测试规则的高级信息,版本型号及报告输出地址接下来需要对“TCP Goodput Properties”进行配置,如下图所示在此窗口中,可配置TCP的大小,客户端数量级TCP滑动窗口大小4.流量测试点击主页面左侧任务栏,选择“Mapping”选项,如下图所示在“Mapping Options”选项中包含以下几个选项“Ethernet To Wireless”——有线端到无线端即下行“Wireless To Ethernet”——无线端到有线端即上行“Wireless To Wireless”——无线端到无线端“Ethernet To Ethernet”——有线端到有线端例如需要测试下行流量,则选择“Ethernet To Wireless”进行测试,当勾选了“Bidirectional Traffic”时,代表了进行双向流量测试,但首先是从有线端发起!(TCP不需要勾选)若果需要测试上行流量,则选择“Wireless To Ethernet”进行测试,这时若勾选“Bidirectional Traffic”选项,代表进行双向流量测试,但首先从无线端发起!(TCP不需要勾选)“Force 1-to-1 client mapping”——代表1对1客户端映射流量测试当配置完毕后,就可点击“绿色”按钮,开始测试了以下为测试TCP大小为500,1000,1400大小时10个用户下行TCP Goodput测试报告Wave Apps功能还有很多,这里就不一一介绍了,本文所讲解的SSID扫描,有线端,无线端的配置以及如何进行流量测试是最为基础的部分,有很多功能还需要大家一同学习,共同开发。
华大驱动器说明书-中文

3.1 模块及按键功能................................................................................................................... 22 3.1.1 模块 22 3.1.2 按键功能............................................................. 22 3.2.1 监视模式 ............................................................. 23 3.2.2 监视模式说明 ......................................................... 24
1.1 铭牌......................................................................................................................................... 6
1.2 驱动器型号说明..................................................................................................................... 6
3.3 参数设置.................................................................................................................................... 24 3.3.1 参数设置 ............................................................. 24 3.3.2 辅助功能 ............................................................. 25
WaveSurfer Xs系列示波器使用说明书
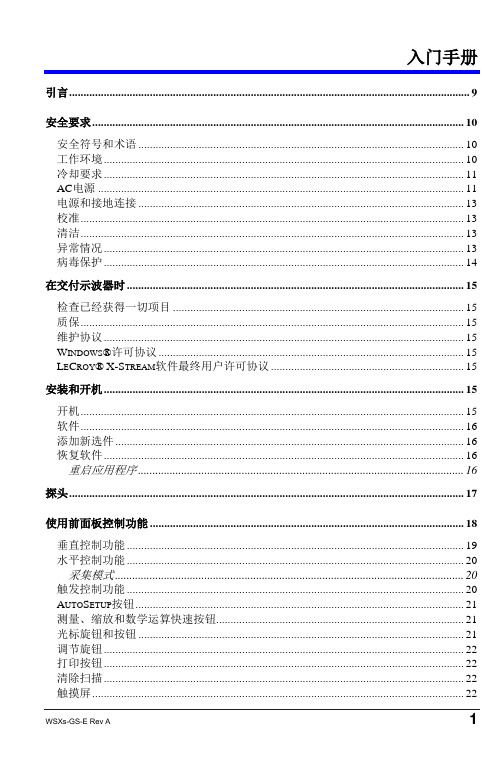
引言 (9)安全要求 (10)安全符号和术语 (10)工作环境 (10)冷却要求 (11)AC电源 (11)电源和接地连接 (13)校准 (13)清洁 (13)异常情况 (13)病毒保护 (14)在交付示波器时 (15)检查已经获得一切项目 (15)质保 (15)维护协议 (15)W INDOWS®许可协议 (15)L E C ROY®X-S TREAM软件最终用户许可协议 (15)安装和开机 (15)开机 (15)软件 (16)添加新选件 (16)恢复软件 (16)重启应用程序 (16)探头 (17)使用前面板控制功能 (18)垂直控制功能 (19)水平控制功能 (20)采集模式 (20)触发控制功能 (20)A UTO S ETUP按钮 (21)测量、缩放和数学运算快速按钮 (21)光标旋钮和按钮 (21)调节旋钮 (22)打印按钮 (22)清除扫描 (22)触摸屏 (22)辉度/采集模式 (22)了解显示信息 (23)顶部菜单栏(“F ILE”菜单) (23)网格区域 (24)触发延迟指示符 (24)触发电平指标符 (25)零电平指示符 (25)描述符标签 (25)消息栏 (26)通过不同方式完成同一操作 (27)顶部菜单栏 (27)鼠标和键盘操作 (27)显示信号—垂直设置 (27)启动通道 (27)耦合 (28)偏移校正 (28)探头衰减 (29)带宽限制 (29)平均信号 (29)内插设置 (29)噪声滤波(ERES) (29)使用工具栏快捷方式 (29)触发 (31)概述 (31)触发术语 (31)触发设置 (32)触发延迟 (32)触发电平指示符 (32)设置边沿触发 (33)触发抑制 (35)SMART T RIGGERS (36)标准SMART Trigger (36)可选的SMART Trigger (36)使用光标进行测量 (37)概述 (37)启动光标 (37)光标类型 (37)Horizontal (Time) (37)Vertical (Amplitude) (37)Horizontal (Frequency) (38)改变光标类型 (38)跟踪光标 (38)读取光标信息 (39)描述符标签 (39)光标表 (39)使用参数进行测量 (39)概述 (39)设置参数 (40)了解参数显示 (41)参数显示格式 (41)状态符号 (41)参数门(W INDOWS) (42)测量统计 (42)关闭参数 (43)缩放通道 (44)概述 (44)创建缩放 (44)触摸屏缩放 (44)前面板QuickZoom按钮 (45)工具栏缩放 (45)缩放描述符标签 (45)调节缩放标度和位置 (46)使用前面板控制功能 (46)使用缩放菜单控制功能 (46)使用工具栏快捷方式 (47)使用数学运算轨迹 (48)概述 (48)数学函数介绍 (48)标准数学运算 (48)MathSurfer高级数学运算 (48)设置数学运算轨迹 (50)数学运算描述符标签 (52)缩放数学运算 (52)使用数学运算菜单缩放控制功能 (53)工具栏快捷方式 (53)使用波形快速查看模式 (54)调节轨迹辉度 (54)保存和调用设置 (55)概述 (55)作为设置文件保存示波器设置 (55)从设置文件中调用示波器设置 (55)调用默认示波器设置 (55)保存和调用波形 (56)概述 (56)内存 (参考波形) (56)波形数据 (56)屏幕图 (56)保存和调用内存 (56)最快速的存储和显示方式 (56)使用内存工具栏快捷方式 (57)保存和调用波形数据 (58)保存波形数据 (58)调用波形数据 (59)保存屏幕图 (59)把屏幕图保存到文件中 (60)作为电子邮件附件发送屏幕图 (61)把屏幕图打印到打印机上 (61)把屏幕图保存到剪切板上 (62)与别人共享数据及交流 (63)概述 (63)连接到网络上 (63)进入桌面 (64)从示波器发送电子邮件 (64)注释图像文件 (64)在波形上创建标签 (64)保存数据文件和图像 (65)创建参考波形(内存) (65)打印 (65)远程控制和查看 (66)打印管理 (66)设置打印机 (66)打印 (66)添加打印机和驱程 (66)改变默认打印机 (67)通过/未通过测试 (67)概述 (67)模板测试 (67)操作 (67)设置通过/未通过测试 (67)设置模板测试 (68)辅助工具和首选项 (69)概述 (69)状态 (69)进入状态对话框 (69)远程通信 (69)设置远程通信 (69)配置Remote Control Assistant事件日志 (69)辅助输出 (70)设置辅助输出 (70)日期和时间 (70)手动设置时间和日期 (70)从互联网设置时间和日期 (70)从Windows设置时间和日期 (71)选项 (71)保养 (71)显示W INDOWS桌面 (72)触摸屏校准 (72)首选项 (72)声音反馈 (72)自动校准 (72)偏置控制 (72)本地语言 (73)偏置/延迟控制 (73)电子邮件 (73)采集状态 (73)远程控制操作 (75)标准 (75)程序消息 (75)自动化 (76)标准 (76)系统恢复 (77)恢复程序 (77)激活Windows (80)空白页引言本简要指南包括与WaveSurfer Xs系列示波器有关的重要的安全和安装信息,并包括示波器基本操作使用的简单操作程序。
Waves SSL EV2用户指南说明书

Waves SSL EV2User GuideIntroductionThank you for choosing Waves. To get the most out of your new Waves plugin, please take a moment to read this user guide. To install software and manage your licenses, you need a free Waves account. Sign up at . With a Waves account you can keep track of your products, renew your Waves Update Plan, participate in bonus programs, and keep up to date with other important information.We suggest that you become familiar with the Waves Support pages: /support. There you will find technical articles about installation, troubleshooting, specifications, and more. Plus, you’ll find company contact information and Waves Support news.SSL EV2C HANNELIf any piece of hardware has earned the title “Classic,” it’s the Solid State Logic 4000 Series analog mixing console. A generation of engineers created iconic mixes for music, television, and films, seated at these desks. The SSL 4000 E, introduced in 1979, was the first mixing desk to incorporate dynamics processing on every channel, along with a master bus compressor in the center section. The ability to patch into the master bus compressor, and to control its sidechain from an internal sub-mix, provided a versatile workspace that opened up many creative possibilities. The 4000 E has a unique personality: it can be present and aggressive, which, along with the characteristic punchiness of the dynamics section, makes for a distinctive sound.The original 4000 E channel strip includes a mic/line input section that introduces a certain amount of harmonic distortion, a filter section with sweepable HP and LP controls, a four-band EQ, and a dynamics section with a compressor and gate/expander. Filter and EQ can be part of the audio chain or used in the sidechain of the dynamics section. As EQ capabilities evolved, new EQ modules were introduced. Models differed by the slope of filters and EQ behavior. They were identified by the color of their filter knobs [B lack Knob (242), Brown Knob (02), Orange Knob (232),and Pink Knob (292)].Brown Knob vs. Black KnobThe Brown Knob EQ was the original SSL 4000 E channel strip EQ/filter. This established the “SSL Sound” for rock and pop music and was soon heard on the radio everywhere. Because of its wide EQ, the Brown sound can be pronounced, even gritty, yet it is very musical; and it excels on drums and bass.The Black Knob EQ was introduced in the mid-1980s. It is cleaner and a tad more open than the Brown Knob and is well suited for vocals and acoustic instruments. Brown is a wider EQ and is considered better suited for reshaping. Black is narrower, which is usually what you want for scooping. Each has a distinct sound.W AVES SSL EV2P LUGINThe original Waves SSL 4000 Collection was released in 2006, in partnership with SSL. It was a groundbreaker in analog device modeling. Every aspect of the SSL hardware was measured, analyzed, and duplicated as a plugin. Every routing option was faithfully recreated. It proved to be a very successful tool, and it remains one of the most frequently used plugins in the business. The Waves SSL EV2 Channel plugin is a new modeling of the SSL 4000 E. It delivers the same functionality as the classic Waves SSL Channel plugin, with a few new features and a slightly rearranged interface. Most notably, you can now switch between the Brown Knob and Black Knob EQs, within the plugin, so you get the best of both worlds. It also provides switchable input analogue harmonic noise distortion and an output imager to control the width of the stereo field.Waves has been developing modeled devices for a long time. SSL EV2 Channel is an offspring of this work and experience. It reflects the latest advances in hardware modeling, so its sound and behavior are closer to that of the SSL 4000 E channel hardware than was possible when the SSL 4000 Collection was created. If, however, you’re using the original Waves SSL 4000 plugin, you probably like its particular sound and know how to work with it. Each modeling—the old and the new—has its own personality and color, so insert them both in your session and find out which works best foryou at that moment.SSL 4000E Channel Routing DiagramWaves SSL EV2 ControlsThe plugin is made up of four sections, and, by default, this is the signal flow: input, dynamics, EQ, and master. The dynamics section and EQ section offer alternative routing.Input Section•Line controls the input level to the plugin. As gain increases, so will harmonicRange: -20 dB to +20 dB•Mic can add as much as 50 dB of input gain, which can result in internal distortion.Such high input gains will increase THD but will probably not cause outputdistortion.Range: 0 dB to +50 dB•Analog adds harmonic distortion, which is a key element in recreating the sound ofan analog mixing console. If Analog control is off, the line and mic controls will act aspure gain: no THD will be added. If you prefer a cleaner, more modern sound, turnAnalog processing off.Range: on or off•20 dB Pad reduces the input level by 20 dB.•Phase Reverse (Ø) reverses the phase of the input signal.mixing desk. Turning Analog off removes all THD from both input and output. It also removes these from theCPU for better performance and greater track count.Dynamics Section ControlsThe dynamics section consists of a soft-knee compressor/limiter and an expander/gate.Although the same gain change circuitry is used for both the compressor/limiter and theexpander/gate, two dedicated gain reduction LEDs display activity for each device.Automatic gain makeup, calculated from the Ratio and Threshold settings of thecompressor, is applied by the compressor to maintain a steady output level. The defaultcompressor attack time is program-sensitive, responding to the audio material’swavefront.The dynamics section’s threshold circuitry uses variable hysteresis, which allows thesignal to decay below its opening level. (Hysteresis is the lag between making a changein input, such as increasing or decreasing power, and the response or effect of thatchange.) This enables program-dependent dynamic processing.Compressor (white knobs)•The compressor’s Ratio/Slope can be set from 1 to infinity (limiter).•The Threshold is variably adjustable from +10 dB to -20 dB.•When the Attack time switch is set to Slow (F.ATK off), attack time is auto-sensing and program dependent. Fast setting (F.ATK) attack time is 1 ms.•Release time is adjustable from 0.1 second to 4 seconds.Expander/Gate (green knobs)•The expander’s Threshold is variable from -30 dB to +10 dB.•Range is variable from 0 dB to 40 dB.•When the Attack Time switch is set to Slow (F.ATK off) attack time is auto-sensing and program-dependent; Fast setting(F.ATK) attack time is 1 ms.•Release Time is adjustable from 0.1 second to 4 seconds.•The Gate switch toggles the section from an expander (default mode) to a gate.Gain Reduction Meters•Green: gate gain reduction•Yellow: compressor gain reductionDyn To•Ch Out moves the dynamics to the output of the E-Channel, making it post-EQ.E-Channel EQ Section ControlsThe equalizer is a four-band device that can be routed to the processor’s output or to the sidechain of the dynamics section. Q can be adjusted in the LMF and HMF ranges. The Black knob has a High Pass filter (18 dB/octave) filter and a Low Pass filter (12 dB/octave). The Brown Knob has a High Pass filter (12 dB/octave) filter and a Low Pass filter (12 dB/octave) filter. Normally, low pass and high pass filters follow the same path as the entire EQ section. However, when Split is selected, the low pass and high pass filters are placed before the dynamics processors in the chain. The equalizer can be switched into the dynamics sidechain to afford simple de-essing and other frequency- controlled dynamics processing by selecting Dyn S-C at the foot of the section. LF and HF shelves can be reshaped to bell curves by pressing Bell .EQ Type Use the buttons at the top of the EQ panel to select between the SSL EQ types: Black knob (default) or Brown knob. EachEQ type has its distinct sound and behavior. On the original SSL 4000 E channel strip, the color of the LF knobs indicates the EQ type, so we followed that tradition. Selecting between Black knob and Brown knob EQ types changes the behavior of the entire EQ section, not just the LF controls.Low and High Pass Filters (Brown Knob)•Low Pass: 12 dB/octave, 3 kHz to 22 kHz (-3 dB point)•High Pass: 12 dB/octave, 16 Hz to 350 Hz (-3 dB point)•Turning the knob completely to the left bypasses the filter.•When Split is selected, the low pass and high pass filters are placed before the dynamics processors in the chain. Low and High Pass Filters (Black Knob)•Low Pass: 12 dB/octave, 3 kHz to 22 kHz (-3 dB point)•High Pass: 18 dB/octave, 16 Hz to 350 Hz (-3 dB point)•Q: approx. 1.7•Turning the knob completely to the left bypasses the filter.•When Split is selected, the low pass and high pass filters are placed before the dynamics processors in the chain. High Frequency EQ Section•Frequency range:1.5 kHz to 16 kHz.•Gain range (Brown Knob, bell): -15 dB to +15 dB (±1db)(Brown Knob, shelf): -15 dB to +15 dB (±1db)•Gain range (Black Knob, bell): -18 dB to +18 dB (±1db)(Black Knob, shelf): -15 dB to +15 dB (±1db)•Selecting Bell changes the LF and HF EQ from shelf to bell shape.•Q (bell): 1.7 (±10%), varies with the cut/boostHigh Medium Frequency EQ Section•Frequency range: 600 Hz to 7 kHz•Q: continuously adjustable from 0.1 to 3.5•Gain range (Brown Knob): varies from ±15 dB when Q is set at 3.5, less when Q is set tot 0.1•Gain range (Black Knob): varies from ±18 dB when Q is set at 3.5, less when Q is set to 0.1Low Medium Frequency EQ Section•Frequency range: 200 Hz to 2.5 kHz•Q: continuously adjustable from 0.1 to 3.5•Gain range (Brown Knob): varies from ±15 dB when Q is set at 3.5, Q is set at 3.5, less when Q is set to 0.1.•Gain range (Black Knob): varies from ±18 dB when Q is set at 3.5, Q is set at 3.5, less when Q is set to 0.1.Low Frequency EQ Section (Black Knob)•Frequency range:30 Hz to 450 Hz•Gain range: (Brown Knob, bell) -15 dB to +15 dB (±1db)(Brown Knob, shelf) -15 dB to +15 dB (±1db)•Gain range: (Black Knob, bell) -18 dB to +18 dB (±1db)(Black Knob, shelf) -15 dB to +15 dB (±1db)•Selecting Bell changes the LF and HF EQ from shelf to bell shape. The slope of the bells varies with the cut/boost.•Q (bell): 1.0 (±10%), varies with the cut/boostEQ ToBypass bypasses the EQ section. Bypass removes the EQ from the CPU for better performance and track count.Setting Up an External SidechainAssign a buss in your DAW to a sidechain. Click the SC button on the WaveSystem Toolbar toenable the external sidechain.EQ SoloThe EQ Solo button isolates the EQ band that you are currently adjusting,which helps you towill hear only that band.The red light to the left of the Solo button is an EQ headroom indicator. It is triggered when the output of the EQ section reaches -3 dBFS.Master Section•Level Indicator displays levels in VU, where -18 dBFS = 0VU. A red LED indicates clipping.Click on the meter to remove the clip warning.•Output Fader controls the output level of the processor.•Width shapes the signal’s stereo image from normal full stereo (Standard) to mono (center position) to reversed full stereo (Rev).•Extra Wide is the width enhancer that lets you spread the sound image wider than theloudspeakers. It’s an aggressive effect that alters the signal’s phase structure and reduces mid-signal content, so it’s important to use it carefully. The amount of the Extra Wide effect isinfluenced by the Mono control.•Filter is a low-frequency shelf at approximately 200 Hz (before width adjustment) that helps tomaintain the integrity of the center during extreme width processing.M/S and DUO Processing with StudioRackSSL EV2 uses the free StudioRack plugin for M/S and DUO processing. StudioRack is a plugin chainer that, amongother things, enables parallel processing for discrete channel control. When you install SSL EV2 from WavesCentral, the necessary StudioRack presets will be installed. Similarly, when you install StudioRack, the presets thatare needed by SSL EV2 are installed.Using SSL EV2 with StudioRack provides two specific types of processing:M/S (mid/sides) The signal is divided into mid and side components, which can be processed separately. This lets you change the processing and panning between the foreground and background and adjust focus. DUO (separate channels) One StudioRack Parallel Rack is assigned to the left channel and another to the right channel. This lets you adjust the processing of each channel separately, which can change the internal balance.To set up M/S and DUO processing, first open an instance of StudioRack in your DAW.In the main StudioRack, insert a Parallel Split. Open theStudioRack presets menu and select “Plugins Setup/SSLEV2 Channel/MS.” This will take care of the entireStudioRack M/S setup.If you prefer to do this manually, use the drop-down menu atthe top of each Parallel rack to select a rack input source:For M/S processing, Ch1=Mid; Ch2=SidesFor DUO processing, Ch1=Left; Ch2=RightAssign an instance of SSL EV2 to both racks.Once the StudioRack parallel racks have been processed separately, they are returned to L/R stereo at the output of the StudioRack plugin. Visit the StudioRack product page to learn more.。
华御安全隔离与信息交换系统安装使用手册V2.0

第 2 页 共 56 页
华御安全隔离与信息交换系统安装使用手册
目
录
华御安全隔离与信息交换系统.........................................................................................................1 安装使用手册..................................................................................................................................... 1 版权说明............................................................................................................................................. 2 关于本手册......................................................................................................................................... 6 一、安装............................................................................................................................................. 7 1.1 系统硬件指标............................................
ICON WESLO 2 健身机操作指南说明书

目 录WESLO 是 ICON IP, Inc. 的注册商标重要注意事项............................................................................................................................................................3用前说明...................................................................................................................................................................5组装..........................................................................................................................................................................6操作与调整..............................................................................................................................................................12如何折叠和移动跑步机............................................................................................................................................18故障检修.................................................................................................................................................................20锻炼指导.................................................................................................................................................................22零件清单.................................................................................................................................................................24分解图.....................................................................................................................................................................25售后服务..............................................................................................................................................................封底有限担保..............................................................................................................................................................封底1.产品所有人有责任确保所有跑步机使用者都充分了解所有的警告和注意事项。
wavesurfer使用指南
wavesurfer使用指南英文回答:Wavesurfer is an open-source audio visualization and editing tool that allows users to analyze and manipulate audio files. It provides a user-friendly interface and a wide range of features for audio processing and visualization. In this guide, we will explore how to use Wavesurfer effectively.1. Installation:To get started with Wavesurfer, you need to install it on your computer. Wavesurfer is available for Windows, macOS, and Linux. You can download the installation package from the official Wavesurfer website and follow the instructions to install it on your system.2. Opening an audio file:Once Wavesurfer is installed, you can open an audiofile by clicking on the "Open" button in the toolbar or by selecting "File" > "Open" from the menu. Wavesurfersupports various audio formats, including WAV, MP3, and OGG.3. Waveform visualization:After opening an audio file, Wavesurfer will displaythe waveform of the audio in the main window. You can zoomin or out of the waveform using the zoom controls or the mouse scroll wheel. Wavesurfer also provides variousdisplay options, such as spectrogram, pitch, and intensity, which can be accessed from the "View" menu.4. Audio playback:To listen to the audio, you can use the playbackcontrols in the toolbar or the keyboard shortcuts. Wavesurfer allows you to play, pause, stop, and loop the audio. You can also adjust the playback speed and volume using the controls provided.5. Editing audio:Wavesurfer offers several editing tools to manipulate the audio. You can select a portion of the waveform and cut, copy, or paste it. You can also apply various effects, such as fade in/out, amplify, normalize, and change pitch. These editing options can be accessed from the "Edit" menu.6. Analyzing audio:Wavesurfer provides several analysis tools to examine the audio in detail. You can perform spectral analysis,pitch analysis, and intensity analysis. These analysistools can help you identify and visualize different aspects of the audio, such as frequency content, pitch variations, and volume changes.7. Saving the edited audio:Once you have made the desired changes to the audio,you can save it by selecting "File" > "Save" from the menu. Wavesurfer allows you to save the audio in various formats,including WAV, MP3, and OGG.中文回答:Wavesurfer是一个开源的音频可视化和编辑工具,允许用户分析和处理音频文件。
- 1、下载文档前请自行甄别文档内容的完整性,平台不提供额外的编辑、内容补充、找答案等附加服务。
- 2、"仅部分预览"的文档,不可在线预览部分如存在完整性等问题,可反馈申请退款(可完整预览的文档不适用该条件!)。
- 3、如文档侵犯您的权益,请联系客服反馈,我们会尽快为您处理(人工客服工作时间:9:00-18:30)。
大区域海浪模式W A VEW A TCH III(v2.22)的安装和使用方法(转tt7fans的博客)2011-05-24 16:10:04| 分类:默认分类| 标签:|字号大中小订阅 .1,安装前的准备>一台可用的机器(最好是*nix,win也可以,不推荐)>可以使用的Frotran90 compiler(win下可以download G95,G77不行)>具备基础的unix使用知识2,准备安装>下载WavewatchIII source code tarball(注:我那时用的是2.22,现在已经version 3.*了,我还没下下来,不知道是什么结构)3,安装>首先,在server上新建一个目录,作为ww3工作的主目录,我的是~/work/wwatch/ >把下载下来的intsall_wwatch.sh放在~/work/目录下(因为这个文件安完就不用了)。
再把其它几个文件放到wwatch目录下,looks like this:------------------------------------------------------------------------------------------[zuohj@hjb]lstotal 66drwx-----x 3 zuohj hjb 512 Sep 15 09:55 ./drwxr-xr-x 16 zuohj root 1.0K Sep 15 14:33 ../-rwxr-xr-x 1 zuohj hjb 30K Sep 15 08:42 install_wwatch3drwxr-xr-x 13 zuohj hjb 512 Sep 15 09:55 wwatch/[zuohj@hjb]cd wwatch/[zuohj@hjb]lstotal 3872drwxr-xr-x 13 zuohj hjb 512 Sep 15 09:55 ./drwx-----x 3 zuohj hjb 512 Sep 15 09:55 ../-rw-r--r-- 1 zuohj hjb 250K Sep 15 08:42 wwatch3.aux.tar-rw-r--r-- 1 zuohj hjb 1.6M Sep 15 08:42 wwatch3.ftn.tar-rw-r--r-- 1 zuohj hjb 50K Sep 15 08:42 wwatch3.inp.tar注:我没download wwatch3.tst.tar,这个是一些实例及相应的结果,用于测试使用------------------------------------------------------------------------------------------>回到~/work/目录下,运行install_wwatch.sh脚本(如果这个脚本不能执行可能是权限的问题)>运行install_wwatch会问题你几个问题,比如说是否打印相关信息等(附录有说明)。
运行完会自动生成若干目录。
比如:drwxr-xr-x 2 zuohj hjb 512 Sep 15 08:46 aux/ --辅助程序的所在drwxr-xr-x 2 zuohj hjb 1.0K Sep 15 09:44 bin/ --一些编译时要用的可执行程序drwxr-xr-x 2 zuohj hjb 512 Sep 15 09:44 exe/ --主程序放在这里drwxr-xr-x 2 zuohj hjb 1.5K Sep 15 09:40 ftn/ --fortran源文件,注意,不可以直接用这些文件编译主程序,里面有一些所谓的“开关”drwxr-xr-x 2 zuohj hjb 512 Sep 15 08:46 inp/ --各主程序的设置drwxr-xr-x 2 zuohj hjb 1.0K Sep 15 09:44 mod/ 专用于存放编译好的mod文件drwxr-xr-x 2 zuohj hjb 1.0K Sep 15 09:44 obj/ object文件drwxr-xr-x 2 zuohj hjb 1.0K Sep 15 09:44 temp/ 临时文件drwxr-xr-x 2 zuohj hjb 512 Sep 15 08:46 test/ testdrwxr-xr-x 2 zuohj hjb 512 Sep 15 08:46 work/ 工作目录安完后会在user的根目录下生成.wwatch3.env,用于存放安装选项。
>现在源程序已经搞定了,你须要去NOAA的web site上下载更新包,打上补丁(我偷懒了,从来没打)。
>下面要做的就是按你自己的机器设置,修改一下编译选项。
在./bin目录下,有2个文件要改(在我的机器上要改3个,但一般只要改两个就成了):-comp,要修改76行左右的Generic项,要这里指定编译器,我改成了这样:# f90 -c $name.$fext > $name.out 2> $name.err# OK="$?"f90 -c -moddir=$path_m $name.$fext > $name.out 2> $name.err #我的Sun solari 上面带的fortran90编译器必须指定mod目录OK="$?"-link,与comp类似,也是要改这个地方,在96行左右,我改成了这样:# Generic -------------------------------------------------------------------# f90 -o $prog $objects > link.out 2> link.err# OK="$?"f90 -o $prog $objects > link.out 2> link.errOK="$?"-ad3(这个文件不是必须改的,主要是因为用的sh,在我的机器上默认是csh,有些语法不兼容),395行左右,主要是export语法有问题。
原来是这样:export mpi_mod='yes'须改成如此:mpi_mod='yes'export mpi_mod一共有4个export语句,每个都要改(还好不多;)其实后来我发现还有一个简单的办法,直接把开头的#!/bin/sh改成#!/bin/bash就一切ok了,两种方法任选。
>现在>好了,现在可以来编译程序了,在此之前,还有一件小事要做,就是把./bin目录加到你的$PATH中去:执行PATH=$PATH:. ,就行了,然后可以开始编译,很简单,运行这几个命令:>w3_clean #用于清除以前做的编译>w3_new #开始一次新的编译>w3_make #编译(另外还有一个utilities,叫w3_source,也顺便说明一下,这个用来把你修改改过的source code重新打包)w3_make可以给一个参数,比如说w3_shel,那么就只重新编译ww3─shell。
>现在已经安装完成了,你看一下exe目录下,应该有一堆程序在那里了,我的看起来是这样:[zuohj@hjb]lstotal 8568drwxr-xr-x 2 zuohj hjb 512 Sep 15 09:44 ./drwxr-xr-x 13 zuohj hjb 512 Sep 15 09:55 ../-rwxr-xr-x 1 zuohj hjb 345K Sep 15 09:44 gx_outf #输出为Grads 格式,输出的是场变量-rwxr-xr-x 1 zuohj hjb 328K Sep 15 09:44 gx_outp #同上,但是指定的Point而非场变量-rwxr-xr-x 1 zuohj hjb 332K Sep 15 09:44 ww3_grib #grib码-rwxr-xr-x 1 zuohj hjb 461K Sep 15 09:44 ww3_grid #用于生成所须的grid-rwxr-xr-x 1 zuohj hjb 459K Sep 15 09:44 ww3_outf #与gx_outf 同,但输出的是ww3内部模式-rwxr-xr-x 1 zuohj hjb 500K Sep 15 09:44 ww3_outp #-rwxr-xr-x 1 zuohj hjb 523K Sep 15 09:44 ww3_prep #用于预处理风场输入-rwxr-xr-x 1 zuohj hjb 757K Sep 15 09:44 ww3_shel #主程序-rwxr-xr-x 1 zuohj hjb 403K Sep 15 09:44 ww3_strt #没用过,???-rwxr-xr-x 1 zuohj hjb 57K Sep 15 09:44 ww3_trck #按一个track 输出,用于与satellite observation对照>把./exe/目录永久加入shell环境设置中的PA TH里面去,这样以后就可以直接用ww3的程序而不用打长长的路径名了。
>如果修改过源代码,用bin目录下的脚本arc_wwatch3打包生成新的用于以后安装的tar文件,这样下次安装后就无需修改错误了。
新的包文件在arc目录下。
=附录1 install_wwatch的说明==============================安装时须手动输入回答按装程序提出的如下问题:(1) Directory (relative to /export/home/~) :这里的~表示某个用户的根目录,实际安装时显示的是用户名,这里问的是要把WA VEWA TCH III安装在那个目录下,这里只需给出相对于用户根目录的目录名,即相对路径。
W A VEWATCHIII规定安装目录必须是这几个tar文件所在的目录;(2)OK ? [y/n]确认刚才输入的安装目录,输入y(Y)回车,接着安装,输入n(N),重新选择安装路径;(3)Printer for listings [printer] :选择安装过程的输出设备,[]内的为默认值(下同),此处直接回车即可,输出到屏幕;(4)Compiler for aux. [f77] :编译时使用的辅助程序,是使用Fortran77编写的,这里依然可以使用默认值,也可以使用已安装的其他Fortran编译器,如f90,pgf90;(5)Compiler for aux. [cc] :选择C语言编译器,可以使用默认值,或者输入已安装的其他C编译器(6)Scratch space [/tmp/~] :~含义如上,这里是创建编译时要使用的临时目录,必须给出绝对路径,可以使用默认值/tmp/~,也可以在自己权限内建立的其他目录;某些操作系统会因为权限的问题,普通用户无法在/tmp下面建立目录,可以输入自己有权建立的目录;(7)Save source code files (*.f) [no] :源代码保存以ftn为后缀的文件里,在编译之前必须通过辅助程序转换为.f文件,存放在临时目录里,这里使用no表示编译成功后删除这些.f临时文件,如果想保留,可以输入yes(YES);(8)Modified set up :Printer (listings) : printerFORTRAN comp. (aux only) : f77C Compiler (aux only) : ccScratch directory : /tmp/yqxuSave sources : noSave listings : noNew settings OK ? [y/n]询问上述设置是否满意,输入n(N),会重新上述过程,输入y(Y),会继续下面的操作;(9)Continue with actual implementation ? [y/n]询问是否继续安装,输入y(Y),继续安装,输入n(N),退出安装;(10)Auxiliary file wwatch3.aux.tar found ...(re)install compile and link system ? [y/n]Source code file wwatch3.ftn.tar found ...Update source code files ? [y/n]Input files file wwatch3.inp.tar found ...Update input files ? [y/n]Test cases wwatch3.tst.tar found ...Update test cases ? [y/n]这里询问是否释放各tar文件,以覆盖上次安装的文件,首次安装需要选择y(Y) (wwatch3.tst.tar除外),注意bin目录下的comp、link和switch这三个文件如果已经存在不会被覆盖,某个tar文件不存在,不会影响安装;(11)Update all files (no prompt) ? [y/n]是否不经确认就执行覆盖操作,如果选择n(N),会对每个已存在文件进行覆盖操作确认;(12)Are you sure ? [y/-]再次确认,输入y(Y),此后会释放tar包里的文件到相应目录,完成安装;安装完成后,在用户根目录下会生成隐藏参数文件.wwatch3.env,某些安装变动可以直接修改该文件,而无需重新安装,这也说明,一个用户只能安装一套W A VEWA TCH III,重新安装时,如果该文件已经存在,安装程序先读取该文件中的参数,如果无需修改可以直接进行覆盖安装,需要修改,可以进行修改安装。