摇篮婴儿车说明书
摇篮婴儿车说明书
1作品立项背景随着国内经济的快速发展以及人们生活水平的不断提高,婴儿车已演变成为婴儿成长过程中的必需品。
每个孩子都是父母的心头肉,父母们都希望孩子能拥有一个健康舒适的成长环境。
即从孩子出生那一刻起,便希望他能享受到舒适的环境,而这种环境的起始点便是婴儿车。
现在的婴儿车虽然多种多样,但具有一定的局限性,因为这种婴儿车仅在行驶中起一定的作用,而在家时,人们一般使用摇篮或婴儿床,那么婴儿车放在家里既占据空间,而且适用价值又不大,这就造成了资源的浪费。
因此,我们设计了这种集方便性、操作简便性、舒适性等多功能于一体的摇篮婴儿车。
它的问世不仅可以增强婴儿在车内的舒适度,而且还可以营造有利于婴儿健康成长的环境。
所以,我们所设计的婴儿车是符合时代背景的,是具有较高价值的实用设计。
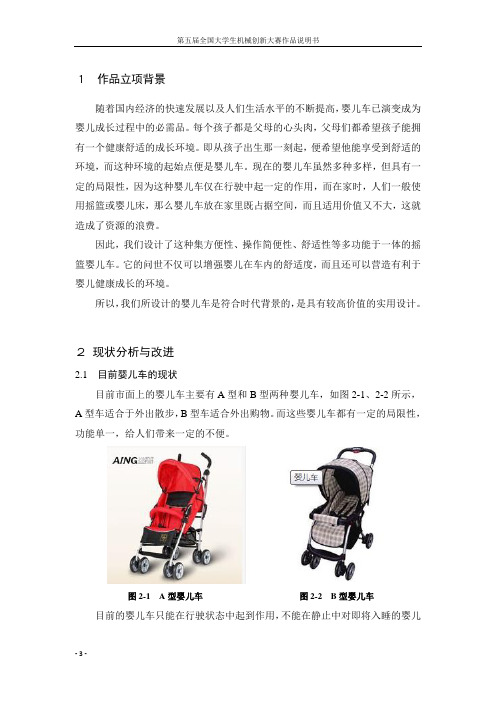
2现状分析与改进2.1 目前婴儿车的现状目前市面上的婴儿车主要有A型和B型两种婴儿车,如图2-1、2-2所示,A型车适合于外出散步,B型车适合外出购物。
而这些婴儿车都有一定的局限性,功能单一,给人们带来一定的不便。
图2-1 A型婴儿车图2-2 B型婴儿车目前的婴儿车只能在行驶状态中起到作用,不能在静止中对即将入睡的婴儿体现其价值。
并且目前的婴儿车睡篮大多数都较低,当行驶在马路时,婴儿很容易吸入汽车尾气,这有害于婴儿的健康。
目前的婴儿车无上、下楼省力功能,在上、下楼时,人们负担较重。
目前的婴儿车只有锁止功能无刹车功能。
这对于正处下坡路的婴儿车而言,具有一定的危险性。
2.2作品改进及创新本摇篮婴儿车通过曲柄滑块机构与平行四边形机构的结合,实现轻微、平稳、可控摆动;当婴儿车运动时,通过牙嵌式离合器使主动轴与从动轴结合,再采用齿轮作为传动装置,那么车轮的滚动将使主动轴随之运动,从而带动曲轴转动,再带动曲柄滑块机构运动,最终实现摇篮的摆动;当婴儿车静止时,通过牙嵌式离合器使主动轴和从动轴分离,然后采用单独的脚踏装置,以脚踩踏的方式来控制曲轴的转动,曲轴的转动将带动曲柄滑块机构运动起来,最终也可实现摇篮的摆动。
婴儿车使用方法

婴儿车使用方法
婴儿车是新生儿和幼儿的必需品之一,但是,很多新手父母在使用婴儿车时存在一些问题。
下面是一些婴儿车使用的方法:
1. 调整座椅:座椅应该是舒适的,并且可以调整到合适的角度,以确保宝宝不会感到不适或不舒服。
2. 调整安全带:安全带必须正确地绑定宝宝,并确保宝宝不能从座位上滑落或跌落。
3. 检查刹车:在使用婴儿车之前,请确保刹车是可靠的,并且可以轻松地使用。
4. 不要超载:婴儿车有一个重量限制,请确保您的宝宝加上任何物品的总重量不超过婴儿车的重量限制。
5. 不要离开宝宝:请不要将宝宝单独留在婴儿车上,即使只是短暂的时间。
6. 避免使用婴儿车上下楼梯:婴儿车不是设计用来上下楼梯的,为了避免意外发生,请使用电梯或其他设施。
7. 定期检查婴儿车:检查婴儿车的所有部件是否完好无损,并确保没有松动的螺丝和其他部件。
8. 学习正确的折叠方法:如果您需要将婴儿车折叠起来进行存储或携带,请阅读说明书并学习正确的折叠方法。
以上是一些婴儿车使用的方法,希望对您有所帮助!
- 1 -。
B-SMART 4 欢途婴儿手推车 说明书

孩子的安全是您的责任。
儿童乘坐时必须使用安全带。
本款推车适用于从刚出生到15公斤的孩子。
在推车静止不动的情况下将孩子放入车中时,请总是使用刹车装置。
悬挂于扶手上的任何物品都会影响推车的稳定性。
本产品不适于奔跑及滑行。
将您的孩子留在车内不加照看是危险的。
使用前确保所有的锁定装置已完全锁定。
超载,不正确的折叠方式和使用未被许可的附件都将会破坏或损坏推车以至其无法稳定使用。
不要让您的孩子没有帮助的情况下爬入推车。
不要让推车长期处于潮湿状态。
如推车潮湿了,应在室温下处于打开状态晾干。
不要让孩子们玩耍推车或调节推车。
警告!不要在推车中放入多于一个孩子。
任何时侯使用前请将安全带调节至合适的长度。
请定期检查所有的螺钉,螺母,螺栓及其它连接件全部固定。
不使用时,请将推车放在一个安全的地方。
避免在推车上放置重物,也不应将推车放在靠近热源的地方,如热辐射器,明火或阳光直射下,这可能使面罩褪色。
靠近机动车辆时,即使使用刹车时也一定要抓牢推车。
机动车辆的气流可导致推车移动。
一定要在上下坡时谨慎小心。
在上下楼梯或乘扶梯时,请抱起孩子并折叠推车。
C N请务必严格遵守使用注意事项,否则会发生意外。
为了避免意外,任何时候都要使用安全带。
切勿在陡坡,台阶,电动扶梯,沙滩,不平的道路,泥土上使用。
务必让儿童乘坐在车座上,推车承重能力15KG。
车底下的车篮不可摆放超过4KG的物件。
车底下的车篮过重(或摆放物件超过车篮 边沿)将会引起危险。
C N使用说明书我们很高兴我们的“欢途”将会陪伴您的孩子安全地度过他或她生命中的最初的几年。
孩子的安全是您的责任1. 适用性在使用推车前仔细阅读这些说明让你自己了解这个折叠式婴儿推车。
如果你的折叠式婴儿推车是被某个不熟悉它的人使用(比如爷爷奶奶),那要向他们展示推车是如何工作的。
如果您不按照这些说明做,您的孩子的安全可能会受到影响。
将本说明书保存在安全的地方以便将来使用。
如果你有任何关于使用它的问题,敬请和我们联系。
H25MM 手动摇篮磨合机用户手册说明书

USER MANUALSwaging Machine Manually OperatedH25MMCONTENTSWARRANTY CONDITIONS (3)DECLARATION OF CONFORMITY (4)SAFETY REGULATIONS (5)TECHNICAL / DIMENSIONAL DATA (6)HANDLING / TRANSPORT (6)PRELIMINARY CHECKS (6)LIGHTING (6)ROUTINE MAINTENANCE (6)DESCRIPTION OF THE MACHINE (7)OPERATING INSTRUCTIONS (7)MICROMETER SETTING (8)CALIBRATION PROCEDURE (9)SWAGE CHART (11)DIE FITTING INSTRUCTIONS (12)MAINTENANCE AND SERVICE (12)LUBRICATON (13)SPARE PARTS (14)OPTIONAL AIR/HYDRAULIC FOOT PUMP (700 BAR.) (15)WARRANTY CONDITIONS1. Note that all machines undergo strict testing before shipment.2. All machines are warranted against any defects for a period of 12 MONTHS startingfrom the date of delivery to the customer. The company reserves the right to requirea copy of the sales invoice.3. We must verify defects. Therefore, each defective item must be returned to ouraddress with SHIPPING CHARGES PREPAID. We will return the item with CARRIAGE FORWARD. ANY DELIVERIES TO OUR COMPANY WITH CARRIAGE FORWARD WILL BE SENT BACK TO THE SENDER.4. This warranty covers replacement and repair of any component found to bedefective.5. Replacements and repairs completed under this warranty cannot extend its 12months validity.6. This warranty does not cover any damages caused by deterioration from use.7. This warranty is not valid for damage resulting from incorrect operation or use not incompliance with the machine instructions.8. This warranty is not valid in case of unauthorised machine modification.9. This Instruction Manual is also to be considered as a warranty certificate, withvalidity commencing from the date indicated on the freight bill.GENERAL SALES TERMS AND CONDITIONSFor general sales terms and conditions, always refer to the catalogue Technical data - General sales terms and conditions, page 59.DECLARATION OF CONFORMITY(according to current EC legislation)the subscribed: I.M.M. Hydraulics S.p.A.registered office in: Via Italia 49, 5166041 ATESSAVAT and fiscal Code 01427010697in the person of Marcello Di Camplideclares:Model: H25MMConstruction Year:Serial Number:Description: Swaging machine, manual pump operatedThe machine is not included in the list of the Annex IV of Machinery Directive 2006/42/CE. The machine complies with the requirements of Machinery Directive 2006/42/CE and to the following modifications.Atessa, 26/10/2018 SignedSAFETY REGULATIONSAlways work in safe conditions and with the necessary space around the machine. Ensure that the machine is placed on a stable and appropriate working surface.1. DO NOT USE the equipment before reading the user manual.2. CAUTION! If improperly used, the equipment may be dangerous and may causeinjury. Do not touch any moving parts.3. CAUTION! It is absolutely essential that all working operations are carried out byone operator only4. This manual must be provided for the machine operator. Ensure that the operator isaware of his/her responsibilities.5. Guards must never be removed or tampered with.6. (Where applicable) A fully trained and competent electrician must connect themachine to the appropriate electricity supply.7. Always wear protective gloves, safety glasses and appropriate clothing.8. (Where applicable) Disconnect the power supply before removing any covers, orattempting any maintenance of the machine9. Only original spare parts can be used in the maintenance of the machine.TECHNICAL / DIMENSIONAL DATATECHNICAL / DIMENSIONAL DATA H25MMCapacity 3/16” – 1 1/4” (2 wire)R1AT, R2AT, 1SN, 2SN3/16”-1” (4 wire)R9R, 4SPPressure requirements for optional7.0 bar (100 psi)air/hydraulic power packPacked Dimensions [mm] 800x600x460Net weight [kg] 60Type of operation Twin speed hand pump(10.000 psi)Noise level < 70 dBHANDLING / TRANSPORTThe machine will normally be shipped bolted to a wooden pallet . The bolts should be removed and the machine lifted onto the work place using suitable lifting equipment.PRELIMINARY CHECKSPlace the machine on a stable surface.LIGHTINGThe equipment does not have its own lighting and so it must be used in a suitablyilluminated area.ROUTINE MAINTENANCEEnsure that moving parts are always lightly greased. Where applicable check periodically that the limit switches and emergency controls are in good working order.DESCRIPTION OF THE MACHINEMachine for connecting hoses with eight interchangeable segments of clamps. OPERATING INSTRUCTIONSThe machine is operated by a hand operated hydraulic pump. When the release valve is closed and the pump operated, the swaging head will close and a hose assembly can be swaged.To release the finished assembly unscrew the release valve two turns.To operate the machine, set the micrometer to the swage size recommended by the fitting manufacturers. (See Micrometer setting instructions below.)Close the release valve and operate the pump to close the dies onto the assembly to be swaged. Ensure the ferrule is within the die length before proceeding.Operate the pump until the indicator rod (Item 1,Fig.1)is level with the end of the micrometer adjusting thimble (Item 2,Fig.1).Swage is now complete. Initial swages should be checked for swage size.To remove completed assembly, unscrew the release valve and allow the machine to open. The machine opening can be stopped by closing the release valve and need not be fully opened each time, unless the complete opening of the pressing head is necessary to remove the assembly.MICROMETER SETTINGTo set the machine to swage a fitting whose final swage size is 25,40 mm , select the die set H22 as indicated on the swage chart in page 11. The micrometer must be set to the difference between the dieset size and the final swage size . In this case:(25,40) - (22) = 3,40To set the micrometer to the desired value (2.10), rotate the thimble (Num.1 - Fig.2) until the line below the value "4", on the thimble, scale is aligned with the center line present on the scale of the micrometer and the horizontal line corresponding to the value "3" indicated on the micrometer scale indicator is flush with the thimble ring nut (Num.2 - Fig.2). The machine is now ready to press to a diameter of 25,40mm .Fig. 2+=25,40Die size: 22Micrometer = 3,40Swage sizeFig 312H22CALIBRATION PROCEDURE1. Fit the H26 die set into the machine.2. Use a mandrel of known size of 30mm.3. With mandrel in the machine pump until the maximum pressure has been achieved.4. Set the calibrator to 4.00 on the dial.5. Turn adjusting screw (Item 4 - Fig.4) at the end of the calibrator rod, until it is levelwith the top of the calibrator (Item 1 - Fig.4).6. To check calibration, release pressure and repeat step 3. At maximum pumppressure the calibrator rod should be level with the top of the calibrator.Fig. 4SWAGE CHARTUse this chart to select the correct die set for the swaging required. The diameters indicate the FINAL SWAGE SIZE.DIE No. Range(mm) Length(mm)Ferrule Diam.Max (mm)H06* 6.0 – 7.9 40.00 18.00 H08* 8.0 – 9.9 40.00 20.00 H10* 10.0 – 12.9 40.00 22.00 H13* 13.0 – 15.9 40.00 25.00 H16 16.0 – 21.9 40.00 28.00 H19* 19.0 – 21.9 40.00 31.00 H22 22.0 – 27.9 50.00 34.00 H26* 26.0 – 27.9 50.00 38.00 H28 28.0 – 33.9 60.00 40.00 H30* 30.0 – 33.9 60.00 42.00 H34 34.0 – 39.9 70.00 46.00 H40 40.0 – 45.9 70.00 52.00 H46* 46.0 – 51.9 75.00 58.00 H52* 52.0 – 57.9 75.00 64.00 *These dies are not supplied as standardDIE FITTING INSTRUCTIONSTo Insert or remove the dies, the head must be closed. The dies are inserted from the front of the swaging head. The die holders have a T slot with a spring loaded ball bearing to retain the die in place. Ensure that the die is fully inserted in the T slot and that the longest portion of the die from the pin is to the back of the head as shown in the next figure:MAINTENANCE AND SERVICEFor machines in regular use it is recommended that a monthly check on the oil level in the pump is carried out. To check oil level, first ensure the machine is fully open and then remove the oil filler (Item 6,Fig.1). The oil should be level with the top of the tie rod that passes through the centre of the pump. If required top up with ISO 32 hydraulic oil. DO NOT OVER FILL.At regular annual intervals it is recommended that the calibration of the press is checked in accordance with the calibration instructions.LUBRICATONThe swaging head must be lubricated at least every 350 swage cycles. To apply the grease, ensure that the machine is fully open. Lubrication is easily done with a small clean brush ensuring that the inside of the swaging ring (chromed moving piston) and flat face of the die holders are evenly coated with grease (see below).Fig. 6PROCEDURE TO BLEED THE SYSTEMClose the pump operating knob and operate the pump until the piston in the swaging machine moves 15-20mm. Position the machine in the vertical plane and loosen the bleed screw (item 12) located in the center of the top face of the piston. (DO NOT REMOVE). Air trapped in the system will escape through the bleed screw. When oil appears from the bleed screw and no more air is expelled, retighten the bleed screw. This operation may need to be repeated should there be excessive air in the system. It is advisable to check the oil level in the pump after the bleeding operation.Lubrificare qui!VERY IMPORTANT! Lubrication is the most important factor that affects the performance of your Hydralok swaging machine . It is vital that the machine is regularlylubricated using a high-performance grease based on molybdenum disulphide. Lack of lubrication or the use of other types of lubricantscould cause irreparable damage to the machine.SPARE PARTSPart. No. Description300-073 Seal kit300-087 Spring kit500-003 Hand pump hose kit500-010 Pneumo hydraulic pump Kit300-094 Calibrator kit105-024 Hand pump105-082 Pneumo hydraulic pumpAdditional dies are available for this machine, as indicated above in the swaging table.Fig. 7OPTIONAL AIR/HYDRAULIC FOOT PUMP (700 BAR.)SETTING INSTRUCTIONSConnect the hose from the Swaging Head to the outlet connection of the pump (Fig.8). Ensure pressure rating of the hose is suitable for 700 Bar operation.AIR SUPPLYConnect a suitable air supply to the air inlet connection of the foot pump as indicated.N.B. The air must be supplied using a filtered and lubricated supply, regulated to a MAXIMUM operating pressure of 7 Bar (100psig).OPERATING THE FOOT PUMP•Press down the Foot Pedal to close the head and perform the swage.•Release the Foot Pedal when the Calibration Indicator reaches its set position.•To open the Head press down on the release part of the Foot Pedal.The head doesn’t need to be fully opened after each operation and can be stopped at any position by releasing the Foot Pedal.Fig. 8。
嬰兒手推車操作说明书

使用前請詳細閱讀本說明書,然後正確使用本嬰兒手推車。
閱讀後請妥善保存作日後參考之用。
若將本製品轉讓予他人使用時,請將本說明書也一併移交對方。
將把手上的安全鎖部分向箭頭方向滑動並保持可解除安全鎖。
Slide the safety lock in demonstrated direction to release the safety lock and keep it at almost right position.本產品設計上,不論在前向或後向使用狀態,在轉換把手後,靠近推車者一方的方向輪會自動鎖上,令轉向輪永遠在前方。
This product is designed so that the swivels at the pushing side are always locked no matter which direction the handle is at. The swivels are always at the front side.在平坦路面使用,可使手推車更順暢推動及轉向容易。
在不平路面推行時,建議鎖上轉向輪鎖。
折疊折疊折疊拿著前後車篷車架然後將車篷往前方翻開。
24將鈕扣打開。
Undo the snaps.將車篷上的鈕釦重新扣上。
Secure the snaps on top.解開背部透氣窗蓋布上左右兩邊的刺黏固定貼。
Release the air through cover by Velcro fasteners at the back of upper part pocket.1.上面口袋刺黏固定貼透過使用底座的靠背通風窗,幼兒會舒適地度過炎熱或悶熱的天氣。
Through the use of backrest ventilation window at the base, child keeps comfortable during in hot or muggy weather.打開靠背透氣窗 Open the air through system (backrest ventilation window)疊疊疊疊112115依箭咀方向解除安全鎖。
默克宝贝Zipy系列婴儿推车说明书

默克宝贝Zipy系列婴儿推车说明书默克宝贝Zipy系列婴儿推车说明书亲爱的家长:感谢您选择我们的产品,祝贺您做出了正确的选择。
我们之所以生产这种特殊类型的童车,不仅是出于对孩子们的爱,还因为我们希望能够满足每个家长的高期望值。
在使用婴儿车之前,强烈建议您阅读下列用户手册。
如果不按说明使用,您的孩子可能会受到人身安全威胁。
该套装包括:4轮,车架,睡篮,折叠座椅,提篮/汽车座椅(可选),与提篮/汽车座椅兼容的车架适配器,杯架,尿布袋,2个防风罩,蚊帐,尿垫,雨罩,购物篮,停车制动装置。
警告警告:孩子无人看管可能会产生危险。
警告:当孩子可以自己坐起时,请使用安全带。
警告:使用婴儿车之前,请检查摇篮或座椅是否已经安全稳固地安装在车架上。
警告:请始终使用裆带结合的腰带。
警告:婴儿车不能左右摇动。
警告:口袋载重量不能超过1公斤,购物篮载重量不能超过4公斤。
警告:任何附加到推把上的负重都会影响车架的稳定性能。
推把最大负重是1.5kg。
警告:本产品不适合跑步或滑冰时使用。
警告:不要使用超过25mm厚的婴儿床垫。
警告:请注意,小部件(如车轴运输的保护帽),可能会被你的孩子吞食,会造成窒息危险。
警告:此婴儿车座不适合6个月以下的婴儿。
警告:每次使用之前请确保底部机制已安全锁定。
警告:无论何时你要泊车,都请激活刹车机制。
警告:千万不要将坐着孩子的婴儿车停在斜坡上。
警告:严禁推着婴儿车下楼梯,孩子可能会坠落。
警告:不要向楼上拉推车,因为婴儿车可能会损坏。
警告:通过路坎或台阶的时候,始终解除前悬架,否则童车框架可能弯曲。
警告:请始终使用雨篷,以防止婴儿车被淋湿。
让孩子远离塑料袋,以免孩子遭受窒息危险。
●始终让孩子和婴儿车在你可控范围内。
●当使用婴儿车载孩子时,行进的速度应该与步行速度相当。
跑步、慢跑或滑冰时,不推荐使用。
不要使用自动扶梯或楼梯。
使用升降电梯时也要小心。
●一辆婴儿车一次仅可用于一个孩子的承载。
●只能使用原装附件及原装备件。
versatrax 婴儿携带车指南说明书

birth to 22kg/(birth - 48 months) versatrax™strollerStroller Operation16F IG U R E 13 ~ 161314121512332021F IG U R E 17 ~ 2117123181A2B19F IG U R E 37 ~ 41F IG U R E 46 ~ 50F IG U R E 77GBContentsFigures 1-16 WARN NG 21 Stroller Assembly24 Open Stroller 24 Assemble & Detach Front Wheel 24 Assemble & Detach Rear Wheel 24 Assemble Canopy 24 Assemble & Detach Cupholder 24Stroller Operation25Adjust Backrest 25Use Buckle 25Use Shoulder & Waist Harnesses 26Use Armbar 26Adjust Calf Support 26Use Front Swivel Lock 27Use Brake 27Use Canopy 27Adjust Handle 27Switch Seat 27Use Storage Bag 27Fold Stroller 28Use Accessories 28Detach & Assemble Soft Goods 29 Cleaning and Maintenance 30EmergencyIn case of emergency or accident, it is most important to have your child taken care of with first aid and medical treatment immediately.Read all the instructions in this manual before using thisproduct. If you have any further questions, please consult theretailer. Some features may vary depending on model.Product Versatrax StrollerSuitable for Child weighing under 22kg(birth - 48 months)Materials Plastics, metal, fabricsPatent No. Patents pendingMade in ChinaBrand Name JoieWebsite Manufacturer Allison Baby UK Ltd.1920WARNING!WARNING Always use the restraint system. Safety belts and restraint systems must be used correctly.!WARNING Ensure that all the locking devices are engaged before use.!WARNING Do not let the child play with this product.!WARNING Check that the pram body or infant child restraint attachment devices are correctly engaged before use.!Adult assembly required.!Use the stroller with a child weighing less than 22kg. It will cause damage to the stroller with an unfitted child.!To prevent a hazardous, unstable condition, do not place more than 4.5kg in the storage basket.!The maximum recommended weight in the cupholder is 1lbs (0.5kg).!Never leave the child unattended. Always keep child in view while in stroller.!Use the stroller with only one child at a time. Never place purses, shopping bags, parcels or accessory items on the handle or canopy.!Accessories which are not approved by the manufacturer shall not be used. Only replacement parts supplied or rec-ommended by the manufacturer shall be used.!Overloading, folding incorrectly, or using component parts from other manufacturers may cause the stroller to be dam-aged, broken or unsafe. Please read the instruction manual carefully.!Please read all the instructions in the manual before using the product. Please save instruction manual for future use. Failure to follow these warnings and instructions may result in serious injury or death.!To avoid serious injury from falling or sliding out, always use seat belt.!Make sure your child’s body is clear from the moving parts when adjusting the stroller.!Be sure the stroller is fully open or folded before allowing child near the stroller.!Child may slip into leg openings and be strangled if the har-ness is not used.!Never use stroller on stairs or escalators.!Keep away from high temperature objects, liquids, and electronics.!Never allow your child to stand on the stroller or sit in the stroller with head toward front of stroller.!Never place the stroller on roads, slopes or dangerous ar-eas.!To avoid strangulation, DO NOT place items with a string around your child’s neck, suspend strings from this product, or attach strings to toys.!Any load attached to the handle and/or on the back of the backrest and/or on the sides of the stroller will affect the stability of the stroller.!DO NOT lift stroller while child is in stroller.!DO NOT use storage basket as a child carrier.!To prevent tipping, never let child climb the stroller. Always lift the child in and out of the stroller.!To avoid finger entrapment, use care when folding and unfolding the stroller.!WARNING To avoid injury ensure that the child is kept away when unfolding and folding this product.!To ensure your child’s safety, please make sure all parts are assembled and fastened properly before using the stroller. !To avoid strangulation, do make sure your child is clear from the canopy.2122!Always engage the brakes when parking the stroller.!Discontinue using stroller if it is damaged or broken.!Stroller to be used only at walking speed. This product is not intended for use while jogging.!To avoid burns, never put hot liquids in your cupholder.!To avoid suffocation, remove plastic bag and packaging ma-terials before using this product. The plastic bag and pack-aging materials should then be kept away from babies and children.!This product is not suitable for running or skating.!Pushchair designed to be used from birth shall recommend the use of the most reclined position for new born babies.!The parking device shall be engaged when placing and removing children.!For infant child restraints used in conjunction with a chassis, this vehicle does not replace a cot or a bed. Should your child need to sleep, then it should be placed in a suit-able pram body, cot or bed.!Carry cot is only suitable for a child who cannot sit up un-aided, roll over and cannot push itself up on its hands and knees. Maximum weight of the child: 9kg.!DO NOT use or add any mattress other than the one sup-plied with the carry cot.!Do not attach items to the handle, seat back or sides ofthe stroller. Any additional load will affect the stability of the stroller and could cause the stroller to tip. Stroller Assembly(Please refer to figures on page 1-16)Please read all the instructions in this manual before assembling and using this product.Open Strollersee images1- 3!Check that the stroller is completely latched before continuing to use.!Please do not press the calf support while opening the backrest. 3- 1 If do it, please benchmark 43 to fold the backrest and reopen it.Assemble & Detach Front Wheelsee images4- 5Assemble & Detach Rear Wheelsee images6- 7Assemble Canopysee images8- 10Assemble & Detach Cupholdersee images11- 12The completely assembled stroller is shown as 132324Stroller OperationAdjust Backrestsee images 14- 15There are 4 recline angles for the backrest.Raise BackrestTo raise the backrest, rotate the recline handle on the back of the seat, pull up on the backrest. 14Recline BackrestTo recline the backrest, rotate the recline handle on the back of the seat, pull down on the backrest. 15!Please do not press the releasing button 14- 3&15- 3 on the middle of the recline handle when adjusting the angle for the recline.!Make sure the recline is set properly for use.Use Bucklesee images16- 17Release BucklePress the center button to release the buckle. 16Lock BuckleMatch the waist belt buckle with the shoulder buckle 17- 1, and click into the center buckle. 17- 2 A “click” sound means the buckle is locked completely. 17- 3!To avoid serious injury from falling or sliding out, always secure your child with harness.!Make sure your child is snugly secured. The space between the child and the shoulder harness is about the thickness of one hand.!Do not cross the shoulder belts. This will cause pressure on a child’s e Shoulder & Waist Harnessessee images18- 24!In order to protect your child from falling out, after your child is placed into the seat, check whether the shoulder and waist harnesses are at proper height and length.18- 1 Shoulder harness anchor18- 2 Slide adjusterFor larger child, use shoulder harness anchor and the highest shoulder slots. For smaller child, use shoulder harness anchor and the lowest shoulder slots.To adjust the position of the shoulder harness anchor, turn the anchor to be level with the side facing forward. Thread it through the shoulder harness slot from back to front. 21 Rethread it through the slot that is closest to child's shoulder height. 22Use slide adjuster to change the harness length. 24- 1Press the button 24- 2, while pulling the waist harness to proper length. 24- 3Use Armbarsee images25- 27Adjust Calf Supportsee images28- 29The calf support has 2 positions.To lower calf support, press the adjustment buttons on both sides of the calf support 28 - 1, and rotate the calf support downwards. 28- 2To raise the calf support, push it upwards. A "click" sound means the calf is locked completely.2526Use Front Swivel Locksee images30Push up the front swivel locks to maintain the moving direction. 30It is recommended to use swivel locks on unevensurfaces.Use Brakesee images31- 32To lock wheels, step the brake lever downwards. 31To release wheels, just lift the brake lever upwards. 32 Always set the parking brake when stroller is not moving.Use Canopysee images33- 35The canopy can be opened completely to protect your child from the sun uttermostly, just unzip the zip 34 , and then pull the canopy toward front.Adjust Handlesee images36Switch Seatsee images37- 40Use Storage Bagsee images41The maximum load of Storage Bag A and B is 0.45kg. Fold Strollersee images42- 50! The button on the middle of the recline handle is used for folding the seat. 43- 1! The stroller with forward-facing seat can stand when the handle is in the highest position and with rear-facing seat can stand by wheels after folded. 47Use AccessoriesAccessories may be sold separately or may not be available depending on region.Use with Infant Child Restraintsee images51- 56When using with Joie infant child restraint gemm, iGemm & iLevel & iSnug please refer to the following instructions.! A “click” sound means the adapter is locked completely.! If you have any problems about using the infant child restraint, please refer to their own instruction manuals.! Please do not fold the stroller when the infant child restraint is still attached.Use Carry Cotsee images57- 60When using with Joie ramble xl carry cot, please refer to the following instructions.! A “click” sound means the adapter is locked completely.! Always use the mattress when using the carry cot.2728! If you have any problems about using the carry cot, please refer to their own instruction manuals.! Please do not fold the stroller when the carry cot is still attached.Use Rain Coversee images61To assemble the rain cover, place it over the seat.! When using the rain cover, please always check its ventilation.! When not in use, please check that the rain cover has been cleaned and dried before folding.! Do not fold the stroller after assembling the rain cover.! Do not place your child into the stroller assembled with rain cover during hot weather.Detach & Assemble Soft Goods see images62- 76Remove armbar shown as 27To re-assemble seat soft goods, follow the steps above in reverse 76 - 62Cleaning and Maintenancesee images77!To clean stroller frame, use only household soap and warm water. No bleach or detergent. Please refer to the care label for instructions on cleaning the fabric parts of the stroller.!Removable soft goods can be washed by machine. No bleach. Do not twist the seat cover and inner padding to dry with great force. It may leave the seat cover and inner padding with wrinkles.!From time to time, check your stroller for loose screws, worn parts,torn material or stitching. Replace or repair the parts as needed. Periodically wipe clean plastic parts with a soft damp cloth. Always dry the metal parts to prevent the formation of rust if the stroller has come into contact with water.!Excessive exposure to sun or heat could cause fading or warping of parts.!If stroller becomes wet, open canopy and allow to dry thoroughly before storing.!If wheels squeak, use a light oil (e.g., Silicon Spray, antirust oil, or sewing machine oil). It is important to get the oil into the axle and wheel assembly. 77!When using your stroller at the beach or other sandy/dusty environments, completely clean your stroller after use to remove sand and salt from mechanisms and wheel assemblies.2930。
好孩子 C801 型婴儿车 说明书

时,可以使用前轮刹
车。(注意:在推杆
换向后,为方便推行,
前轮需要定向。)
13 踏脚板调节:如图 13,踏脚板有两个档 位调节,同时按进 踏脚板调节件并下 放,可调低踏脚板, 直接向上拉可调高 踏脚板。
使用说明
插头 插孔
14
A1 15
B
C801
A3 A2
14 档板的安装拆卸:如 图14,将档板背面的 两个插头插入侧扶 手上的插孔中(从插 孔中较大的一端插 入),然后用力将档 板向左拉,使插头滑 至插孔较小的一端 固定好。反之可拆 掉档板,用水清洗。
9
4
5 安装推杆:如图5, 将推杆的两侧插头 分别插入两侧推杆插 座里,插头内侧的弹 珠弹出表明推杆安装 到位。需拆卸时,按 进弹珠向外拔推杆即 可。(注意:安装时 推杆上有捏手锁定钮 的一面在前。)
6 安装篮筐:如图6a,直 接将篮筐后面四个按 扣从篮筐内侧向外翻, 绕过篮筐杆后扣合、 固定,然后把篮筐插 头对准座垫板插孔按 箭头方向直接向里推 进,听到“喀哒”声表 明安装到位。然后再 把篮筐前面两侧的按 扣穿过座位底下的穿 插孔互相扣在一起即 可,如图6c。需拆卸 篮筐布套时,松开按 扣即可拆卸。
3 安装车篷:如图3, 将两个篷插头分别 插入两个篷插座里 即可。需拆卸时,直 接向外拔车篷。
4 安装前扶手:如图 4a,将前扶手对准固
定柱插入,听到“
喀哒”声,表明安
装到位。需拆卸时
按钮
按进扶手下面的两
个按钮,向外拔扶手
即可,如图4b。
安装使用说明
5 6b 6c
8
2
C801
插头 插孔
6a
7 靠背调节拉手
C801
中国名牌
- 1、下载文档前请自行甄别文档内容的完整性,平台不提供额外的编辑、内容补充、找答案等附加服务。
- 2、"仅部分预览"的文档,不可在线预览部分如存在完整性等问题,可反馈申请退款(可完整预览的文档不适用该条件!)。
- 3、如文档侵犯您的权益,请联系客服反馈,我们会尽快为您处理(人工客服工作时间:9:00-18:30)。
1作品立项背景随着国内经济的快速发展以及人们生活水平的不断提高,婴儿车已演变成为婴儿成长过程中的必需品。
每个孩子都是父母的心头肉,父母们都希望孩子能拥有一个健康舒适的成长环境。
即从孩子出生那一刻起,便希望他能享受到舒适的环境,而这种环境的起始点便是婴儿车。
现在的婴儿车虽然多种多样,但具有一定的局限性,因为这种婴儿车仅在行驶中起一定的作用,而在家时,人们一般使用摇篮或婴儿床,那么婴儿车放在家里既占据空间,而且适用价值又不大,这就造成了资源的浪费。
因此,我们设计了这种集方便性、操作简便性、舒适性等多功能于一体的摇篮婴儿车。
它的问世不仅可以增强婴儿在车内的舒适度,而且还可以营造有利于婴儿健康成长的环境。
所以,我们所设计的婴儿车是符合时代背景的,是具有较高价值的实用设计。
2现状分析与改进2.1 目前婴儿车的现状目前市面上的婴儿车主要有A型和B型两种婴儿车,如图2-1、2-2所示,A型车适合于外出散步,B型车适合外出购物。
而这些婴儿车都有一定的局限性,功能单一,给人们带来一定的不便。
图2-1 A型婴儿车图2-2 B型婴儿车目前的婴儿车只能在行驶状态中起到作用,不能在静止中对即将入睡的婴儿体现其价值。
并且目前的婴儿车睡篮大多数都较低,当行驶在马路时,婴儿很容易吸入汽车尾气,这有害于婴儿的健康。
目前的婴儿车无上、下楼省力功能,在上、下楼时,人们负担较重。
目前的婴儿车只有锁止功能无刹车功能。
这对于正处下坡路的婴儿车而言,具有一定的危险性。
2.2作品改进及创新本摇篮婴儿车通过曲柄滑块机构与平行四边形机构的结合,实现轻微、平稳、可控摆动;当婴儿车运动时,通过牙嵌式离合器使主动轴与从动轴结合,再采用齿轮作为传动装置,那么车轮的滚动将使主动轴随之运动,从而带动曲轴转动,再带动曲柄滑块机构运动,最终实现摇篮的摆动;当婴儿车静止时,通过牙嵌式离合器使主动轴和从动轴分离,然后采用单独的脚踏装置,以脚踩踏的方式来控制曲轴的转动,曲轴的转动将带动曲柄滑块机构运动起来,最终也可实现摇篮的摆动。
并且在踩踏板的时候,各零部件连接处的摩擦等阻力的存在又可以反馈到动力源去,从而使人们达到健身的效果。
本摇篮婴儿车利用平行四边形的不稳定性还可实现座椅与摇篮间的相互转变,从而达到婴儿车多用化的目的。
本摇篮婴儿车通过在车轮上附加行星轮机构,使其具有上下楼梯更加省力、平稳的功能,并且可以利用摇篮下的平行四边机构的不稳定性在上下楼梯时,因重力作用始终使摇篮在同一水平面,即增加了它的平稳性。
本摇篮婴儿车通过手动减速装置和脚刹装置的分别应用,使其能适用于不同情况下的减缓速度或停止,使本作品操作更加灵活。
3 作品原理介绍3.1 材料的选择本作品的车体与摇篮是由的不锈钢管加工而成,其重量轻,除拥有良好的塑性及加工性能外,还拥有良好的力学性能、可回收性、以及较高的耐磨性,能承受机构变形时所产生的压力。
3.2 曲柄滑块机构3.2.1 曲柄滑块机构的概述平面连杆机构是由若干个杆件通过低副连接而成的机构,又称为平面低副机构。
由四个构件通过低副连接而成的平面连杆机构,称为平面四杆机构。
如果低副均为转动副,那么这种四杆机构就称为铰链四杆机构。
它是平面四杆机构的基本形式,曲柄滑块机构可以看作是在它的基础上演化而成的。
曲柄滑块机构广泛应用于各种机械中,其主要优点有:(1)曲柄滑块机构实现直线运动比较简单,滑块可以左右或者上下往复运动。
(2)运动副均为低副,底副的两运动副元素为面接触,压强较小,可承受较大的载荷,并且有利于润滑,运动副元素的几何形状较简单,便于加工制造。
其主要缺点是要求耐磨性能、平面度等较高。
3.2.2 曲柄滑块机构的设计根据上述曲柄滑块机构的概述及优缺点总结,我们可以将其利用于我们的摇篮婴儿车上。
特此,我们为摇篮婴儿车量身设计了一种曲柄滑块机构,此机构是用曲柄和滑块来实现转动和移动相互转换的平面连杆机构,如机构示意图3-1、三维图立体3-2所示,就是将曲柄的回转运动变换为滑块的往复直线运动。
曲柄滑块机构中的与机架构成移动副的构件为滑块,通过转动副A、B连接曲柄和滑块的构件为连杆。
曲柄滑块机构作为核心机构运用于本作品中。
Ox点与曲轴相连,曲轴带动曲柄a做回转运动,从而带动滑块做往复直线运动。
转动副在连杆b的带动下同时做转动和移动,最终使得连杆c缓慢做曲线摆动,从而达到让婴儿车的摇篮平稳摆动的目的。
图3-1 曲柄滑块机构的机构示意图图3-2 曲柄滑块机构的三维立体图3.2.3 曲柄滑块机构自由度的计算曲柄滑块机构的设计是根据已知条件来确定机构各构建的尺寸,其可以归纳为两种基本类型。
(1)实现给定的运动规律;(2)实现给定的运动轨迹。
我们根据曲柄滑块机构的这两种基本特性,再联系我们所需要的运动机构的运动轨迹,故此我们采用此机构作为该款摇篮婴儿车的基本机构。
我们利用曲柄滑块机构的特性来达到摇篮做圆弧摆运动的目的。
根据自由度的计算公式:F=3n-2PL-PH 公式(3-1)其自由度计算为:F=3×4-2×5=23.3 平行四边形机构3.3.1 平行四边形机构的概述平面连杆机构是由若干个杆件通过低副连接而成的机构,又称为平面低副机构。
由四个构件通过低副连接而成的平面连杆机构,称为平面四杆机构。
如果四杆的大小、长度相同,那么这种四杆机构就称为平行四边形机构。
它是平面四杆机构的基本形式,其他形式的四杆机构都可以看作是在他的基础上演化而成的。
平行四边形机构,其主要优点有:(1)平行四边形机构以面接触承受的压强小,便于润滑,磨损较低,可以承受大的载荷;(2)构件形状简单,构件工作可靠;(3)可以使从动件实现多种形式的运动,满足多种运动规律的要求;(4)利用平行四边形机构中的连杆可满足多种运动轨迹的要求。
其主要缺点有:(1)连杆设计较复杂且精度不高;(2)不能用于高速场合。
3.3.2 平行四边形机构的设计根据上述平行四边形机构的概述及优缺点的总结,我们可以将其变形,运用于我们的摇篮婴儿车的摇篮上。
我们所设计的平行四边形机构是以平行四边形为基础的机构,也是利用其特性将其扩展的多干机构。
该机构具有普通平行四边形机构的特性,相对杆始终保持平行,且两连杆的角位移、角速度和角加速度也始终相等的优点。
但该机构的调速范围较小,不适用于要求调速范围很大的场合。
而我们的摇篮婴儿车所需速度本就不大,也不需很大范围的调速,所以很适合用这种机构。
并且利用平行四边形的不稳定性,我们还可给根据需要,改变摇篮的状态,来达到人们想要的结果,如躺式摇篮或座椅式摇篮。
如图3-3是平行四边形机构的结构示意图,图3-4是平行四边形机构的三维图立体。
图3-3 平行四边形机构的结构示意图图3-4 平行四边形机构的三维立体图3.4 传动装置3.4.1 传动装置的概述齿轮传动是利用两齿轮相互啮合传递动力和运动的机械传动,即是用主、从齿轮轮齿直接传递运动和动力的装置。
并且,它是在多有机械传动中,应用最广,可用来传递相对为止不远的两轴之间的运动和动力。
齿轮传动的主要优点是:(1)传动平稳,传动比精确,工作可靠;(2)结构紧凑、效率高、寿命长;(3)使用的功率、速度和尺寸范围大等。
其主要缺点是:(1)制造及安装精度要求高,成本高;(2)不适用于两轴中心距过大的转动;(3)不适用于振动冲击较大的场合。
3.4.2 传动装置的设计因此,根据上述对与齿轮传动的功能介绍及优缺点概述,我们特选用齿轮传动作为我们摇篮婴儿车的传动部分。
如齿轮传动装置结构示意图3-5,三维立体图3-6所示,a杆的两点分别与后轮的中心轴相连,且a轴为主动轴,主动轴上套有一齿轮A,曲轴上套有一齿轮C,而齿轮A与齿轮C通过中间齿轮B连接构成一个整体,以此方式做运动和动力的传递装置。
图3-5 齿轮传动装置机构示意图图3-6 齿轮传动装置三维立体图3.4.3 传动比的计算根据传动比的计算公式:i=z2/z1=n1/n2 公式(3-2)我们设计的齿轮传动比为:i=z2/z1=n1/n2=2(1)能保证恒定的传动比,能传递任意夹角间的运动;(2)可以获得准确的平均传动比;(3)与带传动相比,传递动力大、效率高;寿命长,工作平稳,可靠性。
3.5 行星轮机构3.5.1 行星轮机构的概述行星轮机构是除了能像定向轮那样围绕自己的转动轴转动之外,他们的转动轴还随行星架绕其他齿轮的轴线转动的机构。
绕自己轴线的转动称为“自转”,绕其他轴线的转动称为“公转”,就像太阳系中的行星那样,因而得名。
行星轮的主要特点是体积小,承载能力大,工作平稳。
但大功率告诉行星齿轮传动结构较复杂,要求制造精度高。
3.5.2 行星轮的设计根据上述行星轮的概述,我们按照摇篮婴儿车的使用要求,设计了一款适用于本作品上楼的行星轮。
该行星轮的基本结构是由三个大小相同的行星齿轮构成的行星轮系。
如三维立体图3-7所示,在中心点外依次均布三行星轮,三行星轮用一个三角形的中心架连接而成的。
其优点在于,分别适用爬楼梯和平地行驶,各自适应性良好,并且结构紧凑,操纵简便。
图3-7 行星轮机构三维立体图3.6 分离机构3.6.1 分离机构的概述牙嵌式离合器由两个端面上有牙的半离合器组成,一个半离合器固定在主动轴上,另一个半离合器用导键或花键与从动轴联接,并通过操纵机构使其做轴向移动,从而起到离合作用。
利用两半离合器端面上的牙互相嵌合或脱开以达到主、从动轴的离合的目的。
牙有矩形、梯形、三角形、锯齿形和螺旋形等几种形式。
由于同时参与嵌合的牙数多,故承载较高,适用范围广泛。
牙嵌离合器结构简单,外轮廓尺寸小,能传递较大的转矩,故应用较多,但牙嵌离合器只宜在两轴不回转和转速差很小时进行结合,否则牙齿可能会因受撞击而折断。
3.6.2 分离机构的设计根据上述牙嵌式离合器的概述及优缺点总结,本摇篮婴儿车的决定采用牙嵌离合器作为分离机构。
此牙嵌式离合器采用橡胶材料制作而成,牙则采用梯形式,如牙嵌式离合器三维立体图3-8所示,利用两半离合器端上面的牙相互嵌合或脱开以达到主、从动轴的离合的目的。
图3-8 牙嵌式离合器三维立体图3.7 减震装置本摇篮婴儿车轮子轴心部位采用螺旋弹簧减震,该弹簧利用弹簧钢制成,均匀性好,价格便宜,拥有良好的塑性和韧性,以及优良的表面状态和疲劳性能。
螺旋弹簧和车轴配合,主要起到:转换振动,在婴儿车经过不经过不平路段时能快速衰减车体振动,使婴儿车能平稳的通过。
3.8 刹车装置本摇篮婴儿车采用的是钳制式刹车,它是最常见的刹车装置。
操作者压下手柄,刹车就卡住自行车轮缘。
这样的刹车装置是由安装在刹车构架里面的两块刹皮组成,相对地安装在轮缘的两侧。
刹皮跟轮缘接触,靠摩擦力刹车。
通过对刹车装置的概述,我们可以将其利用于婴儿车上,以便摇篮婴儿车稳的停在路上,防止在斜路上滑行,保障婴儿安全。