Using Command Line Imager
ImageMagick学习笔记

欢迎共同研究ImageMagickEmail:by5605@sxw2011年暑假ImageMagick学习笔记------------------------------------------------------------注意:ImageMagick对中文支持不好,文件(夹)一定不要含中文,否则会报错!切记!-开启开关+关闭开关,恢复从前。
convertconvert顾名思义就是对图像进行转化,它主要用来对图像进行格式的转化,同时还可以做缩放、剪切、模糊、反转等操作。
格式转化比如把foo.jpg 转化为foo.png:转换不会破坏原图像。
convert foo.jpg foo.pngMogrifymogrify -format png *.jpg将所有jpg文件转换成png格式,不破坏源文件(相当于批量转换了)注意:mogrify -format png *.gif会把gif文件的每一帧都转化成png文件,会生成很多文件convert还可以把多张照片转化成pdf格式:convert *.jpg foo.pdfconvert test.gif test.jpg会生成很多以test开头的图片文件=>大小缩放为一个普通大小的图片做一个缩略图convert -resize 100x100 foo.jpg thumbnail.jpg也可以用百分比,更为直观:convert -resize 50%x50% foo.jpg thumbnail.jpg (50%x50%是字母x)convert会自动地考虑在缩放图像大小时图像的高宽的比例,也就是说新的图像的高宽比与原图相同。
批量生成缩略图:mogrify -sample 80x60 *.jpg注意,这个命令会覆盖原来的图片,不过你可以在操作前,先把你的图片备份一下。
convert -sample 25%x25% input.jpg output.jpg等比列缩放=>加边框在一张照片的四周加上边框,可以用-mattecolor 参数,convert -mattecolor "#000000" -frame 60x60 yourname.jpg rememberyou.png其中,"#000000"是边框的颜色,边框的大小为60x60=>在图片上加文字convert -fill green -pointsize 40 -draw "text 10,50 " 2.jpg 222.jpg上面的命令在距离图片的左上角10x50的位置,用绿色的字写下,如果你要指定别的字体,可以用-font参数。
ImageMagick命令使用文档

1.convert命令识别这些选项。
Click on an option to get more details about how that option works.点击一个选项,该选项获取有关如何运作的更多细节。
Option选项Description描述Option-adaptive-blur geometry 自适应,模糊几何adaptively blur pixels; decrease effect near edges自适应模糊像素;靠近边缘下跌的因素-adaptive-blur geometry-adaptive-resize geometry 自适应,几何调整adaptively resize image with data dependent triangulation.自适应地调整数据依赖三角网的形象。
-adaptive-resize geometry-adaptive-sharpen geometry 自适应,提升几何adaptively sharpen pixels; increase effect near edges自适应提升像素;增加近边缘效应-adaptive-sharpen geometry-adjoin -毗连join images into a single multi-image file加入到一个单一的多图像的图像文件-adjoin-affine matrix 仿射矩阵affine transform matrix仿射变换矩阵-affine matrix-alpha -αon, activate, off, deactivate, set, opaque, copy", transparent, extract, backgroun d, or shape the alpha channel上,启动,关闭,停用,设置,不透明,复制“,透明,提取,背景,或形状的Alpha通道-alpha-annotate geometry text - 几何文字注释annotate the image with text图片与文字注解-annotate geometry text-antialias -反锯齿remove pixel-aliasing删除像素走样-antialias-append 后缀append an image sequence附加一个图像序列-append-authenticate value 进行身份验证的价值decipher image with this password这个密码破译图片-authenticate value-auto-gamma 全自动-γautomagically adjust gamma level of image自动将影像调整伽玛水平-auto-gamma-auto-level 全自动级automagically adjust color levels of image自动的调整图像色彩层次-auto-level-auto-orient 包括汽车,东方automagically orient image自动的东方形象-auto-orient-background color ,背景颜色background color背景颜色-background color-bench iterations 工作台迭代measure performance测量性能-bench iterations-bias value 偏置价值add bias when convolving an image加偏压时的图像卷积-bias value-black-threshold value 黑,阈值force all pixels below the threshold into black力低于阈值的所有像素为黑色 -black-threshold value-blue-primary point 蓝小学点chromaticity blue primary point蓝色的主色点-blue-primary point-blue-shift factor 蓝移因子simulate a scene at nighttime in the moonlight模拟夜间在月光下一个场景 -blue-shift factor-blur geometry ,模糊几何reduce image noise and reduce detail levels降低图像噪声,减少细节层次-blur geometry-border geometry 边界几何surround image with a border of color环绕图片的颜色边框-border geometry-bordercolor color - bordercolor 颜色border color边框颜色-bordercolor color-brightness-contrast geometry 亮度,对比度几何improve brightness / contrast of the image提高亮度/对比度的图像-brightness-contrast geometry-caption string 字幕字符串assign a caption to an image指定标题图像-caption string-cdl filename - CDL的文件名color correct with a color decision list正确的颜色与颜色决定列表-cdl filename-channel type 通道型apply option to select image channels适用选项来选择图片频道-channel type-charcoal radius 炭半径simulate a charcoal drawing模拟素描-charcoal radius-chop geometry 劈几何remove pixels from the image interior从图像中删除内部像素-chop geometry-clamp 钳restrict colors from 0 to the quantum depth限制从0到量子色深度-clamp-clip 夹clip along the first path from the 8BIM profile夹沿着从8BIM配置第一个路径 -clip-clip-mask filename 剪辑掩模文件名associate clip mask with the image影像剪辑与副面具-clip-mask filename-clip-path id 剪辑路径编号clip along a named path from the 8BIM profile剪辑沿着从8BIM配置命名的道路-clip-path id-clone index ,克隆指数clone an image克隆一个图像-clone index-clut ,查找表apply a color lookup table to the image申请一个颜色查找表中的形象-clut-contrast-stretch geometry 对比度拉伸几何improve the contrast in an image by `stretching' the range of intensity value改善图像对比度的`延伸'的强度值范围-contrast-stretch geometry-coalesce -凝聚merge a sequence of images合并的图像序列-coalesce-colorize value -上色价值colorize the image with the fill color与上色填充颜色的图像-colorize value-color-matrix matrix 彩色矩阵矩阵apply color correction to the image.应用颜色校正的图像。
PythonImagingLibrary中文手册

5.edge
6.links
7.offset
8.start
9.top
10.hit
11.topath
12.getmask
13.getoutline
24.ImageMath模块(PIL Plus)
1.例子
2.函数
1.eval
3.表达式语法
1.运算符
2.内建函数
25.第三部分:工具手册
26.pildriver工具
15
有一点非常重要的需要注意的是,除非到了迫不得已的时候,库不会装载或者解码原始的点阵数据。当打开一个文件的时候,库会读取文件头以获得文件格式、颜色模式、图像大小等属性,但是文件剩余的部分不会马上处理。
这意味着,文件打开操作是很快的,它与文件的大小、压缩的类型没有关系。这里是一个快速识别一系列图像文件的简单例子:
7.Postscript格式打印
1.Drawing Postscript
8.更多关于读取图像
1.控制解码器
3.概念
1.通道
2.模式
3.大小
4.坐标系统
5.调色板
6.信息
7.滤波器
4.第二部分:模块手册
5.Image模块
1.例子
2.函数
1.new
2.open
3.blend
posite
5.eval
图像归档处理
Python Imaging Library适合编写图像归档和批处理应用程序。使用这个库可以创建缩略图、转换文件格式、打印图像等。
当前版本的库能够识别和读取很多的图像格式。而能够输出的格式被特意限制于在交换和展示图像中最常用的格式上。
图像显示
当前版本的库包含Tk的PhotoImage?和?BitmapImage?接口,也包含Windows的DIB接口(可以同PythonWin和其他基于Windows的界面工具包一起使用)。还有一些其他的PIL支持提供了很多其他的GUI工具包。
PULNiX TM-6710CL 高分辨率单色摄像头说明书

TM-6710CLGeneral DescriptionThe PULNiX TM-6710CL is a high-resolutionmonochrome camera with non-interlace quad speed scanning, 120 Hz format and partial scanning (200 and 100 lines) capabilities. Since the quad speed mode is standard, images can be displayed only on a multi-sync, high-speed monitor. PULNiX PVM multi-sync monitors can display 60 Hz functions including partial scanning.The signal is analog progressive scanning (484 lines). The full frame electronic shutter with asynchronous reset permits shutter speeds to 1/32,000 sec. The shutter function works in all scanning modes. Square pixels provide excellent image definition in all orientations.Optional features include AGC enable, internal IR cut filter, gamma adjust to 0.45, and remoted imagers.Camera LinkCamera Link is a digital transmission standard developed through an initiative headed by PULNiX America, specifically for the machine vision industry in answer to customer requests. This specification includes data transmission as well as camera control and asynchronous serial communications, all on a single cable. Based on an implementation of National Semiconductor’s Channel Link technology, it defines a single connector for both frame grabbers and cameras, ensuring that all products bearing the Camera Link logo are interchangeable with each other.IntegrationThe CCD imager of the TM-6710CL can be exposed longer than normal TV timing (1/60 sec.). Thisfeature provides high sensitivity for dark-environment applications. Integration is achieved by controlling the pulse width of VINIT input up to a few seconds. Theprogressive scanning CCD chip in the TM-6710CL produces a full frame of resolution, using a frame grabber to capture the one frame of integrated image in non-interlace format.Asynchronous ResetThe TM-6710CL ’s asynchronous reset is flexible and takes external horizontal drive (HD) for phase locking (External HD = Analog HD Output/2). When VINIT pulse is applied, it resets the camera’s scanning and purges the CCD.Three modes control the asynchronous reset and shutter speed. With Async shutter mode and external VINIT high (5V), the async mode is automatically selected and the signal readout is inhibited until the trigger pulse occurs. Without VINIT trigger, the output is black video.1. External VINIT with controlled pulse width. The duration between pulse edges (5 volt TTL level) controls the shutter speed and integration period externally.2. Internal shutter speed with Fast mode. The video signal capturing has no delay from the reset timing if the falling edges of VINIT and external HD are the same. Otherwise, there is maximum HD delay before vertical scan resets.3. Internal shutter speed with Slow mode. The shutter speed control can be selected from 1/250 to 1/2,000 sec. Since the exposure period is longer than the frame period, thedata transfer is delayed to accomodate exposure.Applications• Motion analysis• High-speed on-line inspection • Gauging• Character reading• High definition graphics • Fast speed surveillanceProduct Features• High resolution 1/2” progressive scanninginterline transfer CCD imager 648(H) x 484(V) • Quad speed progressive scan - 120 Hz at fullresolution or (partial scan at up to 300 Hz)• 120 Hz, 60 Hz switchable• Full frame shutter , 1/60 to 1/32,000 sec.• Asynchronous reset with external shutter control • 8-bit x 2 (or 8-bit x 1) digital Camera Link output • Software Control via Camera Link interface for gain,A/D ref., shutter and mode selection (compatible with Win98/NT/2000/XP OS)• AGC on/off, gamma 1.0 or 0.45 (AGC off, gamma 1.0standard)• On chip micro-lens and low smear at fast shutter Camera Link CM is a registered trademark of the AIAProgressive Scan High-Speed Shutter CameraShutter Control *Manual Shutter Async Reset 0 no shutter 1/120 normal 1/1201 1/250 128H 1H 1/32,0002 1/500 64H 2H 1/16,0003 1/1,000 32H 3H 1/12,0004 1/2,000 16H 4H 1/8,0005 1/4,000 8H 8H 1/4,0006 1/8,000 4H 16H 1/2,0007 1/12,000 3H 32H 1/1,0008 1/16,000 2H 64H 1/5009 1/32,000 1H Shutter determined by pulse width (P .W.C.)* All shutter timing refers to 120fps full resolution640 x 480 mode output.Async Reset Mode:Mode 0: normal mode; Mode 1-4: fast mode; Mode 5-8: slow mode;Mode 9: pulse width mode.A t modes 1-9 the camera is at standby only , black video is output. One frame image will be output upon receiving an async reset pulse.Electronic ShutterThe TM-6710CL has a substrate drain-type shutter mechanism which produces a superb picture at various speeds without smearing. The built-in manual shutter speed control selects the electronic shutter rate of 1/250, 1/500, 1/1,000, 1/2,000, 1/4,000, 1/8,000, 1/16,000, or 1/32,000 sec. All shutter speeds are applied to partial scan, except slow speed at partial scanning. Progressive scanning allows a full 484 lines of vertical resolution per single shutter, unlike a conventional CCD camera at only 244 lines per shutter.Partial ScanningBy using the GUI or sending the RS-232 command, the TM-6710CL can have partial scanning of 200 and 100 lines (full resolution at narrower field of view and faster frame rate).Normal mode: 120 Hz/60 Hz progressive scan 200 line scan: 236 Hz progressive scan 100 line scan: 300 Hz progressive scan 2-row binning: 226 lines, 238 HzNormal mode: 120 Hz or 60 Hz is selectable from software control. At 60 Hz all parameters extend to half speed. See frame rate – FAST: 120Hz HALF: 60Hz.VINITVDSG (TRANSFER GATE)DISCHARGE PULSESVIDEOSHUTTER VIDEONON-INTERLACE OUTPUTASYNC RESETMode Control SoftwareUser-friendly GUI software, p/n 69-0062, is provided for Mode Switch control. This interface allows users to control the following functions of the TM-670CL camera:• Gain control - increase/decrease gain ofCh. A & Ch. B• Gain fine tune - increase/decrease gain of Ch. A,while decrease/increase Ch. B at 5:1 ratio• Ch. A Vref control - increase/decrease A/D voltagereference• Ch. B Vref control - increase/decrease A/D voltagereference• Gain selection - 9dB to 22dB• Clock selection - 60Hz (input sync changedautomatically) to 120Hz• Async/Manual Shutter control • Factory set recall• Power up (recall or save)• User page storage• Direct Shutter - increase/decrease manual shutterspeed• Partial scan rate - choice of 200 lines, 100 lines, or 2row binning Camera parameters can be uploaded from the PC to the camera. Once these parameters are stored in EEPROMs, an instantaneous change from one setting to another can be done with a delay of few frames in between.Analog VideoAnalog video output is available from the #4 pin of the 12-pin connector. This output is a single output that combines channels A and B, which means the horizontal speed is twice as fast as each individual digital output (fH = 60.98 kHz). The signal level is similar to RS-170 (1.0V p-p at 75 Ω).Connector and Pin ConfigurationsCamera Link Connector13 12 11 10 9 8 7 6 5 4 3 2 126 25 24 23 22 21 20 19 18 17 16 15 141131426MDR 26-Pin Connector(0226-622VC)Pin# Description Pin# Description1 GND (Shield) 14 GND (Shield)2 X0- 15 X0+3 X1- 16 X1+4 X2- 17 X2+5 Xclk- 18 Xclk+6 X3- 19 X3+7 SerTC+ 20 SerTC-8 SerTFG- 21 SerTFG+9 VINIT (CC1-) 22 VINIT (CC1+) 10 INTEG (CC2+) 23 INTEG (CC2-) 11 CC3- 24 CC3+ 12 CC4+ 25 CC4- 13 GND (Shield) 26 GND (Shield)Camera Link Signal Assignment to Channel Link Chip (Base Confi guration)Tx IN0 Data A0 (LSB) Tx IN1 Data A1 Tx IN2 Data A2 Tx IN3 Data A3 Tx IN4 Data A4Tx IN5 Data A7 (MSB) Tx IN6 Data A5 Tx IN7 DataB0 TxIN8 DataB1 Tx IN9 DataB2 Tx IN10 DataB6 Tx IN11 DataB7 Tx IN12 DataB3 Tx IN13 DataB4 Tx IN14 DataB5(TxIN15 thru 22 Reserved)Tx IN23 Tx IN24 LDV Tx IN25 FDVTx IN26 Reserved Tx IN27 Data A6Data A represents Odd lines (channel A) Data B represents Even lines (channel B)12345678910111212-Pin Connector1 GND (power) 7 VD in2 +12V 8 N/C3 GND (analog) 9 HD in4 Video out 10 RXD*5 GND (digital) 11 INTEG6 VINIT in 12 TXD* * Optional TTL serial communicationsExternal SynchronizationThe TM-6710CL can accept external HD and VD for phase locking. The internal PLL can accept external HD and lock with the CCD’s horizontal drive (HD). The CCD HD frequency is half of the analog video output HD.Example: Ext. HD = 30.49 kHz; VD will be 120 Hz and Master Clock will be 50.90 MHz.The internal sync generator can accept external VD to generate internal VD. The external VD frequency should be ±5% of the frame rate.The external sync is TTL level and applied to the 12-pin connector.OUTSIDE CAMERAINSIDE CAMERAExt H D(or Ext V D )4.7k R11µFC1External Sync Input SchematicExt. H D = Analog Output Frequency _____________________ 2Frequency . 12345Channel A Channel B V shift registersPhotodiodeCCD output Horizontal shift registersLines (Odd)(Even)At the same horizontal clock cycle, line 1 and odd lines go to channel A, line 2 and even lines go to channel B. Vertical shift registers move twice per horizontal blanking period. Lines 1 and 2, 3 and 4, and so on, are output from channel A and B simultaneously.Dual-Tap Video OutputThe TM-6710CL uses a dual-tap output for its fastframe readout.C o m p a n y a n d p r o d u c t n a m e s m e n t i o n e d i n t h i s d o c u m e n t a r e t r a d e m a r k s o r r e g i s t e r e d t r a d e m a r k s o f t h e i r r e s p e c t i v e o w n e r s . J A I A ·S c a n n o t b e h e l d r e s p o n s i b l e f o r a n y t e c h n i c a l o r t y p o g r a p h i c a l e r r o r s a n d r e s e r v e s t h e r i g h t t o m a k e c h a n g e s t o p r o d u c t s a n d d o c u m e n t a t i o n w i t h o u t p r i o r n o t i fi c a t i o n .71-0055 R e v C .01.07.2004JAI A·S, DenmarkPhone +45 4457 JAI UK Ltd., EnglandPhone: +44 189 582 JAI Corporation, Japan Phone: +81 045 440 0154www.jai-corp.co.jpJAI PULNiX, GermanyPhone +49-(0) 60 55-93 79-10 (toll-free)180****5444���������������������������������������������������������������������������������������������������������������������������������������������������Covered by patent #6259478B1SPECIFICATIONSImager 1/2” progressive scan interline transfer CCD Active Area 5.8mm x 4.3mm Active Pixel 648 (H) x 484 (V)Cell Size 9.0 µm x 9.0 µmScan Modes (Active Pixels)648 (H) x 484 (V) @ 120 Hz/60 Hz 648 (H) x 200 lines @ 236 Hz 648 (H) x 100 lines @ 300 Hz648 (H) x 226 lines @ 238 Hz (two row binning)SyncHD= 30.49KHz ±5% (at 50.980MHz)Vertical async. reset. or VD=120Hz±5%HD=23.97KHz±5% (at 40.00MHz - optional)Vertical async. reset. or VD=96Hz±5% (opt.)Data Clock Output 25.49 MHz (50.98MHz analog) or 20.03 MHz (40.06MHz analog)TV Resolution Analog: 500 pixels (H) x 484 lines (V)S/N Ratio 45dB min. (AGC = off)Min. Illumination 4 lux at normal speed (120 frame/sec)Video OutputAnalog: 1.0 Vp-p composite , 75Ω non-interlace Digital: Camera LinkAGC OFF (AGC ON is a factory option)Gamma 1.0 (Gamma 0.45 is a factory option)Lens Mount C-mount Power Req.12V DC, 700 mA Operating Temp.-10˚C to 50˚CVibration 7 Grms (10Hz x 2000Hz)Shock70GSize (W x H x L)46.1mm x 39.6mm x 140.0mm (1.81” x 1.56” x 5.51”)Weight260 gr (9.2 oz)MUST BE ORDERED SEPARATELYOptional Functions AGC ON, Gamma 0.45Optional Accessories Power Cable Power SupplyCamera Link Cable12P-02SPD-12UUP series 26CL-02-26。
Image j 基本操作
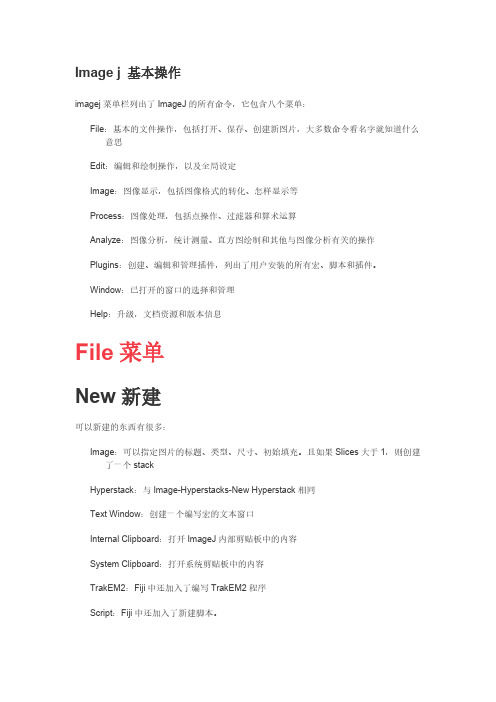
Image j 基本操作imagej菜单栏列出了ImageJ的所有命令,它包含八个菜单:File:基本的文件操作,包括打开、保存、创建新图片,大多数命令看名字就知道什么意思Edit:编辑和绘制操作,以及全局设定Image:图像显示,包括图像格式的转化、怎样显示等Process:图像处理,包括点操作、过滤器和算术运算Analyze:图像分析,统计测量、直方图绘制和其他与图像分析有关的操作Plugins:创建、编辑和管理插件,列出了用户安装的所有宏、脚本和插件。
Window:已打开的窗口的选择和管理Help:升级,文档资源和版本信息File菜单New新建可以新建的东西有很多:Image:可以指定图片的标题、类型、尺寸、初始填充。
且如果Slices大于1,则创建了一个stackHyperstack:与Image-Hyperstacks-New Hyperstack相同Text Window:创建一个编写宏的文本窗口Internal Clipboard:打开ImageJ内部剪贴板中的内容System Clipboard:打开系统剪贴板中的内容TrakEM2:Fiji中还加入了编写TrakEM2程序Script:Fiji中还加入了新建脚本。
Open打开可以打开的东西也有很多:常见图片,后缀有TIFF、GIF、JPEG、DICOM、BMP、PGM和FITS格式。
也可以通过插件打开额外的后缀的图片ImageJ和NIH的图片查询表,后缀是.lut以制表符分割的表格,后缀是.xls和.csv选区,后缀是.roi和.zip文本文件,后缀是.txt、.ijm、.js和.java其他Open Next打开下一个关闭当前图片,打开目录中的下一个图片(如果有的话)。
按住Alt打开目录中的前一个图片(如果有的话)。
Open Samples打开样例打开ImageJ服务器上的样例图片,可以用来测试宏、脚本、插件等。
Open Recent打开最近文件子菜单会显示最近15个打开的文件,可以选择其中一个。
COLMAP简易教程(命令行模式)
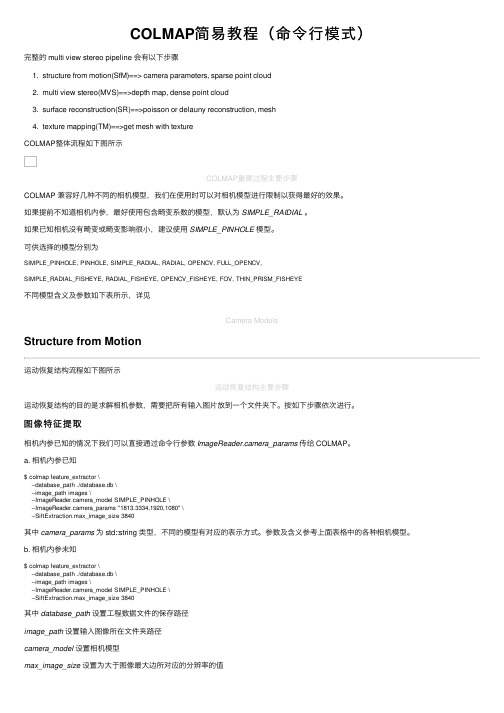
COLMAP简易教程(命令⾏模式)完整的 multi view stereo pipeline 会有以下步骤1. structure from motion(SfM)==> camera parameters, sparse point cloud2. multi view stereo(MVS)==>depth map, dense point cloud3. surface reconstruction(SR)==>poisson or delauny reconstruction, mesh4. texture mapping(TM)==>get mesh with textureCOLMAP整体流程如下图所⽰COLMAP重建过程主要步骤COLMAP 兼容好⼏种不同的相机模型,我们在使⽤时可以对相机模型进⾏限制以获得最好的效果。
如果提前不知道相机内参,最好使⽤包含畸变系数的模型,默认为SIMPLE_RAIDIAL。
如果已知相机没有畸变或畸变影响很⼩,建议使⽤SIMPLE_PINHOLE模型。
可供选择的模型分别为SIMPLE_PINHOLE, PINHOLE, SIMPLE_RADIAL, RADIAL, OPENCV, FULL_OPENCV,SIMPLE_RADIAL_FISHEYE, RADIAL_FISHEYE, OPENCV_FISHEYE, FOV, THIN_PRISM_FISHEYE不同模型含义及参数如下表所⽰,详见Camera ModelsStructure from Motion运动恢复结构流程如下图所⽰运动恢复结构主要步骤运动恢复结构的⽬的是求解相机参数,需要把所有输⼊图⽚放到⼀个⽂件夹下。
按如下步骤依次进⾏。
图像特征提取相机内参已知的情况下我们可以直接通过命令⾏参数ImageReader.camera_params传给 COLMAP。
a. 相机内参已知$ colmap feature_extractor \--database_path ./database.db \--image_path images \--ImageReader.camera_model SIMPLE_PINHOLE \--ImageReader.camera_params "1813.3334,1920,1080" \--SiftExtraction.max_image_size 3840其中camera_params为 std::string 类型,不同的模型有对应的表⽰⽅式。
TooManyCellsR R包的说明书

Package‘TooManyCellsR’October12,2022Title An R Wrapper for'TooManyCells'Version0.1.1.0Author Gregory W.SchwartzMaintainer Gregory W.Schwartz<***********************.edu>Description An R wrapper for using'TooManyCells',a command line program for clustering,visual-izing,and quantifying cell clade relation-ships.See<https://gregoryschwartz.github.io/too-many-cells/>for more details. Imports Matrix,imager,ggplot2,cowplot,jsonliteSystemRequirements'TooManyCells'(https:///GregorySchwartz/too-many-cells)License GPL-3Encoding UTF-8LazyData trueRoxygenNote6.1.1NeedsCompilation noRepository CRANDate/Publication2019-10-0720:20:02UTCR topics documented:importResults (2)tooManyCells (3)tryFunc (4)writeMatrixFiles (5)Index612importResults importResults Import some’too-many-cells make-tree’outputs into a data frame.DescriptionThis function will import some of thefiles resulting from a’too-many-cells make-tree’run into R as data frames.Does not include cluster list.Look at the main tooManyCells function for the cluster list.UsageimportResults(dir="out")Argumentsdir The output directory of a’too-many-cells’run.ValueA list of each output.Reads the followingfiles,see https://gregoryschwartz.github.io/too-many-cells/for more details:"dendrogram.svg","clumpiness.pdf","projection.pdf","la-bel_projection.pdf","clumpiness.csv","cluster_info.csv","node_info.csv",and"cluster_diversity.csv". Examplesinput<-system.file("extdata","mat.csv",package="TooManyCellsR")inputLabels<-system.file("extdata","labels.csv",package="TooManyCellsR")df=read.csv(input,s=1,header=TRUE)mat=Matrix::Matrix(as.matrix(df),sparse=TRUE)labelsDf=read.csv(inputLabels,header=TRUE)#Here we draw this small toy example with no filter or normalization,and#decrease the size of the branches and increase the size of the leaf nodes.#With non-toy real world single cell data,these options should not be#necessary.##Not run:tooManyCells(mat,labels=labelsDf,args=c("make-tree","--no-filter","--normalization","NoneNorm","--draw-max-node-size","40","--draw-max-leaf-node-size","70"))res=importResults("out")plot(res$treePlot,axes=FALSE)##End(Not run)tooManyCells3 tooManyCells Execute’too-many-cells’.DescriptionThis function will run’too-many-cells’on a Matrix.Requires’TooManyCells’to be installed(fol-low instructions at https://gregoryschwartz.github.io/too-many-cells/).UsagetooManyCells(mat,args=c("make-tree"),labels=NULL,output="out",prior=NULL,docker=NULL,mounts=c())Argumentsmat The input Matrix with gene row names and cell barcode column names.args The arguments to give to the command line program.See https://gregoryschwartz.github.io/too-many-cells/for more information.Defaults to"make-tree".labels The input labels data frame with item(cell barcodes)and label(whatever la-bels you want to give them,such as tissue of origin,celltype,etc.)columns.Optional.output The output folder for the’too-many-cells’process.Defaults to"out".prior The location of the tree that was already made(previous’too-many-cells’out-put)so quick visual or pruning changes can be made without remaking the tree(can potentially save hours).docker If using’too-many-cells’with docker,use this argument as the command to call.For instance,if version0.2.1.0was pulled from Docker Hub,set to"gregoryschwartz/too-many-cells:0.2.1.0".mounts Additional directories to mount if needed for docker.The’prior’argument willautomatically mount if specified.ValueA list of each output,including the stdout.Reads the followingfiles,see https://gregoryschwartz.github.io/too-many-cells/for more details:"dendrogram.svg","clumpiness.pdf","projec-tion.pdf","label_projection.pdf","clumpiness.csv","cluster_info.csv","node_info.csv",and"clus-ter_diversity.csv".Examplesinput<-system.file("extdata","mat.csv",package="TooManyCellsR")inputLabels<-system.file("extdata","labels.csv",package="TooManyCellsR")df=read.csv(input,s=1,header=TRUE)mat=Matrix::Matrix(as.matrix(df),sparse=TRUE)labelsDf=read.csv(inputLabels,header=TRUE)#Here we draw this small toy example with no filter or normalization,and4tryFunc #decrease the size of the branches and increase the size of the leaf nodes.#With non-toy real world single cell data,these options should not be#necessary.##Not run:res=tooManyCells(mat,labels=labelsDf,args=c("make-tree","--no-filter","--normalization","NoneNorm","--draw-max-node-size","40","--draw-max-leaf-node-size","70"))plot(res$treePlot,axes=FALSE)res$stdoutres$nodeInfo##End(Not run)tryFunc Different error for importing data.DescriptionThis function will fail gracefully instead of stopping the program with an error.UsagetryFunc(f,file)Argumentsf The function to use.file The inputfile to be read.ValueThe imported data frame or NULL if an error occurred.Examplesinput<-system.file("extdata","mat.csv",package="TooManyCellsR")fail=tryFunc(read.csv,"fail.csv")failsuccess=tryFunc(read.csv,input)successwriteMatrixFiles5 writeMatrixFiles Write a Matrix to a folder.DescriptionThis function will write a Matrix from the Matrix library to a temporary directory containing ma-trix.mtx,genes.tsv,barcodes.tsv,and optionally a labels.csvfile.UsagewriteMatrixFiles(mat,labels=NULL)Argumentsmat The input Matrix with gene row names and cell barcode column names.labels The input labels data frame with item(cell barcodes)and label(whatever la-bels you want to give them,such as tissue of origin,celltype,etc.)columns.Optional.ValueNoneExamplesinput<-system.file("extdata","mat.csv",package="TooManyCellsR")df=read.csv(input,s=1,header=TRUE)mat=Matrix::Matrix(as.matrix(df),sparse=TRUE)writeMatrixFiles(mat)IndeximportResults,2tooManyCells,3tryFunc,4writeMatrixFiles,56。
imagesharp的用法 -回复
imagesharp的用法-回复首先,在讨论Imagesharp的使用方法之前,让我们先了解一下什么是Imagesharp。
Imagesharp是一个基于.NET平台的图像处理库,它提供了丰富的图像处理功能,可以用于在.NET应用程序中对图片进行编辑、调整、转换等操作。
它支持多种图像格式,并具有良好的性能和易用性。
接下来,我们将一步一步地回答"Imagesharp的用法"这个主题。
第一步,安装Imagesharp库。
在使用Imagesharp之前,我们需要首先将其安装到我们的.NET项目中。
可以通过NuGet包管理器来进行安装,也可以手动下载库文件并引用到项目中。
使用NuGet包管理器安装Imagesharp的方法如下:1. 打开Visual Studio,进入你的.NET项目。
2. 在Visual Studio菜单中选择"工具" -> "NuGet包管理器" -> "管理解决方案的NuGet包"。
3. 在右上角的搜索框中输入"Imagesharp",然后点击"Install"按钮安装最新版本。
手动下载并引用Imagesharp的方法如下:1. 在你的浏览器中搜索"Imagesharp",找到官方网站或GitHub仓库。
2. 在官方网站或GitHub仓库中找到下载链接,下载最新版本的库文件。
3. 将下载的库文件解压到你的项目文件夹中。
4. 在Visual Studio中打开你的项目,右键点击项目名称,选择"添加" -> "现有项"。
5. 在文件选择对话框中,选择解压后的库文件,然后点击"添加"按钮。
第二步,图像的加载与保存。
在使用Imagesharp处理图像之前,我们需要先加载图像文件,并可以选择将处理后的图像保存到指定的位置。
- 1、下载文档前请自行甄别文档内容的完整性,平台不提供额外的编辑、内容补充、找答案等附加服务。
- 2、"仅部分预览"的文档,不可在线预览部分如存在完整性等问题,可反馈申请退款(可完整预览的文档不适用该条件!)。
- 3、如文档侵犯您的权益,请联系客服反馈,我们会尽快为您处理(人工客服工作时间:9:00-18:30)。
Using Command Line Imager
Basic Instructions:
1.Download the appropriate Imager CLI package and unzip it.
2.Open a Terminal windows (Mac & Linux) or Command Prompt (Windows). Make sure the
Terminal/Command Prompt is run with elevated privileges (the “su” or “sudo” command on
Mac & Linux, right-click>Run as Administrator on Windows).
e the “cd” command to navigate to the folder where you expanded the Imager CLI files.
4.Run the following command to list the physical drives attached to your system:
ftkimager --list-drives
e a command in the structure of “ftkimager [source] [destination] [options]” to create an
image of your selected drive, where [source] is the physical path of the drive to image and
[destination] is the full path (excluding file extension) where the resulting image will be saved.
[source] can also be an image file for converting to another image format. Use quotes when
[source] or [destination] contain spaces. Reference the options listed below when formulating the command.
Example:
To image the drive listed as \\.\PHYSICALDRIVE0 to an E01 named MyDrive on drive X:\ and encrypt the image using the password test123, you would use the following command:
ftkimager \\.\PHYSICALDRIVE0 “X:\MyDrive” --e01 --outpass test123
Advanced Usage
ftkimager [source] [destination] [options]
The following is a list of all possible options that can be used. Multiple options can be used in the same command.
The following options can be used to add metadata to the destination image. Use quotes when X。