F30-VF说明书下
电安 PDG23F0150TFFJ 商品说明说明书

Eaton PDG23F0150TFFJEaton Power Defense molded case circuit breaker, Globally Rated, Frame 2, Three Pole, 150A, 25kA/480V, T-M (Fxd-Fxd) TU, Standard Line and Load (PDG2X3TA225)25 kAIC at 480 Vac2600150 AThree-pole 600 VPD2 Global35 kAIC @240V (UL)35 kAIC Icu/ 35 kAIC Ics/ 73.5 kAIC Icm @240V (IEC)18 kAIC Icu/ 15/13 kAIC Ics/ 37.8 kAIC Icm @525V South Africa (IEC) 14 kAIC @600V (UL/CSA)25 kAIC Icu/ 20 kAIC Ics/ 52.5 kAIC Icm @440V (IEC) 25 kAIC @480V (UL) 10 kAIC Icu @125 Vdc 10 kAIC Icu @250 Vdc25 kAIC Icu/ 25 kAIC Ics/ 52.5 kAIC Icm @380-415V (IEC)20 kAIC Icu/ 20 kAIC Ics/ 42 kAIC Icm @480V Brazil (IEC)Thermomagnetic Class A Complete breakerStandard Line and LoadInterrupt rating Frame Rated operation voltage (Ue) at AC - maxAmperage Rating Number of poles Voltage rating - max Circuit breaker type Interrupt rating range Switch off technique Class Circuit breaker frame type Terminals3D CAD drawing packageEaton Power Defense MCCB PDG23F0150TFFJ 3D drawing Application notesConsulting application guide - molded case circuit breakersBrochuresPower Defense technical selling bookletPower Defense molded case circuit breaker selection posterPower Defense brochurePower Defense molded case circuit breakers - Frame 2 product aid CatalogsMolded case circuit breakers catalogCertification reportsEU Declaration of Conformity - Power Defense molded case circuit breakersPDG4 CB reportPDG4 CCC certificationPower Defense Declaration concerning California’s Proposition 65PDG2 CB reportInstallation instructionsPower Defense Frame 2 tunnel terminal (aluminum), 50A, 3 pole instructions - IL012236EN H03Power Defense Frame 1 IEC and Frame 2 Rotary Mechanism with NFPA Handle Attachment Instructions (IL012260EN).pdfPower Defense Frame 2 multi wire connector kit -PDG2X3(2)(4)TA2253W instructions - IL012243EN H01Power Defense Frame 2 locking devices and handle block instructions - IL012149ENPower Defense Frame 1-2-3-4 IP door barrier assembly instructions -IL012278ENPower Defense Frame 2 Direct Rotary Handle Assy With Interlock Version Instructions (IL012138EN).pdfPower Defense Frame 2 screw terminal_end cap kit, 225A, 3 pole instructions - IL012258EN H01Power Defense Frame 2 PDG2 and PDC(E)9 breaker instructions -IL012106ENPower Defense Frame 2 multi wire connector kit -PDG2X3(2)(4)TA2256W instructions - IL012242EN H01Power Defense Frame 2/3/4/5/6 voltage neutral sensor module wiringinstructions – IL012316ENPower Defense Frame 2 handle mech direct rotary handle instructions - IL012134ENPower Defense Frame 2 handle mech variable depth rotary handle instructions - IL012136ENPower Defense Frame 2 tunnel terminal (aluminum), 150A, 3 pole instructions - IL012238EN H03Power Defense Frame 2 box terminal (aluminum), 225A, 3 pole instructions - IL012235EN H03Power Defense Frame 2 box terminal (steel), 100A, 3 pole instructions - IL012234EN H03Power Defense Frame 2 tunnel terminal (aluminum), 100A, 3 pole instructions - IL012237EN H03Power Defense Frame 2 global terminal shield, 3 pole - IL012330EN Power Defense Frame 2 shunt trip UVR instructions - IL012130EN Power Defense Frame 2 clamp terminal (steel), 20A, 3 pole instructions - IL012246EN H03Power Defense Frame 2 terminal kit - PDG2X3(2)(4)TA225RF instructions - IL012245EN H01Power Defense Frame 2 tunnel terminal kits - PDG2X1TA225K instructions- IL012239EN H01Power Defense Frame 2 terminal kit - PDG2X3(2)(4)TA150RF instructions - IL012244EN H01Installation videosPower Defense Frame 2 Bell Alarm with PXR Animated Instructions.pdf.rh Power Defense Frame 2 withTMTU, Shunt Trip_UVR Animated Instructions.rhPower Defense Frame 2 TMTU Aux, Alarm, ST and UVR Animated Instructions.rhPower Defense Frame 2 Locking Devices and Handle Block Animated Instructions.pdf.rhPower Defense Frame 2 Handle Mech Variable Depth Rotary Handle Animated Instructions.rhMultimediaPower Defense Frame 3 Variable Depth Rotary Handle Mechanism Installation How-To VideoPower Defense Frame 2 Variable Depth Rotary Handle Mechanism Installation How-To VideoPower Defense Frame 2 Direct Rotary Handle Mechanism Installation How-To VideoPower Defense Frame 2 Aux, Alarm, Shunt Trip, and UVR How-To Video Power Defense Frame 5 Trip Unit How-To VideoEaton Corporation plc Eaton House30 Pembroke Road Dublin 4, Ireland © 2023 Eaton. All Rights Reserved. Eaton is a registered trademark.All other trademarks areproperty of their respectiveowners./socialmediaEaton Power Defense for superior arc flash safety Power Defense molded case circuit breakers Power Defense BreakersPower Defense Frame 6 Trip Unit How-To Video Eaton Specification Sheet - PDG23F0150TFFJ Power Defense time current curve Frame 2 - PD2Molded case and low-voltage power circuit breaker health Making a better machineIntelligent circuit protection yields space savings Single and double break MCCB performance revisited Molded case and low-voltage breaker health Safer by design: arc energy reduction techniquesSpecifications and datasheetsTime/current curvesWhite papers。
F3000用户手册说明书

P/N : MMBB0193002 (1.0)LG Electronics Inc.F3USER’S MANUAL F 3000USER’S MANUAL WE SHOULD INFORM USER THAT THIS MANUAL CAN HAVE SOME DIFFERENCES FROM PHONE DEPENDING ON PHONE S/W AND SERVICE PROVIDER.F 3000USER’S MANUALLG Electronics Inc.ENGLISH F3000USER’S MANUALWE SHOULD INFORM USER THAT THIS MANUAL CAN HAVESOME DIFFERENCES FROM PHONE DEPENDING ON PHONE S/WAND SERVICE PROVIDER.GUIDELINES FOR SAFE AND EFFICIENT USE4F3000 FEATURES7 Part of the phone 7 Display Information 9 On-Screen Icons 9GETTING STARTED 10 Installing the SIM card and the handset battery 10 Charging the Battery 11 Disconnecting the charger 11GENERAL FUNCTIONS 12 Entering Text12MENU TREE14PROFILES15 Activate15 Personalise15 Rename15CALL REGISTER16 Missed calls16 Received calls16 Dialled calls16 Delete recent calls16 Call charges16 GPRS information17TOOLS18 Favourite18 Alarm clock18 Bluetooth18 Calculator19 Unit converter19 World time19ORGANISER20 Contacts20 Scheduler22 Memo222TABLE OF CONTENTS\ Table of ContentsMESSAGES23 Write text message23 Write multimedia message24 Inbox24 Outbox25 Drafts26 Listen to voice mail26 Info message26 Templates27 Settings28MULTIMEDIA29 Camera29 Voice recorder31 MP331 Memory status33SETTINGS34Date &Time34Phone settings34Call settings34Security settings36Network settings37GPRS setting38Reset settings38Memory status38 SERVICE39Internet39SMS-Services40 DOWNLOADS41Games & more41Pictures42Sounds42 ACCESSORIES43 TECHNICAL DATA443|TableofContents\ Guidelines for safe and efficient useRadio wave exposure and Specific Absorption Rate (SAR)informationThis mobile phone model F3000 has been designed to complywith applicable safety requirement for exposure to radiowaves. This requirement is based on scientific guidelines thatinclude safety margins designed to assure this safety of allpersons, regardless of age and health.• The radio wave exposure guidelines employ a unit ofmeasurement known as the Specific Absorption Rate, or SAR.Tests for SAR are conducted using standardized method withthe phone transmitting at its highest certified power level inall used frequency bands.• While there may be differences between the SAR levels ofvarious LG phone models, they are all designed to meet therelevant guidelines for exposure to radio waves.• The SAR limit recommended by the international Commissionon Non-Ionizing Radiation Protection (ICNIRP), which is2W/kg averaged over ten (10) gram of tissue.• The highest SAR value for this model phone tested by DASY4for use at the ear is 0.988 W/kg (10g).• SAR data information for residents in countries/regions that have adopted the SAR limit recommended by theInstitute of Electrical and Electronics Engineers (IEEE), whichis 1.6 W/kg averaged over one (1) gram of tissue.Product care and maintenanceWarning: Use only batteries, charger and accessoriesapproved for use with this particular phone model. The use ofany other types may invalidate any approval or warrantyapplying to the phone, and may be dangerous.• Do not disassemble this unit. Take it to a qualified servicetechnician when repair work is required.• Keep away from electrical appliance such as a TV, radio orpersonal computer.• The unit should be kept away from heat sources such asradiators or cookers.• Do not drop.• Do not subject this unit to mechanical vibration or shock.• The coating of the phone may be damaged if covered withwrap or vinyl wrapper.• Do not use harsh chemicals (such as alcohol, benzene,thinners, etc.) or detergents to clean your phone. There is arisk of this causing a fire.• Do not subject this unit to excessive smoke or dust.• Do not keep the phone next to credit cards or transporttickets; it can affect the information on the magnetic strips.• Do not tap the screen with a sharp object; otherwise, it maydamage the phone. GUIDELINES FOR SAFE AND EFFICIENT USE45|Guidelines for safe and efficient use• Do not expose the phone to liquid or moisture.• Use the accessories like an earphone cautiously.• If you put your phone in a pocket or bag without covering thereceptacle of the phone (power plug pin), metallic articles(such as a coin, paperclip or pen) may short-circuit thephone. Always cover the receptacle when not in use.• Never place your phone in a microwave oven as it will causethe battery to explode.• Only authorized personnel should service the phone and itsaccessories. Faulty installation or service may result inaccidents and consequently invalidate the warranty.• Do not use the phone if the antenna is damaged.If a damaged antenna contacts skin, it may cause a slightburn. Please contact an LG Authorized Service Center toreplace the damaged antenna.• The label of the phone contains important information forcustomer support purposes. Do not remove it.Efficient phone operationTo enjoy optimum performance with minimum powerconsumption please:• Hold the phone as you speak to any other telephone. Whilespeaking directly into the microphone, angle the antenna in adirection up and over your shoulder. If the antenna isextendable/retractable, it should be extended during a call.• Do not hold the antenna when the phone is in use. If you hold it, it can affect call quality, it also may cause the phone to operate as a higher power level that needed and shorten talk and standby times.• If your mobile phone supports infrared, never direct the infrared ray at anyone ’s eye.Electronics devices All mobile phones may get interference, which could affect performance.• Do not use your mobile phone near medical equipment without requesting permission. Avoid placing the phone over the pacemaker, i.e. in your breast pocket.• Some hearing aids might be disturbed by mobile phones.• Minor interference may affect TVs, radios, PCs, etc.• Do not bend, scratch, or expose to static electricity.Road safety Check the laws and regulations on the use of mobile phones in the areas when you drive.• Do not use a hand-held phone while driving.• Give full attention to driving.• Use a hands-free kit, if available.• Pull off the road and park before making or answering a call if driving conditions so require.• RF energy may affect some electronic systems in your motor vehicle such as car stereo, safety equipment.• When riding in a car, do not leave your phone or set up the hands-free kit near to the air bag. If wireless equipment is improperly installed and the air bag is activated, you may be seriously injured.Blasting areaDo not use the phone where blasting is in progress. Observe restrictions, and follow any regulations or rules. Potentially explosive atmospheres• Do not use the phone at a refueling point. Don’t use near fuel or chemicals.• Do not transport or store flammable gas, liquid, or explosives in the compartment of your vehicle, which contains your mobile phone and accessories.In aircraftWireless devices can cause interference in aircraft.• Turn off your mobile phone before boarding any aircraft.• Do not use it on the ground without crew permission.Battery information and care• You do not need to completely discharge the battery before recharging. Unlike other battery systems, there is no memory effect that could compromise the battery’s performance.• Use only LG batteries and chargers. LG chargers are designed to maximize the battery life.• Do not disassemble or short-circuit the battery pack.• Keep the metal contacts of the battery pack clean.• Replace the battery when it no longer provides acceptable performance. The battery pack may be recharged hundreds of times until it needs replacing.• Recharge the battery if it has not been used for a long time to maximize usability.•Do not expose the battery charger to direct sunlight or use it in high humidity, such as the bathroom.• Do not leave the battery in hot or cold places, this may deteriorate the battery performance.Network service• Some services and functions described in this user’s guide are dependent on network or subscription. Therefore, all menus may not be available in your phone. Please consult network operator for more information about your subscription.6GUIDELINES FOR SAFE AND EFFICIENT USE\ Guidelines for safe and efficient use7F3000 FEATURES|F3000featuresPart of the phone1. Earpiece2. Main LCD• Top:Signal strength, batterylevel and various function• Bottom:Soft key indications3. Alpha numeric keys• In standby mode:Inputnumbers to dialHold down:0– International calls1 – Activate Voice mail centre menu2 to 9 – Speed dials* – Activate Timer in Take picture mode• In editing mode: Enternumbers & characters4. Microphone5. Sub LCD6. Left side keys • In standby mode (opened):Volume of key tone • In standby mode (closed):Change the wallpaper of the sub-LCD (hold down)• In menu:scroll up & down • During a call:volume of the earpiece7. MP3 key8. Camera lens9. Flash 10. Right side keys11. Side camera key\F3000features•UD Briefly: List of NamesR Briefly: List of MessagesL Briefly: List of ProfilesHold down: Activate/Deactivate Vibrate mode •In menu:scroll up & down2. Confirm key3. Soft keys• These keys perform the function Indicated in the bottom of the display.4. MP3 hot key• Activate the MP3 Player menu directly.5. Camera hot key• Activates Camera menu directly.6. Send key• Dial a phone number and answer a call.• In standby mode: shows recently dialled, received andmissed call.7. End key• Switched on/off (hold down)• End or reject a call.8. Clear key89|F3000features Display InformationArea DescriptionFirst line Displays several icons.See the right side.Middle lines Display messages, instructions and any information that you enter, such as number to be dialled.Last line Shows the functions currently assigned tothe two soft keys.On-Screen IconsIcon Description Tells you the strength of the network signal.Call is connected.Icon Description You can use GPRS service.Shows that you are using a roaming service.The alarm has been set and is on.You have received a text message.You have received a voice message.You can view your schedule.Vibrate only menu in profile.General menu in profile.Loud menu in profile.Silent menu in profile.Headset menu in profile.You can divert a call.Indicates that the phone is accessing the WAP.Indicates that you are using GPRS.Bluetooth enabled.Menu ContactsInstalling the SIM card and the handset batteryMake sure the power is off before you remove the battery. 1. Remove the battery cover.Press the battery release latch andslide the battery cover toward thebottom of the phone. And removethe battery cover.2. Remove the battery.Hold the top edge of the battery and lift the battery from the battery compartment.3. Install the SIM card.Insert the SIM card into the holder. Slide the SIM card into the SIM card holder. Make sure that the SIM card is inserted properly and that the gold contact area on the card is facing downwards. To remove the SIM card, press down lightly and4. Install the battery.the bottom edge of the batterybattery until it snaps into space. GETTING STARTED\GettingstartedTo insert the SIM card To remove the SIM card5. Replace the battery cover.Lay the battery cover in place of the phone and slide it until the latch clicks.the phone until it clicks into place.2. Connect the other end of the travel adapter to the mains socket. Use only the included packing charger.Disconnecting the chargerDisconnect the travel adapter from the phone by pressing its side buttons as shown in the diagram.|GettingstartedCaution• Do not force the connector as this may damage the phone and/or the travel adapter.• Insert the battery pack charger vertically to wall power outlet.• If you use the battery pack charger out of your own country, use an attachment plug adaptor for the proper configuration.• Do not remove your battery or the SIM card while charging.Warning• Unplug the power cord and charger during lightning storms to avoid electric shock or fire.• Make sure that no sharp-edged items such as animal teeth, nails, come into contact with the battery. There is a risk of this causing a fire.• Do not place or answer calls while charging thephone as it may short-circuit the phone and/or cause electric shock or fire.Entering TextYou can enter alphanumeric characters by using the phone’s keypad. For example, storing names in the Address Book, writing a message, creating scheduling events in the calendar all require entering text.Changing the Text Input Mode1. When you are in a field that allows characters to be entered, you will notice the text input mode indicator in the upper right corner of the display.2. If you want to change modes, press #.The available modes are changed.Using the T9 ModeThe T9 predictive text input mode allows you to enter words easily with a minimum number of key presses. As you press each key, the phone begins to display the characters that it thinks you are typing based on a built-in dictionary. As new letters are added, the word changes to reflect the most likely candidate from the dictionary.1. When you are in the T9 predictive text input mode, start entering a word by pressing keys 2 to 9.Press one key per letter.• The word changes as letters are typed – ignore what’s on the screen until the word is typed completely.• If the word is still incorrect after typing completely, pressthe down navigation key once or more to cycle through the other word options.Example: Press 4 6 6 3 to type Good.Press 4 6 6 3 [down navigation key] totype Home.2. Enter the whole word before editing or deleting any keystrokes.3. Complete each word with a space by pressing the 0key or R key.To delete letters, press C. Press and hold down C to erase the letters continuously.Using the ABC ModeUse the 2to 9keys to enter your text.1. Press the key labeled with the required letter:• Once for the first letter.• Twice for the second letter.• And so on.GENERAL FUNCTIONS\GeneralFunctionsNoticeTo exit the text input mode without saving your input,press E. The phone returns to the idel screen.|General Functions2. To insert a space, press the 0key once.To delete letters, press the C key. Press and hold down the C key to erase the letters continuously.Using the 123 (Numbers) ModeThe 123 Mode enables you to enter numbers in a text message (a telephone number, for example).Press the keys corresponding to the required digits before manually switching back to the appropriate text entry mode.Using the Symbol ModeThe Symbol Mode enables you to enter various symbols or special characters.To enter a symbol, press the *key. Use the navigation keys to select the desired symbol and press the [OK] key.1PROFILES1Vibrate only2Silent3General4Loud5Headset2CALL REGISTER1Missed calls2Received calls3Dialled calls4Delete recent calls 5Call charges6GPRS information 3TOOLS1Favourite2Alarm clock3Bluetooth4Calculator5Unit converter6World time 4ORGANISER1Contacts2Scheduler3Memo5MESSAGES1Write text message2Write multimediamessage3Inbox4Outbox5Drafts6Listen to voice mail7Info message8Templates9Settings6MULTIMEDIA1Camera2Voice recorder3MP34Memory status7SETTINGS1Date &Time2Phone settings3Call settings4Security settings5Network settings6GPRS setting7Reset settings8Memory status8SERVICE1Internet2SMS-Services9DOWNLOADS1Games & more2Pictures3SoundsMENU TREE \MenuTreePROFILES|ProfilesIn Profiles, you can adjust and customise the phone tones for different events, environments, or caller groups.There are five preset profiles: Vibrate only, Silent, General,Loud and Headset . Each profile can be personalised.Activate Menu 1.x.11. A list of profiles is displayed.2. In the Profiles list, scroll to the profile you want to activate and press the left soft key <[Select] or OK key.3. Then, select Activate .Personalise Menu 1.x.2Scroll to the desired profile in the Profile list. After pressing the left soft key <or the OK key, select Personalise . This menu is only available for General, Loud, and Headset.• Call alert type:Set the alert type for incoming calls.• Ring tone:Select the desired ring tone from the list.• Ring volume:Set the volume of the ringing tone.• Message alert type:Set the alert type for messages.• Message tone:Select the alert tone for messages.• Keypad tone:Select the desired keypad tone.• Keypad volume:Set the volume of keypad tone.• Flip tone:Allows to set the flip tone for adjusting environment.• Effect sound volume:Set the volume of effect sound.• Power on/off volume:Set the volume of the ringing tone when switching the phone on/off.• Auto answer:This function will be activated only when your phone is connected to the headset.- Off:The phone will not answer automatically.- After 5 secs:After 5 seconds, the phone will answer automatically.- After 10 secs:After 10 seconds, the phone will answer automatically.RenameMenu 1.x.3You can rename a profile and give it any name you want.1. To change the name of a profile, scroll to the profile in the profile list and after pressing the left soft key <or the OK key, select Rename .2. Key in the desired name and press the OK key or the left soft key <[OK].NoticeVibrate only, Silent and Headset profiles cannot be renamed.You can check the record of missed, received, and dialled calls only if the network supports the Calling Line Identification (CLI) within the service area.The number and name (if available) are displayed together with the date and time at which the call was made. You can also view call times.Missed calls Menu 2.1 This option lets you view the last 10 unanswered calls.Received calls Menu 2.2 This option lets you view the last 10 incoming calls.Dialled calls Menu 2.3 This option lets you view the last 20 outgoing calls (called or attempted).Delete recent calls Menu 2.4 Allows you to delete Missed calls and Received calls lists. You can delete Dialled calls and All calls lists at one time.Call charges Menu 2.5Call duration Menu 2.5.1 Allows you to view the duration of your incoming and outgoing calls. You can also reset the call times. The following timers are available:•Last call: Length of the last call.•All calls: Total length of all calls made and incoming calls since the timer was last reset.•Received calls: Length of the incoming calls.•Dialled calls: Length of the outgoing calls.•Reset all: Allows you to clear the length of all calls by pressing the left soft key <[Yes].Call costs Menu 2.5.2 Allows you to check the cost of your last call, all calls, remaining and reset the cost. To reset the cost, you need to PIN2 code.Settings (SIM Dependent)Menu 2.5.3• Set tariff: You can set the currency type and the unit price. Contact your service providers to obtain charging unit prices. To select the currency or unit in this menu, you need the PIN2 code.CALL REGISTER \Callregister•Set credit:This network allows you to limit the cost of your calls by selected charging units.If you select Read, the number of remaining unit is shown. If you select Change, you can change your change limit.•Auto display:This network service allows you to see automatically the cost of your last calls. If set to On, you cansee the last cost when the call is released.GPRS information Menu 2.6 You can check the amount of data transferred over the network through the GPRS information option. In addition, you can also view how much time you are online.Call duration Menu 2.6.1 You can check the duration of Last call and All calls.You can also reset the call timers.Data volumes Menu 2.6.2 You can check The Sent, Received or All data volumes and Reset all.| Call registerFavourite Menu 3.1 This option allows you to add your own favourites to the list already provided. Once you create your own menu, you can access the desired function quickly in the idle screen by pressing the up navigation key.Alarm clock Menu 3.2 You can set up to 5 alarm clocks to go off at a specified time.1. Select On and enter the alarm time you want.2. Select the repeat period: Once, Mon~Fri, Mon~Sat, Everyday.3. Select the alarm tone you want and press <[OK].4. Edit the alarm name and press < [OK].Bluetooth Menu 3.3 This handset supports built-in Bluetooth connectivity, which makes it possible to connect them with compatible Bluetooth headsets, computer applications and so on.Paired devices Menu 3.3.1 You can view all devices which are compatible with bluetooth phone.Handsfree devices Menu 3.3.2 If you enter My devices or Handsfree devices menu, you access the options as follow.•Connect/Disconnect:Allows to connect the other bluetooth devices.•Add new:Allows to search new bluetooth device.•Assign name:Allows to change the name of bluetooth.•Set as authorised/Set as unauthorised:Allows to set the authorised connection between each blue-tooth devices.•All service:Allows to view all services which are supported by bluetooth device.•Delete:Allows to delete the bluetooth device.•Delete all:Allows to delete all bluetooth devices.Settings Menu 3.3.3 You can register new device which is compatible with bluetooth. If you already have added the device, you can search it after entering a password.•Set bluetooth:You can activate or cancel bluetooth function.TOOLS\ToolsNoteSupported Bluetooth software (Bluetooth stacks) forDUN: WIDCOMM Bluetooth for Windows 1.4 and 3.0|Tools• My phone’s visibility : You can set the function that your phone is shown on the other bluetooth devices.• My phone’s name : You can set the name of bluetooth device.The default name is F3000.CalculatorMenu 3.4This contains the standard functions such as +, –, x, ÷:Addition, Subtraction, Multiplication,and Division .1. Input the numbers by pressing numeric keys.2. Use a navigation key to select a sign for calculation.3. Then input the numbers.4. Press the left soft key <[Result] to view the result.5. Press the left soft key <[Reset] or enter numbers to repeat the procedure above.6. To end Calculator , press the right soft key >[Back].Unit converterMenu 3.5This converts any measurement into a unit you want. There are 4 types that can be converted into units: Length, Area, Weight ,and Volume .1. You can select one of four unit types by pressing < [Unit]key.2. Select the standard value by using L , R .3. Select the unit you want to convert by pressing U and D .4. You can check the converted value for the unit you want.Also, you can input a decimal number by pressing *.World timeMenu 3.6You can view clocks of the world ’s major cities.1. Select the city belonged to the time zone by pressing L , R key.2. You can set the current time to the city time you select by pressing the left soft key <[Set].NoteUse C key to erase any numbers or signs. If you press key #, you can input a minus number. In addition, press key *, you can input a decimal number.Contacts Menu 4.1Search (Calling from phonebook)Menu 4.1.11. Select Search by press the left soft key <[Select] or [OK].2. Enter the name that you want to search or select left soft key <[List] to view all the phonebook list.3. If you want to edit, delete, copy an entry, or to add the voice to one, select left soft key <[Options]. The following menu will be displayed.•Edit:You can edit the name, number, group, character and picture by using the navigation key.•Write text/multimedia message:After you have found the number you want, you can send a text/multimedia message to the selected number.•Email: You can send e-mail.•Send via Bluetooth: This menu allows to send your list ofcontacts by bluetooth.•Copy:You can copy an entry from SIM to phone or fromphone to SIM.•Main number:You can select the one out of mobile, home, office that you often use. After you set this, the mainnumber will be displayed first, when you search.•Delete:You can delete an entry.Add new Menu 4.1.2 You can add phonebook entry by using this function.Phone memory capacity is 1000 entries. SIM card memory capacity depends on the cellular service provider.You can also save 20 characters of name in The Phone memory, and save characters in the SIM card. The number of character is SIM dependent feature.Caller groups Menu 4.1.3 You can list up to 20 members per one group. There are 7 groups you can make lists to.•Member list:Shows the group members you have selected.•Group ring tone:Allows you to specify ring tone for the group members’ call.•Group icon:Allows you to select the icon dependent on Group.•Add member:You can add group members. Each group member shouldn’t be exceeded 20.•Remove member:You can remove the member from the Group member list. But the name and the number still remain in phonebook.•Rename:You can change a group name.ORGANISER\ Organiser NoteIn standby mode, press right soft key >[Contacts] to access directly.NoteInstant searching is available by inputting the initial letter of the name or number you want to search.|OrganiserSpeed dial Menu 4.1.4You can assign any of the keys, 2 to 9 with a Name list entry. You can call directly by pressing this key.Settings Menu 4.1.5• Set memory:Scroll to highlight Set memory , and then press the left soft key <[Select].- If you select Variable , when adding entry, the phone will ask where to store.- If you select SIM or Phone , the phone will store an entry to SIM or phone.• Search by:Scroll to highlight Search by , then press the left soft key <[Select].- If you select Variable , the phone will ask how to search.- If you select Name or Number , the phone will search an entry by Name or Number.• View options : Scroll to highlight View options, and then press the left soft key [Select].- Name only:Set the phonebook list with displaying only name.- With pictures:Set the phonebook list with the information of character and picture.- Name & number:Set the phonebook list with displaying name and number.Copy all Menu 4.1.6You can copy/move entries from SIM card memory to Phone memory and vice versa.1. Scroll to Copy all , and then press the left soft key <[Select]to enter this menu.• SIM to Phone:You can copy the entry from SIM Card to Phone memory.• Phone to SIM:You can copy the entry from Phone memory to SIM Card.2. You can see the following submenus.• Keep original:When copying, Original Dial Number is kept.• Delete original:When copying, Original Dial Number will be erased.Delete all Menu 4.1.7You can delete all entries in SIM and Phone. This function requires Security code.Information Menu 4.1.8• Service dial numberUse this function to access a particular list of services provided by your network operator (if supported by the SIM card).• Memory statusThis feature allows you to see how many free and in-use are in your phonebook.。
达维(Davey)XF系列中心力泵产品说明说明书

71301P R O D U C TD E S C R I P T I O NRobust & compact, 1 or 2 stage centrifugal pumps with corrosionresistant componentry and driven by a TEFC motor. Designed for total head duties to 33m and flows to 225 lpm.Ideal for pumping clean, nonvolatile liquids without fibres or solids in such applications as:-•Irrigation •Aquaculture •Water transfer •Washing systems •HydroponicsO P E R AT I N G L I M I T SU R E S & B E N E F I T SF E AT U R E S & B E N E F I T SDavey manufactured TEFC IP55 motor is corrosion resistant and resists low pressure jets of water, dust and dirt for long service life in arduous conditions.Closed vane corrosion proof impellers with full length “D” drive for positive,robust impeller drive.Motor and pump are designed for frequent starts providing a long and reliable working life.Pump shafts (and casing on two stage models) are manufactured from quality corrosion resistant stainless steel for long service life when pumping less than perfect water.Every pump is performance and pressure tested in our factory to ensure quality and reliability.All models come fitted with a 2m power lead with 10 amp Australian three pin plug for ease of connection to power supply.High quality mechanical shaft seal for long life and reliability.XF92XF171XF221XF192Capacities to 98 lpm 175 lpm 225 lpm 190 lpm Max. Total Head 28m 17m 20m 33m Max. Suction Head7.0m7.5m7.5m 7.5mMin./Max. Water Temperature 1oC/50oC Max. Ambient Temperature 50o CInlet Size 1”BSP(F)Outlet Size1”BSP(F)1”BSP(M)1”BSP(M)1”BSP(F)TRANSFER PUMPSA P P L I C AT I O N SEasy to service design for shorter downtime if or when service is required.Permanently split capacitor design motor for reliable starting even in low voltage circumstances.Double contact C3-HTG sealed bearings for quieter running and longer life.In-built automatic-reset thermal overload protection embedded in the motor for quick response to motor overloading. Motor overloading can be the result of extreme ambient temperature, high or low voltage(beyond specification), pump blockage and / or pumping fluids heavier than fresh water (eg sea water).Plastic feet used on motor shell for long life in poorly drained installations.Also available in 110 or 220 volt 60Hz single phase.M AT E R I A L S O F C O N S T R U C T I O NPA R TM AT E R I A LImpellers Lock nut Pump casing Clamp band Pump shaft Suction coverSeal ring (stationary)Seal ring (rotating)Seal spring Orings DiffusersBlanking ring (XF92 & XF192)SpacerPriming plug Motor shell Shell finishGlass filled polycarbonate 304 stainless steelGlass filled noryl (XF171&XF221)304 stainless steel (XF92&XF192)304 stainless steel 304 stainless steel Glass filled noryl Ceramic Carbon304 stainless steel Nitrile rubber Glass filled noryl Glass filled noryl Glass filled nylon Glass filled norylMarine grade aluminium Baked polyesterE L E C T R I C A L D ATAfoot valve to avoid loss of prime•To prime, fill pump body and suction line through priming plug hole located above suction inlet and replace plugftTOTAL HEADm FLOWD I ME N S I O N SAll dimensions in mm unless otherwise stated.Davey Products Pty LtdMember of the GUD Holdings Ltd GroupABN 18 066 327 517Head Office and Manufacturing 6 Lakeview Drive,Scoresby, Australia 3179Ph:+61 3 9730 9222Fax:+61 3 9753 4100Website:.au Customer Service Centre Ph:1300 367 866Fax:1300 369 119E-mail:***************.au Interstate OfficesSydney - Brisbane - Adelaide Perth - TownsvilleInternational 6 Lakeview Drive,Scoresby, Australia 3179Ph:+61 3 9730 9121Fax:+61 3 9753 4248E-mail:****************.au GermanyKantstrasse 47,04275 Leipzig Ph:+49 341 301 0412Fax:+49 341 301 0413E-mail:**********************New Zealand 2 Rothwell Avenue,North Harbour, Auckland 1330Ph:+64 9 914 3680Fax:+64 9 914 3685Website: E-mail:****************.nz USADavey Pumps Inc.1005 N. Commons Drive Aurora, Illinois 60504Ph:+1 630 898 6976Fax:+1 630 851 7744Website: E-mail:******************This literature is not a complete guide to product usage. Further information is available from your Davey dealer, Davey Customer Service Centre and from the relevant product Installation and Operating Instructions. This data sheet must be read in conjunction with the relevant product Installation and Operating Instructions and all applicable statutory requirements. Product specifications may change without notice.® Davey is a registered trademark of Davey Products Pty Ltd. © Davey Products Pty Ltd 2001.D851-3/5K/0205/GPW supersedes D851-2/5K/0503/GPW。
松下VFF说明书优选稿

三相,380-460V (415V),50/60Hz
输 电压范围 入 电 频率范围
额定交流输入电压的+/-10% 额定输入频率的+/-5%
源
瞬时电压下 降承受力
在大于等于 165V 或低于 165V 不超过 15 毫秒时继续运行
在大于等于 330V 或低于 330V 不超过 15 毫秒时继
续运行
括号里的数字是 EN 型的参数
29
点动减速时 间
设置点动减速时间
0000:40 毫秒,0.1-1600 秒
**005.0
30
预设第 2 频 率
设定第 2 频率
0000:0V 停止,0.2-400Hz
20.00
31
预设第 3 频 率
设定第 3 频率
0000:0V 停止,0.2-400Hz
30.00
32
预设第 4 频 率
设定第 4 频率
加/减速时 0.04-999 秒(单独加速和减速时间设定)。
间
加/减速时 0.1-999 秒(单独加速和减速时间设定)。可与多速设 间 2,3 和 4 定连动。
多速频率设 最多可预设(可编程)8 速频率。可与加速和减速时间
定
设定连动。
跨跃频率设 定
最多可设定 3 个频率跨跃点(频率跨跃幅度为 1-10Hz)
过电压等级 II
污染程度
2
输
输出频率范 围
0.5-400Hz
出 频率显示 数字显示
输出频率精 频度
模拟设定时所选最大输出频率的±0.5%(25±10°C)
率
频率设定频 率分辨率
数字设定:0.01Hz(1/100Hz),模拟设定:0.1Hz(参 数设定为 50/60Hz)
2012款宝马3系F30行驶动态管理系统技术剖析
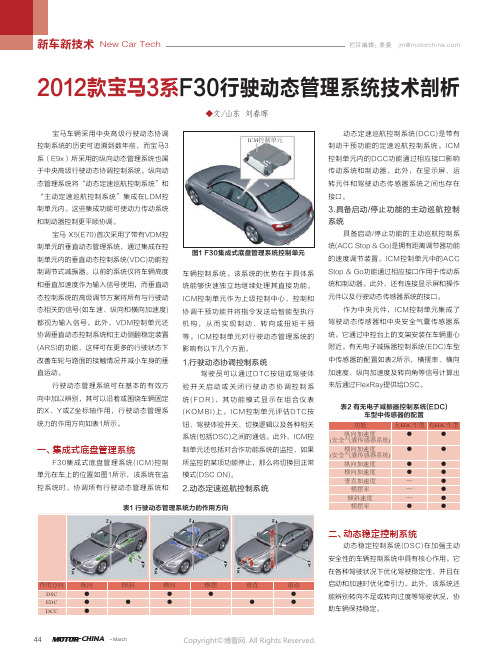
新车新技术New Car Tech栏目编辑:姜曼 2012款宝马3系F30行驶动态管理系统技术剖析◆文/山东 刘春晖宝马车辆采用中央高级行驶动态协调控制系统的历史可追溯到数年前,而宝马3系(E9x)所采用的纵向动态管理系统也属于中央高级行驶动态协调控制系统。
纵向动态管理系统将“动态定速巡航控制系统”和“主动定速巡航控制系统”集成在LDM控制单元内。
这些集成功能可使动力传动系统和制动器控制更平顺协调。
宝马 X5(E70)首次采用了带有VDM控制单元的垂直动态管理系统,通过集成在控制单元内的垂直动态控制系统(VDC)功能控制调节式减振器。
以前的系统仅将车辆高度和垂直加速度作为输入信号使用,而垂直动态控制系统的高级调节方案将所有与行驶动态相关的信号(如车速、纵向和横向加速度)都视为输入信号。
此外,VDM控制单元还协调垂直动态控制系统和主动侧翻稳定装置(ARS)的功能,这样可在更多的行驶状态下改善车轮与路面的接触情况并减小车身的垂直运动。
行驶动态管理系统可在基本的有效方向中加以辨别,其可以沿着或围绕车辆固定的X、Y或Z坐标轴作用,行驶动态管理系统力的作用方向如表1所示。
一、集成式底盘管理系统F30集成式底盘管理系统(ICM)控制单元在车上的位置如图1所示,该系统在监控系统时,协调所有行驶动态管理系统和车辆控制系统。
该系统的优势在于具体系统能够快速独立地继续处理其直接功能。
ICM控制单元作为上级控制中心,控制和协调干预功能并将指令发送给智能型执行机构,从而实现制动、转向或扭矩干预等。
ICM控制单元对行驶动态管理系统的影响有以下几个方面。
1.行驶动态协调控制系统驾驶员可以通过DTC按钮或驾驶体验开关启动或关闭行驶动态协调控制系统(FD R),其功能模式显示在组合仪表(KOMBI)上。
ICM控制单元评估DTC按钮、驾驶体验开关、切换逻辑以及各种相关系统(包括DSC)之间的通信。
此外,ICM控制单元还包括对合作功能系统的监控,如果所监控的某项功能停止,那么将切换回正常模式(DSC ON)。
最新FYF30矿用本安型无线发射器说明书

注:安装、使用本产品前,12请详细阅读使用说明书。
3456FYF30矿用本安型遥控发送器78使用说明书910(第1版)1112执行标准:GB 3836-20101314Q/xxxxx 12-2015出版日期:2015-06-01151617181920安全须知2122★严禁改变该产品本安电路及与本安电路相关的电气元件的型号、规格及23参数!★严禁随意更换使用说明书规定以外的电池!2425262728293031323334353637381.概述39 FYF30矿用本安型遥控发送器(以下简称发送器)配有2节3V CR2032/3Vso 40 松下电器(中国)有限公司生产电池和四个发送编码、八个三态地址编码;天线41 为内置印刷导线,这样可以进一步缩小体积,利用内置干簧管和外部磁钢便于与42 其它设备组成一个无线遥控系统;比如和风门磁钢组合可以组成无线风门报警,43 和综采工作面液压操纵手柄的磁钢组合可以组成无线支架降尘自动喷雾;采用适44 当的安装方式使发送器处于瞬间工作状态以降低电池功耗,延长电池使用寿命。
45发送器外壳采用ABS 塑料制造。
46 产品执行标准:GB3836.1-2010《爆炸性环境 第1部分:设备通用要求》、47 GB3836.4-2010《爆炸性环境 第4部分:由本质安全型“i ”保护的设备》、Q/ZBHT 48 12-2015《FYF30矿用本安型遥控发送器》。
492.型号命名与类型50 2.1型号命名:51 FYF第二特征代号:发射器第一特征代号:遥控用产品类型代号:辅助设备30遥控距离:30米52 2.2防爆型式及防爆标志:53防爆型式: 矿用本质安全型;5455防爆标志: Exib Imb。
562.3 适用范围:发送器适用于含有瓦斯和煤尘爆炸危险的煤矿井下;572.4发送器配套设备:见附录A.583.主要技术参数59a.额定工作电压: DC 6V;60b.工作电流:≤10mA;61c.最大无线传输距离:≤30m(发送器与主机的无线传输距离);62d.工作频率:(315±15)MHz(载频无线电编码);e.发射功率:≤300mW。
FLPV系列烈火防护双级垂直钢浮开关说明说明书

Page 1Copyright © 2021 Sensata Technologies, Inc. External 1-1/4” BSP 316 grade SS -20ºC / +79ºC 10 bar 0.70.8300cm 0.5MM 2Tinned copper| FLPV SERIESFLAMEPROOF DUAL LEVEL VERTICAL STAINLESS FLOAT SWITCHSPECIFICATIONSThe FLPV is a flameproof vertical float switch range which has been designed to give the user a long reach float switch with a number of switching options, to cater for a wide variety of system requirements. Manufactured in Stainless Steel 316L material, these switches are suitable for use in many aggressive liquids or hygienic applications.The single float version gives high (make on rise) and low (make on fall) level indications for alarms and controls systems.The dual float versions give either make on rise for both high and low levels (used for tank emptying control) or make on fall for both high and low levels (used for tank filling control).The switches are screw mounted vertically via a 1 ¼” BSP thread, and does not require access to the inside of the tank.Also available with FLA15 flange mount option, contact Sensata for details.TechnicalElectricalFeatures• Dual switch point for high/low indication • Stainless Steel 316L material • PED Approved (10 Bar)• G1 ¼” mounting thread (optional flange mount)•II 1/2 GDEx db IIB T6 Ga/Gb Ex tb IIIB T85ºC Db Tamb = -20ºC to +79ºC IP66For use in Zones 1 and 2All ratings are for resistive load only.Page 2CONTACT US+44 (0)1202 897969*********************Cynergy3 Components Ltd.7 Cobham Road,Ferndown Industrial Estate,Wimborne, Dorset,BH21 7PE, United KingdomCopyright © 2021 Sensata Technologies, Inc.Sensata Technologies, Inc. (“Sensata”) data sheets are solely intended to assist designers (“Buyers”) who are developing systems that incorporate Sensata products (also referred to herein as “components”). Buyer understands and agrees that Buyer remains responsible for using its independent analysis, evaluation and judgment in designing Buyer’s systems and products. Sensata data sheets have been created using standard laboratory conditions and engineering practices. Sensata has not conducted any testing other than that specifically described in the published documentation for a particular data sheet. Sensata may make corrections, enhancements, improvements and other changes to its data sheets or components without notice.Buyers are authorized to use Sensata data sheets with the Sensata component(s) identified in each particular data sheet. HOWEVER, NO OTHER LICENSE, EXPRESS OR IMPLIED, BY ESTOPPEL OR OTHERWISE TO ANY OTHER SENSATA INTELLECTUAL PROPERTY RIGHT, AND NO LICENSE TO ANY THIRD PARTY TECHNOLOGY OR INTELLECTUAL PROPERTY RIGHT, IS GRANTED HEREIN. SENSATA DATA SHEETS ARE PROVIDED “AS IS”. SENSATA MAKES NO WARRANTIES OR REPRESENTATIONS WITH REGARD TO THE DATA SHEETS OR USE OF THE DATA SHEETS, EXPRESS, IMPLIED OR STATUTORY, INCLUDING ACCURACY OR COMPLETENESS. SENSATA DISCLAIMS ANY WARRANTY OF TITLE AND ANY IMPLIED WARRANTIES OF MERCHANTABILITY, FITNESS FOR A PARTICULAR PURPOSE, QUIET ENJOYMENT, QUIET POSSESSION, AND NON-INFRINGEMENT OF ANY THIRD PARTY INTELLECTUAL PROPERTY RIGHTS WITH REGARD TO SENSATA DATA SHEETS OR USE THEREOF.All products are sold subject to Sensata’s terms and conditions of sale supplied at SENSATA ASSUMES NO LIABILITY FOR APPLICATIONS ASSISTANCE OR THE DESIGN OF BUYERS’ PRODUCTS. BUYER ACKNOWLEDGES AND AGREES THAT IT IS SOLELY RESPONSIBLE FOR COMPLIANCE WITH ALL LEGAL, REGULATORY AND SAFETY-RELATED REQUIREMENTS CONCERNING ITS PRODUCTS, AND ANY USE OF SENSATA COMPONENTS IN ITS APPLICATIONS, NOTWITHSTANDING ANY APPLICATIONS-RELATED INFORMATION OR SUPPORT THAT MAY BE PROVIDED BY SENSATA.Mailing Address: Sensata Technologies, Inc., 529 Pleasant Street, Attleboro, MA 02703, USA.ISO9001CERTIFIED Rev: Cynergy3-flpv-v1 02/24/21DIMENSIONSMade in the UKCustom versions can be made for particular applications.Please contact Sensata with your requirements.Flange mount optionFLA15Single float dual leveltype Dual float dual leveltype。
300VF调试手册

其中:OCSS是一个服务系统,负责有关操作的功能。
对应的控制电路板为RCB板—环形通信板(RING CAR BOARD)由上图知,OCSS负责接收及响应外呼,内呼操作,在轿厢及大厅显示电梯的实际运行方向和所在楼层位置,执行各种特殊功能如消防功能,地震功能,停电自拯救功能等等。
OCSS接收来自对应信号装置(远程站)的操作信号和让对应的远程站和其它子系统响应操作都要通过串行信号线来实现信息传递。
如果不少于两部电梯群控,刚各梯的OCSS(即RCB板)首尾相连,交换收到的操作信息,以最佳的响应响应操作。
最多可以8梯群控。
一般情况下,外呼信号连接至A梯的RCB板,若A梯发生故障或停电检修,则外呼信号会通过切换模块SOM切换至其它梯的RCB板去,保证电梯的不间断正常服务。
这是群控的优点之一。
MCSS在整个控制系统中处于枢纽位置,它一方面接收来自OCSS的要到某楼层去的运行指令,一方面监视安全回路的状态,计算距离和把适当的速度模式(速度和加速度)指令送给DBSS。
当到达OCSS指定楼层,MCSS接到安全确认后(速度已降至规定的安全值,电梯已进入门区),MCSS向DCSS发出开门指令。
另外,当停电时,MCSS利用电池维持电梯在井道内位置数据的信息,当恢复供电时,电梯很快投入正常服务。
无需执行再初始化操作,节省时间。
MCSS功能1、运行控制功能--运行逻辑状态控制的管理确认曳引机齿轮油适中对于13VTR型曳引机,抽出油箱盖棒,在电梯不动时油面应处在棒的两刻度环之间为适中。
抱闸的清洁与临时调整注:缓冲器应先加满油。
因为轿厢的空载重量比对重要轻,为确保人身及设备安全,要使轿厢保持不动,在拆卸抱闸前,让对重压在其缓冲器上。
拆开抱闸,清洁铁心和轴销并加入一层薄的润滑油。
检查确认抱闸的闸衬是清洁,并且于闸瓦牢固地胶合在一起。
重新装配抱闸,临时调整抱闸使之达到以下尺寸。
如图所示:安全钳的间隙X,Y,Z (单位为毫米)型号X Y ZA6972B 5 1.5 2.0A6972C 5 1.5 2.5A6972D 5 1.5 2.54.2.1.3安全钳的间隙要用塞尺检查使之达到所要求的间隙。
- 1、下载文档前请自行甄别文档内容的完整性,平台不提供额外的编辑、内容补充、找答案等附加服务。
- 2、"仅部分预览"的文档,不可在线预览部分如存在完整性等问题,可反馈申请退款(可完整预览的文档不适用该条件!)。
- 3、如文档侵犯您的权益,请联系客服反馈,我们会尽快为您处理(人工客服工作时间:9:00-18:30)。
第一章SWD-F30串行控制系统功能介绍A、基本功能列表编号名称用途电梯动作说明备注1 自动运行(1)到站自动开门;(2)手动提前关门(门开未到延时关门时间时);(3)外召顺向自动截车;(4)外召反向最高(或最低)自动截车。
(1)将控制柜、轿厢、轿顶正常/检修开关旋至正常位置;(2)将轿厢内自动/司机开关置于自动位置。
2 检修运行系统调试、维护检修时使用将系统设置为检修状态后,按慢上或慢下按钮,电梯会以检修速度向上或向下运行,松开按钮后停止。
正常/检修开关分别设在轿顶、轿内、控制柜,优先级别由高至低。
3 司机运行(1)到站自动开门;(2)手动关门;(3)外召自动顺向截车;(1)将控制柜、轿厢、轿顶正常/检修开关旋至正常位置;(2)将轿厢内自动/司机开关置于司机位置。
4 自动关门延时维持开门状态轿门完全打开后,保持开门状态,经过延时后自动关门。
延时时间通过关门等待时间1、关门等待时间2参数设定(S)5 本层外召开门外召开门电梯正在关门或已关门但未启动时,若本层外召,则重新开门。
仍按原设定的关门等待时间2延时关门。
6 安全触板光幕保护安全关门触动安全触板或光幕被遮挡时,关门动作立即停止且自动开门。
安全触板归位或光幕遮挡消失后再重新关门。
7 超载不关门等待减载超载时有定向、不关门、超载灯亮、蜂鸣器鸣响、轿厢内显示OV、电梯不启动。
超载消除后自动恢复正常运行。
8 满载直驶顺向直驶至最近的内选登记层达到额定载荷时只响应内选,不响应外召。
满载消除后自动恢复正常运行。
9 运行状态显示调试维修通过控制柜内主控电脑板上的液晶显示器显示电梯运行的状态、方向、所处楼层、轿门状态、负载状况及故障信息等。
10 门禁运行调试维修将系统设置为门禁状态后,电梯在门区不开门。
需将系统的B6、B7参数都设置为禁止开门。
11 照明自动开关节能有返基站功能,自动返基站,门关好后自动关灯;无返基站功能时在设定时间内电梯无人使用时,轿厢内照明将自动熄灭,接到任何召/呼命令后自动打开。
B1参数为00时,无返基站功能;非00时即为候梯基站。
打检修或急停都能取消节能输出,时间到后再有节能输出。
12 消防运行消防开关闭合后系统进入消防运行:(1)系统将清除所有外召及内选信号;(2)自动返回消防基站;(3)常开门;(4)返回消防基站后输出消防联动信号;(5)如果电梯正在反方向运行,则就近层停车、不开门直驶消防基站,常开门。
(6)开门限位不起作用时,即FU2设为1,消防状态时到达目的楼层不自动开门,点动开门按钮开门,按住开门按钮5秒后则常开门,点动关门。
电梯返回消防基站并处于停用状态不再运行a. 外召无效;b. 电梯在消防层时处于开门状态;c. 需要运行时,消防人员应首先选中目的楼层,然后按住关门按钮,直至门关好、电梯运行;d. 到达目的楼层不自动开门,点动开门,松手就关门,开到位后点动关门,松手就开门,关到位后待机,可再次选层走车。
e. 每次运行只能选定一个目的楼层,并且以最后一个内选指令有效。
13 故障自动靠站解救乘客若快车运行时发生故障停止在非门区,则轿厢向中间楼层方向爬行至平层位置后开门。
在安全回路及门回路接通,变频器工作正常的前提下。
14 驻停控制进入停运状态关闭电锁后电梯进入驻停状态:(1)若此时电梯正在运行且已有内选登记,则电梯不再响应任何外召,将所登记的内选服务完毕后自动返回锁梯层;(2)若无内选登记则电梯直接返回锁梯层;(3)返回锁梯层后:a. 电梯不再响应任何内选及外召;b. 10秒钟后,电梯自动关门、切断轿内照明并且厅外及轿内层显熄灭;c. 按下任一内选或开/关门按钮,轿内照明立即恢复;d. 按动开/关门按钮开门,10秒钟后重新自动关门并切断轿内照明。
(1)若关闭电锁时电梯处于检修状态,则电梯不能自动返回锁梯层,其余功能不变;(2)电梯处于驻停状态时,CPU始终处在工作状态。
一旦打开电锁,电梯会立即退出驻停状态, 投入正常运行。
15 并联控制双梯优化控制当有外召信号时,两台电梯可同时应答,根据各自的位置及运行方向按照快速与节能的原则做出判断,使其中一台电梯做出响应,从而提高电梯的运行效率。
用随机提供的电缆将两台电梯并联接口连接起来并正确设置并联参数,就可以实现两台电梯并联运行。
B、特殊功能列表编号名称用途电梯动作说明备注1 防捣乱停车撤销内选(1)当电梯运行至最远端楼层停车时,清除所有的内选登记;(2)若电梯有负载检测装置,轻载时内选最多登记3个,多选无效。
2 外召按钮嵌入自诊断维修指示若某一外召按钮按下持续时间超过20秒,系统则认为该按钮嵌入(不能复位),对该层外召不予登记,且该按钮对应的外召应答不断闪烁报警。
按钮复位后退出此状态。
3 重复关门执行关门指令后,在规定的时间内门联锁回路没有接通时,重新开门后再关门。
若如此反复20次,门联锁回路仍未接通则停梯待修,并在显示单元给出相应的故障显示。
4 机房选层调试通过控制柜内液晶显示器的按键操作,进行内选登记。
5 不停层设置设定不停靠层通过所设楼层时不停靠。
B4参数,将不停层设为禁止应答。
6 楼层显示字符的任意设定改变某一(些)楼层显示内容通过控制柜内液晶显示器的按键操作任意设置各楼层的显示字符(英文字母或有符号的数字)。
7 专用运行特殊乘客服务此状态下外召按钮无效并且无显示,电梯运行完全由轿厢内司机控制,开关门方式同有司机状态。
电梯配有专用开关时实现8 故障诊断自动发现并记录故障信息(1)当运行发生故障时,自动诊断出故障产生原因,并在液晶显示屏上显示故障信息;(2)将最近32次故障发生的时间、类型及故障楼层等信息保存在“故障报告”菜单中,以供维修人员查看。
故障代码请参见第五章。
9 待梯层设定待梯层等待在无司机状态、在一定时间内既无内选也无外召时,轿厢自动运行到待命层站。
待梯层只能设置一个楼层。
10 手动门设置在司机状态下到层停车时,必须开一次门才可再次走车。
将B6、B7参数设为允许开门;B8、B9参数设为手动开门。
C、安全保护功能列表编号名称电梯动作说明1 安全回路保护安全回路断开,电梯将立刻停止运行。
2 门联锁保护全部门联锁都闭合,电梯方能运行。
如运行中门联锁断开或抖动,电梯将停止运行。
3 运行接触器保护系统可检测电机回路接触器动作是否可靠。
如发现异常(未吸合或粘连),将停止电梯运行。
4 抱闸检测保护通过抱闸臂检测开关对抱闸的打开与闭合实时监测。
当抱闸未按要求打开时,系统将禁止电梯起动。
5 端站换速及楼层号校正系统在运行中检测到端站开关后,电梯将强迫换速并自动校正楼层显示。
6 门锁短接保护系统在开门后检测到门锁回路短接,停止电梯运行。
7 限位保护系统检测到限位开关动作,将立刻停止电梯运行。
8 极限保护系统检测到极限开关动作,整个系统将立刻掉电。
第二章SWD-F30串行控制系统构成与部件介绍2.1 系统结构框图(图2-1)系统的结构框图如图2-1所示。
本系统以微机主控单元SWD-F30为控制核心。
该主控单元采用串行通讯技术通过CAN总线或485HVG总线与轿厢操纵盘及厅外呼梯单元进行数据交换,对井道、安全回路等信息采用并行信号采集方式。
微机通过对采集到的信息数据进行逻辑分析及运算后,输出相应的控制信号和应答来对门电机及抱闸等进行控制。
使电梯的逻辑功能、故障诊断等功能得以实现。
并联各楼层外呼各楼层外呼图2-1 曳引机门锁与安全回路SWD-F30 SWD-F30 DC24V电源SWD-F22 SWD-F22 SWD-F22SWD-F21门机和照明控制等SWD-F22 轿内显示锁梯开关消防开关2.2 SWD-F系列串行控制系统产品类别及型号及列表产品名称规格型号单位说明主控电脑板SWD-F30 块最高支持64层轿厢通讯板SWD-F21 块32层站以下通用外呼通讯及显示板SWD-F22 块拉幕式点阵显示外呼通讯及显示板(横向)SWD-F22A 块拉幕式点阵显示注:本表内容可能会随时间有所变更,仅供参考。
2.3 系统主要部件性能指标2.3.1 性能特点◆主控制器采用性能稳定的32位高速ARM7CPU,运算速度更快;◆CAN总线串行通讯,4层板表贴工艺;◆由标准RS485通信模式升级成485HVG模式,专门适用于干扰强、距离远的场合;◆采用24V的通信总线大大增强了抗干扰能力,整个通信总线无需屏蔽电缆;◆支持并联无需增加成本两根连线即可;2.3.2 适用范围◆电梯集选,两台并联;◆速度范围≤0.63m/s;◆适用楼层:最高64层;◆适用于各种不同的门机系统;2.3.3 参照标准《GB7588-2003电梯制造与安装安全规范》2.3.4 电源规格电压:DC24V ±1.2V 电流:4.5A(楼层≤10层);6A(楼层>10层)2.3.5 工作温度元器件工作温度-40℃~+80℃(液晶操作器除外)2.4 系统主要部件介绍2.4.1 主控电脑板SWD-F30SWD-F30是整套控制系统的核心部分,所有控制功能都是通过它来实现的。
A.外观及安装尺寸图B.布局结构图:CN1 CN2X1~X28 LEDIDC1 JP6 JP5JP7 DIS1 DIS2K6 IDC3K1 K2 K3 K4 K5Y1~Y11 LEDCN31、插件规格(1)CN1、CN2、CN3为多脚插座SH231-5.08,额定电压:250V;额定电流:12A;每排20点;脚距:5mm 。
(2)X1~X28为输入信号端口对应的LED指示灯(3)IDC1为系统总线接口,用于系统调试。
IDC2为系统总线接口,用于接液晶操作器。
(4)JP6、JP7跳线说明:JP6角跳接为液晶屏显示;中间两角跳接为LED显示。
(5)K1~K6为调试用按键,列表如下图所示:2、接口定义及规格如下:名称端口号位置定义用途CN1X1 CN1-1 下平层输入X2 CN1-2 平层 *X3 CN1-3 上平层X4 CN1-4 上强减速X5 CN1-5 上换速 *X6 CN1-6 上限位X7 CN1-7 下强减速X8 CN1-8 下换速 *X9 CN1-9 下限位X10 CN1-10 检修X11 CN1-11 检修上行X12 CN1-12 检修下行X13 CN1-13 安全回路检测X14 CN1-14 厅门联锁检测X15 CN1-15 轿门联锁检测X16 CN1-16 抱闸接触器检测X17 CN1-17 抱闸开关X18 CN1-18 输出接触器检测X19 CN1-19 消防联动X20 CN1-20 变频器正常X21 CN2-1 运行中X22 CN2-2 零速X23 CN2-3 备用序号代码定义K1 MENU 返回上一级菜单、取消键K2 ∧上翻页键,设置参数时加一键K3 ∨下翻页键,设置参数时减一键K4 >光标键(循环右移)K5 ENTER 进入下一级菜单、修改数据后的确定键K6 RSET 复位CN2 X24 CN2-4备用X25 CN2-5X26 CN2-6X27 CN2-7 -X28 CN2-8 -OV CN2-9 通讯电源0V *通讯端口24V CN2-10 通讯电源24V *24V CN2-11 通讯电源24V *24V CN2-12 通讯电源24VOV CN2-13 通讯电源0VOV CN2-14 通讯电源0V *B1+ CN2-15 内呼总线+B1- CN2-16 内呼总线-B2+ CN2-17 外呼总线+B2- CN2-18 外呼总线-B3+ CN2-19 群控总线+B3- CN2-20 群控总线-3、CN3为主控单元输出信号接口。