Android界面开发之常用系统控件界面大合集
android studio 控件常用属性
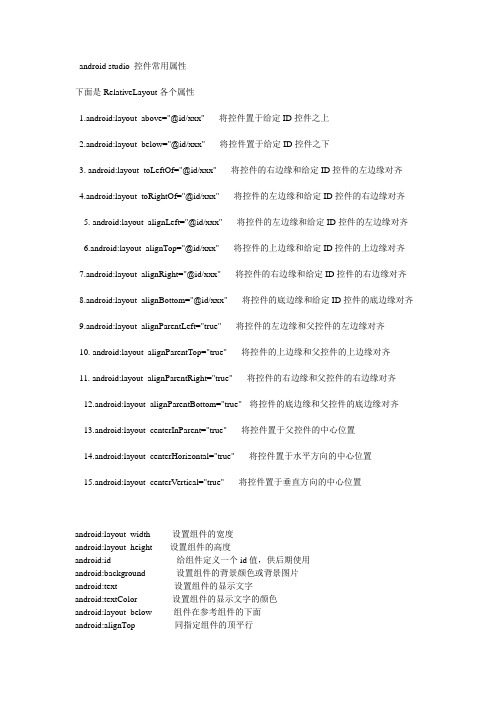
android studio 控件常用属性下面是RelativeLayout各个属性1.android:layout_above="@id/xxx" --将控件置于给定ID控件之上2.android:layout_below="@id/xxx" --将控件置于给定ID控件之下3. android:layout_toLeftOf="@id/xxx" --将控件的右边缘和给定ID控件的左边缘对齐4.android:layout_toRightOf="@id/xxx" --将控件的左边缘和给定ID控件的右边缘对齐5. android:layout_alignLeft="@id/xxx" --将控件的左边缘和给定ID控件的左边缘对齐6.android:layout_alignTop="@id/xxx" --将控件的上边缘和给定ID控件的上边缘对齐7.android:layout_alignRight="@id/xxx" --将控件的右边缘和给定ID控件的右边缘对齐8.android:layout_alignBottom="@id/xxx" --将控件的底边缘和给定ID控件的底边缘对齐9.android:layout_alignParentLeft="true" --将控件的左边缘和父控件的左边缘对齐10. android:layout_alignParentTop="true" --将控件的上边缘和父控件的上边缘对齐11. android:layout_alignParentRight="true" --将控件的右边缘和父控件的右边缘对齐12.android:layout_alignParentBottom="true" --将控件的底边缘和父控件的底边缘对齐13.android:layout_centerInParent="true" --将控件置于父控件的中心位置14.android:layout_centerHorizontal="true" --将控件置于水平方向的中心位置15.android:layout_centerVertical="true" --将控件置于垂直方向的中心位置android:layout_width 设置组件的宽度android:layout_height 设置组件的高度android:id 给组件定义一个id值,供后期使用android:background 设置组件的背景颜色或背景图片android:text 设置组件的显示文字android:textColor 设置组件的显示文字的颜色android:layout_below 组件在参考组件的下面android:alignTop 同指定组件的顶平行控件的可见度:(3种状态)android:visibility="visible"3. 控件的背景:(颜色图片)android:background="#F00"4. 盒子模型:android:layout_margin="10dp"android:padding="5dp"针对已存在的兄弟控件(在某个控件的上面/下面/左边/右边)android:layout_aboveandroid:layout_belowandroid:layout_toLeftOfandroid:layout_toRightOf相对兄弟控件的边对齐android:layout_alignTopandroid:layout_alignBottomandroid:layout_alignLeftandroid:layout_alignRightandroid:maxLength="6" 限制输入字数android:digits='012356789abcdefghijklmnopqrstuvwxyzABCDEFGHIJKLMNOPQRSTUVWXY Z'限制输入数字和大写小写字母1. 开发更简单,执行速度高效。
OPHONE常用控件
今天和大家一起了解一下OPhone的主要组件,和主要组件的使用方法。
OPhone的控件体系分为三个类别:1、基本控件;2、布局组件;3、容器组件;这三类控件主要分布在两个包中:1、android.view 提供抽象接口2、android.widget 提供系统内置的大部分控件整个系统得控件都继承自android.view.View ,而布局及容器类继承自android.view.ViewGroup。
二、基本控件主要包括ImageView、ProgressBar、SurfaceView、TextView、EditText等。
三、布局虽然布局跟容器均继承自android.view.ViewGroup,但并不像SWT那样提供了面板+布局的结构,而是每种Layout就是一种特殊的面板,包括AbsoluteLayout、FrameLayout、LinearLayout、TableLayout、RelativeLayout 等。
四、容器这里的容器是指采用了特定的布局并且提供了行为的控件,包含ListView、GridView、Gallery、Spinner等。
介绍完OPhone OS基础控件的大体结构和布局,下面就来详细的介绍一下它的具体控件:1基本组件:基本组件有很多,比如:Button,TextView,EditText,CheckBox,ImageButton,GridView,ProgressBar,RadioGroup 等,下面通过实例来给大家演示一下组件如何使用。
(1)Button的使用:public class ActivityButton extends Activity {OnClickListener listener1 = null;Button button1;public void onCreate(Bundle savedInstanceState) {super.onCreate(savedInstanceState);listener1 = new OnClickListener() {public void onClick(View v) {setTitle("button1 点击后不可见");button1.setVisibility(View.INVISIBLE);button2.setVisibility(View.VISIBLE);}};setContentView(yout.main);button1 = (Button) findViewById(R.id.button1);//根据ID来指定一个组件。
pythonGUI库图形界面开发之PyQt5树形结构控件QTreeWidget详细使用方法与实例

pythonGUI库图形界⾯开发之PyQt5树形结构控件QTreeWidget详细使⽤⽅法与实例PyQt5树形结构控件QTreeWidget简介QTreeWidget 类根据预设的模型提供树形显⽰控件。
QTreeWidget 使⽤类似于 QListView 类的⽅式提供⼀种典型的基于 item 的树形交互⽅法类,该类基于QT的“模型/视图”结构,提供了默认的模型来⽀撑 item 的显⽰,这些 item 类为 QTreeWidgetItem 类。
如果不需要灵活的“模型/视图”框架,可以使⽤QTreeWidget 来创建有层级关系的树形结构。
当把标准 item 模型结合QTreeView 使⽤时,可以得到更灵活的使⽤⽅法,从⽽把“数据”和“显⽰”分离开。
QTreeWidget类中的常⽤⽅法⽅法描述setColumnWidth(int column,int width)将指定列的宽度设置为给定的值Column:指定的列width:指定的宽度insertTopLevelItems()在视图的顶层索引中引⼊项⽬的列表expandAll()展开所有节点的树形节点invisibleRootItem()返回树形控件中不可见的根选项(Root Item)selectionItems()返回所有选定的⾮隐藏项⽬的列表内QTreeWidgetItem类中常⽤的⽅法⽅法描述addChild()将⼦项追加到⼦列表中setText()设置显⽰的节点⽂本Text()返回显⽰的节点⽂本setCheckState(column.state)设置指定列的选中状态:Qt.Checked:节点选中Qt.Unchecked:节点没有选中setIcon(column,icon)在指定的列中显⽰图标QTreeWidget树形结构控件的实例树形结构是通过QTreeWidget和QTreeWidgetItem类实现的,其中QTreeWidgetItem类实现了节点的添加,其完整代码如下import sysfrom PyQt5.QtWidgets import *from PyQt5.QtGui import QIcon, QBrush, QColorfrom PyQt5.QtCore import Qtclass TreeWidgetDemo(QMainWindow):def __init__(self, parent=None):super(TreeWidgetDemo, self).__init__(parent)self.setWindowTitle('TreeWidget 例⼦')self.tree=QTreeWidget()#设置列数self.tree.setColumnCount(2)#设置树形控件头部的标题self.tree.setHeaderLabels(['Key','Value'])#设置根节点root=QTreeWidgetItem(self.tree)root.setText(0,'Root')root.setIcon(0,QIcon('./images/root.png'))# todo 优化2 设置根节点的背景颜⾊brush_red=QBrush(Qt.red)root.setBackground(0,brush_red)brush_blue=QBrush(Qt.blue)root.setBackground(1,brush_blue)#设置树形控件的列的宽度self.tree.setColumnWidth(0,150)#设置⼦节点1child1=QTreeWidgetItem()child1.setText(0,'child1')child1.setText(1,'ios')child1.setIcon(0,QIcon('./images/IOS.png'))#todo 优化1 设置节点的状态child1.setCheckState(0,Qt.Checked)root.addChild(child1)#设置⼦节点2child2=QTreeWidgetItem(root)child2.setText(0,'child2')child2.setText(1,'')child2.setIcon(0,QIcon('./images/android.png'))#设置⼦节点3child3=QTreeWidgetItem(child2)child3.setText(0,'child3')child3.setText(1,'android')child3.setIcon(0,QIcon('./images/music.png'))#加载根节点的所有属性与⼦控件self.tree.addTopLevelItem(root)#TODO 优化3 给节点添加响应事件self.tree.clicked.connect(self.onClicked)#节点全部展开self.tree.expandAll()self.setCentralWidget(self.tree)def onClicked(self,qmodeLindex):item=self.tree.currentItem()print('Key=%s,value=%s'%(item.text(0),item.text(1))) if __name__ == '__main__':app = QApplication(sys.argv)tree = TreeWidgetDemo()tree.show()sys.exit(app.exec_())初始运⾏图如下优化⼀:设置节点的状态这⾥添加了child1的选中状态child1.setCheckState(0,Qt.Checked)优化⼆:设置节点的背景颜⾊这⾥设置了根节点的背景颜⾊brush_red=QBrush(Qt.red)root.setBackground(0,brush_red)brush_blue=QBrush(Qt.blue)root.setBackground(1,brush_blue)优化三:给节点添加响应事件点击,会在控制台输出当前地key值与value值self.tree.clicked.connect(self.onClicked)def onClicked(self,qmodeLindex):item=self.tree.currentItem()print('Key=%s,value=%s'%(item.text(0),item.text(1)))系统定制模式实例在上⾯的例⼦中,QTreeWidgetItem类的节点是⼀个个添加上去的,这样有时很不⽅便,特别是窗⼝产⽣⽐较复杂的树形结构时,⼀般都是通过QTreeView类来实现的,⽽不是QTreeWidget类,QTreeView和QTreeWidget类最⼤的区别就是,QTreeView类可以使⽤操作系统提供的定制模式,⽐如⽂件系统盘的树列表import sysfrom PyQt5.QtWidgets import *from PyQt5.QtGui import *if __name__ == '__main__':app=QApplication(sys.argv)#window系统提供的模式model=QDirModel()#创建⼀个QTreeView的控件tree=QTreeView()#为控件添加模式tree.setModel(model)tree.setWindowTitle('QTreeView例⼦')tree.resize(640,480)tree.show()sys.exit(app.exec_())本⽂主要讲解了PyQt5树形结构控件QTreeWidget详细使⽤⽅法与实例,更多关于PyQt5控件使⽤知识请查看下⾯的相关链接。
android界面框架-Window
android界面框架-Window从纯sdk及framwork的角度看,android中界面框架相关的类型有:Window,WindowManager,View等。
下面就以这几个类为出发点来概览下安卓开发的“界面架构”。
Window该类接触不多,和它密切相关的View类就比较熟悉了。
Window和View的关系View是可视界面上的一个矩形区域,它显示内容并接收各种交互事件。
所有View形成一个ViewTree这样的结构,对应任何一个界面通过sdk自带的hierarchyviewer工具就可以看到所有View 对象形成的视图树的形象的结构图,相信都不会陌生。
一般的,开发工作主要是利用系统及自定义控件组合完成各种界面,所以理解View的使用和原理更重要些。
再进一步,以ViewTree为整体,再看它和window,系统服务之间的关系可以从整体上把握android中界面框架。
Window类的描述如下:Window: Abstract base class for a top-level window look and behavior policy. An instance of this class should be used as the top-level view added to the window manager. It provides standard UI policies such as a background, title area, default key processing, etc.Window表示“窗口”的概念,类似桌面OS中的窗口的概念,它是对用户界面的一个逻辑划分。
可以参考下Windows编程中对Window类的描述是:“The point of interaction between a user and a standalone application is a window.”。
Android开发自学笔记(AndroidStudio)—4.1布局组件
Android开发⾃学笔记(AndroidStudio)—4.1布局组件⼀、引⾔Android的界⾯是有布局和组件协同完成的,布局好⽐是建筑⾥的框架,⽽组件则相当于建筑⾥的砖⽡。
组件按照布局的要求依次排列,就组成了⽤户所看见的界⾯。
在Android4.0之前,我们通常说Android开发五⼤布局和四⼤组件,这五⼤布局就是:1. LinearLayout 线性布局2. FrameLayout 单帧布局,也有中⽂翻译为帧布局、框架布局。
3. RelativeLayout 相对布局4. AbsoluteLayout 绝对布局5. TableLayout 表格布局⽽在Android4.0之后⼜新增了⼀种GridLayout⽹格布局。
⼆、LinearLayout线性布局线性布局是Android开发中最常见的⼀种布局⽅式,它是按照垂直或者⽔平⽅向来布局,通过“android:orientation”属性可以设置线性布局的⽅向。
属性值有垂直(vertical)和⽔平(horizontal)两种。
线性布局的排列在某⾏或者某列并不会⾃动换⾏或换列,就是说如果采⽤⽔平布局,控件宽度超过屏幕显⽰的话,后⾯的控件都将被隐藏,不会⾃动换⾏。
常⽤的属性有:1. android:orientation:可以设置布局的⽅向2. android:id - 为控件指定相应的ID3. android:text - 指定控件当中显⽰的⽂字,需要注意的是,这⾥尽量使⽤string.xml4. android:gravity - 指定控件的基本位置,⽐如说居中,居右等位置5. android:textSize - 指定控件当中字体的⼤⼩6. android:background - 指定控件所⽤的背景⾊,RGB命名法7. android:layout_width - 指定控件的宽度8. android:layout_height - 指定控件的⾼度9. android:layout_weight - 指定控件的占⽤⽐例10. android:padding - 指定控件的内边距,也就是说控件当中的内容11. android:sigleLine - 如果设置为真的话,则将控件的内容显⽰在⼀⾏当中layout_weight属性以控制各个控件在布局中的相对⼤⼩。
Android开发之EditText属性详解
Android开发之EditText属性详解1、EditText输⼊的⽂字为密码形式的设置(1)通过.xml⾥设置:把该EditText设为:android:password="true" // 以”.”形式显⽰⽂本(2)在代码⾥设置:通过设置EditText的setTransformationMethod()⽅法来实现隐藏密码或这显⽰密码。
editText.setTransformationMethod(PasswordTransformationMethod.getInstance());//设置密码为不可见。
2、(1)EditText输⼊的⽂字为电话号码Android:phoneNumber=”true” //输⼊电话号码3、EditText字数限制的设置(1)在.xml中设置:android:maxLength=“50”(2)代码中设置:editText.setFilters(new InputFilter[]{newInputFilter.LengthFilter(100)});4、EditText设置字体android:typeface="monospace" //设置字型。
字形有:normal, sans, serif,monospace5、EditText是否可编辑Android:editable // 是否可编辑6、在EditText中软键盘的调起、关闭(1)EditText有焦点(focusable为true)阻⽌输⼊法弹出editText=(EditText)findViewById(R.id.txtBody);editText.setOnTouchListener(new OnTouchListener(){public boolean onTouch(View v, MotionEvent event){editText.setInputType(InputType.TYPE_NULL); //关闭软键盘return false;}});(2)当EidtText⽆焦点(focusable=false)时阻⽌输⼊法弹出InputMethodManager imm =(InputMethodManager)getSystemService(INPUT_METHOD_SERVICE);imm.hideSoftInputFromWindow(editText.getWindowToken(),0);(3)调⽤数字键盘并设置输⼊类型和键盘为英⽂etNumber.setInputType(InputType.TYPE_CLASS_NUMBER); //调⽤数字键盘rlEditText.setInputType(InputType.TYPE_TEXT_FLAG_MULTI_LINE);//设置输⼊类型和键盘为英⽂或者:android:inputType="textUri|textMultiLine"(4)android:focusable="false"//键盘永远不会弹出<activity android:name=".AddLinkman"android:windowSoftInputMode="adjustUnspecified|stateHidden"/>//不⾃动弹出键盘//关闭键盘(⽐如输⼊结束后执⾏) InputMethodManager imm =(InputMethodManager)getSystemService(Context.INPUT_METHOD_SERVICE); imm.hideSoftInputFromWindow(etEditText.getWindowToken(), 0);//⾃动弹出键盘((InputMethodManager)getSystemService(INPUT_METHOD_SERVICE)).toggleSoftInput(0,InputMethodManager.HIDE_NOT_ALWAYS); etEditText.requestFocus();//让EditText获得焦点,但是获得焦点并不会⾃动弹出键盘7、android:layout_gravity和android:gravity的区别(1)android:layout_gravity是本元素对⽗元素的重⼒⽅向。
android inerface的使用范例
android inerface的使用范例[Android Interface的使用范例]尽管最新的操作系统和设备不断涌现,但Android仍然是当今市场上最受欢迎的移动操作系统之一。
为了满足不同用户的需求,Android提供了灵活的用户界面(UI)框架,称为Android Interface,通过它可以打造令人难以置信的用户体验。
在本文中,我们将一步一步回答如何使用Android Interface的一些范例,以帮助开发人员更好地了解和应用这一强大的工具。
第一步:了解基本概念和术语在开始使用Android Interface之前,开发人员需要了解一些基本概念和术语。
首先是布局(Layout),它定义了UI组件在屏幕上的排列方式。
Android提供了一系列的布局类型,如线性布局(LinearLayout)、相对布局(RelativeLayout)和帧布局(FrameLayout)等。
其次是视图(View),它是用户界面的构建单元,如按钮(Button)、文本框(EditText)和图像(ImageView)等。
最后是活动(Activity),它是与用户进行交互的屏幕,并且包含了用户界面的逻辑和操作。
第二步:创建新项目并设置布局一旦熟悉了Android Interface的基本概念,接下来就是创建一个新的Android项目。
首先打开Android Studio,并创建一个新的工程。
在创建工程的过程中,可以选择需要的最低API级别和目标设备。
接下来,选择“Empty Activity”作为初始模板,并为活动命名。
创建完成后,在项目资源中找到“activity_main.xml”文件,这是我们要编辑的主要布局文件。
打开“activity_main.xml”文件后,可以看到默认的线性布局。
在布局文件中,开发人员可以添加和调整不同的UI组件,以构建所需的用户界面。
例如,可以在线性布局中添加一个按钮和一个文本框。
第5章 中级控件

5.2.1 复选框CheckBox
• CompoundButton类是抽象的复合按钮,由它派生而来的子类包括: 复选框CheckBox、单选按钮RadioButton以及开关按钮Switch。
5.1.3 九宫格图片
• 将某张图片设置成视图背景时,如果图片尺寸太小,则系统会自 动拉伸图片使之填满背景。
• 可是一旦图片拉得过大,其画面容易变得模糊。
点九图片的实现原理
• 点九图片的扩展名是png,文件名后面常带有“.9”字样。因为该 图片划分了3×3的九宫格区域,所以得名点九图片,也叫九宫格 图片。
状态列表图形的演示效果
按下按钮时的背景样式
按钮弹起时的背景样式
状态类型的取值说明
• 状态列表图形不仅用于按钮控件,还可用于其他拥有多种状态的 控件。
状态类型的属性名称 state_pressed state_checked state_focused state_selected
说明 是否按下 是否勾选 是否获取焦点 是否选中
• 借助状态列表图形StateListDrawable,分别定义已选中时候的“开” 图形,以及未选中时候的“关”图形。
• 状态列表图形的XML文件如下:
• <selector xmlns:android="/apk/res/android"> • <item android:state_checked="true" android:drawable="@drawable/switch_on"/> • <item android:drawable="@drawable/switch_off"/> • </selector>
- 1、下载文档前请自行甄别文档内容的完整性,平台不提供额外的编辑、内容补充、找答案等附加服务。
- 2、"仅部分预览"的文档,不可在线预览部分如存在完整性等问题,可反馈申请退款(可完整预览的文档不适用该条件!)。
- 3、如文档侵犯您的权益,请联系客服反馈,我们会尽快为您处理(人工客服工作时间:9:00-18:30)。
今天我用自己写的一个Demo 和大家详细介绍一个Android开发中遇到的一些常用系统控件的使用技巧。
1.文本框TextViewTextView的作用是用来显示一个文本框,下面我用两种方式为大家呈现TextView,第一种是通过xml布局文件呈现,第二种是通过代码来呈现,由此可见Android 的界面开发真的是非常灵活。
view plaincopy to clipboardprint?1. public class TextViewActivity extends Activity {2. @Override3. protected void onCreate(Bundle savedInstanceState) {4. setContentView(yout.textview);5.6. LinearLayout ll = (LinearLayout) findViewById(R.id.textviewll);7. TextView textView = new TextView(this);8. //设置显示文字9. textView.setText("从代码中添加一个TextView");10. //设置显示颜色11. textView.setTextColor(Color.WHITE);12. //设置显示字体大小13. textView.setTextSize(18);14. //设置显示背景颜色15. textView.setBackgroundColor(Color.BLUE);16. //设置锚点位置17. textView.setGravity(Gravity.CENTER_VERTICAL|Gravity.CENTER_HORIZONTAL);18. //把这个view加入到布局当中19. ll.addView(textView);20.21. super.onCreate(savedInstanceState);22. }23. }1. <?xml version="1.0"encoding="utf-8"?>2. <LinearLayout xmlns:android="/apk/res/android"3. android:id="@+id/textviewll"4. android:orientation="vertical"android:layout_width="fill_parent"5. android:layout_height="fill_parent">6. <TextView android:id="@+id/textView0"7. android:layout_width="fill_parent"8. android:layout_height="wrap_content"9. android:textColor="#000000"10. android:textSize="18dip"11. android:background="#00FF00"12. android:text="@string/textView"13. android:gravity="center_vertical|center_horizontal"14. />15. </LinearLayout>view plaincopy to clipboardprint?1. public class WebViewActivity extends Activity {2. WebView webView = null;3. static final String MIME_TYPE = "text/html";4. static final String ENCODING = "utf-8";5.6.7. @Override8. protected void onCreate(Bundle savedInstanceState) {9. setContentView(yout.webview);10.11. webView = (WebView) findViewById(R.id.webview);12. webView.loadDataWithBaseURL(null,"<a href='http://blog.csd/xys289187120'>欢迎访问雨松MOMO的博客</a>", MIME_TYPE, ENCODING, null);13. super.onCreate(savedInstanceState);14. }15. }1. <?xml version="1.0"encoding="utf-8"?>2. <LinearLayout xmlns:android="/apk/res/android"3. android:id="@+id/textviewll"4. android:orientation="vertical"android:layout_width="fill_parent"5. android:layout_height="fill_parent">6. <TextView android:layout_width="fill_parent"7. android:layout_height="wrap_content"8. android:textColor="#000000"9. android:textSize="18dip"10. android:background="#00FF00"11. android:text="网页框WebView测试"12. android:gravity="center_vertical|center_horizontal"13. />14. <WebView android:id="@+id/webview"15. android:layout_height="wrap_content"16. android:layout_width="fill_parent"/>17. </LinearLayout>view plaincopy to clipboardprint?1. public class MenuActivity extends Activity {2.3. @Override4. protected void onCreate(Bundle savedInstanceState) {5. setContentView(yout.menuview);6. super.onCreate(savedInstanceState);7. }8.9. @Override10. public boolean onCreateOptionsMenu(Menu menu) {11. menu.add(0, 0, Menu.NONE, "菜单1").setIcon(R.drawable.icon);12. menu.add(0, 1, Menu.NONE, "菜单2").setIcon(R.drawable.icon);13. menu.add(0, 2, Menu.NONE, "菜单3").setIcon(R.drawable.icon);14. menu.add(0, 3, Menu.NONE, "菜单4").setIcon(R.drawable.icon);15. menu.add(0, 4, Menu.NONE, "菜单5").setIcon(R.drawable.icon);16. menu.add(0, 5, Menu.NONE, "菜单6").setIcon(R.drawable.icon);17. return super.onCreateOptionsMenu(menu);18. }19.20. @Override21. public boolean onOptionsItemSelected(MenuItem item) {22. Dialog(item.getItemId());23. return super.onOptionsItemSelected(item);24. }25.26. private void Dialog(int message) {27. new AlertDialog.Builder(this).setMessage(28. "您单击第【" + message + "】项Menu菜单项.").show();29. }30. }1. <?xml version="1.0"encoding="utf-8"?>2. <LinearLayout xmlns:android="/apk/res/android"3. android:orientation="vertical"android:layout_width="fill_parent"4. android:layout_height="fill_parent">5. <TextView android:layout_width="fill_parent"6. android:layout_height="wrap_content"7. android:textColor="#000000"8. android:textSize="18dip"9. android:background="#00FF00"10. android:text="Menu菜单测试"11. android:gravity="center_vertical|center_horizontal"12. />13. </LinearLayout>view plaincopy to clipboardprint?1. public class ButtonActivity extends Activity {2.3. Context mContext = null;4. @Override5. protected void onCreate(Bundle savedInstanceState) {6. setContentView(yout.buttonview);7. mContext = this;8.9. //普通按钮10. Button button0 = (Button)findViewById(R.id.buttonview0);12. //设置按钮文字颜色13. button0.setTextColor(Color.BLUE);14. //设置按钮文字大小15. button0.setTextSize(30);16.17. //设置按钮监听点击事件18. button0.setOnClickListener(new OnClickListener() {19.20. @Override21. public void onClick(View arg0) {22. Toast.makeText(ButtonActivity.this, "您点击了‘这是一个按钮’", Toast.LENGTH_LONG).show();23.24. }25. });26.27. //带图片的按钮28. ImageButton button1 = (ImageButton)findViewById(R.id.buttonview1);29. //设置按钮监听点击事件30. button1.setOnClickListener(new OnClickListener() {31.32. @Override33. public void onClick(View arg0) {34. Toast.makeText(ButtonActivity.this, "您点击了一个带图片的按钮", Toast.LENGTH_LONG).show();35.36. }37. });38. super.onCreate(savedInstanceState);39. }1. <?xml version="1.0"encoding="utf-8"?>2. <LinearLayout xmlns:android="/apk/res/android"3. android:orientation="vertical"android:layout_width="fill_parent"4. android:layout_height="fill_parent">5. <TextView android:layout_width="fill_parent"6. android:layout_height="wrap_content"7. android:textColor="#000000"8. android:textSize="18dip"9. android:background="#00FF00"10. android:text="Button按钮测试"11. android:gravity="center_vertical|center_horizontal"12. />13. <Button14. android:id="@+id/buttonview0"15. android:layout_width="fill_parent"16. android:layout_height="wrap_content"17. android:text="这是一个按钮"18. />19. <ImageButton20. android:id="@+id/buttonview1"21. android:layout_width="fill_parent"22. android:layout_height="wrap_content"23. android:src="@drawable/icon"24. />25. </LinearLayout>view plaincopy to clipboardprint?1. public class EditTextActivity extends Activity {2.3. Context mContext = null;4. @Override5. protected void onCreate(Bundle savedInstanceState) {6. setContentView(yout.editview);7. mContext = this;8. //帐号9. final EditText editText0 = (EditText)findViewById(R.id.editview0);10. //密码11. final EditText editText1 = (EditText)findViewById(R.id.editview1);12.13. //确认按钮14. Button button = (Button)findViewById(R.id.editbutton0);15.16. button.setOnClickListener(new OnClickListener() {17.18. @Override19. public void onClick(View arg0) {20. String username = editText0.getText().toString();21. String password = editText1.getText().toString();22. Toast.makeText(EditTextActivity.this, "用户名:"+username +"密码:"+ password, Toast.LENGTH_LONG).show();23. }24. });25. super.onCreate(savedInstanceState);26. }27. }1. <?xml version="1.0"encoding="utf-8"?>2. <LinearLayout xmlns:android="/apk/res/android"3. android:orientation="vertical"android:layout_width="fill_parent"4. android:layout_height="fill_parent">5. <TextView android:layout_width="fill_parent"6. android:layout_height="wrap_content"7. android:textColor="#000000"8. android:textSize="18dip"9. android:background="#00FF00"10. android:text="EditText编辑框测试"11. android:gravity="center_vertical|center_horizontal"12. />13. <EditText14. android:id="@+id/editview0"15. android:layout_width="fill_parent"16. android:layout_height="wrap_content"17. android:hint="请输入帐号"18. android:phoneNumber="true"19. />20.21. <EditText22. android:id="@+id/editview1"23. android:layout_width="fill_parent"24. android:layout_height="wrap_content"25. android:hint="请输入密码"26. android:password="true"27. />28. <Button29. android:id="@+id/editbutton0"30. android:layout_width="fill_parent"31. android:layout_height="wrap_content"32. android:text="确定"33. />34. </LinearLayout>view plaincopy to clipboardprint?1. public class RadioActivity extends Activity {2.3. Context mContext = null;4. @Override5. protected void onCreate(Bundle savedInstanceState) {6. setContentView(yout.radioview);7. mContext = this;8. //单选组(只有在一个组中的按钮可以单选)9. RadioGroup radioGroup = (RadioGroup)findViewById(R.id.radion0);10.11. //单选按钮(第一组)12. final RadioButton radioButton0 = (RadioButton)findViewById(R.id.radionButton0);13. final RadioButton radioButton1 = (RadioButton)findViewById(R.id.radionButton1);14. final RadioButton radioButton2 = (RadioButton)findViewById(R.id.radionButton2);15.16. radioGroup.setOnCheckedChangeListener(new OnCheckedChangeListener() {17.18. @Override19. public void onCheckedChanged(RadioGroup arg0, int checkID) {20. if(radioButton0.getId() == checkID) {21. Toast.makeText(RadioActivity.this, "您选中了第一组" + radioButton0.getText(), Toast.LENGTH_LONG).show();22. }else if(radioButton1.getId() == checkID) {23. Toast.makeText(RadioActivity.this, "您选中了第一组" + radioButton1.getText(), Toast.LENGTH_LONG).show();24. }else if(radioButton2.getId() == checkID) {25. Toast.makeText(RadioActivity.this, "您选中了第一组" + radioButton2.getText(), Toast.LENGTH_LONG).show();26. }27. }28. });29.30. RadioGroup radioGroup0 = (RadioGroup)findViewById(R.id.radion1);31.32. //单选按钮(第二组)33. final RadioButton radioButton3 = (RadioButton)findViewById(R.id.radionButton3);34. final RadioButton radioButton4 = (RadioButton)findViewById(R.id.radionButton4);35. final RadioButton radioButton5 = (RadioButton)findViewById(R.id.radionButton5);36.37. radioGroup0.setOnCheckedChangeListener(new OnCheckedChangeListener() {38.39. @Override40. public void onCheckedChanged(RadioGroup arg0, int checkID) {41. if(radioButton3.getId() == checkID) {42. Toast.makeText(RadioActivity.this, "您选中了第二组" + radioButton3.getText(), Toast.LENGTH_LONG).show();43. }else if(radioButton4.getId() == checkID) {44. Toast.makeText(RadioActivity.this, "您选中了第二组" + radioButton4.getText(), Toast.LENGTH_LONG).show();45. }else if(radioButton5.getId() == checkID) {46. Toast.makeText(RadioActivity.this, "您选中了第二组" + radioButton5.getText(), Toast.LENGTH_LONG).show();47. }48. }49. });50. super.onCreate(savedInstanceState);51. }52. }1. <?xml version="1.0"encoding="utf-8"?>2. <LinearLayout xmlns:android="/apk/res/android"3. android:orientation="vertical"android:layout_width="fill_parent"4. android:layout_height="fill_parent">5. <TextView android:layout_width="fill_parent"6. android:layout_height="wrap_content"7. android:textColor="#000000"8. android:textSize="18dip"9. android:background="#00FF00"10. android:text="单项选择测试第一组"11. android:gravity="center_vertical|center_horizontal"12. />13. <RadioGroup14. android:id="@+id/radion0"15. android:layout_width="fill_parent"16. android:layout_height="wrap_content">17. <RadioButton18. android:id="@+id/radionButton0"19. android:layout_width="fill_parent"20. android:layout_height="wrap_content"21. android:text="item0"22. />23. <RadioButton24. android:id="@+id/radionButton1"26. android:layout_height="wrap_content"27. android:text="item1"28. />29. <RadioButton30. android:id="@+id/radionButton2"31. android:layout_width="fill_parent"32. android:layout_height="wrap_content"33. android:text="item2"34. />35. </RadioGroup>36.37. <TextView android:layout_width="fill_parent"38. android:layout_height="wrap_content"39. android:textColor="#000000"40. android:textSize="18dip"41. android:background="#00FF00"42. android:text="单项选择测试第二组"43. android:gravity="center_vertical|center_horizontal"44. />45. <RadioGroup46. android:id="@+id/radion1"47. android:layout_width="fill_parent"48. android:layout_height="wrap_content">49. <RadioButton50. android:id="@+id/radionButton3"51. android:layout_width="fill_parent"52. android:layout_height="wrap_content"53. android:text="item3"54. />55. <RadioButton56. android:id="@+id/radionButton4"58. android:layout_height="wrap_content"59. android:text="item4"60. />61. <RadioButton62. android:id="@+id/radionButton5"63. android:layout_width="fill_parent"64. android:layout_height="wrap_content"65. android:text="item5"66. />67. </RadioGroup>68. </LinearLayout>view plaincopy to clipboardprint?1. public class CheckboxActivity extends Activity {2.3. //用来储存选中的内容4. ArrayList <String>item = new ArrayList<String>();5.6. @Override7. protected void onCreate(Bundle savedInstanceState) {8. setContentView(yout.checkboxview);9.10. CheckBox checkbox0 = (CheckBox)findViewById(R.id.checkboxview0);11. CheckBox checkbox1 = (CheckBox)findViewById(R.id.checkboxview1);12. CheckBox checkbox2 = (CheckBox)findViewById(R.id.checkboxview2);13. CheckBox checkbox3 = (CheckBox)findViewById(R.id.checkboxview3);14. Button button = (Button)findViewById(R.id.checkboxbutton);15. //对checkbox进行监听16. checkbox0.setOnCheckedChangeListener(new OnCheckedChangeListener() {17.18. @Override19. public void onCheckedChanged(CompoundButton button, boolean arg1) {20. String str = button.getText().toString();21. if (button.isChecked()) {22. item.add(str);23. } else {24. item.remove(str);25. }26.27. }28. });29.30. checkbox1.setOnCheckedChangeListener(new OnCheckedChangeListener() {31.32. @Override33. public void onCheckedChanged(CompoundButton button, boolean arg1) {34. String str = button.getText().toString();35. if (button.isChecked()) {36. item.add(str);37. } else {38. item.remove(str);39. }40.41. }42. });43. checkbox2.setOnCheckedChangeListener(new OnCheckedChangeListener() {44.45. @Override46. public void onCheckedChanged(CompoundButton button, boolean arg1) {47. String str = button.getText().toString();48. if (button.isChecked()) {49. item.add(str);50. } else {51. item.remove(str);52. }53.54. }55. });56. checkbox3.setOnCheckedChangeListener(new OnCheckedChangeListener() {57.58. @Override59. public void onCheckedChanged(CompoundButton button, boolean arg1) {60. String str = button.getText().toString();61. if (button.isChecked()) {62. item.add(str);63. } else {64. item.remove(str);65. }66.67. }68. });69.70. button.setOnClickListener(new OnClickListener() {71.72. @Override73. public void onClick(View arg0) {74. String str = item.toString();75. Toast.makeText(CheckboxActivity.this, "您选中了" + str, Toast.LENGTH_LONG).show();76.77. }78. });79. super.onCreate(savedInstanceState);80. }81. }1. <?xml version="1.0"encoding="utf-8"?>2. <LinearLayout xmlns:android="/apk/res/android"3. android:orientation="vertical"android:layout_width="fill_parent"4. android:layout_height="fill_parent">5. <TextView android:layout_width="fill_parent"6. android:layout_height="wrap_content"7. android:textColor="#000000"8. android:textSize="18dip"9. android:background="#00FF00"10. android:text="多项选择测试"11. android:gravity="center_vertical|center_horizontal"12. />13. <CheckBox14. android:id="@+id/checkboxview0"15. android:layout_width="fill_parent"16. android:layout_height="wrap_content"17. android:text="item0"18. />19. <CheckBox20. android:id="@+id/checkboxview1"21. android:layout_width="fill_parent"22. android:layout_height="wrap_content"23. android:text="item1"24. />25. <CheckBox26. android:id="@+id/checkboxview2"27. android:layout_width="fill_parent"28. android:layout_height="wrap_content"29. android:text="item2"30. />31. <CheckBox32. android:id="@+id/checkboxview3"33. android:layout_width="fill_parent"34. android:layout_height="wrap_content"35. android:text="item3"36. />37. <Button38. android:id="@+id/checkboxbutton"39. android:layout_width="fill_parent"40. android:layout_height="wrap_content"41. android:text="确定"42. />43. </LinearLayout>。