【机械要点】索尼公司与索尼影视图像工作室荣获科学与工程大奖(附图)
索尼

案例7-7 从硬件跨入内容—索尼收购战略一、案例简介1946年5月,索尼公司(以下简称索尼)的创始人井深大和盛田昭夫共同创建了“东京通信工业株式会社”,后于1958年更名为索尼株式会社,总部设在日本东京。
随后,这家坚持不懈地追求技术创新和独到的设计风格的公司带来了世界上第一台晶体管收音机、第一台便携式立体声音响、第一台激光唱片机和第一个有三维画面效果的家用电视游戏控制台等众多产品,并成为第一家在纽约证券交易所上市的日本公司。
多年的发展,索尼由一个小小的收音机修理店壮大成为一个运营收入超过500亿美元,雇员数目超过168 000人的全球巨人。
成为世界上民用电子、工业电子、信息技术产业及娱乐业等领域的先导之一。
本案例将介绍索尼发展历程中几起极为重要的并购,这些并购促使索尼由一个硬件制造商转型成为一个内容提供商,从而奠定了世界数字娱乐界的霸主地位。
1968年3月,索尼与美国哥伦比亚广播公司合资成立哥伦比亚广播公司·索尼唱片公司,索尼占50%股份,这项合作展开了索尼向内容提供商跨进的步伐。
1988年1月,索尼出资获得哥伦比亚广播公司·索尼唱片公司的100%股份,成功将其收购,并于1991年1月更名为索尼音乐娱乐公司(SME, Sony Music Entertainment)。
从此,索尼正式向外界宣布做内容的决心,马不停蹄地于一年后——也就是1989年11月——出资34亿美元购买美国哥伦比亚影视娱乐公司,更名为索尼影视娱乐公司,摇身一变成为世界上最大的数字娱乐内容提供商之一。
2005年4月,在对哥伦比亚影业公司整合完成后,索尼联合几大财团发起了对美国另一影业巨头——米高梅的收购,这次成功的收购,正式宣布了拥有强大的硬件生产能力和内容提供能力的索尼已成为世界数字娱乐绝对霸主。
从硬件到内容,综观索尼的发展思路,并购成为实现这样一个转变的主要法宝,也正是按照不断并购业内巨头的这条思路,索尼将自己打造成了数字娱乐产品的国际巨头。
探析视频游戏的电影化制作趋势——以《Death Stranding》 (死亡搁浅)为例

广电聚焦{4媒论H第4卷第02期探析视频游戏的电影化制作趋势-----以《Death Stranding》(死七相或)为例富娆(中国传媒大学国际交流与合作处,北京100026)摘要:随着我国经济发展,大众媒介技术的不断进步而造成媒介接触成本降低,我国电子游戏产业随移动互联网发展得到长足进步,视频游戏文化最终被当作一种大众文化议题进入学者和公众的视野。
2019年, 美国TGA(The Game Awards,被誉为游戏界奥斯卡泮度游戏颁奖典礼中,大多获奖作品往往投资上亿美元,而且游戏的叙事模式采用了大量电影化叙事技巧,甚至在游戏制作中都开始与电影工业制作呈现出了高度相似的趋势。
笔者将以获得2019年TGA"最佳游戏指导奖”的视频游戏作品《Death Stranding》(下称“死亡搁 浅”)为例,探析目前全球范围内视频游戏电影化制作趋势。
关键词:视频游戏;电影化叙事;电影化制作中图分类号:J904 文献标识码:A文章编号:2096_5079 (2021 ) 02-0054-03—、引言为了承载叙事内容,视频游戏在20世纪90年代后 加入大量电影的视听语言。
随着影视剧视听语言的加 入,让新的视频游戏发生所谓游戏电影化的转向,但这 些变化也只是媒介趋势局部化的体现。
二、电影化叙事上海大学电影学院的蓝凡教授认为电影化叙事是电影存在的本质……剪辑、特写和奇观,是电影化叙 事的三大特有文法,或者说三大特殊修辞,也可以说是 电影化叙事的‘金字塔’三原则”。
“剪辑”,核心概念是“分镜头”,按照剧本要求的 故事逻辑和一定的审美需求,组装拼接成完整的镜头 语言,也即我们常接触到的概念4‘蒙太奇”。
这种影片素 材的选择组接,不仅仅是为了电影故事逻辑的流程,满 足最基本工具性的需求,也同样是为了追寻一种新的 艺术效果,产生新的审美。
分镜头拍摄的方法,是“蒙太 奇”艺术的核心。
“特写”,主要是对“人”与“物”的特写,是对故事 逻辑以及整体情绪、审美氛围的突出的体现,是表象符 号与内在意义之间新的审美与叙事联系的建立。
Vised_manual
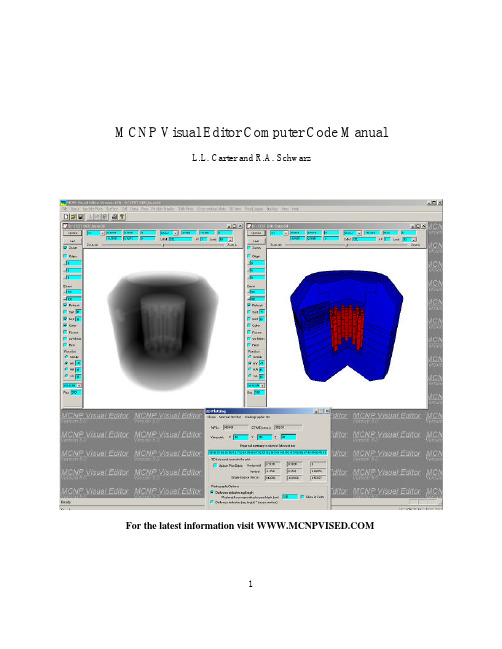
MCNP Visual Editor Computer Code ManualL.L. Carter and R.A. SchwarzFor the latest information visit 1Table of Contents1.0 INTRODUCTION (5)1.1 I NSTALLATION N OTES (5)1.2 P ROGRAM B ACKGROUND (6)2.0 BEGINNING AN INTERACTIVE EDITING SESSION (7)2.1 I MPORTANT F ILES I N T HE V ISUAL E DITOR (8)2.2 T HE M AIN M ENU F UNCTIONS (9)2.3 R EADING A ND W RITING C ELL C ARDS (10)3.0 PLOTTING AND CHANGING PLOT PARAMETERS (11)3.1 U PDATE (12)3.2 L AST B UTTON (12)3.3 Z OOM C HECK B OX (12)3.4 O RIGIN C HECK B OX (12)3.5 C HANGING THE E XTENTS (13)3.6 R EFRESH C HECK B OX (13)3.7 T HE S URFACE AND C ELL C HECK B OX (13)3.8 C OLOR C HECK B OX (13)3.9 F ACETS C HECK B OX (13)3.10 WW M ESH C HECK B OX (13)3.11 R ECT C HECK B OX (14)3.12 P LOT R OTATION O PTIONS (14)3.13 S CALES C HECK B OX (14)3.14 R ES T EXT B OX (14)3.15 C HANGING THE B ASIS (14)3.16 V IEWING G LOBAL/L OCAL C OORDINATES (14)3.17 S ETTING C ELL L ABELS (14)3.18 L EVEL P ULLDOWN M ENU (15)4.0 THE SURFACE WINDOW (16)4.1 C REATING A S URFACE (16)4.2 S CANNING A S URFACE (16)4.3 D ELETING A S URFACE (17)4.4 E DITING A S URFACE (17)4.5 H IDING AND S HOWING S URFACES (17)4.6 S URFACE C OMMENTS (17)4.7 E NTERING S URFACE D IMENSIONS IN I NCHES (17)4.8 S URFACE D ISTANCE (18)4.9 S URFACE D ELTA (18)4.10 M ACROBODY S URFACES (18)5.0 THE CELL WINDOW (19)5.1 C REATING A C ELL (19)5.2 D ISCUSSION O F C ELL P ASTE A ND C UT O PERATIONS (20)25.4 C REATING A C ELL WITH U NIVERSES (22)5.6 U SING U NDO (23)5.7 R EGISTER (23)5.8 S CANNING A C ELL (23)5.9 D ELETING A C ELL (23)5.10 E DITING A C ELL (23)5.11 C REATE LIKE (24)Y OU CAN USE THE “C REATE LIKE” MODE TO CREATE A NEW CELL SIMILAR TO AN EXISTING CELL.A COMMON APPLICATION OF THIS IS TO CREATE A NEW CELL LIKE AN CELL THAT ALREADY EXISTS, BUT WITH A TRANSFORMATION (24)5.12 H IDING AND S HOWING C ELLS (24)5.13 C ELL C OMMENTS (24)5.14 S PLITTING A CELL (25)5.15 C REATING A S QUARE L ATTICE (27)5.16 C REATING A H EXAGONAL L ATTICE (28)5.17 S PECIAL H EX L ATTICE D ISPLAY O PTIONS (29)6.0 MATERIALS (30)6.1 C REATING A M ATERIAL (30)6.2 S CANNING A M ATERIAL (31)6.3 D ELETE A M ATERIAL (31)6.4 E DIT A M ATERIAL (31)6.5 T HE V ISED.DEFAULTS F ILE (31)6.6 M ATERIAL L IBRARY (33)6.7 M ATERIAL O PTIONS (33)7.0 IMPORTANCES (34)7.1 S ETTING C ELL I MPORTANCES (34)7.2 U SING A S CALE F ACTOR (34)7.3 U SING A G EOMETRIC F ACTOR (34)7.4 T HE I MPORTANCE D ISPLAY (35)7.5 T RUNCATING IMPORTANCES (35)8.0 TRANSFORMATIONS (36)9.0 RUN (37)10.0 PARTICLE DISPLAY (39)10.1 SDEF S OURCE P LOTTING (39)10.2 KCODE S OURCE P LOTTING (40)10.3 P ARTICLE T RACK P LOTTING (40)10.4 S ETTING P OINT C OLOR AND S IZE (41)10.5 S ETTING E NERGY OR W EIGHT R ANGES (41)10.6 P ROBLEMS G ENERATING P ARTICLE T RACKS (41)11.0 TALLY PLOTS (43)313.0 3D VIEW (47)13.1 3D C OLOR P LOTS (47)13.2 3D U PDATE THE P LOT B ASIS (48)13.3 C OLOR BY C ELL/S URFACE (48)13.4 D RAW L INES A ROUND C ELLS (48)13.5 C OLOR C ELLS BY M ATERIAL (48)13.6 3D S HADING (48)13.7 D ISTANCE S HADING (48)13.8 P OINT/P LANE S OURCE T YPE (48)13.9 S HOW THE P LOT P LANE (49)13.10 H IDE/S HOW C OOKIE C UTTERS (49)13.11 P LOT TO THE O UTSIDE W ORLD/P LOT P LANE (49)13.12 P LOT R ESOLUTION (49)13.13 3D R ADIOGRAPHIC P LOTS (49)14.0 READ AGAIN (51)15.0 BACKUP INP (51)16.0 PROBLEM REPORTING (51)17.0 REFERENCES (52)APPENDIX A (53)41.0 IntroductionThe Monte Carlo N-Particle (MCNP) computer code is a particle transport code with powerful three dimensional geometry and source modeling capabilities that can be applied to reactor physics, shielding, criticality, environmental nuclear waste cleanup, medical imaging, and numerous other related areas.Creating a MCNP input file with a line editor is both tedious and error prone as it entails arduous descriptions of geometry, tallies, sources, and optimization parameters. These input files may contain thousands of lines, and once the input file is created, substantial additional time is often required to plot and test the geometry and to correct any errors. The Visual Editor (References 1-7) was developed to assist the user in the creation of MCNP input files. Work on the Visual Editor started around 1992. The first release to RSICC was in 1997. The Visual Editor code will became part of the MCNP package with the release if version 5 of MCNP.The Visual Editor allows the user to easily set up and modify the view of the MCNP geometry and to determine model information directly from the plot window. The Visual Editor also allows the user to interactively create an input file with the help of two or more dynamic cross sectional views of the model. A wide selection of menu options enables rapid input of information and immediate visualization of the geometry and other information being created.The current version of the Visual Editor only runs on Windows platforms. Older versions of the code run on Linux and UNIX systems, however, the current code has not yet been updated on these systems.The new user should practice with a few simple problems before trying to create an involved geometry. An example exercise is given in Appendix A.The following discussion summarizes how to use the graphical interface. The Visual Editor is constructed with user friendly menu buttons so this manual is primarily to help the new user get started and to provide some detail when specific questions arise. The discussion here assumes that the user has some familiarity with the MCNP geometry specification, as described in the MCNP manual. Additional information on the Visual Editor, including training opportunities can be found at the Visual Editor website ().1.1 Installation NotesFor most applications, the Visual Editor executable can be used as distributed. The Visual Editor consists of the MCNP source code linked to graphical interface written in C++. If you want to modify the MCNP source code, you can recompile the MCNP Fortran code and link this to the Visual Editor static library.The Visual editor is compiled using Visual C++ for the compiling the graphical interface files and Visual Fortran for compiling the MCNP Fortran files. To create a Visual Editorexecutable you need to get the Visual Fortran project file and place the unprocessed Fortran source code in the Fortran source directory. The code can then be compiled either by loading the project into Visual Fortran and compiling it or by using the provided makefile within the Fortran command prompt available with Visual Fortran.If you want to do particle track plotting, cross section plotting, or run MCNP inside the Visual Editor, the xsdir file must be in the same directory as the Visual Editor executable or a path to xsdir must be specified on the system as required for running MCNP.If you want to have access to the material libraries, you need to create a “vised.defaults” file for the configuration of MCNP on your system. See the section on materials for more information on how to do this.1.2 Program BackgroundThe size of the fonts used by the windows are fixed and can not be changed. The font used is called “small fonts”. If the Visual Editor windows appear too large for your screen, it is recommended that you increase your screen resolution. The ideal screen resolution is 1280x1024.The development of the Windows Visual Editor is done on a Windows 2000 platform. For best performance, it is recommended that users run the Visual Editor in Windows 2000 or Windows XP. Table 1 below lists the different operating systems and what is known about its compatibility with the Visual Editor. If an operating system is not listed, than the code has not been tested on that platform and its functionality is not known.Table 1. Operating System Compatibility.CompatibilityOperatingSystemWindows 2000 Most compatible, this is the Visual Editor development platform. Windows XP Very compatible with 2000 version and should be just as stable. Windows NT Somewhat compatible with 2000, should still be fairly stable. Windows 98 Somewhat unstable, not recommended.Windows 95 Very unstable, not recommended.2.0 Beginning An Interactive Editing SessionUse Windows explorer to bring up the Visual Editor. Figure 1 shows a view of the initial screen. Notice that the main menu functions are shown across the top and that each plot window has its own set of plot commands. You can read in an input file by using the “File->Open” command.Figure 1. Startup configuration for the Visual Editor.To create a new geometry, you can create surfaces by selecting “Surface” from the main menu. These surfaces can then be used to create cells, but selecting “Cell” from the main menu and following the cell creation procedure discussed in the “new cell creation” section of this document.The input window, shown at the bottom of Figure 1, can be displayed by selecting “Input” from the main menu. In the input window, a title card indicating the creation date is created by default. If you want to add you own title, enter it above this card, then select “Save-Update” from the menu. This will temporarily cause the line containing the creation date to go away, but it will come back as a comment card after the first cell is created.The input window is divided into two areas, the upper area prints out Visual Editor andMCNP warnings and errors. The bottom window contains the entire input file. You canedit the file in this window and then select the “Save-Update” menu option to update theplots to reflect the changes made. This gives you the freedom to work either in editormode or use the graphical interface commands. If the file is modified by hand in such away that it is no longer valid, it is possible when doing “Save-Update”, that the Fortranwill generate a fatal error causing the Visual Editor to terminate, although an attempt ismade to trap most fatal errors.When doing a “Save – Update” command, the Visual Editor writes out the input to a temporary file name called inpn. When you are ready to save the file to a permanent file,use the “File->Save” command or the “File->SaveAs” command.The Visual Editor will automatically back up the file every five minutes to a file called “inpn.sav”, so if the Visual Editor crashes, y ou will not lose more than 5 minutes ofwork. Also, if the Visual Editor encounters a MCNP fatal error that it can not recoverfrom, it will try to save the input into a file called “inpcrash”.2.1 Important Files In The Visual EditorTable 2 shows a list of the files used by the Visual Editor. The Visual Editor prints out a number of auxiliary files. Because of this, you may want to run the Visual Editor in itsown directory and transfer the input files you are creating or working on to that directory.Table 2. Files used by the Visual Editor.File Name Descriptioninp Used by the Visual Editor as the default input file name. This file isoverwritten each time the editor starts up. The Visual Editor will giveunpredictable results if you try to read this file in as the input file.inpn Inpn is the file that is created when doing a “Save-Update” command in the input window. The Visual Editor will give unpredictable results if you try toread this file in as the input file.inpn1, inpn2, inpn3, … By selecting “backup” from the main menu a new inpn? (inpn1, inpn2, inpn3, …) file is created representing the contents of the current file being worked on.inpn.sav The input file is backed up every 5 minutes to this file, so if the systemcrashes you will not lose more than 5 minutes of work. The Visual Editorwill give unpredictable results if you try to read this file in as the input file. inpcrash If MCNP generates a fatal error that results in a “stop” statement, a message is sent to the Visual Editor telling the user that the code is about to terminate.It then saves the current input file into a file called inpcrash. This will allowthe user to get the file that was generated up to the point of the fatal error.The Visual Editor will give unpredictable results if you try to read this file inas the input file.outp, outq, … In normal plotting mode, the outp file is overwritten and does notsequentially increase. In other modes, such as 3D plotting, particle trackplotting, tally plotting and running, the outp file name increases sequentiallyjust like when running MCNP outside the Visual Editor. If the VisualEditor crashes, always check this file to see if there are fatal MCNPerrors not trapped by the Visual Editor.dfill Auxiliary file used to contain a fill matrix if one exists in the problem. dcinp Auxiliary file that holds the comment cards from the input file.ddinp Auxiliary file that holds the data cards not recognized by the Visual Editor outmc Contains MCNP output messages, normally written to standard out. If the Visual Editor crashes, always check this file to see if there are fatalMCNP errors not trapped by the Visual Editor.vised.defaults The file containing the location of xsdir and the material libraries, this file is needed for using the material libraries and for selecting isotopes whencreating materials.2.2 The Main Menu FunctionsTable 3 provides an overview of the main menu options and their purpose.Table 3. Main Menu Options.Menu Option DescriptionFile Used to open and save files. File-> New View is used to open additional plot windows into the geometry. The list of recently used files may be unreliableon some systems.Input Used to bring up a simple text editor containing the complete contents of the input file, including cards not recognized by the Visual Editor. The input filecan be edited by hand in this window.Update Plots Update both plot windows.Surface Bring up the surface window to scan, create or modify surfaces.Cell Bring up the cell window to scan, create or modify cells.Data Menu to common data cards: materials, importances, transformations.Run Enable the running of MCNP input files.Particle Display Bring up the source window that allows for source point display and particle track plotting.Tally Plots Allow the plotting of tallies from a runtpe or mctal files. This is the same capability that currently exists when requesting MCPLOT (mcnpinp=filename z options)Cross Section Plots Allow the plotting of MCNP cross sections. This is the same capability that currently exists when requesting MCPLOT (mcnp inp=filename ixz options)3D View Allows the rendering of a 3D view of the geometry or a radiographic image. Read_again Update the plots after the file that was read in has been modified by anexternal text editor.Backup Creates a backup file that sequentially increases (inpn1, inpn2, …).View Select the active plot window.Help Shows the version number.2.3 Reading And Writing Cell CardsThe attempt is made to read the input file and write out the same information to the inpn file. If the input file is created outside the Visual Editor, you will find that when you save it, the Visual Editor will change the order of the lines in the input file. Below is the order in which the Visual Editor writes out the input file:1. Title card2. Cell Cards3. blank line4. Surface Cards5. blank line6. Transformations7. Mode8. Source9. Materials10. Importances11. Other data [VOL, PWT, EXT, FCL, PD, DXC, NONU, WWN, TMP]12. Data not recognized by the Visual EditorThe editor does it best to keep the original comments in the proper locations. The "$" comments from the inp file for cell and surface cards are read into the Visual Editor, but only one "$" comment will be written out for a cell or surface card; i.e., if there are more than one "$" comments for a given cell or surface, only the first one will be written to the inpn file. The Visual Editor will print out an error message saying the “$ comment is lost.”There are a number of data cards that are still not recognized by the Visual Editor such as the source and tally cards. These are stored in a temporary file and written back out to the input file when it is saved. All cards that are recognized by the Visual Editor will be formatted to its specific style. For example importances are written out in a special format that uses a "$" comment on each line to show the cell numbers involved for that line. The Visual Editor also does not currently allow the cell parameters to be specified on the cell card, it will strip off the cell card parameters and place them in a data block.3.0 Plotting And Changing Plot ParametersThe Visual Editor starts up with two default plot windows. Additional plot windows can be created by selecting File->New View. This will open up a new plot window with the plot parameters set to default values.Figure 2 shows a view of the Visual Editor plot window and the various plotting options available on the top and side of the plot window. Also shown is the menu that is displayed when you right click in the plot window. The top portion of this menu can be used to change some of the plot parameters. Also, included in this menu are some shortcuts to common surface and cell operations.To print out a hard copy of a plot, select “File->Print” from the main menu and it will send the contents of the currently selected window to the printer.Figure 2. Plot Window Options.3.1 UpdateAs it's name implies, the "Update" button is used to redraw the plot for that window.To update all plots, use the “Update plots” main menu option. You typically use the “Update plots” button to create the plots after reading in a new input file. This is not done automatically because there are times when you do not want the plot to be displayed because it would take too long to generate.When you change the basis, origin, or extent parameters by hand, you need to select “Update” in the specific window or "Update plots" from the menu to redraw the plots with the new plot values.3.2 Last ButtonThe "Last" button enables you to go back to prior plots. For instance, if you use the “Zoom” button to zoom in on a region in the geometry, the last button will take you back to the “Unzoomed” view. All of the plot parameters are saved when the plot is changed and "Last" will go backwards through the sequence of plots. The parameters changed by "Origin", "Zoom" and "Basis" can all be recalled with "Last". Last remembers the last 1000 plots made for each plot window.3.3 Zoom Check BoxThe "Zoom" check box enables the user to magnify a portion of the plot. When the "Zoom" check box is selected, the user can drag the mouse across a portion of the geometry and that area will be magnified. This is useful for intricate work in small cells.The Visual Editor stays in zoom mode until you uncheck the “Zoom” check box. This allows for multiple zoom operations to be done in a row.Sometimes it is useful to click zoom on one plot and then drag the mouse across a zoom area in a different plot. The identified area will then be shown in the original plot window.3.4 Origin Check BoxThe origin of the two plots automatically defaults to 0,0,0. These coordinates can be set by hand by entering the desired origin values in the three text boxes below the “Origin” check box. Once the new origin is ready to be implemented, select "Update plots". Another way to adjust the origin involves selecting the "Origin" check box for the plot and then setting the origin by clicking in the plot to define the location for the new center of the plot. The origin can be set in either plot window. The plot will stay in “origin” mode until the origin check box is clicked again to turn it off.The buttons to the left of the origin values, enable the user to change the origin “x”, “y” or “z” value by clicking on the coordinate to be changed and selecting its value with a click of the mouse from one of the plot windows. For example, if the right plot is an xyview and the left plot is an xz view, you can change the elevation of the xy view by clicking the z box for the right plot and then clicking the at a different z value on the left plot. The z for the right plot will change to that selected value, resulting in a different cross sectional view.3.5 Changing the ExtentsThe extents for the plots automatically default to 100. The extents can be changed by typing in desired extents under the “Extent” label and selecting “Update” or by using the slider bar on top of the plot windows. This modifies the extent by a scale factor between 0.1 and 10.The buttons to the left of the extent values, allow the user to square up the extents. This is often used after “zooming” in on a region. Both extents will be set to the value you click on making them equal.3.6 Refresh Check BoxThis check box defaults to the checked “on” position. Turn this check box off if you do not want to update the plot window when cells or surfaces are modified or when “Update Plots” is selected from the main menu. There are times when you may not want to update a particular plot window. For example, you might want to turn off plotting if the view contains a large lattice that is time consuming to plot. Be careful when you use this check box to turn off plotting, since the plot will not be updated until you turn this check box on again.3.7 The Surface and Cell Check BoxWhen the "Surface" check box is turned on, surface numbers will appear on the plots next to their respective surface. If the check box is turned off, surface numbers do not appear. Next to the surface check box is a text box where you can enter the font size to use for the surface label. Increase this number to increase the label sizeWhen the "Cell" check box is turned on, cell numbers will appear inside the cells. The meaning of the cell number is determined by the cell label that has been selected. As with surface numbers, the size of the font used for cell numbers can be changed by changing the number in the text box.3.8 Color Check BoxThis check box will enable col or plotting. The color can be set to represent Materials or any of the items specified by the “color by” option, as shown in Figure 2.3.9 Facets Check BoxWhen displaying macrobody surfaces, this check box will change the display to show surface facet numbers instead of the macrobody surface numbers.3.10 WW Mesh Check BoxBy checking this check box, the weight window mesh will be displayed if this option is used in the active input file.3.11 Rect Check BoxSelect this check box to change the plot window to a rectangular plot instead of a square plot. A rectangular plot is needed to see the grid lines or the plot legend. Tally and cross section plots also look better in a rectangular plot instead of a square plot.3.12 Plot Rotation OptionsThe 2D plots can be rotated through three different angles. Selecting “Ax” will rotate the plot in a counter clockwise direction around the axial axis pointing out of the plot window. The default rotation angle is 15 degrees. The “Ver” option will rotate th e 2D view along the angle between the horizontal and axial vector. This will cause the view to rotate around the vertical axis. The “Hor” option will rotate the 2D view along the angle between the vertical and axial vector. This will cause the view to rotate around the horizontal axis.3.13 Scales Check BoxThe “Scales” pull down menu allows you to display a border around the geometry plot ora grid across the plot. This can only be seen if the “Rect” check box has been set.3.14 Res Text BoxThe resolution text box sets the resolution for color plots. The default value is 300. The maximum value is 3000. The higher the resolution, the better the color resolution on a color plot. The drawing time will increase as this value increases.3.15 Changing the BasisOne of the advantages of multiple plots is the ability to view the same geometry with multiple cross sectional slices. This is especially helpful with complex three-dimensional geometries. The left plot in the Editor defaults to an xz basis and the right defaults to a xy basis. A "Basis" pull down menu is available in the top left portion of the plot window with the choices of xy, xz, yx, yz, zx, and zy.The basis menu is also available by clicking the right button in the plot window. The basis can also be entered by hand by setting the six basis vectors and then selecting the “Update” button or “Update Plots” menu option to redraw the plots.3.16 Viewing Global/Local CoordinatesThe Global/local menu determines how the displayed coordinates at the top of the plot window are to be interpreted. With local set, the coordinates are for the universe prior to being transformed because of a transformation or a fill, otherwise the coordinates are relative to the origin of the geometry.3.17 Setting Cell LabelsSelecting the "Labels" button with the right mouse button will bring up menu which lists the cell labels recognized by MCNP. These labels are: CEL, IMP:, RHO, DEN, VOL, FCL:, MAS, PWT, MAT, TMPn, WWNn:, EXT:p, PD, DXC:, U, LAT, FILL, and NONU. Those items with a ":" have a pull right menu to choose p, n, e. Items with an“n” in their name require that you enter the requested value at the top of the plot window in the “n =” text box.3.18 Level Pulldown MenuThe level pulldown menu allows you to hide lower levels of a lattice for complex geometries that have lattices inside of lattices, such as a reactor core filled with fuel assemblies. The geometry will only be plotted to the level specified. Level 1 is the top level, normal geometries will plot at this level. Level 3 will go down one universe level, level 5 will go down two universe levels.By setting these level buttons, you can significantly decrease the amount of time it takes to make a plot of a lattice geometry by su ppressing the plotting of lower universe information. Additionally, you can use the special lattice cell label options to plot useful information about the lattice geometry.4.0 The Surface WindowFigure 3 shows the surface window. This window is used to create new surfaces, delete surfaces and modify surfaces. The operation that is being performed is determined by the mode shown at the bottom of the surface window. The default mode is “Create new” which will create a new surface. All recognized MCNP surface types can be created or modified.Figure 3. The surface window.4.1 Creating a SurfaceTo create a new surface, first select a surface type, either by clicking on the “Surfaces” menu option or doing a right click in the gray area of the window as demonstrated in Figure 3. All surface types will show up including surfaces defined by points and macrobody surfaces.The surface number will be set by default when creating a surface. The editor uses the last valid surface number and incremen ts it by one. The surface coefficients are typically entered by hand. For some of the simple surfaces you can use the mouse to set the coefficients to an approximate value by clicking on the screen. For example, for a simple sphere (SO surface), you can set the radius, by clicking on the screen.You can indicate that the surface is a reflective surface by clicking on the “Reflective” check box. Alternatively, you can assign a transformation to the surface, by either entering the transformation number in by hand or clicking on the “Transformation” button to bring up a list of available transformations for the input file. When you select a transformation, the number of the transformation is placed in the transformation text box. Select “Register” from the menu to create the surface and add it to the input file. Once a surface is created, the mode changes to “Create like” which will default to creating additional surface, just like the one that was created.4.2 Scanning a SurfaceYou scan a surface, by clicking on the “Scan” mode and then dragging the mouse across。
canon eos m5中文使用手册说明书
基本指南進階指南相機的基本操作自動模式/混合自動拍攝模式其他拍攝模式播放模式無線功能設定選單配件附錄索引P 模式Tv 、Av 、M 、C1及C2模式用前須知基本指南進階指南相機的基本操作自動模式/混合自動拍攝模式其他拍攝模式播放模式無線功能設定選單配件附錄索引P 模式Tv 、Av 、M 、C1及C2模式用前須知基本指南進階指南相機的基本操作自動模式/混合自動拍攝模式其他拍攝模式播放模式無線功能設定選單配件附錄索引P 模式Tv 、Av 、M 、C1及C2模式用前須知基本指南進階指南相機的基本操作自動模式/混合自動拍攝模式其他拍攝模式播放模式無線功能設定選單配件附錄索引P 模式Tv 、Av 、M 、C1及C2模式用前須知2223232424262728293131 (33)34 (37) (37)37基本指南進階指南相機的基本操作自動模式/混合自動拍攝模式其他拍攝模式播放模式無線功能設定選單配件附錄索引P 模式Tv 、Av 、M 、C1及C2模式用前須知5353 (53)5556) (56)) (57)5858) (58)) (59)) (59)) (59)) (60)(以1分鐘的短片為例) (60)) (61)61 (62)63636464656566) (66)在混合自動拍攝模式下拍攝 .播放短片摘要靜止影像/短片靜止影像短片場景圖示 .螢幕上的方框 ......................................................................................常用的便捷功能 ...............................................................................42使用自拍 ..............................................................................................使用自拍功能以避免相機震動 .....................................................自訂自拍 .........................................................................................輕觸螢幕進行拍攝(輕觸式快門) .......................................................連續拍攝 ..............................................................................................影像自訂功能 ...................................................................................45變更影像畫質 ......................................................................................拍攝RAW 格式的影像 ....................................................................使用選單 .........................................................................................變更長寬比 ..........................................................................................變更短片影像畫質 ..............................................................................實用的拍攝功能 ...............................................................................48使用雙軸電子水平儀 ..........................................................................使用自動程度 ......................................................................................自訂相機操作 ...................................................................................49避免自動對焦輔助光發光 ..................................................................關閉防紅眼燈 ......................................................................................變更拍攝後影像的顯示時間 ..............................................................其他拍攝模式.....................................................................使用您喜愛的設定進行拍攝(創意輔助儲存/載入設定.儲存設定載入設定基本指南進階指南相機的基本操作自動模式/混合自動拍攝模式其他拍攝模式播放模式無線功能設定選單配件附錄索引P 模式Tv 、Av 、M 、C1及C2模式用前須知8181818182828283 (83)84 (84)85858686 (87)8889) (89) (91)929292 (93).............................93調整影像亮度(曝光補償關閉曝光模擬鎖定影像亮度/曝光(自動曝光鎖變更測光方法 .變更ISO 感光度調整自動ISO 設定 .自動包圍曝光(自動包圍曝光拍攝) ...................................................自動校正亮度及對比度(自動亮度優化) ...........................................拍攝明亮主體(高光色調優先) ...........................................................影像色彩 ...........................................................................................71調整白平衡 ..........................................................................................自訂白平衡 .....................................................................................手動校正白平衡 .............................................................................手動設定白平衡色溫 .....................................................................自訂色彩(相片風格) ...........................................................................自訂相片風格 .................................................................................儲存自訂相片風格 .........................................................................對焦 ...................................................................................................75選擇自動對焦方式 ..............................................................................單點自動對焦 .................................................................................+追蹤............................................................................................流暢區域自動對焦 .........................................................................選擇要對焦的主體(觸控自動對焦使用自動對焦鎖拍攝 ..........................................................................使用伺服自動對焦拍攝 ......................................................................變更對焦設定 ......................................................................................微調焦點 ..............................................................................................使用手動對焦模式拍攝 .輕鬆辨識對焦區域(手動對焦突出輪廓) .閃光燈 ...............................................................................................80變更閃燈模式 .自動 .................................................................................................基本指南進階指南相機的基本操作自動模式/混合自動拍攝模式其他拍攝模式播放模式無線功能設定選單配件附錄索引P 模式Tv 、Av 、M 、C1及C2模式107108108109109110110110111111111111112112113113114115115116117117119120120將功能指定給按鈕及轉盤將功能指定給速控轉盤自訂快速設定選單 .選擇要包含在選單中的項目重新排列選單項目儲存拍攝設定 ......................................................................................可儲存的設定 .................................................................................儲存常用拍攝選單項目(我的選單) ...................................................重新命名我的選單設定頁 .............................................................刪除我的選單設定頁 .....................................................................將我的選單設定頁或項目全部刪除 .............................................自訂我的選單設定頁顯示 .............................................................播放模式..........................................................................檢視 .................................................................................................100輕觸式螢幕操作 ................................................................................切換顯示模式 ....................................................................................自訂顯示的拍攝資訊 ...................................................................過度曝光警告(影像的光亮部份) .顯示自動對焦點 ...........................................................................顯示格線 .......................................................................................亮度直方圖 ...................................................................................RGB 直方圖 ...................................................................................拍攝靜止影像時檢視建立的短片按日期檢視 ...................................................................................瀏覽及篩選影像 .............................................................................104使用索引搜尋影像 .輕觸式螢幕操作輕觸兩下放大尋找符合特定條件的影像 .使用主轉盤在影像之間跳轉 .輕觸式螢幕操作基本指南進階指南相機的基本操作自動模式/混合自動拍攝模式其他拍攝模式播放模式無線功能設定選單配件附錄索引P 模式Tv 、Av 、M 、C1及C2模式141141142142142143發送的影像 ........................143 .............................144 ................................................144144144145146146147 ...................................................147148 ............................................................148 ....................................................149150150150151151152152152縮減檔案大小 .編輯短片摘要 .無線功能.可用的無線功能使用Wi-Fi 功能使用藍牙®功能 ..................................................................................將影像傳輸至智能手機 .................................................................124將影像傳輸至具備藍牙功能的智能手機 ........................................將影像傳輸至兼容NFC 的智能手機 ................................................相機處於拍攝模式時透過NFC 連接............................................相機處於播放模式時透過NFC 連接............................................透過Wi-Fi 選單連接至智能手機.......................................................使用其他存取點 ................................................................................確認存取點的兼容性 ...................................................................使用兼容WPS 的存取點 ...............................................................連接至列出的存取點 ...................................................................以前使用過的存取點 ...................................................................發送影像至註冊的網絡服務 .........................................................132註冊網絡服務 ....................................................................................註冊CANON iMAGE GATEWAY ...............................................註冊其他網絡服務 .......................................................................上傳影像至網絡服務 ........................................................................使用媒體播放器檢視影像 .............................................................136從連接的打印機無線打印影像 .....................................................137發送影像至其他相機影像發送選項發送多張影像 .逐張選擇影像選擇範圍發送評分的影像基本指南進階指南相機的基本操作自動模式/混合自動拍攝模式其他拍攝模式播放模式無線功能設定選單配件附錄索引P 模式Tv 、Av 、M 、C1及C2模式用前須知164164165166166166167167 (169169169)170171171171171172173174 ...........................................174175175175176176176 ...........................................................177 ...........................................177 .. (177)使用省電模式 .省電調整 .螢幕亮度 .切換螢幕資訊顏色 .世界時鐘 .日期及時間 .顯示的語言 ........................................................................................關閉相機聲音 ....................................................................................開啟相機聲音 ....................................................................................隱藏提示 ............................................................................................按圖示列出拍攝模式 ........................................................................調整輕觸式螢幕面板 ........................................................................清潔影像感應器 ................................................................................關閉自動清潔 ...............................................................................啟動清潔感應器 ...........................................................................手動清潔感應器 ...........................................................................查看認證標誌 ....................................................................................設定要記錄在影像中的版權資訊 ....................................................刪除全部版權資訊 .......................................................................調整其他設定 ....................................................................................回復相機的預設設定 ........................................................................回復相機的所有預設值 ...............................................................回復個別功能的預設值 ...............................................................配件 .................................................................................系統圖 .............................................................................................161另購配件 .. (162)鏡頭 ....................................................................................................電源 ....................................................................................................閃光燈 ................................................................................................麥克風 ................................................................................................其他配件 ............................................................................................打印機 ................................................................................................基本指南進階指南相機的基本操作自動模式/混合自動拍攝模式其他拍攝模式播放模式無線功能設定選單配件附錄索引P 模式Tv 、Av 、M 、C1及C2模式用前須知清除打印清單的所有影像將影像加入相簿 .指定選擇的方法逐張加入影像將所有影像加入相簿移除相簿的所有影像附錄 .................................................................................疑難排解 .........................................................................................179螢幕提示 .........................................................................................183螢幕資訊 .. (185)拍攝時 ................................................................................................電量 ...............................................................................................播放時 ................................................................................................資訊顯示1 .....................................................................................資訊顯示2 .....................................................................................資訊顯示3 .....................................................................................資訊顯示4 .....................................................................................資訊顯示5 .....................................................................................資訊顯示6 .....................................................................................資訊顯示7 .....................................................................................資訊顯示8 .....................................................................................短片控制介面的總覽 ...................................................................功能及選單表 (188)各拍攝模式下的可用功能 ................................................................快速設定選單 ....................................................................................拍攝設定頁 .C.Fn 設定頁INFO.速控.設定設定頁 .我的選單設定頁 .播放設定頁 .播放模式下的快速設定選單 .206206206206206207207207207208209209210210210210210210211)的注意事項 ...............................214214214215 . (215215215)基本指南進階指南相機的基本操作自動模式/混合自動拍攝模式其他拍攝模式播放模式無線功能設定選單配件附錄索引P 模式Tv 、Av 、M 、C1及C2模式用前須知基本指南進階指南相機的基本操作自動模式/混合自動拍攝模式其他拍攝模式播放模式無線功能設定選單配件附錄索引P 模式Tv 、Av 、M 、C1及C2模式用前須知基本指南進階指南相機的基本操作自動模式/混合自動拍攝模式其他拍攝模式播放模式無線功能設定選單配件附錄索引P 模式Tv 、Av 、M 、C1及C2模式用前須知用前須知基本指南進階指南相機的基本操作自動模式/混合自動拍攝模式其他拍攝模式播放模式無線功能設定選單配件附錄索引P 模式Tv 、Av 、M 、C1及C2模式用前須知基本指南進階指南相機的基本操作自動模式/混合自動拍攝模式其他拍攝模式播放模式無線功能設定選單配件附錄索引P 模式Tv 、Av 、M 、C1及C2模式用前須知基本指南進階指南相機的基本操作自動模式/混合自動拍攝模式其他拍攝模式播放模式無線功能設定選單配件附錄索引P 模式Tv 、Av 、M 、C1及C2模式用前須知基本指南進階指南相機的基本操作自動模式/混合自動拍攝模式其他拍攝模式播放模式無線功能設定選單配件附錄索引P 模式Tv 、Av 、M 、C1及C2模式用前須知基本指南進階指南相機的基本操作自動模式/混合自動拍攝模式其他拍攝模式播放模式無線功能設定選單配件附錄索引P 模式Tv 、Av 、M 、C1及C2模式用前須知基本指南進階指南相機的基本操作自動模式/混合自動拍攝模式其他拍攝模式播放模式無線功能設定選單配件附錄索引P 模式Tv 、Av 、M 、C1及C2模式用前須知基本指南進階指南相機的基本操作自動模式/混合自動拍攝模式其他拍攝模式播放模式無線功能設定選單配件附錄索引P 模式Tv 、Av 、M 、C1及C2模式用前須知基本指南進階指南相機的基本操作自動模式/混合自動拍攝模式其他拍攝模式播放模式無線功能設定選單配件附錄索引P 模式Tv 、Av 、M 、C1及C2模式用前須知基本指南進階指南相機的基本操作自動模式/混合自動拍攝模式其他拍攝模式播放模式無線功能設定選單配件附錄索引P 模式Tv 、Av 、M 、C1及C2模式用前須知基本指南進階指南相機的基本操作自動模式/混合自動拍攝模式其他拍攝模式播放模式無線功能設定選單配件附錄索引P 模式Tv 、Av 、M 、C1及C2模式升起閃光燈],請按下起閃光燈。
SAE J1939-11
路面车辆推荐操作规程(被采纳为美国国家标准) SAEJ1939-11:
物理层,250K 比特/秒,屏蔽双绞线
前言
本系列 SAE 推荐操作规程是由卡车及客车电子电气委员会所属的卡车及客车控制及通信小 组委员会制定的。该小组委员会的目标是针对电控单元的需求、设计和使用,提交信息报告、 制定推荐操作规程。这些电控单元在汽车部件之间传递着电子信号和控制信息。本规程的使用 不限于卡车和客车应用,其对于其他的应用也可以提供直接的支持,正如已在建筑及农业设备 和固定式的动力系统。
2.1 应用出版物............................................................................................................................. 4 2.1.1 SAE 出版物 .................................................................................................................... 4 2.1.2 ISO 出版物 ..................................................................................................................... 4 2.1.3 军用出版物..................................................................................................................... 4
电影机械设计中的仿生学原理考核试卷

B.电影《盗梦空间》中的梦境装置
C.电影《环太平洋》中的机甲
D.电影《超能陆战队》中的微型机器人
18.以下哪种生物特性被应用于电影《变形金刚》中的变形金刚设计?()
A.昆虫的外骨骼
B.机器人的自我学习
C.生物的遗传变异
D.动物的伪装
19.以下哪个不是仿生学在电影机械设计中关注的问题?()
D.《神奇四侠》中的超能力
18.以下哪些生物特性被用于电影中的外骨骼设计?()
A.昆虫的外骨骼
B.鲨鱼的皮肤
C.鸟类的骨骼
D.人类的肌肉结构
19.以下哪些是仿生学在电影机械设计中考虑的进化因素?()
A.生物的适应性
B.生物的多样性
C.生物的遗传变异
D.生物的寿命
20.以下哪些领域可以从电影机械设计中的仿生学应用中获得启发?()
1.仿生学在电影机械设计中可以提供以下哪些方面的启示?()
A.材料选择
B.结构设计
C.功能优化
D.故事情节发展
2.以下哪些生物特性被用于提高电影机械的隐身能力?()
A.蝴蝶翅膀的反光
B.蜥蜴的变色
C.章鱼的喷射墨汁
D.昆虫的外骨骼
3.以下哪些电影应用了仿生学原理设计机械?()
A.《银翼杀手》
B.《星际穿越》
A.生物与环境的适应性
B.生物的生存策略
C.生物的繁殖方式
D.生物的饮食习惯
20.以下哪个不属于仿生学在电影机械设计中的应用领域?()
A.军事
B.医疗
C.娱乐
D.农业
(请在此处继续编写其他题目类型)
二、多选题(本题共20小题,每小题1.5分,共30分,在每小题给出的四个选项中,至少有一项是符合题目要求的)
Autodesk Lustre数字调色配光软件开发人员荣获奥斯卡科学与工程奖

监看应用提供了极大方便 。 高清格式转换器为一款功能强大的全格式
I ・ DI DMI VI 、D 格非公司经过多年的技术积累 , 已经成功研发 出一系列 高清产品 通用视音频格式转换器,可实现 SD 、HD S 、VGA、H AF / RC。 及周边设备。高清多画面是高质量定制式模块化的多画面显示系统, 等多格式之间的相互 转化并支持画面区域缩放 / D A
作 为国内 知名的优 秀系统 集成 商 ,极具创新 力的企 业 ,世纪睿科 并目 不停地 探索技 术上 的革 新 。 0 9 2 0
年, 世纪睿 科承担 了十 一运总控传 输 系统与国庆 6 周年 高清数字 O 传输 系统等重 大项 目的搭建 。 O 0 , 2 1 年 世纪睿 科会秉 着 “ 精诚服 务”的谦 逊态度 在创新 的道路上 继续 勇往直前 , 应着时代 的脚 顺
测 试
新型的泰克 WF 3 0波形监测仪 具有业内领先的实时、自动 M8 0
S / D3 b D 限图显示和抖 动测量功能 ,它能够有效地监测和 D H /G / S I s
确保视频 设备的正常运行。 场 领导厂 商 泰克 公 司宣 布 ,索尼 澳大 利 亚有 限公 司已采用 泰 克 诊断模拟和数字视频设备中的信号故障 ,
I
0m Da1 V 1 1
f T I ma i I 琶 l fr t n o n o
三 艏 非 视 频
自EI N 0 l 0 N TEc H c Jl V 61 . LTo
格非在南京电视台受到好评
南京电视台高清演播室采用了高清多画面 、高清格 式矮 换器 、
o h a kP a 1 f eBlc e r t )等数 百部电影中大显舅手 ,帮助塑造影 片环境
史上最经典的slogan广告词

经典的slogan 广告词1.Good to the last drop.滴滴香浓,意犹未尽。
(麦斯威尔咖啡)2.Obey your thirst.服从你的渴望。
(雪碧)3.The new digital era.数码新时代。
(索尼影碟机)4.We lead. Others copy.我们领先,他人仿效。
(理光复印机)5.Impossible made possible.使不可能变为可能。
(佳能打印机)6.Take time to indulge.尽情享受吧!(雀巢冰激凌)7.The relentless pursuit of perfection.不懈追求完美。
(凌志轿车)8.Poetry in motion, dancing close to me.动态的诗,向我舞近。
(丰田汽车)9.Come to where the flavor is. Marlboro Country.光临风韵之境,万宝路世界。
(万宝路香烟)10.To me, the past is black and white, but the future is always color.对我而言,过去平淡无奇;而未来,却是绚烂缤纷。
(轩尼诗酒)11. Just do it. 只管去做。
(耐克运动鞋)12. Ask for more. 渴望无限。
(百事流行鞋)13. The taste is great. 味道好极了。
(雀巢咖啡)14. Feel the new space. 感受新境界。
(三星电子)15. Intelligence everywhere.智慧演绎,无处不在。
(摩托罗拉手机)16. The choice of a new generation.新一代的选择。
(百事可乐)17. We integrate, you communicate.我们集大成,您超越自我。
(三菱电工)18. Take TOSHIBA, take the world.拥有东芝,拥有世界。
- 1、下载文档前请自行甄别文档内容的完整性,平台不提供额外的编辑、内容补充、找答案等附加服务。
- 2、"仅部分预览"的文档,不可在线预览部分如存在完整性等问题,可反馈申请退款(可完整预览的文档不适用该条件!)。
- 3、如文档侵犯您的权益,请联系客服反馈,我们会尽快为您处理(人工客服工作时间:9:00-18:30)。
张小只智能机械工业网索尼公司与索尼影视图像工作室荣获科学与工程大奖(附图)
1月4日,电影艺术与科学学院(AMPAS)宣布了第89届年度科学与技术奖的获奖者,其中索尼集团荣获5项大奖。
这些权威奖项代表了电影行业在技术层面的最高成就。
本年度索尼公司赢得了两项科学与工程大奖。
一个是嘉奖F65 CineAlta数码电影摄像机,另一个是奖励索尼在与潘纳维申公司(Panavision)合作Genesis®数字电影摄像机时做出的贡献。
F65 CineAlta数码电影摄像机
此外,索尼影视图像工作室(Sony Pictures Imageworks)的Christopher Kulla和Clifford Stein其在几何引擎和射线追踪算法方面的贡献,共同获得科学与工程奖。
Larry Gritz因在开放式着色语言(OSL)的成就而获得了技术成就奖;前职员Parag Havaldar在索尼影视图像工作室时,凭借对面部表情捕捉技术的研究,也获得了技术
成就奖。
组图为2月11日在洛杉矶举办的颁奖典礼的精彩瞬间。
颁奖仪式现场盛况索尼公司专业产品集团产品设计2部高级总监須藤文彦先生
(左起) Thiago Ize, Christopher Kulla, Alan King, Marcos Fajardo 和Clifford Stein
索尼公司业务主管大西俊彦先生(右)与潘纳维申公司Bob Harvey
Larry Gritz
Parag Havaldar
获奖名单:
科学与工程奖:
获奖方:索尼公司
获奖理由:索尼开发了F65 CineAlta摄像机,它具有开创性的高像素图像传感器,出色的动态范围,并使用4K输出。
张小只机械知识库。