1.50y页SlideSalad Mobile Application_16_9
Java Card Development Kit Simulator Release Notes说

Java Card Development KitSimulator Release NotesVersion 3.1.0u5F12192-06March 2021Table of Contents•Introduction•What's New•System Requirements•Installation•Known Issues•Documentation•Product InformationIntroductionJava Card technology enables secure elements, such as smart cards and othertamper-resistant security chips to host applications called applets, which employ Javatechnology.Java Card technology offers a secure and interoperable execution platform that canstore and update multiple applications on a single resource constrained device,while retaining the highest certification levels and compatibility with standards. JavaCard developers can build, test, and deploy applications and services rapidly andsecurely. This accelerated process reduces development costs, increases productdifferentiation, and enhances value to the customers.The Java Card Development Kit is a suite of tools for designing implementations ofJava Card technology and developing applets based on the Java Card Specifications.It is available as two independent downloads:•The Java Card Development Kit Tools are used to convert and verify Java Cardapplications.•The Java Card Development Kit Simulator offers a testing and debuggingreference for Java Card applications. It includes a Java Card simulationenvironment and Eclipse plug-in.Together, these two downloads provide a complete, stand-alone developmentenvironment in which applications written for the Java Card platform can be developedand tested.These release notes describe the Java Card Development Kit Simulator version3.1.0u5, which is based on version 3.1 of the Java Card Platform Specifications. What's NewThe following are the new features, changes, and bug fixes in the Java Card Development Kit Simulator, version 3.1.0u5:•Fixes to setKey() and getKey() methods of HMACKey and GenericSecretKey as per the clarifications provided in the specification.The following are the new features, changes, and bug fixes in the Java Card Development Kit Simulator, version 3.1.0u4:•Added the usage of the target platform when the CAP file verification is done in Eclipse plugin projects•Added the usage of the target platform when CAP file verification is done for building the samples using the Ant tool•Fixes in HMAC implementation and handling of APDU case 4 in the APDU toolThe following are the new features, changes, and bug fixes in the Java Card Development Kit Simulator, version 3.1.0u3:•Fixed an installer issue when loading multiple applet and library CAP files with static resources•Fixed a minor issue in the ByteBuffer.slice methodThe following are new features and changes in the Java Card Development Kit Simulator, version 3.1.0u1:•The Java Card plugin for Eclipse now supports all features of the latest Java Card Development Kit Tools and usability improvements for their integration. New features include:–Support for extended CAP files–Support for static resources in CAP files–Support the target parameter of the converter for the following versions of the Java Card Platform Specifications: 3.0.4, 3.0.5, and 3.1.0–New and improved management of CAP file configurations and the build process–Persistence of CAP file configurations in files that can be directly used by the converter tool in the command line–Support for Java Card Development Kit Tools path configuration as an independent setting. This ensures that the plug-in can always be configured to access the latest tools bundle.–Support for Java Card framework API debugging (source bundles only)The following are new features and changes in the Java Card Development Kit Simulator, version 3.1:•The Java Card Development Kit Simulator now supports version 3.1 of the Java Card Platform specifications. New features include:–Improved API Extensibility Using Virtual Method Mapping Table–Support for Array Views–Support for large CAP file that may comprise multiple packages–Support for static resources in CAP files–Certificate API–Monotonic Counter API–System Time API–Extended I/O FrameworkFor a complete list of supported features, see the Java Card Development Kit User Guide, Version 3.1.•Java Card Development Kit Tools and Java Card Development Kit Simulator are now two independent bundles, which can be downloaded separately, enablingeasier update of the Development Kit Tools.•New samples are available to demonstrate the use of:–Array Views–Certificate HandlingThe Java Card Development Kit Simulator, version 3.1 also supports new cryptographic algorithms. For a list of the supported cryptographic algorithms, see Supported Cryptography Classes section in the Java Card Development Kit User Guide, Version 3.1.System RequirementsThis product is targeted for use on a PC running the Microsoft Windows 7, Windows 8, and Windows10 operating system.The following software must be installed for the Java Card Development Kit Simulator to work:•Java Development Kit (JDK): This release has been verified and tested with Oracle JDK 11 (64 bit version) and OpenJDK 11 (64 bit version). Download the JDK software from:/technetwork/java/javase/downloadsInstall it according to the instructions on the website.•Eclipse IDE: Eclipse IDE is optional and is required only for using Eclipse plug-in.Download the Windows Eclipse IDE (Eclipse Neon, Oxygen, or Photon) from the following URL, and install it according to instructions on the website:https:///InstallationThe Java Card Specifications, Development Kit Simulator, and Development Kit Tools must be downloaded and installed individually.•See the Downloading the Specification Documents topic of the Java Card Platform Specification Release Notes, Version 3.1 for more details on how to download the Java Card Specification bundle.•See the Installation topic of the Java Card Development Kit User Guide for more details on how to install the Java Card Development Kit Simulator and Java Card Development Kit Tools.•The Java Card Development Kit Simulator installer is provided on the Oracle Technology Network download website (https:///technetwork/ java/embedded/javacard/overview/index.html). Install the Development Kit Simulator by downloading and running the Java Card Development Kit Simulator .msi installer. Contents of the Development Kit SimulatorThis release of the Java Card Development Kit Simulator contains Java Card simulation environment and Eclipse plug-in.The following table describes the files and directories that are installed in the root installation directory (JC_HOME_SIMULATOR).Directory/File Descriptionbin Contains all shell scripts or batch files forrunning the tools (such as the apdutool,capdump, converter, and so on), and thecref (Java Card Platform Simulator) binaryexecutable.docs Contains subdirectories each withcompilations of the Javadoc tool files for theAPDU I/O API, the Java Card 3.1 API, and theJava Card Client RMI API.eclipse-plugin The repository for the Java Card plugin forEclipse.legal Contains license files.lib Contains all Java programming language JARfiles required for running tools by using theshell scripts or batch files, provided in the bindirectory.samples Contains sample applets and applications. Known IssuesAfter installing the Java Card Eclipse plugin in Eclipse, when you start the Eclipse for the first time, the Java Card Run/Debug configurations in the Run/Debug Settingsof the project properties might not appear. To fix this issue, you must reopen the Run/ Debug Settings window.DocumentationThe Java Card Documentation web site provides online product documentation for the Java Card Platform.Document DescriptionJava Card Development Kit User Guide This document describes how to use the JavaCard Development Kit to develop applicationsfor Java Card Platform. It is available in HTMLand PDF formats.Java Card Platform Specifications.The following specification documents areavailable for the Java Card Platform:•Java Card Platform Runtime EnvironmentSpecification, Classic Edition, Version 3.1(PDF format)•Java Card Platform Virtual MachineSpecification, Classic Edition, Version 3.1(PDF format)•Java Card Platform ApplicationProgramming Interface, Classic Edition,Version 3.1 (HTML format)•Java Card Platform Specification ReleaseNotes, Version 3.1 (HTML and PDFformats)Product InformationThe Java Card Technology website provides useful information about the Java Card product.Visit the Java Card Technology website to access the most up-to-date information on the following:•Product news and reviews•Release notes and product documentation Documentation AccessibilityFor information about Oracle's commitment to accessibility, visit theOracle Accessibility Program website at /pls/topic/lookup?ctx=acc&id=docacc.Access to Oracle SupportOracle customers that have purchased support have access to electronic support through My Oracle Support. For information, visit /pls/topic/ lookup?ctx=acc&id=info or visit /pls/topic/lookup?ctx=acc&id=trs if you are hearing impaired.Java Card Development Kit Simulator Release Notes, Version 3.1.0u5F12192-06Copyright © 1998, 2021, Oracle and/or its affiliates. All rights reserved.Simulator release notes for Java Card Development Kit, Version 3.1.0u5.This software and related documentation are provided under a license agreement containing restrictions on use and disclosure and are protected by intellectual property laws. Except as expressly permitted in your license agreement or allowed by law, you may not use, copy, reproduce, translate, broadcast, modify, license, transmit, distribute, exhibit, perform, publish, or display any part, in any form, or by any means. Reverse engineering, disassembly, or decompilation of this software, unless required by law for interoperability, is prohibited.The information contained herein is subject to change without notice and is not warranted to be error-free. If you find any errors, please report them to us in writing.If this is software or related documentation that is delivered to the U.S. Government or anyone licensing it on behalf of the U.S. Government, then the following notice is applicable:U.S. GOVERNMENT END USERS: Oracle programs (including any operating system, integrated software, any programs embedded, installed or activated on delivered hardware, and modifications of such programs) and Oracle computer documentation or other Oracle data delivered to or accessed by U.S. Government end users are "commercial computer software" or "commercial computer software documentation" pursuant to the applicable Federal Acquisition Regulation and agency-specific supplemental regulations. As such, the use, reproduction, duplication, release, display, disclosure, modification, preparation of derivative works, and/or adaptation of i) Oracle programs (including any operating system, integrated software, any programs embedded, installed or activated on delivered hardware, and modifications of such programs), ii) Oracle computer documentation and/or iii) other Oracle data, is subject to the rights and limitations specified in the license contained in the applicable contract. The terms governing the U.S. Government’s use of Oracle cloud services are defined by the applicable contract for such services. No other rights are granted to the U.S. Government.This software or hardware is developed for general use in a variety of information management applications. It is not developed or intended for use in any inherently dangerous applications, including applications that may create a risk of personal injury. If you use this software or hardware in dangerous applications, then you shall be responsible to take all appropriate fail-safe, backup, redundancy, and other measures to ensure its safe use. Oracle Corporation and its affiliates disclaim any liability for any damages caused by use of this software or hardware in dangerous applications.Oracle and Java are registered trademarks of Oracle and/or its affiliates. Other names may be trademarks of their respective owners.Intel and Intel Inside are trademarks or registered trademarks of Intel Corporation. All SPARC trademarks are used under license and are trademarks or registered trademarks of SPARC International, Inc. AMD, Epyc, and the AMD logo are trademarks or registered trademarks of Advanced Micro Devices. UNIX is a registered trademark of The Open Group.This software or hardware and documentation may provide access to or information about content, products, and services from third parties. Oracle Corporation and its affiliates are not responsible for and expressly disclaim all warranties of any kind with respect to third-party content, products, and services unless otherwise set forth in an applicable agreement between you and Oracle. Oracle Corporation and its affiliates will not be responsible for any loss, costs, or damages incurred due to your access to or use ofthird-party content, products, or services, except as set forth in an applicable agreement between you and Oracle.。
Travelport.Smartpoint.UserGuide
1.2
Draft Changes Final
June 2012
Sandra Brinkley Sandra Brinkley
1.3
July 2012
Inclusion of v2.2 updates Travelport Smartpoint app
June 2012
Version 1.3
பைடு நூலகம்
Page 2
Travelport Smartpoint App™
Global Product User Guide v2.2
June 2012
Version 1.3
Page 1
Revision History Version 1.0 1.1 Status Draft Final Date 21Sep11 10Nov 11 Update Summary Initial version Inclusion of TRAM and SW plus Updates By Julie Dennis Julie Dennis
Table of Contents
Overview ....................................................................................................................................... 7 Product Information ...................................................................................................................... 7 Product Instal
3G SYSTRA

CTXX 5345 Issue 3.0 en © Nokia Networks Oy3G SYSTRA3G System Training Service Description错误!使用“开始”选项卡将 Title 应用于要在此处显示的文字。
© Nokia Networks OyCTXX 5345 Issue 3.0 enThe information in this document is subject to change without notice and describes only theproduct defined in the introduction of this documentation. This document is intended for theuse of Nokia Networks' customers only for the purposes of the agreement under which thedocument is submitted, and no part of it may be reproduced or transmitted in any form ormeans without the prior written permission of Nokia Networks. The document has beenprepared to be used by professional and properly trained personnel, and the customerassumes full responsibility when using it. Nokia Networks welcomes customer comments aspart of the process of continuous development and improvement of the documentation.The information or statements given in this document concerning the suitability, capacity, orperformance of the mentioned hardware or software products cannot be considered bindingbut shall be defined in the agreement made between Nokia Networks and the customer.However, Nokia Networks has made all reasonable efforts to ensure that the instructionscontained in the document are adequate and free of material errors and omissions. NokiaNetworks will, if necessary, explain issues which may not be covered by the document.Nokia Networks' liability for any errors in the document is limited to the documentarycorrection of errors. Nokia Networks WILL NOT BE RESPONSIBLE IN ANY EVENT FORERRORS IN THIS DOCUMENT OR FOR ANY DAMAGES, INCIDENTAL ORCONSEQUENTIAL (INCLUDING MONETARY LOSSES), that might arise from the use of thisdocument or the information in it.This document and the product it describes are considered protected by copyright accordingto the applicable laws.NOKIA logo is a registered trademark of Nokia Corporation.Other product names mentioned in this document may be trademarks of their respectivecompanies, and they are mentioned for identification purposes only.Copyright © Nokia Networks Oy 2013. All rights reserved.错误!使用“开始”选项卡将 Heading 9 应用于要在此处显示的文字。
YClient用户手册说明书
YClient User Manual(YClient Android)CONTENTS1 Software installation (2)2 Software uninstall (2)3 Software settings and instructions (3)3.1 Landing settings (3)3.2 Window setting (5)3.2.1 Video Transmit (6)3.2.2 Video play control (7)3.2.3 Window setting (10)3.2.4 Timing Playing setting (11)3.2.5 Animation interaction sending (12)3.2.6 Image Editing (13)4 System settings (13)4.1 System set (14)4.2 Restart/Turn off (14)4.3 Window set (15)4.4 Insert Text (15)4.5 Clock set (16)4.6 Time correction (17)/Address:Skyworth innovation valley 5# A layer ,901 Tangtou Road no. 1 on the 8th Shiyan Street Baoan District 14.7 Brightness setting (17)4.8 Screen connect setting (18)4.9 Software Information (19)5 Advcanced settings (20)5.1 Wifi hostspot set (20)5.2 Modify name of WIFI (22)6 Matters needing attention (22)6.1 Udisk play matters needing attention (22)6.2 The video window to add notes (22)6.3 U disk update android matters needing attention (22)6.4 U disk update APK software considerations (23)Version:Rev 1.0.0Date:2017-03-24/Address:Skyworth innovation valley 5# A layer ,901 Tangtou Road no. 1 on the 8th Shiyan Street Baoan District 21. Software installationLog on / to download Android YClient software ,Click install package to install or scan the QR to install.2. Software uninstallEnter phone setting system,select the application ,select YClient and click to uninstall./Address:Skyworth innovation valley 5# A layer ,901 Tangtou Road no. 1 on the 8th Shiyan Street Baoan District 33.1.4 Set the client name,then click [Scanning device]. It will enter the following Address:Skyworth innovation valley 5# A layer ,901 Tangtou Road no. 1 on the 8th Shiyan Street Baoan District3.1.5 Click“scanning device”to find led screen, after LED display is found , it willpresent following interface.Address:Skyworth innovation valley 5# A layer ,901 Tangtou Road no. 1 on the 8th Shiyan Street Baoan DistrictAddress:Skyworth innovation valley 5# A layer ,901 Tangtou Road no. 1 on the 8th Shiyan Street Baoan DistrictVideo play controlBack to Main interface, click “Playback control”, we will enter follow interface,/Address:Skyworth innovation valley 5# A layer ,901 Tangtou Road no. 1 on the 8th Shiyan Street Baoan District:Click this icon, you will see all of file that stored on player,files include ::::::●:Stop●:decide cycle type●:delete play list●:Voice switcher●:Check box to select file to play●Remove file from play listDrag the file forward left, icon will exist, click it to remove the file, click icon to preview file(Remarks:this acting just for file removing, will not delete source file)●Delete source file:/Address:Skyworth innovation valley 5# A layer ,901 Tangtou Road no. 1 on the 8th Shiyan Street Baoan District 9, will present follow list, select the file need delete, click“delete file”toBack to Main Menu, click and enter the interface of window setting, you can set to change window size and window location.Address:Skyworth innovation valley 5# A layer ,901 Tangtou Road no. 1 on the 8th Shiyan Street Baoan District/Address:Skyworth innovation valley 5# A layer ,901 Tangtou Road no. 1 on the 8th Shiyan Street Baoan District3.2.5Animation interaction sendingBack to Main interface, enter Animation interaction interface, it access audience to send gift from cell phone then realize interaction.Choose appropriated gift, you will enter follow interface, then drag the icon upward, animation will cancel on a short time playing, click “reset” to reset gift to play it again./Address:Skyworth innovation valley 5# A layer ,901 Tangtou Road no. 1 on the 8th Shiyan Street Baoan District 123.2.6 Image EditingClick “Choose image” to Choose image you want to edit, then you can edit it or add some text.4 System settingsEnter the interface as image(1) ,click “ system set” to enter interface.Image (1) image (2)/Address:Skyworth innovation valley 5# A layer ,901 Tangtou Road no. 1 on the 8th Shiyan Street Baoan District134.1System setClick “system set” ,It will present brightness,Voice setting‘’’4.2Restart/Turn offClick Restart/Turn off, you will enter the follow interface,click “restart” to restart the player. Click”turn off” to turn off player, set the timing time, click “save” to realize timing restart./Address:Skyworth innovation valley 5# A layer ,901 Tangtou Road no. 1 on the 8th Shiyan Street Baoan District 144.3Window setClick this menu, you can do the setting for existing window, one device support 2windows setting, please reference as follow:4.4Insert Text:Click this menu,enter the setting interface, it is available to insert the text you need. In/Address:Skyworth innovation valley 5# A layer ,901 Tangtou Road no. 1 on the 8th Shiyan Street Baoan District 15Click this menu to do the clock set. Virtual clock,alarm clock 2 options.After clock location,size setting, switch status to “ON” then click “finished”.Click this menu to do time correction, deal to player is battery free, time will be change when on power off.Click this menu to brightness manual adjustment and automatic adjustment.Automatic adjustment base timing setting.4.8Screen connect settingClick this menu to do a simple setting of screen connection, and send gamma in the same time./Address:Skyworth innovation valley 5# A layer ,901 Tangtou Road no. 1 on the 8th Shiyan Street Baoan District 184.9Software InformationClick this option to check the Version of software.5Advanced settingIn system setting interface,click “advanced setting”,type “88886666” when password input blank pop-up, then enter setting interface./Address:Skyworth innovation valley 5# A layer ,901 Tangtou Road no. 1 on the 8th Shiyan Street Baoan District 195.1 Wifi hostspot setWhen Wifi hostpot is on 【OFF 】,screen is accepted to connect another wifi signal( the other Mdea player is covered), click “save”,it will present “system modify successfully”.Reconnect wifi hotspot to scan device./Address:Skyworth innovation valley 5# A layer ,901 Tangtou Road no. 1 on the 8th Shiyan Street Baoan District20Please connect Medea together into 1 hot spot, it will realize to multi-screen control when connect this hot spot/Address:Skyworth innovation valley 5# A layer ,901 Tangtou Road no. 1 on the 8th Shiyan Street Baoan District215.2 Modify name of WIFIPlease switch hot spot from 【OFF】to 【ON】, click “ok” when the follow window pop off. Setting finished.6 Matters needing attention6.1 Udisk play matters needing attention6.1.1 U disk must be USB 2.0 interface,do not support USB 3.0 interface;6.1.2 Video copy in the U disk root directory, can not be put in U dish in any of thefolder;6.1.3 a single video not more than 500 m, The resolution of the video request under720 P,the size of the usb drive all video size can not exceed the remainingmemory(YClient can be read into the MDEA end the rest of the memory size)/Address:Skyworth innovation valley 5# A layer ,901 Tangtou Road no. 1 on the 8th Shiyan Street Baoan District 226.1.4 Through the U disk broadcast video, Only need to play the video and images arestored in the MDEA system;6.2 The video window to add notes6.2.1MDEA system temporary support for the two Windows, window 1 support videoand pictures, window 2 only support pictures play;6.3 U disk update android matters needing attention6.3.1 U disk must be USB 2.0 interface,do not support USB 3.0 interface;6.3.2 MDEA1 and MEDA2 OTA upgrade firmware package don't chaos in usbdrive(Such as: U DISK has a MEDA1 OTA upgrade the firmware, do not have to put into the MEDA2 equipment;)6.3.3 U disk cannot be thought system disk and insert it into the equipment can'tidentify;6.3.4 U disk stored file had better not have a lot of layers, or equipment need to scanfor a long time;6.4 U disk update APK software considerations6.4.1 U disk must be USB 2.0 interface,do not support USB 3.0 interface;6.4.2 U disk cannot be thought system disk and insert it into the equipment can'tidentify;6.4.3 U disk stored file had better not have a lot of layers, or equipment need to scanfor a long time;/Address:Skyworth innovation valley 5# A layer ,901 Tangtou Road no. 1 on the 8th Shiyan Street Baoan District 23。
移动端实现树级菜单的方法
移动端实现树级菜单的方法全文共四篇示例,供读者参考第一篇示例:在移动端开发中,实现树级菜单是一项常见且重要的任务。
在移动设备上,由于屏幕空间有限,设计和实现树级菜单需要考虑到用户体验和界面布局的限制。
本文将介绍一些常见的方法和技巧来实现移动端的树级菜单。
一、使用折叠菜单折叠菜单是一种常见的树级菜单设计模式,适用于移动设备上的界面。
在折叠菜单中,每个父级菜单项下面可以展开或折叠多个子级菜单项,用户可以点击父级菜单项来展开或折叠子级菜单项。
这种设计模式节省了屏幕空间,并且用户可以方便地浏览和操作树状结构的数据。
在实现折叠菜单时,可以使用HTML、CSS和JavaScript来构建。
可以使用HTML的ul和li标签来表示菜单的层级结构,使用CSS样式来控制菜单的外观和布局,使用JavaScript来添加交互效果和实现菜单的展开和折叠功能。
通过合理的布局和样式设计,可以在移动设备上呈现出清晰、易用的树级菜单。
二、利用滑动菜单在实现滑动菜单时,可以利用现有的移动端UI框架或库来快速实现。
一些流行的移动端UI框架,如jQuery Mobile、Ionic等,提供了丰富的界面组件和交互效果,可以帮助开发人员快速构建滑动菜单。
通过合理的布局和交互设计,可以让滑动菜单在移动设备上呈现出流畅、直观的用户体验。
三、响应式设计在设计移动端树级菜单时,需要考虑到不同设备屏幕大小和分辨率的差异。
为了适应不同尺寸的移动设备,可以使用响应式设计的技术来实现自适应的界面布局。
通过使用CSS媒体查询和弹性布局等技术,可以让树级菜单在不同尺寸的屏幕上自动调整布局和样式,确保用户在任何设备上都能够方便地访问和操作菜单。
在移动端实现树级菜单时,需要综合考虑用户体验、界面设计和技术实现等多方面因素。
通过选择合适的设计模式、利用现有的UI框架和工具、采用响应式设计等方法,可以实现一个优秀的移动端树级菜单,为用户提供更好的导航和操作体验。
希望本文介绍的方法和技巧能够帮助开发人员更好地实现移动端树级菜单。
BD_FACSDiVa_软件操作手册
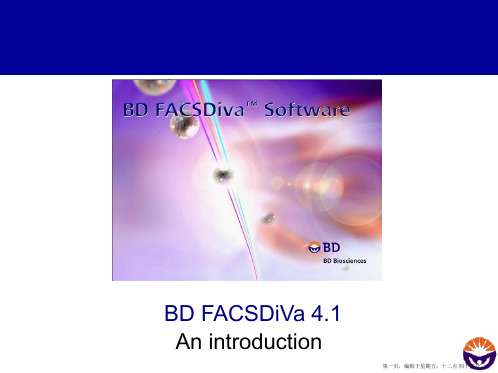
Sort control Defines all settings for Frequency, amplitude, and
Stream deflection
Acquisition Status Counters for events per second,
Aborted events, Elapsed time
A new experiment contains a „standard“ instrument setting and a single tube in a so-called „specimen“.
When selecting "New Experiment" from the menu bar you can select a "Template" for your Experiment (created from your older experiments).
第十八页,编辑于星期五:十二点 四十四分。
Instrument Parameters
The „Add“ and „Delete“ buttons allow the user to delete unwanted parameters, thus saving space for the recorded data sets. Note that the parameters correspond to fluorochrome names, not channel numbers. The association between channels, lasers and fluorochromes is explained later.
第九页,编辑于星期五:十二点 四十四分。
LARA-Dio iOS安装手册说明书

Installation manual LARA-Dio Application for iOSContent1. Introduction (3)2. Install the app on your iOS mobile phone (3)3. Basic settings (4)4. Application Control (6)1. IntroductionLARA-Dio is complementary to the iNELS Multimedia Intelligent Wired System which allows you to control your LARA Radio audio sphere from a smart iOS-enabled phone.The main advantage of the application is the ability to control all audios from a single location.2. Install the app on your iOS mobile phoneDownload the LARA-Dio app to your mobile phone from App Store.When you open App Store, enter iNels in the search engine. Select LARA-Dio from the list and run it.Press the Install button to confirm. Wait for the installation; this may take several seconds (depending on your phone type).3. Basic settings∙Launch the application by pressing the Lara icon .∙When you first start, the two options for adding the LARA Radio are displayed.o NEW SEARCH - After pressing the button, all LARA Radio(s) available on your network will automatically be searched for. A list appears from which you can add LARA Radioindividually.o ADD MANAGER - here you enter the required login details required by LARA Radio (device name, static IP address, login name, password). By default, the LARA Radiologin name set to admin and password elkoep.After the LARA Radio has been successfully added, the radio list is automatically downloadedand the application is set to the default screen from which you can control LARA Radio.Button Settings MUTE - mutes volumeto minimumVolume controlName of the radio station played Control buttons: previous / next radio;play / stop Mark your favoriteradio4. Application Control∙ Press the List button to enter the list of your added LARA Radio. By touching a title or a dot, you can control and edit the LARA Radio.∙The middle icon is used to update the radio list stored in the LARA Radio.∙ Press Radio list button to enter the list of all radio stations you have set.Press the Heart button to assign / remove the marked radio from your favourite list.Press the station name to control the radio.∙With the Playlist button, you will enter the list of songs stored in your phone.Touching the track will play it.Return to the Home screen - just press the play button.Playlist saved onyour phonePreview analbum coverWhen you press the Favourite radio station button, the list you have defined lets you controlthe radio.You can also add individual radio stations directly from the main screen to the favourites list by pressing the heart symbol (top right).Favourite radio stationsWhen the Setup button is pressed, the grey side panel is hidden, where you can press theSettings bar to get to the setup menu.Number of Added LARA Radio(s) Pencil icon - foreditingTrash icon - to removeNameManual additionAutomatic search。
移动推送帮助手册说明书

-----q q q q--帮助手册推送使用场景介绍按设备号DeviceId推送按账号account推送按别名alias推送按标签tag推送通知的各种应用场景打开指定activity打开指定网页打开应用自定义 key/value 说明查看设备状态查看推送效果1、按设备号推送 DeviceIddeviceId是设备在推送的唯一标示,一般刚刚接入推送的时候,验证推送效果会采用这种推送方式。
deviceId获取方式:Android:CloudPushService的getDeviceId方法,iOS:[CloudPushSDK getDeviceId]在控制台推送的"高级设置"选择 "指定终端",或者在OPENAPI中按照device推送:setTarget("device")2、按账户号推送 accountaccount和设备绑定,可以是任意您的业务需要的,一个设备只能添加一个account,不同设备可以绑定同一个account,非中文字符。
注: 按account推送的时候,绑定该account的手机都会收到推送。
如有账号之间互斥登陆需要自己的业务来保证。
在控制台推送的"高级设置"选择 "指定账号",或者在Open API中按照account推送:setTarget("account")注:如需要解绑账号,调用unbindAccount方法。
3、按别名推送aliasalias是给设备添加的别名,相比于account,别名绑定更加灵活,同一设备最多添加128个别名,单个别名长度最大为128字节。
别名绑定后,在Open API中按alas推送:setTarget("alias"),调用setTargetValue()指定别名即可。
调用removeAlias()接口可以删除设备的指定别名或全部别名,4、按标签推送 tagtag是给设备添加的标签,可以是任意您的业务需要的,支持向【设备】【账号】【别名】绑定标签,系统最大支持128个标签。
- 1、下载文档前请自行甄别文档内容的完整性,平台不提供额外的编辑、内容补充、找答案等附加服务。
- 2、"仅部分预览"的文档,不可在线预览部分如存在完整性等问题,可反馈申请退款(可完整预览的文档不适用该条件!)。
- 3、如文档侵犯您的权益,请联系客服反馈,我们会尽快为您处理(人工客服工作时间:9:00-18:30)。
Best App Showcase
Enter your subhead line here
TITLE GOES HERE
This is a sample text. You simply add your own text and description here. This text is fully editable. It can be replaced with your own style. You can change its color or font size. This is a sample text. You simply add your own text and description here. This text is fully editable. It can be replaced with your own style.
Best App Showcase – Top Features
Enter your subhead line here
TITLE GOES HERE
TITLE GOES HERE
TITLE GOES HERE HERE
TITLE GOES HERE
Get The App >
TITLE GOES HERE
This is a sample text. You simply add your own text and description here.
TITLE GOES HERE
This is a sample text. You simply add your own text and description here.
The Best App Showcase Anywhere, Anytime.
Interactive, Innovative, Irresistible
The Best App Showcase Anywhere,
Anytime.
This is a sample text. You simply add your own text and description here. This text is fully editable. It can be replaced with your own style. You can change its color or font size. This is a sample text. You simply add your own text and description here. This text is fully editable. It can be replaced with your own style.
TITLE GOES
HERE
This is a sample text. You simply add your own text and
description here.
TITLE GOES
HERE
This is a sample text. You simply add your own text and
TITLE GOES HERE
TITLE GOES HERE
TITLE GOES HERE
TITLE GOES HERE
TITLE GOES HERE
TITLE GOES HERE
Best App Showcase – Top Features
Enter your subhead line here
FEATURE #4
4 This is a sample text. You simply add your own text and description here.
This text is fully editable. It can be replaced with your own style.
The Best App Showcase Anywhere, Anytime.
Interactive, Innovative, Irresistible
The Best App Showcase Anywhere, Anytime
Interactive, Innovative, Irresistible
Download on the
App Store
Get it on
Google Play
Get it on
Windows Store
The Best App Showcase Anywhere, Anytime
Interactive, Innovative, Irresistible
Download on the
TITLE GOES HERE
The Best App Showcase
Enter your subhead line here
TITLE GOES HERE
This is a sample text. You simply add your own text and description here. This text is fully editable. It can be replaced with your own style. You can change its color or font size. This is a sample text. You simply add your own text and description here. This text is fully editable. It can be replaced with your own style.
The Best App Showcase Anywhere, Anytime.
FEATURE # 1
1 This is a sample text. You simply add your own text and description here.
This text is fully editable. It can be replaced with your own style.
TITLE GOES HERE
This is a sample text. You simply add your own text and description here.
TITLE GOES HERE
This is a sample text. You simply add your own text and description here.
Best App Showcase – Top Features
Enter your subhead line here
The Best App Showcase Anywhere, Anytime.
TITLE GOES HERE
TITLE GOES HERE
TITLE GOES HERE
TITLE GOES HERE
TITLE GOES HERE
This is a sample text. You simply add your own text and description here.
TITLE GOES HERE
This is a sample text. You simply add your own text and description here.
TITLE GOES HERE
This is a sample text. You simply add your own text and description here.
TITLE GOES HERE
This is a sample text. You simply add your own text and description here.
TITLE GOES HERE
This is a sample text. You simply add your own text and description here. This text is fully editable. It can be replaced with your own style. You can change its color or font size. This is a sample text. You simply add your own text and description here. This text is fully editable. It
description here.
TITLE GOES
HERE
This is a sample text. You simply add your own text and
description here.
Best App Showcase – Top Features
Enter your subhead line here
Feature #2
2 This is a sample text. You simply add your own text and description here.
This text is fully editable. It can be replaced with your own style.
App Store
Get it on
Google Play
The Best App Showcase Anywhere, Anytime
Interactive, Innovative, Irresistible
The Best App Showcase Anywhere, Anytime
Interactive, Innovative, Irresistible
