音络USB便携型会议电话使用说明书
soundstation2 电话会议使用说明

背景灯.................................................................................................. 12
语言 ..................................................................................................... 13
结束呼叫................................................................................................. 9
Байду номын сангаас
呼叫保持............................................................................................... 10
管理设置 — 概述 ........................................ 24
密码 ..................................................................................................... 25 地点信息............................................................................................... 26 电话系统............................................................................................... 28
视频会议系统简要使用说明

视频会议终端简易操作
拨主会场通知的会议号
视频会议终端简易操作
被邀请加入会议
视频会议终端简易操作
会议建立
视频会议终端简易操作
遥控器介绍
视频会议终端简易操作
遥控器介绍
视频会议终端简易操作
菜单键
视频会议终端简易操作
根据学校不同需要开启/关闭本地声音
菜单高级设置音频音效
视频会议终端简易操作
视频电话简易操作
登录账号
视频电话简易操作
拨号界面
视频电话简易操作
来电显示
视频电话简易操作
接通会议
视频电话简易操作
创建多人会议
视频电话简易操作
添加与会成员
视频电话简易操作
添加与会成员
视频电Байду номын сангаас简易操作
添加与会成员
四、其他视频会议设备操作
遥控器
其他视频会议设备操作
机柜内设备: 1.功放 2.华为视频终端TE50 3.会议话筒主机
1xHD-AI阵列mic 1x3.5mm Line in
1xHDMI
音频输出(6出) 4xRCA 2xHDMI
其它接口
2xUSB 2.0 2x10/100/1000M LAN 2xCOM口(RS232) 1xPSTN 1xWIFI(内置)
TE50连线总览
视频会议终端简易操作
拨出单个号码
视频会议终端简易操作
连接笔记本,显示演示桌面
将VGA接头插入笔记本, 部分笔记本需手动切换。
视频会议终端简易操作
根据学校不同需要开启/关闭双屏显示笔记本桌面
菜单高级设置视频公共设置 主视频源
三、视频电话简易操作
华为Espace 8950
INNOTRIK AUCTOPUS会议电话产品
INNOTRIK AUCTOPUS会议电话产品产品介绍:AUCTOPUS 扩展型会议电话是企业级会议电话的理想之选,适合在大、中、小型会议室和办公室中使用。
360度范围4米的试音距离涵盖了绝大部分会议应有场景。
AUCTOPUS扩展麦会议电话产品是业界全新的具有真正的INNOTRIK全双工技术、清晰的语音通话质量,可同时进行双向、自然流畅的会谈,其表现得相当优秀。
其麦克风的拾音灵敏度高,现场与会者在4米之内以正常语音说话,可以自然流畅地与远端会场的与会者交流,这使得每一次通话都成为更高效率的会谈。
其主要功能和特点:1.适用商务,造形典雅大方。
2.液晶显示屏幕大,屏幕背光明亮,字体显示清晰。
3.菜单式操作界面。
4.按键舒适,触感好,操作方便。
5.新颖的LED状态指示灯,响铃、通话、静音、保留等,一目了然。
6.容易操作的预拨号、重拨、静音、保留等电话功能。
7.内置10 组可存储的电话簿。
8.支持多方通话。
9.可以扩展2个麦克风装置10.扩展麦克风装置---具有大方的静音按键11.扩展麦克风装置---具有透明的环形指示灯产品结构:1.主控机:包括音频处理和功能控制单元、输入键盘、液晶显示屏。
2.电源接口装置:包括电源适配器、模拟电话线转换接口。
3.线缆:包括1根长6.4米主控机连接电缆和1根长2.1米的连接公共模拟电话网的电话线;4.可以扩展2个麦克风装置:每个装置包括1根2.4米长的专用连接线。
4、主控机尺寸:37.4 x 33.0 x 7.0 (cm)。
5、主控机重量:960克6、电源接口装置尺寸:22.0 x 9.8 x 6.0(cm)。
7、电源接口装置重量:720克8、扩展麦克风装置(可选配件)重量:110克9、扩展麦克风装置(可选配件)尺寸:8.98 x 8.36 x 2.77(cm)。
10、电源: 交流电压AC 220V/50Hz。
11、网络接口: 适合RJ-11,模拟PBX或者PSTN接口。
好会通Meeteasy系列会议电话产品说明书

好会通Meeteasy 系列会议电话产品说明书深圳市好会通科技有限公司 ®Mini 2Mini Mid Ex Mid 2Mid 2ExMidMid HC Mid 2HC®说明书目录一、产品简介 (2)二、好会通Meeteasy系列会议电话及配件 (3)三、好会通Meeteasy系列会议电话接线及接口示意图 (3)四、好会通Meeteasy会议电话功能键说明 (6)五、好会通Meeteasy会议电话的应用示意图 (7)六、好会通Meeteasy会议电话与好会通多方电话会议系统组网应用 (7)七、好会通Meeteasy会议电话详细介绍 (8)7.1.好会通Meeteasy Mini会议电话 (8)7.2.好会通Meeteasy Mini2会议电话 (9)7.3.好会通Meeteasy Mid会议电话 (10)7.4.好会通Meeteasy Mid2会议电话 (11)7.5.好会通Meeteasy Mid EX会议电话 (12)7.6.好会通Meeteasy Mid2EX会议电话 (13)7.7.好会通Meeteasy Mid HC会场终端 (14)7.8.好会通Meeteasy Mid2HC会场终 (15)八、好会通Meeteasy会议电话型号参数比较表 (16)九、型号及配件表 (16)一、产品简介:好会通®/Meeteasy®系列会议电话关注客户需求,贯彻以人为本的设计理念,采用先进的数字信号语音处理(DSP)技术和创新的模块化设计方案,具有卓越的会议电话通话效果和强大的扩展功能,可支持电脑网络通话和3方通话,兼具会议电话和个人电话的功能。
其造型稳重大方,简洁清爽,优美的弧线穿插其中,整体而富有细节,高贵而不张扬。
自主研发的回音消除技术及动态噪音抑制技术,高品质的喇叭和麦克风让会议电话语音音质、音量有质的飞跃。
其无与伦比的全双工通话性能,更是绝无仅有。
好会通®/Meeteasy®系列会议电话包括8款产品,充分满足用户的多样化需求,易于扩展,保护用户投资。
alcatel-lucent_h3p_h3g_h6_桌面电话 用户手册说明书

桌面电话用户手册第一版介绍感谢您选择阿尔卡特朗讯电话。
本文主要介绍连接到服务器的桌面电话以及提供的服务桌面电话桌面电话桌面电话本文中描述的电话在不同的服务器上受支持,本文档中描述的某些功能取决于电话连接到的服务器。
如果需要有关系统兼容性或给定服务器的功能级别的详细信息,请联系系统管理员。
显示的标签和图标取决于集的类型和外观。
如果未在电话系统上配置相应的功能,则不显示标签。
根据显示器的大小,某些标签可能会被截断。
话机的主要功能列表如下多账号彩色屏幕英寸黑白屏,英寸屏幕亮度可调话机角度可调高清手柄耳机耳机兼容双百兆网口双千兆网口外接电源可挂墙多种音频模式切换本地方会议呼叫网页管理现在就开始了解您的话机安装脚架连接您的话机安装有线手柄了解您的电话使用您的电话事件信息话机状态信息设置账号编程键设置缺省账号开启拨号盘拨话机号码按名字拨号从通话记录发起呼叫使用您的个人目录进行呼叫使用快速拨号键呼叫进行点对点呼叫重拨列表联系人联系人管理呼叫您的联系人添加新联系人创建新群组编辑联系人删除联系人删除所有联系人本地话簿删除组删除本地话簿全部组呼叫联系人仅显示未接来电从通话记录中删除联系人清除呼叫记录创建一个快速呼叫使用快速呼叫键发起通话给话机上锁给话机解锁开启或关闭自动键盘锁将电话转移到另一个被保持的联系人将您的电话转移到另一个联系人盲转结束会议会议结束后,让其余两位人员交流结束会议用您的桌面电话做更多的事配置无线网络管理无线网络登录到桌面共享登出桌面共享为您的话机进行个性化设置选择铃声调整铃声大小配置铃声配置蜂鸣模式响铃设备新建可编程按键删除可编程按键支持的可编程按键类型联系您的管理员(技术支持)默认密码高级设置网页管理()配件基本技术规格订购信息担保和条款现在就开始了解您的话机包装清单话机手柄脚架手柄线网线安全手册和快速安装指南安装您的话机安装脚架话机背面有道脚架槽是用来固定话机的脚架,基于脚架放入的不同脚架槽,您的话机可以在在桌面倾斜个角度,分别是度和度要撤下脚架,请安箭头方向向左推拉即可连接您的话机请首先阅读安全说明。
AT2020USBi 心型指向性 USB电容话筒 说明书
音量控制 : 话筒增益控制
重量 : 350 g
大小 : 162.0 mm 长,52.0 mm 机 体 最 大 直 径
输 出连接头 : Micro HDMI 接 头
随 机附件 : ⅝"-27 接头转轴式 支 架 套 环 ; ⅝"-27 至 ⅜"-16 螺 纹 转 接 头 ; 保 护 袋 ; 三脚桌面支架; 1.5m 长 USB 连 线 ;1.5m 长 Lightning 连 线
iPad 或 iPhone 6 . USB 连接线 7. Lightning 连接线
以附设的转轴支架套环和三脚桌面支架设置您的话筒 A. 把转轴支架套环旋扭固定到三脚桌面支架的顶部 B. 把三脚桌面支架放置在一个平滑的平面位置(三脚架的座架应拉开以提供一个宽阔而安全
的底部) C . 把 AT2020USBi 话 筒 插 入 安 装 到 转 轴 支 架 套 环 的 螺 纹 套 筒 的 枢 轴 中, 并 把 话 筒 紧 锁。 话 筒 前
3. 开始菜单 > 控制面板 > 声音 要 选择 AT2020USBi 作为 默 认 的 录 音 设 备 , 首 先 在“ 开 始 ”菜 单 中 选 择“ 控 制 面 板 ”。
6
4 . 选 择“声音”。
Windows 8 的 初 步 设 置 ( 继续 )
5. 下面的视窗将会弹出:
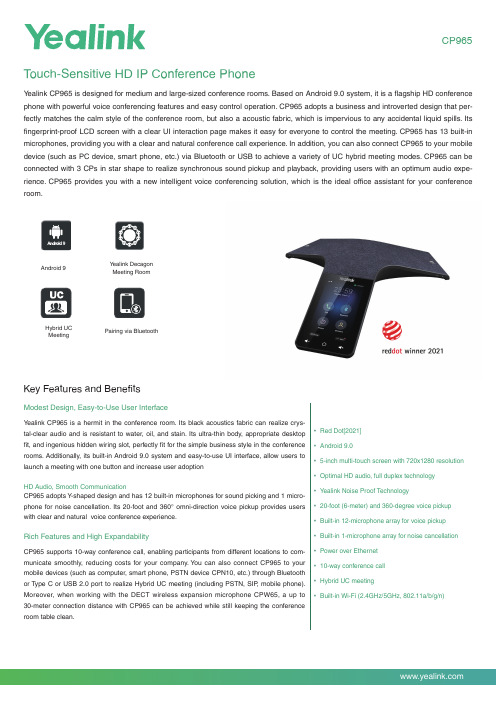
Yealink CP965 触摸敏感 HD IP会议电话说明书
CP965 T ouch-Sensitive HD IP Conference PhoneY ealink CP965 is designed for medium and large-sized conference rooms. Based on Android 9.0 system, it is a flagship HD conference phone with powerful voice conferencing features and easy control operation. CP965 adopts a business and introverted design that per-fectly matches the calm style of the conference room, but also a acoustic fabric, which is impervious to any accidental liquid spills. Its fingerprint-proof LCD screen with a clear UI interaction page makes it easy for everyone to control the meeting. CP965 has 13 built-in microphones, providing you with a clear and natural conference call experience. In addition, you can also connect CP965 to your mobile device (such as PC device, smart phone, etc.) via Bluetooth or USB to achieve a variety of UC hybrid meeting modes. CP965 can be connected with 3 CPs in star shape to realize synchronous sound pickup and playback, providing users with an optimum audio expe-rience. CP965 provides you with a new intelligent voice conferencing solution, which is the ideal office assistant for your conference room.Key Features and BenefitsModest Design, Easy-to-Use User InterfaceY ealink CP965 is a hermit in the conference room. Its black acoustics fabric can realize crys-tal-clear audio and is resistant to water, oil, and stain. Its ultra-thin body, appropriate desktopfit, and ingenious hidden wiring slot, perfectly fit for the simple business style in the conferencerooms. Additionally, its built-in Android 9.0 system and easy-to-use UI interface, allow users tolaunch a meeting with one button and increase user adoptionHD Audio, Smooth CommunicationCP965 adopts Y-shaped design and has 12 built-in microphones for sound picking and 1 micro-phone for noise cancellation. Its 20-foot and 360° omni-direction voice pickup provides userswith clear and natural voice conference experience.Rich Features and High ExpandabilityCP965 supports 10-way conference call, enabling participants from different locations to com-municate smoothly, reducing costs for your company. Y ou can also connect CP965 to yourmobile devices (such as computer, smart phone, PSTN device CPN10, etc.) through Bluetoothor T ype C or USB 2.0 port to realize Hybrid UC meeting (including PSTN, SIP, mobile phone).Moreover, when working with the DECT wireless expansion microphone CPW65, a up to30-meter connection distance with CP965 can be achieved while still keeping the conferenceroom table clean.• Red Dot[2021]• Android 9.0• 5-inch multi-touch screen with 720x1280 resolution• Optimal HD audio, full duplex technology• Y ealink Noise Proof Technology• 20-foot (6-meter) and 360-degree voice pickup• Built-in 12-microphone array for voice pickup• Built-in 1-microphone array for noise cancellation• Power over Ethernet• 10-way conference call• Hybrid UC meeting• Built-in Wi-Fi (2.4GHz/5GHz, 802.11a/b/g/n) Android 9Pairing via BluetoothY ealink DecagonMeeting RoomHybrid UCMeetingSpecificationsYEALINK NETWORK TECHNOLOGY CO., LTD.Email:********************:Email:********************:About YealinkY ealink (Stock Code: 300628) is a global-leading provider of Unified Communication & Collaboration Solutions specialized in video conferencing, voice communications, and collaboration, dedicated to helping every person and organization embrace the power of "Easy Collaboration, High Productivity".With best-in-class quality, innovative technology, and user-friendly experiences, Y ealink is one of the best providers in more than 140 countries and regions, ranks No.1 in the global market share of IP Phone, and is the T op 5 leader in the video conferencing market (Frost & Sullivan, 2021).For more information about Y ealink, click here .CopyrightCopyright © 2022 YEALINK(XIAMEN) NETWORK TECHNOLOGY CO., LTD.All rights reserved. No parts of this publication may be reproduced or transmitted in any form or by any means, electronic or mechanical, photocopying, recording, or otherwise, for any purpose, without the express written permission of Y ealink(Xiamen) Network T echnology CO., LTD.Technical SupportVisit Y ealink WIKI (/) for firmware downloads, product documents, FAQ, and more. For better service, we sincerely recommend you to use Y ealink Ticketing system (https://) to submit all your technical issues.YEALINK(XIAMEN) NETWORK TECHNOLOGY CO.,LTD.Web: Addr: No.1 Ling-Xia North Road, High Tech Park,Huli District, Xiamen, Fujian, P .R.CCopyright©2022 Y ealink Inc. All rights reserved.。
MXL Tempo USB 麦克风使用说明书

TEMPO USB MICROPHONEC ongratulations on your purchase of the MXL T empo USBmicrophone. MXL microphones are the result of world-class engineering and manufacturing capabilities. They are designed to provide you with outstanding performance and exceptional value. While we encourage you to review this entire manual, there are a few key points about handling this microphone that we want you to familiarize yourself with right from the start.MXL USB mics are professional quality, cardioid condenser studio microphones designed specificallyfor recording, podcasting, and video chats. Unlike microphones designed for live performance or dynamic model microphones, this instrument requires careful handling. Hence, you should observe the following:ALWAYS: Handle the microphone carefully, avoidingsudden shocks such as dropping or bumpingthe microphone into other objects. ALWAYS: Maintain a distance of approximately 4 – 6inches when speaking or singing into themicrophone. You are encouraged to use apop filter for added protection of the sensitivecapsule and to shield the instrument from salivaand sudden bursts of air.NEVER:Tap the microphone to check if it’s working. The RED LED on the back of the microphone locatednext to the headphone jack will tell you it’s onand that the correct side is facing you. NEVER:Blow into the microphone to check if it’sworking. The RED LED on the back of themicrophone located next to the headphone jackwill tell you it’s on and that the correct side isfacing you.By following these few basic handling procedures, you can expect a long and trouble-free relationship with your new microphone. Again, thank you for your purchase of this outstanding MXL microphone.A Little Background InformationMXL condenser microphones use what is known asa cardioid pickup pattern, which is more sensitive to sound waves arriving at the front of the microphone as opposed to those arriving from the sides or rear. This microphone benefits from being a USB (Universal Serial Bus) device—meaning this is a plug and play microphone2that will interface with Windows® operating system and Mac® computers without the need for any special drivers. Because it is a USB device, this microphone does not require an external microphone preamp, as is the case with most condenser microphones.When recording an outdoor performance, use a windscreen to protect your microphone from recording problems caused by wind and damage from the elements.Unpack Your MicrophoneBegin by examining the contents of your MXL USB kit. You should have the following components:• One MXL Tempo USB microphone• USB 2.0 high speed cable• Tripod stand• Hard mount mic stand adapter• Owner’s manualGetting Familiar with Your MicrophoneIn addition to speaking or singing into the side of the microphone with the cardioid symbol you should also notice the 1/8” stereo headphone jack on the back. This is a stereo headphone jack for monitoring the microphone’s signal as well as hearing the audio played back from your computer. The 1/8” jack accepts most headphones but the maximum headphone volume will vary by manufacturer and model so care should always be exercised when first plugging in.Using the Supplied Desktop Microphone Stand1. Screw the microphone stand mount to the desktopstand.2. Separate the desktop stand’s legs and place it on a flatsurface.3. While holding the microphone upright and firmly in onehand, secure the microphone to the desktop stand byscrewing the black mounting ring into the microphone’s base. The microphone should now sit securely in thedesktop stand.4. Adjustments can be made to the angle of themicrophone by loosening the thumbscrew on the side of the stand adapter.5. At this point, attach the end of the USB cable thatmatches the microphone’s connector. The other end3 4Connecting the Microphone to Your Computer (Windows)The MXL Tempo USB microphone will operate with both USB 2.0 (high speed USB) and USB 1.1 data buses. We recommend you connect your microphone directly to the computer’s USB port as opposed to using a USB hub. USB hubs have been known to interfere with the performance of various USB devices.PLEASE NOTE: Audio and video recording can be very taxing to a computer’s resources. For this reason, you should close any and all running applications that are not essential.Please take the following steps to get connected:1. If open, close your audio recording application. Youwill open it after the microphone is connected and operational.2. Connect the remaining end of the USB cable to thecomputer’s USB port. You will see a red LED illuminate on the back of the microphone located next to the headphone jack, and Windows will display the New Hardware Found dialog message.3. Allow Windows time to identify the device.4. In approximately one minute, Windows should displaya dialog message stating that Your New Hardware is Installed and Ready for Use . After this first connection, Windows will require just a few moments to identify themicrophone.of the cable will connect to your computer’s USB port .5Initial Setup with Windows XP Operating System1. To select the MXL Tempo USB microphone as thedefault audio device, go to the Start Menu and select Control Panel.2. Select Sounds and Audio Devices.3. Click on the Audio tab and select USB audio CODECas the default device for Sound playback and Sound Recording .64. To adjust the headphone volume, click on the Volumebutton under Sound playback.5. The master volume can be changed by moving the Speaker fader up or down.6. T o adjust the volume of the microphone signal directlyto the headphones, adjust the Microphone fader up or down (this does not affect the volume of the microphone signal being recorded).77. To adjust the volume of the microphone signal thatgoes to the computer and is recorded, click on the Volume button under sound recording.8. Adjust the level by moving the Microphone fader upor down. The gain of the microphone is very sensitive. For most applications, the gain will be set towards the bottom of the fader.Your computer is now setup to use the MXL TempoUSB microphone with most recording applications. Some applications will require additional settings to be changed within the program. Please see your recording software’s manual for proper setup. 8Initial Setup with Windows Vista/Windows 7 Operating Systems1. To select the Tempo USB microphone as the defaultaudio device, go to the Start Menu and select Control Panel.2. Double click the Sound icon.3. Select the Playback tab. Highlight the speaker iconlabeled as USB AUDIO CODEC and click Set Default . T o make further adjustments to the playback volume, double-click on the speaker icon labeled USB AUDIO CODEC.94. Click on the tab labeled Levels. The volume of theheadphones can be adjusted by moving the fader labeled as Speakers.T o adjust the volume of the microphone signal directly to the headphones, adjust the Microphone fader (this does not affect the volume of the microphone signal being recorded). Then click OK .5. To set the MXL Tempo USB microphone as the defaultinput, select the Recording tab in the Sound window. Highlight the microphone icon labeled USB AUDIO CODEC and click Set Default.T o make further adjustments to the microphone volume, double-click on the microphone icon labeled USB AUDIO CODEC.10Initial Setup with Mac OS X1. To select the Tempo USB as the default sound deviceclick on the Apple icon at the top of the screen then select the System Preferences .6. Click on the tab labeled Levels and adjust the Microphone fader. The gain of the microphone is verysensitive. For most applications the fader will be set towards the left.T o make adjustments to the sample rate and bit depth, click on the tab labeled Advanced and select the appropriate set-ting in the drop down menu.Your computer is now setup to use the MXL TempoUSB microphone with most recording applications. Some applications will require additional settings to be changed within the program. Please see your recording software’s manual for proper setup.2. Click on the Sound icon.113. Click on the Output tab, then select the device named USB Audio CODEC. Y ou can adjust the headphonevolume by moving the fader labeled Output Volume.4. Next click on the Input tab and select the devicenamed USB Audio CODEC. Y ou can adjust themicrophone volume by moving the Input Volume fader. The gain of the microphone is very sensitive. For most applications the fader will be set more towards the left. Your computer is now setup to use the MXL TempoUSB microphone with most recording applications. Some applications will require additional settings to be changed within the program. Please see your recording software’s manual for proper setup.For More InformationFor additional information about your MXL USBmicrophone, how to contact technical support, as well as information on other products manufactured by MXL, please visit us online at .。
- 1、下载文档前请自行甄别文档内容的完整性,平台不提供额外的编辑、内容补充、找答案等附加服务。
- 2、"仅部分预览"的文档,不可在线预览部分如存在完整性等问题,可反馈申请退款(可完整预览的文档不适用该条件!)。
- 3、如文档侵犯您的权益,请联系客服反馈,我们会尽快为您处理(人工客服工作时间:9:00-18:30)。
* 您不能在电脑上同时连接多个传声扬声器设备包括本机 * 请将本机直接连接至电脑。通过 USB 集线器连接可能会引起操
1、本设备位于墙壁较近,使本设备远离墙壁。 2、有一个物体放置在本设备较近,避免在本设备的麦克风前面放置物
体。 3、应用本设备的房间混响现象严重。解决办法将具有高吸音性能的物体
放置在房间里,但不要放在本设备麦克风前面。 4、将本设备扬声器音量调低,以减轻混响。
设备产生回声(在另一方自己听到自己说话的声音)。 另外电脑多连接了一个开启的麦克风。需在电脑系统和网络电话软件的 音频设置中,选择本设备的麦克风和喇叭。 另一个设备的设备配置出现问题。Leabharlann , ,, ,4
, ,
,
无线移动电话
专用音频连接线
电 脑U S B接 口 供 电 U S B数 据 线
,
,
,
,
,
,
5
可以按照移动电话的操作方法按挂机键,就可以结束无线移动电话会议 的通话。
本机可以做为电脑或移动电话的一种外接便携式麦克风和扬声器设备, 按上述的连接方法,可以通过电脑或移动电话的音乐播放器和录音应用 程序,进行电脑的音乐播放和录音。
9 —U S B 接口 : 用于 连 接随 附 的U S B数据 线 。
2
1
2
3
1 —扬声器静音指示灯:
本机作为电脑的一种外置麦克风和扬声器设备,可以进行电脑网络电话 会议。
本机适合于Windows 2000 / Windows XP / Windows Vista / Windows7 and Mac OS X操作系统的电脑,要求USB 接口为USB1.1 或更高(建议 USB2.0),并且连接互联网的电脑,已安装有网络电话功能的即时通讯 或VoIP软件包(如:QQVoice、skype、MSN、uucall等)。 本设备的USB数据线为随插即用,无须额外安装驱动程序。
在进行电话会议时,请关闭电脑的音乐播放和录音功能的操作。
本设备按使用说明书操作,首先要检查设备之间的各种连接线是否完 好,插头插入插座是否到位,然后依照下列问题检查处理,如果问题仍 然有,请与您的经销商或客户服务中心联系,按售后三包服务。
听不到其它设备发出的声音。 1、可能本设备扬声器处于静音状态,请关闭本设备扬声器静音功能。其
使用说明书
1
7
1
2 3 4 5 6 89
1 —扬声器: 发出声音的喇叭。
2 —扬声器静音按键: 按下此按键,以暂时关闭扬声器的声音。若要打开扬声器的 声音,请再按下此按键。
3 — 音量 减 小按 键: 依次按下此按键,会逐步降低喇叭的音量。
4 —麦克风选择按键: 依次按下此按键,会顺序选择开启麦克风的拾音方向。
5 — 音量 增 加按 键: 依次按下此按键,会逐步增加喇叭的音量。
6 — 麦克 风 静音 按 键: 按下此按键,以暂时关闭所有麦克风。若要取消静音功能, 请再次按下。
7 — 麦克 风: 收集对应区域的声音,共有三个拾音麦克风。
8 — 音频 输 入/输出 接 口( A U D I O I N / O U T ): 用于连接专用的音频连接线。
它设备上的麦克风处于静音状态,请关闭静音。 2、本设备扬声器音量设置为最小,请调高本设备扬声器音量。其它设备
上的麦克风敏感度设置为最低,请适当调高。 在其它设备上听不到本设备所发出的声音。
1、本设备上的麦克风可能处于静音状态,关闭麦克风静音功能。其它设 备上的扬声器可能处于静音状态,请关闭静音。
2、本设备麦克风敏感度设置为最低,提高本设备麦克风敏感度。其它设 备上的扬声器音量设置为最低,请适当调高。 设备产生反馈噪音(振鸣啸叫)。
1.款式轻便、经典大方,便于携带。 2.结构设计紧密结实,保证品质。 3.全双工新技术,会议通话效果清晰。 4.支持电脑互联网络电话会议。 5.支持无线移动电话会议。 6.支持电脑或移动电话的音乐播放和录音。 B接口免驱动,即插即用。 B总线提供电源简单方便。
主机
USB数据 线
便携包
设备产生背景噪音。 设备附近放有一个干扰设备。使设备远离此干扰设备(比如有使用的风 扇和电热壶等产生的干扰噪声)。
喇叭声音发劈。
6
本设备扬声器音量过大,调低本设备扬声器音量。 ,
, ,
7
17.不打算长期使用本机时,请从电脑上拔下USB数据线,以避免引起火 灾。
18.请勿随意松开本设备的合盖螺钉,造成密封不良,影响品质效果。 19.请勿尝试维修本设备。如果设备存在问题需要维修,请与您的经销商
或客户服务中心联系,按售后三包服务。 产品的技术支持和服务,请登录网址: 查询。
Windows 7 /Windows Vista/Windows XP/Windows 2000和Mac OS X
USB 数据线(1.8 米),使用说明书,便携包 专用音频连接线
8
作问题。 3
U S B数 据 线
连接互联网络的个人电脑
在电脑上启动具有网络电话功能的软件,按照软件说明进行电话功能操 作,网络电话接通后,就可以和对方进行网络电话会议了。
在会议通话过程中,如果喇叭音量太小或太大,可以先重复按下本机的 “音量增加”或“音量减小”按键,调整合适的音量来满足要求,若觉 得不够,可再调整电脑上的喇叭音量大小。
首先感谢您选择使用深圳市音络科技有限公司的会议电话产品。 AUCTOPUS是深圳市音络科技有限公司的注册商标。 深圳市音络科技有限公司的AUCTOPUS I-20会议电话产品,不仅能通过电 脑的USB接口在互联网上进行高品质的网络电话会议;而且也能通过耳机 接口作为无线移动电话的一种扬声器和麦克风的免提通话设备,进行高品 质的无线移动电话会议。其造型经典大方,便于携带。麦克风拾音方向可 以根据会议场景进行选择设置,适合在会议室和办公室等场所使用。 AUCTOPUS I-20产品是业界全新的具有INNOTRIK全双工音频技术,可同时 进行双向、自然流畅的会谈,其清晰的语音通话性能表现得相当卓越。 另外,AUCTOPUS I-20产品也可以作为电脑和无线移动电话的一种 扩展麦克风和音箱,进行相应功能的音乐播放和录音。
在会议通话过程中,如果对方听到声音太小或太大,可以先要求对方调 节接收音量的大小来满足要求,若觉得不够,可再调整本机电脑的麦克 风送话音量的大小。
在会议通话过程中,想把您的声音静音,请按主机“麦克风静音”键。 同时主机的麦克风静音指示灯会亮起,并且被启用的麦克风指示灯也会 熄灭。这时您只能听到对方的声音,而对方听不到您的声音;如要取消 静音,请再一次按主机“麦克风静音”键,立即可以恢复通话。此时主 机的麦克风静音指示灯会熄灭,并且被启用的麦克风指示灯也会亮起。