虚拟机中红帽系统的网络设置
VirtualBox虚拟机网络配置教程
VirtualBox虚拟机网络配置教程第一章:介绍VirtualBox虚拟机网络配置概述VirtualBox是一款功能强大的开源虚拟化软件,它允许用户在一台物理计算机上运行多个虚拟机,从而实现虚拟化环境的搭建。
在使用VirtualBox时,网络配置是一个重要的方面。
在本教程中,我们将重点介绍VirtualBox虚拟机网络的不同模式及其配置方法。
第二章:NAT模式NAT(Network Address Translation)模式是VirtualBox默认的网络模式。
在NAT模式下,虚拟机与主机以及其他虚拟机之间实现了网络通信。
同时,VirtualBox也会为虚拟机分配一个IP地址,在虚拟机内部使用该IP地址进行网络通信。
配置NAT模式的方法如下:1. 打开VirtualBox,选择要配置网络的虚拟机,点击设置。
2. 在“网络”选项卡中,选择“NAT”模式。
3. 确定更改,并启动虚拟机。
第三章:桥接模式桥接模式允许虚拟机直接与物理网络中的其他设备通信。
在桥接模式下,虚拟机会获得物理网络的独立IP地址,可以像物理计算机一样使用网络服务。
配置桥接模式的方法如下:1. 打开VirtualBox,选择要配置网络的虚拟机,点击设置。
2. 在“网络”选项卡中,选择“桥接网卡”模式。
3. 选择要使用的物理网络适配器,并确定更改。
4. 启动虚拟机,它将获得与物理网络相同的IP地址。
第四章:仅主机模式仅主机模式允许虚拟机与主机进行网络通信,而不与其他设备通信。
在这种模式下,虚拟机与主机共享同一个IP地址,但可以通过网络进行通信。
配置仅主机模式的方法如下:1. 打开VirtualBox,选择要配置网络的虚拟机,点击设置。
2. 在“网络”选项卡中,选择“仅主机”模式。
3. 启动虚拟机,它将与主机共享同一个IP地址。
第五章:内部网络模式内部网络模式允许虚拟机之间进行通信,但与主机以及物理网络中的其他设备隔离。
在内部网络模式下,虚拟机可以通过虚拟网络进行通信,而不会受到外部网络的干扰。
Red Hat Enterprise Linux 8 配置和管理网络说明书

Red Hat Enterprise Linux 8配置和管理网络管理网络接口、防火墙和高级网络功能Last Updated: 2023-08-04Red Hat Enterprise Linux 8 配置和管理网络管理网络接口、防火墙和高级网络功能法律通告Copyright © 2023 Red Hat, Inc.The text of and illustrations in this document are licensed by Red Hat under a Creative Commons Attribution–Share Alike 3.0 Unported license ("CC-BY-SA"). An explanation of CC-BY-SA is available at/licenses/by-sa/3.0/. In accordance with CC-BY-SA, if you distribute this document or an adaptation of it, you must provide the URL for the original version.Red Hat, as the licensor of this document, waives the right to enforce, and agrees not to assert, Section 4d of CC-BY-SA to the fullest extent permitted by applicable law.Red Hat, Red Hat Enterprise Linux, the Shadowman logo, the Red Hat logo, JBoss, OpenShift, Fedora, the Infinity logo, and RHCE are trademarks of Red Hat, Inc., registered in the United States and other countries.Linux ® is the registered trademark of Linus Torvalds in the United States and other countries. Java ® is a registered trademark of Oracle and/or its affiliates.XFS ® is a trademark of Silicon Graphics International Corp. or its subsidiaries in the United States and/or other countries.MySQL ® is a registered trademark of MySQL AB in the United States, the European Union and other countries.Node.js ® is an official trademark of Joyent. Red Hat is not formally related to or endorsed by the official Joyent Node.js open source or commercial project.The OpenStack ® Word Mark and OpenStack logo are either registered trademarks/service marks or trademarks/service marks of the OpenStack Foundation, in the United States and other countries and are used with the OpenStack Foundation's permission. We are not affiliated with, endorsed or sponsored by the OpenStack Foundation, or the OpenStack community.All other trademarks are the property of their respective owners.摘要利用 Red Hat Enterprise Linux (RHEL)的网络功能,您可以配置主机以满足您组织的网络和安全要求。
Red Hat修改IP
在命令界面下输入命令:service network restart
最后显示结果如下:
登录服务器进入登录界面选择other输入用户名root密码vocabox2012进入terminal鼠标点出左上角applicationssystemtools配置ip输入命令setup用键盘上下选择networkconfiguration再按enter键确定
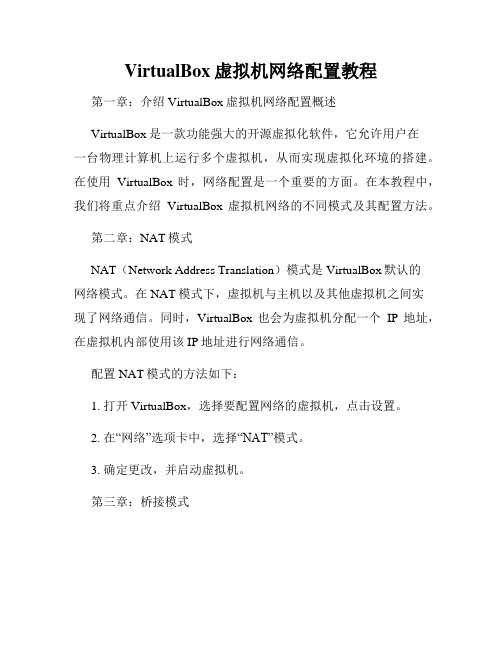
1、登录服务器
进入登录界面,选择other,输入用户名root密码pplications – System tools – Terminal,进入命令行界面。如下图:
3、配置IP
输入命令setup,用键盘上下选择Network configuration,再按Enter键确定。
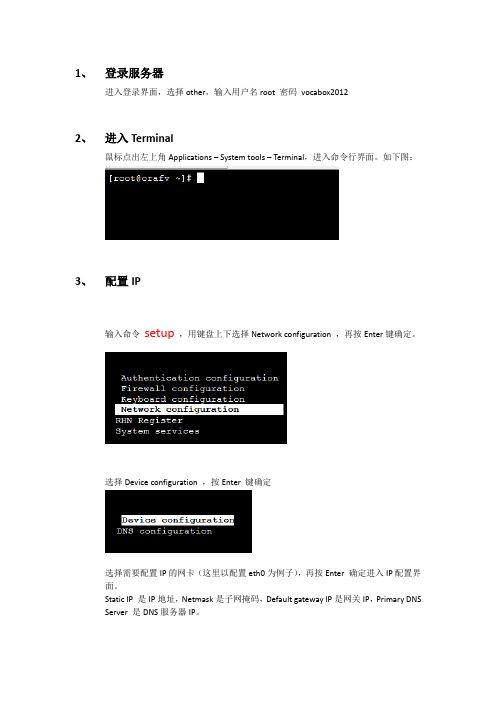
选择Device configuration,按Enter键确定
选择需要配置IP的网卡(这里以配置eth0为例子),再按Enter确定进入IP配置界面。
Static IP是IP地址,Netmask是子网掩码,Default gateway IP是网关IP,Primary DNS Server是DNS服务器IP。
配置IP、子网掩码、网关、DNS后就Tab移动光标到OK确定SaveSave&QuitQuit,退出到命令界面。
Neutron的主要服务组件配置与网络创建.

OPENSTACK配置与管理
任务七 neutron的主要服务组件配置与网络搭建
[root@controller ~]# openstack-config --set /etc/neutron/neutron.conf DEFAULT nova_url http://controller:8774/v2 [root@controller ~]# openstack-config --set /etc/neutron/neutron.conf DEFAULT nova_admin_username nova [root@controller ~]# openstack-config --set /etc/neutron/neutron.conf DEFAULT nova_admin_tenant_id $(keystone tenant-list | awk '/ service / { print $2 }') [root@controller ~]# openstack-config --set /etc/neutron/neutron.conf DEFAULT nova_admin_password 000000 [root@controller ~]# openstack-config --set /etc/neutron/neutron.conf DEFAULT nova_admin_auth_url http://controller:35357/v2.0
OPENSTACK配置与管理
任务七 neutron的主要服务组件配置与网络搭建
四.任务步骤及其详解:(此处有视频:9-2(1)Neutron的安装及其配置) 步骤一:在Neutron组件中配置Nova的认证信息 Neutron为了保证各虚拟机实例之间通讯正常,需要在 Neutron中配置Nova的认证信息,在Neutron组件运行时, 会通过Keystone组件获取Nova的相关信息以获取虚拟机实例 的状态信息,首先我们在controller节点的Neutron的主文件 中添加Nova的相关信息,命令如下。
VMware虚拟机中安装redhat linux操作系统图解

VMware虚拟机中安装redhat linux操作系统图解最初在学linux时,在虚拟机上安装linux的确花了不少时间,遇到了不少问题,随着linux学习的深入,我也曾在虚拟机上安装了Ubuntu,还尝试了在电脑上直接安装redhat.现在总结了一下自己遇到的一些问题,以及我逛百度知道时网友遇到的问题,以RedHat Linux 5企业版在VMware虚拟机上的安装做一个详细一点的图解教程,希望可以给刚接触linux的朋友一点帮助(由于图片太多,我将该教程分为上,下来两部分进行讲解)。
一.准备安装所需要的软件先推荐一个redhat的下载地址,RedHat Linux 5企业版:/content,这个比较全面,但是也比较大(2.68G),如果自己有合适的linux安装版本,可以不使用这个。
二.在VMware虚拟机为RedHat Linux创建新的虚拟机:1.打开虚拟机,选择新建虚拟机:2.下一步:3.选择自定义(这里选择典型可能会在安装过程中出现一个硬件找不到的错误,所以推荐选择自定义),然后点下一步:4.下一步:5.操作系统选择linux,版本不用修改:6.命名,并选择虚拟操作系统的存放位置(位置所在硬盘空间最好大于5G):7.下一步:8.给虚拟机分配内存(这个自己看情况,我的电脑内存是512,给虚拟机分配了256)9.选择虚拟机网络类型(推荐使用桥接网络)10.下一步11.下一步12.选择磁盘类型,这里选择IDE(这也是第三步选择自定义的原因,因为选择典型的话,系统会自动选择SCSI硬盘,而有的linux,主要是早的linux版本,不能使用SCSI硬盘,所以才会出现没有发现硬盘的错误)13.指定磁盘容量(推荐大小为8g,基本够用了)14.完成在开始安装Linux之前,请首先收集一下相关硬件信息。
如果不能确定系统对硬件的兼容性可以到 进行查询。
为Linux准备一个5G以上空间(建议值)大小的分区。
Redhat-6.5基于网络安装服务器配置

概述本文以Redhat6.5为基础,通过配置网络安装服务器,实现Redhat Linux的网络安装。
主要用到的软件(服务)有DHCP,TFTP,NFS,Kickstart等。
本文只列出具体步骤,不含原理说明。
1. 基础配置1.1 更改IP地址[root@localhost ~]# vi /etc/sysconfig/network-scripts/ifcfg-eth0[root@localhost ~]# cat /etc/sysconfig/network-scripts/ifcfg-eth0DEVICE=eth0HWADDR=08:00:27:53:44:fbTYPE=EthernetUUID=82affeef-922e-40b2-b89f-a5df8e9fa236ONBOOT=yesNM_CONTROLLED=yesBOOTPROTO=noneIPADDR=192.168.7.30NETMASK=255.255.255.0GATEWAY=192.168.7.1IPV6INIT=noUSERCTL=no[root@localhost ~]# ifup eth0Active connection state: activatedActive connection path: /org/freedesktop/NetworkManager/ActiveConnection/11.2 更改hostnme[root@localhost ~]# vi /etc/sysconfig/network[root@redhatnis ~]# cat /etc/sysconfig/networkNETWORKING=yesHOSTNAME=redhatnis[root@localhost ~]# vi /etc/hosts[root@localhost ~]# cat /etc/hosts127.0.0.1 localhost localhost.localdomain localhost4 localhost4.localdomain4 ::1 localhost localhost.localdomain localhost6 localhost6.localdomain6 192.168.7.30 redhatnis1.3 关闭SELINUX及防火墙(iptables)[root@localhost ~]# vi /etc/selinux/config[root@redhatnis ~]# cat /etc/selinux/config |grep disa# disabled - SELinux is fully disabled.SELINUX=disabled[root@localhost ~]# chkconfig |grep iptaiptables 0:off 1:off 2:on 3:on 4:on 5:on 6:off[root@localhost ~]# chkconfig --level 2345 iptables off[root@localhost ~]# shutdown -ry 02. 软件安装1.1 挂载安装光盘[root@redhatnis ~]# mount /dev/sr0 /mntmount: block device /dev/sr0 is write-protected, mounting read-only[root@redhatnis ~]# df -hFilesystem Size Used Avail Use% Mounted on/dev/mapper/vg_root-lv_root 20G 6.2G 12G 35% /tmpfs 940M 72K 940M 1% /dev/shm/dev/sda1 485M 39M 421M 9% /boot/dev/sr0 3.6G 3.6G 0 100% /mnt1.2 配置YUM源[root@redhatnis ~]# cd /etc/yum.repos.d[root@redhatnis yum.repos.d]# vi installmedia.repo[root@redhatnis yum.repos.d]# cat installmedia.repo[InstallMedia]name=Red Hat Enterprise Linux 6.5baseurl=file:///mnt/Serverenabled=1gpgcheck=0[root@redhatnis yum.repos.d]# yum listLoaded plugins: product-id, refresh-packagekit, security, subscription-managerThis system is not registered to Red Hat Subscription Management. You can usesubscription-manager to register.InstallMedia | 3.9 kB 00:00 ...Installed PackagesConsoleKit.x86_64 0.4.1-3.el6 @anaconda-RedHatEnterpriseLinux-201311111358.x86_64/6.51.3 安装所需软件[root@redhatnis ~]# yum install -y -q xinetd tftp tftp-server ftp vsftpd dhcpnfs-utilsThis system is not registered to Red Hat Subscription Management. You can usesubscription-manager to register.3. 配置DHCP Server[root@redhatnis ~]# cd /etc/dhcp[root@redhatnis dhcp]# vi dhcpd.conf[root@redhatnis dhcp]# cat dhcpd.conf## DHCP Server Configuration file.# see /usr/share/doc/dhcp*/dhcpd.conf.sample# see 'man 5 dhcpd.conf'#allow booting;allow bootp;#Boot 所需文件filename "pxelinux.0";#TFTP服务器IPnext-server 192.168.7.30;subnet 192.168.7.0 netmask 255.255.255.0{option subnet-mask 255.255.255.0;#IP地址范围range 192.168.7.31 192.168.7.100;default-lease-time 21600;max-lease-time 43200;}[root@redhatnis dhcp]# service dhcpd startStarting dhcpd: [ OK ][root@redhatnis dhcp]# chkconfig --level 345 dhcpd on[root@redhatnis dhcp]# chkconfig |grep dhcpddhcpd 0:off 1:off 2:off 3:on 4:on 5:on 6:off4. 通过FTP(vsftpd)方式上传ISO镜像[root@redhatnis ~]# cd /etc/vsftpd/[root@redhatnis vsftpd]# vi ftpusers[root@redhatnis vsftpd]# cat ftpusers |grep root#root[root@redhatnis vsftpd]# vi user_list[root@redhatnis vsftpd]# cat user_list |grep root#root[root@redhatnis ~]# service vsftpd startStarting vsftpd for vsftpd: [ OK ][root@redhatnis ~]# chkconfig --level 345 vsftpd on此处上传ISO镜像[root@redhatnis ~]# ll /tmp |grep iso-rw-r--r-- 1 root root 3853516800 Feb 16 08:40 rhel-server-6.5-x86_64-dvd.iso 5. 配置NFS[root@redhatnis ~]# mkdir /iso[root@redhatnis ~]# mv /tmp/rhel-server-6.5-x86_64-dvd.iso /iso[root@redhatnis ~]# vi /etc/exports[root@redhatnis ~]# cat /etc/exports/iso *(ro)/mnt *(ro)[root@redhatnis ~]# service rpcbind statusrpcbind (pid 931) is running...[root@redhatnis ~]# service rpcidmapd statusrpc.idmapd (pid 1435) is running...[root@redhatnis ~]# service nfs startStarting NFS services: [ OK ]Starting NFS quotas: [ OK ]Starting NFS mountd: [ OK ]Starting NFS daemon: [ OK ]Starting RPC idmapd: [ OK ][root@redhatnis ~]# showmount -eExport list for redhatnis:/mnt */iso *[root@redhatnis ~]# chkconfig --level 345 nfs on[root@redhatnis ~]# chkconfig |grep nfsnfs 0:off 1:off 2:off 3:on 4:on 5:on 6:off6. 配置TFTP Server[root@redhatnis ~]# mkdir /tftpboot[root@redhatnis ~]# vi /etc/xinetd.d/tftp[root@redhatnis ~]# cat /etc/xinetd.d/tftp# default: off# description: The tftp server serves files using the trivial file transfer \# protocol. The tftp protocol is often used to boot diskless \# workstations, download configuration files to network-aware printers, \# and to start the installation process for some operating systems.service tftp{socket_type = dgramprotocol = udpwait = yesuser = rootserver = /usr/sbin/in.tftpdserver_args = -s /tftpbootdisable = noper_source = 11cps = 100 2flags = IPv4}7. 复制相关文件[root@redhatnis ~]# mount -t iso9660 -o loop,ro /iso/rhel-server-6.5-x86_64-dvd.iso /mnt[root@redhatnis ~]# cp -pr /mnt/images /iso[root@redhatnis ~]# cp -pr /mnt/Packages/syslinux-4.02-8.el6.x86_64.rpm /iso[root@redhatnis ~]# ll /isototal 3764068dr-xr-xr-x 3 root root 4096 Nov 12 2013 images-rw-r--r-- 1 root root 3853516800 Feb 16 14:10 rhel-server-6.5-x86_64-dvd.iso -r--r--r-- 1 root root 879224 Jan 4 2013 syslinux-4.02-8.el6.x86_64.rpm [root@redhatnis ~]# ll /iso/images/total 185548-r--r--r-- 1 root root 380928 Nov 12 2013 efiboot.img-r--r--r-- 1 root root 37976064 Nov 12 2013 efidisk.img-r--r--r-- 1 root root 145731584 Nov 12 2013 install.img-r--r--r-- 1 root root 5898240 Nov 12 2013 product.img[root@redhatnis ~]# cd /iso[root@redhatnis iso]# rpm2cpio syslinux-4.02-8.el6.x86_64.rpm |cpio -dimv[root@redhatnis iso]# lsimages rhel-server-6.5-x86_64-dvd.iso syslinux-4.02-8.el6.x86_64.rpm usr[root@redhatnis iso]# cp ./usr/share/syslinux/pxelinux.0 /tftpboot[root@redhatnis iso]# cp ./images/pxeboot/{vmlinuz,initrd.img} /tftpboot[root@redhatnis iso]# cd /tftpboot/[root@redhatnis tftpboot]# cp /boot/grub/splash.xpm.gz ./8. 创建default文件[root@redhatnis tftpboot]# mkdir pxelinux.cfg[root@redhatnis tftpboot]# cd pxelinux.cfg[root@redhatnis pxelinux.cfg]# cp /mnt/isolinux/isolinux.cfg ./default[root@redhatnis pxelinux.cfg]# vi default[root@redhatnis pxelinux.cfg]# cat defaultdefault linuxprompt 1timeout 60menu background splash.jpgmenu title Welcome to Red Hat Enterprise Linux 6.5!menu color border 0 #ffffffff #00000000menu color sel 7 #ffffffff #ff000000menu color title 0 #ffffffff #00000000menu color tabmsg 0 #ffffffff #00000000menu color unsel 0 #ffffffff #00000000menu color hotsel 0 #ff000000 #ffffffffmenu color hotkey 7 #ffffffff #ff000000menu color scrollbar 0 #ffffffff #00000000label linuxmenu label ^Install or upgrade an existing systemmenu defaultkernel vmlinuzappend ks=nfs:192.168.7.30:/iso/ks.cfg initrd=initrd.imglabel vesamenu label Install system with ^basic video driverkernel vmlinuzappend initrd=initrd.img xdriver=vesa nomodesetlabel rescuemenu label ^Rescue installed systemkernel vmlinuzappend initrd=initrd.img rescuelabel localmenu label Boot from ^local drivelocalboot 0xfffflabel memtest86menu label ^Memory testkernel memtestappend -[root@redhatnis pxelinux.cfg]# cd ..[root@redhatnis tftpboot]# lltotal 36676-r--r--r-- 1 root root 33383449 Feb 16 15:07 initrd.img-rw-r--r-- 1 root root 26828 Feb 16 14:59 pxelinux.0drwxr-xr-x 2 root root 4096 Feb 16 15:04 pxelinux.cfg-rw-r--r-- 1 root root 1341 Feb 16 15:06 splash.xpm.gz-r-xr-xr-x 1 root root 4128944 Feb 16 15:07 vmlinuz9. 创建Kickstart 配置文件系统安装完后会在/root下生产anaconda-ks.cfg文件,也可以通过Kickstart Configurator软件来配置生成该文件。
VM虚拟机网络设置解释很好
VM虚拟机网络设置VMWare中的几种网络设置(1)Bridged方式用这种方式,虚拟系统的IP可设置成和本机系统在同一网段,虚拟系统相当于网络内的一台独立的机器,和本机一起插在一个Hub上,网络内其他机器可访问虚拟系统,虚拟系统也可访问网络内其他机器,当然和本机系统的双向访问也不成问题。
(2)NAT方式这种方式也能实现本机系统和虚拟系统的双向访问。
但网络内其他机器不能访问虚拟系统,虚拟系统可通过本机系统用N AT协议访问网络内其他机器。
NAT方式的I P地址设置方法:虚拟系统先用D HCP自动获得IP地址,本机系统里的V Mwareservice s会为虚拟系统分配一个I P,之后如果想每次启动都用固定IP 的话,在虚拟系统里直接设定这个I P即可。
(3)host-only方式顾名思义这种方式只能进行虚拟机和主机之间的网络通信,既网络内其他机器不能访问虚拟系统,虚拟系统也不能访问其他机器。
(4)not use方式既是不使用网络,虚拟系统为一个单机。
一般来说,Bridged方式最方便好用。
但如果本机系统是win2000而网线没插(或根本没有网卡),网络非常可能不可用(大部分用PCI网卡的机器都如此),此时就只能用N AT方式或h ost-only,之前所说的那两块虚拟网卡就是适应这两种网络准备的。
vmware虚拟机的网络设置虚拟机的网络设置(原理篇)在正式开始之前,我想有必要先来学习一些必要的网络知识。
否则,在不懂得所有原理的情况下依葫芦画瓢虽然可解一时之需要,但遇见具体情况改动的情况下就只能干瞪眼了。
由于篇幅限制,这里只讲和VM ware设置有关的一点简单网络知识。
1,什么是网络?Interne t是指“互连网”,好象这句话说的有点多余,不过确实有非常多人对他有错误的理解,“互连网”是指一个个网络互连,而不是像有些人想象的那样把一台台计算机杂乱无章的互连。
红帽子、centOS双线双网卡双IP双网关设置方法
机房上架了一台测试机,系统是ubuntu9.04 X64的系统,母机IBM X336机器。
用户需求是双线,故采用一个网卡配置电信地址,另一个网卡配置联通地址,安装好系统后配置好IP 发现联通地址和电信地址只能有一个可以ping通,若电信地址配置网关,联通地址不配网关,则只能ping通电信地址,反之只能ping通联通地址,若同时配置联通和电信地址则两个都不通。
因为不是咱们公司的网络,对于上层实现方式也不清楚,只知道联通和电信引至不同的VLAN,而且电信联通不不能透传,但他们有其他机器有同样的介入方式的机器却可以正常出外网,这样就排除网络的问题了,而且此台机器原来是2003系统的时候也可以正常访问网络,也排除了机器网卡的问题了。
那么就只有是这个操作系统有问题了。
经过求助google 等大师,终于搞定。
下面是具体操作流程:ubuntu双网卡双IP.不同网关.不同子网.如何同时ping通两块网卡的解决方法,服务器环境如下:、系统:ubuntu9.04 X64 server电信IP(TEL):114.80.0.4 netmask 255.255.255.128 gateway 114.80.0.3联通IP(CNC):112.65.0.2 netmask 255.255.255.0 gateway 112.65.0.11.配置网卡信息# vi /etc/network/interfacesauto loiface lo inet loopback# The primary network interfaceauto eth0iface eth0 inet staticaddress 114.80.0.4netmask 255.255.255.128gateway 114.80.0.3# dns-* options are implemented by the resolvconf package, if installeddns-nameservers 202.96.209.133auto eth1iface eth1 inet staticaddress 112.65.0.2netmask 255.255.255.0保存配置信息并重新启动网卡# /etc/init.d/networking restart2.增加2个路由表分别是电信:tel 联通:cnc# vi /etc/iproute2/rt_tables252 tel251 cnc保存并推出3.增加路由规则# ip route flush table tel# ip route add default via 114.80.0.3 dev eth0 src 114.80.0.4 table tel# ip ruleadd from 114.80.0.4 table tel此处是设置电信的网关,并可实现让电信的资源访问只从eth0网卡出去# ip route flush table cnc# ip route add default via 112.65.0.1 dev eth1 src 112.65.0.2 table cnc# ip rule add from 112.65.0.2 table cnc此处是设置联通的网关,并可实现让联通的资源访问只从eth1网卡出去4.配置networking启动脚本文件在结尾exit 0之前增加如下内容# vi /etc/init.d/networkingip route flush table telip route add default via 114.80.0.3 dev eth0 src 114.80.0.4 table telip rule add from 114.80.0.4 table telip route flush table cncip route add default via 112.65.0.1 dev eth1 src 112.65.0.2 table cncip rule add from 112.65.0.2 table cncexit 05,退出并重启网络# /etc/init.d/networking restart此时再测试机器网络情况,就会发现电信和联通的地址都可以正常访问了。
虚拟机三种网络模式及配置
虚拟机三种网络模式及配置虚拟机是在物理计算机上运行的虚拟计算环境,它可以模拟出一个完整的计算机系统。
虚拟机的网络模式是指虚拟机与物理网络之间的连接方式。
在虚拟机中,有三种常见的网络模式:桥接模式、NAT模式和仅主机模式。
1. 桥接模式(Bridge Mode):桥接模式是最常用的一种网络模式,它通过虚拟交换机将虚拟机与物理网络连接起来,虚拟机的网络接口相当于直接连接在物理网络上的一台独立计算机。
在桥接模式下,虚拟机可以与物理网络上的其他计算机进行通信,可以和物理网络中的其他计算机共享同一个局域网。
配置桥接模式的步骤如下:1)创建虚拟交换机,并将虚拟交换机的网络连接设置为桥接模式;2)将虚拟机的网络连接设置为桥接模式,并选择连接的虚拟交换机;3)设置虚拟机的网络IP地址和子网掩码,使其和物理网络处于同一个网络段;4)设置虚拟机的默认网关,使其能够访问物理网络上的其他计算机。
桥接模式的优点是虚拟机和物理网络的通信速度快,可以和物理网络上的其他计算机进行无障碍通信。
缺点是虚拟机会占用物理网络中的一个IP地址,并且虚拟机的网络连接依赖于物理网络的稳定性。
2. NAT模式(Network Address Translation Mode):NAT模式是虚拟机的默认网络模式,它通过虚拟网络地址转换的方式将虚拟机连接到物理网络上。
在NAT模式下,虚拟机的网络接口通过虚拟网络交换机连接到主机的物理网络上,但虚拟机无法直接与物理网络中的其他计算机通信,只能通过主机进行网络通信。
配置NAT模式的步骤如下:1)将虚拟机的网络连接设置为NAT模式;2)设置虚拟机的网络IP地址和子网掩码,使其和虚拟网络处于同一个网络段;3)设置虚拟机的默认网关为主机的IP地址。
NAT模式的优点是配置简单,虚拟机的网络连接通过主机进行转发,可以实现与物理网络的通信。
缺点是虚拟机无法直接与物理网络中的其他计算机通信,只能通过主机进行网络通信。
VirtualBox虚拟机网络设置指南
VirtualBox虚拟机网络设置指南第一章:虚拟机网络简介虚拟机是一种在物理计算机上仿真创建的运行环境,能够运行各种操作系统。
在VirtualBox中,虚拟机网络模拟了计算机网络,为虚拟机提供了与外部网络通信的能力。
第二章:VirtualBox网络模式1. 网络模式概述VirtualBox提供了四种网络模式供选择,分别是NAT模式、桥接模式、仅主机模式和内部网络模式。
每种模式的应用场景和特点各不相同。
2. NAT模式NAT模式是最常用的网络模式之一。
在这种模式下,虚拟机通过物理主机网卡与外部网络通信,物理主机充当了一个虚拟化的路由器。
优点是配置简单,供给多数用户快速上手。
但虚拟机无法被外部网络直接访问。
3. 桥接模式桥接模式是通过物理主机网卡直接桥接虚拟机和外部网络的模式。
虚拟机与外部网络处于同一子网,可以被外部网络直接访问。
相比NAT模式,桥接模式的配置稍复杂,但更加灵活。
4. 仅主机模式仅主机模式将虚拟机网络与物理主机网络隔离,虚拟机之间和虚拟机与物理主机之间可以相互通信,但无法访问外部网络。
这种模式适用于建立内部测试环境或私有网络。
5. 内部网络模式内部网络模式将虚拟机连接到一个内部网络,虚拟机之间可以互相通信,但无法访问外部网络。
这种模式适用于创建复杂的内部网络拓扑结构,如测试和开发环境。
第三章:网络设置常见问题解决方法1. 虚拟机无法上网如果虚拟机无法上网,首先要检查物理主机网络连接是否正常。
然后,确保虚拟机网络配置正确,包括网络模式选择、IP地址配置等。
还可以尝试重新启动虚拟机和VirtualBox软件。
2. 虚拟机与物理主机无法通信如果虚拟机与物理主机无法通信,需要确保虚拟机和物理主机在同一局域网中,网络设置正确。
还可以检查防火墙设置,确保虚拟机和物理主机互相不会被阻止。
3. 虚拟机之间无法通信如果虚拟机之间无法通信,首先需要检查虚拟机网络设置是否正确。
其次,确保虚拟机之间的IP地址配置不冲突。
- 1、下载文档前请自行甄别文档内容的完整性,平台不提供额外的编辑、内容补充、找答案等附加服务。
- 2、"仅部分预览"的文档,不可在线预览部分如存在完整性等问题,可反馈申请退款(可完整预览的文档不适用该条件!)。
- 3、如文档侵犯您的权益,请联系客服反馈,我们会尽快为您处理(人工客服工作时间:9:00-18:30)。
虚拟机中红帽系统的网络设置
一、设置虚拟机的网络连接方式
单击虚拟机菜单栏的“VM”项,选择“Settings”
选择网络连接方式:单击“Network Adapter”,选择“NAT: Used to share the host’s IP address”
二、查看主机分给虚拟机的IP段
打开主机的“网络和共享中心”,可以看到如下图两个虚拟机的网络连接项,我们要用到的是“VMware Network Adapter VMnet8”
单击“VMware Network Adapter VMnet8”,弹出其状态框
再单击“详细信息…”
此时可以看到,主机分配给虚拟机的IP段为192.168.74.X
我们只要将虚拟机的IP设置为192.168.74.2 ~ 192.168.74.255间的任意值即可。
三、设置虚拟机IP
进入红帽系统桌面,右键打开终端
在终端中输入setup,并单击回车键
在弹出的对话框中通过键盘的上下方向键选择到“网络配置”
在弹出的对话框中通过Tab键切换选项,在“IP地址”中输入IP,其他项使用默认值。
完成后,通过Tab键切换到“确定”,回车键退出。
通过Tab键切换到“退出”,回车键退出设置
最后将红帽系统重新启动,即最终完成虚拟机的网络设置。