memoQ_QuickStartGuide_6_2_中文快速上手指南
i.MX 6ULL 基于的评估板快速启动指南说明书
Quick Start GuideBased on i.MX 6ULL Applications Processor2Figure 1: Main interfaces of i.MX 6ULL EVKi.MX 6ULL MIC USB OTG USB HOSTJTAG Arduino Ethernet x 2LCDNAND/QSPI NOREMV Bluetooth ® connector (bottom side)SD Boot Device Select SwitchMicroSD/eMMC SODIMM Interface Boot Mode Select Switch DDR3L DC IN: 5 V/4 A CANON/OFFSpeakerResetDebug USBABOUT THE EVALUATION KIT BASED ON i.MX 6ULLThe Evaluation Kit (EVK) based on i.MX6ULL introduces developers to the i.MX 6ULL applications processor. To speed up development, hardware design files, tools and board support packages (BSPs) for Linux® are available at/iMX6ULLEVK.There are some peripheral boards that work with the i.MX 6ULL EVK to provide additional capabilities such as resistive touch display, EMV and Bluetooth/Wi-Fi®connectivity. Refer to / iMX6ULLEVK for further information.34The following features are available with the EVK based on i.MX 6ULL applications processor:• i.MX 6ULL applications processor with a 900 MHz ARM ® Cortex ®-A7 core • 4 GB DDR3L SDRAM, 400 MHz • 256 MB QSPI NOR Flash • eMMC (unpopulated)• NAND flash (unpopulated)• M icroSD ® connector • SD connector• LCD expansion port connector • USB OTG connector • USB Host connector• 3.5 mm audio stereo headphone jack • Board-mounted microphone• L/R speaker connectors• Two 10/100 Mbit/s Ethernet connectors • CAN bus connector • Sensors including:- three-axis accelerometer - Digital compass - Gyroscope (unpopulated)• JTAG 20-pin 2.54 mm connector • Debug port for ARM Cortex-A7 core via USB micro-B connector • Bluetooth connectorFEATURES5GETTING STARTEDThis section describes how to use the evaluation kit and the required accessories to develop applications using the evaluation kit.1Unpacking the KitThe evaluation kit is shipped with the items listed in Table 1. Ensure the items are available in the i.MX 6ULL Evaluation Kit.ITEM DESCRIPTIONCPU board CPU board with i.MX 6ULL applications processor, memory, discrete powers and MicroSD card slot Base Board Peripherals and connectivity board Documentation Quick Start GuidePower Supply Output: 5 V/4 A, Plug: 2.1 mm x 5.5 mm USB Cable USB cable (micro-B to standard-A)Micro-SD cardBootable Linux imageTable 1: Contents of the i.MX 6ULL Evaluation Kit62Prepare AccessoriesThe following items in Table 2 are required to run the i.MX 6ULL Evaluation Kit.ITEMDESCRIPTIONLCD Module (optional)LCD8000-43T is the validated module, which has a 4.3 inch resistive touch screen and supports a resolution of up to 480x3(RGB)x272.Note: An LCD module is not a standard part of the evaluation kit.Table 2: Optional Equipment7ITEMDESCRIPTIONDocumentation• Schematics, layout and Gerber files • Quick Start Guide Software development tools Linux BSPsDemo imagesCopy of the latest Linux BSP images that are available to program on to the MicroSD cardTable 3: Download Software and Tools Contents8SETTING UP THE SYSTEM1Insert MicroSD CardInsert the MicroSD card into socket J301 on the CPU board (700-28617).2Connect USB Debug CableConnect the micro-B end of the supplied USB cable into debug port J1901 on the base board (700-28616). Connect the other end of the cable to a PC acting as a host terminal. If needed, the serial to USB drivers can be found at/products/mcu/Pages/USBtoUARTBridgeVCPDrivers.aspx Open the terminal window (i.e., Hyper Terminal or TeraTerm) and apply the following configuration:• Baud rate: 115200• Data bits: 8• Stop bit: 1• Parity: None•Flow control: None3Connect LCD Module (optional)Connect the FPC cable of LCD Module (LCD8000-43T) to the LCD connector J901 on base board (700-28616), which is bottom contact.Note: The LCD Module is not included in the kit. It is sold separately at /iMX6ULLEVK.4Connect Ethernet Cable (Optional)Connect an Ethernet cable to the right port of the Ethernet Jack J1501.5Connect Power SupplyConnect the plug of the 5 V power supply to the DC power jack J2001 on base board (700-28616) and slide power switch SW2001 to ON. When power is connected to the EVK, it will automatically begin the boot sequence.9Figure 3. SW601 setting for internal boot modeFigure 2. SW602 setting for internal boot mode BOOT PROCESS FOR LINUX IMAGE Boot Process• Change SW602 to D1:ON,D2:OFF (Refer to Table 4) to enter internal boot mode, and then switch SW601 to D1:OFF , D2:OFF , D3:ON, D4:OFF (Refer to Table 5) to boot from the MicroSD card, as shown in Figure 2 and Figure 3. After the board images are programmed and the boot switches are correctly configured, the system is ready to run.• Power on the EVK board.• During the boot process, there will be operating system status information scrolling on the terminal window of the PC (if connected). The Linux penguin images will initially appear in the upper left corner of the LCD screen.• When the boot process is complete, the Linux operating system (Yocto Project) will be displayed on the LCD screen.• To work from the terminal window on the host PC, press ‘Enter’ at the terminalwindow to get the command prompt. Account name: root, password none.DIP SWITCH CONFIGURATIONTable 4 shows the switch configuration of boot mode for i.MX 6ULL EVK. Internal boot is chosen as default.Table 5 shows the switch configuration of boot device for i.MX 6ULL EVK. MicroSD is chosen as default.D1/MODE1D2/MODE0BOOT MODE OFF OFF Boot From FusesOFF ON Serial DownloaderON OFF Internal BootON ON ReservedTable 4: i.MX 6ULL EVK DIP switch configuration (SW602)D1D2D3D4BOOT DEVICEOFF OFF ON OFF MicroSDOFF OFF OFF OFF QSPIOFF ON ON OFF EMMCON ON OFF ON NANDTable 5: i.MX 6ULL EVK DIP switch configuration (SW601)1011Button Functions Table 6 shows the functions of the push buttons and switches on the board.ITEMDESCRIPTIONSW2101Evaluation kit ON/OFF button• I n Yocto Project, short press and long press will only generate an interrupt, the usage could be defined by upper software.• Prolonged depress (>5 sec) will force an immediate hardware shutdown.• I f board is in the SHUTDOWN state, short press of the button will restart (boot) the system.• I f board is in the STANDBY state, short press of the button will bring the system out of standby (resume operations, no boot).SW2102Evaluation kit RESET button• Press of the button will reset the system and begin a boot sequence.SW2001Evaluation kit switch• S liding the switch to the ON position connects the 5 V power supply to the Evaluation Kit main power system.• S liding the switch to the OFF position immediately removes all power from the board.Table 6: EVK board button operations/iMX6ULLEVKNXP and the NXP logo are trademarks of NXP B.V. All other product or service names are the property of their respective owners. ARM and Cortex are registered trademarks of ARM Limited (or its subsidiaries) in the EU and/or elsewhere. All rights reserved. © 2012, 2014–2017 NXP B.V.Doc Number: IMX6ULLQSG REV 1 Agile Number: 926-29362 REV BSUPPORTVisit the i.MX community at .WARRANTY Visit /warranty forcomplete warranty information.。
Sound Devices MixPre-6 快速启动指南说明书

- QUICK START GUIDE -MixPre-6 Audio Recorder | Mixer | USB InterfaceMusicians • Singer/Song Writer• Live Performance • Music RecitalsVideographers• Audio for DSLRsField Recording• Interviews / Podcasts• Corporate Meetings• Nature Recording2MIXPRE-6Call Support1-608-524-0625 ingMIXPRE-6Back PanelRelease TabBattery SledSD Card Slot▶ConnMixPre-64▶Connect the USB Y-cable to the MixPre-6’s USB-C port and two USB-A ports on a computer.MixPre-6 Left PanelY-cable USB-C to USB-A▶Connect a USB-C to USB-C cable to the MixPre-6 and a USB-C power source.To power the MixPre-6 from an AC wall outlet:▶Connect the MX-Charge external USB-C Wall Adapter accessory to the USB-C port on the MixPre-6 and an electrical outlet.Power SwitchUSB-C Power SupplyTo power on your MixPre-6:▶Slide the Power switch—located on the left panel—to the right.QUICK START GUIDE53. Tap M4. Tap CCurrent File NamePower Status Icon Menu IconSD Card Remaining Record Time Current Headphone PresetTime CounterFile List Icon Meter ViewStatus BarF EATUrE d EscrIpTIoNFile List icon Tap this icon to view the list of recorded files.Current file name The name of the current file appears red when recording and green when playing.Power status icon Displays an icon representing type of power source (USB or battery); the battery icon also indicates the current batteries’ remaining power level.Menu icon Tap this icon to access the main Menu screen. When displaying menus, this icon changes to the Home icon.Meter view The stereo meter view shows the left and right mix channelsStatus barTap the status bar to toggle through three views of information that includes date and time, current headphone presets, remaining record times, sample rate and bit depth.Time counterDisplays elapsed time or the timecode, which is stamped on each recorded file and.3. Tap Menu (dots) to view the 2nd page of settings.Page 1Page 24. Tap Card > Edit > Format.⚠This will erase all contents of the SD Card!5. When asked to confirm the command to format the card, tap OK.The status bar displays the SD card’s remaining record time, which will vary based on the storage capacity of the card being used. Other variables that affect digital recording times include concurrent audio track count, sample rate, and bit depth. Here are some record time estimates for a 16 GB SD card.F orMAT & r ATE T rAcks r EcordINg T IMEWAV - 48 kHz / 24 bits8 4 hours 2 ¾ minutesMIXPRE-65. Connect HeadphonesTo connect headphones:▶Plug in the headphones cable to the headphone output located onthe right panel.⚠To adjust headphone volume:▶Turn the HP encoder, located on the right panel of the MixPre-6.HP Encoder HP Outpute on top era so thatts, connectic In, whiche on that typeof recording applications. Channels 1-4 are sourced from the XLR/TRS combo inputs—two on each side panel—or from Aux/Mic or USB 1-4 inputs. Channels 5-6 may be sourced from the Aux/Mic input, or USB 1-2 inputs.To connect an audio source:▶Using a standard XLR or TRS audio cable, connect an audio source to any of four XLR/TRS combo inputs on the MixPre-6.▶Plug an USB audio source into the USB-C port on the MixPre-6.▶Plug an audio source into the Aux/Mic In 3.5 mm TRS connection.Aux/Mic In on Right PanelXLR/TRS Inputs#1 & #2Left Panel8LCD Press the rotary knobs for the chosen channel. The Channel SettingsChannelKnobs2. Tap Input and select from the following input types:I NpUT T YpEs d EscrIpTIoNMic Use for microphones. For condenser mics requiring 48v phantom power, set Phantom to On. Line Use this type for balanced analog line level sources.Aux In 1-2Use for unbalanced stereo input.LED Rings8. Connect Timecode Input (Optional)The MixPre-6 has an internal Time-of-Day clock that can be used for timecode, but an external source for timecode may also be used via HDMI or the Aux/Mic In 3.5 mm connection on the MixPre-6’s right side panel. The Aux/Mic In port provides two unbalanced channels through which to receive timecode.To connect timecode:the HDMI out from the camera to the HDMI TC In port on the MixPre-6.Right Panel2. Tap .3. Select Inputs > Aux In Mode, and then select Timecode.4. Select Timecode > Mode. Options include: Off, Aux In 1, Aux In 2, and HDMI TC In.MIXPRE-610QUICK START GUIDERecording may also be triggered from rolling timecode or from compatible .Select Record > Rec Trigger. Options include: Off, HDMI flag, and Timecode.(*) button, for flexible Tap * ButtonChoose a function from the available options, which include quickaccess to the following: toggling between Channel 5 & 6 screens, the Project sub-menu, the Solo/Mute screen, the SD Card screen or the Transport ControlsStar Button1112MIXPRE-6QUICK START GUIDE133. (OptioTo monitor return from the camera, connect the camera’s analog audio output to the 3.5 mm Aux/Mic In on the MixPre-6, and set Inputs > Aux In Mode to Return.QUICK START GUIDE tripod and camera, attach it to the bottom of the camera first before screwing it into place Retrieve the anti-rotation pin and Allen wrench. Both are magneticallyAllen Wrench & Anti-rotation PinMixPre-6 Back Panel3. (Optional) If your camera has a slot for the anti-rotation pin, screw the pin into place on topof the MixPre-6, and then position the MixPre-6 against the bottom of the camera so that the pin fits into the camera’s slot.The anti-rotation pin may also be screwed into a tripod and slotted into thebottom of the MixPre-6.4. From the MixPre-6’s bottom panel, insert the Allen wrench into themounting screw hole and push up on the retractable screw. Rotate to Retractable ScrewThreaded hole for Anti-rotation Pin15ith mobilenel of theMixPre-6. nel of theThis Declaration of Conformity applies to the above-listed product(s) placed on the EU marketMatt Anderson - Sound Devices, LLC PresidentQUICK START GUIDE19www.sound Part # 7376.003。
快速参考指南音频系统(家用)说明书
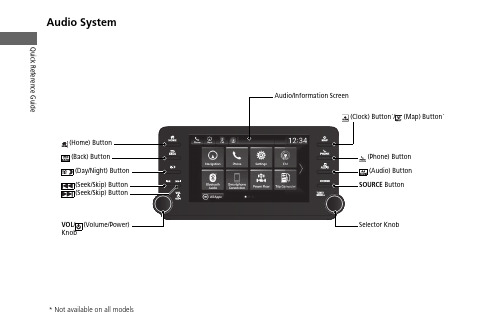
Quick Reference Guide Audio System(Back) Button(Day/Night) Button(Seek/Skip) Button(Seek/Skip) Button VOL/(VButtonButton*(Map) Button*Features About Your Audio SystemThe audio system features AM/FM radio and SiriusXM® Radio* service. It can alsoplay USB flash drives, iPod, iPhone and Bluetooth® devices.You can operate the audio system from the buttons and knobs on the panel, theremote controls on the steering wheel, or the icons on the touchscreen interface.1About Your Audio SystemiPod®, iPhone® and iTunes are trademarks of AppleInc.State or local laws may prohibit the operation ofhandheld electronic devices while operating avehicle.SiriusXM® Radio is available on a subscription basis*only. For more information on SiriusXM® Radio*,contact a dealer.SiriusXM® Radio* is available in the United States andCanada, except Hawaii, Alaska, and Puerto Rico.SiriusXM®* is a registered trademark of SiriusXMRadio*, Inc.Remote ControlsiPodUSB Flash Driveuu Audio System u USB PortsFeaturesUSB Ports■In the center pocket ()The USB port(s) (2.5A) is/are for charging devices, playing audio files and connectingcompatible phones with Apple CarPlay or Android Auto.u To prevent any potential issues, be sure to use an Apple MFi Certified Lightning Connector for Apple CarPlay, and for Android Auto, the USB cables should be certified by USB-IF to be compliant with USB 2.0 Standard.■In the center pocket ()*The USB port (2.5A) is only for charging devices.u You cannot play music even if you have connected music players to it.*1: Models without wireless Apple CarPlay and wireless Android Auto 1USB Ports•Do not leave the iPod or USB flash drive in the vehicle. Direct sunlight and high temperatures may damage it.•We recommend that you use a USB cable if you are attaching a USB flash drive to the USB port.•Do not connect the iPod or USB flash drive using a hub.•Do not use a device such as a card reader or hard disk drive, as the device or your files may be damaged.•We recommend backing up your data before using the device in your vehicle.•Displayed messages may vary depending on the device model and software version.The USB port can supply up to 2.5A of power. It does not output 2.5A unless the device requests.For amperage details, read the operating manual of the device that needs to be charged.Under certain conditions, a device connected to the port may generate noise to the radio station you are listening to.USB charge*2*1uu Audio System u USB PortsFeatures ■Rear of the center console*The USB ports (2.5A) are only for charging devices.u You cannot play music even if you haveconnected music players to them.uu Audio System u Audio System Theft ProtectionAudio System Theft ProtectionThe audio system is disabled when it is disconnected from the power source, such aswhen the battery is disconnected or goes dead. In certain conditions, the systemmay display a code entry screen. If this occurs, reactivate the audio system.■Reactivating the audio system1.Set the power mode to ON.2.Turn on the audio system.3.Press and hold the audio system power knob for more than two seconds.u The audio system is reactivated when the audio control unit establishes aconnection with the vehicle control unit. If the control unit fails to recognizethe audio unit, you must go to a dealer and have the audio unit checked.Featuresuu Audio System u Audio Remote ControlsFeatures Audio Remote ControlsAllow you to operate the audio system while driving. The information is shown onthe driver information interface or head-up display*.VOL+/VOL- (Volume) ButtonsPress VOL+: To increase the volume.Press VOL-: To decrease the volume.Left Selector Wheel•When selecting the audio modePress the (home) button, then roll up or down to select Audio on the driverinformation interface, and then press the left selector wheel.1Audio Remote ControlsSome modes appear only when an appropriatedevice or medium is used.Depending on the Bluetooth® device you connect,some functions may not be available.Press the (back) button for the driverinformation interface to go back to the previousscreen or cancel a command.Press the (home) button to go back to the homescreen of the driver information interface.VOL+/VOL- (Volume) ButtonsLeft Selector Wheel(home) Button/(Seek/Skip)Buttons(back)Buttonuu Audio System u Audio Remote ControlsFeaturesRoll up or down:FMAM SiriusXM ®*USB1 (USB)USB2*Bluetooth ® AudioSmartphone Connection (Apple CarPlay/Android Auto)To cycle through the audio modes, roll up or down and then press the left selector wheel:uu Audio System u Audio Remote ControlsFeatures/ (Seek/Skip) Buttons•When listening to the radioPress :To select the next preset radio station.Press :To select the previous preset radio station.Press and hold : To select the next strong station.Press and hold : To select the previous strong station.•When listening to an iPod, USB flash drive, or Bluetooth® Audio, or Smartphone ConnectionPress :To skip to the next song.Press :To go back to the beginning of the current or previous song.•When listening to a USB flash drivePress and hold : To skip to the next folder.Press and hold : To go back to the previous folder.FeaturesPress to go to the home (Back) Button: Press to go back to the previous display when it is displayed./ (Seek/Skip) Buttons: Press to change songs.(Clock) Button *: Press to display the clock*: Press to display the map (Phone) Button: Press to display the phone screen.(Audio) Button: Press to display the current audio information.SOURCE Button: Press to display the sourceselect screen.Selector Knob: Rotate left or right to scrollPress to change Press once and select or to make an adjustment.u Each time you press , the mode switches among the daytime mode, nighttime mode and off mode.1Audio System Basic OperationThese indications are used to show how to operate Rotate select.Press to enter.Selector KnobWhen the list is not displayed, songs, frequency, etc. can be changed.While connected to Apple CarPlay, it changes as follows:•Pressing the Phone Button, display the Apple CarPlay phone screen.•Pressing the Audio Button, display the Apple CarPlay audio screen.uu Audio System Basic Operation u Audio/Information ScreenFeatures Audio/Information ScreenDisplays the audio status and wallpaper. From this display, you can go to varioussetup options.■Using the audio/information screenPress the button to go to the home screen.Select the following icons on the home screen or after selecting All Apps.■PhoneDisplays the HFL information.■Switching the Display1Audio/Information ScreenTouchscreen Operation•Use simple gestures - including touching, swiping,and scrolling - to operate certain audio functions.•Some items may be grayed out during driving toreduce the potential for distraction.•You can select them when the vehicle is stopped oruse voice commands.•Wearing gloves may limit or prevent touchscreenresponse.You can change the touchscreen sensitivity setting.All AppsFeatures■Trip ComputerDisplays the trip computer information.•Current Drive tab: Displays the current trip information.•Trip A /Trip B tab: Displays information for the current and three previous drives.The information is stored every time you reset Trip A/B.To reset the Trip A/B, select Settings , then select Delete Trip History .To change the setting of how to reset Trip A/B, select Settings , then select “Trip A” Reset Timing or “Trip B” Reset Timing .■ClockDisplays the clock.■System Updates *Updates the software version of the audio system.■FM/AM/Sirius XM /USB1 (USB)/USB2/Bluetooth Audio**Displays information for each audio format.■SettingsEnters the customizing menu screen.■Navigation *Displays the navigation screen.■HondaLinkDisplays the HondaLink screen.■Apple CarPlay/Android AutoDisplays the Apple CarPlay or Android Auto screen.■MessagesDisplays the text message screen.■AT&T Hotspot*Displays the AT&T Hotspot screen.■Compass*Displays the compass screen.FeaturesFeatures■Power Flow Displays the motor and engine power flow, average fuel economy, and range.1Audio/Information Screen The power flow monitor is also displayed on thedriver information interface.While the vehicle is stationary with the enginerunning, the following may appear on the audio/information screen.The auto engine stop does not activate. (Engine ON)The autoengine stopactivates. (Engine OFF)Average Fuel Economy (Current Drive)Power Flow Driving High Voltage BatteryFeatures Displays the power flow, indicating what is supplying power to the vehicle and/orcharging the battery.u The indicator for the power transmission appears in blue, and for the batterycharging operation, in green.BluePower is being supplied bythe High Voltage batteryand the engine-drivengenerator.BluePower is being supplied bythe High Voltage battery.BluePower is being supplied bythe engine-drivengenerator.1Audio/Information Screenwheels, the icon appears in the power flowmonitor on the screen.FeaturesBlue and Green Power is being supplieddirectly by the engine and the High Voltage battery isbeing charged by the engine-driven generator.Green The High Voltage battery isbeing charged throughregenerative braking.Green The High Voltage battery isbeing charged by theengine-driven generator.。
骁立摄像头手册说明书
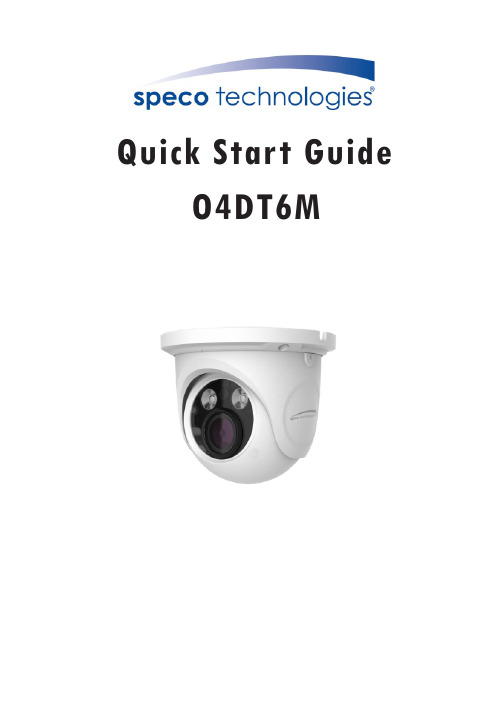
Quick Start GuideO4DT6M■If the product does not work properly, please contact your dealer or the nearest service center. Never attempt to disassemble the camera yourself. Any unauthorized changes or modifications could void the warranty.■Do not allow water or liquid intrusion into the camera.■All installation and operation here should conform to local electrical safety codes. Make sure the device is firmly installed on the wall or ceiling.■Do not use camera beyond specified voltage range.■ Do not drop the camera or subject it to physical shock.■ Avoid touching the camera lens.■ If cleaning is necessary, please use cleaning cloth to wipe it gently.■ Do not aim the camera at the sun or extremely bright light sources.■ Do not place the camera in extremely hot or cold environments and dusty and damp locations. Do not expose it to highly electromagnetic radiation.■ Do not block any ventilations.1234* 1 It is recommended to install the security cap for outdoor installations .* 2 DC 12V power supply is not required if a PoE switch or injector is used to power the camera.► Connecting Network Cable① Loosen the nut from the main element.② Run the network cable (without RJ 45 connector) through both elements. Then crimp the cable with RJ 45 connector .③ Connect the cable to the hermetic connector . Then tighten the nut and the main cover .1* Before you start, please make sure that the wall or ceiling is strong enough to withstand three times the weight of the camera and the junction box.① Open the mounting base and the upper cover of the junction box.②Install junction box onto the wall by using the screws provided.Mounting baseUpper cover③ Mount the rubber plug to the gap of the mounting base of the camera and then fasten the camera onto the junction box.④ Route the cables through the cable hole and connect the cables.Then reinstall the upper cover onto the junction box.⑤ Adjust the camera to obtain an optimum angle by loosening the lock screws. Before adjustment, preview the image of the camera on amonitor. After that, tighten the lock screws to finish the installation.● OperationIP Scanner can search for the device on the local network.① Make sure that the camera and the PC are connected to the same local network. The camera is set to DHCP by default.② Install IP Scanner from the CD and run it after installation.Lock screw③ In the device list, you can view the IP address, model number, and MAC address of each device. Select the applicable device and double click to open up the web viewer. You can also manually enter the IP address in the address bar of the web browser.The login interface is shown above. Default user name is admin and password is 1234. After logging in, follow directions to installapplicable plugins.。
EN Quick Start Guide 30 sec. 短时间内的快速启动指南说明书
EN Quick Start Guide30 sec.T urn on your device ().Check if the TV responds to all key commands.If the TV does not respond, continue with step 2.Press thekey until it flashes twiceand then remains lit.• Look up the code for your brand inthe ‘Shortlist with brands’ in this Quick Start Guide.• Note the 4-digit code for yourbrand.• Enter the code, using the digit keys.Press and hold thekey andimmediately release it when the device (e.g. TV) switches off (standby).This may take up to 30 seconds.T urn on your device () andcheck whether the keys you need for operating the device are working. If the TV responds to all of the key commands, the SRP 3004 is ready for use. If a key does not function (properly),keep it pressed and immediately release it when the device responds.Repeat this for every key that does not work.12345Remark:If the TV does not react as needed, repeat step until you get a good result.(Press and hold thekey. Release the key immediately as soon as the TV switches off).4Press thekey twice to exit setupmode and save your settings6Shortlist with brandsBrand............4-digit code Akai.....................................0074Basic Line...........................0325Blue Sky.............................0395BT Vision............................3742Carrefour..........................0492CyberHome......................0672Daewoo.............................0692Digiturk..............................0783Echostar.............................0866Emerson.............................0917Firstline..............................1008Foxtel.................................1029France T elecom................1033Haier...................................1175Hisense..............................1249Hitachi................................1251Humax................................1298JVC......................................1464Kabel Deutschland..........1468Kathrein.............................1486LG.......................................1628Loewe (1660)Brand.............4-digit code Magnum.............................1709Medion...............................1787Mivar...................................1857Numericable.....................3949Pace.....................................2134Panasonic...........................2153Philips.................................2195Premiere............................3666Proline................................2274Saivod.................................2439Samsung.............................2448Sanyo..................................2462Sharp...................................2550Sky.......................................2610Skymaster..........................2621Sony....................................2679TCL.....................................2856T echniSat............................2873T elefonica...........................2913TNT....................................4184T oshiba...............................3021Vestel. (3148)For brands not mentioned in this shortlist , refer to the codelist in the back of the user manual.Important!• Restart from the beginning if you make a mistake. If you encounterproblems or have questions, please consult the user manual. It is provided to help you set up and use the remote control.• Before operating a device, first select the device by pressing the corresponding device selection key: , , or .© 2010 Koninklijke Philips Electronics N.V .All rights reserved. Reproduction in whole or in part is prohibited without the prior written consent of the copyright owner.The information presented in this document does not form part of any quotation or contract,is believed to be accurate and reliable and may be changed without notice. No liability will be accepted by the publisher for any consequence of its use. Publication there of does not convey nor imply any license under patent- or other industrial or intellectual property rights.Document order number: 3139 235 5252 2/SRP3004/53November 2010RTP/4710。
LG BANTER QUICK START GUIDE

5. Touch Send.
Browse the Web
Check your favorite websites while on the go with Banter Touch! 1. From standby mode, touch the Menu icon . 2. Touch the Browser icon > Browser. 3. Read the notice and touch Yes to continue. 4. Touch the shortcuts on the homepage to
Camera Key
.
2. Touch the icons along the left side of the viewfinder to view and adjust settings.
3. Line up your shot and press the Camera
Key
to take the photo.
with the keyboard, and touch Done. 4. Touch Send.
Send a Picture Message 1. With the slide open, touch the Messaging
icon > New Picture Message. 2. Touch Contacts to select a recipient. 3. Touch the Text field, enter your message with the keyboard,
memoQ_QuickStartGuide_6_2_中文快速上手指南

集成翻译环境快速入门指南© 2004-2013Kilgray Translation Technologies.版权所有译者:许欣蕾 审校:李雨北京大学语言信息工程系2012级学生目录 (2)介绍 (4)1.1 翻译环境 (4)1.2 生产率 (5)2 安装及系统要求 (6)2.1 改变用户界面语言 (6)3 翻译过程 (7)3.1 项目 (7)3.2 使用 memoQ 进行翻译 (7)3.3 使用 memoQ 工作 (8)4 创建和修改项目 (9)4.1 创建项目 (9)4.1.1 修改当前项目 (12)4.2 创建翻译记忆库 (12)4.3 创建术语库 (12)4.4 添加更多资源 (13)5 翻译和翻译窗格 (14)5.1 打开文档进行翻译 (14)5.2 编辑翻译 (14)5.3 确认句段 (15)5.4 合并及分割句段 (15)5.5 使用翻译结果 (15)如果没有自动建议:在翻译记忆库和术语库中查找信息 (17)5.7 创建您自己的术语库 (19)5.8 Pre-translation(预翻译) (20)5.9 过滤和筛选 (20)5.10 句段状态 (20)5.11 使用格式标签 (20)5.12 使用预测输入 (22)5.13 使用AutoPick(自动选取) (23)6 交付翻译 (24)6.1 以原始格式交付文档 (24)6.2 以双语文件格式交付文档 (24)6.3 交付翻译记忆库 (25)7 处理分发包任务 (26)7.1 从分发包中创建项目 (26)7.2 交付译文 (26)8 处理在线项目 (28)8.1 开始工作:查看在线项目 (28)8.2 处理在线项目 (30)8.3 交付任务 (31)9 常用键盘快捷键 (32)本指南包含memoQ6.2和translator pro两个版本。
内容包括本软件英文用户界面的信息。
目前我们还在不断地完善这些文字信息。
如有变更,恕不提前通知。
QUICK GUIDE (快速入门)
e商系列商务管理软件QUICK GUIDE(快速入门)eb2000/eb2003/2006安装权限设置必要权限注解eb2000安装运行eb2ksvr.exe,启动安装程序,一般默认既可,注意安装目录不要选择有汉字的文件夹,安装完毕后提示安装成功。
(有可能提示需要重新启动。
)安装完毕后自动弹出e商2000服务器版配置程序。
服务器配置程序的设置步骤和参数设置:a、先进行注册的操作;✧无序列号试用,请直接点击【试用】按钮,提示“获得临时授权成功”。
✧已经申请免费单用户版序列号,将序列号和注册信息填好后,点击【注册】,提示“获得临时授权成功”,确定后,再点【注册】,提示“注册成功”。
✧正式购买获得的网络版序列号,将序列号和公司名称、联系人和电话注册信息填好后,点击【注册】,提示“获得临时授权成功”,确定后,再点【注册】,提示“注册成功”。
1、试用可以3个人同时使用3个月时间;3个月后失效。
2、单用户和网络版,第一次注册均是获得1年时间的授权;以后凡是信息准确、真实有效的用户再次注册获得30年的授权。
3、试用和注册,功能均是相同的,没有差别。
b、建立数据库1、装好软件使用之前,要建立数据库,软件使用后的单据信息和基本资料等都存放在数据库中。
程序和数据是分开存放的,做数据备份时只要备份数据库文件就可以了,是不需要将整个安装文件夹的文件拷贝的,重新安装软件必须使用安装程序重新安装,直接运行拷贝的文件夹的文件是不能正常使用的。
2、按照需要建立数据库,可以使用ACCESS,MSDE,SQL SERVER3种类型中的一种数据库,需要注意的是MSDE和SQL Server 需要先安装好数据库服务管理程序,而且安装的过程中选择混合验证模式,才能正确使用MSDE、SQL Server类型的数据库。
3、数据库可以和安装程序不在同一个文件夹中,要记住你建立的数据库名字和存放的路径。
c、建立公司帐套输入欲建立公司帐套的名字,然后点击【建立公司】。
- 1、下载文档前请自行甄别文档内容的完整性,平台不提供额外的编辑、内容补充、找答案等附加服务。
- 2、"仅部分预览"的文档,不可在线预览部分如存在完整性等问题,可反馈申请退款(可完整预览的文档不适用该条件!)。
- 3、如文档侵犯您的权益,请联系客服反馈,我们会尽快为您处理(人工客服工作时间:9:00-18:30)。
集成翻译环境快速入门指南© 2004-2013Kilgray Translation Technologies.版权所有译者:许欣蕾 审校:李雨北京大学语言信息工程系2012级学生目录 (2)介绍 (4)1.1 翻译环境 (4)1.2 生产率 (5)2 安装及系统要求 (6)2.1 改变用户界面语言 (6)3 翻译过程 (7)3.1 项目 (7)3.2 使用 memoQ 进行翻译 (7)3.3 使用 memoQ 工作 (8)4 创建和修改项目 (9)4.1 创建项目 (9)4.1.1 修改当前项目 (12)4.2 创建翻译记忆库 (12)4.3 创建术语库 (12)4.4 添加更多资源 (13)5 翻译和翻译窗格 (14)5.1 打开文档进行翻译 (14)5.2 编辑翻译 (14)5.3 确认句段 (15)5.4 合并及分割句段 (15)5.5 使用翻译结果 (15)如果没有自动建议:在翻译记忆库和术语库中查找信息 (17)5.7 创建您自己的术语库 (19)5.8 Pre-translation(预翻译) (20)5.9 过滤和筛选 (20)5.10 句段状态 (20)5.11 使用格式标签 (20)5.12 使用预测输入 (22)5.13 使用AutoPick(自动选取) (23)6 交付翻译 (24)6.1 以原始格式交付文档 (24)6.2 以双语文件格式交付文档 (24)6.3 交付翻译记忆库 (25)7 处理分发包任务 (26)7.1 从分发包中创建项目 (26)7.2 交付译文 (26)8 处理在线项目 (28)8.1 开始工作:查看在线项目 (28)8.2 处理在线项目 (30)8.3 交付任务 (31)9 常用键盘快捷键 (32)本指南包含memoQ6.2和translator pro两个版本。
内容包括本软件英文用户界面的信息。
目前我们还在不断地完善这些文字信息。
如有变更,恕不提前通知。
1.1 翻译环境memoQ 是一款先进的翻译软件。
本文档介绍了翻译环境的概念并指导您通过使用 memoQ 获益。
翻译翻译:在翻译过程中,您可以根据目标文化的特征,将文档从一种语言转换成另一种语言。
您所翻译的文档大多都很相似;如果您是产品的生产者或者服务提供商,那么大部分源文档就会和您所在的领域相关。
假如您是专业翻译者,您很可能从同一位客户那里获得很多相似的文档,或者您可能得到同一主题的多个文档,诸如法律或用户手册。
翻译环境会利用这些相似性。
memoQ 最主要的组成部分包括 translation memory 、 LiveDocs corpora 、 term base 以及 translation editor (执行文字处理器的功能)。
其中,Translation editor 又包括 AutoPick 和 Muses 。
当您在 memoQ 翻译编辑器中翻译文档时,编辑器几乎可以自动处理所有的格式。
文档以句段为单位。
在 memoQ 中,一个句段大约等同于一个句子。
在翻译编辑器中,您需要逐一翻译每个句段。
您翻译完一个句段之后,可以将其添加到translation memory (翻译记忆库 ) 中。
翻译记忆库翻译记忆库:翻译记忆库是一种重复利用现有翻译的传统方法。
翻译记忆库储存成对的句段:一种是源语言;另一种则是其译文。
在您翻译过程中,翻译工作区会查看翻译记忆库是否包含与您正在翻译内容相似的句子。
如果存在这样的句子,它会作为翻译建议显示出来。
工作区还会显示现有句子和已有句子的不同之处。
回收文件(对齐和 LiveDocs ):除了传统翻译方法,您可以直接使用之前的翻译文档——和翻译记忆库的使用类似。
memoQ 的 LiveDocs 功能:允许您创建文档语料库。
LiveDocs 语料库包含文档对(对齐文档)、双语文档、单语文档以及二进制(非文本)文件。
一个对齐文档对包括源语言文档及其译文。
当您将一对对齐文档添加到语料库,memoQ 会将添加的文档对齐:它通过数学方法对齐源语言句子和目标语言句子。
对齐完成后,文件对就添加到了语料库中。
memoQ 会立即显示文档内容的匹配。
memoQ 的自动对齐算法非常准确,但偶尔还是会有不匹配的句对。
当您遇到不匹配(不对齐)的句对时,您可以在对齐编辑器中打开文档对。
您在文档对中纠正对齐后,memoQ 会自动显示正确的匹配。
沉浸式编辑沉浸式编辑::沉浸式编辑可以提高翻译的质量。
它包括 Predictive Typing 和 AutoPick 。
Predictive Typing 可以为您提示术语库中的术语、不可译的内容、自动翻译内容和 Muses 。
当您在翻译窗格中输入译文时,Muse 可以根据翻译记忆库和语料库为您提供子句段的翻译建议。
您可以使用 AutoPick 将原单元格的数字、标签和日期插入到目标单元格。
术语库和术语提取术语库和术语提取::当您使用翻译记忆库或 LiveDocs 语料库时,您可以建立一个所有句子的数据库——更确切地说,是所有句段的数据库。
因为翻译的单元可以是一个段落甚至是比一句话还短的一个短语。
如果您想要创建一个出现的在句段中词汇表,您可以使用(术语库)term base 。
术语库包含多语的术语条目——可以是词也可以是短语,还可以包含更多数据信息。
memoQ的翻译编辑器自动高亮显示术语库中包含的术语,并以列表形式显示其翻译:您用键盘输入或者鼠标点击,将列表中的术语插入译文。
如果您在翻译前没有术语库,您可以让 memoQ 通读原文档,挑选出术语候选列表。
文本分析文本分析::在翻译环境中,文本的数据分析同样也很重要,它可以帮助您预测工作量。
翻译环境的一个重要部分就是生产率。
如果翻译环境中的一个翻译单元花费的时间少于传统文字处理器——同时保证翻译质量,您的生产力就会提高。
memoQ 的数据模块可以分析文本,并估计您可以通过翻译记忆库和 LiveDocs 语料库节省多少时间。
memoQ 是一款集成翻译环境:它为您提供了翻译所需的所有功能。
您无需再使用其它软件。
1.2 生产率您通过翻译环境所提供的生产率取决于文本的类型。
如果文本的重复率高——例如用户手册和技术说明书——生产率可以提高多达 70% 至 80%。
但是,对于“一般”文本如教科书而言,生产率仅能提高10%-30%。
对于信件而言,使用翻译环境对提高效率收效甚微。
在翻译记忆库中,所有翻译的源语言句段和目标语言句段存储在一起。
memoQ 可以分析文本,找到和之前翻译类似的句段。
memoQ 还可以计算相似程度。
如果一个句段已经存储在翻译记忆库或 LiveDocs 语料库中——即文本和文档几乎一样——那么这就可以称为100%匹配(100% match )或上下文匹配(context match )。
如果翻译记忆库或 LiveDocs 语料库仅包含相似的句段,那么这就是模糊匹配(Fuzzy match )。
memoQ 的数据模块还提供一个创新功能:即同质性分析。
倘若您之前没有积累的翻译记忆库或 LiveDocs 语料库,您还可以使用该功能。
同质性分析可以计算您当前翻译文本的内在相似性,从而对翻译文本所花费的时间做出更准确的估计。
2安装和激活 memoQ ,请参见 Kilgray 官网的 memoQ installation and activation guide 。
(/resource-center/user-guides )。
2.1 改变用户界面语言默认情况下,memoQ 的界面语言是英语。
但是您也可以改变软件的用户界面语言。
具体操作步骤如下:1. 如果 memoQ 没有运行的话,请启动 memoQ 。
memoQ 的窗口弹出,并显示 Dashboard 。
2. 从 Tools 菜单下,选择 Options 。
Options 对话框弹出。
3. 在左边的 Category 列表上,点击 Appearance 。
在主面板上,memoQ 显示控制软件界面的设置。
4. 在 User interface language 下拉菜单中,选择目标语言,然后点击 OK 。
5. 关闭 memoQ ,再重新启动。
下次,软件就会用您所选择的语言显示命令和消息。
注意注意::默认情况下,您可以选择的界面语言有:英语、德语、法语、匈牙利语、波兰语、葡萄牙语和西班牙语。
您所在的位置会决定您是否可以使用日语界面语言。
界面语言在不断增加,因此,您可能会看到更多可选语言。
33.1 项目在 memoQ 中,翻译是以项目形式开展的。
一个翻译项目包括以下部分:1.Translation documents(翻译文件)可添加大量文档,一般可达几百个2.LiveDocs corpora(在线文档语料库),包括双语文档,源语言-目标语言文档对,单语文档和二进制文件(可以添加一个到两个远程或本地文件)3.Translation memories(翻译记忆库)可以添加大量文件,包括远程或本地文件,一般可添加五到六个。
4.Term bases(术语库)可以添加大量文件,包括远程或本地文件,一般可添加五到六个。
5.Settings(设置)和light resources(轻资源):分句规则,自动翻译规则,翻译记忆库设置,质量保证设置等等。
6.Muses,即在翻译时提供子句段的翻译建议。
一般可以添加一个或两个本地的 Muses。
您可以将资源,如翻译记忆库、术语库、分句规则、自动翻译规则等存储在本地计算机上,或者通过网络从memoQ 服务器进行访问。
您可以将这些资源分配给多个项目。
memoQ 会记录存储在计算机上的翻译记忆库、术语库和其它资源,这些资源可以应用在任何一个项目中,或者在多个项目中同时使用。
3.2 使用 memoQ 进行翻译在 memoQ 中,翻译过程包括以下步骤:创建项目。
选择翻译文档及想要使用的翻译记忆库和术语库。
当您创建完项目后,memoQ 1.创建项目会将源文档的翻译内容导入工作区,确保文档导入的格式与源文档保持一致。
您在创建项目时,也可以创建新的翻译记忆库和术语库。
创建完项目后,您在需要时也可以改变内容和设置。
翻译。
您在一个称为 translation grid 的特殊文字处理器中输入翻译。
在 memoQ 中,每个翻2.翻译译文档都有一个独立的翻译窗格。
在memoQ 窗口中以独立的标签显示。
在翻译过程中,memoQ 会自动查找分配给项目的翻译记忆库、LiveDocs 语料库和术语库。
在项目中,您可以同时编辑多个文档,但您一次不能处理多个项目。
交付。
翻译完成后,您可以命令memoQ 导出译文。
软件通过使用导入文档时获取的格式3.交付信息,在硬盘上保存与源文档格式相同的翻译文档。