派沃烘干机专用控制器说明书
烘干机操作规程
烘干机操作规程1. 介绍烘干机是用于将湿度较高的物品或材料进行烘干的设备。
为了确保烘干机的正常运行和人员安全,制定了本操作规程。
2. 安全要求2.1. 操作人员必须熟悉烘干机的使用说明,并了解烘干机的运行原理和技术参数。
2.2. 操作人员必须穿戴相应的防护装备,如耳罩、眼镜、手套等,以确保个人安全。
2.3. 在操作前,必须对烘干机进行检查,确保电源接地正常,机器清洁,无杂物。
2.4. 操作人员禁止穿拖鞋或裸脚操作烘干机,避免发生意外。
3. 操作步骤3.1. 打开烘干机3.1.1. 确保电源开关处于关闭状态。
3.1.2. 检查烘干机的电源连接是否正常,松动的情况需要重新连接。
3.1.3. 打开电源开关,确认烘干机开始供电。
3.2. 设置烘干温度和时间3.2.1. 根据烘干物品的性质和需要,调整烘干温度和时间。
3.2.2. 注意,不同物品对烘干温度和时间的要求不同,确保设置合适的参数。
3.3. 将物品放入烘干机3.3.1. 打开烘干机门,并将需要烘干的物品放入烘干机内。
3.3.2. 确保物品放置均匀,不要堆积过高或过密,以保证烘干效果。
3.4. 启动烘干机3.4.1. 确认物品放置完毕后,关闭烘干机门。
3.4.2. 按下启动按钮,开始烘干过程。
3.4.3. 在烘干过程中,要定期检查烘干机的运行状态,确保正常运行。
3.5. 关闭烘干机3.5.1. 当烘干时间到达设定时间后,按下停止按钮,停止烘干机运行。
3.5.2. 关闭电源开关,切断电源。
4. 注意事项4.1. 操作人员在使用烘干机过程中,应保持专注,避免分心或离开烘干机。
4.2. 烘干机运行过程中,不得随意触摸或拆卸烘干机的部件。
4.3. 当烘干机发生故障或异常情况时,应立即停止使用,并通知维修人员。
4.4. 禁止在烘干机附近堆放易燃物品,以免引发火灾。
4.5. 当使用高温烘干机时,要注意防止烫伤,避免直接接触热表面。
5. 反馈与维护5.1. 操作人员在使用烘干机过程中,如发现设备存在问题或隐患,应及时向负责人汇报。
冷干机控制说明书

冷冻式干燥机控制说明一、各种负载的控制1、压缩机C首次上电无三分钟延时启动,其他时候压机启动时有三分钟延时。
2、室外风机FM检测冷凝器出口温度T2≥(设定温度+回差温度)时外风机开启,冷凝器出口温度T2≤(设定温度-回差温度)时外风机关闭,回差温度为2度。
3、电磁阀EV检测压机电磁阀温度T3≥设定温度时打开,T3≤(设定温度-5℃)时关闭。
二、保护功能停机保护是指压缩机、风机、电磁阀失电。
1、高压保护功能:正常开机状态下,压机起动20S后检测高压开关。
连续10S检测到高压开关闭合,则进入高压保护,系统停机。
如连续1S检测到高压开关断开,则退出高压故障保护,机组正常运行(可恢复时)。
30分钟内若出现3次高压保护,则非掉电不可恢复,故障显示为“高压保护”。
2、低压保护功能:正常开机状态下,压机起动2分钟后检测低压开关。
连续10S检测到低压开关闭合,则进入低压保护,系统停机。
如连续1S检测到低压开关断开,则退出低压故障保护,机组正常运行。
30分钟内若出现3次低压保护,则非掉电不可恢复,故障显示为低压保护;3、排气温度过高保护:当系统压机开启1分钟后,连续5秒检测到该系统压机排气温度T1≥压缩机高温停机保护设定温度时,则进入压机排气温度过高保护。
当检测到该系统压机排气温度T1≤(压缩机高温停机保护设定温度-20℃)时,则退出压机排气温度过高保护。
30分钟内若出现3次排气温度过高保护,则非掉电不可恢复,故障显示为“超温保护”。
4、过流保护:正常开机状态下,压机起动2分钟后检测过流开关。
连续10S检测到过流开关闭合,则进入过流保护,系统停机。
30分钟内若出现3次过流保护,则非掉电不可恢复,故障显示为“过流保护”。
5、相序保护:开机前,检测相序开关。
检测到相序开关断开,则进入相序保护,系统无法开机。
6、通讯功能:采用标准的Modbus通讯协议,可通过RS485接口与PC机联机进行数据的采集与监控。
7、具有远程启停连锁控制功能三、接线图接线及操作说明:1、温度探头配置:RT1:10K热敏电阻,测温范围(-25℃-125℃),检测压缩机机头温度。
干燥器操作说明书
当设定完t3时间值后,可按面板上的“启动/代码”按钮,最高位显示4,表示设定均压时间t4。其余位显示均压时间设定值。按“停止/参数”按钮增加延时值。可使设置值从1逐步增加到30秒,然后再重复进行。
每三个月:
10、前置和后置过滤器芯,检查堵塞情况及可能的损坏,根据需要替换。
11、关闭进/出口阀门或将干燥机旁通,彻底将干燥机系统泄压,打开干燥剂充填口,采样检查干燥剂,如果干燥剂被油污染粉碎,请更换干燥剂。
12、拆下并检查进口气动阀和再生排气阀,清洗和替换磨损的阀座和密封圈。
13、检查气动阀门膜片和气缸是否泄漏或密封件是否磨损。
1.干燥剂扩散器滤网堵塞
2.压缩空气处理量超过额定流量
3.再生气动阀保持打开
4.单向止回阀动作失灵
1.通过吸附筒体压力表和干燥机出口压力表检查
2.采用流量计检测
3.通过手动的方法检查控制气动阀是否正常工作
4.拆下单向止回阀检查
1.更换干燥剂扩散器
2.检查进口气量的情况
3.检查导向气路或电磁阀,根据需要更换
设定完毕,将拨位开关拨向右方,则设定值将被写入E2PROM储存起来,即使断电后仍能保留。如果设置值错误,则“停止/参数”按钮上方的指示灯闪烁,请重新设定参数。
2、 动作时序图
时序图说明:
OA段
AB段
BC段
CO’段
O’A’段
A’B’段
B’C’段
C’O’段
A塔
吸附
静止
再生
均压
烘干机操作规程

烘干机操作规程一、引言烘干机是一种常用的设备,用于将湿润的物品进行烘干处理。
为了确保烘干机的安全运行和高效工作,制定本操作规程,明确烘干机的操作流程和注意事项,以保障工作人员的安全和设备的正常运行。
二、适用范围本操作规程适用于所有使用烘干机的工作人员。
三、操作流程1. 准备工作1.1 确保烘干机周围的环境整洁,无杂物和易燃物。
1.2 检查烘干机的电源线和插头是否完好,无损坏和松动。
1.3 检查烘干机的滤网是否清洁,如有堵塞应及时清理。
1.4 检查烘干机的控制面板是否正常,各功能按钮是否灵活可用。
2. 开机操作2.1 确保烘干机的电源已接通,插头已插紧。
2.2 打开烘干机的门,将待烘干的物品均匀放置在烘干机内。
2.3 关闭烘干机的门,并确保门锁紧。
2.4 按下烘干机的电源开关,待烘干机启动后,根据需要选择合适的烘干时间和温度。
3. 烘干过程中的注意事项3.1 在烘干过程中,禁止将手或其他物体伸入烘干机内部。
3.2 禁止在烘干机上堆放其他物品,以免影响烘干效果和设备正常运行。
3.3 如发现烘干机异常情况(如异味、异常噪音等),应立即停机检查,并通知维修人员。
3.4 烘干机工作期间,应保持周围环境通风良好,避免过热现象发生。
4. 关机操作4.1 在烘干时间结束后,按下烘干机的电源开关,将烘干机断电。
4.2 打开烘干机的门,将烘干好的物品取出,并进行清点和记录。
4.3 清理烘干机内部的灰尘和杂物,保持设备的清洁。
5. 常规维护5.1 定期检查烘干机的电源线和插头,如有损坏应及时更换。
5.2 定期清洁烘干机的滤网和内部,保持通风畅通。
5.3 定期检查烘干机的控制面板和功能按钮,如有异常应及时修复或更换。
四、安全注意事项1. 在操作烘干机前,工作人员应穿戴好防护服和防护手套,确保人身安全。
2. 在操作烘干机过程中,禁止将手或其他物体伸入烘干机内部,以免发生意外伤害。
3. 烘干机工作期间,应保持周围环境整洁,禁止堆放易燃物品,避免发生火灾。
机器人烘干器设置指南说明书
4additional information (ʑDrum light(depending on model) –goes out automatically when the washing machine door is opened or closed and after the programme Do not trap any items of washing!ServiceflapWashing machine door with handleEnd of programme ...When the display button.Rinse holdIf Rinse hold –select Terminating the programme––Select Washing1.To prevent unused detergent from flowing into the outlet2.Consumption valuesProgramme Load Current***Water***Programme Programme Additional function Load consumption consumption–Insert laundry–––SoakingDose detergent with i-DOS or pour into dispenserinstructions. Select the required programme. SelectStarchingSelectaccording to manufacturer's specifications (if required clean beforehand). SelectLoad displayThe load sensor detects the load level in the washing machine. The washing is not balanced.Load adjustIndependently of the load display, the load adjust. uses other sensors to optimally adjust thewater and power consumption and the programme duration in each programme – dependingon textile type and load.ReloadSelectstarts. The machine checks whether a top-up is possible. Follow the information on the displaypanel#11Filling dispenserWhen selecting your detergent and care product, follow the manufacturers instructions.We recommend the use of standard, universal and color liquid detergents for all machine-washable, coloured textiles made of cotton and synthetic materials.Do not use any solvent-based, corrosive or gas-emitting products (e.g. liquid beach).To prevent product from drying, do not leave the fill cover open for a long time.Changing dosage strength:setting isThe selection (OFF/light/normal/strong) of i-DOS1 and i-DOS2 is retained for eachprogramme until the next change occurs, even if the machine is switched off.ʑTo adjust the basic dosages:13Intelligent Dosage System (i-DOS)ʑConverting i-DOS2 dispenser contentsInstead of softener, a second liquid detergent can also beused in dispenser i-DOS2.1.PressÙOptions button to select i-DOS2: content.2.Press / Change buttons to switch between softener anddetergent.finished in 2:26Ēi-DOS2: content®)c softener–An additional changeable insert for a second detergent is enclosed and can be fitted in thefill cover. a Page 11–When the dispenser contents are changed, the basic dosage is reset to the correspondingfactory setting. If required, adjust the basic dosage.Manual dosage in dispenser B/C1.Set intelligent dosage to – (OFF). a Page 122.Dose in dispenser B/C according to amount of washing,manufacturer’s specifications and existing water hardness.B/C = Powder/liquid detergent–Do not manually dose liquid detergent for programmes with Prewash and/or withend time programme option.–For programmes with Prewash pour in detergent. a Page 9Do not open detergent drawer while water is being supplied.Customer serviceʑIf you cannot rectify the fault yourself (a separate Installation/Maintenance instructions,What to do if ...), please contact our customer service. We will always finds a suitable solutionto avoid unnecessary visits by technicians.ʑYou can find the contact data for your nearest customer service here or in the customerservice list (depending on model).–GB–IE***********(Calls from a BT landline will be charged at up to 3 pence per minute. A call set-upfee of up to 6 pence may apply.)01450 2655ʑPlease give customer service the product number (E-Nr.) and the production number (FD)of the appliance.Product number Production numberThese instructions can be found on:inside of washing machine door */openservice flap * and rear of the appliance.* depending on modelʑRely on the competence of the manufacturer. Contact us.You can therefore be sure that the repair is carried out by trained service technicians whocarry original spare parts.en operating instructionsWashing machinewith Intelligent Dosage SystemWAS32890EUObserve the safety instructions on page 8.Read these instructions and the separate installationinstructions before operating the washing machine.12Buttons, display panela Page 6Handle of the detergent drawerYour washing machineCongratulations – You have opted for a modern, high-qualitydomestic appliance manufactured by Bosch. The washing machine is distinguished by its economical consumption of water, energy and detergent.Each appliance which leaves our factory is inspected thoroughly to ensure that it functions properly and is in perfect condition.Every machine has been preset at the factory for the intelligent dosage system. You can start washing immediately!Changes to the standard settings. a Page 12, 13Further information on our products, accessories, spare parts and services can be found at: °C Select the temperature – – (cold) up to 90°; by pressing i-DOS1Select the detergent dosage. a l = light, ll = normal, lll = strong, – i-DOS2Select the softener or detergent d l = light, ll = normal, lll = strong, –Select the spin speed (revolutions p 0 to 1600 * (* depending on modÙ Options Select standard settings. a Page Options Select programme options. a Pa / Change Change settings in the options. ai-DOS1i-DOS1 selected/reload display.a Page 11 – 13Detergent i-DOS2i-DOS2 selected/reload display.a Page 11 – 13Softener or Detergentʋfor household use only,ʋfor washing machine-washable textiles and hand-washable wool in the apropriate detergent,ʋwhen dosage any detergents/cleaning aids andcleaning agents, always follow manufacturer’s instructions,ʋto be operated with cold drinking water andcommercially available detergents and care products which are suitable for use in washing machines.–Do not leave children unattended near the washing machine!–Children must not use the washing machine!–Keep pets away from the washing machine!Intended useIntelligent Dosage System (i-DOS)Your washing machine features an intelligent dosage system for liquid detergent and softener. Dispensers i-DOS1 and i-DOS2 (1.3 l/0.5 l) in the detergent drawer are used for this. You can select whether you want to use one liquid detergent and one softener or two liquid detergents. a Page 13Automatic programmesAutomatic adjustment of the wash programme and intelligent dosage depending on the detected washing type and soiling. a Page 10ContentsPageʋIntended use.......................................................................................1ʋPreparing your washing machine...................................................2ʋBefore 1st wash..............................................................................2/3ʋBefore each wash..........................................................................3/4ʋAfter each wash..............................................................................4/5ʋSelect options and change settings/Display panel.....................6ʋOverview of programmes.................................................................7ʋSafety instructions..............................................................................8ʋConsumption values..........................................................................8ʋImportant information........................................................................9ʋInformation on programmes/options ...........................................10ʋIntelligent Dosage System (i-DOS)........................................11–13ʋManual dosage.................................................................................13ʋCustomer service (13)Protection of the environment/conservation tips–Utilise the maximum load of washing for each particular programme.–Wash normally soiled fabrics without prewash.–The selectable temperatures apply to the care labels on thetextiles. The temperatures in the machine may deviate from this so that you get the optimum mix of energy-saving and washing results.–Detergent dosage using the intelligent dosage system helps save detergent and water.–Energy saving mode: The display panel light goes out after several minutes, $Start/Reload flashes. To activate the light, select any button.–If the washing is then dried in the tumble dryer, select spin speed according to the instructions of the dryer manufacturer.Automatic stain treatmentSpecial treatment of 16 different stain types is possible.No pretreatment of the stains is required – washing machine adjusts the washing process. a Page 10Preparing your washing machineCorrect installation according to separate Installation/Maintenance instructions.Checking the machine–Never switch on a damaged machine!–Inform your customer service!Insert mains plug–With dry hands only!–Take hold of the plug only!Turn on the tap34Start/ReloadProgramme selectorDrum light(depending on model) –goes out automatically when the washing machine door is opened or closed and after the programme starts.Open the washingmachine door 1.Sort the washing2.According to the information on the care labels.According to type; colour; soiling and temperature.Follow manufacturer’s care information!Do not exceed maximum load. a Page 7Follow important instructions! a Page 9Select a programme3.Programme selector for switching the machine on and offand for selecting the programme. Can be rotated in either direction.If childproof lock active, a Deactivate, Page 9Follow the information on thedisplay panel!Max. 8kg Cottons Insert laundryInsert laundry4.Observe load display on the display panel.a Page 90 Load: Max. 8kgCottons Insert laundryClose the washing machine door5.Do not trap any items of washing!finished in 2:26Cottonsi-DOS1: II i-DOS2: IIIntelligent dosage has been preset at the factory:i-DOS1 : ll = Detergent dosage : normal i-DOS2 : ll = Softener dosage : normalChange dosage a Page 12Select programme settings6.All buttons are sensitive, they only need to be touched gently!Temperature/Spin speed a Page 2Programme options (menu) a Page 6Stain selection a Page 10Manual dosage a Page 13Start programme7.B /C dispenser for manuali-DOS1 dispenser fo liquid detergenti-DOS2 dispenser for in softener or liquid detergWashinDetergent drawer with:/ Change buttons.Page 12= OFF; by pressing / Change buttons.dosage. a Page 12= OFF; by pressing / Change buttons.per minute, 0 = no spin while the programme is running). del); by pressing / Change buttons.e 6age 6a Page 6Before each washHandle of the detergentdrawerWashinFill dispensers i-DOS1 and i-DOS2a Page 11Wash once without any washing1.To prevent unused detergent from flowing into the outletduring the first wash: Pour 1 litre of water into dispenser B /C and start the >Empty programme.2.Wash once using L Cottons 90 °C programme withoutany washing .Before 1stwashadditional information (ʑServiceflap Washing machine door with handle End of programme ...When the displaybutton.Rinse holdIf Rinse hold–selectTerminating the programme––Selectng56–Insert laundry–––Soaking Dose detergent with i-DOS or pour into dispenser instructions. Select the required programme. Select Starching Select according to manufacturer's specifications (if required clean beforehand). Select Load displayThe load sensor detects the load level in the washing machine. The washing is not balanced.Load adjustIndependently of the load display, the load adjust. uses other sensors to optimally adjust the water and power consumption and the programme duration in each programme – depending on textile type and load.ReloadSelect starts. The machine checks whether a top-up is possible. Follow the information on the display panel #When selecting your detergent and care product, follow the manufacturers instructions.We recommend the use of standard, universal and color liquid detergents for all machine-washable, coloured textiles made of cotton and synthetic materials.Do not use any solvent-based, corrosive or gas-emitting products (e.g. liquid beach).To prevent product from drying, do not leave the fill cover open for a long time.11Changing dosage strength:setting is The selection (OFF/light/normal/strong) of i-DOS1 and i-DOS2 is retained for each programme until the next change occurs, even if the machine is switched off.ʑTo adjust the basic dosages:13Intelligent Dosage System (i-DOS)ʑConverting i-DOS2 dispenser contentsInstead of softener, a second liquid detergent can also be used in dispenser i-DOS2.1.Press ÙOptions button to select i-DOS2: content .2.Press / Change buttons to switch between softener anddetergent.finished in 2:26Ēi-DOS2: content®)c softener–An additional changeable insert for a second detergent is enclosed and can be fitted in the fill cover. a Page 11–When the dispenser contents are changed, the basic dosage is reset to the corresponding factory setting. If required, adjust the basic dosage.Manual dosage in dispenser B /C1.Set intelligent dosage to – (OFF). a Page 122.Dose in dispenser B /C according to amount of washing,manufacturer’s specifications and existing water hardness.B /C = Powder/liquid detergent–Do not manually dose liquid detergent for programmes with Prewash and/or with end time programme option.–For programmes with Prewash pour in detergent. a Page 9Do not open detergent drawer while water is being supplied.Customer serviceʑIf you cannot rectify the fault yourself (a separate Installation/Maintenance instructions, What to do if ...), please contact our customer service. We will always finds a suitable solution to avoid unnecessary visits by technicians.ʑYou can find the contact data for your nearest customer service here or in the customer service list (depending on model).–GB –IE***********(Calls from a BT landline will be charged at up to 3 pence per minute. A call set-up fee of up to 6 pence may apply.)01450 2655ʑPlease give customer service the product number (E-Nr.) and the production number (FD) of the appliance.Product number Production numberThese instructions can be found on: inside of washing machine door */open service flap * and rear of the appliance.* depending on model ʑRely on the competence of the manufacturer. Contact us.You can therefore be sure that the repair is carried out by trained service technicians who carry original spare parts.enoperating instructionsObserve the safety instructions on page 8.Read these instructions and the separate installationinstructions before operating the washing machine.。
干燥机中文说明书
目录安全总则 (2)1.0工作原理及流程 (3)2.0安装 (4)2.1位置 (4)2.2配管 (4)2.3电源及配线 (4)3.0运行 (5)3.1冷冻部分 (5)3.2吸附部分 (7)3.3电器及控制部分 (7)4.0维护 (9)4.1冷冻部分 (9)4.2吸附部分 (10)5.0常见故障及处理方法 (12)5.1冷冻部分 (12)5.2吸附部分 (14)安全总则◆组合式干燥器是带有压力容器的设备,工作压力必须在铭牌上标明的工作压力范围之内。
◆组合式干燥器在电力驱动下运行,请按国家电力标准进行安装。
◆在进行任何电气检修工作前,务必切断总电源。
◆在进行空气管路、阀件(冷凝水系统)检修前,务必泄放完该处空气压力。
◆在进行制冷管路阀件检修前,务必泄放完该处制冷剂。
◆请在安全模式下操作所有设备,并有专人负责。
1.0 工作原理及流程组合式干燥器是合理的将冷冻干燥器和吸附干燥器结合在一起,通过冷干器处理后的压缩空气,压力露点在5℃左右,含水量相当少约5.6 g/m3,温度比进口温度低约10℃,此时进吸附干燥器继续进行深层吸附。
因此组合式干燥器可以达到-60℃稳定的露点。
进吸附干燥器前已经通过冷干器将一部分水除去,减轻了吸附干燥器工作量,因此,吸附干燥器的切换时间可以延长,从而减少耗气量,延长吸附剂的使用寿命。
以上流程图只作参考。
本公司对产品不断研究、改进,保有变更权,流程更改恕不另行通知。
2.0 安装2.1位置1.组合式干燥器应安装在环境温度为2~40℃,四周通风良好、空气洁净的建筑物内。
当室内通风条件不良时,需在机房内安装换气排风设备;2.组合式干燥器与空压机之间应保持一定距离,以防止空压机产生的振动影响组合式压缩空气干燥器的正常运行;3.组合式干燥器应水平安装在平整的水泥地面上; 4.组合式干燥器在压缩空气系统中的布置可参考下图固体尘<μ1m≤./01P P M w w 残余含油量固体尘<μ2m ≤ /P P M w w2残余含油量组合式干燥器2.2 配管1. 注意压缩空气接入口和出口的接口位置是否正确;2. 组合式干燥器串接在气源系统中,最好在空气入口和出口之间并联旁路管道,中间设截止阀以供调试、维修时使用;3. 管径配置不要太小,尽量减少管路弯头,选用全开型阀门等,皆可减少压降,避免引起大的压降;4. 管道安装完毕后,最好能通入压缩空气,检查空气管道、法兰接口和排水器有无空气泄漏,若有泄漏,及时排除故障; 2.3 电源及配线1.应按铭牌上标定之电压、相数、容量配置电源,电源线勿使用太细; 2.电压波动范围不得超过额定电压的10%,其值如下:220V 时,电压的范围208-230V ; 380V 时,电压的范围342-418V 。
烘干机操作规程

烘干机操作规程一、引言烘干机是一种用于将湿物品快速干燥的设备,广泛应用于工业生产和家庭使用。
为了确保烘干机的安全运行和高效工作,制定本操作规程,以规范烘干机的操作流程和注意事项。
二、适用范围本操作规程适用于所有使用烘干机的工作人员,包括工业生产线上的操作人员和家庭用户。
三、安全注意事项1. 在操作烘干机之前,必须仔细阅读并理解烘干机的使用说明书,熟悉烘干机的各项功能和操作方法。
2. 在操作烘干机之前,必须确保烘干机的电源已经接通,并且电源线路符合安全要求,没有破损或松动。
3. 在操作烘干机之前,必须确保烘干机的工作环境清洁、通风良好,避免烘干机周围有易燃物品或堆积物。
4. 在操作烘干机之前,必须检查烘干机的滤网是否清洁,如有堵塞必须及时清理,以确保烘干机的正常工作。
5. 在操作烘干机期间,禁止将易燃物品、湿漉漉的衣物或其他不适宜烘干的物品放入烘干机中。
6. 在操作烘干机期间,禁止将手或其他物体伸入烘干机内部,以免造成伤害。
7. 在操作烘干机期间,禁止随意更改烘干机的设置参数,必须按照指定的程序进行操作。
四、操作流程1. 打开烘干机门,将待烘干的物品放入烘干机内部,并确保物品分布均匀,不要超过烘干机的容量限制。
2. 关闭烘干机门,并确保门锁牢固,避免在烘干过程中门意外打开。
3. 打开烘干机的电源开关,待烘干机启动后,选择适当的烘干模式和时间设置。
4. 在烘干过程中,可以根据需要选择适当的温度和转速,以达到最佳的烘干效果。
5. 烘干过程中,可以适时检查烘干机的工作状态,确保烘干机正常运行,如有异常情况,应立即停止烘干并检查故障原因。
6. 烘干结束后,关闭烘干机的电源开关,待烘干机停止运行后,打开烘干机门,取出烘干物品。
7. 取出烘干物品后,应及时清理烘干机内部的残留物和滤网,保持烘干机的清洁和良好的工作状态。
五、故障处理1. 如果烘干机在运行过程中发生异常噪音、异味、烟雾等情况,应立即停止使用,并断开电源,然后联系维修人员进行检修。
干燥机控制面板说明书
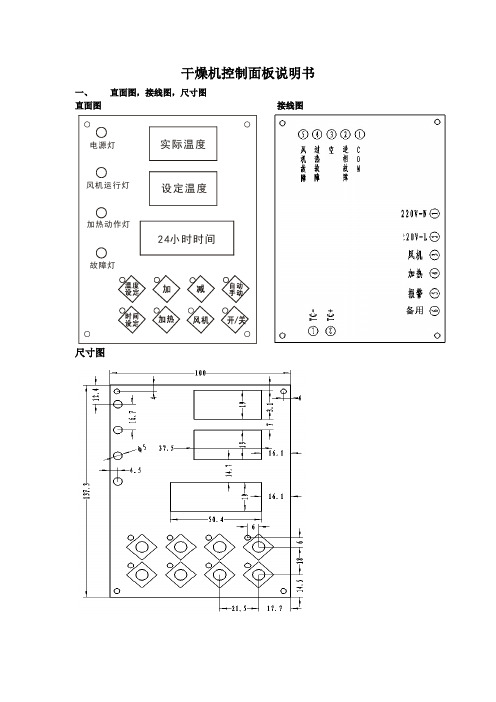
干燥机控制面板说明书一、 直面图,接线图,尺寸图直面图 接线图尺寸图电源灯风机运行灯加热动作灯故障灯实际温度设定温度24小时时间二、功能说明①.测、控温范围:0-400度②.加热、为PID控温方式③.24小时实时时间显示④.九段定时开,关机功能⑤.开机延时和关机延时⑥.一周七天预约时间设定方法:在上电情况下,长按“时间设定键”3S,设定灯亮,则在PV上显示“1ON”星期一开机时间,此时可以通过按“加键”或“减键”和“移位键”可修改当前设定值,再按一下“时间设定键”,则在PV上显示“1OF”星期一关机时间,此时可以通过按“加键”或“减键”和“移位键”可修改当前设定值,如此类推在“1ON-1OFF~7ON-7OFF”之间循环显示,按照上述操作,可设置周一至周七的开、关机的时间。
并且此时在“TIME”显示器上以闪烁方式显示对应的时间,完成设定后再长按“时间设定键”,或不操作10S,退出并保存参数。
⑦.时钟时间校正设定:(设定范:24小时实时时间)在上电状态下,按一下“时间SET”键,设定灯亮,进入设定状态,PV显示器显示“TNE”字样,此时“TIME”显示器闪动,此时按“加键”或“减键”和“移位键”可修改当前实时时间值。
再按一下“时间SET”键,PV显示器显示“DAY”,系统进入星期校正,此时按“加键”或“减键”和“移位键”可调整当前为星期几,范围(1~7)⑧.自动运行方式:当一周预约时间设置好后,按下“手/自动键”此时”手/自灯亮”,系统按设置好的一周预约时间,运行。
⑨.电源未开启时,按“风机”和“加热”键无效,风机未开启时,按“加热”键无效,电源开启后开,关“风机”键有效,风机开启后,开、关“加热”键有效⑩.过温温度:指PV上的测量温度大于此项温度设定时,则系统停止加热并同时输出报警三、操作按键时有风鸣音作提示开、关机过程①.上电时在PV上显示3S倒计时,在SV上显示软件版本号,3S过后,则在PV上显示“OFF”字样(此为关机状态)②.开机过程:在关机状态下,此时,按一下开/关机键,则PV、SV上立即显示出相应参数,电源指示灯亮,此时按一下“风机”键,则风机灯亮,风机继电器吸合,此时按一下“加热”键,则加热灯亮,加热继电器作PID输出,加热输出灯随加热继电器输出亮和灭(此为开机过程)③.关机过程:1.直接通过按开/关键关机时:先关加热,延时完关机风机延时后,再关风机,在延时过程中,PV上以交替方式显示“OFF”和当前温度。
- 1、下载文档前请自行甄别文档内容的完整性,平台不提供额外的编辑、内容补充、找答案等附加服务。
- 2、"仅部分预览"的文档,不可在线预览部分如存在完整性等问题,可反馈申请退款(可完整预览的文档不适用该条件!)。
- 3、如文档侵犯您的权益,请联系客服反馈,我们会尽快为您处理(人工客服工作时间:9:00-18:30)。
TXZK-1型密集烤房控制器使用说明书深圳市派沃新能源科技有限公司目录一、密集烤房控制器简介: (1)二、控制器面板功能说明 (3)三、控制器的工作模式 (5)四、按键功能与操作说明 (6)五、高级设置与手动操作 (9)六、安装指导........................................................ 错误!未定义书签。
七、注意事项........................................................ 错误!未定义书签。
八、技术指标........................................................ 错误!未定义书签。
九、售后服务承诺及免责声明.......................................... 错误!未定义书签。
十、环境保护倡议.................................................... 错误!未定义书签。
十一、保修卡.. (18)一、密集烤房控制器简介:密集烤房控制器是为烟叶烘烤设计的一款自动控制产品,适用于各种密集型烤房。
该控制器采用数字温度传感器及高性能单片机设计,内置烘烤曲线,适应不同地区不同种类烟叶的烘烤,具有很大的灵活性和实用性。
控制器具有以下特点:1)使用超大液晶屏显示,简单直观易操作。
2)采用美国原装数字温度传感器,具有测温精确、抗干扰能力强及防潮防水等性能。
3)控制器内置两种工作模式:自设模式(单段或多段工作方式)、曲线模式(3条曲线:上部叶、中部叶、下部叶),满足用户的不同需要。
4)完备的安全保护功能,包括过流保护、防雷击保护、输出短路保护,具有传感器开路报警、循环风机故障报警、电源故障报警、偏温报警等,确保烘烤过程及烘烤设备的安全。
5)具有循环风机电机过载保护功能,在发生缺相、过载的情况下,能自动切断循环风机电源,防止设备损坏。
6)具有电源电压监测功能,实时显示控制器电源电压。
当电源电压过高或过低时,控制器切断所有外部控制输出信号,以保护外部设备,减少损害。
7)具有RS485组网通信接口,使用工业标准Modbus RTU通讯协议,可以通过计算机读取控制器的工作过程记录,包括烤房内干湿球的温度记录、时间记录、停电记录等,为用户总结烘烤经验提供依据。
18)具有RS485变频器通信接口,可实现控制器与变频器通信,自动控制循环风机转速。
9)语音报警提示功能,用户可根据需要定购语音报警或者蜂鸣器报警方式,还可以根据需要单独外配一个5V防水声光报警器,以增强报警效果。
10)通过模糊自适应控制算法,自动控制助燃鼓风机开停和排湿风门开度,把烤房内的干湿球温度控制在设定的范围内。
整个烘烤过程仅需要用户选择合适的曲线或根据烟叶变化情况正确设置烘烤参数,并保证燃煤充足即可达到理想的烘烤结果,大大降低劳动力成本并有效提高烤烟质量。
11)具有风门堵转检测功能,实时指示排湿风门打开和关闭状态,增加风门直流电机使用寿命。
12)备用电池方便用户在停电时观察烤房内的干湿球温度。
13)键盘锁功能,在锁定情况下,可以防止他人意外设置数据或误操作。
2二、控制器面板功能说明31.面板功能说明1) 段码式液晶显示,烘烤时显示上下棚状态、控制棚的干湿球温度、当前目标控制的干湿球温度、阶段时间、总时间、当前控制曲线全部数据、工作模式、输出状态(助燃、排湿、循环风速)、电压测量值、烤次、当前日历时钟。
2) 2个发光管分别用于指示控制器运行状态和参数设置状态。
3) 8个按键,分别为2.按键的功能定义4三、控制器的工作模式控制器内置两种工作模式,分别为曲线模式和自设模式,为了方便操作,在非烘烤过程中按键3秒可以直接进行曲线模式的下部叶工作方式和自设模式之间的转换。
如果要应用上部叶和下部叶的工作方式,应根据曲线模式的操作说明进行设置,具体说明如下:1.曲线模式:根据烟叶烘烤专家的经验,将烟叶部位分为上部叶、中部叶、下部叶。
三条不同烟叶部位对应三条不同的曲线,用户可以根据实际情况选择合适的烘烤曲线,还可以在选定的曲线基础上继续修改。
操作说明:1)在测量显示状态,按进入。
2)反复按动键,设定数据会在“曲线数据、工作模式、日期时钟选择”三组参数中第一个数据之间跳动,形成闭环操作。
3)按键使屏上数据逐个切换激活,被激活的数据会闪动。
4)按键来修改激活后的参数。
4)按键保存本次数据设置。
6)按键不保存。
(注:模式的选择在系统运行状态下无效)5在停止烘烤状态下,使用目标选择键选择曲线烘烤阶段,选定后按运行键,此时从当前选择的阶段位置开始运行。
2.自设模式:该模式的工作方式为多段方式。
多段工作方式操作方法:1) 在测量显示状态,按键3秒进入。
2) 反复按动键,设定数据会在“曲线数据、工作模式、日期时钟选择”三组参数中第一个数据之间跳动,形成闭环操作。
3) 按键使屏上数据逐个切换激活,被激活的数据会闪动。
4) 按键来修改激活后的参数。
5) 按键保存本次数据设置。
6) 按键将取消本次数据设置。
(注:模式的选择在系统烘烤状态下无效)四、按键功能与操作说明1.按键说明1)运行/停止键在系统停止运行时,按该键一次,运行指示灯亮,控制器进入正常的烘烤状态,所有控制6正常输出。
在烘烤状态下,按住此键3秒进入停止烘烤状态,运行指示灯灭,除了循环风机正常运行外,其它输出关闭。
2)设置键在运行状态下,按该键一次,系统进入参数设置状态,设置指示灯亮,此时可对曲线显示部分的各个目标数值以及日期时钟等烘烤参数进行设置。
在设置时,先按键移动选定目标,此时目标出现闪烁,然后按键,完成目标值设定,最后按键保存并按键退出设置状态,此时设置指示灯灭,回到测量状态;不按键时,控制器不保存数据并在30秒后自动退出设置状态。
3)目标选择键目标选择的运行轨迹由曲线目标设定框自上而下、自左向右,至自设、下、中、上部叶目标,至日期时钟目标,再至曲线目标设定框,或反向移动形成一个闭环移动轨迹。
点按时,移动至下一个目标;长按时,可连续迅速移动,直至达到目标位置。
在非设置和烘烤状态,此键可以选择不同的烘烤阶段进行烘烤。
4)目标修改键在设置状态时,点按目标修改键递加或递减一个数字单位;长按目标修改键递加或递减多个数字单位。
在查询状态时,查询显示选定烤次下的不同时段历史数据;同时按下3秒后进入高级参数设置状态。
5)查询记录键短按该键一次,切换到显示非控制棚干、湿球传感器温湿度,并在目标温湿度处显示风机7电流;按住该键3秒,进入历史查询状态,并显示当前烤次历史记录,并在显示屏左上侧信息栏显示本烤次开烤后最后一次记录的数据。
6)确认键在设置状态时,按此键保存数据并退出;在查询状态时,按此键退出查询状态;当循环风机因故障进行保护停止运转后按此键启动循环风机。
2.操作说明1)开始烘烤:在非设置、查询状态下,按待运行指示灯亮即进入烘烤过程,同时液晶屏上显示目标温湿度和阶段时间、总时间;在非设置和查询状态下按移动时间外框所在的阶段后,按可以直接在此阶段开始运行。
2)停止烘烤:运行过程中按住 3秒以上待运行指示灯灭,退出烘烤过程。
3)设置参数:按待设置灯亮进入设置状态,通过移动闪动的目标参数,通过改变目标参数,在设置状态下连续按可以使闪动的目标参数在第一个设定温度值、烘烤曲线和实时时间之间快速切换。
修改完参数后按保存,按退出保存。
4)查询:按可以查看另一棚的温湿度值和风机电流值,长按 3秒以上进入历史烘烤记录查询状态,在此状态下可以通过和浏览烘烤的历史数据。
按退出查询状态。
5)自检:按住键和键给控制器通电,控制器进入自检模式,控制器全部显示“8”,且鼓风机通电,冷风门先开后关;然后进入待机状态。
86)恢复出厂值:按住键和键给控制器通电,内部数据恢复出厂值并进入烘烤过程。
五、高级设置和手动操作1.拨码开关设置:拨码开关默认状态是1下(关)2下(关),此状态控制器参数可调,把下棚传感器作为主控传感器。
拨码位置 1 2ON(上) 参数锁定上棚控制OFF(下) 参数可调下棚控制当使用电池时,应该把电池开关拨到开位置。
3.内部参数设置1)在系统正常运行状态下,同时按键3秒进入高级参数设置菜单;2)按键可以在F0-F2菜单之间切换;3)按键选择每个菜单的子选项;4)按键可修改对应参数的设定值。
5)按保存,按退出保存。
91011122.手动操作1)冷凤门手动操作开关是自复位开关,推到上面是开,推到下面是关。
2)鼓风机手动开关是非自复位开关,自动控制时应该把开关置于“自动”位置。
3)风机调速开关置于低速时风机在低速运转,高速时风机在高速运转,置于停止时风机停止运转。
4)当循环风机因为电路板或者继电器原因不能运转时,可以通过备用开关应急开启循环风机;此时只需把备用开关闭合风机就能运转,但是将失去电流电压异常保护;应急使用后必须及时排除控制器故障,让风机正常运行。
六、安装指导1.控制器必须安装在雨水淋不到和儿童接触不到的地方,同时避免阳光直晒。
相应的电缆应距离地面1.5米以上高度。
2.控制器输入输出请选择合适线径进行接线,并确保接线压紧,压实。
循环风机电缆的截面积应当不小于1.5平方毫米,其他电缆截面积不小于1平方毫米,绝缘等级450V以上。
3.传感器线不可以与交流电缆或变频器距离太近,平行走线时,应当距离交流电缆至少20cm,交叉时,应当保持90度的交叉角度。
水壶挂放时必须保证水壶的中心线与地面垂直,烘烤前确保水壶中加满水。
4.安装备用电池时注意电池规格和极性,请使用优质电池。
5.妥善保管控制配件,说明书等,以备以后维修时使用。
13七、注意事项1.使用前请仔细阅读使用说明书。
2.非专业人员,严禁在带电状态下接线、检修线路或检修外部设备。
3.每次烘烤之前,检查每一个接线插座是否连接可靠。
4.切勿使输出短路,否则会烧坏继电器及电路板。
5.检查任何带电设备之前,必须断开控制器电源。
6.烘烤之前,必须正确安装备用电池。
7.不可以新旧电池搭配使用。
8.烘烤之前必须对控制器进行接地处理。
9.长时间不使用时,请取出电池,并妥善放置控制器。
10.控制器掉电后,内部实时时钟将恢复出厂值,在烘烤前请正确设置实时时间。
八、技术指标1.控制器工作电源:AC380V±20%2.温度测量范围:0~99.9℃分辨率0.1℃3.温度测量误差:±0.5℃4.电压测量误差:±5V145.电流测量误差:±0.5A7.电池规格:5号电池,1.5V,3节8.外型尺寸:415mm×295mm×127mm9.外壳材料:阻燃ABS塑料V-1级10.输出容量:助燃鼓风机AC220V 0.7A ,排湿风门DC12V 0.8A,循环风机AC380V 5A11.控制器功耗:5W12.空气开关容量:AC400V 32A/3A九、售后服务承诺及免责声明我公司系列密集烤房控制器均应在说明书规定或相关行业产品规范许可的条件下使用,仅在承诺或本身质量原因范围内,且在质保期内,提供免费维修服务;如在保质期内属于我方责任而我方无法进行有效维修的产品,可以进行更换;超出质量保证期的,维修、服务时仅收取实际发生成本费用。