丰田技术员大修手册
丰田技术员01b09_01

T = 力矩 N=力 m = 距离
提示: N (牛顿)是质量单位,与 kgf 关系 如下: 1 N = 0.11355 kgf 1 kgf = 9.80665 N
(4/5) 发动机的功率输出 发动机的功率输出就是在一定时间内产 生的功率数量。 虽然 KW 是国际单位,但 也使用 HP,PS 等单位。 功率输出是发动机转速乘力矩的积。 由 于在高速时形成进气效率降低导致轴向 扭矩减少,因而功率输出升高至一定水 平。 此峰值称为最大功率输出。
2 电路图 EWD 手册中包括车辆电气线路图的摘要并适用于各种车型。
3 SST (专用维修工具)表 专用维修工具 (SST)表提供车辆修理和检验所必需的专用维修工具的信息。 每年出版一次。
4 NCF (新车说明书) NCF 手册提供新车型的信息并对新机构有描述。
5 SDS (维修数据表) 在检验和调整中频繁使用的数据 (如 V 型皮带的张紧度和阀门的间隙)都列在单张的资料单上。这些资料单每 年按照各国家和地区 (美国和加拿大除外)的全部车型出版。
2 设计号 紧接着的 5 位数字用来划分发动机 或车辆的类型。
3 (-00)
再后 2 位数字 (只在需要时才有)
是颜色和尺寸的分类号。
(1/1)
零件目录
虽然零件号是指定给所有零件的,但并 不需要标示在零件上。 所有的零件号都 可以在零件目录中查到。 零件目录分三种类型。 参看 “零件目录 指南 *”中关于使用目录的正确方法。 * 由丰田维修零件管理分公司出版。
当处于低点时活塞在气缸中的位置。
(1/5)
总排气量 气缸的排气量 ( 或简称 “排量”) 是由 缸径和行程来决定。 活塞总排量是一个 气缸的活塞排量乘上气缸数。 通常,活塞总排量越大,发动机的功率 越大。
丰田高级技师 发动机大修 单体发动机的拆卸和检查
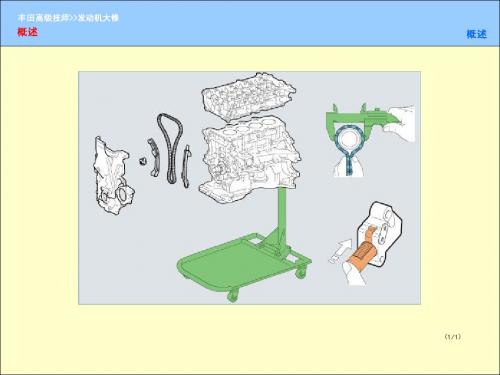
丰田高级技师>>发动机大修
分解
12. 拆卸缸垫
总成
缸垫
(1/1)
丰田高级技师>>发动机大修
检查
总成
(1/1)
丰田高级技师>>发动机大修
检查
检查链条张紧器
棘轮爪
棘轮爪
链条张紧器
止动板 止动板 棘轮爪
柱塞
柱塞
柱塞
(1/1)
丰田高级技师>>发动机大修
检查
检查凸轮轴正时链轮
游标卡尺
正时链条
链轮
(1/1)
丰田高级技师>>发动机大修
重新组装
1. 清洁粘着表面 2. 施加密封填料 3. 安装正时链条盖
安装正时链条盖
密封填料
O形环
正时链条盖
维修提示: 清洁/冲洗
维修提示: 密封填料/垫圈 维修提示: 螺栓 (1/1)
丰田高级技师>>发动机大修
3. 涂抺密封填料
密封填料
涂抺密封填料
密封填料
一号油底壳 变速器壳盖
丰田高级技师>>发动机大修
重新组装
安装正时链
正时链条
链条张紧器 滑块
链条张紧器
链条减振器
(1/3)
丰田高级技师>>发动机大修
重新组装
1. 设定正时标记位置
安装正时链
凸轮轴正时链轮正时标记 ATDC20°
凸轮轴正时链轮 曲轴正时链轮正时标记
TDC
曲轴正时链轮
ATDC140-40° ATDC20° 曲轴正时链轮正时标记
丰田高级技师>>发动机大修
分解
4. 拆卸水泵
丰田汽车亚洲龙维修手册_ 上
一汽丰田卡罗拉维修维修手册(fuel tank)
110FE–01A65046A65047Front Floor Carpet –FUEL FUEL TANK ASSY11–25992AuthorĂ:DateĂ:2004 COROLLA (RM1037U)Removal & Installation and Disassembly & Reassembly1.REMOVE BENCH TYPE REAR SEAT CUSHION ASSY (See page 72–6, 72–8)2.REMOVE REAR FLOOR SERVICE HOLE COVER (See page 11–16)3.WORK FOR PREVENTING GASOLINE FROM SPILLING OUT(a)Start the engine.(b)After the engine has stopped on the its own, turn the ignition switch to lock.4.DISCONNECT FUEL TANK MAIN TUBE SUB–ASSY (See page 11–16)5.DISCONNECT FUEL EMISSION TUBE SUB–ASSY NO.1 (See page 11–16)6.REMOVE FUEL TANK VENT TUBE SET PLATE (See page 11–16)7.REMOVE FUEL PUMP ASSEMBLY (See page 11–16)8.REMOVE FUEL SUCTION TUBE SET GASKET9.DRAIN FUEL10.REMOVE FLOOR PANEL BRACE FRONT(a)Remove the 2 nuts and floor panel brace front.11.REMOVE EXHAUST PIPE ASSY FRONT(a)Using a clip remover, remove the clip.(b)Tear off the front floor carpet.汽车技师帮技术资料一汽丰田卡罗拉维修维修手册(fuel tank)A65706A65049A6505011–26–FUEL FUEL TANK ASSY993AuthorĂ:DateĂ:2004 COROLLA (RM1037U)(c)Disconnect the oxygen sensor connector.(d)Remove the 2 exhaust pipe supports.(e)Remove the 4 bolts, 4 compression springs and exhaustpipe.12.REMOVE FUEL TANK PROTECTOR NO.1(a)Remove the 5 bolts and fuel tank protector.13.SEPARATE PARKING BRAKE CABLE ASSY NO.2(a)Remove the 2 installing bolts of the parking brake cable.汽车技师帮技术资料一汽丰田卡罗拉维修维修手册(fuel tank)A65051A65052A66709Nylon Tube Fuel TubeConnector Clip Pipe O–ring Fuel Tube Connector A65054A65055–FUEL FUEL TANK ASSY 11–27994AuthorĂ:DateĂ:2004 COROLLA (RM1037U)14.SEPARATE PARKING BRAKE CABLE ASSY NO.3(a)Remove the 2 installing bolts of the parking brake cable.15.DISCONNECT FUEL TANK MAIN TUBE SUB–ASSY (a)Pinch the fuel tube connector clip, and remove the fuel tube connector clip.(b)Pull out the fuel tank main tube.NOTICE:S Check if there is any dirt like mud around the fuel tube connector before this work and clean the dirt away.S Be careful of dirt like mud because the fuel tube con-nector has an O–ring to seal the fuel tube connector and pipe.S Do not use any tool in this work.S Do not bend or twist the nylon tube by force.S After disconnecting, cover the fuel tube connector with a vinyl bag.S When the fuel tube connector and pipe are stuck,pinch the fuel tank main tube between fingers, and turn it carefully to free and then disconnect the fuel tank main tube.16.DISCONNECT FUEL TANK INLET PIPE FUEL HOSE (a)Disconnect the fuel tank inlet filler pipe hose from the fuel tank.17.DISCONNECT FUEL TANK BREATHER HOSE (a)Disconnect the fuel tank breather hose from the fuel tank.汽车技师帮技术资料一汽丰田卡罗拉维修维修手册(fuel tank)A65056Push Pinch A A PinchA65057A65058A65059Nylon Tube Fuel TubeConnector ClipPipe O–ring Fuel Tube Connector A6506011–28–FUEL FUEL TANK ASSY 995AuthorĂ:DateĂ:2004 COROLLA (RM1037U)18.DISCONNECT FUEL TANK VENT HOSE (a)Disconnect the fuel tank bent hose from the charcoal can-ister.(1)Push the connector deep inside.(2)Pinch portion A.(3)Pull out the connector.19.DISCONNECT VALVE TO FUEL FILLER PIPE HOSE (a)Disconnect the valve to fuel filler pipe hose from the fuel tank inlet pipe.20.DISCONNECT FUEL EMISSION TUBE SUB–ASSY NO.1(a)Pinch the fuel tube connector clip and then pull out the fuel emission tube.NOTICE:S Check if there is any dirt like mud around the fuel tube connector before this work and clean the dirt away.S Be careful of dirt like mud because the fuel tube con-nector has an O–ring to seal the fuel tube connector and pipe.S Do not use any tool in this work.S Do not bend or twist the nylon tube by force.S After disconnecting, cover the fuel tube connector with a vinyl bag.S When the fuel tube connector and pipe are stuck,pinch the fuel emission tube between fingers, and turn it carefully to free and then disconnect the fuel emission tube.21.REMOVE FUEL TANK ASSY (a)Set a mission jack to the fuel tank.(b)Remove the 4 bolts, 2 fuel tank bands and fuel tank.汽车技师帮技术资料一汽丰田卡罗拉维修维修手册(fuel tank)A65061A65062A65063A65064A60576Nylon TubeFuel TubeConnector ClipPipe O–ring Fuel TubeConnector –FUEL FUEL TANK ASSY 11–29996AuthorĂ:DateĂ:2004 COROLLA (RM1037U)22.REMOVE FUEL TANK MAIN TUBE SUB–ASSY (a)Remove the fuel tank main tube from the fuel tube clamp and bracket.23.REMOVE FUEL TUBE CLAMP NO.4(a)Remove the bolt and fuel tank clamp.24.REMOVE FUEL TUBE BRACKET (a)Remove the fuel tube bracket from the fuel tank.25.REMOVE FUEL EMISSION TUBE SUB–ASSY NO.1(a)Pinch the fuel tube connector clip and then pull out the fuel emission tube.NOTICE:S Check if there is any dirt like mud around the fuel tube connector before this work and clean the dirt away.S Be careful of dirt like mud because the fuel tube con-nector has an O–ring to seal the fuel tube connector and pipe.S Do not use any tool in this work.S Do not bend or twist the nylon tube by force.S After disconnecting, cover the fuel tube connector with a vinyl bag.S When the fuel tube connector and pipe are stuck,pinch the fuel emission tube between fingers, and turn it carefully to free and then disconnect the fuel emission tube.汽车技师帮技术资料一汽丰田卡罗拉维修维修手册(fuel tank)A65065A65066A65067Clip Remover Gasket A6506811–30–FUEL FUEL TANK ASSY 997AuthorĂ:DateĂ:2004 COROLLA (RM1037U)26.REMOVE FUEL TUBE CLAMP NO.2(a)Remove the fuel tube clamp from the fuel tank.27.REMOVE CHECK VALVE PROTECTOR (a)Using a screwdriver, unlock the claw, and remove the check valve protector by turning it counter clockwise.28.REMOVE FUEL TANK INLET VALVE ASSY (a)Insert a clip remover between the fuel tank inlet valve and gasket, remove the fuel tank inlet valve by gradually pushing it upward.NOTICE:S Work accurately to maintain the sealing performance of the fuel tank inlet valve, since it is made from resin.It is easy to damage by removing and installing forci-bly.S Be sure to install a new fuel tank inlet valve and gas-ket.29.REMOVE CHECK VALVE GASKET (a)Remove the gasket from the fuel tank inlet valve.汽车技师帮技术资料一汽丰田卡罗拉维修维修手册(fuel tank)A65069A65069A65070A65071Apply a light coatof oil–FUEL FUEL TANK ASSY 11–31998AuthorĂ:DateĂ:2004 COROLLA (RM1037U)30.REMOVE FUEL TANK CUSHION NO.1(a)Remove the 7 fuel tank cushions from the fuel tank.31.INSTALL FUEL TANK CUSHION NO.1(a)Install the 7 new fuel tank cushions to the fuel tank.32.INSTALL CHECK VALVE GASKET (a)Install a new gasket to the fuel tank.33.INSTALL FUEL TANK INLET VALVE ASSY (a)Apply a light coat of oil around the fuel tank inlet valve asshown in the illustration, and insert it into the fuel tankwithout force.NOTICE:Be careful not to drop the gasket into the fuel tank.34.INSTALL FUEL EMISSION TUBE SUB–ASSY NO.1(a)Push in the fuel tube connector to the pipe until fuel tube connector makes ”click” sound.NOTICE:S Check if there is any damage or foreign objects on the connected part.S After connecting, check if the fuel tube connector and pipe are securely connected by pullingthem.35.INSTALL FUEL TUBE CLAMP NO.4(a)Install the fuel tube clamp with the bolt.Torque: 6.0 N ⋅m (61 kgf ⋅cm, 53 in.⋅lbf)汽车技师帮技术资料一汽丰田卡罗拉维修维修手册(fuel tank)A51891Tail Pipe Side Gasket –FUEL FUEL TANK ASSY 11–331000AuthorĂ:DateĂ:2004 COROLLA (RM1037U)(c)Install a new gasket on the exhaust pipe (rear side).(d)Install the exhaust pipe with the 4 compression springsand 4 bolts.Torque: 43 N ⋅m (440 kgf ⋅cm, 32 ft ⋅lbf)(e)Install the 2 exhaust pipe supports.(f)Connect the oxygen sensor connector.(g)Install the font floor carpet with a clip.43.INSTALL FLOOR PANEL BRACE FRONT(a)Install the floor panel brace front with the 2 nuts.Torque: 30 N ⋅m (302 kgf ⋅cm, 22 ft ⋅lbf)44.INSTALL FUEL SUCTION TUBE SET GASKET (See page 11–16)45.INSTALL FUEL PUMP ASSEMBLY (See page 11–16)46.INSTALL FUEL TANK VENT TUBE SET PLATE (See page 11–16)47.CONNECT FUEL EMISSION TUBE SUB–ASSY NO.1 (See page 11–16)48.CONNECT FUEL TANK MAIN TUBE SUB–ASSY (See page 11–16)49.CHECK FUEL LEAK (See page 11–1)50.CHECK EXHAUST GAS LEAK51.INSTALL REAR FLOOR SERVICE HOLE COVER (See page 11–16)52.INSTALL BENCH TYPE REAR SEAT CUSHION ASSY (See page 72–6, 72–8)汽车技师帮技术资料一汽丰田卡罗拉维修维修手册(fuel tank)。
丰田专业技术人员一般信息维修手册共24页

60、生活的道路一旦选定,就要勇一般信息维修手册
41、俯仰终宇宙,不乐复何如。 42、夏日长抱饥,寒夜无被眠。 43、不戚戚于贫贱,不汲汲于富贵。 44、欲言无予和,挥杯劝孤影。 45、盛年不重来,一日难再晨。及时 当勉励 ,岁月 不待人 。
56、书不仅是生活,而且是现在、过 去和未 来文化 生活的 源泉。 ——库 法耶夫 57、生命不可能有两次,但许多人连一 次也不 善于度 过。— —吕凯 特 58、问渠哪得清如许,为有源头活水来 。—— 朱熹 59、我的努力求学没有得到别的好处, 只不过 是愈来 愈发觉 自己的 无知。 ——笛 卡儿
丰田A25发动机维修手册

丰田A25发动机维修手册一、连杆和曲轴轴向间隙的检测 56二、曲轴主轴瓦的更换 57三、连杆轴瓦地更换 60四、油底壳的拆卸 63五、曲轴和活塞的拆卸 65六、曲轴的检测 68七、气缸体和活塞的检测 70 八、活塞、活塞销和连杆的更换 73九、连杆螺栓的检测 80 十、曲轴的安装 80十一、油底壳的安装 83 第二章润滑系统 86一、机油压力报警器的检测 87二、机油压力的测试 87三、发动机机油的更换 88四、发动机机油滤清器的更换 88五、机油滤清器螺纹连接管的更换 89六、机油泵的大修 90七、呼吸器盖板的安装 94 第三章进气歧管和排气系统 95 一、维修标准值 95二、进气系统位置组件索引 95三、空气滤清器总成 95四、进气歧管 96五、排气管与消音器 97六、检查 98七、进气歧管的拆卸与安装 98八、排气歧管的拆卸与安装 99 第四章发动机冷却系统 100一、维护标准信息 101二、冷却液 101三、密封剂 101四、车上维护 101五、节温器 102六、水泵 103七、进出水软管 104八、散热器 105九、调温器的检测 107十、水泵的检测 107十一、水泵更换 108十二、调温器更换 108十三、水温传感器更换 109第五章燃油和排放系统 110一、燃油箱 110二、电动燃油泵 111第一章汽油机第一节概述 BYD473QA/QB汽油机采用我公司自主研发的电子控制燃油喷射系统,具备先进的自我诊断功能。
喷射系统采用多点、顺序喷射,具有升功率大、油耗低、噪声小、污染低、结构紧凑等特点。
在各种工况下,BYD473QA/QB汽油机均可在最佳状态下工作,可以保证其配载的整车具有可靠的安全性、驾驶的舒适性、最佳的经济性和完美的环保性能。
一、主要技术参数BYD473QA/QB型汽油机的主要技术参数见下表。
型号 BYD473QA BYD473QB 形式四冲程、水冷、直列、单顶置凸轮轴、电子控制燃油喷射式气缸数 4汽缸直径(mm) 73活塞行程(mm) 80 88.9压缩比 10.2点火次序 1-3-4-2标定功率(kW) 67(5800r/min) 75(5800r/min)最大扭矩(Nm) 120 4700 r/min) 135(4800r/min)标定转速(r/min) 5800最低燃油消耗率(g/kW?h) 275机油压力(kPa) 300~350(3000r/min?50r/min) 最低稳定转速(怠速)(r/min) 780?50总排量(L) 1.339 1.488机油燃油消耗比(%) 0.26外形尺寸(mm)(长×宽×高)587×543×682 587×543×700 净质量(kg) 87.5 92怠速排放 CO?0.15% HC?40ppm(780?50r/min)CO?0.15% HC?40ppm(2000?50r/min) GB18285-2005燃油车用93#无铅汽油(GB17930-1999) 润滑油SG 10W/30(南方各季节和北方春、夏、秋季用)SG 5W/30(北方冬季用)GB11121冷却液乙二醇型冷却液离合器形式干式、单圆盘、膜片弹簧、常压式轮廓尺寸(mm) 离合器从动盘总成φ200×8.9mm(自由状态)离合器盖总成φ255×40.4mm重量 4.314kg变速箱形式同步器齿轮啮合式、五前进挡、一倒挡各档速比1档3.3082档 1.8263档 1.2074档 0.9395档 0.730倒挡 3.231主减速比 4.471轮廓尺寸(mm) (长×宽×高)504×382×363mm 润滑油中负荷车辆齿轮油(GL-4 SAE 80W/90) 二、维修技术数据发动机缸盖名称测量项目测量条件标准值维修极限缸盖翘面 0.08mm高度119.9~120.1mm凸轮轴轴向间隙0.05~0.25 mm 0.5 mm 凸轮轴与支架之间的油膜间隙0.045~0.084 mm 0.1 mm 总跳动度最大0.03 mm 0.04 mm 凸轮凸角高度进气 35.38 mm排气 35.377 mm气门间隙(冷态)进气 0.15~0.18 mm排气 0.23~0.28 mm挺杆外径进气 5.470~5.485 mm 5.45 mm排气 5.455~5.470 mm 5.42 mm挺杆与导管之间的间隙进气0.025~0.060 mm 0.08 mm 排气0.04~0.075 mm 0.11 mm气门座宽度进气0.85~1.15 mm 1.60 mm 排气1.25~1.55 mm 2.00 mm挺杆安装高度进气 46.1~46.5 mm 46.8 mm 排气 46.2~46.6 mm 46.9 mm气门弹簧自由长度进气 50.5 mm排气 57.2 mm气门导管内径进气 5.51~5.53 mm 5.55 mm 排气 5.51~5.53 mm 5.55 mm安装高度进气 15.85~16.35 mm排气 15.85~16.35 mm摇臂摇臂与摇臂轴之间的间隙进气 0.02~0.054 mm 0.08 mm 排气0.02~0.054 mm 0.08 mm发动机缸体名称测量项目测量条件标准值维修极限缸体表面翘曲最大0.07 mm 0.10 mm缸径73~73.019 mm 73.07 mm缸孔锥度---- 0.05 mm重新镗缸极限值---- 0.25 mm。
一汽丰田卡罗拉维修维修手册(fuel tank)
110FE–01A65046A65047Front Floor Carpet –FUEL FUEL TANK ASSY11–25992AuthorĂ:DateĂ:2004 COROLLA (RM1037U)Removal & Installation and Disassembly & Reassembly1.REMOVE BENCH TYPE REAR SEAT CUSHION ASSY (See page 72–6, 72–8)2.REMOVE REAR FLOOR SERVICE HOLE COVER (See page 11–16)3.WORK FOR PREVENTING GASOLINE FROM SPILLING OUT(a)Start the engine.(b)After the engine has stopped on the its own, turn the ignition switch to lock.4.DISCONNECT FUEL TANK MAIN TUBE SUB–ASSY (See page 11–16)5.DISCONNECT FUEL EMISSION TUBE SUB–ASSY NO.1 (See page 11–16)6.REMOVE FUEL TANK VENT TUBE SET PLATE (See page 11–16)7.REMOVE FUEL PUMP ASSEMBLY (See page 11–16)8.REMOVE FUEL SUCTION TUBE SET GASKET9.DRAIN FUEL10.REMOVE FLOOR PANEL BRACE FRONT(a)Remove the 2 nuts and floor panel brace front.11.REMOVE EXHAUST PIPE ASSY FRONT(a)Using a clip remover, remove the clip.(b)Tear off the front floor carpet.汽车技师帮技术资料一汽丰田卡罗拉维修维修手册(fuel tank)A65706A65049A6505011–26–FUEL FUEL TANK ASSY993AuthorĂ:DateĂ:2004 COROLLA (RM1037U)(c)Disconnect the oxygen sensor connector.(d)Remove the 2 exhaust pipe supports.(e)Remove the 4 bolts, 4 compression springs and exhaustpipe.12.REMOVE FUEL TANK PROTECTOR NO.1(a)Remove the 5 bolts and fuel tank protector.13.SEPARATE PARKING BRAKE CABLE ASSY NO.2(a)Remove the 2 installing bolts of the parking brake cable.汽车技师帮技术资料一汽丰田卡罗拉维修维修手册(fuel tank)A65051A65052A66709Nylon Tube Fuel TubeConnector Clip Pipe O–ring Fuel Tube Connector A65054A65055–FUEL FUEL TANK ASSY 11–27994AuthorĂ:DateĂ:2004 COROLLA (RM1037U)14.SEPARATE PARKING BRAKE CABLE ASSY NO.3(a)Remove the 2 installing bolts of the parking brake cable.15.DISCONNECT FUEL TANK MAIN TUBE SUB–ASSY (a)Pinch the fuel tube connector clip, and remove the fuel tube connector clip.(b)Pull out the fuel tank main tube.NOTICE:S Check if there is any dirt like mud around the fuel tube connector before this work and clean the dirt away.S Be careful of dirt like mud because the fuel tube con-nector has an O–ring to seal the fuel tube connector and pipe.S Do not use any tool in this work.S Do not bend or twist the nylon tube by force.S After disconnecting, cover the fuel tube connector with a vinyl bag.S When the fuel tube connector and pipe are stuck,pinch the fuel tank main tube between fingers, and turn it carefully to free and then disconnect the fuel tank main tube.16.DISCONNECT FUEL TANK INLET PIPE FUEL HOSE (a)Disconnect the fuel tank inlet filler pipe hose from the fuel tank.17.DISCONNECT FUEL TANK BREATHER HOSE (a)Disconnect the fuel tank breather hose from the fuel tank.汽车技师帮技术资料一汽丰田卡罗拉维修维修手册(fuel tank)A65056Push Pinch A A PinchA65057A65058A65059Nylon Tube Fuel TubeConnector ClipPipe O–ring Fuel Tube Connector A6506011–28–FUEL FUEL TANK ASSY 995AuthorĂ:DateĂ:2004 COROLLA (RM1037U)18.DISCONNECT FUEL TANK VENT HOSE (a)Disconnect the fuel tank bent hose from the charcoal can-ister.(1)Push the connector deep inside.(2)Pinch portion A.(3)Pull out the connector.19.DISCONNECT VALVE TO FUEL FILLER PIPE HOSE (a)Disconnect the valve to fuel filler pipe hose from the fuel tank inlet pipe.20.DISCONNECT FUEL EMISSION TUBE SUB–ASSY NO.1(a)Pinch the fuel tube connector clip and then pull out the fuel emission tube.NOTICE:S Check if there is any dirt like mud around the fuel tube connector before this work and clean the dirt away.S Be careful of dirt like mud because the fuel tube con-nector has an O–ring to seal the fuel tube connector and pipe.S Do not use any tool in this work.S Do not bend or twist the nylon tube by force.S After disconnecting, cover the fuel tube connector with a vinyl bag.S When the fuel tube connector and pipe are stuck,pinch the fuel emission tube between fingers, and turn it carefully to free and then disconnect the fuel emission tube.21.REMOVE FUEL TANK ASSY (a)Set a mission jack to the fuel tank.(b)Remove the 4 bolts, 2 fuel tank bands and fuel tank.汽车技师帮技术资料一汽丰田卡罗拉维修维修手册(fuel tank)A65061A65062A65063A65064A60576Nylon TubeFuel TubeConnector ClipPipe O–ring Fuel TubeConnector –FUEL FUEL TANK ASSY 11–29996AuthorĂ:DateĂ:2004 COROLLA (RM1037U)22.REMOVE FUEL TANK MAIN TUBE SUB–ASSY (a)Remove the fuel tank main tube from the fuel tube clamp and bracket.23.REMOVE FUEL TUBE CLAMP NO.4(a)Remove the bolt and fuel tank clamp.24.REMOVE FUEL TUBE BRACKET (a)Remove the fuel tube bracket from the fuel tank.25.REMOVE FUEL EMISSION TUBE SUB–ASSY NO.1(a)Pinch the fuel tube connector clip and then pull out the fuel emission tube.NOTICE:S Check if there is any dirt like mud around the fuel tube connector before this work and clean the dirt away.S Be careful of dirt like mud because the fuel tube con-nector has an O–ring to seal the fuel tube connector and pipe.S Do not use any tool in this work.S Do not bend or twist the nylon tube by force.S After disconnecting, cover the fuel tube connector with a vinyl bag.S When the fuel tube connector and pipe are stuck,pinch the fuel emission tube between fingers, and turn it carefully to free and then disconnect the fuel emission tube.汽车技师帮技术资料一汽丰田卡罗拉维修维修手册(fuel tank)A65065A65066A65067Clip Remover Gasket A6506811–30–FUEL FUEL TANK ASSY 997AuthorĂ:DateĂ:2004 COROLLA (RM1037U)26.REMOVE FUEL TUBE CLAMP NO.2(a)Remove the fuel tube clamp from the fuel tank.27.REMOVE CHECK VALVE PROTECTOR (a)Using a screwdriver, unlock the claw, and remove the check valve protector by turning it counter clockwise.28.REMOVE FUEL TANK INLET VALVE ASSY (a)Insert a clip remover between the fuel tank inlet valve and gasket, remove the fuel tank inlet valve by gradually pushing it upward.NOTICE:S Work accurately to maintain the sealing performance of the fuel tank inlet valve, since it is made from resin.It is easy to damage by removing and installing forci-bly.S Be sure to install a new fuel tank inlet valve and gas-ket.29.REMOVE CHECK VALVE GASKET (a)Remove the gasket from the fuel tank inlet valve.汽车技师帮技术资料一汽丰田卡罗拉维修维修手册(fuel tank)A65069A65069A65070A65071Apply a light coatof oil–FUEL FUEL TANK ASSY 11–31998AuthorĂ:DateĂ:2004 COROLLA (RM1037U)30.REMOVE FUEL TANK CUSHION NO.1(a)Remove the 7 fuel tank cushions from the fuel tank.31.INSTALL FUEL TANK CUSHION NO.1(a)Install the 7 new fuel tank cushions to the fuel tank.32.INSTALL CHECK VALVE GASKET (a)Install a new gasket to the fuel tank.33.INSTALL FUEL TANK INLET VALVE ASSY (a)Apply a light coat of oil around the fuel tank inlet valve asshown in the illustration, and insert it into the fuel tankwithout force.NOTICE:Be careful not to drop the gasket into the fuel tank.34.INSTALL FUEL EMISSION TUBE SUB–ASSY NO.1(a)Push in the fuel tube connector to the pipe until fuel tube connector makes ”click” sound.NOTICE:S Check if there is any damage or foreign objects on the connected part.S After connecting, check if the fuel tube connector and pipe are securely connected by pullingthem.35.INSTALL FUEL TUBE CLAMP NO.4(a)Install the fuel tube clamp with the bolt.Torque: 6.0 N ⋅m (61 kgf ⋅cm, 53 in.⋅lbf)汽车技师帮技术资料一汽丰田卡罗拉维修维修手册(fuel tank)A51891Tail Pipe Side Gasket –FUEL FUEL TANK ASSY 11–331000AuthorĂ:DateĂ:2004 COROLLA (RM1037U)(c)Install a new gasket on the exhaust pipe (rear side).(d)Install the exhaust pipe with the 4 compression springsand 4 bolts.Torque: 43 N ⋅m (440 kgf ⋅cm, 32 ft ⋅lbf)(e)Install the 2 exhaust pipe supports.(f)Connect the oxygen sensor connector.(g)Install the font floor carpet with a clip.43.INSTALL FLOOR PANEL BRACE FRONT(a)Install the floor panel brace front with the 2 nuts.Torque: 30 N ⋅m (302 kgf ⋅cm, 22 ft ⋅lbf)44.INSTALL FUEL SUCTION TUBE SET GASKET (See page 11–16)45.INSTALL FUEL PUMP ASSEMBLY (See page 11–16)46.INSTALL FUEL TANK VENT TUBE SET PLATE (See page 11–16)47.CONNECT FUEL EMISSION TUBE SUB–ASSY NO.1 (See page 11–16)48.CONNECT FUEL TANK MAIN TUBE SUB–ASSY (See page 11–16)49.CHECK FUEL LEAK (See page 11–1)50.CHECK EXHAUST GAS LEAK51.INSTALL REAR FLOOR SERVICE HOLE COVER (See page 11–16)52.INSTALL BENCH TYPE REAR SEAT CUSHION ASSY (See page 72–6, 72–8)汽车技师帮技术资料一汽丰田卡罗拉维修维修手册(fuel tank)。
丰田5A_FE/8A_FE维修手册范本
维修手册附录丰田5A-FE/8A-FE发动机机械部分维修手册目录:一.部分发动机总成·2(一)组件··2(二)大修··5二.气缸盖总成·47(一)组件··47(二)大修··47三.气缸体总成·69(一)组件··69(二)大修··69一.部分发动机总成(5A - FE/8A - FE) (一)组件(二)大修1.拆下火花塞2.拆下通风阀分总成(a) 拆下通风阀。
(b) 拆下垫片。
3.拆下气门室盖分总成(a) 拆下加油盖。
(b) 拆下4个螺母,4个密封垫和气门室盖。
4.拆下2号正时链条或皮带罩(a) 拆下4个螺栓和2号正时皮带罩。
5.拆下曲轴齿轮或皮带轮罩分总成。
(a) 拆下2个螺栓和曲轴齿轮罩。
6.将1号气缸设定在上止点,压缩位置(a) 转动曲轴皮带轮,将皮带轮槽口对准1号正时皮带罩上的正时标记“O”。
(b) 检查曲轴正时皮带轮的“K”标记与轴承盖的正时标记对准。
否则,转动曲轴一周(3600)。
7.拆下凸轮轴皮带轮(a) 使用SST拆下皮带轮螺栓。
SST 09213 - 54015, 09330 - 00021 (90105 - 08076)(b) 使用SST拆下曲轴皮带轮。
SST 09950 - 50013 (09951 - 05010, 09952 - 05010 09953 - 05020, 09954 - 05021)8.拆下正时链条或皮带罩分总成(a) 拆下3个螺栓和正时皮带罩。
9.拆下正时皮带导轮10.拆下惰轮张紧弹簧(a) 旋松惰轮安装螺栓。
(b) 拆下张紧弹簧。
11.拆下正时皮带提示:如果重复使用正时皮带,在皮带上画一个方向箭头f按发动机旋转的方向),并如图所示在皮带轮和皮带上做出定位标记。
(a) 拆下正时皮带。
12.拆下1号正时皮带惰轮分总成。
- 1、下载文档前请自行甄别文档内容的完整性,平台不提供额外的编辑、内容补充、找答案等附加服务。
- 2、"仅部分预览"的文档,不可在线预览部分如存在完整性等问题,可反馈申请退款(可完整预览的文档不适用该条件!)。
- 3、如文档侵犯您的权益,请联系客服反馈,我们会尽快为您处理(人工客服工作时间:9:00-18:30)。
特点:丙烯酸密封剂缺少空气时能在金 属表面硬化。 使用范围:螺丝密封 密封剂颜色:绿
(1/1)
丰田高级技术员—大修基础
基本技能
皮带轮 拆卸和安装转动部件时,比如皮带轮, 它们将沿松动和紧固方向转动,要确保 稳定转动部件。 不能稳定转动部件将损坏螺栓或很难进 行准确的调整。 部件位置不同,固定方法也不一样。 操作时参考修理手册。
丰田高级技术员—大修基础 概述
基本技能 概述 本章介绍大修所需的基本技能。 学会这 些技能,参照修理手册,你就可以完成 所有的大修。
(1/3) 1. 拆卸和安装部件时的检查要点
-1-
丰田高级技术员—大修基础
(1)螺栓 按照规定的顺序松动或紧固螺栓以防止设有多个螺栓的部件变形。
(2)螺栓粘合剂 为防螺栓变松,给一些螺栓涂加锁止粘合剂
提示:
位置不同,规定的角度也不同。 参考修理手册。
(5)检查油漆标记的位置。
(2/3)
2. 如何判断塑性域螺栓可否被再使用 塑性域螺栓的形状被轴向力所改变。被 拆缷掉的塑性域螺栓是否可再使用需进 一步的判断。测量下面的位置可以判断 该零件是否可再使用。
(1)测量螺栓的张紧力位置直径。 A 在螺栓的螺纹处 B 在螺栓颈下
一些稳定方法: • 用 SST 稳定部件 • 用工具或台钳稳定部件
1 水泵皮带轮 2 SST (活动销扳手臂总成) 3 台钳 4 凸轮轴 5 正时链轮 (无 VVT-i)
(1/3)
1. 用 SST 稳定部件 • 曲轴皮带轮固定螺栓
(1)把 SSTA 安装到皮带轮上。 (2)用销子把 SST B 固定到 SST A 上。 (3)夹住 SST B。 (4)拆卸和安装皮带轮固定螺栓。 提示:
• 由于使用粘合剂后螺栓需要即时紧 固,要事先准备好要安装的部件。
• 粘合剂有数种型号。 遵照说明书, 正确使用。
1 螺栓 2 粘合剂
(2/2)
参考: 锁紧粘合剂的型号
1. 粘合剂 1324 (Three bond 1324)
特点:丙烯酸锁紧粘合剂缺少空气时能 在金属表面硬化。 使用范围:螺丝密封 密封剂颜色:红
1 塑性域螺栓 2 气缸盖 3 气缸体 4 曲轴轴承盖
-8-
(1/3)
参考: 塑性域螺栓的特性
上紧螺栓,其紧固程度要超过弹性区域 ( 这一区域的大小与螺栓的轴向拉力和旋 转角度 (图 A )成正比关系);在塑性 区域的紧固,在该区域里,旋转角度的 变化不影响轴向拉力的大小。如图所示, 这种紧固方法降低了相对于螺栓旋转角 度的轴向拉力的非均匀度,增加了螺栓 的稳定轴向拉力。
螺栓,而是一旦松动就要暂时紧固螺 栓。 (2)以上方法能防止在松动最后的螺栓 时,传动桥被拆下或移动。
1 螺栓 2 松动最后的螺栓。 3 传动桥
(3/5) 3. 工作方法 (1)松动螺栓时,如果有重的部件作用于
螺栓就很难顺利地松动螺栓。 撑起该 部件可消除作用于螺栓上的力。 没有 部件的重力作用于其上的螺栓容易松 动。 (2)安装多只螺栓时,比如在安装悬架梁 时,如果只在一侧完全紧固,其他螺 栓就很难对齐螺栓孔。 为防止这类事情的发生,应先整体对 正并稍紧固后再最后紧固。
1 紧固螺栓 2 悬梁架
(4/5) 4. 安装螺栓的预防措施 紧固螺栓时,必须检查螺栓空孔内是否 有液体,比如水或油。 如果螺栓在此状况下紧固,液压变高, 这将破坏部件。
1 压缩气体 2 螺栓 3 油或水
(5/5)
-5-
丰田高级技术员—大修基础
1 刷子 2 压缩气体 3 旧螺栓 4 螺栓孔
-6-
基本技能
(2)水平移动 SST 时要沿对角斜面敲击 SST。
(3)用 SST 尽可能地分开密封面,避免弄 弯油底壳。
注意: • 打入 SST 时检查双头螺栓的位置。 • 打入 SST 时,沿油底壳小心滑动而不 撬起其表面。 损坏安装面将导致漏 油等故障,所以操作时要小心逐步 地进行。 (2/5)
• 用塑料锤或平头螺丝刀时 拆卸部件时,用塑料锤或平头螺丝刀撬 和击打肋条。 示例
部件不能只用 SST B 固定。把 SST A 加入到要固定的部件之间。
1 SST-A: 曲轴皮带轮夹持工具 2 SST-B: 配对凸缘夹持工具
• 水泵皮带轮 (1)对正 SST 卡爪和维修孔,调节间距把
SST 安装到带轮上。 (2)夹住 SST,拆卸和安装皮带轮固定螺
栓。
1 SST (活动销扳手臂组件) 2 对正间距
(13)安装位置 / 方向 部件的安装位置和安装方向是有规定的
(14)软管 / 夹子 管道和软管由夹子固定,断开和连接软管时,选择恰当的工具并采取正确的方法
(15)蓄电池 断接蓄电池时 ,遵照规定的顺序以防短路
(16)连接器 断开连接器时,先打开锁紧部件,然后断开连接器
(17)箍 / 卡爪 内部部件用箍 / 卡爪安装
(2)测量螺栓的长度。 C 全长
1 塑性域螺栓 2 游标卡尺 3 测量范围 4 最大收缩范围
(3/3)
密封填料 / 垫片
为了防止漏油和漏水,一些部件比如传 动桥和油底壳的安装面有密封填料和垫 片。
密封填料和垫片可确保紧密粘接。 如何拆卸和安装有密封填料和垫片的部 件:
• 拆卸粘合的部件 • 清洗密封填料和垫片 • 涂抺密封填料
(1/1)
丰田高级技术员—大修基础 1 油漆标记
-9-
基本技能
1. 塑性域螺栓的紧固方法
拧紧塑性域螺栓的方法不同于拧紧普通 螺栓。
(1)在螺丝上和螺栓头部的下面涂抹薄薄 一层机油
(2)安装并用力均匀地上紧螺栓。
(3)给每一只螺栓作油漆标记。
(4)紧固螺栓到规定的角度。
规定角度的例如:: • 90 度 + 90 度 • 90 度 • 45 度 + 45 度
• 用塑料锤
1 塑料锤 2 传动桥箱盖 3 肋条
• 用平头螺丝刀 注意:
• 用平头螺丝刀时,用保护带或乙烯 带缠住其尖端,以避免对安装面的 任何损坏。 然后用螺丝刀均匀地沿交叉对角线 方向撬以使顺利地拆掉该箱。
• 该部件的任何弯曲或对安装面的任 何损坏将导致漏油。
1 平头螺丝刀 2 油底壳 3 气缸体
-3-
(1ቤተ መጻሕፍቲ ባይዱ5)
丰田高级技术员—大修基础
基本技能
1. 松动和紧固顺序 遵循规定的顺序,每次均匀 . 少许地松 动和紧固螺栓以防变弯。
(1)矩形部件 (气缸盖) 拆卸时,从外侧向内侧松动螺栓。 安装 时,从内侧向外侧紧固螺栓。
(2)圆柱形部件 (离合器壳) 以对角线方向每次少许松动和紧固螺栓。
(3)盖 (轴承盖) 拆卸时,从外侧向内侧松动螺栓。 安装时,从内侧向外侧紧固螺栓。
(7)检测开裂 / 损坏 用颜色渗透方法检查开裂和损坏
(8)洁净 / 清洗 为保持精度和部件的原有性能,洁净并清洗部件
(9)外观检查 进行外观检查以确保没有异常或损坏
拆卸和安装须知
(3/3)
螺栓
当部件用多个螺栓安装时,遵照以下各 点能防止损坏和事故 (受伤),也能帮 助你顺利地完成工作。
1 松动和紧固顺序 2 防止部件掉落 3 工作方法 4 安装螺栓的预防措施
螺栓粘合剂
为防止松动,一些螺栓要涂抹粘合剂。 螺栓再次使用时,要洁净螺栓并涂抺锁 紧粘合剂。 另外,一些螺栓在供应时即涂抹锁紧粘 合剂 。 这种螺栓称为预覆螺栓。 松动涂抹锁紧粘合剂的螺栓时,开始比 较困难,但是一旦粘合剂失去功效,松 动螺栓就很容易。
1. 洁净
(1)用钢丝刷洁净螺栓,然后用压缩空气 吹去多余的粘合剂。
(2)用洁净油除去粘附在螺栓孔内的锁止 粘合剂。 如同清洁螺栓一样,最后用 压缩空气吹去多余的锁止粘合剂。
注意:
不除去异物而紧固螺栓将损坏螺栓和 部件。
提示:
重新覆加锁紧粘合剂前,洁净旧粘合
剂将极大提高粘合效果。
(1/2)
2. 紧固 (重新涂抺锁紧粘合剂)
螺栓洁净后,给整个表面涂一层粘合剂。
注意:
• 一些锁紧粘合剂使用后立即硬化。 使用这种粘合剂时,应即时紧固螺 栓。
注意: • 小心不要造成涂有密封剂的表面任 何的弯曲或损坏。 • 涂有密封剂的表面上如有任何油或 异物,将不利于紧密粘接并导致漏 油。
1布 2 刮刀 3 油石 4 刷子
(4/5)
3. 涂抺密封填料 在全部表面均匀地涂抺一层密封填料, 不要有任何间隙。密封填料的位置和数 量 (厚度)有规定值。
安装前参考修理手册。 安装前检查表面有无异物。
1 缸垫 2 油底壳 3 SST (油底壳密封刮刀) 4 刮刀 5布 6 密封填料
(1/5)
丰田高级技术员—大修基础
1 SST (油底壳密封刮刀) 2 油底壳 3 密封填料
基本技能
1. 拆卸粘合的部件 • 使用油底壳密封刮刀
(1)把 SST (油底壳密封刮刀)直插入油 底壳、气缸体等的安装面。
提示: 第一次把 SST 插入到安装面时,油底 壳容易扭曲。 要均匀地插入 SST,使 它 的边和粘接面充分接触。
塑性 物体在受到外力时形状发生改变,当外 力消失时,物体不能恢复原状,这种特 性被称之为塑性。与此相反,物体能够 恢复原状的特性被称之为弹性。若物体 的受力超过弹性极限就会导致塑性变形。
弹性 物体在受到外力时形状改变,外力消失 后恢复原状的特性被称之为弹性,如果 所受外力超过一特定临界值,该物体将 不能复原,该临界值被称为弹性极限。 受力超过弹性极限会导致塑性变形。
(7)压入部件 齿轮或轮毂类部件被压入并紧密结合,用压力机和 SST 来安装和拆卸这些部件。
(8)油封 为防漏油,一些部件装有密封填料或密封垫。
(9)卡环 卡环是一种圆形的部件,可安装在不同的位置上,以防止松动。