数字相机控制器的说明书
数字相机操作手册
数字相机操作手册一、简介数字相机是一种通过电子传感器将光信号转化为数字图像的设备。
它具有便携、高像素、易操作等特点,在如今的社交媒体和个人摄影中扮演着重要的角色。
本操作手册将向您介绍如何正确操作数字相机,以便您能够拍摄出高质量的照片。
二、准备工作1. 电池:确保您的相机已装上充足电量的电池,或者连接上适配器进行电源供应。
2. 存储卡:选用适合相机的存储卡,并正确插入相机中。
3. 镜头:根据需要选择合适的镜头,并保持其干净。
4. 附件:带上相机带、清洁布和其他必要的辅助设备。
三、相机操作流程1. 打开相机:找到相机的电源开关并打开相机,等待相机自检完成。
2. 拍摄模式选择:根据拍摄需求选择合适的模式,如自动模式、光圈优先模式、快门优先模式等。
3. 调整白平衡:根据环境光线的特点选择合适的白平衡模式,以确保拍摄出真实的颜色。
4. 对焦设置:使用自动对焦功能或手动对焦功能,将焦点对准拍摄对象。
5. 曝光控制:通过光圈和快门速度的调整来控制曝光量,确保图像细节丰富。
6. 拍摄操作:按下快门按钮,等待相机完成拍摄,避免过度晃动相机。
7. 图片回放:拍摄完成后,可以使用相机上的回放按钮进行图像预览,以确保满意的拍摄效果。
8. 存储与传输:将拍摄的照片存储到存储卡中,并通过USB接口或Wi-Fi功能传输到电脑或其他设备。
四、注意事项1. 照片清洁:保持相机镜头和闪光灯的清洁,避免灰尘或指纹影响照片质量。
2. 相机保护:避免相机接触水液或高温环境,防止损坏相机内部元件。
3. 视角选择:根据拍摄对象和场景选择合适的焦距和角度。
4. 防抖技巧:在低光条件下拍摄时,使用三脚架或提高快门速度以避免图像模糊。
5. 拍摄角度:尝试不同的拍摄角度,以寻找创新的视觉效果。
6. 后期处理:使用图像处理软件对照片进行合理的后期处理,突出主题和增强图像细节。
五、故障排除1. 电源问题:如果相机无法开启,检查电池是否充电或更换电池。
2. 存储问题:如相机显示存储卡错误信息,检查存储卡是否正确插入或更换存储卡。
小型数字相机用户指南说明书

Mini Digital CameraUser’s Guide1.INTRODUCTION1.1 Introduction of the Mini Digital CameraThis digital camera is a network digital camera, your close daily-life partner.The small casing makes it easy to carry around. It is easy to use, and capture sharp and real image. Besides taking photos, it carries video clips function features.process, photos-sending.The most convenient feature is that you can communicate with others face to face through Internet.The Mini Digital Camera makes your life more beautiful.1.2.SuppliesMini Digital Camera, USB Cable, One piece of AAA Battery, Installation CD 1.3.Part NamesButton Explanation:SNAP :Power Off Button, Snap ButtonMODE:Mode Button,Power On Button1.4.LCD Panel20: Normal modeOF : Power off modeS : Self-Timer shot modeC : Continuous shot modeCP : Compressed modeP : Non-compressed modeAI : Video function modeCL: Delete last photoCA: Delate all photosH: High-resolution formatL : Low-resolution formatF5 : 50Hz(~220v V oltage)F6 : 60Hz(~110v V oltage)1.5 SpecificationStorage memory size:16Mb SDRAMPhotos:non-compressedCIF (352*288): about 20 picturesQCIF (176*144): about 81 picturesUnder compressedCIF (352*288): about 60 picturesQCIF (176*144): about 243 picturesLens:1/4 inch fixed lensAperture.:2.8Exposure mode:AutoWhite balance:AutomaticSelf-timer delay:10 secondsCommunication port:USB standard portImage Sensor:1/4 inch CMOSImage Specification:352*288 pixel (CIF)、176*144 pixel (QCIF)Mode:Single/Self-timer/ continuous shot /set up AVI files(352*288/ 176*144 pixel A VI format)Shutter speed:1/60 second-1/1500 secondLCD panel:2 digit displaysFrame rate:12 frames per second6-8 frames per second (in video mode / in C mode) Power supply and management:A ) One piece of AAA alkaline batteryB ) Automatically power off in 30 seconds idle.C ) 10 hours continuous photo taking.D)Low battery alertWeight:about 27g(without battery)Dimensions:58.7 mm X 41.7mm X 15mmOperation System:WIN98/2000/ME/XP2. How to use the Mini Digital Camera2.1 Power On/OffPress MODE button when the camera is off. LCD panel shows"H",and then shows"20". "H" stands for CIF quality format, and "20" for normal mode and number of photo can be taken. When the Mini digital camera is idle for 30 seconds, it will automatically shut off.2.2 Normal Shot ModePress MODE button, LCD display normal mode.Press SNAP Button, a short sound from the buzzer shows thec ompletion of photo taking and the figure on LCD will automatically reduce .When reaching the capacity,LCD displays "00". Even you furtherpressing the SNAP Button, you will hear ‘di-di’ sound, the figure onLCD remains unchanged.When light is not enough, you will hear ‘di-di-di’ sound,and the figureon LCD remains unchanged.2.3 Self-timer Shot ModeP ress MODE Button to choose self-timer mode.Press SNAP Button to start self-timer,self-timer will delay 10 seconds.It finishes with a ‘di’ sound.After the completing of self timer, the figure on LCD will automatically reduce and back to normal mode.2.4 Continuous shot modePress MODE Button to choose continuous mode.Press SNAP Button to start continuous shot. It stops until release SNAP Button or the number of photos reaches the minimum value "00".2.5 A VI Function ModePress MODE Button to choose video function mode.Press SNAP Button to start,and LCD will flash.After starting taking video, it will stop when the SNAP Button is released or the minimum value "00" is shown on the LCD panel. Note : Please move slowly and steadily when taking video.3. Function Operation3.1 Delete single photo ( Only delete the last photo)Press MODE Button,LCD panel shows icon "CL"P ress S NAP Button to choose and LCD will flash,then press SNAP Button again to confirm. After the last photo is deleted. LCD shows the number of photos(could not be taken) increasing by one.3.2 Delete all photosPress MODE Button,LCD shows icon "CA ":Press SNAP Button to choose and LCD will flash,then press SNAPButton again to confirm, and all photos are deleted.3.3 CIF formatPress MODE Button,LCD shows icon"H"Press SNAP Button to confirm,LCD shows icon"H" when turn on the camera in this mode.3.4 QCIF formatPress MODE Button,LCD shows icon"L"Press SNAP Button to confirm,LCD shows icon"L" when turn on the camera in this mode.3.5 Compressed modePress MODE Button,LCD shows icon"CP "Press SNAP Button to confirm.Compressed mode under CIF format allows to take maximum of 60 photos.Compressed mode under QCIF format allows to take maximum of 243 photos.3.6 Non-compressed modePress MODE Button,LCD shows icon "P"Press Shutter Button to confirm.Non-compressed mode under CIF format allows to take a maximum of20 photos.Non-compressed mode under QCIF format allows to take a maximum81 photos3.7 Exposure light / AC voltage / frequency 50Hz modePress MODE Button,LCD shows icon "f5"Press SNAP Button to confirm.When exposure light is florescent lamp, AC voltage is 220V, frequencyi s 50Hz, please chose this mode.(factory setting is 220V and 50Hz)3.8 Exposure light / AC voltage / frequency 60Hz modePress MODE Button,LCD shows icon "f6"Press SNAP Button to confirm.When exposure light is fluorescent lamp,AC voltage is 110V,frequency is 60Hz, please chose this mode.Remark:50Hz/60Hz is the AC voltage/frequency of different regions and countries. 50Hz for china, 60Hz for European and American countries.4. Installation and Application of the software4.1 Software installationPut the included installation software into the CD ROM, run the setup. exe file and install the drive and application as per hints.Restart the computer after finishing the installation.4.2 Software UninstallThe software can be uninstalled by clicking the menu item of "Uninstall", or selecting the "Camera Driver" item in the "Add/Remove Programs"applet of control panel and remove it.4.3 Main Explanation of the Software' MenuSave Active ItemSave All ItemsStopPreviewCapture Single FramePC-CameraPhoto Album Mod4.4 Video Parameter settingChoose the video color space and video sizeDe-flicker:Set AC frequency of fluorescent light.AE Speed: Set the frame rate to capture videoLight Source:Select brightness environmentExposure:Set video exposureCapture Source:Select Capture deviceDevice Setting:Adjust various video settings, such as white balance, etc.Video FormatChoose the video color space and video size4.5 Download FileConnect the mini digital camera with your computer via USB cable, then double click shortcut on the computer desk, the following figures will pop up:Press button "YES", all photos will be transferred to your PC.4.6 Browse FileSelect the photo in application window right side, and then this photo will be shown in application window left side as actual size4.7 Save FilePress button to save one file which you have selectedPress button to save all files4.8 Play A VI FileAfter downloading video, below image shows(Download method is the same as that of photos)Click AVI play button to start (Computer should install multi-media software, e.g. Windows Media Player or Real Player Basic AVI play button)4.9 PC-CAMERAConnect the mini digital camera with your computer via USB cable, then double click the shortcut on your computer desk. The following interface will appear:Press button to work as PC-CameraPress button to stop PC cameraPress button to start preview video imagePress button to capture the current frame5 Photo Impression4.0Through the Photo Impression4.0 you can select to download photos and edit photos.6. Safety Notice1)Never get the product wet or put it in high humid environment toprevent unstable performance.2)Turn off the camera before changing batteries and finish it with in8 seconds to prevent data loss.。
大恒图像 水星二代(MERCURY2)GigE 数字相机 应用说明书

水星二代(MERCURY2)GigE数字相机应用说明书版本:V2.0.0本手册中所提及的其它软硬件产品的商标与名称,都属于相应公司所有。
本手册的版权属于中国大恒(集团)有限公司北京图像视觉技术分公司所有。
未得到本公司的正式许可,任何组织或个人均不得以任何手段和形式对本手册内容进行复制或传播。
本手册的内容若有任何修改,恕不另行通知。
© 2023中国大恒(集团)有限公司北京图像视觉技术分公司版权所有网站:公司总机:************客户服务热线:400-999-7595销售信箱:************************支持信箱:**************************首先感谢您选用大恒图像产品,水星二代(MERCURY2)GigE接口数字相机是我公司水星一代(MERCURY)数字相机的升级产品,在相机功能上有所增加,结构上有所改进。
水星二代GigE相机包括标准版(MER2-G(-P)系列),Pro版(ME2P-G-P系列)、Super版(ME2S-G-P系列)和China版(ME2C-G(-P)系列)。
相机采用了GigE标准接口,安装、使用方便,适用于工业检测、医疗、科研、教育、安防等领域。
水星二代GigE接口数字相机是微型相机,对于相机尺寸要求苛刻的用户,它们将会是一个不错的选择。
本手册详细介绍了水星二代GigE接口数字相机的应用。
概述 (1)系列概述 (1)型号名称说明 (1)遵循的标准 (1)相关文档及软件下载 (1)注意事项及认证声明 (2)安全声明 (2)使用注意事项 (2)EMI、ESD注意事项 (3)使用环境注意事项 (3)相机机械安装注意事项 (3)认证声明 (3)安装指南 (5)主机端准备 (5)3.1.1. 用户软件组成 (5)3.1.2. 用户软件接口 (5)相机供电 (6)相机驱动安装 (7)3.3.1. 系统要求 (7)3.3.2. 驱动安装 (7)相机IP配置 (7)打开相机采集 (8)性能参数 (9)重要参数解释 (9)4.1.1. 关于光谱响应图 (9)MER2-G(-P) 系列 (9)4.2.1. MER2-041-302GM/C(-P) (9)4.2.3. MER2-134-90GM/C(-P) (12)4.2.4. MER2-137-90GM/C(-P) (14)4.2.5. MER2-160-75GM/C(-P) (15)4.2.6. MER2-202-60GM/C(-P) (17)4.2.7. MER2-203-30GC-P-L (18)4.2.8. MER2-204-30GC-P-L (20)4.2.9. MER2-231-41GM/C(-P) (21)4.2.10. MER2-302-37GM/C(-P) (23)4.2.11. MER2-503-23GM/C(-P) (24)4.2.12. MER2-503-23GM-P POL (26)4.2.13. MER2-507-23GM/C(-P) (27)4.2.14. MER2-507-23GM(-P) NIR (29)4.2.15. MER2-532-22GM/C (30)4.2.16. MER2-630-18GM/C(-P) (32)4.2.17. MER2-1070-10GM(-P) (33)4.2.18. MER2-1220-9GM/C (35)4.2.19. MER2-2000-6GM/C(-P) (36)ME2C-G(-P) 系列 (38)4.3.1. ME2C-041-302GM/C(-P) (38)4.3.2. ME2C-051-120GM/C(-P) (39)4.3.3. ME2C-137-90GM/C(-P) (41)4.3.4. ME2C-160-75GM/C(-P) (42)4.3.5. ME2C-202-60GM/C(-P) (44)4.3.6. ME2C-203-30GC-P-L (45)4.3.7. ME2C-204-30GC-P-L (47)4.3.8. ME2C-231-41GM/C(-P) (48)4.3.9. ME2C-240-48GM/C(-P) (50)4.3.10. ME2C-302-37GM/C(-P) (51)4.3.11. ME2C-503-23GM/C(-P) (53)4.3.12. ME2C-507-23GM/C(-P) (54)4.3.13. ME2C-507-23GM(-P)-NIR (56)4.3.14. ME2C-532-22GM/C (57)4.3.15. ME2C-630-18GM/C(-P) (59)4.3.16. ME2C-1070-10GM(-P) (60)4.3.17. ME2C-1220-9GM/C (62)4.3.18. ME2C-2000-6GM/C(-P) (63)ME2S-G-P 系列 (65)4.4.1. ME2S-1260-9GM/C-P (65)ME2P-G-P 系列 (66)4.5.1. ME2P-231-41GM/C-P (66)4.5.2. ME2P-503-23GM/C-P (68)4.5.3. ME2P-560-21GM/C-P (69)4.5.5. ME2P-900-13GM/C-P (72)4.5.6. ME2P-1220-9GM/C-P (74)4.5.7. ME2P-1230-9GM/C-P (75)4.5.8. ME2P-1840-6GM/C-P (77)4.5.9. ME2P-2000-6GM/C-P (78)4.5.10. ME2P-2621-4GM/C-P \ ME2P-2622-4GM/C-P (80)4.5.11. ME2P-2621-4GM-P NIR \ ME2P-2622-4GM-P NIR (82)机械尺寸 (84)相机尺寸 (84)光学接口 (88)固定块尺寸 (88)滤光片及镜头 (89)滤光片规格参数及响应图 (89)镜头选型参考 (90)6.2.1. HN-2M 系列定焦镜头 (91)6.2.2. HN-5M 系列定焦镜头 (91)6.2.3. HN-6M 系列定焦镜头 (92)6.2.4. HN-20M 系列定焦镜头 (92)6.2.5. HN-P-6M 系列定焦镜头 (93)6.2.6. HN-P-10M 系列定焦镜头 (93)6.2.7. HN-P-20M 系列定焦镜头 (94)6.2.8. HN-P-25M 系列定焦镜头 (94)6.2.9. HN-P 系列8K~16K线扫镜头 (94)电气接口 (95)LED灯状态 (95)网口 (95)I/O接口 (95)7.3.1. I/O接口定义 (95)MER2/ME2P系列 (95)ME2S/ME2C系列 (96)Line0(光耦隔离输入)电路 (97)Line1(光耦隔离输出)电路 (100)Line2/3(双向)电路 (102)7.3.2.3.1. Line2/3配置成输入管脚 (103)7.3.2.3.2. Line2/3配置成输出管脚 (105)功能定义 (108)I/O控制 (108)8.1.1. 配置输入引脚 (108)8.1.2. 配置输出引脚 (109)8.1.3. 读取引脚状态 (113)图像采集控制 (114)8.2.1. 开始采集/停止采集 (114)开始采集 (114)停止采集 (115)8.2.2. 采集模式 (117)8.2.3. 触发类型选择 (117)8.2.4. 触发模式切换 (119)8.2.5. 连续采集及其配置 (120)8.2.6. 突发采集模式 (120)8.2.7. 软触发采集及其配置 (121)8.2.8. 外触发采集及其配置 (121)8.2.9. 交叠曝光和非交叠曝光 (122)8.2.10. 设置曝光 (123)设置曝光模式 (123)设置Sensor曝光模式 (125)设置曝光时间模式 (127)设置曝光时间 (128)8.2.11. 曝光延迟 (128)基本属性设置 (132)8.3.2. 像素格式 (132)8.3.3. ROI (137)8.3.4. 自动曝光和自动增益 (137)自动曝光自动增益ROI设置 (137)自动增益 (138)自动曝光 (139)8.3.5. 测试图 (139)8.3.6. 参数组 (141)8.3.7. 用户自定义名称 (143)8.3.8. 时间戳 (143)8.3.9. Binning (144)8.3.10. 像素抽样 (146)8.3.11. 镜像翻转 (147)8.3.12. 数字移位 (149)8.3.13. 采集状态 (150)8.3.14. 黑电平和自动黑电平 (151)黑电平 (151)自动黑电平 (151)8.3.15. 取消参数范围限制 (151)8.3.16. 用户数据区 (159)8.3.17. 定时器 (159)8.3.18. 计数器 (160)图像处理 (161)8.4.1. 环境光源预设 (161)8.4.2. 自动白平衡 (161)自动白平衡ROI (161)自动白平衡调节 (162)8.4.3. 颜色转换 (163)8.4.4. 饱和度 (164)8.4.5. Gamma (165)8.4.7. 平场校正 (167)平场校正系数的求取和预览 (168)系数的读取和保存 (169)文件的读取与保存 (169)8.4.8. 查找表 (169)8.4.9. HDR (170)8.4.10. 降噪 (171)图像传输 (171)8.5.1. 帧率计算 (171)8.5.2. 最大帧率 (172)8.5.3. 包长 (179)8.5.4. 包间隔 (179)8.5.5. 预留带宽 (180)8.5.6. 传输控制 (180)8.5.7. 帧存控制 (180)事件 (181)8.6.1. 曝光结束事件 (182)8.6.2. 图像帧数据丢弃事件 (182)8.6.3. 帧存不为空事件 (182)8.6.4. 触发信号溢出事件 (182)8.6.5. 事件队列溢出 (182)8.6.6. 帧高速连拍开始触发信号溢出事件 (183)8.6.7. 帧开始触发信号等待事件 (183)8.6.8. 帧高速连拍开始触发信号等待事件 (183)软件使用 (184)IP配置 (184)9.1.1. 界面 (184)9.1.2. 使用说明 (185)枚举 (185)自动配置IP (185)显示信息 (186)修改相机IP地址 (187)修改相机IP配置方式 (187)修改用户自定义名称 (188)复位设备和重连设备 (188)9.1.3. 注意事项 (188)IP地址格式检查 (188)用户自定义名称长度限制 (189)提示信息 (189)帧率计算工具 (189)查找表生成插件 (190)9.3.1. 界面 (190)9.3.2. 使用说明 (192)使用场景 (192)基准Lut选择 (192)调整Lut (194)保存查找表 (195)读取Lut (195)9.3.3. 注意事项 (196)从设备中读取 (196)Lut写入设备 (196)目录结构 (196)平场校正插件 (196)9.4.1. 界面 (197)9.4.2. 使用说明 (198)平场校正执行步骤 (198)采集亮场图像 (198)执行平场校正 (199)校正数据从设备读取/写入设备 (199)校正数据从文件加载/保存到文件 (199)9.4.3. 注意事项 (200)平场校正实现方式 (200)静态坏点校正插件 (201)9.5.1. 界面 (201)9.5.2. 使用说明 (203)执行静态坏点校正步骤 (203)捕获图像 (203)静态坏点校正 (203)坏点数据文件使用 (204)常见问题处理 (205)版本说明 (206)联系方式 (210)销售联系方式 (210)技术支持联系方式 (210)总部及各办事处联系方式 (210)1.概述概述系列概述水星二代(MERCURY2)GigE数字相机是由大恒图像自主研发的成熟产品,性能出色、设计小巧、价格实惠、安装、使用方便。
Panasonic DMC-F5 数字相机基本使用手册说明书

Basic Owner’sManualDigital Camera Model No.DMC-F5before using this product, and save thismanual for future use.Dear Customer,Thank you for choosing Panasonic!You have purchased one of the most sophisticated and reliable products on themarket today. Used properly, we’re sure it will bring you and your family years ofenjoyment. Please take time to fill in the information below. The serial number is onthe tag located on the underside of your camera. Be sure to retain this manual asyour convenient camera information source.Date of Purchase Dealer Phone No.Dealer Purchased From Model No.Dealer Address Serial No.Please note that the actual controls and components, menu items, etc. of your Digital Cameramay look somewhat different from those shown in the illustrations in this Owner’s Manual.Carefully observe copyright laws.•Recording of pre-recorded tapes or discs or other published or broadcast materialfor purposes other than your own private use may infringe copyright laws. Evenfor the purpose of private use, recording of certain material may be restricted.WARNING:To reduce the risk of fire, electric shock or product damage,•Do not expose this unit to rain, moisture, dripping or splashing.•Use only the recommended accessories.•Do not remove covers.•Do not repair this unit by yourself. Refer servicing to qualified service personnel.The socket outlet shall be installed near the equipment and shall be easilyaccessible.■Product identification markingProduct LocationDigital Camera Bottom■About the battery packCAUTIONBattery pack (Lithium ion battery pack)•Use the specified unit to recharge the battery pack.•Do not use the battery pack with equipment other than the specified unit.•Do not get dirt, sand, liquids, or other foreign matter on the terminals.•Do not touch the plug terminals (+ and −) with metal objects.•Do not disassemble, remodel, heat or throw into fire.If any electrolyte should come into contact with your hands or clothes, wash it offthoroughly with water.If any electrolyte should come into contact with your eyes, never rub the eyes.Rinse eyes thoroughly with water, and then consult a doctor.CAUTION•Danger of explosion if battery is incorrectly replaced. Replace only with thetype recommended by the manufacturer.•When disposing the batteries, please contact your local authorities or dealerand ask for the correct method of disposal.•Do not heat or expose to flame.•Do not leave the battery(ies) in a car exposed to direct sunlight for a long periodof time with doors and windows closed.WarningRisk of fire, explosion and burns. Do not disassemble, heat above 60 °C (140 °F) or incinerate.■About the AC adaptorCAUTION!To reduce the risk of fire, electric shock or product damage,•Do not install or place this unit in a bookcase, built-in cabinet or inanother confined space. Ensure this unit is well ventilated.AC adaptorThis AC adaptor operates on AC between 110V and 240V.But•In the U.S.A. and Canada, the AC adaptor must be connected to a 120V ACpower supply only.•When connecting to an AC supply outside of the U.S.A. or Canada, use a plugadaptor to suit the AC outlet configuration.■Cautions for use•Do not use any other USB connection cables except the supplied one or agenuine Panasonic USB connection cable (DMW-USBC1: optional).•Do not use any other AC adaptors except the supplied one.•Always use genuine Panasonic batteries (DMW-BCL7PP).•If you use other batteries, we cannot guarantee the quality of this product.•Keep the Memory Card out of reach of children to prevent swallowing.Keep this unit as far away as possible from electromagnetic equipment (suchas microwave ovens, TVs, video games etc.).•If you use this unit on top of or near a TV, the pictures and/or sound on this unitmay be disrupted by electromagnetic wave radiation.•Do not use this unit near cell phones because doing so may result in noiseadversely affecting the pictures and/or sound.•Recorded data may be damaged, or pictures may be distorted, by strongmagnetic fields created by speakers or large motors.•Electromagnetic wave radiation generated by microprocessors may adverselyaffect this unit, disturbing the pictures and/or sound.•If this unit is adversely affected by electromagnetic equipment and stopsfunctioning properly, turn this unit off and remove the battery or disconnect ACadaptor. Then reinsert the battery or reconnect AC adaptor and turn this unit on.Do not use this unit near radio transmitters or high-voltage lines.•If you record near radio transmitters or high-voltage lines, the recorded picturesand/or sound may be adversely affected.AccessoriesBattery packDMW-BCL7PP•Charge the battery before use.USB connection cableK1HY08YY0033CD-ROMVFF1178AC adaptorVSK0768Hand strapVFC4737•Software– PHOTOfunSTUDIO 9.0 LE (Windows XP/Vista/7/8)– L oiLoScope 30 day full trial version (Windows XP/Vista/7/8)(This will only install a shortcut to the trial version download site.)•Owner’s Manual for advanced features•If any accessories are lost, customers should contact Panasonic’sparts department at 1-800-833-9626 for further information aboutobtaining replacement parts.■Optional AccessoriesRecordingDelete button•[]: to delete a pictureSpecificationsSpecifications are subject to change without notice.AC adaptorBattery pack (lithium-ion)VQT4W21M1212KZ0P© Panasonic Corporation 2013Printed in ChinaPanasonic Consumer Marketing Company of North America,Division of Panasonic Corporation of North AmericaOne Panasonic Way, Secaucus, NJ 07094For USA and Puerto Rico assistance, please call: 1-800-211-PANA(7262) or,contact us via the web at: /contactinfoRegister online at /register (U.S. customers only)FCC Note:This equipment has been tested and found to comply with the limitsfor a Class B digital device, pursuant to Part 15 of the FCC Rules.These limits are designed to provide reasonable protection againstharmful interference in a residential installation. This equipmentgenerates, uses, and can radiate radio frequency energy and, if notinstalled and used in accordance with the instructions, may causeharmful interference to radio communications. However, there is noguarantee that interference will not occur in a particular installation. Ifthis equipment does cause harmful interference to radio or televisionreception, which can be determined by turning the equipment off andon, the user is encouraged to try to correct the interference by one ormore of the following measures:•Reorient or relocate the receiving antenna.•Increase the separation between the equipment and receiver.•Connect the equipment into an outlet on a circuit different from that to whichthe receiver is connected.•Consult the dealer or an experienced radio/TV technician for help.FCC Caution: T o assure continued compliance, follow the attachedinstallation instructions and use only shielded interfacecables with ferrite core when connecting to computer orperipheral devices.Any changes or modifications not expressly approved by the partyresponsible for compliance could void the user’s authority to operatethis equipment.Declaration of ConformityTrade Name:P anasonicModel No.:D MC-F5Responsible Party: P anasonic Corporation ofNorth AmericaOne Panasonic WaySecaucus, NJ 07094Support Contact: P anasonic ConsumerMarketing Company ofNorth America1-800-211-PANA (7262)This device complies with Part 15 of the FCCRules. Operation is subject to the followingtwo conditions: (1) This device may not causeharmful interference, and (2) this device mustaccept any interference received, includinginterference that may cause undesiredoperation.。
数字相机基本操作说明

数字相机基本操作说明1. 概述本文档旨在向用户介绍数字相机的基本操作。
通过本文档,您将了解数字相机的各种功能,并学会如何合理使用这些功能,以达到拍摄高质量照片的目的。
2. 开机与关机- 开机:按下电源按钮,等待相机启动。
启动完成后,您将看到屏幕上的相机操作界面。
- 关机:长按电源按钮,直到屏幕提示确认关机。
按照屏幕提示,选择是或否。
3. 拍摄模式选择数字相机通常提供多种拍摄模式,以适应不同拍摄场景。
常见的拍摄模式包括:- 自动模式:相机根据环境条件自动调整光圈、快门速度等参数。
- 手动模式:用户可以手动设置光圈、快门速度、白平衡等参数。
- 运动模式:用于拍摄快速运动的场景,相机会自动调整快门速度以冻结画面。
- 夜间模式:适用于拍摄夜间景观,相机会调整光圈和快门速度以获得更好的暗部细节。
- 人像模式:适用于拍摄人物,相机会通过调整焦距和光圈等参数突出主体。
- 风景模式:适用于拍摄风景,相机会通过调整焦距和光圈等参数突出景物。
根据实际需要,选择相应的拍摄模式进行拍摄。
4. 对焦与曝光- 对焦:在取景框内选择想要对焦的主体,并按下快门按钮轻按一半,相机将对焦到所选主体上。
- 曝光:按下快门按钮完全,拍摄照片。
相机将根据环境条件自动调整光圈、快门速度等参数,并进行曝光操作。
5. 存储与删除照片- 存储:数字相机通常使用存储卡来保存照片。
在拍摄完成后,您可以将存储卡插入电脑中,通过数据线或读卡器将照片导入电脑中进行保存。
- 删除:在相机中选择要删除的照片,并按下删除按钮确认删除。
6. 其他常用功能数字相机还提供了其他一些常用功能,例如:- 闪光灯:用于补光,适用于光线不足的环境。
- 连拍:连续拍摄多张照片,以捕捉物体的动态变化。
- 延时拍摄:在设定的延时时间后自动拍摄照片。
- 自拍模式:适用于自拍,相机会延迟一段时间后拍摄照片。
您可以根据需要使用这些附加功能,提升照片的拍摄效果。
7. 总结本文档介绍了数字相机的基本操作,包括开机与关机、拍摄模式选择、对焦与曝光、存储与删除照片以及其他常用功能。
数字相机的操作指南
数字相机的操作指南随着科技的不断进步,数字相机已经成为人们记录生活中美好瞬间的重要工具。
然而,对于许多人来说,数字相机的操作似乎仍然有些复杂。
在本篇文章中,我们将为大家提供一份简明扼要的数字相机操作指南,帮助大家更好地使用这一设备。
一、基础设置在开始使用数字相机之前,首先需要进行一些基础设置。
首先,确保相机已经插入充足的电池,并将存储卡插入相机。
然后,根据需要调整相机的日期和时间设置。
这样做可以确保照片的时间信息准确无误。
二、拍摄模式选择数字相机通常提供多种拍摄模式,如全自动模式、光圈优先模式、快门优先模式等。
根据不同的拍摄场景和需求,选择合适的拍摄模式可以帮助我们更好地控制照片的效果。
例如,在拍摄人物肖像时,可以选择光圈优先模式,以便调整景深,突出主体;而在拍摄运动场景时,可以选择快门优先模式,以冻结运动瞬间。
三、对焦和曝光对焦和曝光是拍摄过程中非常重要的两个因素。
对焦是确保照片清晰的关键,而曝光则决定了照片的亮度和色彩。
大多数数字相机都提供自动对焦和自动曝光功能,但在某些情况下,手动调整对焦和曝光可以获得更好的效果。
为了获得清晰的照片,可以使用相机的对焦锁定功能,将焦点锁定在主体上,然后重新构图;而为了调整曝光,可以使用曝光补偿功能,增加或减少曝光值,以适应不同的光线条件。
四、构图与角度构图是拍摄中不可或缺的一部分。
通过合理的构图,可以使照片更加生动有趣。
在构图时,可以尝试使用“三分法则”,将画面分为三个部分,将主体放置在其中一个交叉点上,以增加画面的平衡感。
此外,也可以尝试不同的角度拍摄,如俯拍、仰拍、侧拍等,以呈现不同的视角和效果。
五、使用闪光灯闪光灯在拍摄中起到了非常重要的作用。
它可以为照片提供额外的光源,使拍摄对象更加明亮。
然而,在使用闪光灯时,需要注意光线的平衡。
过度使用闪光灯可能会导致照片过曝,而过度依赖自然光可能会导致照片过暗。
因此,在使用闪光灯时,可以尝试降低闪光灯的强度,或者使用反射板等辅助工具来调整光线的平衡。
数字相机操作指南

数字相机操作指南数字相机是现代摄影的重要工具,为了能够更加充分地发挥其功能,掌握正确的操作方法是至关重要的。
本篇文章将为您介绍数字相机的操作指南,帮助您轻松使用和拍摄出高质量的照片。
一、相机准备1. 安装电池和存储卡:确认相机已经安装好电池,并且存储卡已经插入到相机中,以确保相机能够正常工作和存储照片。
2. 调整相机设置:根据需要,您可以调整相机的日期和时间设置、照片大小和格式、对焦模式等参数。
二、基本操作1. 打开相机:按下相机的开关按钮,等待相机启动完成,进入拍摄准备状态。
2. 对焦:使用相机的取景器或LCD屏幕观察目标,按下快门按钮的半程,使相机对焦于目标物体上。
3. 拍摄照片:当相机对焦完成后,按下快门按钮完全,拍摄一张照片。
如果需要连拍,可以按住快门按钮不松手,相机将会连续快速拍摄多张照片。
4. 查看照片:您可以通过相机的屏幕或者通过连接到电脑上来查看刚才拍摄的照片。
三、常用摄影模式1. 自动模式:相机将会根据场景和光线条件自动调整相关设置,适合新手拍摄。
2. 程序模式:您可以选择不同的拍摄模式,例如人像、风景、运动等,相机将会自动调整相关设置,以获得最佳拍摄效果。
3. 快门优先模式:您可以手动设置快门速度,相机将会根据您的设定调整光圈大小,用于特定的拍摄需求。
4. 光圈优先模式:您可以手动设置光圈大小,相机将会根据您的设定调整快门速度,用于特定的拍摄需求。
四、进阶操作1. 曝光补偿:当照片曝光过度或者曝光不足时,您可以通过调整曝光补偿来修正照片的亮度。
这在拍摄高亮度场景或者逆光拍摄时非常有用。
2. 白平衡:不同的光源会导致照片的色温偏离真实颜色,您可以通过设置白平衡来使照片还原真实颜色,例如阳光、荧光灯等。
3. ISO设置:ISO值影响照片的感光度,较高的ISO值适合低光条件下拍摄,但会带来噪点。
根据光线条件和拍摄需求,您可以调整ISO值以获得最佳曝光效果。
4. 焦距调节:您可以通过旋转镜头的焦距环或者使用相机的变焦控制器来调整焦距,以实现拍摄广角或者远距离物体的效果。
DSC-RX100M3 数字单反摄影机用户指南说明书
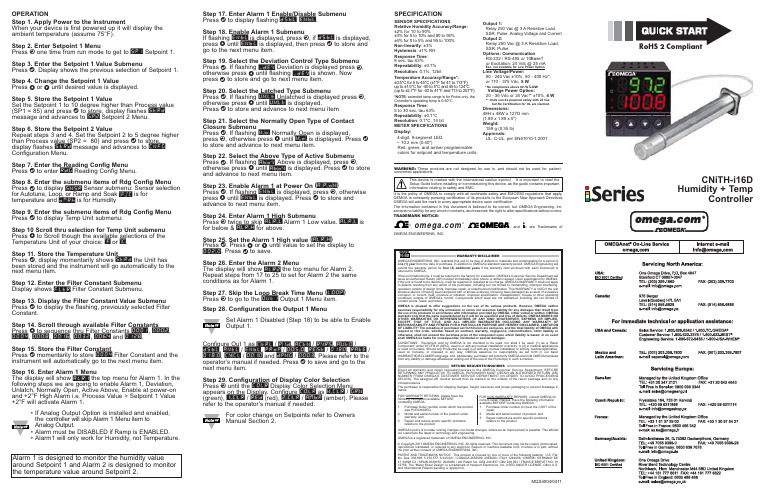
Step 17. Enter Alarm 1 Enable/Disable Submenu Press d to display flashing DSBL / ENBL .Step 18. Enable Alarm 1 SubmenuIf flashing ENBL is displayed, press a , if DSBL is displayed,press b until ENBL is displayed, then press d to store and go to the next menu item.Step 19. Select the Deviation Control Type Submenu Press d . If flashing _DEV Deviation is displayed press a ,otherwise press b until flashing _DEV is shown. Now press d to store and go to next menu item.Step 20. Select the Latched Type SubmenuPress d . If flashing UNLT Unlatched is displayed press a ,otherwise press b until UNLT is displayed.Press d to store and advance to next menu itemStep 21. Select the Normally Open Type of Contact Closure SubmenuPress d . If flashing N.o.Normally Open is displayed,press a , otherwise press b until N.o.is displayed. Press d to store and advance to next menu item.Step 22. Select the Above Type of Active Submenu Press d . If flashing ABoV Above is displayed, press a ,otherwise press b until ABoV is displayed. Press d to store and advance to next menu item.Step 23. Enable Alarm 1 at Power On (A.P.oN )Press d . If flashing ENBL is displayed, press a , otherwise press b until ENBL is displayed. Press d to store and advance to next menu item.Step 24. Enter Alarm 1 High SubmenuPress a twice to skip ALR.L Alarm 1 Low value. ALR.L is for below & ALR.H for above.Step 25. Set the Alarm 1 High value (ALR.H )Press d . Press b or c until value to set the display to 002.0. Press d to save.Step 26. Enter the Alarm 2 MenuThe display will show ALR2the top menu for Alarm 2.Repeat steps from 17 to 25 to set for Alarm 2 the same conditions as for Alarm 1.Step 27. Skip the Loop Break Time Menu (LOOP )Press a to go to the OUT1Output 1 Menu item.Step 28. Configuration the Output 1 MenuSet Alarm 1 Disabled (Step 18) to be able to Enable Output 1.Configure Out 1 as CTRL / PID , ACTN / RVRS , AUTO /DSBL , ANTL / ENBL , PRoP / 005.0, REST / 0180, RATE /018.0, CYCL / 0010and DPNG / 0003. Please refer to the operator’s manual if needed. Press d to save and go to the next menu item.Step 29. Configuration of Display Color Selection Press a until the COLR Display Color Selection Menu appears on the Display. Configure COLR as N.CLR /GRN (green), 1.CLR / RED (red), 2.CLR /AMBR (amber). Please refer to the operator’s manual if needed.For color change on Setpoints refer to Owners Manual Section 2.OPERATIONStep 1. Apply Power to the InstrumentWhen your device is first powered up it will display the ambient temperature (assume 75°F).Step 2. Enter Setpoint 1 MenuPress a one time from run mode to get to SP1Setpoint 1. Step 3. Enter the Setpoint 1 Value SubmenuPress d . Display shows the previous selection of Setpoint 1.Step 4. Change the Setpoint 1 ValuePress b or c until desired value is displayed.Step 5. Store the Setpoint 1 ValueSet the Setpoint 1 to 10 degree higher than Process value (SP1 = 85) and press d to store, display flashes STRD message and advances to SP2Setpoint 2 Menu.Step 6. Store the Setpoint 2 ValueRepeat steps 3 and 4. Set the Setpoint 2 to 5 degree higher than Process value (SP2 = 80) and press d to store,display flashes STRD message and advances to CNFG Configuration Menu.Step 7. Enter the Reading Config Menu Press d to enter RDG Reading Config Menu.Step 8. Enter the submenu items of Rdg Config Menu Press d to display SNSR Sensor submenu: Sensor selection for Autotune, Loop, or Ramp and Soak °F.°C is for temperature and DRRh is for HumidityStep 9. Enter the submenu items of Rdg Config Menu Press d to display Temp Unit submenu:Step 10 Scroll thru selection for Temp Unit submenu Press b to Scroll though the available selections of the Temperature Unit of your choice: °F or °C .Step 11. Store the Temperature UnitPress d , display momentarily shows STRD the Unit has been stored and the instrument will go automatically to the next menu item.Step 12. Enter the Filter Constant Submenu Display shows FLTR Filter Constant Submenu.Step 13. Display the Filter Constant Value Submenu Press d to display the flashing, previously selected Filter Constant.Step 14. Scroll through available Filter Constants Press b to sequence thru Filter Constants 0001, 0002,0004, 0008, 0016, 0032, 0064and 0128.Step 15. Store the Filter ConstantPress d momentarily to store 0004Filter Constant and the instrument will automatically go to the next menu item.Step 16. Enter Alarm 1 MenuThe display will show ALR1the top menu for Alarm 1. In the following steps we are going to enable Alarm 1, Deviation,Unlatch, Normally Open, Active Above, Enable at power-on and +2°F High Alarm i.e. Process Value > Setpoint 1 Value +2°F will activate Alarm 1.•If Analog Output Option is installed and enabled,the controller will skip Alarm 1 Menu item to Analog Output.•Alarm must be DISABLED if Ramp is ENABLED.•Alarm1 will only work for Humidity, not Temperature.MQS4004/0411SPECIFICATIONSENSOR SPECIFICATIONSRelative Humidity Accuracy/Range:±2% for 10 to 90%±3% for 5 to 10% and 90 to 95%±4% for 0 to 5% and 95 to 100%Non-linearity : ±3%Hysteresis : ±1% RH Response Time :8 sec, tau 63%Repeatability : ±0.1%Resolution : 0.1%, 12bitTemperature Accuracy/Range*:±0.5°C for 5 to 45°C (±1°F for 41 to 113°F); up to ±1.5°C for -40 to 5°C and 45 to 124°C (up to ±2.7°F for -40 to 41°F and 113 to 257°F)*NOTE:extended temp range is for Probe only, the Controller’s operating temp is 0-50°CResponse Time : 5 to 30 sec, tau 63%Repeatability : ±0.1°C Resolution : 0.1°C, 14 bit METER SPECIFICATIONS Display:4-digit, 9-segment LED,•10.2 mm (0.40")Red, green, and amber programmable colors for setpoint and temperature units.Output 1:Relay 250 Vac @ 3 A Resistive Load,SSR, Pulse, Analog Voltage and Current Output 2:Relay 250 Vac @ 3 A Resistive Load,SSR, PulseOptions:Communication RS-232 / RS-485 or 10BaseT or Excitation:24 Vdc @ 25 mAExc. not available for Low Power OptionLine Voltage/Power:90 - 240 Vac ±10%,50 - 400 Hz*, or 110 - 375 Vdc, 5 W* No compliance above 60 Hz Low Voltage Power Option:20 - 36 Vdc or 24 Vac** ±10%, 4 W** Units can be powered safely with 24 Vacbut No Certification for UL are claimed.Dimensions:48H x 48W x 127D mm (1.89 x 1.89 x 5")Weight:159 g (0.35 lb)Approvals:UL, C-UL, per EN61010-1:2001WARNING:These products are not designed for use in, and should not be used for, patient-connected applications.It is the policy of OMEGA to comply with all worldwide safety and EMC/EMI regulations that apply. OEMGA is constantly pursuing certification of its products to the European New Approach Directives. OMEGA will add the mark to every appropriate device upon certification.The information contained in this document is believed to be correct, but OMEGA Engineering, Inc. accepts no liability for any errors it contains, and reserves the right to alter specifications without notice.TRADEMARK NOTICE:®,®,, andare Trademarks ofOMEGA ENGINEERING, INC.®This Quick Start Reference provides informationon setting up your instrument for basic operation.The latest complete Communication and OperationalManual as well as free Software and ActiveX Controlsare available at /specs/iseries oron the CD-ROM enclosed with your shipment. SAFETY CONSIDERATIONThe instrument is a panel mount device protected in accordance with EN61010-1:2001. Remember that the unit has no power-on switch. Building installation should include a switch or circuit-breaker that must be compliant to IEC 947-1 and 947-3.SAFETY:•Do not exceed voltage rating on the label located onthe top of the instrument housing.•Always disconnect power before changing signal andpower connections.•Do not use this instrument on a work bench withoutits case for safety reasons.•Do not operate this instrument in flammable orexplosive atmospheres.•Do not expose this instrument to rain or moisture. EMC:•Whenever EMC is an issue, always use shielded cables.•Never run signal and power wires in the same conduit.•Use signal wire connections with twisted-pair cables.•Install Ferrite Bead(s) on signal wire close to theinstrument if EMC problems persist.MOUNTINGPanel Mounting Instruction:ing the dimensions from the panel cutout shown inexploded views, cut an opening in the panel.45mm +.61/-.00square with R 1.5, 4 places(1.772”+.024/-.000square with R 0.06”, 4 places)Panel thickness: 6.4mm (0.25”) max / 0.8mm (0.03”) min.2.Insert the unit into the opening from the front of the panel,so the gasket seals between the bezel and the front of the panel.3.Slide the retainer over the rear of the case and tightenagainst the backside of the mounting panel.。
- 1、下载文档前请自行甄别文档内容的完整性,平台不提供额外的编辑、内容补充、找答案等附加服务。
- 2、"仅部分预览"的文档,不可在线预览部分如存在完整性等问题,可反馈申请退款(可完整预览的文档不适用该条件!)。
- 3、如文档侵犯您的权益,请联系客服反馈,我们会尽快为您处理(人工客服工作时间:9:00-18:30)。
数字相机控制器的说明书
一、简介
数字相机控制器是一种用于控制数字相机拍摄和调节参数的设备。
本说明书将详细介绍数字相机控制器的功能、操作方法以及相关注意事项。
二、功能特点
1. 远程控制:数字相机控制器能够通过无线方式远程控制相机的拍摄。
用户只需操控控制器即可对相机进行遥控拍摄,方便快捷。
2. 参数调节:控制器配备了丰富的参数调节选项,包括曝光时间、光圈大小、ISO感光度等。
用户可根据实际拍摄需求对这些参数进行灵活调整。
3. 拍摄模式切换:控制器支持不同拍摄模式的切换,如单拍模式、连拍模式、定时拍摄等。
用户可根据需要选择合适的拍摄模式。
4. 视频录制控制:控制器还可用于控制相机的视频录制功能,用户可以启动和停止视频录制,并进行必要的参数调节。
5. 可视化界面:控制器配备了易于操作的可视化界面,用户可以直观地了解相机当前的参数设置,以及通过界面进行调整。
三、操作方法
1. 连接相机:首先,确保数字相机处于开机状态,并启用其无线连
接功能。
然后,在控制器上启动无线连接功能,并进行相机与控制器
的配对操作。
一旦连接成功,控制器将能够对相机进行远程控制。
2. 参数调节:通过控制器的调节按钮或触摸屏界面,用户可以实时
调整相机的曝光时间、光圈大小等参数。
调整后的参数将立即生效并
反映在相机的拍摄效果中。
3. 拍摄操作:控制器上配有拍摄按钮,用户可通过按下按钮完成拍
摄操作。
在启用连拍模式时,按住按钮将连续拍摄多张照片。
4. 视频录制:若需录制视频,用户可进入视频录制模式,并通过控
制器上的录制按钮启动和停止录制。
同时,也可对视频的分辨率、帧
率等参数进行调节。
四、注意事项
1. 保持稳定:在进行远程控制拍摄时,需保持相机和控制器之间的
稳定连接,以确保指令的传输和执行准确无误。
避免干扰源和障碍物
干扰信号传输。
2. 电池管理:及时检查控制器的电池电量,并确保电量充足。
在长
时间不使用时,建议将电池取出,以免电池损坏。
3. 操作环境:在使用控制器时,应保持环境光线适宜,并避免高温、潮湿等恶劣条件。
控制器也需远离水源,以防意外损坏。
4. 固件升级:为了获得更好的功能和稳定性,定期检查控制器的固
件版本,并及时进行升级。
升级步骤请参考官方提供的说明。
5. 兼容性:控制器通常具有一定的兼容性要求,不同型号的相机和
控制器之间可能存在兼容性问题。
在购买前,请阅读产品说明书,确
认其与相机的匹配情况。
五、常见问题解答
1. 如何连接控制器和相机?
答:首先确保相机和控制器均处于开机状态,并启用无线功能。
在
控制器上寻找相机连接选项,并进行配对操作。
2. 为什么无法对相机进行远程控制?
答:请检查相机和控制器之间的连接是否正常。
确保已正确配对,
并保持稳定的信号传输,同时避免遮挡和干扰源。
3. 控制器是否支持所有数字相机?
答:不同型号的控制器和相机之间可能存在兼容性差异。
在购买前,请查阅产品说明书以确定其是否适用于您的相机型号。
6、总结
本说明书对数字相机控制器的功能、操作方法和注意事项进行了详
细介绍。
用户可根据本文提供的信息,灵活运用数字相机控制器,完
成更高质量的拍摄作品。
若对此产品有进一步疑问,请参阅官方提供
的用户手册或咨询售后服务。
祝愿您拍摄愉快!。