
迪士尼智能麦克风音响说明书
迪士尼智能麦克风音响说明书
第一章:产品概述
1.1 产品名称:迪士尼智能麦克风音响
1.2 产品型号:DM-001
1.3 产品特点:迪士尼授权定制、智能语音交互、高品质音效、多种音效模式、便携式设计等
第二章:产品外观和配件
2.1 外观描述:迪士尼智能麦克风音响采用可爱的卡通造型设计,外壳采用环保材料制成,配有彩色LED灯,显示不同的工作状态。
2.2 配件清单:产品包含主机、USB充电线、用户手册、保修卡等配件。
第三章:产品功能
3.1 智能语音交互:内置语音助手,支持迪士尼相关内容的查询、播放音乐、讲故事等功能,用户只需通过语音指令即可实现操作。
3.2 高品质音效:采用先进的音频处理技术,提供清晰、逼真的音质效果,带给用户身临其境的音乐体验。
3.3 多种音效模式:支持多种音效模式的切换,如卡拉OK模式、演唱会模式、普通模式等,满足不同场景下的使用需求。
3.4 连接功能:支持蓝牙、AUX等多种连接方式,用户可以通过蓝牙连接手机、平板等设备,也可以通过AUX连接其他音频设备。
第四章:产品使用方法
4.1 充电:使用附带的USB充电线,将音响与电源适配器或电脑连接,待指示灯亮起表示开始充电,充满电后可拔掉充电线。
4.2 开机/关机:长按音响上的电源按钮,待指示灯亮起表示开机成功,再次长按电源按钮即可关机。
4.3 连接设备:打开手机或其他设备的蓝牙功能,搜索并连接“迪士尼麦克风音响”;或者通过AUX线将音响与其他音频设备连接。
4.4 语音交互:按住音响上的语音按钮,等待提示音后,发出语音指令即可实现相应的操作。
第五章:产品注意事项
5.1 使用环境:请在室内使用,避免长时间暴露在高温、潮湿或多尘的环境中。
5.2 音量控制:使用时请注意音量控制,避免长时间听音量过大的音乐,以免对听力造成损害。
5.3 长时间不使用:长时间不使用时,请将音响存放在干燥、通风的地方,避免积灰和损坏。
5.4 维护保养:请勿将音响浸入水中,清洁时只需使用柔软的湿布轻拭外壳即可。
第六章:产品保修和售后服务
6.1 保修期:本产品享受一年质保,自购买之日起计算。
6.2 保修范围:在正常使用情况下,如出现非人为损坏的故障,可
享受免费维修或更换。
6.3 售后服务:如需售后服务,请联系迪士尼客服中心,提供产品购买凭证及详细故障描述。
结语:
迪士尼智能麦克风音响是一款集智能语音交互、高品质音效等多种功能于一体的产品。
通过本说明书,您可以了解到该产品的外观特点、功能使用方法、注意事项以及售后服务等方面的内容。
希望本产品能为您带来愉快的音乐体验和娱乐时光。
如有任何疑问或问题,请随时联系我们的客服中心,我们将竭诚为您提供服务。
迷你凯撒扬声器说明书
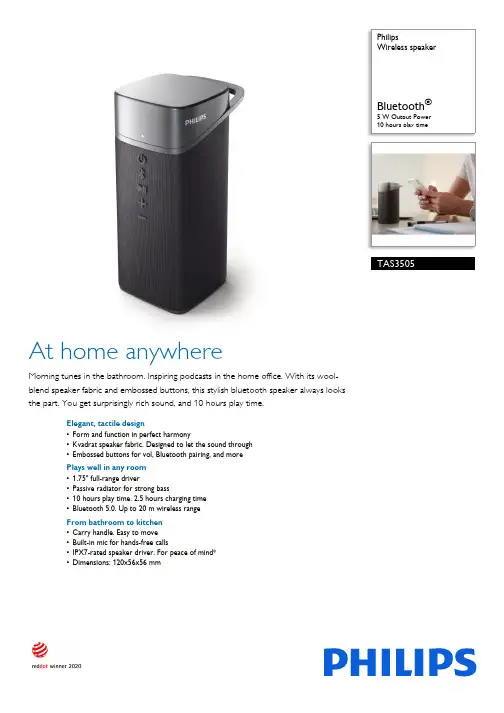
PhilipsWireless speakerBluetooth ®5 W Output Power 10 hours play timeTAS3505At home anywhereMorning tunes in the bathroom. Inspiring podcasts in the home office. With its wool-blend speaker fabric and embossed buttons, this stylish bluetooth speaker always looks the part. You get surprisingly rich sound, and 10 hours play time.Elegant, tactile design•Form and function in perfect harmony•Kvadrat speaker fabric. Designed to let the sound through •Embossed buttons for vol, Bluetooth pairing, and more Plays well in any room •1.75" full-range driver•Passive radiator for strong bass•10 hours play time. 2.5 hours charging time •Bluetooth 5.0. Up to 20 m wireless range From bathroom to kitchen •Carry handle. Easy to move •Built-in mic for hands-free calls•IPX7-rated speaker driver. For peace of mind*•Dimensions: 120x56x56 mmIssue date 2022-05-14Version: 14.1.212 NC: 8670 001 67229EAN: 48 95229 10869 1© 2022 Koninklijke Philips N.V.All Rights reserved.Specifications are subject to change without notice. Trademarks are the property of Koninklijke Philips N.V. or their respective SpecificationsWireless speakerBluetooth® 5 W Output Power, 10 hours play timeHighlightsForm and function in harmonyThis simple yet striking Bluetooth speaker does music in style. Embossed buttons let you control playback, Bluetooth, and more. The built-in mic lets you take hands-free calls, and the carry handle makes it easy to move between rooms.10 hours play timeYou get 10 hours play time from a single charge, and the wireless range is 20 m. Charging the speaker takes 2.5 hours, via the included USB-C cable.Passive radiators deliver strong bass and the sound stays clear even at high volume.Kvadrat speaker fabricThis speaker is covered with a premium speaker fabric created by high-end manufacturer Kvadrat. The beautiful wool-blend material is acoustically transparent, allowing the sound to flow freely from the speaker into the room.Sound•Output power (RMS): 5W •Output power (MAX): 10W •Sound System:Mono•Frequency response: 120 Hz - 18 KHz Loudspeakers•Number of sound channels: 1•Driver configuration: Full range •Number of full range drivers: 1•Full range driver diameter: 44mmConnectivity•Bluetooth version: 5.0•Bluetooth profiles: A2DP, AVRCP, HFP, HSP •Bluetooth range: Line of sight, 20m or 66ft •Type of cable: USB charging cable (Type-C)•DLNA Standard:No•Multiple speaker connection: NoCompatibility •Smartphone/tablet APP control: No Convenience•Volume control: Digital up/down •Automatic power off •Built-in microphone •Handsfree calling•Call Management: Answer/End Call •Ease of Installation: Automatic pairing •Water resistance: IPX7*•Display screen: No •Light Effect: NoPower•Battery type: lithium (built-in)•Battery Capacity: 1200mAh, 3.7V •Operating time on battery: 10 hr•Charging time: 2.5 hr •Power bank:NoAccessories•Cable: USB charging cable•Included accessories: Quick install guide, Warranty Card, World Wide Warranty leafletDesign and finishing•Color: GreyProduct dimensions•Product dimensions (W x H x D): 2.2 x 4.7 x 2.2 inch•Product dimensions (W x H x D): 5.6 x 12 x 5.6 cm •Weight: 0.503 lb •Weight: 0.228 kgPackaging dimensions •Packaging dimensions (W x H x D): 10.5 x 16 x 9.5 cm•Packaging dimensions (W x H x D): 4.1 x 6.3 x 3.7 inch •Gross weight: 0.358 kg •Gross weight: 0.789 lb •Nett weight: 0.595 lb •Nett weight: 0.27 kg•Number of products included: 1•Packaging type: Carton •Tare weight: 0.194 lb •Tare weight: 0.088 kg•Type of shelf placement: Standing •EAN: 48 95229 10869 1UPC•UPC: 8 40063 20204 7*The IPX7 rating means the speaker driver can be submerged for up to 30 minutes at a depth of up to 1 m. The speaker fabric is not waterproof but can withstand a drop of water.。
迪士尼 USB 麦克风说明书
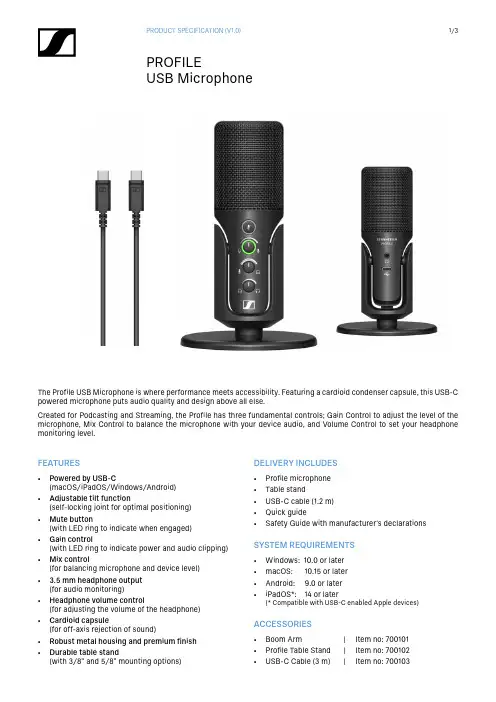
DELIVERY INCLUDES• Profile microphone • Table stand • USB-C cable (1.2 m)• Quick guide• Safety Guide with manufacturer‘s declarationsACCESSORIES• Boom Arm| Item no: 700101• Profile Table Stand | Item no: 700102• USB-C Cable (3 m)| Item no: 700103SYSTEM REQUIREMENTS• Windows: 10.0 or later • macOS: 10.15 or later • Android: 9.0 or later • iPadOS*: 14 or later(* Compatible with USB-C enabled Apple devices)FEATURES• Powered by USB-C(macOS/iPadOS/Windows/Android)• Adjustable tilt function(self-locking joint for optimal positioning)• Mute button(with LED ring to indicate when engaged)• Gain control(with LED ring to indicate power and audio clipping)• Mix control(for balancing microphone and device level)• 3.5 mm headphone output(for audio monitoring)• Headphone volume control(for adjusting the volume of the headphone)• Cardioid capsule(for off-axis rejection of sound)• Robust metal housing and premium finish • Durable table stand(with 3/8" and 5/8" mounting options)The Profile USB Microphone is where performance meets accessibility. Featuring a cardioid condenser capsule, this USB-C powered microphone puts audio quality and design above all else.Created for Podcasting and Streaming, the Profile has three fundamental controls; Gain Control to adjust the level of the microphone, Mix Control to balance the microphone with your device audio, and Volume Control to set your headphone monitoring level.Hzd B F S0-5-10-15-20-25-30-35-40-45-50500° and 90° frequency response @ 80 dB SPL1002005001k2k 5k10k20kSPECIFICATIONSOverall device Operating temperature 0 °C to +40 °CWeightMicrophone: 350 g Table stand: 60 gMicrophone Transducer principle Pre-polarized condenser microphone Pick-up pattern CardioidSensitivity at max. gain Sensitivity at min. gain -10 dBFS at 80 dB SPL -50 dBFS at 80 dB SPL Max SPL Min. gain Max. gain 125 dB SPL 85 dB SPL Frequency range 20 to 20,000 HzEquivalent noise level Min. gain Max. gain 34 dB(A) SPL 28 dB(A) SPL Sampling rates 44.1, 48 kHz Sampling resolution16, 24 BitHeadphone output Connector3.5 mm TRS-Nr. / Part No.erungsnummerPolar PatternDIMENSIONSSennheiser electronic GmbH & Co. KG · Am Labor 1 · 30900 Wedemark · Germany · 。
HuddlePod Air DUO双频无线音频小麦克风安装与使用手册说明书

__________________________________________________________________________________________________ HuddlePod AirDUO__________________________________________________________________________________________________Dual Wireless Audio PodsInstallation and Operation ManualPlease visit / for the most up to date version of this manualPrecautions_____________________________________________________________Safety Tips________________________________________________________________•Please be aware any deviation from these tips may void your warranty•Please read this manual carefully before using the Huddle Pod.•Avoid damage from stress, violent vibration or liquid intrusion during transportation, storage, or installation.•Take care of the Huddle Pod during installation to prevent damage to the camera case, ports, lens, or tilt mechanism.•Keep the Huddle Pod away from strong electromagnetic sources.•Do not clean the Huddle Pod with any active chemicals or corrosive detergents.•Do not disassemble the Huddle Pod or any of the Huddle Pod’s components. If problems arise, please contact your authorized HuddleCamHD dealer.•After long term operation, moving components may wear down. Please contact your authorized HuddleCamHD dealer for repair.What’s in the Box______________________________________________________ Supplied Hardware________________________________________________________•(2) HuddlePod Air2 wireless chat pods•(1) USB 2.0 Wireless Receiver•(2) Mini USB 2.0 cable (Charging/Power)•(2) Neoprene Travel Case•(2) USB Charger•This User ManualPhysical Description ___________________________________________________Front View of the HuddlePod _______________________________________________1. Power LEDs 4. Microphone Mute7.HiFi ModeBlue LEDs when poweredToggle Microphone on/off Mutes microphone and increases speaker quality for music 2. USB 2.0 Port 5. Speakerphone Mute 8. Volume Up/DownMini USB port for power & charging Toggle Speakerphone on/off Control speaker volume 3. Audio Output 6. Power Button 9. Wireless Receiver3.5mm headphone jackPower unit on/offDurable wireless receiver239Set-up Guide____________________________________________________________1.Connect Mini USB2.0 cable from HuddlePod(s) to PC or USB power supply for charging(Orange LED is lit when charging. A full charge may take up to 5 hours to complete)2.Once fully charged press the power button on each chat pod to turn the chat pod(s) on3.Connect wireless receiver directly to Windows, Mac, or Linux computer in an available USB 2 / 3 portand allow the drivers to fully installUSB Power Supply & Charging______________________________________1.This device is provided with a built-in rechargeable lithium ion battery. Before use of the device for thefirst time, charge the battery fully (may take up to 5 hours for a full charge)2.When one end of the USB cable is inserted into the USB port on the device and the other end to theUSB port on the computer, or to a USB power supply, power will be supplied to the device and thebuilt-in battery will begin charged. At the same time, the device will be automatically powered on3.When charging is complete you can disconnect the USB cable from the device for portability.Remember to always turn off the device before storing or travel4.In the event of a low battery while in use 6 orange LEDs above the buttons will begin to flash5.Lithium ion batteries should not be left in a fully discharged state for a significant period or damage tothe battery, resulting in the voltage dropping below the battery protection circuit shutoff point, can occur rendering the battery un-chargeable. Whenever the HuddlePod Air2 shuts down due to battery discharge please recharge as soon as possibleNote: A full recharge is not required to maintain battery life, however while lithium ion batteries will provide the longest run time from a full charge they will provide more charge-discharge cycles withshallower cycles (i.e. do not fully charge / do not fully discharge). Decisions regarding how to maintain your HuddlePod Air2 battery will depend upon your intended session length(s)Note: Any USB charger without a Safety Certificate or not intended for lithium ion batteries, may cause explosion or damage to this chat podNote: As a consumable, the built-in battery will gradually lose its total capacity (run time) betweencharges – after repeated charge-discharge cycles. Full charge / discharge cycle rating is 300-500 cycles to reach 80% of original capacity depending upon environmental factors, such as ambient temperatureAchieving Best Performance________________________________________ •Install the product(s) in a dry place with good ventilation, avoiding direct sunlight, vibration, moisture, and cold. Keep away from heat sources and dust•Keep the product(s) far from motors, transformers, and other electronic equipment to avoid electronical or magnetic interference•Never install the product(s) near electrical appliances such as induction cookers or microwave ovens to prevent operation failure caused by electromagnetic waves or magnetic fields•Keep hands dry when connecting or disconnecting any cables to prevent electrical shock•Never use brute force when connecting cables, which may cause a fire, electric shock, product damage,a short or open circuit•Unplug all cables and turn product(s) to the off state before cleaning•Never use any chemical solvent to clean the product•Never loosen the screws on the product, which may cause poor sealing, reduce the functional qualities and violate the warranty•Please do not put device into a fire, which may cause an explosion•If there is any leakage from the unit, please do not touch the battery or the leaking substance, as the battery may be damaged•Never try to repair the product by yourself. If you find any problems, please contact your authorized HuddleCamHD dealerTroubleshooting_______________________________________________________ Audio is not coming out of the HuddlePod Air Duo Speaker•Is the HuddlePod turned on?o If there are no LEDs lit on the pod, press and hold the power button for 3 seconds. If no LEDs light, the battery is discharged. Charge the battery or use the pod with the AC power adapterconnected.•Is the HuddlePod Air connected to the PC?o Do the 3 blue LEDs blink? If so, the wireless adapter is not connected to the PC. This LED will stop blinking once the adapter is successfully connected. Make sure that the PC with adapter iswithin the wireless signal range of the pod.•Check the audio parameters on the PC’s operating system, that has the receiver attached.o For example, in Windows, check the “sound” control panel and make sure that the HuddlePod Air2 is selected as the active “playback device”.Microphone is not working on the HuddlePod Air DuoNote: See power & connectivity troubleshooting options above to verify device is properly powering on •Check the audio parameters on the PC’s operating system, that has the receiver attached.o For example, in Windows, check the “sound” control panel and make sure that the HuddlePod Air2 is selected as the active “recording device”.Specifications___________________________________________________________ Model Number: HC-HPAIR2-DUOMicrophone Features•Echo Cancellation 256 ms echo cancellation•Audio Output Max 18dB w/ auto level control•Noise Cancellation Intelligent NC up to 16 dB•Digital EQ Built-in digital EQ for stable audio•Battery Life 8-9 hours battery life, 4-5 hours charge time•Interface USB 2.0 & 3.5mm audio outputWireless Speakerphone Specifications (per unit)•Weight: 1 lbs. (0.45 kg)•Dimensions: 7” L x 6” W x 1.5” H (178mm L x 152mm W x 35mm H)•Operating Temperature: Temp 32 – 1.4°F ( 0~40°C), Humidity 20% ~ 85%•Compatibility: Windows 7/8/8.1/10, Mac 10.5+, Android 4.4+•USB Cable: Supplied for power & charging only•RF frequency range: 2.4 GHz – 2.4835 GHz•Certifications: CE Mark (R & TTE Directive), FCC。
Philips Fidelio E6 5.1 通信录电影音箱说明书
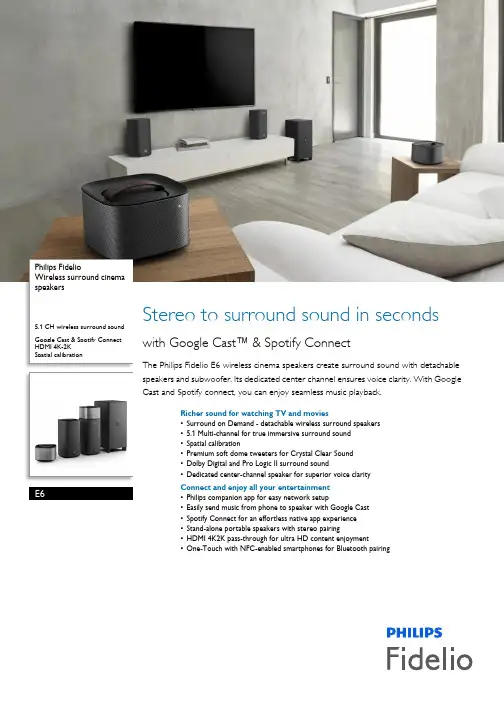
Philips FidelioWireless surround cinema speakers5.1 CH wireless surround sound Google Cast & Spotify Connect HDMI 4K-2KSpatial calibrationE6Stereo to surround sound in seconds with Google Cast™ & Spotify ConnectThe Philips Fidelio E6 wireless cinema speakers create surround sound with detachable speakers and subwoofer. Its dedicated center channel ensures voice clarity. With Google Cast and Spotify connect, you can enjoy seamless music playback.Richer sound for watching TV and movies•Surround on Demand - detachable wireless surround speakers•5.1 Multi-channel for true immersive surround sound•Spatial calibration•Premium soft dome tweeters for Crystal Clear Sound•Dolby Digital and Pro Logic II surround sound•Dedicated center-channel speaker for superior voice clarityConnect and enjoy all your entertainment•Philips companion app for easy network setup•Easily send music from phone to speaker with Google Cast•Spotify Connect for an effortless native app experience•Stand-alone portable speakers with stereo pairing•HDMI 4K2K pass-through for ultra HD content enjoyment•One-Touch with NFC-enabled smartphones for Bluetooth pairingHighlights Surround on DemandSubmerge your listening senses in superb surround sound whenever you want it. Simply detach the wireless surround speakers from the left and right main speaker units and place them at the rear of the room to get multichannel surround sound experience with your games and movies. When the action is over, reattach the speakers for music and TV shows. Using proprietary wireless audio technology with surround speakers that operate on a unique frequency, there is no network interference. The result is a completely wireless surround system with lossless audio quality for music and movies. 5.1 Multi-channelE6 equipped 5.1 channels with built-in 6 amplifiers to deliver great sound quality. this 5.1 systems use the same speaker channels and configuration, having a front left and right, a center channel, two surround channels and a subwoofer. It support Dolby digital pro-logic 2. Spatial calibrationAn advanced spatial calibration function developed by our unique innovation lab ensures the best possible balance of sound, regardless of where in a room rear speakers have been placed. When triggered, this function uses a specially designed tonal signal to locate each of the rear speakers. It then uses this information to identify the best sound balance for this speaker placement and adjusts the sound of each speaker to match. This allows the listener to enjoy properly balanced sound even if speakers are placed outside of the ideal position.Google CastEnjoy high quality and seamless playback withyour favorite music apps. This soundbar hasGoogle Cast built-in so you can cast yourfavorite music apps from your personal deviceto your speakers. You can cast from youriPhone®, iPad®, Android phone and tablet,Mac® and Windows® laptop, or Chromebook.Philips companion appUse Philips HCWeSet Manager app to setupand connect your new speakers to your homewireless network and start enjoy the highquality audio and seamless playback experiencefrom your favorite apps*. *It is mandatory toinstall the app for network setup, as well asservices and privacy agreement before you cancast music wirelessly from your music apps.*To cast music from Spotify, You'll needSpotify Premium to use ConnectSpotify as a remoteUsing Spotify Connect you can easily browse,explore, and play music from any room in thehouse using your smart device as a remote.With a direct Spotify connection, you can playmusic straight from the cloud so your smartdevice can be used for calls, videos or even goout of range without interrupting your music.This is also more battery friendly, since energyused for music is minimized. All the same greatSpotify features are there, from its ready-madelists to its high sampling rates. Everything youneed to discover new music and hear it at itsbest.Stand-alone portable speakersBoth of the Philips Fidelio E6's detachablespeakers feature an independent Bluetoothmodule, making them truly independent. Thismeans they can be taken anywhere, in thehome or out, for total freedom of musicalenjoyment. Each portable speaker deliverpowerful sound wherever they are. It can bework as a single Bluetooth speaker or a pair ofstereo wireless Bluetooth speakers.HDMI 4K2KHDMI 4K2K incorporates the HDMI 1.4standard. This adds support for ultra-highdefinition (UHD) video content. Presently thisrefers to 4K, which at its largest is 4096 pixelswide by 2160 pixels high or four times the sizeof a standard 1080p HD display. The termcovers a slightly lower 4K resolution of 3840pixels wide by 2160 pixels high. Both formatsare supported through HDMI 1.4. 4K displaysput high-end home theater systems in the samesphere used in many commercial movietheaters. To make the speakers futureresistant, this standard has been integrated forthe growth of 4K TV.Issue date 2017-03-23 Version: 5.4.712 NC: 8670 001 28053 EAN: 48 95185 61321 5© 2017 Koninklijke Philips N.V.All Rights reserved.Specifications are subject to change without notice. Trademarks are the property of Koninklijke Philips N.V. or their respective owners.SpecificationsSound•Sound Enhancement: Surround on demand, Night Mode, Treble and Bass Control, Audio sync, Auto Volume Leveller, Movie, Music, Near Listening, Voice, Smart Sound•Sound System: DTS Digital Surround, Dolby pro-logic 2•Subwoofer output power: 90W•Total Power RMS @ 30% THD: 270 W •Satellite speaker output power: 180W Loudspeakers•Loudspeaker types: 2 x Satellite speakers •Drivers per Satellite speaker: 1 X 19mm soft dome tweeter, 2 x 3" full range woofers•Drivers per Surround speaker: 1 x 2.5" Full range speaker•Satellite speaker freq range: 150-20K (-3dB) Hz •Satellite speaker impedance: 8 ohm •Subwoofer driver: 1 x 6.5" woofer •Subwoofer freq range: 20-150 (-3dB) Hz •Subwoofer impedance: 4 ohm•Subwoofer type: Wireless subwoofer, Bass reflex system•System: 2.1/5.1 systemConnectivity•Rear Connections: Digital coaxial in, Digital optical in, HDMI 1.4 output (ARC), HDMI IN 1, HDMI IN 2, Audio in 3.5 mm jack, Ethernet•Wireless connections: Bluetooth, NFC, Wi-Fi, Wireless rear speakers, Wireless subwoofer •Online services: Google Cast™, Spotify Connect Convenience•EasyLink (HDMI-CEC): Audio Return Channel, Automatic audio input mapping, One touch standby, Remote Control-Passthrough, One touch play, System standby•HDMI Features: Audio Return Channel (ARC), Support 4K2KSmartphone/Tablet App•App name: Philips HCWeSet, Free download fromApple App store and Google PlayAudio Playback•Compression format:MP3Accessories•Included accessories: 2 x AAA Batteries, RemoteControl, Safety & Legal Leaflet, Trademarks Sheet,World Wide Warranty leaflet, Optical audio cable,Quick start guide, 2 x Power cordsPower•Power supply: 110-240V, 50Hz•Standby power consumption: <0.5 WSustainability•Packaging: 80% recycled corrugated board, Soyabased inkOuter Carton•EAN: 48 95185 61321 5•Gross weight:17 kg•Outer carton(L x W x H): 67 x 28 x 55.3 cm•Nett weight: 13.5 kg•Number of consumer packagings: 1•Tare weight: 3.5 kgPackaging dimensions•Packaging dimensions (W x H x D):67 x 55.3 x 28 cm•EAN: 48 95185 61321 5•Gross weight:17 kg•Nett weight: 13.5 kg•Number of products included: 1•Packaging type: Carton•Tare weight: 3.5 kg•Type of shelf placement: LayingProduct dimensions•Product dimensions (W x H x D):54.2 x 44 x 22 cm•Weight:12.6 kg*Spotify premium account is required for this speaker.*Availability of music service depends on country. Please visit therelevant music service website for details.。
D105人声麦克风使用手册说明书

-3--1--2-技术数据概述类型动圈麦克风原理压力梯度型指向性超心型(图1)频率响应70~14,000Hz(图2)灵敏度(1,000Hz 开路电压)-52dBV /Pa (2.5mV /Pa )±3dB1Pa=94dB SPL标称阻抗500Ω最小负载阻抗500Ω输出接插件3 pin male XLR 型外观颜色灰色涂装环境要求麦克风的工作温度范围-10℃~-50℃(14℉~122℉), 相对湿度范围0~95﹪外型尺寸Φ45.0mm (1.77in .)X 180.0mm (7.09in .)_(图3)重量270g (9.52oz .)1000 Hz极坐标图型(图1)频率响应(图2)外型尺寸(图3)安装工程音响系统爱用的手握麦克风,附有0n /off 开关。
具有良好的电声性能各漂亮、结实的外形,适用于人声、乐器扩声和录音,也适用于会议和采访等。
特征具有平坦的低频和特定的中高频提升。
高灵敏度、低失真。
声反馈前增益高。
适用于主唱、演讲、歌唱表演等。
架设麦克风附加E 字的麦克风架具备一支可延伸脚,让重量级的录音室麦克风也可用于空间受限的现场扩声用途。
保养麦克风电容式麦克风应存放于低湿度的环境中,以维持最佳声音性能。
麦克风应保存在空调房间或者除湿箱内以去除水气。
清洁的空气也是重要的因素,远离吸烟的环境以避免焦油残留物在振膜上面。
压力梯度麦克风对于振动十分敏感。
适当的防震架对于高性能的麦克风达到极低噪音的录音是不可或缺的。
坚固稳定的脚架可以将麦克风准确地固定在最佳收音点。
选择重量级的麦克风架用于录音室电容麦克风,因为这类麦克风的重量远高于一般手持麦克风。
舒伯乐提供多样的麦克风架以符合各类型的需要。
大脚威力脚架特别设计给大振膜电容麦克风,可以同时使用2支大振膜麦克风加上立体录音架,适用于单点立体声录音。
9020-50mm180°90120~135120~135Karaok 扬声器P.A. 系统扬声器为了获得最佳信噪比,麦克风应尽量靠近所需声源。
MG12 15 18迷你麦克风产品说明书

MG12/15/18OVERVIEW The MG12, MG15, and MG18 are professional miniature gooseneck condensermicrophones designed for applications such as podium, presentation, meetingsand teleconferencing. Known for their clarity, excellent sound quality and ease ofoperation, the MG12/15/18 have the ability to accurately capture and reproducevocals from a comfortable distance.The MG12/15/18 are characterized with a uniformly controlled cardioid polarpattern, helping to isolate the speaker from other ambient noise in the room or onthe stage. The MG12/15/18 gooseneck mics are also available in a hypercardioidpolar pattern for tighter pattern control (see models below). With a wide frequencyrange of 60 Hz - 19 kHz, the MG12/15/18 provide natural sound with exceptionaltransient response.The MG12/15/18 gooseneck system is equipped with a sophisticated dual preampcircuitry – one circuit located in the capsule housing and the other circuit built intothe base of the XLR. This circuitry is internally balanced, insuring that the audio pathwill be isolated from hum and noise. In addition, the circuitry employs protectionfrom RF and spurious emissions from cell phones and wireless GSM devices.The goosenecks may be mounted with the supplied flange mount (TM1218) or withan optional base with an internal shockmount (SMT1218R). The mics may also beused on a standard mic stand or in conjunction with the Audix ATS10 table stand withlighted on-off switch, ATS1 table stand with programmable switch and ATS1L withremote logic capability.Manufactured t o v ery h igh s tandards a nd t ight t olerances, t he M G12/15/18 f eatures amachined b rass b ody, fi eld r eplaceable c apsule, r eplaceable e lectronics, a nd a v arietyof optional accessories. The MG12/15/18 operate on phantom power of 18 - 52 Voltsand are available in non-reflective black matte finish. SUPPLIED ACCESSORIESTM1218 - Flange table mountWS1218 - External foam windscreenOPTIONAL ACCESSORIESATS1 - Table stand with programmable switchATS1LP - Table stand with remote logic capability and spin phoenix connectorATS1LX - Table stand with remote logic capability and spin XCR connectorATS10 - Table standSMT1218R - Rubber insulated shockmountDCLIP - Mic stand adapterAPS2 - Two-channel phantom power supply Condenser MicrophoneFEATURES • Natural accurate sound • Modular threaded capsule(s)• Low noise electronics, dual circuitry, internally balanced • RF Immunity • Low profile design • Tension fit design for stable positioning APPLICATIONS • Pulpit, podium • Board meetings• Video Teleconferencing• Courtroom REPLACEMENT CAPSULES • CPSMICROC - Cardioid (Black)• CPSMICROHC - Hypercardioid (Black)• CPSMICROO - Omnidirectional (Black) • CPSMICROS - Supercardioid (Black)ATS1 ATS10 APS2 SMT1218R DCLIPHi Lo FREQUENCY RESPONSE POLAR PATTERNS ARCHITECT AND ENGINEER SPECIFICATIONS The microphone(s) shall be of the condenser type with a modular threaded capsule. The microphone(s) shall be available in a cardioid and hypercardioid polar pattern and shall have a base terminating in a male XLR plug. The microphone(s) shall operate on 18 - 52 Volts phantom power. The microphone(s) shall have a sensitivity of 38 mV/Pa (cardioid) or 32mV/Pa (hypercardioid) and a nominal impedance of 150 ohms at 1 kHz. The microphone(s) shall have a maximum SPL level of ≥130 dB and shall be fabricated from aluminum tubing, brass fittings, and coiled steel gooseneck material. The micro-phone capsule shall be available in three gooseneck lengths. The microphone(s) shall be the Audix MG12, MG15, MG18. OPERATION AND MAINTENANCE The MG12/15/18 are low impedance microphones and should be plugged into a “mic level” input o n y our c onsole, m ixer, o r r ecording d evice. T he M G12/15/18 r equire p hantom power and will NOT operate without phantom power voltage (minimum of 18- 52 Volts) which i s a vailable o n m ost p rofessional m ic p reamps a nd m ixing d evices. A void p lugging or unplugging the microphone from a PA system unless the channel is muted or the volume of the system turned down. Failure to do so may result in a loud “popping” noise which could seriously damage the speakers in the PA system. Changing Capsules: Capsules can easily be replaced or interchanged by simply screwing them on and off the capsule housing. Permanent I nstallation: T he M G12/15/18 c an b e c onveniently p lugged i nto a ny s tandard XLR female connector or receptacle. For permanent installation on a table, podium or flat surface, u se t he s upplied fl ange s hockmount. T he b ase o f t he M G12/15/18 w ill fi t s ecurely into t he fl ange a nd a s tandard X L R-f m icrophone c able o r p anel j ack m ay b e u sed. I f f urthershockmount or isolation is required, it is recommended to used the optional SMT1218Rrubber shockmount which requires boring out a 2 inch ER TIPSSpeaking distance and angle of microphone: The two flexible portions of themicrophone w ill e nable y ou t o p osition t he m ic a ccording t o h eight a nd s peaking s tyle o fthe user. In general, the microphone can be angled at 60-75 degrees towards the speakerand be 12-16 inches away from the mouth. A shorter distance can be used for a fullersound or for weaker voices.Windscreen: The supplied windscreen should be used to help minimize pop noise andbreath n oise. I f b reath o r p op n oise a ppears t o b e e xcessive, e ither m ove f arther a way f romthe m icrophone o r t ry s peaking o ver t he t op o f t he m icrophone r ather t han d irectly i nto i t.Using with ATS10 T able Stand: For ultimate flexibility and portability, the optional ATS10heavy duty table stand is ideal. Since the electronics for the MG12/15/18 are built rightinto the base of the microphone, all that is necessary is to plug the mic directly into thetable stand connector on the top of the base. T he mic cable will be plugged into the backof the base and connected to a low impedance mic level input on the mixer or recordingdevice. R emember t hat p hantom p ower i s r equired i n o rder t o o perate. T here i s a n oiseless2 position on-off switch located in the table stand. The down position is ‘on’ and the upposition is ‘off’. The LED indicator light will be lit when the mic is turned on. This is not apush-to-talk system so you need not hold down the switch, just push and click to on or offposition. A standard XLR-XLR microphone cable can be used to connect the ATS10 to themixer or recording device. Consider the ATS1 series when programmable switching and/or remote logic capability is required.To use on microphone stand: The MG12/15/18 may be used on any standardmicrophone stand by using the DCLIP . T he XLR base of the microphone will snap securelyinto the DCLIP and can be used at any angle.Further miking techniques may be found at .ALL SPECIFICATIONS SUBJECT TO CHANGE WITHOUT 503.682.6933 Fax: 503.682.7114Audix Corporation 9400 SW Barber St. Wilsonville, OR 97070ver 3.0 02-19PRODUCT REGISTRATION: Please register your product online at /docs_12/about/product_registration.shtml .SERVICE AND W ARRANTY: This microphone is under warranty for a period of 3 years to be free of defects in material and workmanship. In the event of a product failure due to materials or workmanship, Audix will repair or replace said product at no charge with proof of purchase. Audix does not pay or reimburse shipping costs for warranty repairs or returns. T he warranty excludes any causes other than manufacturing defects, such as normal wear, abuse, environmental damage, shipping damage or failure to use or maintain the product per the supplied instructions. No Implied W arranties: All implied warranties, including but not limited to implied warranties of merchantability and fitness for a particular purpose are hereby excluded. T he liability of Audix, if any, for damages relating to allegedly defective products shall be limited to the actual price paid by Dealer for such products and shall in no event include incidental or consequential damages of any kind. Should your microphone fail in any way, please contact the Audix Service department at 503.682.6933. A Return Authorization is required before returning any product. OTHER T HAN THIS WARRANTY, AUDIX MAKES NO WARRANTIES, EXPRESS OR IMPLIED, WITH RESPECT TO THE PRODUCTS, THE USE OF THE PRODUCTS, THE PERFORMANCE OF THE PRODUCTS. AUDIX SHALL NOT BE LIABLE FOR SPECIAL INCIDENTAL, CONSEQUENTIAL, INDIRECT OR SIMILAR DAMAGES ARISING FROM OR BASED ON T HE SALE, USE, STORAGE OR DISPOSAL OF T HE PRODUCTS, AUDIX’S SERVICE W ORK, BREACH OF W ARRANTY, BREACH OF CONTRACT. NEGLIGENCE, OR ANY OTHER T HEORY OF LIABILITY, EVEN IF AUDIX HAS BEEN ADVISED OF T HE POSSIBILITY OF SUCH DAMAGES.SPECIFICATIONS M G 12/15/18。
Funai麦克风与扬声器系统设置说明书
Página configuración generalBloqueo disc Atenuar pant. Programa Idioma menús Prot. pant. DormirCód VAS DivX(R)English Dansk Nederlands Suomi Français Deutsch Italiano NorskUtilice los botones para seleccionar un idioma y pulse OK para confi rmar.InglésChinoFrancésEspañolPortuguésPolacoItalianoTurcoPágina preferenciasAudioSubtítulosMenú de discoParentalSurroundPBCNav MP3/JPEGContraseñaAudio }Selecciona el idioma de audio preferido para la reproducción de DVD.Subtítulos }Selecciona el idioma de subtítulos preferido para la reproducción de DVD.Menú de disco }Selecciona el idioma de menú de disco preferido para la reproducción de DVD.Utilice los botones para seleccionar un idioma y pulse OK para confi rmar.Pág. conf. vídeo Tipo TVPantalla TV Progresivo Ajuste color Config. HDMI Componente 4:3 panorámico 4:3 buzón16:9 Wide Screen4:3 panorámico }Seleccione esta opción sidispone de un televisorconvencional y desea queambos lados de la imagen aparezcan recortados o formateados para que se ajusten al televisor.4:3 buzón }Seleccione esta opción sidispone de un televisorconvencional. En este caso, semostrará una imagen ancha con franjas negras en la parte superior e inferior del televisor.YUV RGBPág. conf. vídeoTipo TV Pantalla TV Progresivo Ajuste color Config. HDMI ComponenteDesplácese a { Componente } > { YUV } enel menú y pulse OK para confi rmar.Pág. conf. vídeoDesactivado ActivadoTipo TV Pantalla TV Progresivo Ajuste color Config. HDMI ComponenteDesplácese a { Progresivo } > { Activado en el menú y pulse OK para confi rmar.Lea el mensaje de aviso que aparece en eltelevisor y confi rme la acción seleccionando(Aceptar) en el menú y pulse OK Hasta que no active el modo deexploración progresiva no aparecerá la imagen en el televisor.Active el modo de exploración progresiva deltelevisor (consulte el manual del usuario del televisor). Aparece un mensaje en el televisor.Página configuración audioVolum altavocesRetar altavocAudio HDMIAum. resol. CDSincron. audio Delant. izq.Delant. der.CentralSubwooferLzq. post.Delant. der.Config. volumen altavocesUtilice los botones para establecer el nivel de volumen para cada altavoces (-6 dB ~ +6 dB) y pulse OK para confi rmar.Página configuración audioVolum altavocesRetar altavocAudio HDMIAum. resol. CDSincron. audioCentralLzq. post.Der. post.Config distancia altavocesUtilice los botones para seleccionar los tiempos de retardo (0 ms ~ 15 ms) para los altavoces central y posterior que mejor se adapten a sus necesidades de sonido envolvente.Pulse OK para confi rmar.Consejos útiles:Un tiempo de retardo de 1 ms equivale a un cambio de distancia de 30 cm.Utilice un ajuste de tiempo de retardo mayor si los altavoces posteriores están más cerca del oyente que los frontales.Se generará automáticamente el tono de prueba para ayudarle a calibrar el nivel de sonido de cada altavoces.Pulse í/ ë para mostrar las otras imágenes en la página anterior o siguiente.ash USB o el lector de tarjetas de memoria USB directamente a lade la unidad (como se muestra en la ilustración anterior).Aparecerá un mensaje en el televisor durante 5 segundos cuando se detecte el dispositivo.Página configuración general Bloqueo discAtenuar pant.ProgramaIdioma menúsProt. pant.DormirCód VAS DivX(R)Página configuración audio Volum altavocesRetar altavocAudio HDMIAum. resol. CDSincron. audioPág. conf. vídeoTipo TVPantalla TVProgresivoAjuste colorConfig. HDMIComponentePágina preferenciasAudioSubtítulosMenú de discoParentalSurroundPBCNav MP3/JPEGContraseñaSubtítlo DivXDefault。
Pyle PSBT65A 迷你无线蓝牙流媒体 PA 音箱剧院声音系统带无线麦克风说明书
Rechargeable Battery is “dead”
Battery is not charged for over 3~4 months
Plug into AC outlet to recharge
Use shielded cable
Recharge or replace battery
PSBT65A
Compact & Portable Wireless BT Streaming PA Speaker
Karaoke Sound System with Wireless Microphone, Built-in Rechargeable Battery, MP3/USB/SD
IMPORTANT SAFETY INSTRUCTIONS
TIPS TO PROLONG THE LIFE OF RECHARGEABLE BATTERIES 1. Store portable system with batteries in a fully charged condition. 8-10
hours to fully charge. 2. The battery prefers a partial rather than a full discharge. A partial
1. FOR OUTDOOR USE: To reduce the risk of re or electric shock, do not expose this apparatus to rain or moisture.
2. UNDER WET LOCATION: Apparatus should not be exposed to dripping or splashing and no objects lled with liquids, such as vases should be placed on the apparatus.
Samson G-Track Pro USB麦克风与音频接口说明书
Owner's ManualIntroductionCongratulations on your purchase of the Samson G-Track Pro USB Microphone with Audio Interface. The G-Track Pro features dual 1” ultra thin capsules with selectable polar patterns, onboard 24-bit 96kHz Analog-to-Digital converterand USB output. Plus, the G-Track Pro features a built-in audio interface with headphone output allowing you to connect your electric guitar or bass, keyboards, drum machines and just about any other signal source. The onboard mixer allows you set clean signals for recording by providing Instrument and Mic input level controls. In addition, the G-Track Pro employs a clever monitoring system allowing you to choose a variety of playback options for headphones or monitors with zero latency monitoring of the input signals. Whether you’re recording your latest song idea, podcast, or streaming on your gaming channel, the G-Track Pro is the simplest and most comprehensive solution for high-quality recording on a Mac or PC. Just plug it in and start creating!In these pages, you’ll find a detailed description of the features of the G-Track Pro, as well as step-by-step instructions for its setup and use. If your microphone was purchased in the United States, you’ll also find a registration card enclosed—don’t forget to follow the instructions so that you can receive online technical support and so that we can send you updated information about this and other Samson products in the future. Also, be sure to check out our website www. for complete information about our full product line.We recommend you keep the following records for reference, as well as a copy of your sales receipt:Serial number: _________________________________________Date of purchase: ______________________________________________If you have any questions or comments regarding the G-Track Pro or any other products from Samson, do no hesitate to contact us at**********************.With proper care and maintenance, your G-Track Pro will operate trouble-free for many years. Should your G-Track Pro ever require servicing, a Return Authorization (RA) number must be obtained before shipping your unit to Samson. Without this number, the unit will not be accepted. Please visit /ra for an RA number prior to shipping your unit. Please retain the original packing materials and, if possible, return the unit in its original carton. If your G-Track Pro was purchased outside ofthe United States, contact your local distributor for warranty details and service information.2G-Track Pro • Professional USB Microphone with Audio InterfaceOwner’s Manual 3E N G L I S HF R A N ÇA I SD E U T S C H E E S P A ÑO L I T A L I A N O 1. Capsule – Dual, 1-inch (25mm) diaphragms2.Pattern Switch – Select from one of the three pick-up patterns:Omnidirectional, Cardioid, Figure-83.Recording Select Switch – The slide switch allows you to select the different recording modes: Mono: Microphone input and instrument input are mixedtogether and sent to the computer as a mono signal.2-Track: Microphone input and intsrument input are sent to the computer on separate tracks. 4.Status Indicator – The three color Power/Clip/Mute LED lights green to indicate power, flashes red when the input signal is clipping, and lights amber when the microphone is muted.5.Mute Button – Mutes the output of the microphone to the computer and headphone output. The Status Indicator will illuminate amber when the microphone is muted. 6.M IC – Control to adjust the sensitivity of the internal microphone.7.INSTRUMENT – Control to adjust the input level of the instrument input.8.VOLUME – Control to adjust the overall volume of the 1/8” Headphone output.9.USB Jack – B size USB connector for interfacing with your PC or Mac computer.G-Track Pro CalloutsG-Track Pro Callouts– This switch turns the directmonitor on and off. This switchdoes not affect the audio fromthe computer.11. Headphone Output – 3.5mmstereo jack for connectingheadphones or studio monitors.The headphone output providesa mix of the direct signal (ifenabled) from the microphoneand the audio playback from thecomputer.12. IN Jack – 1/4” mono instrumentinput for connecting instrumentsin like electric guitar and bassguitar, or line level signal likethose from keyboards, drummachines and mixers.4G-Track Pro • Professional USB Microphone with Audio InterfaceQuick StartFollow this simple quick start for a typical set-up to start recording.Using the G-Track Pro with a computer1. Position the G-Track Pro on your desktop by using the included microphonebase.2. Set the G-Track Pro’s pattern switch. If you are recording a single person,set the switch to the Cardioid position and be sure to face the front side,with the Samson logo. If recording two people, set the microphone to theFigure-8 position and if recording multiple subjects, set the switch to theOmni position.3. Connect headphones to the Headphone output located on the rear of themicrophone.4. Plug the USB cable into the G-T rack Pro and plug the other end of the cable into anavailable USB port on your computer.5. Set the G-T rack Pro as the input and output audio device by following the steps inthe section “Connecting to a Computer”.6. Launch your recording software.7. T urn down the output VOLUME control on the G-T rack Pro and if not already set,select the G-T rack Pro as the input and outputs in the software.8. Create two mono audio tracks. Set one track to G-T rack Pro Left Input for themicrophone input and the other track to G-T rack Pro Right Input for the instrument input. Note: Input names may vary depending on software.9. Arm the tracks for recording.10. Set the input levels of the microphone by following the steps in the section “SettingLevels”.11. Set the direct monitor setting by following the steps in the section “Direct Monitor”.12. While singing/speaking or playing your instrument into the G-T rack Pro, raise theVOLUME control until the audio output is at a comfortable listening level.13. Press the record button and start creating.Owner’s Manual5Connecting to a ComputerUsing the G-Track Pro with Windows Computers1. Connect the G-Track Pro to the computer using the included USB cable.2. From the Start Menu, open the Control Panel and select Sound.3. Click the Recording tab and select the Samson G-Track Pro as the audioinput device.4. Set the Output sample rate by clicking the Properties button and selectingthe Advanced tab.5. Set the G-Track Pro as the output device by clicking the Playback tab andselecting the Samson G-Track Pro.6. Set the Input sample rate by clicking the Properties button and selecting theAdvanced tab. Note: The Input and Output sample rates must be set to the same setting. To avoid any sample rate conversion issues, make sure thatthe sample rate in your software is set to the same settings.Using the G-Track Pro with Apple OSX1. Connect the G-Track Pro to the computer using the included USB cable.2. Open System Preferences from the dock or the main Apple Menu.3. Select the Sound preference icon, choose the Input tab and select SamsonG-Track Pro.4. Set the G-Track Pro as the output device by clicking the Output tab andselecting Samson G-Track Pro.5. To set the sample rate, from the Applications folder, open the Utilities folderand open Audio MIDI Setup.6. From the Window menu, select Show Audio Window.7. Select the Samson G-Track Pro8. From the Format dropdown menu, select the desired sample rate and bitdepth.6G-Track Pro • Professional USB Microphone with Audio InterfaceSetting LevelsYou can adjust the G-Track Pro’s internal analog input gain stage by using theG-Track Pro’s INSTRUMENT and MIC level control knobs. The purpose of the level, (or gain) controls are to optimize the amount of good signal relative to any associated noise. The G-Track Pro preamp includes a clip indicator to show when the input signal is overdriving or clipping the input.To set a good level on the mic:1. Set the G-Track Pro up in front of the desired sound source and slowly raisethe MIC volume control until you see the CLIP indicator light red.2. Then, turn the MIC volume control down until the indicator no longer lightsred.3. Repeat the same process for the instrument. Play your instrument or linelevel device at a performance level, and slowly turn up the INSTRUMENTvolume control until the CLIP indicator lights red.4. Then, turn the INSTRUMENT volume control down until the CLIP indicatorno longer lights red.5. Once you set the INSTRUMENT and MIC input level control you shouldn’tneed to change them during recording.6. Use the level controls in the computer software to set the balance betweenthe instrument mic and stereo mix from the software.Owner’s Manual7G-Track Pro • Professional USB Microphone with Audio Interface8An important characteristic of any microphone is its directionality or polar pattern. The G-Track Pro feature dual 1” capsules, allowing for a choice of three individual polar patterns: omnidirectional, unidirectional (cardioid), and bidirectional (figure-8). The microphone pattern can be selected using the three-position slide switch below the left side of the grill. Each pattern has distinct pick-up characteristics with respect to the sensitivity and frequency response to sounds arriving from different directions. The following section discusses some of the features of each pattern, to help you choose the best setting for your application. Omnidirectional - The omnidirectional settingreproduces sound from all directions, (including off-axis), with an even frequency response, which makes it resistant to the phenomenon known as proximity effect. It captures a greater amount of ambient soundthan the other settings, and thus will include more of the room sound than when using a directional setting. The omnidirectional setting is great for recordingensemble performances including group vocals, brass, woodwind, and other instruments with the artists facing each other in a circle around the microphone. To select the omnidirectional pickup pattern, set the pattern selection switch to the right position.Unidirectional (Cardioid) - The cardioid pickup pattern is the most widely used for studio and live miking applications. It captures sound in front of the microphone and rejects sound from the sides and back, which allows for better separation of instruments in the studio, and picks up more of the instrument sound in relation to the sound of the room. The separation also allows for more control and more gain before feedback in live sound reinforcement situations. To select the cardioid pickup pattern, set the pattern selection switch to the center position.Bidirectional (Figure-8) - This setting captures sound directly in front and back of the microphone while rejecting sound on the left and right sides, and has minimal off-axis frequency response deterioration. It is very useful in a variety of stereo microphone techniques. The figure-8 pattern can be used to simultaneously capture two instruments or vocalists by positioning the microphone directly between them, so one is addressing the front of the microphone and the other the rear. To select the figure-8 pickup pattern, set the pattern selection switch to the left position.About Polar Patterns909090Direct MonitorThe G-Track Pro has a simple, yet sophisticated direct monitor system, which provides zero latency monitoring.What’s Latency, and what’s Zero Latency, and why do I need it?Latency is the delay time between record and playback that all computer software has when recording and monitoring simultaneously. Simply stated, when recording, the computer software needs to recognize the input signal,then crunch a bunch of numbers and then send the signal through to the output. Depending on several factors like the speed of your computer, the amount of tracks you’ve recorded, and whether or not you’re using the effectsin the software, this can take a few to several milliseconds. A delay of several milliseconds can sometimes make it hard for a musician to play on time. To solve this problem, the G-Track Pro lets you monitor the internal microphone and line inputs directly on the headphones without making the round-trip in and out of the computer. As a result you hear the inputs with no latency.MONITOR ON/OFF SwitchWhen listening back to your recording during a mixing session, or if you wantto only hear the G-Track Pro’s inputs after it has gone through your computer software effects, you may want to turn the Direct Monitor off. To turn the Direct Monitor off, move the DIRECT MONITOR switch on the rear of the G-Track Proto the OFF position, you hear only the playback from your computer software,in stereo, with no input signal. To enable the Direct Monitor, set the DIRECT MONITOR switch to the ON position. If you plan to use direct monitoring on the G-Track Pro, disable software monitoring for the armed (input) tracks.Owner’s Manual9SpecificationsElement Type Dual back electret condenserDiaphragm Width/Thickness 25mm/3 micronsPolar Pattern C ardioid (unidirectional), bidirectional(figure-8), omnidirectionalFrequency Response 50Hz–20kHzMax Sensitivity +6dB FS/PA (all polar patterns)Max. SPL 120dB SPLBit Depth/Sample Rate 16 or 24-bit/ Up to 96kHzDigital Output USBHeadphone Output/Impedance 1/8” (3.5mm)/ 16ΩHeadphone Power Output 85mW @ 32ΩInstrument Input/Impedance 1/4”/ 1MΩControls M ute, Mic/Instrument/Headphone Volumes,Monitor On/Off, Mono/2 Track RecordingModesLED 3-color Power/Clip/MuteBody Construction/Grille Die-cast zinc/heavy gauge mesh Accessories Integrated desktop base, USB cable Product Dimensions 4.5” x 10.5” diameter(116mm x 268.5mm diameter)Product Weight 3.52lb (1.6kg)10G-Track Pro • Professional USB Microphone with Audio InterfaceOwner’s Manual 11E I T A L I A N O Note: This equipment has been tested and found to comply with the limits for a Class B digital device, pursuant to Part 15 of the FCC rules. These limits are designed to provide reasonable protection against harmful interference in a residential installation. This equipment generates, uses and can radiate radio frequency energy and, if not installed and used in accordance with the instruc-tions, may cause harmful interference to radio communications. However, there is no guarantee that the interference will not occur in a particular installation. If this equipment does cause harmful interference to radio or television reception, which can be determined by turning the equipment off and on, the user is encouraged to try to correct the interference by one or more of the following measures:Reorient or relocate the receiving antenna.Increase the separation between the equipment and receiver.Connect the equipment into an outlet on a circuit different from that of the receiver.Consult the dealer or an experienced radio/TV technician for helpWARNING: Listening to music at high volume levels and for extended durations can damage one’s hearing. In order to reduce the risk of damage to hearing, one should lower the volume to a safe, comfortable level, and reduce the amount of time listening at high levels.Please use the following guidelines established by the Occupational Safety Health Administration (OSHA) on maximum time exposure to sound pressure levels before hearing damage occurs.• 90 dB SPL at 8 hours• 95 dB SPL at 4 hours• 100 dB SPL at 2 hours• 105 dB SPL at 1 hour• 110 dB SPL at 1/2 hour• 115 dB SPL at 15 minutes• 120 dB SPL - avoid or damage may occurIf you want to dispose this product, do not mix it with general household waste. There is a separate collection system for used electronic products in accordance with legislation that requires proper treatment, recoveryand recycling.Private household in the 28 member states of the EU, in Switzerlandand Norway may return their used electronic products free of charge to designated collection facilities or to a retailer (if you purchase a similar new one).For Countries not mentioned above, please contact your local authorities for a correct method of disposal.By doing so you will ensure that your disposed product undergoes the necessary treatment, recovery and recycling and thus prevent potential negative effects on the environment and human health.Important Safety Information。
CLUBZ MINI 迪士尼移动蓝牙音箱用户手册说明书
We recommend that you register your Product via the relevant country speci c website for your Product. Y our registration will allow us to inform you about updates for certain products, possible new o ers and new Products and/or applications. Registering is easy; just follow the instructions on the relevant country speci c website for your Product.HARMAN International Industries, Incorporated (“HARMAN”) is the manufacturer and through its local subsidiary, warrants to you that the Product (including components provided in/with the Product) will be free from defects in workmanship and materials for a period of ONE year from the date of retail purchase by you (the “Warranty Period”). During the Warranty Period, the Product (including components), will be repaired or replaced at HARMAN’s option, without charge for either parts or labor OR at HARMAN’s sole option, the price of the Product may be refunded, subject to depreciation based on your purchase price for the Product pro-rated over the remaining balance of the Warranty Period. Any warranty service or replacement of parts will not extend the Warranty Period. This Limited Warranty does not cover defects which are a result of: (1) damage caused by accident, unreasonable use or neglect (including the lack of reasonable and necessary maintenance); (2) damage during shipment (claims must be presented to the carrier);NOTE: IF YOU PURCHASED PRODUCTS IN INDIA, PLEASE VISIT WWW .HARMANWARRANTY .IN TO REGISTER FOR WARRANTYThis limited warranty (the “Limited Warranty”) protects only the original end-user (“you” or “your”), and is not transferable and is applicable only in the country (excluding EEA member states and the Russian Federation) in which you originally purchased your INFINITY Product (the “Product”). Any attempt to transfer this warranty shall immediately make this warranty void. WHO IS PROTECTED BY THE WARRANTYLIMITED WARRANTY08 EN(3) damage to, or deterioration of, any accessory or decorative surface; (4) damage resulting from failure to follow instructions contained in your owner’s manual;(5) damage resulting from the performance of repairs by someone other than HARMAN authorized service center; (6) deterioration of component parts, the nature of which is to become worn or depleted with use, such as batteries.Furthermore, this Limited Warranty covers only actual defects within the Product itself, and does not cover the cost of installation or removal from a xed installation, setup or adjustments, claims based on misrepresentation by the seller, performance variations resulting from installation-related circumstances such as source quality or AC power or Product modi cations, any unit on which the serial number has been e aced, modi ed or removed, or units used for other than home use. This Limited Warranty is valid only for INFINITY products purchased from an authorized dealer.Except to the extent expressly prohibited in your jurisdiction by applicable law, all implied warranties, including tness for a particular purpose and merchantability are hereby excluded and in no event shall HARMAN or any HARMAN subsidiary be liable for any indirect, direct, incidental, special or consequential loss or damages whatsoever (including, without limitation, other pecuniary loss) arising out of the use of or inability to use the Product, even if HARMAN and/or a HARMAN subsidiary have been advised of the possibility of such damages. To any extent that HARMAN cannot lawfully disclaim implied warranties under this Limited Warranty, all such implied warranties are limited in duration to the duration of this warranty. Some jurisdictions do not allow the exclusion or limitation of incidental or consequential damages or exclusions or limitations on the duration of implied warranties or conditions, so the above limitations or exclusions may not apply to you. This warranty gives you speci c legal rights, and you may also have other rights that vary by jurisdiction.09 ENThis Limited Warranty covers all expenses for labor and materials required for the repair OR replacement of the Product that is found to be defective, and a reasonable return shipping charge within the country of repair. Please be sure to save the original shipping carton(s), because a charge will be made for additional cartons/packaging. Y ou will be charged for the cost of examining a unit that is not in need of repair (including resulting shipping costs), or for necessary repairs not covered by this Limited Warranty . We sincerely thank you for your expression of con dence in INFINITY. We wish you many years of listening pleasure.For a seamless experience please register your product at www .HarmanWarranty .in.(if you purchased products in I ndia) nformation on service centers can be found on the registration page. Contact the dealer who sold you this Product, or contact HARMAN customer support using the contact information on the relevant country speci c support website for your Product to request warranty service. To validate your right to this Limited Warranty, you must provide the original sales invoice or other proof of ownership and date of purchase. Do not return your Product without prior authorization from the corresponding dealer or HARMAN. Warranty repair of the HARMAN Product must be carried out by Harman authorized service center . Unauthorized warranty repair will void the warranty and is performed at your sole risk.Y ou are also welcome to consult the relevant country speci c HARMAN support website for your Product for helpful hints. HOW TO OBTAIN WARRANTY SERVICEWHO PAYS FOR WHAT10 ENTo register for warranty in India, scan QRwww.HarmanWarranty.inHARMAN International Industries, Incorporated8500 Balboa Boulevard, Northridge, CA 91329 USA。