Fanvil-话机LDAP
爱维云使用手册说明书
爱维云使用手册网利友联科技(北京)有限公司版本:V1.0.0目录帐户和套餐 (2)申请/注册平台帐户 (2)用户权限分类 (3)个人信息修改 (4)套餐分类 (4)按需购买 (5)订单管理 (7)续费管理 (8)交易记录 (8)账户充值 (9)常见问题 (9)互联网监控 (10)理解互联网监控 (10)查看互联网监控列表 (10)查看性能概况 (11)主机监控 (12)监控方式和指标 (12)爱维Agent原理介绍 (12)Agent兼容环境说明 (13)Agent配置环境(Linux) (14)Agent配置环境(Windows) (15)启动/停止Agent (17)Agent日志查看 (20)查看主机性能概况 (20)常见问题 (22)连锁店监控 (23)什么是链路探针 (23)探针兼容环境说明 (23)配置环境(Linux) (24)配置环境(Windows) (29)启动/停止探针 (36)探针日志查看 (39)查看链路探针列表 (39)添加监控 (40)批量导入 (44)查看监控设备性能概况 (45)采集时间表 (46)内网监控 (48)监控方式与监控内容 (48)爱维内网工具下载 (48)兼容环境说明 (49)安装说明(Linux) (49)安装说明(Windows) (52)启动/停止内网监控工具 (56)登录爱维内网工具 (57)操作手册下载 (58)业务视图 (59)理解业务视图 (59)查看业务趋势 (59)查看业务视图 (60)告警管理 (61)告警状态说明 (61)告警列表 (62)告警通知设置 (63)微信告警 (64)通过url发送告警 (67)数据源 (69)创建数据源 (69)zabbix接入 (70)成员/成员组 (75)报告管理 (76)邮件报告 (76)帐户和套餐申请/注册平台帐户可申请注册的帐户类型系统平台支持个人用户的注册,及服务商用户的申请个人用户注册您可以点击注册按钮后,点击个人用户注册,提交表单后,会向您的注册邮箱发送激活链接,激活后即可登录系统平台官网。
Fanvil V64 快速入门指南说明书
WHAT’S IN THE BOX?Fanvil V64A. PhoneB. Ethernet CableC. Handset CableD. HandsetE. StandF.Power Adapter D.E.F.C. B.A.GUIDED SETUPAssembling Your PhoneSlot the plinth into the back of the phone, as shown below. Multiple insertpositions provide the opportunity for multiple viewing angles.Connect Handset and Optional HeadsetNote: Your phone supports headsets using an RJ-9 cable.For connection directions, refer to your headset documentation.Connect CablesPlease follow the diagramon the right for informationon your device’s connectionoptions.Once plugged into power & establishing a network connection, thephone will automatically download its configuration files & becomeusable. The voicemail box will be functional with a default greeting.Establishing a Wi-Fi Connection1. Press the “Menu” soft key2. Use the navigation arrow keys and “OK” keys to reach the “Basic”menu option3. Scroll down to “WLAN” option using the navigation keys and press OK4. Toggle “WLAN” to Enabled using the right navigation key5. Scroll down to the “Available Networks” option using the navigationkeys and press “OK”6. Press the “Scan” soft key to scan for available 2.4Ghz/5Ghz networks.7. Select the desired Wi-Fi network using the navigation and “OK” keysand follow the prompts to enter any required password.VOICEMAIL BOX SETUPRecording Your Personal Voicemail Greeting1. Press the “Messages” button.2. Enter the PIN provided to you by your Administrator, followed by the # key.3. Select option 3 for personal options.4. Select option 1 to record your voicemail greeting.5. Follow the voice prompts to record and check your greeting.Changing Your PIN From the Phone1. Press the “Messages” button.2. Enter the PIN provided to you by your Administrator, followed by the # key.3. Select option 3 for personal options.4. Select option 2 to change your PIN.5. Enter the new PIN when prompted. Press # when done.COMMONLY USED FEATURESPlacing Outgoing CallsWhen the phone is not in use:1. Pick up the handset or press the “Speakerphone” button.2. Dial tone will be heard.When using a headset:1. Press the “Headset” button to activate headset mode.2. Dial an extension or telephone number.When you are already on a call:1. Press the “Hold” soft key.2. Press the “More” soft key.3. Press the “New Call” soft key.4. Dial an extension or telephone number.5. Resume the original call by pressing the “Resume” soft key. Answering an Incoming CallOn the handset:• Pick up the handset to answer the call.On a headset:• When the headset is connected, press the “Headset”button to answer the call.On Speakerphone:• Press the “Speaker” button to answer the call.Rejecting an Incoming CallPress the “Reject” soft key to immediately send the caller to voicemail. Ending a CallOn a handset• Hang up the handset or press the “EndCall” soft key.On a headset:• Press the “Headset” button OR press the “End Call” soft key.On speakerphone:• Press the “Speakerphone” button OR press the “End Call” soft key.HoldPlacing a call on hold:• While on a call, press the “Hold” soft key.Retrieving calls on hold:• Press the “Resume” soft key.Mute1. To mute the microphone on a call, press the “Mute” button.2. To un-mute the microphone, press the “Mute” button again. Transferring CallsCold Transfer1. Press the Xfer soft key during an active call.2. Enter the number you want to transfer to.3. Press the Xfer soft keyWarm Transfer1. Press the Xfer soft key during an active call.2. Enter the number you want to transfer to, and press the Dial soft key.3. Press the Xfer soft key when the second party answers.Call WaitingWhile already on a call, and a new call rings in, you will hear a beep tone emitted by your phone.To Answer the Second Call:1. Press the “Answer” soft key to access that call. The first call will be placed on hold.2. Once the second call has ended, resume the original call by pressing the “Resume” soft key.To Reject the Second Call:• Press the “Reject” soft key to immediately send the caller to voicemail. Volume AdjustmentIn-Call Volume:• While on a call, press the “+” and “-“ buttons to raise or lower the volume. Ringer Volume:• While the phone is not in use, press the “+” or “-“ buttons to adjust the ringer volume on the phone.We are here to helpOnline: /knowledgebase/voice Email:***************************Call: 1.877.880.0055SpeakerphoneWhile the phone is not in use:• Press the “Speakerphone” button to activate the speakerphone and get dial tone for an outbound call.While on a call on the handset or headset:• Press the “Speakerphone” button to continue the current call on thespeakerphone.While a call on speakerphone is active:• Press the “Speakerphone” button to hang up the current call. Forwarding Calls1. Press the “Menu” soft key.2. Press the right arrow key to highlight “Features” and press the “Ok” button.3. Press the “Ok” button while highlighting “Call Forward”.4. Press the “Ok” button or the “Enter” soft key.5. Select the forwarding option you’d like to manipulate, and press the“Ok” button.a. For example, to default calls to always forward select “Unconditional”6. Utilize the arrow keys to select options (up & down) and toggle options off and on (left & right).7. After your changes have been made, select the “OK” button to save changes. Redial• Press when the phone is idle to dial out the last dialed number.• Press the “CallLog” soft key to visit the list of recent calls to select adifferent previous call.。
Fanvil X4G 配置指南说明书
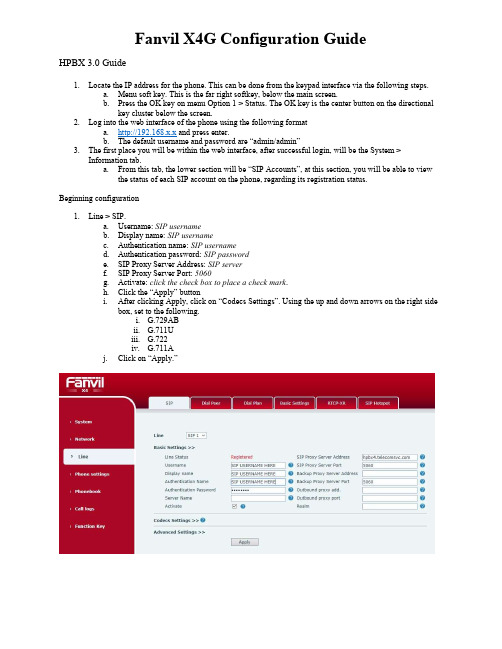
HPBX 3.0 Guide1.Locate the IP address for the phone. This can be done from the keypad interface via the following steps.a.Menu soft key. This is the far right softkey, below the main screen.b.Press the OK key on menu Option 1 > Status. The OK key is the center button on the directionalkey cluster below the screen.2.Log into the web interface of the phone using the following formata.http://192.168.x.x and press enter.b.The default username and password are “admin/admin”3.The first place you will be within the web interface, after successful login, will be the System >Information tab.a.From this tab, the lower section will be “SIP Accounts”, at this section, you will be able to viewthe status of each SIP account on the phone, regarding its registration status.Beginning configuration1.Line > SIP.ername: SIP usernameb.Display name: SIP usernamec.Authentication name: SIP usernamed.Authentication password: SIP passworde.SIP Proxy Server Address: SIP serverf.SIP Proxy Server Port: 5060g.Activate: click the check box to place a check mark.h.Click the “Apply” buttoni.After clicking Apply, click on “Codecs Settings”. Using the up and down arrows on the right sidebox, set to the following.i.G.729ABii.G.711Uiii.G.722iv.G.711Aj.Click on “Apply.”2.Line > Basic Settings taba.Locate the “Local SIP Port” fieldb.Set the Local SIP port: 5 + the last 3 digits of the extension.i.If the extension were 791, then the local SIP port would be: 5791ii.If the extension were 7091, then the local SIP port would be: 5091iii.If the extension were 70091, then again, the local SIP port would be: 5091c.Click “Apply” to save the settingsa.This section is broken into three parts on the screen, each with their own “Apply” button.i.Note: Clicking “Apply” in one section will not save settings for all three, you MUSTclick “Apply” in each section before editing the next.b.Time zone: change this to match the location that the phone is deployed to.i.Click “Apply.”c.Daylight Savings Time Settings > Location: set this to the country the phone is deployed to.i.Click “Apply.”a.This step is optional.b.Greeting Words: Set with either of the followingi.Customer/User nameii.Customer’s Business nameiii.Phone DiD or extension number.5.Function Key > Function Key taba.This area defines what is displayed next to the DSS Line keys that display on the lower rightscreen of the phone.i.DSS Key 1-1 Name: Extension Number | Line: SIP1ii.DSS Key 1-2 Name: Extension Number | Line: SIP1iii.DSS Key 1-3 Name: Extension Number | Line: SIP1iv.DSS Key 1-4 Name: Extension Number | Line: SIP1。
Fanvil X5S 无线电话 DHCP Option 66 自动配置指南说明书

DHCP Option66auto provisionVersion:V1.1Release Date:3rd,Nov,2021Contents1.Introduction (1)1.1.Overview (1)1.2.Applicable model (1)1.3.Target audience (1)2.Operation procedure (2)1.Introduction1.1.OverviewThis document introduces the batch upgrade of phones through DHCP option66(one of the methods of automatic deployment).Its principle is:restart the phone.When the phone starts,it will send a request to the router to obtain IP.When the router distributes IP to the phone,it will also send the upgraded information to the phone(which needs to be set on the router in advance)so that the phone can find the corresponding data to upgrade.1.2.Applicable modelThis document is applicable to all phone models of Fanvil.1.3.Target audienceThis document is for daily maintenance personnel who solve phone problems.2.Operation procedureProvision network connection method:Install a software on your PC to set up a DHCP server (download address:http://www.dhcpserver.de/cms/),use the new DHCP server to provide the IP address for the phone,and then set the upgrade information sent to the phone.In addition,configure a server (FTP or TFTP server)on the personal computer to store the data to be upgraded (such as phone software or configuration files,etc.).The final network topology is as follows:1.Configure DHCP Server http://www.dhcpserver.de/cms/After downloading the DHCP server,unzip it to your computer and start the installationSet the IP of the computer.Set a fixed IP (such as 192.168.1.2).It is recommended to set a wired network card.Double click dhcpwiz Exe,run DHCP server,a pop-up window prompts to start setting,and click Next:LanIP phoneIP phone IP phoneAfter clicking next,you will be prompted to select the network card,that is,which network card to use to establish DHCP server,and then use this network card to distribute IP to the phone.Select the wired network card with IP just set:After clicking next,the DHCP server is integrated with a TFTP server,so there is no need to build another one.Just check it directly.Pay attention to the root directory of the selected TFTP server.This root directory is the directory where the upgrade data is stored.If you have theopportunity to find the data to be upgraded in this directory,it is recommended not to set a directory with Chinese and remember this directory,Later,put the data to be upgraded into this root directory:Click next to prompt the IP address range of distribution:Click the button,set DHCP option66.The information set here is veryimportant,that is,set the information that tells the phone where to download the upgradedata.Click Add to add a DHCP option as follows:Add path(“tftp://192.168.1.2/CommonFile.txt”)Don't omit the double quotation marks. This path will be sent to the IP phone when distributing the IP to the phone.After receiving the message,the phone will know that the IP is192.1681.2this computer(that is,the computer set up)to download the name commonfile Txt file,which is a guidance configuration file to guide the phone to do what.We will introduce it in detail in the next steps.Click OK twice and confirm.Click next to prompt the summary of the previous settings:Check overwrite existing file,click write INI file,and then click Next:Click the Install button to make the previous configuration effective:Check,click the start button to start running the DHCP server.You can see that the status changes to running:Click Finish:Clikd,click Yes in the pop-up prompt box to see this icon in the lowerright corner of the computer and on the taskbar:,indicates that DHCP server has been installed on the computer.Modify profilePhone upgrade this configuration file will not modify the user configuration on the phone. This file is a guidance file that tells the phone where to download the phone software. Therefore,first put the telephone software under the TFTP root directory,and then write the address of the telephone software into the guidance file,so that after the telephone downloads the guidance file,it will know where to download the telephone software after analysis.Open the guidance file with few contents,but make sure the address is correct:The address of the phone software includes the host address of the TFTP server(i.e.the address of the computer)and the file name of the phone software(firmware.Z is written here,Fanvil Technology Co.LtdAddr:10/F Block A,Dualshine Global Science Innovation Center,Honglang North 2nd Road,Bao'an District,Shenzhen,China Tel:+86-755-2640-2199Email:**********************************Official Web: so the phone will find the telephone software with the file name of firmware.Z).Put the phone software under the root directory of TFTP,and the phone will download the software upgrade.Note:when modifying the guidance configuration file,do not modify other contents (do not delete or add spaces),otherwise the upgrade fails.2.Upgrade operationAfter the above configuration is completed,you can upgrade the phones in batches.1.Put the guidance configuration file of the phone and the software of the phone (the file name should be consistent with that set in the guidance configuration file)into the TFTP root directory.2.Restart the phone.Manual restart or batch power on is OK,depending on the site conditions.On the PC,you can see the prompt for the restarted phone to obtain the IP.Wait about 30seconds,and you can see the prompt for downloading the upgrade software on the phone screen.When the phone is restarted automatically,the phone upgrade is completed.After the upgrade,exit the DHCP server on the computer and restore the connection to the original router.。
WP820高端wi-fi便携彩屏话机 管理员手册_1.0.7.30
深圳市潮流网络技术有限公司WP820高端Wi-Fi便携彩屏话机管理员手册技术支持潮流网络技术有限公司为客户提供全方位的技术支持。
您可以与本地代理商或服务提供商联系,也可以与公司总部直接联系。
地址:深圳市南山区科技园北区新西路16号彩虹科技大厦4楼邮编:518057网址:客服电话:*************客服传真:*************技术支持热线:4008755751技术支持论坛:/forums网上问题提交系统:/support/submit-a-ticket商标声明和其他潮流网络商标均为潮流网络技术有限公司的商标。
本文档提及的其他所有商标或注册商标,由各自的所有人拥有。
注意:由于产品版本升级或其他原因,本文档内容会不定期进行更新。
除非另有约定,本文档仅作为使用指导,本文档中的所有陈述、信息和建议不构成任何明示或暗示的担保。
目录文档目的 (1)更新日志 (2)固件版本1.0.7.30 (2)固件版本1.0.7.26 (2)固件版本1.0.7.22 (2)固件版本1.0.7.15 (2)固件版本1.0.7.7 (3)固件版本1.0.5.5 (3)固件版本1.0.3.20 (3)固件版本1.0.3.6 (4)固件版本1.0.3.5 (4)固件版本1.0.1.15 (5)固件版本1.0.1.12 (5)欢迎使用 (6)产品概述 (7)产品特性 (7)技术参数 (7)安装 (10)设备包装清单 (10)安装WP820 (11)充电基座 (11)话机 (11)电池信息 (12)WP820按键描述 (12)WP820图标说明 (14)WP820话机菜单 (16)使用Wi-Fi获取网络 (19)查看IP地址 (20)WEB用户页面访问配置 (21)通过Web浏览器配置 (21)访问Web页面 (21)Web页面语言 (22)保存更改的设置 (22)Web页面访问权限管理 (22)更改用户密码 (23)更改管理员密码 (24)更改HTTP/HTTPS Web访问端口 (25)WEB页面设置参数说明 (26)状态页面参数说明 (26)状态---帐号状态页面参数说明 (26)状态---网络状态页面参数说明 (26)状态---系统信息页面参数说明 (27)帐号页面参数说明 (28)帐号---基本设置页面参数说明 (28)帐号---SIP设置页面参数说明 (29)帐号---编码设置页面参数说明 (32)帐号---通话设置页面参数说明 (35)帐号---高级设置页面参数说明 (37)电话设置页面参数说明 (39)电话设置---基本设置页面参数说明 (39)电话设置---通话设置页面参数说明 (39)电话设置---铃声音调设置页面参数说明 (41)电话设置---视频设置页面参数说明 (42)电话设置---PTT/对讲设置页面参数说明 (42)网络设置页面参数说明 (44)网络设置---蓝牙设置页面参数说明 (44)网络设置---Wi-Fi设置页面参数说明 (44)网络设置---OpenVPN®设置页面参数说明 (46)网络设置---高级网络设置页面参数说明 (47)系统设置页面参数说明 (48)系统设置---日期和语言设置页面参数说明 (48)系统设置---安全设置页面参数说明 (48)系统设置---偏好设置页面参数说明 (50)系统设置---网管设置页面参数说明 (52)系统维护页面参数说明 (52)系统维护---更新升级页面参数说明 (52)系统维护---系统诊断页面参数说明 (55)系统维护---事件通知页面参数说明 (57)应用页面参数说明 (59)应用---本地联系人页面参数说明 (59)应用---LDAP联系人页面参数说明 (61)应用---录音页面参数说明 (63)增值业务页面参数说明 (63)增值业务---门禁系统页面参数说明 (63)增值业务---Broadsoft联系人页面参数说明 (63)增值业务---安全/告警页面参数说明 (64)升级和部署 (66)升级和部署配置 (66)通过话机菜单配置 (66)通过Web页面配置 (67)通过本地PC升级 (67)通过TFTP服务器升级 (68)通过U盘升级 (69)通过U盘部署配置文件 (69)通过U盘升部署Wi-Fi (70)部署和配置文件下载 (70)恢复出厂设置 (71)通过话机菜单恢复出厂设置 (71)通过Web页面恢复出厂设置 (71)通过硬按键恢复出厂设置 (73)体验WP820 (74)图2充电基座 (11)图3WP820话机安装 (11)图4WP820按键说明 (13)图6连接Wi-Fi网络 (20)图7Wi-Fi信息屏 (20)图8WP820Web GUI语言 (22)图9修改用户密码 (23)图10修改管理员密码 (24)图11Web访问端口 (25)图12通过话机菜单升级 (66)图13通过Web页面升级 (67)图14上传升级固件 (68)图15U盘固件检测 (69)图16通过话机菜单恢复出厂 (71)图17Web页面恢复出厂设置 (72)图18Web页面确认恢复出厂 (72)表2WP820技术参数说明 (7)表3设备包装清单 (10)表4WP820的按键 (13)表5WP820图标说明 (14)表6WP820菜单结构 (18)表7用户权限 (22)表8状态---帐号状态页面参数说明 (26)表9状态---网络状态页面参数说明 (26)表10状态---系统信息页面参数说明 (27)表11帐号---基本设置页面参数说明 (28)表12帐号---SIP设置页面参数说明 (29)表13帐号---编码设置页面参数说明 (32)表14帐号---通话设置页面参数说明 (35)表15帐号---高级设置页面参数说明 (37)表16电话设置---基本设置页面参数说明 (39)表17电话设置---通话设置页面参数说明 (39)表18电话设置---铃声音调设置页面参数说明 (41)表19电话设置---视频设置页面参数说明 (42)表20电话设置---PTT/对讲设置页面参数说明 (42)表21电话设置---壁纸设置页面参数说明 (44)表22网络---蓝牙设置页面参数说明 (44)表23网络---Wi-Fi设置页面参数说明 (44)表24网络设置---OpenVPN®设置页面参数说明 (46)表25网络设置---高级网络设置页面参数说明 (47)表26系统设置---日期和语言设置页面参数说明 (48)表27系统设置---安全设置页面参数说明 (48)表28系统设置---偏好设置页面参数说明 (50)表29系统设置---网管设置页面参数说明 (52)表30系统维护---更新升级页面参数说明 (52)表31系统维护---系统诊断页面参数说明 (55)表32事件通知配置列表 (57)表33应用---本地联系人页面参数说明 (59)表34应用---LDAP联系人页面参数说明 (61)表35应用---录音页面参数说明 (63)表36应用---通话记录页面参数说明 (63)表37增值业务---门禁系统页面参数说明 (63)表38增值业务---Broadsoft联系人页面参数说明 (63)表39增值业务---安全/告警页面参数说明 (64)文档目的本文档描述了如何通过话机菜单和Web页面配置WP820。
Fanvil i16V 视频对讲机安装指南说明书

1) PanelDevice size Package Contents 1Physical specification2195 x 120 x 34 (mm)IR LED SpeakerCameraDSS keyMIC2) Interface description①②③④⑤⑥⑦⑧Open the rear case of the device, there is a row of terminal blocks for connecting the power supply, electric lock control, etc. The connection is as follows :Wall-mounted:1) Use built-in screw tool to remove the surface shell;2) Based installation dimensions, mounting hole in the wall to draw, use an electric drill holes lay;3) The white rubber plugged into the wall and the bottom fixed with screws to the wall;4) After connecting the power cord and network cable, screw the surface shell fixed.Installation Diagram3Fanvil Technology Co., LtdWebsite: EMail:***********************@Tel: +86-755-2640-2199 Fax: +86-755-2640-2618Add: 10/F Block A, Dualshine Global Science Innovation Center, Honglang North 2nd Road, Bao'an District, Shenzhen, ChinaMethod 2: Long press DSS key for 10 seconds(after power-on for 30 seconds), and when the speaker beeps rapidly, press DSS key again quickly, the beeps stop ,the intercom will report the IP address by itself.Step 1: Log in the WEB admin interface of the device Input IP address (e.g.http://192.168.1.128) into address bar of PC’s web browser. The default user name and password are both adminStep 2: Add SIP account Set SIP server address, port, user name, password and SIP user with assigned SIP account parameters. Select <enable registration>, click <Apply> to take effect.There are two methods as shown below to search the device.Methods 1: Open the iDoorPhone Network Scanner,click the Refresh button to search the device and find the IP address.(Download address /tool/iDoorPhoneNetworkScanner.exe)In addition, device provides the device surface DSS key operation to switch IP address acquisition mode:Long press the DSS key for 10 seconds, to be issued by the speaker Beep, and then press the DSS key three times, the beep stops. Wait 10 seconds, after the success of the system automatically broadcast the current IP address.Searching Video Intercom4Video Intercom Configuration 5Step 3: Set DSS keySet DSS key speed dial parameters, as shown below, click “Apply”to save this setting. Type: Hot key.Number 1: The DSS Key will dial to this Number 1.Number 2: If number 1 is unavailable, it will be transferred to number 2.Line: Working line.Subtype: Speed Dial.Step 4: Set the Intercom parametersStep 5: Set the security functionTwo short circuits input and output configuration,trigger ring,tamper detection configuration。
Alcatel-Lucent 8001 DeskPhone用户使用手册_final version
Alcatel-Lucent 8001 DeskPhone用户使用手册Alcatel-Lucent 8001 DeskPhone 1目录1. 入门 (4)1.1.概述 (4)1.2.产品特点 (4)2. 安装话机 (4)3. 话机概览 (6)3.1.话机按键和硬件 (6)3.2.话机屏幕功能 (8)4. 网络接入方式设置 (9)4.1.DHCP接入 (9)4.2.静态IP接入 (9)4.3.PPPOE接入 (10)5. SIP账号的设置 (11)6. 基本功能 (12)6.1.发出呼叫 (12)6.1.1.简单呼叫 (12)6.1.2.匿名呼叫 (12)6.1.3.重拨 (13)6.1.4.呼叫记录拨号 (13)6.1.5.电话本拨号 (13)6.1.6.多线路拨号 (14)6.1.7.热线拨号 (14)6.2.应答呼叫 (14)6.2.1.手柄/免提/耳麦应答 (14)6.2.2.多线路应答 (15)6.2.3.自动应答 (15)6.3.终止呼叫 (15)6.4.保持呼叫和恢复呼叫(切换通话线路) (16)6.5.转移呼叫 (16)6.5.1.后转及盲转 (16)6.5.2.呼叫前转 (17)6.6.闭音的使用 (18)6.7.免打扰的使用 (18)6.8.三方会议 (19)6.9.语音信箱 (20)7. 高级功能 (20)7.1.电话本的使用 (20)7.1.1.企业通讯录 (20)7.1.2.个人通讯录 (21)7.1.3.LDAP (23)7.1.4.黑名单 (24)7.1.5.模糊查找功能 (24)Alcatel-Lucent 8001 DeskPhone 27.2.呼叫记录的使用 (25)7.3.Peer-to-Peer模式 (25)8. 话机键盘设置 (26)8.1.话机菜单语言设置 (26)8.2.短信息功能 (27)8.3.时间及夏令时功能 (27)8.4.自定义铃声及音量 (27)8.5.电话本查找 (28)8.6.话机键盘设置的无法设置项 (29)9. 话机WEB设置 (30)9.1.网络 (30)N网口配置 (31)9.1.2.PC网口配置 (32)9.2.账号及服务器配置 (33)9.3.声音调节 (35)9.4 线路键编程 (38)9.5功能键自定义编程 (38)9.6软按键编程 (39)9.4.通讯录 (39)9.4.1.组管理 (40)9.4.2.电话本 (41)9.4.3.LDAP (42)9.4.4.话机LDAP配置属性介绍 (43)9.4.5.黑名单 (45)9.4.6.企业通信录 (46)9.5.高级配置 (46)9.5.1 VLAN配置 (46)9.5.2VPN配置 (47)9.5.3拨号规则配置 (47)9.6话机维护 (49)9.6.1调试级别 (49)9.6.2密码修改 (49)9.6.3恢复出厂配置 (50)9.6.4自动升级 (50)9.6.5FTP升级 (52)9.6.6TFTP升级 (53)9.6.7HTTP升级 (54)9.6.8重启 (54)9.7话机状态 (54)9.8系统信息 (55)9.9页面语言设置 (55)10话机故障排除 (56)10.1诊断模式 (56)Alcatel-Lucent 8001 DeskPhone 31.入门1.1.概述ALCATEL-LUCENT 8001属中小屏商务型IP话机,时尚和科技的外观、优异的语音质量、强大的功能,支持2条线路注册,可同时管理多个通话。
朗视S系列如何使用LDAP
在亿联话机上使用LDAP
我们在亿联T28上配置LDAP作为示例。 注意: 在最新版本的固件, 比如 2.72.0. givenName sn cn 值 名字 姓氏 昵称
telephoneNumber homePhone mobile mail departmentNumber
LDAP 名称过滤 LDAP 号码过滤 服务器地址 端口 跟节点 用户名 密码 最大查询结果 LDAP 名字属性 LDAP 号码属性 LDAP 显示名称 协议 搜索延迟 (毫秒)(0~2000) 来电号码匹配 LDAP 结果排序 拨号/预拨号查询
(|(cn=%)(sn=%)) (|(telephoneNumber=%)(homePhone=%)(mobile=%)) 192.168.9.144/朗视S系列PBX的IP地址/ 389 dc=pbx,dc=com cn=admin,dc=pbx,dc=com ****** /朗视S系列PBX中设置的LDAP密码,建议更改/ 50 cn sn display Name telephoneNumber homePhone mobile mail department Number %cn Version 3 0 启用 启用 启用
如何使用LDAP
什么是LDAP?
LDAP 是轻量目录访问协议缩写, 是一种服务器-客户端协议,用于访问目录服务。 LDAP 在朗视S系列PBX上面用于电话簿,设置了这个功能,我们可以在话机上通过搜索关键字来获取到号码。
如何在朗视S系列PBX上配置LDAP
检查“启用LDAP服务器”选项,然后在其他字段中使用默认配置. 朗视S系列PBX作为LDAP服务端。 默认设置如下: 目录结点: dc=pbx,dc=com PBX结点: ou=pbx,dc=pbx,dc=com 用户名: cn=admin,dc=pbx,dc=com 密码: (根据需要填写) 然后,您根据需要添加联系人
Fanvil话机可编程按键功能使用说明书
Fanvil话机可编程按键功能使用版本:<1.1>发布日期:<2020/11/3>1.介绍 (1)1.1.概述 (1)1.2.适用型号 (1)1.3.目标受众 (1)2.按键分类及使用方法 (2)2.1线路键:多线路切换使用: (2)2.2记忆键:快速拨号 (3)2.3通话驻留 (3)2.4功能三:BLF(订阅)功能 (4)2.5功能键:语音留言(MWI) (6)2.6电话本联系人 (7)2.7抢接 (7)2.8录音 (7)2.9锁定话机 (9)2.10功能八:多页按键事件的查看和切换 (10)1.1.概述可编程按键(DSS Key),是为了满足用户对话机功能的自定义需求而实现的。
X系列终端话机根据型号的不同,具有不同数目的可编程按键。
某些型号的话机,还可以连接扩展板,扩展板上的每一个按键都为可编程按键。
1.2.适用型号适用于方位所有型号的话机。
1.3.目标受众本文档适用于需要设置DSS key的用户。
2.按键分类及使用方法2.1线路键:多线路切换使用:X系列话机按下线路键,若该线路未被注册,则进入线路设置模式。
若线路已注册,则进入拨号模式。
可以输入号码进行呼叫。
设置说明:红色框选择《线路》类型、绿色框和黄色框是选填项、蓝色框选择对应的SIP线路。
侧屏方式设置侧屏设置效果副屏方式设置副屏设置效果2.2记忆键:快速拨号设置说明:红色框选择《记忆键》、《快速拨号》类型、绿色框是选填项、蓝色框一设置被叫号码,蓝色框二三根据自身要求选择对应的SIP线路和颜色设置操作方法设置效果2.3通话驻留功能描述:在通话中,如果因为不方便,需要换个位置继续通话时,可以使用该功能。
使用方法:在通话中,按下该键,当听到服务器提示的一个Call Park号码,即可挂机。
服务器会将通话暂时保留起来。
然后去另外的地方,摘机拨打服务器所提示的Call Park号码,就可以恢复原来的通话。
设置说明:红色框选择《记忆键》、《通话驻留》类型、绿色框是选填项、蓝色框设置服务器的驻留号码使用说明:AB话机处于通话中,B话机按通话驻留键后,A话机可以听到被驻留的音乐,C话机按下驻留键后,AC话机通话正常。
Fanvil BW320 说明书
7. 请依照本说明书指示方法使用,否则可能因此导致本产品受损。
2
目录
1. 欢迎使用 BW320 话机 .............................................................................................................5
1.1. 产品包装内容 .......................................................................................................................5
2. 认识 BW320 ...............................................................................................................................6
- 1、下载文档前请自行甄别文档内容的完整性,平台不提供额外的编辑、内容补充、找答案等附加服务。
- 2、"仅部分预览"的文档,不可在线预览部分如存在完整性等问题,可反馈申请退款(可完整预览的文档不适用该条件!)。
- 3、如文档侵犯您的权益,请联系客服反馈,我们会尽快为您处理(人工客服工作时间:9:00-18:30)。
图 3.1 LDAP 系统结构图
3.2 LDAP 中的 objectClass 与 Attribute
LDAP 支持对条目能够和必须支持哪些属性进行控制,这是由一个特殊的称为对象类别 (objectClass)的属性来实现的。该属性的值决定了该条目必须遵循的一些规则,其规定了该条目 能够及至少应该包含哪些属性。
方位可以在没有任何通知或提示的情况下随时对本文档中的内容进行修改。虽然方位力图在文档中 提供准确的材料和信息,但方位并不保证这些材料和内容的准确、完整、充分、兼容和可靠性。方位保 留随时修改本文档中的服务(全部或部分)而无需事先告知用户的权利,方位在行使前述各项权利时亦 无需对用户承担任何责任。本文档中描述的产品或功能可能存在已知的设计缺陷或错误(已在勘误表中 注明),可能会导致产品与已发布的规范相背离,可应要求提供最新的勘误表。方位并不就文档中提供 的任何产品、服务或信息做出任何声明、保证或认可,所有销售的产品和服务应受本公司的销售合同和 条款的约束。请在下订单之前联系您当地的方位销售办事处或您的经销商以获得产品最新规格说明。
象都有一个惟一的名称,如
“uid=tom,ou=test,dc= winline,dc=com”
rdn
Relative dn
相对辨别名,类似于文件系统中的相对路径,它是与目录树 结构无关的部分,如“uid=tom”或“cn= Thomas Johansson”
2.4 参考资料
1./link?url=brydQRx82r5-GrGiY10z_TWpXH97udnb0FvgmTPBUwja3s4SUBAccI pYuom5XbpI2Foae9pno9pdKGwaD3sOgYIOoE-jGgAasHwRRq-0Bda 2./techdoc/net/2007/01/20/948652.shtml
© 2014 苏州方位通讯科技有限公司。
4
此文档所有权以及最终解释权归苏州方位通讯科技有限公司所有
严禁未经授权擅自复制或披露该信息的全部/部分内容
方位资料,严禁盗用!
2 文档介绍
2.1 LDAP 概述
LDAP(Lightweight Directory Access Protocol),轻量级目录访问协议。它是目录访问协议的一 个标准。其基于 X.500 标准,可以根据需要定制。轻量级目录访问协议以信息目录的形式存在,在 该目录中可以只定义一次用户和组,而在多台机器和多个应用程序间共享它们。
© 2014 苏州方位通讯科技有限公司。
2
此文档所有权以及最终解释权归苏州方位通讯科技有限公司所有
严禁未经授权擅自复制或披露该信息的全部/部分内容
方位资料,严禁盗用!
目录
目录 3 1 修订历史 ...............................................................................................................................................4 2 文档介绍 ...............................................................................................................................................5
© 2014 苏州方位通讯科技有限公司。
6
此文档所有权以及最终解释权归苏州方位通讯科技有限公司所有
严禁未经授权擅自复制或披露该信息的全部/部分内容
方位资料,严禁盗用!
3 LDAP 信息模型
3.1 LDAP 目录中的信息结构
LDAP 目录中的信息是按照树型结构组织,具体信息存储在条目(entry)的数据结构中。条目 相当于关系数据库中表的记录,条目是具有区别名 DN(Distinguished Name)的属性 (Attribute),DN 是用来引用条目的,DN 相当于关系数据库表中的关键字。属性由类型(Type) 和一个或多个值(Values)组成,为了方便检索的需要,LDAP 中的 Type 可以有多个 Value。LDAP 以树型结构存储的信息,在树根一般定义国家(c=CN)或域名(dc=com),其下往往定义一个或多 个组织(organization)或组织单元(organizational units)。LDAP 系统结构图见图 1。
LDAP 中,一个条目必须包含一个 objectClass 属性,且需要赋予至少一个值。每一个值将用 作一条 LDAP 条目进行数据存储的模板;模板中包含了一个条目必须被赋值的属性和可选的属性。
objectClass 有着严格的等级之分,最顶层是 top 和 alias。例如,organizationalPerson 这个 objectClass 就隶属于 person,而 person 又隶属于 top。
dc
Domain Component 域名,其格式是将完整的域名分成几部分,如域名为
变成 dc= winline,dc=ne”
Ou
Organization Unit
组织单位,类似于 Linux 文件系统中的子目录,它是一个容
方位资料,严禁盗用!
LDAP 简单应用说明
版本: 发布日期:
1.1 2014-02-22
© 2011 - 2014 苏州方位通讯科技有限公司. 此文档所有权以及最终解释权归苏州方位通讯科技有限公司所有。 (以后简称为方位). 严禁未经授权擅自复制或披露该信息的全部/部分内容。
方位资料,严禁盗用!
规格如有更改,恕不另行通知。 免责声明
© 2014 苏州方位通讯科技有限公司。
5
此文档所有权以及最终解释权归苏州方位通讯科技有限公司所有
严禁未经授权擅自复制或披露该信息的全部/部分内容
方位资料,严禁盗用!
2.2 目标受众
此文档针对需要测试 LDAP 应用的内部人员和客户。
2.3 术语表
关键字
英文全称
含义
c
Country
国家,如“CN”或“US”等。
© 2014 苏州方位通讯科技有限公司。
7
此文档所有权以及最终解释权归苏州方位通讯科技有限公司所有
严禁未经授权擅自复制或披露该信息的全部/部分内容
方位资料,严禁盗用!
objectClass 可分为以下 3 类: ● 结构型(Structural):如 person 和 organizationUnit; ● 辅助型(Auxiliary):如 extensibeObject; ● 抽象型(Abstract):如 top,抽象型的 objectClass 不能直接使用。
下面列出部分常用 objectClass 要求必设的属性。 ● account:userid。 ● organization:o。 ● dcobject:dc。 ● person:cn 和 sn。 ● organizationalPerson:与 person 相同。 ● organizationalRole:cn。 ● organizationUnit:ou。 ● posixGroup:cn、gidNumber。 ● posixAccount:cn、gidNumber、homeDirectory、uid、uidNumber。
2.1 LDAP 概述..................................................................................................................................5 2.2 目标受众 .....................................................................................................................................6 2.3 术语表 .........................................................................................................................................6 2.4 参考资料 .....................................................................................................................................6 3 LDAP 信息模型 ...................................................................................................................................7 3.1 LDAP 目录中的信息结构..........................................................................................................7 3.2 LDAP 中的 objectClass 与 Attribute..........................................................................................7 4 如何在 Fanvil 话机上使用 LDAP 电话本..........................................................................................9 4.1 概述 .............................................................................................................................................9 4.2 配置并运行 LDAP......................................................................................................................9 5 适用机型 .............................................................................................................................................11