turboTEC 安装与维护手册
德国威能turboTEC_pro_及_turboTEC_plus_用户使用说明书
3.6
节能提示 ........................................................................... 7
4 4.1 4.1.1 4.1.2 4.2 4.2.1 4.2.2 4.3 4.4 4.4.1 4.4.2
4.4.3 4.5 4.5.1 4.5.2 4.5.3 4.5.4 4.6
定货号 0010003948 0010003949 0010003952 0010003950 0010003953 0010003951 0010003954
您可以在壁挂炉的包装和铭牌上查看产品的号及定货 号。
1.1 文件保管 请将本操作手册和所有相关文件保管在即时可用之处。 如果将壁挂炉转卖或送人,请将文件一同交给后继使 用者。
供用户使用
操作手册
turboTEC pro / turboTEC plus
壁挂式燃气采暖锅炉 壁挂式燃气采暖/热水锅炉
CN
JNG27-VU CN 242/3-5-H JNG31-VU CN 282/3-5-H JNG41-VU CN 362/3-5-H
JLG27-VUW CN 242/3-3-H JLG27-VUW CN 242/3-5-H JLG31-VUW CN 282/3-5-H JLG41-VUW CN 362/3-5-H
turboTEC pro / turboTEC plus系列壁挂炉特点 turboTEC pro / turboTEC plus为威能新一代壁挂式燃气 锅炉(以下简称壁挂炉),结构紧凑,外观庄重、大方。 VUW系列为全自动的壁挂式家用燃气采暖/生活热水两用 锅炉,可安装在密闭的室内。生活热水由壁挂炉内的副换 热器直接提供,生活热水功能与采暖功能自动切换,生活 热水功能优先。VU系列是全自动的壁挂式家用燃气采暖系 统锅炉,当需要供应生活热水时候,必须配套相应的储水 /加热设备,如间接加热的热水储水罐。
威能烟道说明书
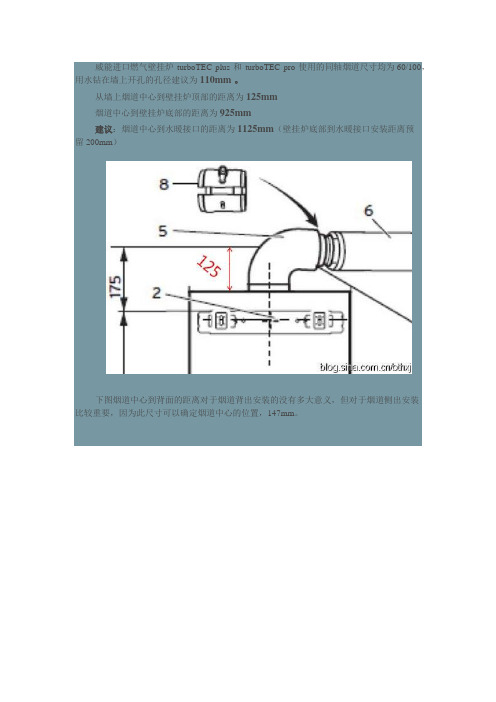
威能进口燃气壁挂炉turboTEC plus 和turboTEC pro 使用的同轴烟道尺寸均为60/100,用水钻在墙上开孔的孔径建议为110mm 。
从墙上烟道中心到壁挂炉顶部的距离为125mm烟道中心到壁挂炉底部的距离为925mm建议:烟道中心到水暖接口的距离为1125mm(壁挂炉底部到水暖接口安装距离预留 200mm)下图烟道中心到背面的距离对于烟道背出安装的没有多大意义,但对于烟道侧出安装比较重要,因为此尺寸可以确定烟道中心的位置,147mm。
威能国产燃气壁挂炉 turbo 18kw 24kw 使用的同轴烟道尺寸为60/100,用水钻在墙上开孔的孔径建议为110mm。
从墙上烟道中心到壁挂炉顶部的距离为110mm烟道中心到壁挂炉底部的距离为850mm建议:烟道中心到水暖接口的距离为1050mm(壁挂炉底部到水暖接口安装距离预留 200mm)威能国产燃气壁挂炉 turbo 28kw 35kw 使用的同轴烟道尺寸为80/125,用水钻在墙上开孔的孔径建议为140mm。
从墙上烟道中心到壁挂炉顶部的距离为160mm烟道中心到壁挂炉底部的距离为960mm建议:烟道中心到水暖接口的距离为1160mm(壁挂炉底部到水暖接口安装距离预留 200mm)下图烟道中心到背面的距离对于烟道背出安装的没有多大意义,但对于烟道侧出安装比较重要,因为此尺寸可以确定烟道中心的位置。
威能燃气壁挂炉烟道安装1. 根据上面给出的烟道中心到挂板的尺寸,把威能燃气壁挂炉拷到墙上。
2. 将烟道连同密封墙垫一起通过墙孔伸出墙外,然后向内拉,直到密封墙垫紧贴在外墙上。
3. 将90°弯头插入水平烟道的排烟管中4. 将90°弯头另一端压入壁挂炉的排烟/进气口内。
5. 保证出墙烟道端口距墙110mm。
6. 烟道出墙处应向下倾斜2-3°,以使冷凝水不会倒流入燃气采暖热水炉。
7. 将烟道密封连接。
8. 将所有连接处用烟道固定圈密封固定。
最新德国威能Vaillant壁挂炉电锅炉配件全系列型号表turboMAX-turboTEC-

POS Art.No.English Description Chinese Description List Price List Price List Price 编号代号型号说明中文型号说明单价市场统一零售价经销商进货价0010015227L1PB22-VUW 202/5-3 (H-CN)20 kW标准型壁挂式燃气采暖/热水锅炉140900020061014Horizontal air/flue duct and terminal 60/100国产0.75米标准烟道,Ø60/1005600010015228L1PB27-VUW 242/5-3 (H-CN)24 kW标准型壁挂式燃气采暖/热水锅炉150300020061014Horizontal air/flue duct and terminal 60/100国产0.75米标准烟道,Ø60/1005600010015232L1PB27-VUW 242/5-5 (H-CN)24 kW豪华型壁挂式燃气采暖/热水锅炉171800020061014Horizontal air/flue duct and terminal 60/100国产0.75米标准烟道,Ø60/1005600010015233L1PB31-VUW 282/5-5 (H-CN)28 kW豪华型壁挂式燃气采暖/热水锅炉187200020061014Horizontal air/flue duct and terminal 60/100国产0.75米标准烟道,Ø60/1005600010015234L1PB41-VUW 362/5-5 (H-CN)36 kW豪华型壁挂式燃气采暖/热水锅炉223300020061014Horizontal air/flue duct and terminal 60/100国产0.75米标准烟道,Ø60/1005600010015229N1PB27-VU 242/5-5 (H-CN)24 kW豪华壁挂式燃气采暖锅炉14830 0020061014Horizontal air/flue duct and terminal 60/100国产0.75米标准烟道,Ø60/1005600010015230N1PB31-VU 282/5-5 (H-CN)28 kW豪华壁挂式燃气采暖锅炉15550 0020061014Horizontal air/flue duct and terminal 60/100国产0.75米标准烟道,Ø60/1005600010015231N1PB41-VU 362/5-5 (H-CN)36 kW豪华壁挂式燃气采暖锅炉20460 0020061014Horizontal air/flue duct and terminal 60/100国产0.75米标准烟道,Ø60/100560*** *** *** *** *** *** *** ***6 7 814650 15590 17740 19280 22890 15390 16110 210201 2 3 4 5POS Art.No.English Description Chinese DescriptionList Price List price List Price 编号订货号英文描述中文描述单价市场零售价格经销商进货价0010024179L1PB22-VUW 162/5-X (H-CN)16 kW 采暖/22KW 热水国产壁挂式燃气采暖热水炉82800020061014Horizontal air/flue duct and terminal 60/100国产0.75米标准烟道,Ø60/1005600010015223L1PB20-VUW 182/5-X (H-CN)turboMAX 18 kW 国产壁挂式燃气采暖热水炉95400020061014Horizontal air/flue duct and terminal 60/100国产0.75米标准烟道,Ø60/1005600010015224L1PB26-VUW 242/5-X (H-CN)turboMAX 24 kW 国产壁挂式燃气采暖热水炉102900020061014Horizontal air/flue duct and terminal 60/100国产0.75米标准烟道,Ø60/1005600010015225L1PB32-VUW 282/5-X (H-CN)turboMAX 28kW 国产壁挂式燃气采暖热水炉119700020061014Horizontal air/flue duct and terminal 60/100国产0.75米标准烟道,Ø60/1005600010015226L1PB38-VUW 352/5-X (H-CN)turboMAX 35kW 国产壁挂式燃气采暖热水炉1546000201047120.9m standard flue pipe, Ø80/125国产0.9米标准烟道,Ø80/1259400010024180L1PB22-VUW 162/5-X (H-CN)16 kW 采暖/22KW 热水国产壁挂式燃气热水炉(单采暖)79900020061014Horizontal air/flue duct and terminal 60/100国产0.75米标准烟道,Ø60/1005600010015219N1PB20-VU 182/5-X (H-CN)turboMAX 18kW 国产壁挂式燃气采暖热水炉(单采暖)93400020061014Horizontal air/flue duct and terminal 60/100国产0.75米标准烟道,Ø60/1005600010015220N1PB26-VU 242/5-X (H-CN)turboMAX 24kW 国产壁挂式燃气采暖热水炉(单采暖)100900020061014Horizontal air/flue duct and terminal 60/100国产0.75米标准烟道,Ø60/1005600010015221N1PB32-VU 282/5-X (H-CN)turboMAX 28kW 国产壁挂式燃气采暖热水炉(单采暖)117500020061014Horizontal air/flue duct and terminal 60/100国产0.75米标准烟道,Ø60/1005600010015222N1PB38-VU 352/5-X (H-CN)turboMAX 35kW 国产壁挂式燃气采暖热水炉(单采暖)145100*********0.9m standard flue pipe, Ø80/125国产0.9米标准烟道,Ø80/125940110020017744 2 of 7 pump controll accessory,for NC boiler 同步控制器,可同时控制两个外接泵(如:热水循环泵和采暖循环泵)490490 ***120020148876Control box, VR40, assy,VaillantturboMAX 外置泵控制盒组件,VR40,威能510510*********************************8,550 9,900 10,650 12,310 15,450 8,840 10,10010,850 12,530 16,400 67891012345POS Art.No.English DescriptionChinese DescriptionList Price List Price List Price编号代号型号说明中文型号说明单价市场统一零售价经销商进货价0010015793LL1GBQ20-VUW CN 206/5-520 kw 进口冷凝壁挂式燃气采暖热水炉20800PC04015Boiler protection package Pro (40kW)锅炉保护套装(40kW )11800020237072Horizontal air/flue duct and terminal ¢60/100, for ecoTEC 20-35kw标准水平烟道(PP ),¢60/100mm ,用于20-35kw 冷凝炉6900010015794LL1GBQ26-VUW CN 256/5-525 kw 进口冷凝壁挂式燃气采暖热水炉22220PC04015Boiler protection package Pro (40kW)锅炉保护套装(40kW )11800020237072Horizontal air/flue duct and terminal ¢60/100, for ecoTEC 20-35kw标准水平烟道(PP ),¢60/100mm ,用于20-35kw 冷凝炉6900010015795LL1GBQ31-VUW CN 306/5-530 kw 进口冷凝壁挂式燃气采暖热水炉23640PC04015Boiler protection package Pro (40kW)锅炉保护套装(40kW )11800020237072Horizontal air/flue duct and terminal ¢60/100, for ecoTEC 20-标准水平烟道(PP ),¢60/100mm ,用于20-35kw 冷凝6900010015796LL1GBQ36-VUW CN 356/5-535 kw 进口冷凝壁挂式燃气采暖热水炉24960PC04015Boiler protection package Pro (40kW)锅炉保护套装(40kW )11800020237072Horizontal air/flue duct and terminal ¢60/100, for ecoTEC 20-标准水平烟道(PP ),¢60/100mm ,用于20-35kw 冷凝6900010015789LN1GBQ20-VU CN 206/5-520 kw 进口冷凝壁挂式燃气采暖热水炉(单采暖)19050PC04015Boiler protection package Pro (40kW)锅炉保护套装(40kW )11800020237072Horizontal air/flue duct and terminal ¢60/100, for ecoTEC 20-标准水平烟道(PP ),¢60/100mm ,用于20-35kw 冷凝6900LN1GBQ26-VU CN 256/5-525 kw 进口冷凝壁挂式燃气采暖热水炉(单采暖)20800PC04015Boiler protection package Pro (40kW)锅炉保护套装(40kW )11800020237072Horizontal air/flue duct and terminal ¢60/100, for ecoTEC 20-标准水平烟道(PP ),¢60/100mm ,用于20-35kw 冷凝6901LN1GBQ31-VU CN 306/5-530 kw 进口冷凝壁挂式燃气采暖热水炉(单采暖)22220PC04015Boiler protection package Pro (40kW)锅炉保护套装(40kW )11800020237072Horizontal air/flue duct and terminal ¢60/100, for ecoTEC 20-标准水平烟道(PP ),¢60/100mm ,用于20-35kw 冷凝6900010015792LN1GBQ36-VU CN 356/5-535kw 系统冷凝炉,采暖输出(80/60℃): 35kw23640PC04015Boiler protection package Pro (40kW)锅炉保护套装(40kW )11800020237072Horizontal air/flue duct and terminal ¢60/100, for ecoTEC 20-标准水平烟道(PP ),¢60/100mm ,用于20-35kw 冷凝6900LN1GBQ48-VU CN 486/5-5 (H-CN)48kw 进口冷凝壁挂式燃气采暖热水炉(单采暖)33040303209Horizontal air/flue duct and terminal ¢80/125, for ecoTEC 46-标准水平烟道,80/125,用于ecoTEC 48-65kW1510PC07002Boiler protection package (70kW)锅炉保护套装(70kW )5388002005956service valves ecoTEC 46, 65, 82,99 kW保养阀连接组件,用于ecoTEC 46,65,82,99kw 62235Sentinel X100 500ml Sentinel X100 保护剂 500ml 848006Caleffi gas filter1″Caleffi DN25燃气过滤器C546307Caleffi DIRTMAG1 1/4″磁性除污器 全铜5463 DN32注:去藕罐,系统膨胀罐,外置采暖循环泵必须安装,热水罐请选择200L 及以上型号;冷凝附件包型号PC07002 Boiler protection***************************922,670 24,090 25,510 26,830 20,920 22,670 24,090 25,510 39,938注:进口20-35KW 冷凝附件包型号PC04015 Boiler protection package Pro (40kW)123456781LN1GBQ65-VU CN 656/5-5 (H-CN)65kw进口冷凝壁挂式燃气采暖热水炉(单采暖)38540 303209Horizontal air/flue duct and terminal ¢80/125, for ecoTEC 46-标准水平烟道,80/125,用于ecoTEC 48-65kW1510 PC07002Boiler protection package (70kW)锅炉保护套装(70kW)5388002005956 0service valves ecoTEC 46, 65, 82,99 kW保养阀连接组件,用于ecoTEC 46,65,82,99kw62235Sentinel X100 500ml Sentinel X100 保护剂 500ml848006Caleffi gas filter1″Caleffi DN25燃气过滤器C546307Caleffi DIRTMAG1 1/4″磁性除污器全铜5463 DN32注:去藕罐,系统膨胀罐,外置采暖循环泵必须安装,热水罐请选择200L及以上型号;冷凝附件包型号PC07002 Boiler protection package (70kW)注:1)冷凝炉系统必须装除污器或过滤器,见去污器价格表(也可外购)。
Gates UW Titan Tube 设置、使用和维护指南说明书

Introduction Page 1UW Titan TubeSetup, Use, and Care GuideIntroduction Page 2Copyright 2022, Gates Underwater Products, Inc.Last document revision: 10 May 2022This manual and current revision is available in 8.5 x 11 size and full color atGates Underwater ProductsGates Underwater Products, Inc.13685 Stowe Drive Ste APoway, California 92064 USAPhone: +1.858.391.0052Web: Introduction Page 3Table of ContentsSetup, Use, and Care Guide (1)1:Introduction (4)Warranty Disclaimer (4)ASTERA Items Required (4)Unpacking UW Titan Tube (4)A word about cosmetics.. (4)2:Preparing the ASTERA Titan Tube (5)3:Titan Tube Install to UT2 (6)UT2 Buoyancy: Use of BASE Weight (12)4:Functional Check (13)5:Accessories (14)Surface Power / Command Cable (14)UT2 Rack (15)6:Maintenance (17)O-Rings (17)Fresh Water Rinse (17)7:Customer Support (18)Introduction Page 41: IntroductionCongratulations on your purchase of Gates UW Titan Tube (UT2) lighting product,designed specifically for the ASTERA Titan Tube LED light. UT2 is designed for years of reliable service, and functional user-friendly features.Warranty DisclaimerIt is your responsibility to learn the proper setup, use and care of UT2. Gates Warranty for parts is provided with UT2 for a period of 2 years, and electronics / cables /connectors for one 1 year. If you have any questions about this accessory kit, contact Gates directly. Details are in the last section of this manual.ASTERA Items RequiredThe following user supplied items are required to operate UT2.✓ASTERA Titan Tube ✓ASTERA charging stationUnpacking UW Titan TubeThe items listed below are included with UT2.Kit Components✓UT2 Light Tube✓UT2 Alignment Plate ✓4mm HEX tool ✓3/16 HEX tool✓UT2 BASE Weight ✓UT2 Spare KitA word about cosmetics..UTS tubes are made of clear polycarbonate, a tough material resistant to impact and fracture. To make a tube, the polycarbonate is extruded, a process that leaves inherent length-wise lines and possibly other marks that are visible to the naked eye. These are cosmetic only, and do not affect the function or performance of UT2.Preparing the ASTERA Titan Tube Page 52: Preparing the ASTERA Titan Tube✓Remove any accessories from ASTERA Titan Tube such as handles, connectors, etc.✓Charge ASTERA Titan Tube. If you are planning to use Titan Tube without a surface tether connection, fully charge the light before proceeding.✓Turn Wi-Fi OFF. If you are not planning to connect with ASTERA Titan Tube via Wifi while operating above water, turn Wi-Fi OFF.Remove any accessoriesfrom ASTERA Titan Tube.Titan Tube Install to UT2 Page 63: Titan Tube Install to UT2After stripping down the ASTERA Titan Tube:✓Secure the UT2 ‘blank side’ Alignment Plate to Titan Tube as shown below.This Alignment Plate is secured at the ‘far’ end, away from the ASTERA Titan Tubecontrol panel.NOTE the notch is aligned with the Titan Tube control panel. Assure the Align Plateis fully seated to Titan Tube.Tighten the screw with provided 4mm HEX tool.Install Alignment Plateto end opposite controlpanel. NOTE the notch ison the same side as theTitan Tube control panel.21Titan Tube Install to UT2 Page 7 ✓Secure the UT2 ‘CTRL SIDE’ Alignment Plate to Titan Tube as shown below.This Alignment Plate is secured at the ‘near’ end, next to the ASTERA Titan Tubecontrol panel.NOTE the notch is aligned with the Titan Tube control panel. Assure the Align Plate is fully seated to Titan Tube.Tighten the screw with provided 4mm HEX tool.2 Install CTRL SIDE Plate to end with control panel. NOTE the notch is on the same side as the control panel.Titan Tube Install to UT2 Page 8 ✓Remove Pressure Cap from UT2. Unthread the large ring and separate from themain tube. See image below.✓Pull out pushbuttons on UT2 Controller Block. This step provides extra clearance to ASTERA Titan Tube during insertion. 7 total pushbuttons.Remove the UT2 Pressure Cap. NOTE: Pressure Cap shown with optional GMC Surface Control Bulkhead connector.12X7Pull outpushbuttons (x7)Titan Tube Install to UT2 Page 9 ✓Mate Pressure Cap with ASTERA Titan Tube. Align the cap with control panel as shown below.NOTE the Pressure Cap does not secure with a fastener to the Titan Tube. Itremains ‘floating’ to allow for variations in Titan Tube and UT2 fitment.✓Plug in the power / DMX connector.Plug in Power /Comm connector.Titan Tube Install to UT2 Page 10✓ Insert ASTERA Titan Tube into UT2. Gently slide ASTERA Titan Tube into UT2housing. Keep Titan Tube control panel aligned with UT2 Controller Block. ✓ When nearly fully inserted, watch for alignment of ‘blank side’ Alignment Plate tomate with the UT2 end cap, which has holes to receive 2 pins on the Alignment Plate.While keeping respective control panels aligned, slide Titan Tube into UT2housing.12Titan Tube Install to UT2 Page 11 ✓Once fully inserted and seated, rotate the Pressure Cap until it stops to fully secure Titan Tube into UT2 Housing. Check that Titan Tube buttons are alignedwith UT2 pushbuttons.3Titan Tube Install to UT2 Page 12 UT2 Buoyancy: Use of BASE Weight✓UT2 is nearly neutrally buoyant in the basic configuration. If weight is needed to make UT2 negatively buoyant, install the included BASE Weight using theprovided 3/16 HEX tool.Functional Check Page 134: Functional Check✓Functional check is a straightforward verification of UT2 pushbuttons, that they properly align and access the Titan Tube control panel buttons.✓If functional check fails, double check that the Titan Tube is fully seated in UT2, with alignment pins seating properly at the end opposite the control panel, as notedin the previous section. Repeat those steps if necessary to align Titan Tube buttons with UT2 pushbuttons.Functionally check UT2operation at the ControlPanel.Accessories Page 145: AccessoriesSurface Power / Command CablePower / Command Cables are available for full light control from the surface. 100 ft / 37m length, the surface end will connect directly to various ASTERA products designed for this purpose, such as Power Box, Data Link, and Charging Case. Details can be found here: ASTERA Titan Tube .✓ When using the surface cable, first remove the GMC cap at the end of UT2, asshown.✓ Similarly, plug in the Power / Command Cable and assure it is fully seated /tightened for proper seal and operation.NOTE the GMC is a ‘dry connect’ type. Do not connect or disconnect underwater.Accessories Page 15UT2 RackThe UT2 Rack mounts four UT2 Housings together to form a ‘bank’ of lights. On the Center is a cheeseplate for mounting, and the UT2 Rack includes a ‘junior pin’ receiver for use with any conventional light stand.Accessories Page 16 ✓UT2 will mount to the rack with two thumbscrews. Rest UT2 into the rack cradle (refer to image below) and secure with thumbscrews.Maintenance Page 176: MaintenanceO-RingsUT2 has only one serviceable o-ring, found on the Pressure Cap. If general usage includes installation and removal of the ASTERA Titan Tube, then lubrication of this o-ring on a regular basis is recommended.NOTE the o-ring is located in one of three locations on the Pressure Cap. One has the black o-ring, the other two are occupied by a red color ‘blank’. Return the lubricated o -ring to its original location.Fresh Water RinseAfter use, rinse UT2 in fresh water. Rinse thoroughly, particularly after use in salt water.Clean and dry with a soft cloth, and store in a cool, dry place.Customer Support Page 187: Customer SupportShould you have any questions about the Underwater Titan Tube, please contact Gates: Email: *******************************Web: Phone: +1-858.391.0052。
杭州威能地暖壁挂炉 安装使用说明书(系列二)
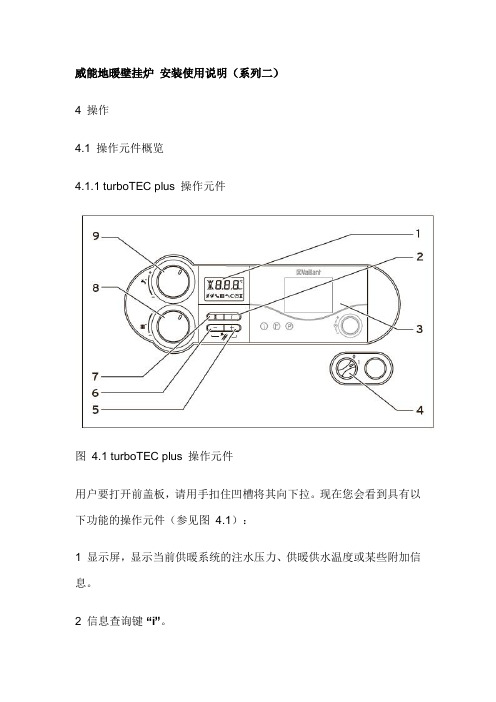
威能地暖壁挂炉安装使用说明(系列二)4 操作4.1 操作元件概览4.1.1 turboTEC plus 操作元件图4.1 turboTEC plus 操作元件用户要打开前盖板,请用手扣住凹槽将其向下拉。
现在您会看到具有以下功能的操作元件(参见图4.1):1 显示屏,显示当前供暖系统的注水压力、供暖供水温度或某些附加信息。
2 信息查询键“i”。
3 装控制器(配件)。
4 主开关,用于启动或关停燃气采暖热水炉。
5 “+” 按钮,用于向前滚动显示屏上的信息(威能技术服务人员在设置参数和排除故障时使用)和切换到显示当前供暖供水温度。
6 “-”按钮,用于显示屏的显示信息向回翻页(威能技术服务人员在设置参数和排除故障时使用)。
7 “复位”按钮,用于复位某些故障。
8 用于设置供暖供水温度的旋钮。
9 仅针对集成有生活热水供应的turboTEC:用于设置热水出水温度的旋钮。
仅针对连接有热水储水罐的turboTEC:用于设置储水罐水温的旋钮。
数字化信息和分析系统(DIA)图4.2 显示屏(turboTEC plus 取用生活用水时)turboTEC pro / turboTEC plus 系列燃气采暖热水炉配备有一个数字化信息与分析系统。
该系统可以提供燃气采暖热水炉运行状态的信息并帮助您排除故障。
在燃气采暖热水炉正常运行期间,显示屏(3) 显示供暖系统的当前注水压力(在示例中为1.2 bar = 0.12 MPa)。
如果出现故障,一个错误代码将取代注水压力的显示。
此外,还可以从所显示的符号获得以下信息:* 只适用于集成有生活热水供应(VUW) 的turboTEC plus 系列燃气采暖热水炉。
** 只适用于连接有热水储水罐(VU) 的turboTEC plus 系列燃气采暖热水炉。
表4.1 显示屏上符号的含义按住“-” 按钮约5 秒钟将显示从供暖供水温度切换为系统注水压力,反之亦然。
4.1.2 turboTEC pro 操作元件图4.3 turboTEC pro 操作元件操作元件具有下列功能(参见图4.3):1 显示屏,显示当前供暖系统的注水压力、供暖供水温度或某些附加信息。
威能锅炉安装操作规范
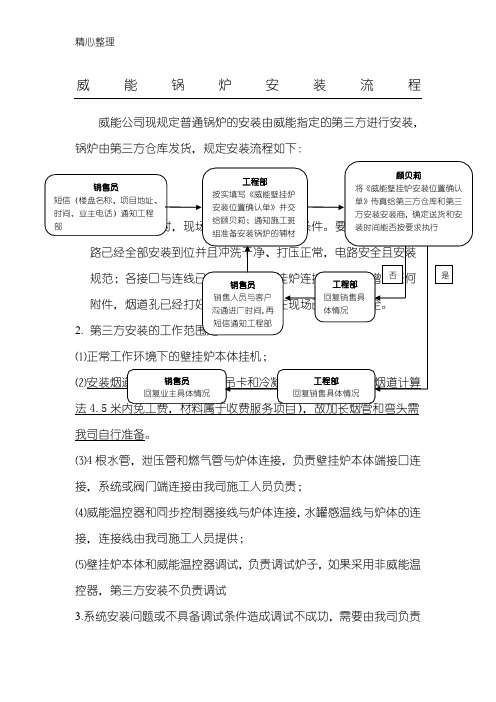
威能锅炉安装流程威能公司现规定普通锅炉的安装由威能指定的第三方进行安装,锅炉由第三方仓库发货,规定安装流程如下:⑷威能温控器和同步控制器接线与炉体连接,水罐感温线与炉体的连接,连接线由我司施工人员提供;⑸壁挂炉本体和威能温控器调试,负责调试炉子,如果采用非威能温控器,第三方安装不负责调试3.系统安装问题或不具备调试条件造成调试不成功,需要由我司负责本次200元/次上门费。
4.施工班组要准备的相关辅材,包括电线、波纹管、PPR管和管件、加长烟道、吊卡等,如需要带货安装方携带需要提前告知,付费使用,因第三方安装携带辅材价格较贵,不建议让其携带辅材安装。
5.因个人或部门原因,第三方安装出现费用问题,由责任人承担。
5、壁挂炉禁止安装在燃气灶台、水池上方;应保证壁挂炉安装位置与燃气管路及燃气表之间的距离符合国家的现行规定标准。
6、壁挂炉尽量安装在承重墙上,若无法安装在承重墙上,必须保证壁挂炉可以牢固安装。
7、壁挂炉尽量安装在厨房,设备间或封闭的阳台。
如果安装在未封闭的阳台,必须保证设备有安全的半封闭背阴环境,不能受到日光照晒和雨淋,保证水电气充足供应,最低环境温度应保证在5℃以上;威能壁挂炉为室内安装机型,不允许安装在室外。
8、壁挂炉安装需要至少保持以下距离:壁挂炉安装后距离地面安全同燃气壁挂炉耗气量匹配;燃气管路安装必须牢固固定;燃气表的选择:18kw-36kw炉型选用4m3燃气表,≥36kw-50kw炉型选用6m3燃气表,≥50kw-80kw炉型选用10m3燃气表;更大功率根据实际耗气量进行选择。
三、水管路连接壁挂炉下方应预留排水地漏,壁挂炉安装完毕后必须连接安全阀泄压管至地漏处或泄水口;采暖系统管路应安装过滤器;有龙门系统应安装自动排气阀;采暖系统管径应按需求进行严格计算;所有水路管路必须与墙面或地面进行安装固定。
四、烟道安装注:此表为TurboTEC系列壁挂炉烟道要求;每增加一个90°弯头,烟道长度减少1m;每增加一个45°弯头,烟道长度减少0.5m;垂直烟道超过0.5m,必须加装冷凝水收集器。
TurboOA1.0智能办公系统安装手册、管理员操作手册、用户操作手册

TurboOA 办公平台安装手册版本1.0萍乡取道网络科技有限公司Pingxiang Qudao network science and technology Co., Ltd版权说明本手册由萍乡取道网络科技有限公司(取道公司)出版,版权属取道公司所有。
未经出版者正式书面许可,不得以任何方式复制本文档的部分或全部内容。
关于本手册本手册旨在指导TurboOA 1.0用户完成安装、部署和配置。
读者对象本手册读者对象为使用TurboOA 1.0的使用者。
用户反馈取道公司感谢您使用TurboOA产品。
如果您发现本手册中有错误或者产品运行不正确,或者您对本手册有任何意见和建议,请及时与取道公司联系。
您的意见将是我们做版本修订时的重要依据。
目录第1章系统安装要求 (4)1.1 硬件配置要求 (4)1.2 软件系统要求 (4)1.2.1 操作系统要求 (4)1.2.2 数据库服务器,应用服务器要求 (4)1.2.3 客户端浏览器要求 (4)1.2.4 客户端MS OFFICE版本要求 (4)第2章系统安装步骤 (5)2.1 SQL Server数据库服务器安装 (5)2.2 附加TurboOA数据库 (11)2.3 TurboOA服务端安装与IIS配置 (14)2.4 TurboOA客户端安装 (18)第1章系统安装要求1.1 硬件配置要求安装TurboOA的服务器硬件要求:CPU:主频不低于2.0GHz 内存:不低于2G 硬盘:不低于5G1.2 软件系统要求1.2.1 操作系统要求安装TurboOA服务端操作系统要求为:Windows 2000/2003 Server安装TurboOA客户端操作系统要求为:WindowsXP、Windows7.0或Windows 2003 Server1.2.2 数据库服务器,应用服务器要求安装TurboOA服务器端数据库要求为:SQL Server2000SP4、SQL Server2005安装TurboOA服务器端应用服务器要求为:IIS5.1及以上。
威能壁挂炉使用说明书
操作手册供用户使用CN操作手册turboTEC pro , turboTEC plus燃气采暖热水炉 VUW 燃气采暖热水炉(单采暖)VU目录燃气采暖热水炉特点 (3)1阅读提示 (3)1.1文件保管 (3)1.2符号说明 (4)1.3手册的适用性 (4)1.4CE 标志 (4)1.5铭牌 (4)2安全须知 (5)2.1警告提示 (5)2.1.1警告提示的分类 (5)2.1.2警告提示的结构 (5)2.2规定用途 (5)2.3对错误操作危险的警告提示 (6)3运行说明 (8)3.1保修 (8)3.2安装地点要求 (8)3.3维护 (9)3.4循环利用与废弃处理 (8)3.4.1燃气采暖热水炉废弃处理 (8)3.4.2包装废弃处理 (9)3.5节能提示 (9)4操作 (11)4.1操作元件概览 (11)4.1.1turboTEC plus 系列操作元件 (11)4.1.2turboTEC pro 系列操作元件 (12)4.2燃气采暖热水炉投入运行前准备 (13)4.2.1打开截止阀 (13)4.2.2检查系统压力 (13)4.3启动燃气采暖热水炉 (14)4.4生活热水供应 (14)4.4.1设置生活热水温度 (14)4.4.2启动和关闭速热启动功能(只适用于集成有生活热水供应的turboTEC plus 系列燃气采暖热水炉) (15)4.4.3取用生活热水 (15)4.5供暖模式运行的设置 (15)4.5.1设置供暖供水温度(未连接外部控制器) (16)4.5.2设置供暖供水温度(连接有外部控制器) (16)4.5.3设置室内温控器或气候补偿器 (16)4.5.4关闭供暖(夏季模式) (17)4.6给燃气采暖热水炉/供暖系统注水 (17)4.7防冻保护 (18)4.7.1防冻保护功能 (18)4.7.2通过排水防冻 (18)4.8将燃气采暖热水炉停止运行 (19)4.9状态显示(供威能专业技术人员在保养和维修时参考) ..........................195排除故障 .. (20)5.1缺水引起的故障 (20)5.2点火故障 (21)5.3进气或排烟通道故障 (21)6保养和售后服务 (22)6.1有关规定用途、清洁和每日维护的注意事项 (22)6.2客户服务 (22)关键词索引 (23)目录燃气壁挂式采暖热水炉特点威能 turboTEC pro/turboTEC plus 系列为结构紧凑的燃气壁挂式采暖热水炉(以下简称燃气采暖热水炉)。
- 1、下载文档前请自行甄别文档内容的完整性,平台不提供额外的编辑、内容补充、找答案等附加服务。
- 2、"仅部分预览"的文档,不可在线预览部分如存在完整性等问题,可反馈申请退款(可完整预览的文档不适用该条件!)。
- 3、如文档侵犯您的权益,请联系客服反馈,我们会尽快为您处理(人工客服工作时间:9:00-18:30)。
CN供安装人员使用安装和维护手册turboTEC pro / turboTEC plus壁挂式燃气采暖锅炉壁挂式燃气采暖/热水锅炉JNG27-VU CN 242/3-5-H JNG31-VU CN 282/3-5-H JNG41-VU CN 362/3-5-HJLG27-VUW CN 242/3-3-H JLG27-VUW CN 242/3-5-H JLG31-VUW CN 282/3-5-H JLG41-VUW CN 362/3-5-H目录1 阅读提示 .......................................................................31.1 文件保管 ...........................................................................31.2 安全须知和符号说明 ......................................................31.3手册的适用性 (32 壁挂炉简介 ...................................................................42.1 结构....................................................................................42.2 CE 标识 .............................................................................42.3 特定用途 ...........................................................................42.4 产品名称和产品标识 ......................................................42.5 产品类型概述 ...................................................................53 安全须知和符合性规范 ...............................................53.1 安全须知 ...........................................................................53.1.1 安装与调试 .......................................................................53.1.2 闻到燃气味时 ...................................................................53.1.3 在壁挂炉周围作业时 ......................................................53.2 应用规范和指南...............................................................54 壁挂炉的安装定位 .......................................................64.1 供货清单 ...........................................................................64.2 附件....................................................................................64.3 壁挂炉管路接口的位置和尺寸......................................74.4 安装位置的选择...............................................................74.5 安装和保养的最小空间 ..................................................84.6 安装图样 ...........................................................................84.7 壁挂炉的安装 ...................................................................94.8 壁挂炉外壳的拆卸..........................................................104.9壁挂炉外壳的安装 (115 壁挂炉系统的安装 ......................................................125.1 供暖系统概述 ..................................................................125.2 燃气管路的连接..............................................................125.3 壁挂炉水侧的连接..........................................................135.3.1 VUW 型生活热水管路的连接 ........................................135.3.2 VU 型生活热水管路的连接............................................135.4 采暖系统供回水管的连接 .............................................135.5 安装壁挂炉烟道系统 .....................................................145.6 关于电源连接的说明和注意事项.................................155.6.1 电源连接 ..........................................................................155.6.2 控制器、附件和外部系统组件的连接 ........................155.6.3 电路接线图 ......................................................................176 运行调试的准备工作 ..................................................196.1 系统注水 ..........................................................................196.1.1 壁挂炉对水质的要求 .....................................................196.1.2 生活热水系统的注水 .....................................................196.1.3采暖系统的注水 (19目录6.2 燃气调节的注意事项 ....................................................206.2.1 检测壁挂炉燃气阀前的压力 ........................................206.2.2 最大输入热负荷的检测 .................................................216.2.3 最小输入热负荷的检测和设置.....................................216.2.4 燃气默认设置和故障排除 ............................................226.3 系统检测 .........................................................................236.3.1 供暖状态显示 .................................................................236.3.2 VUW 型生活热水状态显示 ...........................................246.3.3 VU 型生活热水状态显示...............................................246.4 对用户进行指导.............................................................246.5 关于保修期的说明.........................................................247 壁挂炉采暖运行 .........................................................257.1 参数选择和设置方法 ....................................................257.2 壁挂炉参数设置的概述 ................................................267.2.1 设置部分热负荷.............................................................267.2.2 设置水泵延时运行时间 ................................................267.2.3 设置最大供水温度.........................................................267.2.4 设置回水温度控制.........................................................267.2.5 设置燃烧器反短时循环时间 ........................................277.2.6 设定维护时间和维护提示 ............................................277.2.7 设置泵的输出功率.........................................................287.3 设置旁通阀 .....................................................................288 检查和保养 .................................................................298.1 检查和保养概述.............................................................298.2 安全须知 .........................................................................298.3 保养工作概述 .................................................................308.4 清洁燃烧器和主热交换器 ............................................308.4.1 拆除并清洁主热交换器 .................................................318.4.2 拆除并清洁燃烧器..........................................................318.5 更换电子部件和显示屏 ................................................328.6 壁挂炉的排空 .................................................................328.7 系统功能性检查.............................................................329 故障分析和排除方法 ................................................339.1 故障分析 .........................................................................339.1.1 运行状态代码 .................................................................339.1.2 诊断代码 .........................................................................349.1.3 故障代码 .........................................................................379.1.4 故障存储 .........................................................................389.2 测试程序 .........................................................................389.3 恢复出厂设置参数.........................................................3810 循环利用与废弃处置 (3811技术参数 (391 阅读提示以下信息能够为您阅读整个文件提供帮助其它适用文件需要与本安装和维护手册一并使用。