自助洗车机安装与操作指导书
全自动洗车机操作流程

04
05
检查传送带驱动系统,调整 传送带张紧度,清除异物
06
安全注意事项及操作规范
遵守设备安全操作规程
在操作全自动洗车机之前,必须仔细阅读并理解 设备的安全操作规程。
确保了解设备的所有功能和操作步骤,以及相关 的安全警示和标志。
遵守设备制造商提供的所有安全指南和建议。
注意个人防护措施
1
在操作全自动洗车机时,必须穿戴适当的个人防 护装备,如防水衣物、防滑鞋和防护手套。
02
操作前准备工作
检查设备状态及安全性
检查洗车机的外观是 否完好,无明显损坏 或变形。
检查洗车机的安全保 护装置是否齐全、有 效。
检查各部件连接是否 紧固,无松动或脱落 现象。
确认水源和电源连接正常
确认水源连接正常,水管无漏 水现象,且水压稳定。
确认电源连接正常,电线无破 损或老化现象,且电压稳定。
清洗过程
车辆离开
启动全自动洗车机,按照设定程序对车辆 进行清洗,包括预洗、主洗、漂洗等环节 ,确保清洗效果达到预期。
清洗完成后,引导车辆离开洗车机,并进 行必要的检查和整理。
拓展延伸:如何提高洗车效率和质量
优化洗车程序
根据车辆的不同类型和清洗需求,对 全自动洗车机的清洗程序进行优化, 提高清洗效率和质量。
在操作过程中,始终保持对设备的监控,并随时准备采取紧急措施,如按 下急停按钮,以应对可能发生的异常情况。
07
总结回顾与拓展延伸
本次操作流程总结回顾
准备工作
车辆进入
确保全自动洗车机设备正常运行,清洗液 、水、电等供应充足,并对车辆进行预检 ,了解车辆状况和清洗需求。
引导车辆进入洗车机指定位置,确保车辆 停放准确,不会触碰到设备。
潘基自动洗车系统用户手册说明书
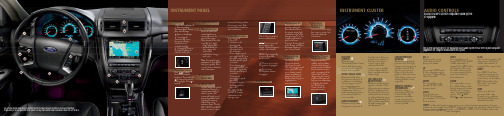
1235467710111211Use extreme caution when using any device or feature that may take your attention off the road. Your primaryresponsibility is the safe operation of the vehicle. Use only non-essential features and devices when it is safe to do so.89The system illustrated here is the navigation based audio system. Please refer to your navigation supplement for complete information on this system.1 H eadlampsT urns the headlamps off. T urns on parking, instrument panel, license plate and tail lamps.T urns on headlamps. (if equipped) Automatically turns the exterior lamps on/off based on available daylight.(if equipped) T urns on fog lamps by pulling the control towards you.2 p anel d immer C ontrolPress \ to adjust the instrument panelbrightness. Press and hold to turn on the interior courtesy lights. Press to turn off.3 i nterior t runk r elease4 m ulti -F unCtion l everRotate the end of the control up/down to increase/decrease the speed of the wipers. Push the end of the stalk: • q uickly for a single swipe without fluid. • a nd hold briefly forthree swipes with washer fluid. • a nd hold for a longerwash cycle.Note: For optimal wiper performance, clean blades and glass regularly . Refer to your Owner’s Guide for more information.5 t ilt /t elesCope s teering W Heel6 m essage C enterDisplays important vehicle information through a constant monitoring of vehicle systems. The system will notify you of potential problems with a display of warnings followed by a longindicator chime. Use the INFO, SETUP and RESET buttons to access variousmenus and settings within the message center. Refer to your Owner’s Guide for more information.7 s teering W Heel C ontrolsTo set the speed: 1. Press ON. 2. A ccelerate to the desired speed. • P ress SET + andtake your foot off the accelerator. • T o set a higher speed,press and hold SET + or press SET + repeatedly until the desired speed is reached. • T o set a lower speed,press and hold SET – or press SET – repeatedly until the desired speed is reached. • T o return to apreviously set speed, press RSM. • T o turn off, depressthe brake pedal or press OFF .Press INFO, RESET and SETUP to make adjustments to the message center.VOL +/-: Press to increase/decrease volume levels.: Press to access the previous/next radiostation, CD track or preset satellite radio channel.M EDIA: Press repeatedly to access all possible media sources.: Press to access voice recognition, if equipped.: Press to access SYNC ® phone features, if equipped.8 H azard F lasHer9 p assenger a irbag o Illuminates when the passenger airbag has been turned off due to the system sensing light to medium weight in the front passenger seat. For complete information, refer to the FrontPassenger Sensing System in the Seating and Safety Restraints chapter of your Owner’s Guide.10 n avigation s ystem (iF equipped )The Mobile Media Navigation System allows you to record CDs, listen to your saved music, play DVDs and access climate control options in addition to navigating the vehicle. Refer to your Navigation supplement for more information.TracTion conTrolIlluminates whenrac ®/T raction Control is active. If the light remains on, contact your authorized dealer as soon as possible.Service engine SoonIlluminates briefly whenthe ignition is turned on. Ifit remains on or is blinking after the engine is started, the on-board diagnostics System (OBD-II) has detected a malfunction. Drive in a moderate fashion and contact your authorized dealer as airBag readineSSIlluminates briefly when the ignition is turned on. Ifthis light fails to illuminate, remains on or continues to A chime will also sound if there is a malfunction in the indicator light.aBS (anTi-lock Brake SYSTem)Illuminates briefly when the ignition is turned on. If the light remains on or continues to flash, a malfunction has been detected. Contact your authorized dealer as soon as possible and have the system serviced. Normal braking (less ABS) is still functional unless the brake warning light is also illuminated.low Tire PreSSUre warningIlluminates when your tire pressure is low . If the light remains on, the tire pressure should be checked. If the light does not turn on or begins to flash when the ignition is first turned on or while driving, contact your authorized dealer as soon as possible.hroTTle conTrol/TranSmiSSionIlluminates when apowertrain or AWD fault is detected. If the light remains on, or continues to come on, contact your authorized dealer for service as soon as possible.v ol Push to turn the system on/off. T In-dash CD6/MP3 satellite compatible sound system (if equipped)QUICK REFERENCE GUIDEAdditionAl feAturesDual automatic temperature control (if equipped)Fusion may 2010Second PrintingQuick reference guideae5J 19g217 aBfusionThe system illustrated here is the navigation based climate system.Please refer to your owner’s guide for complete information on this system.This Quick reference guide is not intended to replace your vehicle owner’s guide which contains more detailed information concerning the features of your vehicle, as well as important safety warnings designed to help reduce the risk of injury to you and your passengers. Please read your entire owner’s guide carefully as you begin learning about your new vehicle and refer to the appropriate sections when questions arise.all information contained in this Quick reference guide was accurate at the time of duplication. we reserve the right to change features, operation and/or functionality of any vehicle specification at any time. Your Ford dealer is the best source for the most current information. For detailed operating and safety information, please consult your owner’s guide.Ford moTor comPanYcustomer relationship center | P .o. Box 6248 | dearborn, mi 481211-800-392-3673 (Ford) | (Tdd for the hearing impaired: 1-800-232-5952) | www.ford.caPress to turn on/off.aUTo/driver Side TemPPress to activate automatic temperature control. The system will automatically determine fan speed, airflow location, A/C (on or off) and outside or recirculated air, to heat or cool the vehicle to reach the desired temperature. Press again to deactivate. T urn to increase/decrease the temperature on the driver side of the vehicle (when PASS TEMP is active) or for the entire vehicle cabin (when PASS TEMP is not active).PaSSenger TemPPress to activate the passenger side climate control (dual zone). T urn the control to increase/decrease temperature on the passenger side. Press again to turn off and return to single zone where the driver side temperature control determines the temperature for the entire vehicle.maX a/CDistributes recirculated air through the instrument panel vents to cool the vehicle. This mode is more economical and efficient. May also help reduce undesirable odors from entering the vehicle.Fan SPeed Press + to increase or – to decrease fan speed.Distributes outside air through the windshield defroster and demister vents. Can be used to clear thin ice or fog from the windshield.Recirculated air may reduce the amount of time needed to cool down the interior of the vehicle and may also help reduce undesirable odors from reaching the interior of the vehicle.Press to activate and clear the rearwindow and side heated mirrors (if equipped) of thin ice and fog. Press again to deactivate.airFlow modeSSelect if you would like airflow through the panel vents , floor vents , panel and floor vents , or through the defrost/ floor vents .r earvieW C amera (iF equipped )This system provides a visual display of the area behind the vehicle. The display automatically appears on the navigation screen (if equipped) or in the rear view mirror when the vehicle is in Reverse (R) and uses colors (green, yellow and red) to alert you of your proximity to objects. Note: Visibility aids do notreplace the need to watch where the vehicle is moving. Refer to your Owner’s Guide for safety information, more detail, and limitations.synC ® (iF equipped )SYNC ® is a hands-free communications and entertainment system with special phone and media features. For more information, please refer to the SYNC ® Supplement, the SYNC ® section in the Navigation Supplement(if equipped) or visit www .b lind s pot i nFormation s ystem (blis ®)WitH C ross t raFFiC a lert (Cta) (iF equipped )BLIS ® uses radar sensors to help you determine if a vehicle may be in your blind spot zone when driving on roads andfreeways. The CTA feature alerts you if a car is coming toward you when you are backing out of a parking space. Note: Visibility aids do not replace the need to watch where the vehicle ismoving. Refer to your Owner’s Guide for safety information, more detail, and limitations.i ntegrated k eyHead t ransmitter (ikt)•P ress once to lock all doors. Press again to confirm all doors are closed.• P ress once to unlock the driver’s door. Press again within five seconds to unlock all doors.• P ress to activatethe panic alarm. Press again or turn the ignition on to deactivate.• P ress twice within three seconds to open the trunk.• C ar finder: Press twice within three seconds to locate your vehicle. The horn will chirp and the turn lamps will flash.r everse s ensing s ystem (iF equipped The reverse sensing system may warn you if there is an object behind the vehicle. A warning tone will sound which increases in frequency as the object gets closer and then will sound continuously when the object is less than 10 inches away . The system is active when the vehicle is in Reverse (R) and traveling less than 3 mph (5 km/h). Note: Visibility aids do not replace the need to watch where the vehicle is moving. Refer to your Owner’s information, more detail, and limitations.of airbags or the activation of the safety belt pretensioners. The turn signals will flash and the horn will sound. To deactivate, press the hazard flasher control, or on o close from a venting position: Press and。
2024年全自动洗车机安全操作规程
2024年全自动洗车机安全操作规程(____字)第一章:总则第一条为了规范全自动洗车机的操作行为,确保使用者和设备的安全,促进全自动洗车机的健康发展,制定本规程。
第二条本规程适用于全自动洗车机的装置、操作和维护等方面的安全工作。
第三条全自动洗车机的操作人员必须严格遵守本规程的规定,正确操作,维护全自动洗车机设备的安全性能。
第二章:操作流程第四条操作人员在进入洗车机作业空间前,应确认设备的运转稳定,待全自动洗车机设备准备就绪后,方可进行操作。
第五条操作人员应具备相关职业资格和操作技能,并按照相关法律法规的要求,参加相关培训并取得合格证书。
第六条操作人员应在操作前仔细阅读全自动洗车机的使用说明书,了解设备的操作规程、主要部件和安全装置的位置及用途,并熟悉设备的操作流程。
第七条操作人员应穿戴好相应的工作服装和防护用具,保持个人卫生和操作环境的清洁。
第三章:设备操作第八条操作人员在操作全自动洗车机时,应按照设备操作流程依次进行,并确保每个环节操作正确,不得有遗漏。
第九条操作人员在操作过程中,严禁穿戴长发或长袖服装,以免被设备吸入或缠绕。
第十条操作人员在操作过程中,应始终保持警觉,注意设备的运行状况,如发现异常情况应及时报告,停止操作并采取相应的安全措施,确保人员和设备的安全。
第十一条操作人员在操作过程中,应按照设备的安全要求,正确使用设备的各种功能,不得随意修改或调整设备的参数。
第十二条操作人员在设备操作过程中,应确保设备周围没有杂物,以免影响设备的正常运行或造成安全事故。
第四章:设备维护第十三条操作人员在进行设备维护时,应先将设备断开电源,并按照设备维护说明书的相关要求进行操作。
第十四条操作人员在维护设备时,应定期检查设备的电源线、线缆和连接器的接触是否良好,如出现问题应及时更换或修复。
第十五条操作人员在维护设备时,应按照设备维护说明书的要求进行润滑、清洁和更换易损件等工作,确保设备的正常运行。
第十六条操作人员在维护设备时,应注意安全措施,如佩戴防护手套、眼镜等,以避免因操作不当或设备故障导致伤害。
潘基自动洗车机用户手册说明书
IndexAccessories and Modifications.... 182Accessories................................. 182Additional Safety Precautions.. 183Modifications............................. 183ACCESSORY (Ignition KeyPosition)........................................ 81Accessory Power Socket.............. 113Additives, Engine Oil..................... 232Airbag (SRS)................................ 9, 45Air Cleaner Element...................... 249Air Conditioning Filter.................. 262Air Conditioning System...... 118, 125Maintenance............................... 261Usage................................. 121, 127Air Outlets (Vents)............... 120, 125Air Pressure, Tires........................ 264Alcohol in Gasoline........................ 332Aluminum Wheels, Cleaning........ 287Antifreeze....................................... 235Anti-lock Brakes (ABS)Indicator................................ 59, 201Operation.................................... 200Anti-theft, Audio System............... 171Anti-theft Steering Column Lock .. 80Appearance Care........................... 285Audio System........................ 133, 148Automatic Lighting Off Feature.... 68Automatic Seat Belt Tensioners.... 43Automatic Speed Control................ 74Automatic Transmission............... 192Capacity, Fluid................... 326, 328Checking Fluid Level................ 243Shifting........................................ 193Shift Lever Position Indicator.. 193Shift Lever Positions................. 193Shift Lock Release (196)BatteryCharging SystemIndicator............................ 58, 310Jump Starting............................. 303Maintenance............................... 256Specifications..................... 327, 329Before Driving............................... 173Belts, Seat..................................... 8, 41Beverage Holder............................ 110Body Repair (292)BrakesAnti-lock System (ABS)............ 200Break-in, New Linings .............. 174Bulb Replacement............. 276, 277Fluid............................................ 246Parking........................................108System Indicator.................. 59, 313Wear Indicators......................... 199Braking System.............................. 199Break-in, New Car......................... 174Brightness Control, Instruments... 69Brights, Headlights......................... 67Bulb ReplacementBack-up Lights........................... 277Brake Lights ...................... 276, 277Ceiling Light............................... 281Courtesy Lights......................... 281Front Parking Lights................. 275Front Side Marker Lights......... 274Headlights.................................. 272High-mount Brake Light.......... 279License Plate Lights.................. 280Rear Side Marker Lights.......... 278Specifications..................... 327, 329CONTINUEDIndexBulb ReplacementSpotlights.................................... 281Trunk Light................................ 282Turn Signal Lights..................... 274Bulbs, Halogen. (272)Capacities Chart.................... 326, 328Carbon Monoxide Hazard.............. 52Carrying Cargo.............................. 184Cassette PlayerCare.............................................160Operation........................... 145, 156CAUTION, Explanation of............... ii CD Changer.......................... 142, 161CD Player........................................ 140Ceiling Light................................... 114Center Pocket................................ 113Certification Label......................... 324Chains............................................. 269Changing OilHow to.........................................232When to....................................... 220Changing a Flat Tire ..................... 295Changing Engine Coolant. (237)Charging System Indicator.... 58, 310Checklist, Before Driving............. 188Child Safety...................................... 20Child Seats........................................ 25Tether Anchorage Points........... 40Cleaner Element, Air..................... 249CleaningAluminum Wheels..................... 287Carpeting.................................... 288Exterior.......................................286Fabric.......................................... 289Interior........................................ 288Leather........................................289Seat Belts.................................... 289Vinyl............................................ 289Windows..................................... 290Climate Control System................ 125Clock, Setting the .......................... 109Clutch Fluid.................................... 247CO in the Exhaust......................... 334Coin Box......................................... 113Cold Weather, Starting in............. 190Compact Spare............................... 294Console Compartment.................. 111Consumer Information*................ 340Controls, Instruments and.. (55)CoolantAdding.........................................235Checking..................................... 180Proper Solution.......................... 235Replacing.................................... 237Temperature Gauge.................... 64Corrosion Protection..................... 291Courtesy Lights............................. 115Crankcase Emissions ControlSystem......................................... 334Cruise Control Operation............... 74Customer Relations Office.. (341)DANGER, Explanation of................. ii Dashboard.................................... 2, 56Daytime Running Lights................. 68Defects, Reporting Safety............. 344Defogger, Rear Window................. 72Defrosting the Windows...... 123, 131Dimensions............................. 326, 328Dimming the Headlights................ 67DipstickAutomatic Transmission........... 243Engine Oil...................................178IndexDirectional Signals........................... 69Disc Brake Wear Indicators......... 199Disposal of Used Oil...................... 234DoorsLocking and Unlocking............... 81Monitor Light............................... 61Power Door Locks....................... 81DOT Tire Quality Grading........... 330Downshifting, 5-speed ManualTransmission.............................. 191Drive Belts...................................... 262Driver and Passenger Safety............ 5Driving............................................ 187Economy..................................... 181In Bad Weather.......................... 205In Foreign Countries.. (333)Economy, Fuel............................... 181Emergencies on the Road............. 293Battery, Jump Starting.............. 303Brake System Indicator............ 313Changing a Flat Tire................. 295Charging System Indicator...... 310Checking the Fuses. (315)Low Oil Pressure Indicator...... 309Malfunction IndicatorLamp....................................... 311Manually Closing Moonroof.... 314Overheated Engine................... 306Emergency Brake.......................... 108Emergency Flashers....................... 71Emergency Towing....................... 320Emergency Trunk Opener............. 87Emissions Controls........................ 334Emissions Testing, State .............. 337EngineCoolant Temperature Gauge ..... 64Drive Belts.................................. 262Malfunction IndicatorLamp................................. 59, 311Oil Pressure Indicator......... 58, 309Oil, What Kind to Use............... 230Overheating................................ 306Specifications..................... 327, 329Speed Limiter.................... 192, 196Starting........................................189Ethanol in Gasoline ....................... 332Evaporative Emissions Controls.. 334Exhaust Fumes.. (52)Expectant Mothers, Use of SeatBelts by......................................... 18Exterior, Cleaning the. (286)Fabric, Cleaning............................. 289Fan, Interior........................... 118, 129Features, Comfort andConvenience............................... 117Filling the Fuel Tank..................... 175FiltersAir Cleaner................................. 249Air Conditioning........................ 262Oil................................................ 2325-speed Manual TransmissionChecking Fluid Level................ 245Shifting the................................. 191Flashers, Hazard Warning.............. 71Flat Tire, Changing a.................... 295Floor Mats...................................... 288FluidsAutomatic Transmission........... 243Brake.. (246)CONTINUEDIndexFluidsClutch..........................................247Manual Transmission............... 245Power Steering........................... 248Windshield Washers................. 242FM Stereo RadioReception........................... 134, 149Folding Rear Seat.......................... 100Foreign Countries, Driving in...... 333Four-way Flashers........................... 71Front Airbags............................... 9, 45Fuel..................................................174Fill Door and Cap....................... 175Gauge............................................ 64Octane Requirement................. 174Oxygenated................................ 332Reserve Indicator......................... 62Tank, Filling the......................... 175Fuses, Checking the. (315)Gas Mileage, Improving................ 181Gasohol........................................... 332Gasoline.......................................... 174Fuel Reserve Indicator................ 62Gauge............................................ 64Octane Requirement................. 174Tank, Filling the......................... 175Gas Station Procedures................. 175GaugesEngine Coolant Temperature .... 64Fuel................................................64Speedometer................................ 63Tachometer.................................. 63GAWR (Gross Axle WeightRating) ....................................... 208Gearshift Lever PositionsAutomatic Transmission........... 1935-speed ManualTransmission.......................... 191Glass Cleaning............................... 290Glove Box......................................... 88GVWR (Gross Vehicle WeightRating) (208)Halogen Headlight Bulbs.............. 272Hazard Warning Flashers............... 71Headlights......................................... 67Aiming......................................... 272Automatic Lighting OffFeature...................................... 68Daytime Running Lights............. 68High Beam Indicator................... 62Lights On Indicator..................... 62Reminder Chime.......................... 67Replacing Halogen Bulbs ......... 272Turning on.................................... 67Head Restraints............................... 99Heating and Cooling...................... 118High Altitude, Starting at.............. 190High-Low Beam Switch .................. 67HomeLink UniversalTransmitter.................................. 89Hood Latch..................................... 251Hood, Opening the........................ 176Horn................................................... 66Hydraulic Clutch............................ 247Hydroplaning. (206)Identification Number, Vehicle.... 324IgnitionKeys............................................... 77Switch............................................80IndexTiming Control System............. 335Immobilizer System......................... 78Important Safety Precautions .......... 6Indicators, Instrument Panel.......... 57Infant Restraint................................ 20Infant Seats....................................... 29Tether Anchorage Points........... 40Inflation, Proper Tire .................... 264Inside Mirror.................................. 106Inspection, Tire.............................. 265Instrument Panel......................... 2, 56Instrument Panel Brightness......... 69Interior Cleaning............................ 288Interior Lights................................ 114Introduction.. (i)Jacking up the Car......................... 297Jack, Tire........................................ 296Jump Starting (303)Keys (77)Label, Certification........................ 324Lane Change, Signaling.................. 69Lap/Shoulder Belts................... 15, 41LightsBulb Replacement..................... 272Indicator........................................ 57Parking.......................................... 67Turn Signal................................... 69Load Limit...................................... 185LOCK (Ignition Key Position)....... 80Lockout Prevention......................... 82LocksAnti-theft Steering Column........ 80Fuel Fill Door............................. 175Glove Box..................................... 88Power Door.................................. 81Trunk............................................ 86Low Coolant Level......................... 180Lower Gear, Downshifting to a.... 191Low Oil Pressure Indicator.... 58, 309Lubricant SpecificationsChart................................... 326, 328Luggage (184)Maintenance................................... 215Owner Maintenance Checks.... 227Record.................................. 225-226Required Indicator....................... 65Safety...........................................216Schedule.............................. 220-224Malfunction IndicatorLamp..................................... 59, 311Manual Transmission.................... 191Manual Transmission Fluid ......... 245Meters, Gauges................................ 63Methanol in Gasoline.................... 332Mirrors, Adjusting......................... 106Moonroof........................................ 105Closing Manually....................... 314Operation (105)Neutral Gear Position.................... 195New Vehicle Break-in ................... 174Normal Shift Speeds. (192)CONTINUED。
DeEzee 自动洗车系统说明书

1-800-779-2102
Mon – Thurs: 8:00am - 5:00pm | Friday: 8:00am - 4:00pm CST
INSPECT YOUR PRODUCT FOR DAMAGE & MISSING PARTS BEFORE PROCEEDING TO INSTALLATION
Cab Racks • PLASTIC: Storage Boxes • OTHER: Front and Rear Bumpers
THREE-YEAR WARRANTY:
• POWDER-COATED / E-COATED STEEL: Side Steps, Running Boards, Storage Boxes, Transfer Tanks, Cab Racks, Sport Bar Ladder Racks, Cargo Carriers, Mounting Brackets (NX, Rough Step, and Bumper Guards only)
自助洗车安装指南
自助洗车安装指南
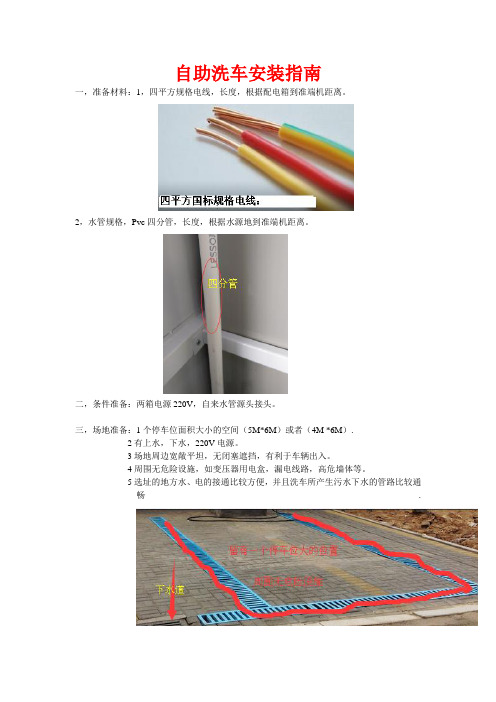
一,准备材料:1,四平方规格电线,长度,根据配电箱到准端机距离。
2,水管规格,Pvc四分管,长度,根据水源地到准端机距离。
二,条件准备:两箱电源220V,自来水管源头接头。
三,场地准备:1个停车位面积大小的空间(5M*6M)或者(4M *6M).
2有上水,下水,220V电源。
3场地周边宽敞平坦,无闭塞遮挡,有利于车辆出入。
4周围无危险设施,如变压器用电盒,漏电线路,高危墙体等。
5选址的地方水、电的接通比较方便,并且洗车所产生污水下水的管路比较通畅.
四,接通电线:电线顺机箱底部正面孔进来沿机箱边缘顺着原排线接进电表的正极与负极。
五,接通水管:外接水管从机器底部后侧圆孔进入,接到水表借口处。
六,清水枪安装:清水枪管从机器测孔进入。
接到洗车机电机排水口。
七,泡沫枪安装:泡沫枪管从机器测孔进入。
接到洗车机电机排泡沫口。
八,加洗车液。
取一瓶洗车液。
加半瓶,开启水阀加满。
(1:400)
九,电机正确安装,将白色螺帽取下来,换上红色螺帽。
电机正常使用,用的是红色螺帽。
十.保持电机油压是正常情况。
油压应保持加满到1/3到2/3之间。
十一.开启电阀。
便携式洗车机操作规程
便携式洗车机操作规程便携式洗车机操作规程:1. 安全检查:在使用便携式洗车机之前,必须进行安全检查。
检查洗车机是否完好,外壳是否有损坏,电源线是否损坏等。
同时,检查水源是否正常,水管是否完好,安全阀是否可靠。
2. 设置工作区域:在开始操作之前,设置一个适当的工作区域。
确保操作区域平坦,没有明显的障碍物。
将车辆停在合适的位置,并确保周围没有人员或其他车辆。
3. 连接水源:将洗车机的进水管连接到水源,并确保连接处没有漏水。
同时,打开水源阀门,调整水流量到适当的水压。
4. 连接电源:将洗车机的电源线连接到电源插座,并确保电源线没有损坏或暴露的情况。
检查电源开关是否关闭,然后打开电源开关。
5. 设置喷头:根据需要选择适当的喷头。
一般情况下,使用较大的扇形喷头进行洗车。
将喷头连接到喷嘴,然后将喷嘴插入洗车机出水口。
6. 开始洗车:按下洗车机的启动按钮,开始洗车。
先从车顶开始,逐渐向下处理,并确保将水流和喷头对准车身表面以有效清洗。
在洗车的过程中,保持适当的距离,以避免给车身带来任何损坏。
7. 清洗车轮和轮胎:车轮和轮胎是车辆上最容易被污物污染的部分,因此需要特别清洗。
使用较小的喷头和更高的水压清洗车轮和轮胎,以确保彻底去除污垢。
8. 清洗车窗和镜子:使用喷头的高浓度水柱直接对准窗户和镜子,清洗车窗和镜子。
清洗时要小心,不要用力过度,以免造成损坏。
9. 去除顽固污渍:如果遇到顽固污渍,例如鸟粪或油渍,可以使用适当的清洗剂。
将清洗剂喷洒在污渍上,然后使用喷头清洗,直到污渍完全去除。
10. 关闭洗车机:完成洗车后,先关闭洗车机的电源开关,然后关闭水源阀门。
将洗车机放置在干燥通风的地方,以便存放和维护。
总结:使用便携式洗车机进行洗车时,必须注意安全,并遵循操作规程。
正确设置工作区域,连接水源和电源,选择适当的喷头,并注意清洗车身的各个部分。
清洗过程中,要注意保护车身,避免用力过度导致损坏。
在清洗完成后,及时关闭洗车机的电源和水源,并妥善存放。
潍柴自动洗车系统操作手册说明书
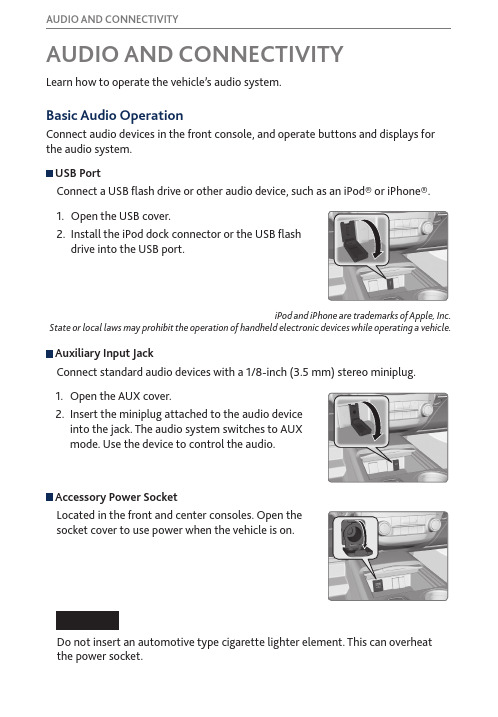
AUDIO AND CONNECTIVITYBasic Audio OperationConnect audio devices in the front console, and operate buttons and displays for the audio system. USB PortConnect a USB flash drive or other audio device, such as an iPod® or iPhone®.1.Open the USB cover.2.Install the iPod dock connector or the USB flash drive into the USB port.Auxiliary Input JackConnect standard audio devices with a 1/8-inch (3.5 mm) stereo miniplug.1.Open the AUX cover.2.Insert the miniplug attached to the audio device into the jack. The audio system switches to AUX mode. Use the device to control the audio.iPod and iPhone are trademarks of Apple, Inc.State or local laws may prohibit the operation of handheld electronic devices while operating a vehicle.AUDIO AND CONNECTIVITYLearn how to operate the vehicle’s audio system.Accessory Power SocketLocated in the front and center consoles. Open the socket cover to use power when the vehicle is on.Do not insert an automotive type cigarette lighter element. This can overheatthe power socket.AUDIO AND CONNECTIVITYAdjusting the Sound Adjust various sound settings.Models without navigationUse the selector knob to make and enter selections.1.Press the SETUP button.2.Select Sound Settings.3.Select the setting you want, and adjust it to the desired level.4.Press the BACK button to exit the menu.Models with navigationUse the interface dial to make and enter selections.1.From the audio screen, press the MENU button.2.Select Sound.3.Select the setting you want, and adjust it to the desired level.4.Press the BACK button to exit the menu.You can also adjust the sound using the ODMD touchscreen. Select More, select Sound, and select the + or - icons to adjust settings. Select Xto exit the screen.Steering Wheel ControlsOperate certain functions of the audio system using the steering wheel controls.MODE button: Cycle through available audio modes.VOL (p /q ) buttons: Adjust audio volume. CH (+/-) button: Change presets, tracks, albums, or folders.FM/AM/XM® RadioPress (+) or (-) for the next or previous station.Press and hold (+) or (-) for the next or previous strong station.CD/HDD*/iPod®/USB/Bluetooth® Audio Press (+) or (-) for the next or previous track.Press and hold (+) or (-) for the next or previous folder (CD/USB).Pandora®Press (+) for the next song.Press and hold (+) or (-) for the next or previous station.*if equippedAUDIO AND CONNECTIVITYModels without navigationColor Information DisplayDisplay audio information. Use the buttons to operate the system.Color information displayAUDIO AND CONNECTIVITY Models without navigationFM/AM RadioPlay FM or AM radio stations.FM/AM radio displayAUDIO AND CONNECTIVITYModels without navigationSiriusXM® RadioAvailable on a subscription basis only. For more information or to subscribe, contact your dealer, or visit (U.S.) or www.siriusxm.ca (Canada).SiriusXM displayAvailable in the U.S. and Canada, except Hawaii, Alaska, and Puerto Rico. XM® is a registered trademark of Sirius XM Radio, Inc.AUDIO AND CONNECTIVITY Models without navigationCompact Disc (CD)Insert a CD to begin playing. The audio system supports audio CDs, CD-Rs, and CD-RWs in MP3, WMA, or AAC formats.CD displayNOTICEDo not use CDs with adhesive labels or insert a damaged CD. Inserting these types of CDs may cause them to get stuck or damage the audio unit.AUDIO AND CONNECTIVITYModels without navigationiPod®Play and operate an iPod through the vehicle’s audio system. Connect your device to the USB port.Searching for MusicUse the selector knob to search for tracks stored on the iPod using several methods.1.From the audio screen, press the selector knob to enter the iPod menu.2.Select a search type (artist, album, track, etc.).3.Select the song you want to play.iPod is a trademark of Apple, Inc.iPod displayState or local laws may prohibit the operation of handheld electronic devices while operating a vehicle. Only launch streaming audio on your phone when it is safe to do so.AUDIO AND CONNECTIVITYModels without navigationUSB Flash DrivePlay and operate a USB flash drive through the vehicle’s audio system. Connect your USB flash drive to the USB po rt .Searching for MusicUse the selector knob to search for tracks stored on the USB drive using several methods.1.Press the selector knob to enter the USB menu.2.Select a folder or file.3.Select the song you want to play.USB displayModels without navigationBluetooth® AudioPlay streaming or stored audio from your compatible phone through your vehicle’s audio system. Connect your phone to Bluetooth® HandsFreeLink®.Visit /handsfreelink (U.S.) or www.handsfreelink.ca (Canada) to check phone compatibility. Standard data rates apply.Bluetooth Audio displayNotes:•Make sure the volume on your phone is properly adjusted.•You may need to enable additional settings on your phone for playback.•The resume/pause function and remote audio controls are not supported on all phones.State or local laws may prohibit the operation of handheld electronic devices while operating a vehicle. Only launch streaming audio on your phone when it is safe to do so.Models with navigationOn-Demand Multi-Use Display™ (ODMD™)Operate the audio system using either the touchscreen or dashboard buttons.The functions shown here can be used with most audio sources. Refer to subsequent audio pages for more specific functions. Options that appear depend on the selected audio source.Interface dial (from the audioscreen): Move up, down, left, andright. Rotate and press ENTER tomake selections in the upper display.AUDIO AND CONNECTIVITY Models with navigationFM/AM RadioPlay FM or AM radio stations.FM/AM radio display*if equippedAUDIO AND CONNECTIVITYModels with navigationSiriusXM® RadioAvailable on a subscription basis only. For more information or to subscribe, contact your dealer, or visit (U.S.) or www.siriusxm.ca (Canada).SiriusXM displayTo learn about additional features—such as multi-channel preset, replay, or SportsFlash—see your Navigation Manual on the Owner Information CD or visit (U.S.) or myacura.ca (Canada).Available in the U.S. and Canada, except Hawaii, Alaska, and Puerto Rico. XM® is a registered trademark of Sirius XM Radio, Inc.AUDIO AND CONNECTIVITYModels with navigationCompact Disc (CD) or USB Flash DriveInsert a CD to begin playing. The audio system supports audio CDs, CD-Rs, and CD-RWs in MP3, WMA, or AAC formats.Connect your USB flash drive using the USB port (see page 50). The audio system supports MP3, WMA, or AAC files.NOTICEDo not use CDs with adhesive labels or insert a damaged CD. Inserting these types of CDs may cause them to get stuck inside or damage the audio unit.Use the interface dial to search for tracks on the CD or USB.1.From the audio screen, press MENU.2.Select Music Search.3.Select a search type (artist, album, track, etc.) or folder.4.Select the song you want to play.CD displayAUDIO AND CONNECTIVITYModels with navigationHard Disc Drive (HDD) AudioWhen music CDs are inserted, they are automatically recorded by system default onto the built-in HDD for later playback.HDD displaySearching for MusicUse the interface dial to search for tracks using several methods.1.From the audio screen, press MENU.3.Select a search type (artist, album, track, etc.).4.Select the song you want to play.You can also search for and play HDD music using Song By Voice™ (see page 151).AUDIO AND CONNECTIVITYModels with navigationiPod®Play and operate an iPod through the vehicle’s audio system. Connect your device to the USB port.Searching for MusicUse the interface dial to search for tracks using several methods.1.From the audio screen, press MENU.2.Select Music Search.3.Select a search type (artist, album, track, etc.).4.Select the song you want to play.You can also search for and play iPod music using Song By Voice™.iPod is a trademark of Apple, Inc.iPod displayAUDIO AND CONNECTIVITYModels with navigationBluetooth® AudioPlay streaming or stored audio from your compatible phone through your vehicle’s audio system. Connect your phone to Bluetooth® HandsFreeLink®.Visit /handsfreelink (U.S.) or www.handsfreelink.ca (Canada) to check phone compatibility. Standard data rates apply.Bluetooth Audio displayNotes:•Make sure the volume on your phone is properly adjusted.•You may need to enable additional settings on your phone for playback.•The resume/pause function and remote audio controls are not supported on all phones.State or local laws may prohibit the operation of handheld electronic devices while operating a vehicle. Only launch streaming audio on your phone when safe to do so.。
- 1、下载文档前请自行甄别文档内容的完整性,平台不提供额外的编辑、内容补充、找答案等附加服务。
- 2、"仅部分预览"的文档,不可在线预览部分如存在完整性等问题,可反馈申请退款(可完整预览的文档不适用该条件!)。
- 3、如文档侵犯您的权益,请联系客服反馈,我们会尽快为您处理(人工客服工作时间:9:00-18:30)。
再次用清水冲洗车身 用鹿皮巾、毛巾等擦干车身
13
常州途润机电科技有限公司 电话:0519-83812819
3.3 使用说明—— 洗车注意事项
1. 暂停使用水枪时,请按下相应的“暂停”按钮。 2. 投币时,须投足XX元才能启动机器;投币余额不能退
12
常州途润机电科技有限公司 电话:0519-83812819
3.2 使用说明—— 洗车操作步骤
9. 用鹿皮巾或者纤维毛巾等擦拭车身,吸干车身表面水分。 10. 如果刷卡后仍有余额,可将卡片再次放到刷卡区,余额
自动退回。
刷卡(投币XX 元) 选择“高压”模式 按下“清水/暂停”按钮
清水冲洗车身 按下“泡沫/暂停”按钮
地址:中国.江苏省常州市武进区花园街1号
邮编:277400
电话: (0519) 8381-2819
传真: (0519) 8633-9701
公司网站:
电子邮件:service@
3. 左下角:按钮区。自左至右分别是“清水/暂停”、 “泡沫/暂停”按钮,以及 “高压/常压”旋钮。
4. 左上角:显示屏。待机时,上行显示当前日期,下行显 示当前时间;启动机器后,上行显示洗车余额,下行显 示剩余水量(时间)。
11
常州途润机电科技有限公司 电话:0519-83812819
3.2 使用说明—— 洗车操作步骤
6
常州途润机电科技有限公司 电话:0519-83812819
1.3 结构与功能—— 功能介绍
9. 用水、用电量统计
本机内部配备了水表、电表等仪表,方便您对用水量 和用电量的统计和监控,也节省了您另行购买和安装 的时间精力。
型号 颜色 长*宽*高 电源 水源 整机功率 出水压力 出水量 安装方式 重量 包装尺寸
6. 通电测试。经过步骤5之后,控制系统会在通电后2
秒左右发出“嘀嘀”声,表明系统已正常上电;操作 面板显示屏上将分别显示当前日期和时间。
7. 系统设置。洗车机出厂时,已将每次洗车扣款额设
置为5元,对应的出水量为50L;如果您需要对此进行 更改(或作其它设置),请依照附件说明操作。
9
常州途润机电科技有限公司 电话:0519-83812819
10
常州途润机电科技有限公司 电话:0519-83812819
3.1 使用说明—— 操作面板简介
如下图所示,操作面板可划分为4个区域:
1. 右上角:刷卡感应区。IC卡贴近该区域时,洗车机将从 中自动扣款或退款。
2. 右下角:投币器。硬币从投币器上方投入,如遇机器故 障或断电,则所投硬币自动从下方退出。
3、使用说明
• 3.1 操作面板简介 • 3.2 洗车操作步骤 • 3.3洗车注意事项
4、保养与维修
• 4.1 维护与保养 • 4.2 问题与故障Q&A • 4.3 备品与备件
2
常州途润机电科技有限公司 电话:0519-83812819
1.1 结构与功能—— 外形概述
广告灯箱 操作面板
高压水枪
钣金外壳
自助洗车机 安装与使用说明书
— — 标准机型 TURUN-01
常州途润机电科技有限公司
2014年8月 第Ⅰ版
常州途润机电科技有限公司 电话:0519-83812819
目录
1、结构与功能
• 1.1 外形概述 • 1.2 内部组成 • 1.3 功能介绍 • 1.4 技术参数
2、安装说明
• 2.1 安装环境 • 2.2 安装步骤 • 2.3 注意事项
漏电保护测试
15
常州途润机电科技有限公司 电话:0519-83812819
4.2 保养与维修—— 问题&故障
1. 烧保险丝:当电源电压不稳或其他非正常情况时,
保险丝可能会被烧掉。此时,须从保险丝座中取出坏掉 的保险丝,并插入新保险丝。保险丝额定电流为7~8A, 外径约10mm,长度32mm。
2. 水龙头不出水或水流很小:请检查洗车机所接
沫—此时只需大部分车身覆盖泡沫即可。 6. 再次按下“泡沫/暂停”按钮,暂停洗车机; 7. 使用洗车海绵、毛刷、洗车掸等擦洗车身—如果您需要
清洗毛巾、海绵等,可在此时将“高压/常压”旋钮拨到 常压模式,再按下“清水/暂停”按钮,便可在洗车机侧 面的水龙头下清洗您的工具。 8. 确认“高压/常压”旋钮处于高压模式,随后按下“清水 /暂停”按钮,手持水枪再次用清水冲洗全车身。
1.3 结构与功能—— 功能介绍
本机主要功能包括:喷高压清水、喷洗车泡沫、出常 压自来水、语音播报、灯箱广告展示、多币种硬币识别、 刷卡消费与统计、按流量计费、用水用电量统计等。
1. 喷高压清水
本机喷水压力在5~8Mpa范围内,可根据您的需要进 行调节。关闭水枪时,洗车机自动停止加压,即省水 又省电,并可以延长洗车机的寿命。
4.3 保养与维修—— 备品备件
自您购买洗车机之日起一年内,凡属非人为故障 均可享受我公司免费零件更换服务。
同时为了保证您所购洗车机能够得到及时维修和 配件更换,针对以下配件,我公司备有充足的配 件库存。如有需要,请与我们联系。
17
常州途润机电科技有限公司
Changzhou Turun Mechatronic Technology Co., Ltd.
8
常州途润机电科技有限公司 电话:0519-83812819
2.2 安装说明—— 安装步骤
1. 放平机器。将洗车机在地基上放牢,调整机器下方
的4个垫脚(通过拧螺纹调节高低),以使机器摆正。
2. 接通自来水。建议使用PPR管,将自来水接通到机
器左侧下方的管螺纹接头处。
3. 检查水路。自来水接通后,沿水流方向逐个打开球
1. 刷卡或投币XX元; 2. 将“高压/常压”旋钮切换到高压模式,准备用高压水冲
洗车身; 3. 按下“清水/暂停”按钮,持水枪用清水冲洗车身——建
议您从中间到两边、从上到下冲洗车身; 4. 清水冲洗完毕后,请再次按下“清水/暂停”按钮,暂停
洗车机; 5. 按下“泡沫/暂停”按钮,持水枪在车身上喷洒洗车泡
N. W.
65 Kg
Packing Size 1750×900×700 mm
7
常州途润机电科技有限公司 电话:0519-83812819
2.1 安装说明—— 安装环境
环境温度: -5℃~+60℃ 电压范围: 200~240V 海拔高度:不超过2000米。 通风条件:机器四周至留有三面通风。 安装地基:地基基础应在硬土地面上,夯实后, 做150mm以上的混凝土地面。 如有条件,请在洗车机上方加遮挡。
5
常州途润机电科技有限公司 电话:0519-83812819
1.3 结构与功能—— 功能介绍
4. 语音播报
本机具备语音播报功能,可在用户洗车时进行操作指 导和提示;并对洗车机故障状态进行报警。您可以根 据需要,对播报音量进行调节。
5. 灯箱广告展示
位于洗车机门上部的灯箱广告区,内部可安装广告照 明灯,并可根据需要对照明灯进行定时设置和控制。 例如,在夏季,我们可以将广告灯的照明时间设置为 19:00到第二天6:00。
还。 3. 刷卡时,自动扣款XX元,余额可退还卡内。 4. 选择“高压”模式时,高压水枪可喷出高压清水和泡沫。 5. 选择“常压”模式时,洗车机侧面水龙头可以出常压清
水。 6. 本机泡沫冲洗的价格是清水冲洗的3倍,请节约使用泡
沫。 7. 泡沫喷洒时间建议在30秒左右;冲泡沫不能代替擦洗。 8. 洗车机待机时长若超过10分钟,洗车余额将归零。 9. 洗车完成,请将水枪挂回原处。
水龙头
3
常州途润机电科技有限公司 电话:0519-83812819
1.2 结构与功能—— 内部组成
1. 电控箱
电控箱固定在洗车机门板内侧,承载了洗车机主要的控 制器件和电路;用户在安装洗车机时,需要将220V单相 电路连接至此电控箱内。
2. 电机/水泵
电机和水泵组合在一起,固定在洗车机底部钣金上。为 保证设备寿命,电机采用全铜线圈,水泵亦为全铜泵头。
3. 水管水路
本机水路主体部分采用优质PPR水管焊接而成,管螺 纹连接全部用密封胶进行了密封。部分管路采用了不 锈钢波纹管进行连接,以方便拆卸。 水表、球阀等操作元件,均布置在洗车机上部空间, 以方便用户操作、检查。
4. 泡沫水箱
泡沫水箱置于洗车机中部,可方便地从机器中取出以 清浩或者更换。
4
常州途润机电科技有限公司 电话:0519-83812819
阀,查看有无漏水情况;打开泡沫箱放水球阀,给水 箱加满水。
4. 接电缆。使用截面积1mm²以上的3芯电缆,将220V
民用电接到洗车机内部电控箱中。请依照电控箱中的 指示正确接线,并确保地线接地可靠。
5. 通电准备。通电之前,请先将电控箱中的断路器断
开;闭合您取电处的电源开关;用测电笔或万用表检 查火线与零线是否颠倒;最后再闭合洗车机断路器。
的自来水压是否正常。如果自来水压很低或者所用水源 为非管道自来水,侧面水龙头会因为压力不足而无法使 用。
3. 身体碰到洗车机时有触电感:请检查洗车机
控制箱内部的接点端子上,是否正确接上了地线;或者 检查地线是否可靠接地——自制地线,应确保插入地下 1米以上。
保
保
险
险
丝
丝
座
16
常州途润机电科技有限公司 电话:0519-83812819
14
常州途润机电科技有限公司 电话:0519-83812819
4.1 保养与维修—— 维护与保养
1. 补充洗车液:一般情况下,泡沫箱装满洗车液以后,
可以连续洗车100辆次以上。洗车液用完时,需要及时 补充。补充洗车液时,请先将洗车粉、剂或者浓缩液适 量加入泡沫箱,再打开注水球阀注入清水稀释。