椒图电吸门适配车型表——广西总代理南宁锦业豪改
18款智慧型CS75加装无钥匙进入系统建设方案

检查系统连接: 确保系统与车辆 之间的连接正常, 避免因连接问题 导致系统无法正 常工作
检查系统功能: 定期测试系统功 能,确保系统能 够正常工作,避 免因系统故障导 致车辆无法正常 启动
定期保养:按照 车辆保养手册的 要求,定期对无 钥匙进入系统进 行保养,确保系 统能够长期稳定 工作
定期检查系统运行情况,及时发 现故障和异常
调试系统参数, 确保系统运行稳 定,提高用户体 验。
04
测试系统在各种 环境下的适应性, 包括高温、低温、 潮湿等。
01 检查安装是否正确,确保系统正 常工作
03 向客户讲解使用方法和注意事项
02 清理现场,整理工具和材料,保 持整洁
04 确认客户满意,完成安装工作
检查连接器是否插紧,有 无接触不良
01
02
03
04
加装过程:包括 选型、采购、安 装、调试等环节
结果评估:包括 使用效果、安全 性、可靠性等方 面的评估
成本效益:分析 加装无钥匙进入 系统带来的成本 节约和效益提升
经验教训:总结 加装过程中的经 验和教训,为今 后类似项目提供 参考
01
02
03
04
评估标准:加 装后车辆的安 全性、舒适性、 便捷性等方面
检ቤተ መጻሕፍቲ ባይዱ线路有无短路或断路
检查线路有无干扰或信号 衰减
检查线路有无电磁干扰或 辐射干扰
检查线路是否连接正确, 有无松动或脱落
检查线路有无破损或断裂
检查连接器有无损坏或故 障
检查线路有无接地或绝缘 不良
01
检查无钥匙进入系统的硬件安装是 否正确
03
测试无钥匙进入系统的感应距离是 否正常
05
测试无钥匙进入系统的安全性能是 否正常
辚辣自动车讯:1500203-INS-RB罩门安装指南说明书
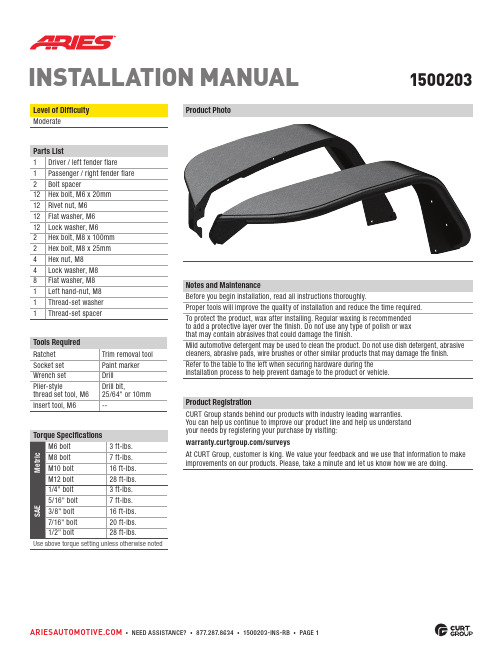
INSTALLATION MANUAL1500203Level of Difficulty Moderate Notes and Maintenance Before you begin installation, read all instructions thoroughly.Proper tools will improve the quality of installation and reduce the time required.To protect the product, wax after installing. Regular waxing is recommended to add a protective layer over the finish. Do not use any type of polish or wax that may contain abrasives that could damage the finish.Mild automotive detergent may be used to clean the product. Do not use dish detergent, abrasive cleaners, abrasive pads, wire brushes or other similar products that may damage the finish.Refer to the table to the left when securing hardware during the installation process to help prevent damage to the product or vehicle.Product PhotoProduct RegistrationCURT Group stands behind our products with industry leading warranties. You can help us continue to improve our product line and help us understand your needs by registering your purchase by visiting:/surveysAt CURT Group, customer is king. We value your feedback and we use that information to make improvements on our products. Please, take a minute and let us know how we are doing.Starting on the driver side, remove thefront inner fender wells using a socket set.Step 2Remove all push-in retainers, taking carenot to damage the plastic inner fender liner. Once all retainers have been removed, remove the inner fender liner and set it aside.Step 3Disconnect the side markerlight from the factory harness.Step 5Using the factory metal brace to help balance the inner liner, place the inner liner up againstthe Jeep body and align the mounting holes.Step 6Identify the matching holes from the new inner liner and the original holes.Mark the locations where drilling is needed.Step 7Remove the fender flare and inner fender liner and drill 25/64" or 10mm holes to fit the M6 threaded metal inserts supplied with the fender flares.Do not make the holes larger than requiredor the rivet nuts may fail to install.Remove the plastic trim retainerclips and the factory fender flare.Step 9Insert the rivet nut into the drilled ing a 13mm wrench, hold the M8 nut on the thread-set tool. With a 13mm socket, turn the head of the bolt clockwise until the M8 nut and thread-set spacer contact the M6 washer and rivet nut. After tension is felt, carefully compress the rivet nut in the hole while applying slight pressure to keep it seated (approximately two full rotations).CAUTION: Over tightening the rivet nut may damage the thread-set tool and / or vehicle panel. Only compress the rivet nut enoughto seat it in the hole without rotating.Step 10Drill a through-hole for anM8 bolt and insert an M8 bolt spacer.Screw the left hand-nut completely onto the thread-set tool. Slide the thread-set spacer onto the larger thread until it rests against the M8 left hand-nut.Place an M6 flat washer on the small thread followed by an M6 rivet nut.Thread the rivet nut onto the small end of the tool until it seats the washer against theshoulder between the M6 and M8 threads.Step 13Congratulations on the installation of your new ARIES fender flares.With the fender flares installed, periodic inspections should be performed to ensure all mounting hardware remains tight.Some states may require a side marker to be road legal. Refer to part number 1500240 and install if desired.To protect your investment, see the 'Notes and Maintenance' section onthe first page of this instruction manual.Step 12Tighten down all hardware and torque to the values specified on the first page of this manual.Repeat this processon the passenger side.Place the fender back into place and secure using an M6 bolt, lock washer and flat washer.With an M8 flat washer, insert an M8 x 100mm hex bolt through the bolt spacer and secure with an M8 flat washer, lock washer and hex nut.With an M8 flat washer, insert an M8 x 25mm hex bolt through the front mounting location and secure with anM8 flat washer, lock washer and hex nut.。
唯雅诺 用户手册说明书
详细出版信息互联网有关梅赛德斯-奔驰车辆和戴姆勒股份公司的详细信息,请访问以下网址: 资料组如果您对本用户手册有任何疑问或建议,敬请联系:戴姆勒卡客车(中国)有限公司福建奔驰汽车工业有限公司©戴姆勒股份公司:未经戴姆勒股份公司书面授权,任何人不得以任何方式再版、翻译或复制本用户手册的全部或部分内容。
违者必究。
福建奔驰汽车工业有限公司中国福建省福州市青口投资区奔驰大道1号350119符号G 警告警告说明能够提醒您注意可能会危及您或他人健康或生命的危险。
H 环保说明环保说明可向您提供有关环保措施或环保处置方式的信息。
!材料损坏说明可提醒您可能导致您车辆损坏的危险。
i 这些符号表示有用的操作指示或可能对您有帮助的详细信息。
X 此符号表示必须遵守的操作指示。
X 多个连续符号表示包含多个步骤的操作指示。
(Y 页)此符号指明有关某主题详细信息的所在位置。
Y Y 此符号表示在下页继续显示的警告或操作指示。
Display 此文字表示显示屏上的信息。
定稿日期2014年3月24日欢迎进入梅赛德斯-奔驰的世界首次驾驶前,请仔细阅读本用户手册并熟悉您的车辆。
为了您的安全并使车辆达到较长的使用寿命,请遵守本用户手册中的说明和警告注意事项。
不遵守这些说明和警告注意事项可能会导致车辆受损或造成人身伤害。
本用户手册提供了有关您车辆最重要功能的信息。
您车辆的装备或产品描述可能会由于以下原因而与本手册中的描述有所不同:R车型R订购项目R国家规范R适用性个别警告灯和指示灯可能不起作用。
梅赛德斯-奔驰不断致力于制造最先进的汽车。
因此,梅赛德斯-奔驰保留对以下方面进行更改的权利:R设计R装备R技术性能因此,提供的描述可能与您车辆的实际情况有所不同。
以下资料均为车辆的组成部分:R用户手册R保养小册R因装备而异的补充资料这些资料应随车携带。
在出售此车时,务必将其随车一同转让。
戴姆勒股份公司技术资料组预祝您旅途安全愉快。
6365841700É6365841700<ËÍ索引........................................................4序言......................................................17概览......................................................23安全......................................................31开启和关闭...........................................47座椅、方向盘和后视镜.......................63照明和风挡玻璃雨刮器.......................81智能气候控制.......................................95驾驶和驻车.........................................107车载电脑和显示.................................133储物及特色功能.................................169使用车辆运输装载物.........................181保养和护理.........................................187故障救援............................................205车轮和轮胎.........................................213技术数据 (227)1,2,3...12伏插座 (178)AABS请参见防抱死制动系统(ABS)安全车内的宠物 (42)车内的儿童 (37)儿童防护装置 (37)安全带 (35)安全带警告/警告灯 (37)安全带收紧力限制器 (37)安全带收紧器 (37)高度调节 (36)警告灯 (168)佩戴 (36)清洁 (204)显示信息 (159)重要安全注意事项 (35)安全带收紧力限制器(启用) (33)安全带收紧器功能 (37)启用 (33)安全系统请参见驾驶安全系统安装车轮安装车轮 (222)拆下车轮 (221)拆卸和安装备用轮胎 (224)车辆准备工作 (220)固定车辆以防溜车 (220)降低车辆 (222)升起车辆 (220)BBAS请参见制动辅助系统(BAS)保险丝 (212)保养 (193)保养时间间隔显示保养到期日(自动显示) (194)超出保养到期日 (194)调出保养到期日 (194)注意事项 (194)杯座 (175)重要安全注意事项 (175)备用轮胎拆卸/安装 (224)一般说明 (223)重要安全注意事项 (223)变速箱请参见自动变速箱便捷关闭功能 (59)便捷开启/关闭(空气内循环模式) (104)便捷开启功能 (59)标签 (20)泊车请参见驻车C菜单(车载电脑)操作......................................137,146设定......................................138,147操作系统请参见车载电脑侧车窗便捷关闭功能 (59)便捷开启功能 (59)复位 (60)概述 (58)铰接式侧车窗 (58)开启/关闭 (59)问题(故障) (60)重要安全注意事项 (58)侧灯更换灯泡 (88)插座 (178)产品信息 (17)超速区域 (135)超速运转模式 (117)车窗请参见侧车窗清洁 (200)车窗帘(清洁说明) (204)车灯请参见照明更换灯泡(卤素大灯) (86)车顶内衬和地毯(清洁说明) (204)车顶托架注意事项 (186)最大有效载荷 (237)车顶载荷(车顶托架) (237)车辆操作安全性 (18)登记 (20)电子设备 (228)个人设定(车载电脑).......138,147固定车辆以防溜车.. (116)降低 (222)解锁(钥匙) (48)解锁(在紧急情况下) (50)紧急解锁 (49)默示保证 (21)起步 (110)牵引 (209)升起 (220)数据获取 (21)锁止(钥匙) (48)锁止(在紧急情况下) (50)停放 (117)显示信息 (164)运输 (211)正确使用 (20)装备 (17)车辆紧急锁止 (50)车辆识别号(VIN) (229)车辆识别牌 (229)车辆数据 (235)车轮安装车轮 (220)安装新车轮 (222)拆下车轮 (221)拆卸和安装备用轮胎 (224)车轮尺寸/轮胎尺寸 (223)存储 (220)对换/更换 (219)防滑链 (216)更换车轮 (219)检查 (214)紧固扭矩 (222)清洁 (201)重要安全注意事项 (214)车轮螺栓紧固扭矩 (222)车门紧急解锁 (50)紧急锁止 (50)控制面板 (29)显示信息 (164)中央锁止/解锁(钥匙)...............48车内的宠物. (42)车内的动物 (42)车内灯请参见车内照明车内照明更换灯泡 (90)环境照明(车载电脑).......142,151前排. (85)有关更换灯泡的注意事项 (90)中央开启后舱照明 (86)车速表请参见仪表盘数字式车速表(车载电脑)......................................140,149选择显示单位(车载电脑)......................................140,149车速控制请参见定速巡航控制车外温度显示 (135)车外照明请参见照明车型识别牌请参见车辆识别牌车用工具套件 (206)车载电脑标准显示..............................138,147显示信息 (153)信息记忆 (154)重要安全注意事项 (134)车载电脑(带方向盘按钮的车辆)设定菜单..............................138,147乘客舱空调系统请参见智能气候控制乘客舱暖气系统请参见智能气候控制出风口设定侧出风口 (106)设定后舱出风口 (106)设定中央出风口 (105)调节(乘客舱) (106)重要安全注意事项 (105)出行准备目视检查车辆外部 (109)在车内检查 (109)储备(燃油箱)请参见燃油储物空间和储物箱方向盘储物箱 (171)手套箱 (170)眼镜盒 (171)仪表板内的储物箱 (171)重要安全注意事项 (170)储物箱请参见储物空间和储物箱传感器(清洁说明) (202)D大灯请参见大灯自动模式加注清洁系统清洗液 (192)起雾 (85)清洁系统(功能) (85)大灯自动模式 (83)单程里程表调出......................................143,152复位.. (135)导轨安装捆扎环 (184)最大拉伸强度 (236)倒车灯更换灯泡 (89)灯泡请参见更换灯泡点火开关请参见钥匙位置点烟器 (177)电磁兼容性 (19)电动车窗请参见侧车窗电动滑动车门防夹功能 (55)功能 (55)开启/关闭(车门拉手) (57)开启/关闭(使用按钮) (56)开启/关闭(使用钥匙) (57)问题(故障) (57)障碍物探测 (55)重要安全注意事项 (55)电话 (178)电控车辆稳定行驶系统(ESP®)警告灯 (165)显示信息 (158)指示灯 (167)重要安全注意事项.........................44电子限速功能(SPEEDTRONIC)不变 (127)存储当前车速.......................125,126调出最后存储的车速. (126)功能/注意事项 (124)可变 (125)启用可变 (126)设定不变电子限速功能(SPEEDTRONIC) (127)停用可变 (126)问题(故障) (127)显示信息 (163)限速器(LIM)指示灯 (125)选择 (125)重要安全注意事项 (125)电子制动力分配(EBV)功能/注意事项 (43)显示信息 (157)指示灯 (166)定速巡航控制存储和保持当前车速 (123)定速巡航控制杆 (123)功能/注意事项 (122)恢复存储车速 (123)驾驶系统 (122)启用 (123)启用条件 (123)停用 (124)问题(故障) (124)显示信息 (163)限速器(LIM)指示灯 (123)选择 (123)重要安全注意事项 (122)冬季操作散热器盖 (21)冬季驾驶防滑链 (216)一般说明 (215)易滑路面 (120)冬季轮胎M+S轮胎 (215)设定限速 (117)动力性能 (236)对讲机型式认证/频率 (228)EE/e标记 (228)儿童防护装置 (37)在车内 (37)儿童防护锁后舱滑动天窗 (42)滑动车门 (41)尾门 (41)重要安全注意事项 (40)儿童座椅ISOFIX (40)用于乘客座椅 (39)F发动机操作安全 (19)发动机编号 (229)改变输出功率 (19)工作不稳定 (111)关闭 (117)技术数据 (236)警告灯(发动机诊断) (168)跨接起动 (207)启动 (109)启动故障 (111)牵引起动(车辆) (211)清洁说明 (200)发动机电子设备问题(故障) (111)注意事项 (228)发动机油换油 (233)机油等级注意事项 (232)机油液位(注意事项) (190)加注 (190)加注容积 (232)粘度 (233)使用机油尺检查机油液位 (190)添加剂 (233)显示信息 (162)有关耗油量的信息 (233)发动机罩关闭 (189)开启 (188)显示信息 (164)重要安全注意事项.......................188发动机罩下的保养点. (190)方向盘按钮(车载电脑)...............135,145按钮概览.. (27)清洁 (203)调节 (77)防抱死制动系统(ABS)功能/注意事项 (42)显示信息 (155)指示灯 (166)重要安全注意事项 (43)防盗警报系统(ATA) (45)防盗系统防盗警报系统(ATA) (45)防启动装置 (45)防护系统请参见辅助防护系统(SRS)防滑链 (216)防夹功能电动滑动车门 (55)防启动装置 (45)分里程表请参见单程里程表风挡玻璃除雾 (103)清洁 (200)风挡玻璃清洗液刮扫 (91)加注 (192)加注容积 (235)显示信息 (164)注意事项 (235)风挡玻璃雨刮器更换雨刮器叶片 (92)后车窗雨刮器 (92)开启/关闭 (91)使用风挡玻璃清洗液刮扫 (91)问题(故障) (94)雨量/光线传感器 (91)扶手 (76)服务中心请参见具有资质的专业服务中心符合性声明 (18)辅助防护系统(SRS)介绍 (32)警告灯 (168)警告灯(功能) (32)显示信息 (159)附加装备 (20)附件请参见附加装备附件和改装件请参见车身G改装件和附件请参见车身高压清洁设备 (200)更改编程(钥匙) (49)更换灯泡侧灯 (88)车内照明 (90)倒车灯 (89)灯泡型号概述(前部车灯) (87)灯泡型号概述(尾灯) (89)后雾灯 (89)近光灯(卤素大灯) (87)门控灯 (91)牌照灯 (90)日间行驶灯(卤素大灯) (88)尾灯 (89)雾灯 (88)显示信息 (159)远光灯 (87)制动灯 (89)重要安全注意事项 (86)驻车灯(后部) (89)驻车灯(前部) (88)转角照明灯 (88)转向信号灯(后部) (89)转向信号灯(前部) (88)更换电池(钥匙) (50)工作液发动机油 (232)风挡玻璃清洗液 (235)冷却液(发动机) (234)汽油 (230)燃油 (230)制动液 (233)重要安全注意事项 (229)供暖请参见智能气候控制故障请参见牵引信息记忆(车载电脑)...............154关闭警报[防盗警报系统(ATA)]. (45)H海外驾驶梅赛德斯-奔驰服务 (118)燃油 (118)后部行李架注意事项 (186)后舱开启/关闭智能气候控制 (100)设定出风口 (106)设定温度 (101)后舱空调系统请参见智能气候控制后舱暖气系统请参见智能气候控制后车窗加热开启/关闭 (104)问题(故障) (104)后车窗雨刮器 (92)后货架最大有效载荷 (237)后排长座椅拆卸/安装 (74)调节座椅靠背 (68)方便出入功能 (67)滑动 (70)面对面位置 (74)向下/向上折叠 (73)一般说明 (67)座椅导轨 (69)座椅固定点 (69)后排座椅拆卸/安装 (72)调节靠背 (68)滑动 (69)面对面位置 (72)向上/向下折叠 (71)一般说明 (67)转动 (69)座椅导轨 (69)座椅固定点 (69)后视镜内部后视镜 (78)外部后视镜 (78)重要安全注意事项 (77)后视摄像头功能/注意事项 (130)开启/关闭 (131)清洁说明 (202)问题(故障) (132)重要安全注意事项 (130)后雾灯更换灯泡 (89)开启/关闭 (83)护理安全带 (204)车窗 (200)车顶内衬 (204)车轮 (201)车内 (202)车外照明 (201)传感器 (202)地毯 (204)发动机 (200)方向盘 (203)高压清洗机 (200)后视摄像头 (202)滑动车门 (202)换档杆 (203)漆面 (200)饰条 (203)手洗 (199)塑料饰件 (203)显示屏 (202)雨刮器叶片 (201)注意事项 (198)自动清洗机 (199)座椅套 (203)滑动车门 (54)请参见电动滑动车门从车内开启/关闭 (55)从车外开启/关闭 (55)儿童防护锁 (41)清洁 (202)重要安全注意事项 (54)滑动天窗儿童防护锁 (42)复位 (62)开启/关闭 (60)开启/关闭(从后舱操作) (61)开启/关闭(从驾驶室操作) (61)问题(故障) (62)显示信息 (164)遮阳帘 (62)重要安全注意事项 (60)环境保护一般说明 (17)环境照明....................................142,151换档杆清洁 (203)换灯泡请参见更换灯泡IISOFIX儿童座椅固定装置 (40)J机油请参见发动机油基本设定请参见设定记忆功能 (66)技术数据车顶托架 (237)车辆数据 (235)导轨 (236)动力性能 (236)发动机 (236)后货架 (237)加速 (236)捆绑点 (236)轮胎/车轮............................219,223容积.. (229)速度 (236)加速防滑控制(ASR)功能/注意事项 (44)启用/停用 (44)显示信息 (156)指示灯 (166)重要安全注意事项 (44)加油请参见燃油加油工作流程 (115)燃油表 (135)重要安全注意事项 (114)加油口盖请参见加油口盖板加注燃油加油口盖板 (115)驾驶安全系统电控车辆稳定行驶系统(ESP®) (44)电子制动力分配(EBV) (43)防抱死制动系统(ABS) (42)概述 (42)加速防滑控制(ASR) (44)制动辅助系统(BAS) (43)重要安全注意事项 (42)驾驶室请参见仪表盘概览 (24)驾驶室管理及数据系统(COMAND)显示屏清洁 (202)驾驶提示冰雪覆盖的路面 (120)超速运转模式 (117)车速限制 (117)冬季驾驶 (120)防滑链 (216)海外驾驶 (118)磨合注意事项 (108)涉水驾驶 (120)湿滑路面 (119)水滑现象 (120)新制动盘 (119)新制动蹄片/衬片 (119)一般 (117)越野行驶 (120)在撒盐道路上制动效果受限 (119)在湿滑路面上行驶 (120)在斜坡上行驶 (118)制动 (118)重要安全注意事项 (108)自动变速箱 (113)驾驶系统电子限速功能(SPEEDTRONIC) (124)定速巡航控制 (122)后视摄像头 (130)显示信息 (163)驻车定位系统(PARKTRONIC)..127驾驶员侧车门和前排乘客侧车门 (54)驾驶员及乘客安全车内的宠物 (42)车内的儿童 (37)辅助防护系统(SRS) (32)重要安全注意事项 (32)解锁从车内(中央解锁按钮) (53)紧急解锁 (50)使用紧急钥匙单元 (49)紧急解锁车辆 (50)紧急钥匙单元插入 (49)功能/注意事项 (49)取下 (49)锁止车辆 (50)近光灯更换灯泡 (87)海外驾驶 (118)开启/关闭 (82)显示信息 (159)警告灯和指示灯安全带 (168)储备燃油 (168)电控车辆稳定行驶系统(ESP®) (165)电控车辆稳定行驶系统(ESP®)功能 (167)发动机诊断 (168)防抱死制动系统(ABS) (166)辅助防护系统(SRS) (32)概览 (26)加速防滑控制(ASR) (165)限速器(LIM)[可变电子限速功能(SPEEDTRONIC)] (125)限速器(LIM)(定速巡航控制) (123)制动辅助系统(BAS) (166)制动器 (166)警告三角标志 (206)具有资质的专业服务中心 (19)K开启/关闭周围照明(车载电脑)............................................142,151可变电子限速功能(SPEEDTRONIC)请参见电子限速功能(SPEEDTRONIC)空调设定出风口 (105)空调系统请参见智能气候控制控制面板风挡玻璃上方 (28)驾驶员侧车门 (29)智能气候控制 (27)中央控制台 (27)跨接起动(发动机) (207)捆绑点和捆扎材料允许拉伸载荷 (236)重要安全注意事项 (184)捆扎环安装 (184)允许拉伸载荷 (236)L冷却液(发动机)加注 (192)加注容积 (235)检查液位 (191)显示温度(车载电脑).......138,147显示信息 (161)注意事项 (234)里程表请参见总里程表请参见单程里程表里程计算机(车载电脑).........143,152里程记录器请参见单程里程表轮胎M+S轮胎 (215)存储 (220)防滑链 (216)更换 (219)更换车轮 (219)驾驶信息 (214)检查 (214)轮胎尺寸(数据)...............219,223使用寿命 (215)胎面 (215)重要安全注意事项 (214)转动方向 (220)轮胎压力列表 (219)推荐 (217)MM+S轮胎 (215)梅赛德斯-奔驰授权服务中心请参见具有资质的专业服务中心梅赛德斯-奔驰原厂零部件 (21)门控灯更换灯泡 (91)磨合注意事项 (108)默示保证 (21)N内部后视镜 (78)P牌照灯更换灯泡 (90)配电箱风扇显示信息 (164)频率对讲机 (228)移动电话 (228)瓶座 (176)Q漆面(清洁说明) (200)启动(发动机) (109)启用/停用空气内循环模式 (104)启用/停用制冷及除湿功能 (101)起步 (110)起步辅助操作 (110)起步之前重要安全注意事项 (109)起动辅助显示信息 (156)气囊启用 (33)前置气囊(驾驶员、前排乘客) (34)重要安全注意事项 (33)汽油 (230)千斤顶存储位置 (206)使用 (220)支撑点 (220)牵引安装/拆卸拖车环 (210)车辆卡陷时 (211)出现故障时 (210)在前后轴均着地的状态下 (211)在前轴或后轴升起的情况下 (210)重要安全注意事项 (209)牵引起动发动机紧急启动 (211)重要安全注意事项 (209)强制降档 (113)清洁后视镜转向信号灯 (201)R燃油等级(汽油) (230)海外驾驶 (118)加注燃油 (114)燃油表 (135)添加剂(汽油) (231)问题(故障) (116)显示油箱剩余燃油可达里程..........................................144,153消耗量统计...........................144,153消耗量信息.. (231)油箱容积/储备燃油 (230)重要安全注意事项 (230)燃油表 (135)燃油箱可达里程(车载电脑).......144,153问题(故障). (116)燃油箱容量储备燃油警告灯 (168)燃油消耗量统计(车载电脑)..144,153燃油液位燃油表 (135)日间行驶灯更换灯泡(卤素大灯) (88)开启/关闭(车载电脑).....141,150开启/关闭(开关).. (82)SSRS请参见辅助防护系统(SRS)伞架 (177)散热器盖...............................................21散热器上的防虫盖. (21)上方控制面板 (28)设定复位所有(车载电脑).......138,147复位子菜单(车载电脑)...139,148设定定位照明(车载电脑).....142,151设定气流大小. (102)设定气流分配 (102)设定时钟(车载电脑).............141,150设定限速请参见电子限速功能(SPEEDTRONIC)涉水驾驶 (120)时间设定时间(车载电脑)......141,150饰条(清洁说明).. (203)手动松开驻车锁(自动变速箱) (114)手套箱 (170)手制动器请参见驻车制动器授权服务中心请参见具有资质的专业服务中心授权服务中心 (19)数据请参见技术数据数字式车速表设定单位(车载电脑).......140,149显示(车载电脑)...............138,147数字式里程表 (19)水滑现象 (120)塑料饰件(清洁说明) (203)锁止请参见中央锁止锁止(车门)紧急锁止 (50)T添加剂发动机油 (233)汽油 (231)调节大灯光程 (84)铁路运输 (118)通讯设备操作 (178)型式认证/频率 (228)头枕调节(电动) (75)调节(手动) (75)重要安全注意事项 (75)VVIN请参见车辆识别号(VIN)W外部后视镜复位 (79)调节 (78)移位(故障) (78)折合/展开(电动) (78)折合/展开(自动) (78)自动折合(车载电脑).......143,152危险警告灯. (84)尾灯请参见照明更换灯泡 (89)尾门从车外开启/关闭 (57)儿童防护锁 (41)重要安全注意事项 (57)温度车外温度 (135)设定(智能气候控制) (101)设定单位(车载电脑).......139,148雾灯更换灯泡 (88)开启/关闭 (83)X洗车装置(护理) (199)夏季轮胎 (215)显示标准显示(车载电脑).......138,147车外温度(车载电脑).......138,147数字式车速表(车载电脑)......................................138,147选择状态栏显示(车载电脑)......................................140,149显示屏显示信息 (153)显示信息保养间隔显示 (194)车辆 (164)重要安全注意事项 (153)限速器(LIM)指示灯定速巡航控制 (123)可变电子限速功能(SPEEDTRONIC) (125)泄气的轮胎更换车轮/安装备用轮胎 (220)信息请参见显示信息信息记忆(车载电脑) (154)蓄电池(车辆)充电 (197)断开和拆卸 (196)跨接起动 (207)连接和安装 (197)显示信息 (164)养护 (198)重要安全注意事项 (194)Y烟灰缸 (177)延迟关闭....................................142,151眼镜盒. (171)腰部支撑 (66)遥控请参见钥匙钥匙便捷关闭功能 (59)便捷开启功能 (59)车门中央锁止/解锁 (48)点火开关位置 (109)丢失 (52)更改编程 (49)更改锁止系统设定...............143,152更换电池.. (50)紧急钥匙单元 (49)问题(故障) (52)显示信息 (165)重要安全注意事项 (48)钥匙位置 (109)钥匙位置(点火开关) (109)一触式换档 (112)仪表盘车速表 (135)概述 (25)警告灯和指示灯 (26)仪表盘照明 (134)仪表照明请参见仪表盘照明移动电话 (178)型式认证/频率 (228)饮料杯座请参见杯座用户手册 (17)油箱容积储备,显示信息 (162)油箱剩余燃油可达里程(车载电脑)............................................144,153余热功能(智能气候控制). (105)雨刮器叶片更换 (92)清洁 (201)雨伞请参见伞架语言显示(车载电脑)...............140,149远光灯更换灯泡 (87)开启/关闭 (84)越野行驶越野行驶规则 (121)越野行驶后的检查项目 (122)重要安全注意事项 (120)运输车辆 (211)固定装载物 (184)铁路 (118)载荷分配 (183)载物舱布局变化 (183)装载指导 (182)Z在野外行驶请参见越野行驶载荷分配 (183)载物舱选项 (183)罩 (185)照明请参见车内照明请参见更换灯泡侧灯 (82)大灯光程 (84)大灯闪烁器 (84)大灯自动模式 (83)海外驾驶 (118)后雾灯 (83)近光灯 (82)开启/关闭日间行驶灯(车载电脑)......................................141,150开启/关闭日间行驶灯(开关) (82)开启/关闭周围照明(车载电脑)......................................142,151设定车外照明延迟关闭(车载电脑)......................................142,151设定环境照明的亮度(车载电脑)......................................142,151危险警告灯. (84)雾灯 (83)远光灯 (84)照明开关 (82)重要安全注意事项 (82)驻车灯 (82)转角照明灯功能 (84)转向信号灯 (83)遮阳帘 (62)折叠桌 (171)诊断系统连接接口 (19)制动电子制动力分配(EBV) (43)防抱死制动系统(ABS) (42)驾驶提示 (118)制动辅助系统(BAS) (43)制动液(注意事项) (233)重要安全注意事项 (118)制动灯更换灯泡 (89)制动辅助系统(BAS)功能/注意事项 (43)显示信息 (156)指示灯 (166)制动力分配,电子请参见电子制动力分配(EBV)制动器保养 (166)检查制动液液位 (192)施加驻车制动 (116)显示信息 (156)新的制动蹄片/衬片 (119)驻车制动器(注意事项) (119)制动蹄片/衬片显示信息 (156)新的 (119)制动系统故障 (156)警告灯 (166)制动液检查液位 (192)警告灯 (166)显示信息 (157)注意事项 (233)制冷请参见智能气候控制智能气候控制便捷开启/关闭(空气内循环模式) (104)车窗除雾 (103)后舱空调 (100)开启/关闭 (100)开启/关闭后车窗加热 (104)开启/关闭空气内循环模式 (104)开启/关闭余热功能 (105)空调系统 (97)设定气流 (102)设定气流分配 (102)设定温度 (101)系统概述 (96)有关后车窗加热的问题 (104)再加热功能(空气除湿) (103)制冷及除湿功能 (101)重要安全注意事项 (96)自动模式 (101)自动智能气候控制 (98)中央控制台概览 (27)中央门锁请参见中央锁止中央锁止紧急解锁 (49)锁止/解锁(按钮) (53)锁止/解锁(钥匙) (48)锁止和解锁(按钮) (53)自动锁止 (54)中央锁止系统请参见中央门锁驻车请参见驻车定位系统(PARKTRONIC)后视摄像头 (130)重要安全注意事项 (116)驻车制动器...................................116驻车灯更换灯泡(后部) (89)更换灯泡(前部) (88)开启/关闭 (82)驻车定位系统(PARKTRONIC)传感器范围 (128)功能/注意事项 (127)驾驶系统 (127)警告显示 (129)溜车警告 (129)停用/启用 (129)问题(故障) (130)重要安全注意事项 (128)驻车辅助请参见驻车定位系统(PARKTRONIC)请参见后视摄像头驻车制动器显示信息 (158)注意事项/功能 (116)转角照明灯更换灯泡 (88)转角照明灯功能功能/注意事项 (84)转速表 (135)转向信号灯更换灯泡(后部) (89)更换灯泡(前部) (88)开启/关闭 (83)装载物固定 (184)运输 (182)装载物固定辅助工具载物舱罩 (185)装载指导 (182)自动变速箱概述 (111)换档 (112)换档范围 (113)换档杆 (112)换档杆位置 (112)驾驶提示 (113)紧急操作模式 (114)挪车 (113)启动发动机 (109)强制降档 (113)手动松开驻车锁 (114)问题(故障) (114)一触式换档 (112)油门踏板位置 (113)重要安全注意事项 (111)自行换档 (112)自动变速箱紧急操作模式 (114)自动锁止 (54)自动智能气候控制请参见智能气候控制自行车支架 (186)总里程表....................................138,147组合开关.. (83)最高车速技术数据 (236)速度限制 (117)座椅存储设定(记忆功能) (66)扶手 (76)校正驾驶员座椅位置 (64)清洁座椅套 (203)调节(电动) (65)调节(手动) (65)调节头枕 (75)调节腰部支撑 (66)重要安全注意事项 (64)座椅加热 (76)座椅加热 (76)环境保护一般说明H环保说明戴姆勒的公开政策是一项综合性的环保政策。
上汽大众全新途安L系列车型 使用维护说明书

本说明书适用于下列表中各种型号的上汽大众全新途安L多用途乘用车。
用户在使用本公司产品以前,必须认真研读产品使用维护说明书,任何不当的使用、保养和修理都可能导致车辆的损坏及影响质量担保服务。
因此,在使用产品前请认真阅读本使用维护说明书,并对照表中的型号确认您的车型。
名称型号发动机变速箱上汽大众全新途安L多用途乘用车SVW6453AGD CSS五挡手动变速器上汽大众全新途安L多用途乘用车SVW6453BGD CSS七挡自动变速器上汽大众全新途安L多用途乘用车SVW6453CGD CSS五挡手动变速器上汽大众全新途安L多用途乘用车SVW6453DGD CSS七挡自动变速器上汽大众全新途安L多用途乘用车SVW6453GED CUF七挡自动变速器上汽大众全新途安L多用途乘用车SVW6453HED CUF七挡自动变速器上汽大众全新途安L多用途乘用车SVW6453FGD CSS七挡自动变速器上汽大众全新途安L多用途乘用车SVW6453JED CUF七挡自动变速器上汽大众全新途安L多用途乘用车SVW6453ECD CSR五挡手动变速器上汽大众全新途安L多用途乘用车SVW6453QGD CSS七挡自动变速器上汽大众全新途安L多用途乘用车SVW6453KGD CSS五挡手动变速器上汽大众全新途安L多用途乘用车SVW6453LGD CSS七挡自动变速器上汽大众全新途安L多用途乘用车SVW6453MGD CSS七挡自动变速器上汽大众全新途安L多用途乘用车SVW6453NGD CSS五挡手动变速器上汽大众全新途安L多用途乘用车SVW6453PGD CSS七挡自动变速器上汽大众全新途安L多用途乘用车SVW6453RGD CSS七挡自动变速器上汽大众全新途安L多用途乘用车SVW6453SGD CSS七挡自动变速器上汽大众全新途安L多用途乘用车SVW6453ETD DJS七挡自动变速器上汽大众全新途安L多用途乘用车SVW6453FTD DJS七挡自动变速器上汽大众全新途安L多用途乘用车SVW6453GTD DJS七挡自动变速器上汽大众全新途安L多用途乘用车SVW6453ALD DNC五挡手动变速器上汽大众全新途安L多用途乘用车SVW6453BTD DJS七挡自动变速器上汽大众全新途安L多用途乘用车SVW6453CTD DJS七挡自动变速器上汽大众全新途安L多用途乘用车SVW6453DTD DJS七挡自动变速器本使用维护说明书描述了该车型车辆在当前范围的配置、功能及操作的一般通用信息,但用户车辆的实际配置和功能等信息以具体交付时的为准。
五菱之光加装5门遥控中控锁

防盗器内部工作原理防盗器的中控系统是由两个五抓继电器组成的,橙色线.白色线.黄色线是第一组继电器,橙黑线.白黑线.黄黑线是第二组继电器。
第一组继电器的动触点与白色线相连,静触点(常闭)与橙色线相连,静触点(常开)与黄色线相连。
也就是说在静止的情况下,白色线和橙色线是相连的,当你按动遥控器的关锁键时,第一组继电器的线圈通电(大约持续0.5秒),产生的电磁使动触点与常闭触点断开并与常开触点相连,持续0.5秒钟后复位,动触点重新与常闭触点相连。
也就是说白色线在电磁的作用下与橙色线断开并与黄色线相连,持续0.5秒钟后复位。
白色线重新与橙色线相连,这是在做关锁动作时第一组继电器的工作全过程。
第二组继电器负责开锁动作,同第一组继电器一样第二组继电器的动触点与白黑线相连,常闭触点与橙黑线相连,常开触点与黄黑线相连。
在静止的情况下,白黑线与成黑线相连,当你按动遥控器的开锁键时,第二组继电器的线圈通电(大约持续0.5秒钟)产生的电磁使动触点与常闭触点断开并与常开触点相连,同样持续0.5秒钟后复位,动触点重新与常闭触点相连。
也就是说白黑线在电磁的作用下与橙黑线断开并于黄黑线相连,持续0.5秒钟后复位。
白黑线重新与橙色线相连,这是在做开锁动作时第二组继电器的工作全过程。
说了这么多让我们总结一下,首先防盗器中控系统的两个五抓继电器是完全独立控制的。
第一组继电器在静止的时候白色线与橙色线是连通的,第二组继电器在静止的时候白黑线与橙黑线是连通的,这一点很重要,然后就是做开锁动做和关锁动作时防盗器内继电器的工作过程,明白了防盗器内部工作原理后再结合触发方式电路图,防盗器就变的简单易懂了。
安装防盗器的程序和安装工具与工艺安装防盗器的程序1、先查验车辆的状况:如电瓶电压、水温表、机油表、大灯、小灯、转向灯、刹车灯、室内灯、气囊灯、ABS灯、SRS、天窗等。
2、安装:查找要接的+12V长火线、地电(搭铁)、转向灯线、门边线、刹车线、起动马达线、中控线、开/关信号线等。
浔星金牛 Cheetah 73LP 安装指南说明书

Cheetah 73LP Installation GuideModel ST373405LW/LC/LWV/LCV, ST336605LC/LCVSCSI interface disc drivePublication Number: 100109946, Rev. A, April 2001Handling precautions/Electrostatic discharge protection •Disc drives are fragile. Do not drop or jar the drive and handle the drive only by the edges or frame.•Drive electronics are extremely sensitive to static electricity. Keep the drive in its antistatic container until you are ready to install it. Wear a wrist strap and cable connected to ground. Discharge static from all items near or that will contact the drive. Never use an ohmmeter on any circuit boards.•T urn off the power to the host system during installation.•Always use forced-air ventilation when operating the drive.•Use caution when troubleshooting a unit that has voltages present.•Do not disassemble the drive; doing so voids the warranty.•Return the entire drive for depot service if any part is defective.•Do not apply pressure or attach labels to circuit board or drive top.Electromagnetic complianceSee Safety and Regulatory Agency Specifications, p/n 75789512.Drive characteristicsST373405ST336605 Formatted capacity (Gbytes)73.4 36.7Max. data blocks 143,374,74171,687,371(088BB995h)(0445DCCBh) Cylinders (user accessible)29,54929,549Heads (user accessible)84Disc rotation (rpm)10,04110,041 Operating voltages+5V+12V+5V+12VTypical operating current (Amps)0.820.910.820.82What you need•Phillips screwdriver and four 6-32 UNC drive mounting screws•Forced-air ventilation to provide adequate drive cooling•An unused drive power connector from your system’s power supply (not applicable to LC/LCV models because power is supplied through the interface connector on these units)T o operate at LVD transfer rates, you may also need an LVD-capable SCSI host adapter, LVD I/O cable and active negation external terminator. Multimode interfaceThis drive can operate in single-ended (SE) or low voltage differential (LVD) mode. This multimode capability provides backwards compatibility so you can use it with or without an LVD-capable host adapter. The primary bene-fits of LVD technology include faster transfer rates, reduced power con-sumption, increased allowable cable lengths, and improved device connectivity.Y ou can configure the drive to switch between SE and LVD modes automat-ically or force it to operate in SE mode only. To configure this option, see Figure 2.Note.T o operate at the Ultra2 rates in LVD mode, all devices on the same bus (cable) must be running in LVD mode. If you add any SE device to the bus, all devices on that bus operate in SE mode.Note.Some LVD host adapters provide an LVD connector and an SE con-nector on the same host adapter to allow you to run SE and LVD drives concurrently at their maximum capabilities. Check your SCSI host adapter documentation. See Figure 3.Caution.Do not mix LVD drives on the same bus with high voltage differen-tial (HVD) devices–drive damage may occur.Installation instructions1.Set the SCSI IDDetermine which SCSI IDs are already being used in the system and then assign this disc drive a SCSI ID that isn’t already being used. Use the J6 connector located on the front of the drive to set the SCSI ID (see Figure 1). •Most ST373405 drives are factory set with the SCSI ID set at 0. If this is the only SCSI drive in your system and there are no other SCSI deviceson the daisychain, you can leave this drive’s SCSI ID set to 0 and pro-ceed to the next step.•The host system’s SCSI controller usually uses SCSI ID 7.•If you have an LC or LCV model drive, the host normally sets the ID over the I/O interface, so you don’t need to worry about this step.•Some systems provide a cable designed to connect to the J5 jumper block on the drive to remotely set the ID. Y ou can connect this cable to J5Figure 1.Setting the SCSI ID (the J5 block is on LW/LWV models only)2.Configure terminationIf you are installing the drive in a system that has other SCSI devices installed, terminate only the end devices on the SCSI bus (cable). This drive does not have internal terminators or any other way of adding internal termi-nation on the drive. Y ou must provide external termination when termination is required. This is normally done by adding an inline terminator on the end of the cable. See Figure 3 for an illustration showing a system configuration that uses an external terminator.•Use active (ANSI SCSI-2 Alternative 2) single-ended terminators when terminating a bus operating in single-ended mode.•Use SPI-2-compliant active low voltage differential terminators when ter-minating a SCSI Ultra2 bus operating in LVD mode.•The host adapter is normally on the end of the bus and internally termi-nated. Y ou can configure your bus with another device on the end if you remove termination from the host adapter.3.Configure terminator powerTerminators have to get power from some source. The default configuration results in the drive not supplying termination power to the bus. Y ou should normally leave this drive set at this default unless your host system requires the drive to supply termination power to the bus. To configure this drive to supply termination power to the bus, place a jumper on J2 pins 1 and 2 as shown in Figure 2.•Host systems designed to use LC and LCV drives normally provide termi-nation power from the host adapter or other source. For this reason, LC and LCV model drives cannot be configured to provide termination power to the bus.Figure 2.Option select jumpers4.Connect the drive activity LED (optional)Connect the Drive Activity LED cable to J6 pins 11 and 12 (see Figure 2), or connect a drive ID and Drive Activity LED cable to J5, depending on host system requirements.5.Check the other available jumper settingsSelect other options on J2 as illustrated in Figure 2. Do not change these unless instructed to do so by the host system documentation.6.Mount the drive in the host system and connect cablesNote.LC and LCV drives are designed to be attached to a carrier or tray and inserted into the host system without I/O or power cables.a.Mount LW and LWV model drives to the host system’s chassis usingfour 6-32 UNC screws. Two mounting holes are in each side of the drive and there are four mounting holes in the bottom of the drive. Do not over-tighten or force the screws. Y ou can mount the drive in any orienta-tion.b.Connect the SCSI I/O cable into the drive’s SCSI connector. Take carenot to stretch or crimp this cable, and do not block the system’s cooling air flow with the cable.Note.For Ultra2 and faster operation, special twisted pair LVD cables are required.c.Connect the DC power cable to the drive. See Figure 3.Figure 3.Cable connections and external termination7.Format the driveThe drive has been low level formatted at the factory. Y ou do not need to perform another low level format on this drive unless you decide to perform certain diagnostics through the host adapter. If you do decide to perform a low level format, do not abort the format as this is likely to make the drive inoperable. A low level format, with verify turned on, will typically take two hours for ST373405 models and 90 minutes for ST336605 models.Protect against power failure or other power interruptions during the format.a.Turn on DC power to the host system.b.Boot the system from a system floppy, CD, or from a previously installedhard disc drive if there is one.c.Format the drive.Caution.Formatting a drive erases all user data. Be sure that you under-stand this principle before formatting any hard disc drive. It is notnecessary to format a drive that previously has been used tostore data, unless your intention is to erase all user data. Seagateis not responsible for lost user data.Cheetah disc drives are designed to operate with a variety of operating sys-tems. Please refer to your system or SCSI controller manual for information about formatting and setting up the drive. Some quick desktop system notes are provided below.•Microsoft TM. Set the drive type in CMOS to “Zero,” “None,” or “No hard drive installed.” Use FDISK.EXE and FORMA T.EXE. Systems using Win-dows 98 or later can create one single partition (drive letter) on the drive.•Macintosh TM. Use a third-party drive utility (most revisions of Apple’s HD Setup utility only work with drives having special Apple firmware). Troubleshooting•Drive does not spin up. Check cables and all jumper settings. Make sure cable pin 1 (edge stripe) matches PCB pin 1.•Drive spins, but no LED on/off activity. Check SCSI ID setting. Set the ID so that each device on the SCSI chain has its own unique ID. See also the next item below. Host I/O controller is usually ID7.•Computer does not seem to recognize the drive. Verify that the drive is enabled by the SCSI host adapter setup utility.•FDISK does not detect the drive. Run the FDISK program located on your Windows startup diskette. Type fdisk/status to verify that your hard drive is present.Seagate support servicesFor online information about Seagate products, visit or ***********************************************If you need help installing your drive, consult your dealer first. If you need additional help, call a Seagate technical support specialist. Before calling, note your system configuration and drive model number (ST373405LW/ LWV or ST373405LC/LCV).Africa+31-20-316-7222Norway800-113 91 Australia1800-14-7201Poland00 800-311 12 38 Austria0 800-20 12 90Spain900-98 31 24 Belgium0 800-74 876Sweden0 207 90 073 Denmark80 88 12 66Switzerland0 800-83 84 11 France0 800-90 90 52Singapore800-1101-150 Germany************Taiwan+886-2-2514-2237 Hong Kong800-90-0474Thailand001-800-11-0032165 Indonesia001-803-1-003-2165Turkey00 800-31 92 91 40 Ireland 1 800-55 21 22United Kingdom************Italy800-790695USA/Canada/1-800 SEAGA TE or Malaysia1-800-80-2335Latin America+1-405-936-1234 Middle East+31-20-316-7222Other EuropeanNetherlands0 800-732-4283countries+31-20-316-7222 New Zealand0800-443988Warranty. Contact your place of purchase or our web site (above).Return Merchandise Authorization (RMA). Before returning the drive, verify that it is defective. Seagate Worldwide customer service centers are the only facilities autho-rized to service Seagate drives. Contact nearest center for return procedures and trade regulations.Shipping the driveCaution. Back up the data before shipping. Seagate assumes no responsibility for data lost during shipping or service. Shipping drive in an unapproved container voids the warranty. Pack the drive with original box and packing materials. Use no other materials. This prevents electrical and physical damage in transit.© 2001 Seagate T echnology LLC All rights reservedPublication number: 100109946, Rev. A, April 2001, Printed in U.S.A.Seagate, Seagate Technology, and the Seagate logo are registered trademarks of Seagate T echnology LLC. Cheetah is a registered trademark of Seagate T echnology LLC. Other product names are registered trademarks or trademarks of their owners. Seagate reserves the right to change, without notice, product offerings or specifica-tions.。
新车技术参数

13.68/14.68
高尔夫 · 纯电 2020 款 驰 / 驰 Pro
14.77/16.86
广汽丰田
雷凌双擎 2019 款 1.8H CVT 进取版 国 V/ 国 VI
13.38
雷凌双擎 2019 款 1.8H CVT 豪华版 国 V/ 国 VI
14.28
雷凌双擎 2019 款 1.8H CVT 运动版 国 V/ 国 VI
4647/1891/1725 4554/1855/1719 4544/1818/1536
2995/1560/1595
4897/1908/1691 4677/1760/1520
4855/1835/1475
4840/1850/1465 4585/1855/1679 4585/1855/1679 4585/1855/1679 4585/1855/1679
eRX5 2019 款 50T 4G 互联超越版 / 互联网超越旗舰版 / 智尊版 17.59/18.59/19.99
Ei5 2019 款 舒适版 / 豪华版 / 智联旗舰版 / 智联至尊版
12.88/13.88/14.88/15.88
东风风神
E30L 2016 款 E30L
16.48
东风日产
楼兰混动 2019 款 2.5 S/C HEV XE 四驱混动智联尊尚版 / 尊贵版 / 旗舰版 国 VI 30.03/33.63/37.58
13.99
元 EV 2018 款 EV360 智联尚酷型 / 悦酷型 / 炫酷型 / 创酷型 7.99/8.59/9.39/9.99
唐 EV 2019 款 EV600 两驱智联创悦型 / 创享型 5 座
25.99/27.99
唐 EV 2019 款 EV600D 四驱智联创睿型 / 创领型 / 创世版 5 座 28.99/30.99/35.99
面包车自己动手安装5门中控锁DIY
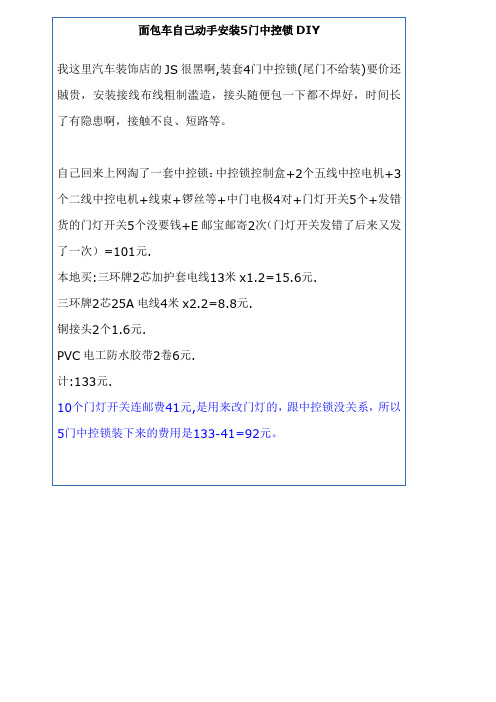
面包车自己动手安装5门中控锁DIY我这里汽车装饰店的JS很黑啊,装套4门中控锁(尾门不给装)要价还賊贵,安装接线布线粗制滥造,接头随便包一下都不焊好,时间长了有隐患啊,接触不良、短路等。
自己回来上网淘了一套中控锁:中控锁控制盒+2个五线中控电机+3个二线中控电机+线束+锣丝等+中门电极4对+门灯开关5个+发错货的门灯开关5个没要钱+E邮宝邮寄2次(门灯开关发错了后来又发了一次)=101元.本地买:三环牌2芯加护套电线13米x1.2=15.6元.三环牌2芯25A电线4米x2.2=8.8元.铜接头2个1.6元.PVC电工防水胶带2卷6元.计:133元.10个门灯开关连邮费41元,是用来改门灯的,跟中控锁没关系,所以5门中控锁装下来的费用是133-41=92元。
此帖被评分,最近评分记录威望:3(liuwy)[楼主] | 发表于: 2009-05-14 14:15:33zxb1234567福特5系用户资料站内短信朋友推荐引用回复修改内容报告帖子买的中控锁一套是四个电机,一个主控五线电机和三个受控二线电机及相应的线束,我要连尾门也装所以又另加了一只主控五线电机,把两支主控五线电机装在两前门,三支受控二线电机装在两中门和尾门,改成两前门中任何一道前门开锁和闭锁其它四门都一起动作的2控3的中控锁。
中级别: 车神门电极用到2对,2对作备用。
会号: 云9999车型: 五菱荣光6407B3精华: 57发帖: 1231 Array威望: 764 点注册时间:2008-04-03最后登录:2011-05-28看车颜色识车主性格--大家都来看看自己的性格,呵呵[1 楼] | 发表于: 2009-05-14 14:16:30zxb1234567用户资料站内短信朋友推荐引用回复修改内容报告帖子东西准备好了找时间自己动手安装,我没车库,车停露天院子里,只能找空闲和天气凉爽时来做,零零星星的弄了几天才弄完。
先改中控线束,前门副驾驶门要加三根线,找不到同颜色的线只福特5系级别: 车神会号: 云9999车型: 五菱荣光6407B3精华: 57发帖: 1231威望: 764 点注册时间:2008-04-03最后登录:2011-05-28 好用三环牌2芯加护套电线把护套去掉来做,用剥线钳剥开相应的线接上加接的线并用电烙铁焊好接头再用PVC 电工胶带包扎起来,跟原线束颜色不同所以在每根线头用上用纸写上原线颜色(白、棕)用透明胶带贴在线头上。
- 1、下载文档前请自行甄别文档内容的完整性,平台不提供额外的编辑、内容补充、找答案等附加服务。
- 2、"仅部分预览"的文档,不可在线预览部分如存在完整性等问题,可反馈申请退款(可完整预览的文档不适用该条件!)。
- 3、如文档侵犯您的权益,请联系客服反馈,我们会尽快为您处理(人工客服工作时间:9:00-18:30)。
GS
LEXUS GS SERIES LEXUS GS F
GX LX
LEXUS GX400/460 LEXUS GX400/461 LEXUS LX450D/460/570
A1 A3
2015>>至今 2011>>2014 2013>>至今
JTM11 JTM11 JTM11
2016>>至今 A4 2013>>2015 2008>>2012 A4AR 2010>>2016 2016>>至今 A4Q 2013>>2015 2008>>2012 A5CA 2012>>至今 2010>>至今 2012>>至今 2008>>2011 2015>>至今 2011>>2014 2013>>至今 2015>>至今 2011>>2014 2015>>至今 2011>>2014 2014>>至今 2010>>2013 2014>>至今 2010>>2013 2015>>至今 2012>>2014
2017>> 2010>> 2016>> 2010>> 2016>> 2013>> 2012>> 2013>> 2018>> 2015>> 2012>> 2013>> 2011>> 2011>> 2013>> 2015>> 2017>>
JTV JTV JTV JTV JTV JTV JTV JTV JTV JTV JTV JTV JTV JTV JTV JTV JTV
JTTA JTTA JTTA JTTA JTTA JTTA JTTA JTTA JTTA JTTA JTTA JTTA JTTA JTTA
IS
ES JT-TA 雷克萨斯 LEXUS
LEXUS ES240/351 LEXUS ES2##/350/300H LEXUS ES2##/350/301H LEXUS GS SERIES
JTM11 JTM11 JTM11 JTM11 JTM11 JTM11 JTM11 JTM11 JTM11 JTM11 JTM11 JTM11 JTM11 JTM11 JTM11 JTM11 JTM11 JTM11 JTM11 JTM11 JTM11 JTM11 JTM11 JTM11
A5CO
A6 A6AR A6Q
LAND CRUISER PRADO LAND CRUISER PRADO 普拉多(霸道)PRADO LAND CRUISER PRADO LAND CRUISER PRADO LAND CRUISER PRADO 兰德酷路泽 LANDCRUISER FJ酷路泽 LAND CRUISER LAND CRUISER(CHINA) FJ CRUISER
JTTA JTTA JTTA JTTA JTTA JTTA JTTA JTTA JTTA JTTA JTTA JTTA JTTA JTTA JTTA JTTA JTTA JTTA JTTA JTTA JTTA JTTA JTTA JTTA
JT-TA
普锐斯 PRIUS
JT-TA
丰田 TOYOTA
PRIUS C 普锐斯 PRIUS PRIUS V PRIUS (CHINA) PRIUS 红杉 SEQUOIA 杰路驰 SEQUOIA ZELAS ZELAS PREVIA/TARAGO 普瑞维亚 PREVIA/TARAGO PREVIA 埃尔法 ALPHARD ALPHARD/VELLFIRE/HV ALPHARD/VELLFIRE/HV WISH WISH NOAH NOAH YARIS(CHINA) 雅力士 YARIS YARIS(CHINA) YARIS 威驰 VIOS 逸致 E"Z VIOS(CHINA) VIOS(CHINA) E"Z CAMRY(CHINA) 凯美瑞 CAMRY CAMRY(CHINA)
椒图电吸门适配车型表——广西总代理南宁锦业豪改
系列 厂牌 车型 晶锐(法比亚)Fadia/Jingrui 柯珞克Karoq 柯迪亚克Kodiaq 明锐(欧雅)Octavia 明锐经典版Octavia Classic JT-V 斯柯达 Skoda 昕锐/昕动Rapid/Spaceback 速派Superd 吴锐Superd Hao Rui 野帝Yeti 柯米克Kamiq 明锐旅行车Octavia combi 速尊Superb Derivative 年份 2015>> 2018>> 2017>> 2014>> 2014>> 2013>> 2014>> 2016>> 2014>> 一 一 一 型号 JTV JTV JTV JTV JTV JTV JTV JTV JTV JTV JTV JTV
200705-201007 201007-在产(老款) 200905-201205 201205-在产 201511-201708 201510-在产(老款) 200903-201108 201108-在产 201308-201607 200908-201308 201308-在产 200708-在产 200708-201311 201007-在产(老款) 200703-201010 201206-201710 201710-在产 201208-201503 201503-在产 201604-在产 200705-201009 201009-在产 201009-201203 201112-201706
途锐 Touareg
2013>>2014 2011>>2012
夏朗 Sharan 高尔夫 Golf 高尔夫新能源 E-golf 进口大众ImportedVolkswagen JT-V 甲壳虫 Beetle 尚酷 Scirocco 蔚揽 Variant CC 迈腾 Magotan 大众 up! 途观 Tiguana 广西壮族自治区 南宁市 江南区 金凯路21号(金凯开源路口东门) 公司电话:0771-4928399 17677129728(微信同号)
JTTA JTTA JTTA JTTA JTTA JTTA JTTA JTTA JTTA JTTA JTTA JTTA JTTA JTTA JTTA JTTA JTTA JTTA JTTA JTTA JTTA JTTA JTTA JTTA
小霸王 WISH
诺亚方舟 NOAH
凯美瑞 CAMRY CAMRY/HYBRID(CHIN) 锐志 REIZ 皇冠 CROWN REIZ REIZ CROWN(CHINA) CROWN(CHINA) 201112-201501 201009-201309 201309-在产 200912-201207 201207-在产 JTTA JTTA JTTA JTTA JTTA
上汽-大众 SAIC Volk swagen
途观 Tiguana 途安 Touran 辉昂 PHIDEON JT-M11
2017>> 2016>> 2017>> 2015>>
JTV JTV JTM11 JTM11 JTM11 JTM11 JTV JTV JTV JTV JTV JTV JTV JTV JTV JTV
2011>> 2010>> 在售 2012>> 2009>> 2013>> 2012>> 2012>> 2012>> 2016>.
918 2015 918 Spyder 92A 2011 Cayenne 95B 2014 Macan 970 2010 Panamera 981 2012 Boxster JT-M11 保时捷 PORSCHE 918C 2014 Cayman
2015>>2015 2011>>至今 2014>>至今 2010>>2016 2012>>2016 2014>>2016
A7Biblioteka JT-M11奥迪 AUDI
A8
A8Q
Q3
Q5
2013>>至今 2009>>2012 2016>>至今
JTM11 JTM11 JTM11 JTM11 JTM11 JTM11 JTM11 JTM11 JTM11 JTM11 JTM11 JTM11 JTM11 JTM11 JTM11 JTM11 JTM11
Q7
2010>>2015 2007>>2009 2015>>至今
TT
2011>>2014 2007>>2010
R8 RS3 RS4 RS5 RS5C RS6 RS7 RSQ3 TTRS
2016>>至今 2016>>至今 2013>>2016 2010>>2016 2013>>2016 3012>>至今 2014>>至今 2014>>至今 2010>>2014
2016>>2016 2012>>2016 2017>>至今 2014>>至今 2014>>至今 2016>>2016
JTM11 JTM11 JTM11 JTM11 JTM11 JTM11
宝来 Bora CC 蔚领 C-Trek 高尔夫 Golf 一汽-大众 Faw-Volk swagen 高尔夫 嘉旅 Golf Sportsvan 捷达 Jetta 迈腾 Magotan 速腾 Sagitar 探歌 T-Roc JT-V 凌度 Lamando 新朗逸 Lavida 朗行 Gran Lavida 帕萨特 Passat 菠萝 Polo/polo Jin Qin 上汽-大众 SAIC Volk swagen 桑塔纳 Santana 桑塔纳 浩纳 Gran Santana 途昂 Teramont