洗衣机使用须知中英文对照
洗衣机英文标示
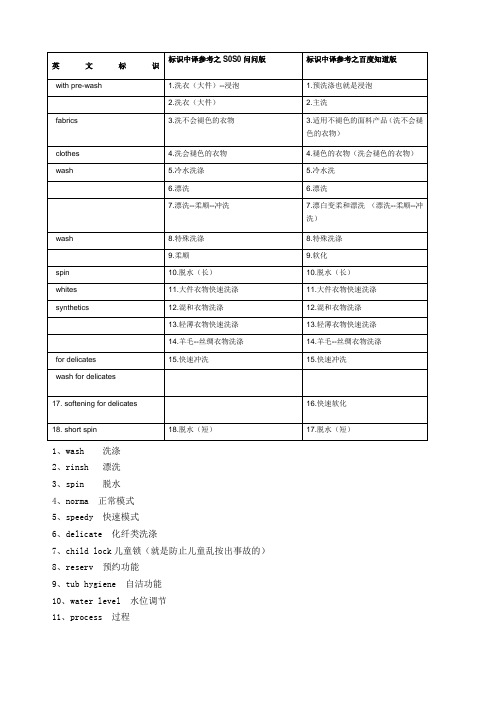
13.轻薄衣物快速洗涤
14.羊毛--丝绸衣物洗涤
14.羊毛--丝绸衣物洗涤
for delicates
15.快速冲洗
15.快速冲洗
wash for delicates
17. softenin spin
18.脱水(短)
17.脱水(短)
烫平机
SET
RUN
FUNC
RUN
FWD
REV
Stop reset 停止复位
Velometer 速度计,调速仪
Tramsducer 变频调速器
Power 功率
5.冷水洗涤
5.冷水洗
6.漂洗
6.漂洗
7.漂洗--柔顺--冲洗
7.漂白变柔和漂洗 (漂洗--柔顺--冲洗)
wash
8.特殊洗涤
8.特殊洗涤
9.柔顺
9.软化
spin
10.脱水(长)
10.脱水(长)
whites
11.大件衣物快速洗涤
11.大件衣物快速洗涤
synthetics
12.混和衣物洗涤
12.混和衣物洗涤
英文标识
标识中译参
1.洗衣(大件)--浸泡
1.预洗涤也就是浸泡
2.洗衣(大件)
2.主洗
fabrics
3.洗不会褪色的衣物
3.适用不褪色的面料产品(洗不会褪色的衣物)
clothes
4.洗会褪色的衣物
4.褪色的衣物(洗会褪色的衣物)
wash
1、wash洗涤2、rinsh漂洗 3、spin脱水4、norma正常模式5、speedy快速模式6、delicate化纤类洗涤7、child lock儿童锁(就是防止儿童乱按出事故的)8、reserv预约功能9、tub hygiene自洁功能10、water level水位调节 11、process过程 12、program程序
Whirlpool 无水洗衣机说明书

en IndexSafety instructions4. . . . . . . . . . . . . Getting to know your appliance6. .Before using your appliancefor the first time7. . . . . . . . . . . . . . . . Setting up the water softener8. . . .Filling in the salt9. . . . . . . . . . . . . . .Filling with rinse aid10. . . . . . . . . . . .Not suitable for the dishwasher11. . Arranging crockery, glasses,etc. in the dishwasher12. . . . . . . . . . Detergents15. . . . . . . . . . . . . . . . . . .auto 3in117 . . . . . . . . . . . . . . . . . . . . . serve@Home *19. . . . . . . . . . . . . . . . Adjusting the appliance20. . . . . . . . . Programme overview21. . . . . . . . . . Selecting options/ standard settings22 Information on programme sequence28 Information on onboard computer30 Maintenance and care31. . . . . . . . . .Fault finding33. . . . . . . . . . . . . . . . . . Customer Service36. . . . . . . . . . . . .Notes37 . . . . . . . . . . . . . . . . . . . . . . . . Installation38. . . . . . . . . . . . . . . . . . . .Waste disposal39. . . . . . . . . . . . . . . .en6Getting to know yourapplianceDiagrams of the control panel and theinterior of the appliance can be foundin the envelope at the front.Individual positions are referred to inthe text.Control panel 1d Main switch 2Button M/OK: Select options, store (changed) value 3Buttons – and +: Select programmes and settings4DE EN FR NL IT EL d MOK Start–+<>The language abbreviation “DE” for“Deutsch” (German) is flashing. If youProviding operating materials To operate the dishwasher you will require8chapter “Setting up the softeningsystem”), you do not need to fillin the salt because the operationsalt must be added.During the rinse cycle the salt is being washed automatically from the salt Open the screw-type cap of thecompartmentFill in the rinse aid slowly and take care not to overfill. The right amount isindicated by the level indicator at thecompartment not being illuminatedwhen the door is fully opened and bythe display “Refill Rinse Aid” no longer being lit.Close the lid of the compartment until it audibly clicks into place. If necessary,the filling aid will be re-insertedautomatically.If you want to fill in the rinse aid at a later time you can skip the display “Refill Rinse Aid” by pressing the button M/OK 2.rinse–aid controlFill when door is fully open.Filling when the door is half open.NoteUse only rinse aid for domesticdishwashers. Spilt rinse aidmay result in excessive foamformation in the next rinsecycle. Therefore, remove anyspilt rinse aid with a cloth.*not included with all models Pots and pansLower basket 28Shelf ** not on all modelsLean tall glasses and those with long stems against the shelf – not against other items to be washed.Long items, serving cutlery, salad servers or knives should be placed on the shelf so Adjusting position of basket ** not on all models86cm81cmØ max.30/*25cmØ max.20/*25cmØ max.34/*29cmØ max.20/*25cmIf required, the height of the top basket can be adjusted in order to create more space for large utensils either in the top or bottom basket.Select one of the two following procedures according to the design of the top basket for your appliance model:To lower the basket, press in succession the two levers on the left and right sides of the basket. Always take hold of the side of the basket on the upper edge, otherwise the basket will not drop smoothly (and may damage the utensils).To raise the basket, take hold of the basket on the upper edge and pull upwards.Before you re-insert the basket, ensure that it is at the same height on both sides. Otherwise, the appliance door cannot be closed and the upper spray arm will not connect to the water circuit.To ensure that the spray jet can reach all parts, arrange the baking sheets as illustrated(max. 4 baking sheets and 2 grilles).NoteNever operate the dishwasher without the top basket or baking sheet spray head!enDetergent dispenser with dosing aidThe graduated detergent dispenser helps you add the correct amount of detergent. The lower and middle lines in the dispenser indicate15 ml and 25 ml of detergent respectively. The dispenser can be filled with 40 ml of detergent when the door is opened horizontally.Filling with detergentYou can add detergent either when the appliance door is completely open or –for a more comfortable posture – when the door is half open.If the detergent dispenser is still closed,open it by pressing the catchClose the detergent dispenser when the door is completely open.Close the detergent dispenser when the door is half open.During the washing cycle the cover of the detergent dispenser is automatically opened and the detergent is washed out. The cover is therefore open when the programme ends.<>Auto WashAfter switching on the Main Menu shows the programme “Auto Wash”.en28Information on programme sequenceWhen the appliance starts, the following displays are indicated.Finished in XX min.en29Information on programme sequenceEndThis appliance is labelled in accordance with European Directive 2002/96/EG concerning used electrical and electronic appliances (waste electrical and electronic equipment – WEEE). The guideline determines the framework for the return and recycling of used appliances as applicable throughout the EU.Bosch Info-Team:DE Tel. 0180 / 5 30 40 50 (EUR 0,12/Min. DTAG) AT Tel. 0660 / 59 95Internet:http://www.bosch-hausgeraete.de 9000 078 299 en (8503) 638TenAQUAĆSTOP Warranty.(not applicable to appliances without AquaĆStop)In addition to warranty claims against the seller based on the sales agreement and in addition to our appliance warranty we shall replace the appliance under the following conditions:1. If damage is caused by water due to a malfunction of our AquaĆStop system, we shallmake good the damage in the case of private consumers.2. This liability warranty is valid for the service life of the appliance.3. The warranty claim is subject to correct installation and connection of the appliance inaccordance with our instructions. This also includes correct installation of the AquaĆStop extension (original accessory)." Our warranty does not cover defective supply lines orfittings up to the AquaĆStop connection on the tap.4. In principle, it is not necessary to monitor an appliance fitted with AquaĆStop duringoperation or to secure it afterwards by turning off the tap. You should only turn off the tap if you are absent from home for a prolonged period, e.g. on holiday for several weeks.Robert Bosch Hausgeräte GmbHCarl–Wery–Straße 3481739 MünchenTo contact us directly, use the tel. no or fax no. in theenclosed customer service list.。
FFCR70110 洗衣機使用說明書说明书

For cold fill only models: do not connect to the hot water supply.
Move the appliance without lifting it by the worktop or top lid.
Installation, including water supply (if any) and electrical connections and repairs must be carried out by a qualified technician. Do not repair or replace any part of the appliance unless specifically stated in the user manual. Keep children away from the installation site. After unpacking the appliance, make sure that it has not been damaged during transport. In the event of problems, contact the dealer or your nearest After-sales Service. Once installed, packaging waste (plastic, styrofoam parts etc.) must be stored out of reach of children - risk of suffocation. The appliance must be disconnected from the power supply before any installation operation - risk of electric shock. During installation, make sure the appliance does not damage the power cable - risk of fire or electric shock. Only activate the appliance when the installation has been completed.
洗衣机指南:首次使用和设置说明书

water.
Adding rinse aid
1. Press the catch on the lid
of the dispenser for rinse
2
aid and lift .
gether and lift
1
the coarse filter
out .
Cleaning spray arms
1. Unscrew the upper spray arm and
2
pull down to remove .
1
2
5. Clean the filter elements under running water.
residue.
2. Turn the coarse filter anticlock-
2
wise and re-
move the filter
system .
1
3. Pull down the micro filter to remove.
4. Press the locking
catches to-
Adding special salt
To avoid damage to the appliance, only add special salt to the dispenser for special salt just before the programme starts. 1. Unscrew the lid of the dispenser for special salt
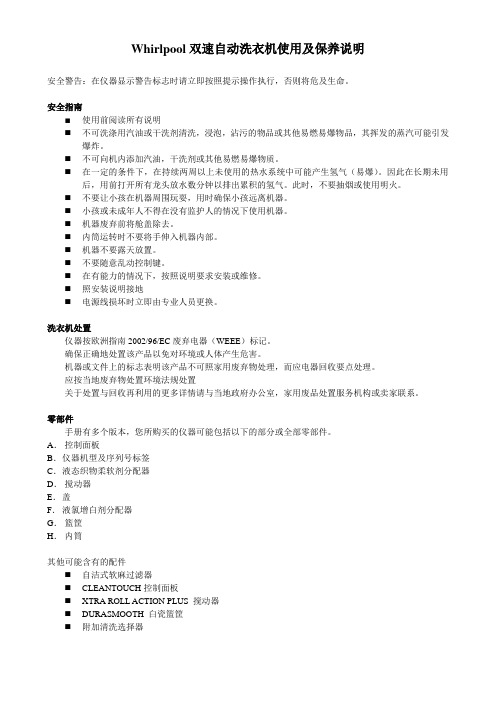
Whirlpool双速自动洗衣机使用及保养说明
注:确保冷热水龙头都已完全打开,否则自动控温功能将不会正常工作。
水温
用途
热
白色与淡色衣物
很脏
温
亮色衣物
中等到轻微脏度
冷
褪色衣物
轻微脏度
注:洗涤剂在水温低于60℉(15.6℃)时将不能很好的分散,致使污物难以去除。某些织物会留下穿着时的皱痕并起毛球(衣物表面形成的小绒球)
3件女背心
4条衬裙
4条女裤
2个胸罩
2件睡衣
毛巾类
8条浴巾
8条手巾
10件浴衣
1块浴室脚垫
混合填装
2条双人床单或
1条大号床单
4个枕套
6件T恤
6条短裤
2件衬衫
2条长裤
6条手帕
正常声响
您的新洗衣机可能会产生就洗衣机所没有的声响。这些声响也许会比较少见而引起您的注意,但它们是正常的。
洗涤中
当你使用小填装量档时,洗衣机中水位较低。会在搅动器上方产生滴答声。
B.仪器机型及序列号标签
C.液态织物柔软剂分配器
D.搅动器
E.盖
F.液氯增白剂分配器
G.篮筐
H.内筒
其他可能含有的配件
自洁式软麻过滤器
CLEANTOUCH控制面板
XTRA ROLL ACTION PLUS搅动器
DURASMOOTH白瓷篮筐
附加清洗选择器
控制面板
填装量:小,中,大(自左向右,下同)
温度:上方(洗涤:热水、温水、冷水、温水)
不通过分配器添加柔软剂
如需要,在最后清洗的水中加入量好的衣物柔软剂。柔软剂常用1/2到1杯(125ml到250ml)温水稀释。未稀释会沾污织物。(见“液态衣物柔软剂的添加”)
洗衣機FFW812C11EFFW1012C11EFFW1212C11E使用...

進水管連接
重要:
本洗衣機需要的進水壓力為1到10 bar(0.1到1.0Mpa)。(特別需要 注意的是,通過管道的進水流量應 該在每分鐘10到80升之間,以確保 機器正常運作)。如果管道供水的 水壓過高,請加入一個減壓閥。
取出隨機附送的特製軟管,連接到 機器的進水閥。 請用隨機附送的新軟管,舊軟管請 不要重複使用。
為了使本洗衣機正常工作,要確保 管道自來水和管道排水都通暢。如 果有故障,可以先請有經驗的管道 工作人員檢查管道。經檢驗後,故 障仍不能解除,請致電維修中心。
使用注意
本洗衣機設計僅作為家庭使用。 本洗衣機只能用於洗滌和漂洗有適
當洗滌方式標籤的衣物。 只能使用適合機器用的洗滌劑、衣
物柔順劑和添加劑。 遵循所洗衣物的洗滌指南和洗滌用
絕對不要試圖自己維修本洗衣機。
如果根據本說明書的指導,您仍然 發現有其它故障,請按以下步驟操作: 關機器,拔下電源插頭,關閉水龍頭 及聯絡維修中心。
如果您房間裏有小孩…
家用電器可能對小孩造成傷害。
如果您需要離開機器,請注意關上 將所有洗衣粉等化學物品放置在小
孩觸不到的位置。
7 ZH
請保證通風開口處不能有地毯擋住。 如果電源線或電源插頭損壞,請務
必聯繫經授權的維修中心更換。
請檢查進水軟管。不要使用舊的進 水軟管,否則可能造成洗滌衣物上 的污漬。
請仔細固定安裝排水軟管,以防止 漏水,從而保證洗衣機的正常排水。 請確保在安裝洗衣機的過程中,進 水軟管和排水管沒有被折疊,擠壓, 甚至破損。
59.7
59.7
深度 (厘米)
56.5
56.5
56.5
淨重 (公斤)
70
洗衣机使用流程英文版
洗衣机使用流程英文版Laundry Machine Usage Procedure.Laundry is a chore that most households face regularly, and having a dependable washing machine makes the task much easier. However, to ensure optimal performance and extend the lifespan of your washing machine, it's essential to follow the correct usage procedure. Here's a step-by-step guide to using a washing machine effectively:Step 1: Sorting the Laundry.The first step is to sort your laundry into separate piles based on color, fabric type, and wash requirements. This is crucial to prevent color bleeding, fabric damage, and ensuring that each item is cleaned appropriately. Separate piles should include:Whites and light colors.Dark colors.Delicates and fabrics that require gentle washing.Heavily soiled items.Items that require special care or treatment.Step 2: Preparing the Laundry.Before loading the laundry into the washing machine,it's important to prepare the items. This involves checking pockets for any forgotten items, zipping or buttoning up garments to prevent tangling, and turning garments inside out if necessary to protect the fabric.Step 3: Choosing the Right Cycle.The next step is to select the appropriate washing cycle based on the type of laundry you have. Modern washing machines offer a variety of cycles for different fabrics and soil levels. Common cycles include:General/Mixed Fabrics.Delicates/Handwash.Heavy Duty/Tough Stains.Quick Wash.Wool/Special Fabrics.Read the care labels on your clothes and select the cycle that best suits the fabrics and soiling level of your laundry.Step 4: Adding Detergent and Fabric Softener.Once you've chosen the cycle, it's time to add the detergent and fabric softener. Measure the recommended amount of detergent based on the size of your load and pour it into the designated compartment of the washing machine. If using fabric softener, add it to the separatecompartment meant for that purpose. Some machines allow you to add detergent and softener directly into the drum, but it's best to follow the manufacturer's instructions.Step 5: Loading the Laundry.Carefully load the laundry into the machine, starting with the heavier or bulkier items. Distribute the laundry evenly to avoid overloading or tangling. Be sure to check the manufacturer's recommendations regarding the maximum load capacity of your machine.Step 6: Starting the Cycle.Once the laundry is loaded, close the door and select the desired cycle. Adjust the wash temperature and spin speed if necessary, depending on the fabric type and care instructions. Finally, press the start button to initiate the cycle.Step 7: Monitoring the Cycle.During the washing cycle, it's important to monitor the progress. If your machine has a display panel, it will indicate the current stage of the cycle. Listen to the machine and check periodically to ensure it's operating normally. If any abnormalities are noticed, such as excessive noise or vibration, stop the cycle immediately and check for any obstructions or issues.Step 8: Ending the Cycle.Once the cycle is complete, the machine will automatically stop. Open the door and carefully remove the laundry. Check for any remaining detergent or softener residue and rinse off if necessary. Then, transfer the laundry to the dryer or hang them to dry depending on your preference.Step 9: Cleaning and Maintenance.After using the washing machine, it's important to perform regular cleaning and maintenance to keep it in good condition. Wipe down the inside of the drum with a dampcloth to remove any lint or residue. Check and clean the detergent and softener compartments, and empty the lint trap if your machine has one. Additionally, it's recommended to run an empty cycle with vinegar or a dedicated washing machine cleaner to remove any buildup of detergent or mold.Conclusion.Using a washing machine correctly not only ensures optimal cleaning results but also prolongs the lifespan of the appliance. By following the steps outlined in this guide, you can enjoy effortless laundry days while protecting your clothes and the environment. Remember to always read the care labels on your clothes, follow the manufacturer's instructions for your washing machine, and perform regular cleaning and maintenance to keep your machine running smoothly.。
服装洗涤图标及中英文对照
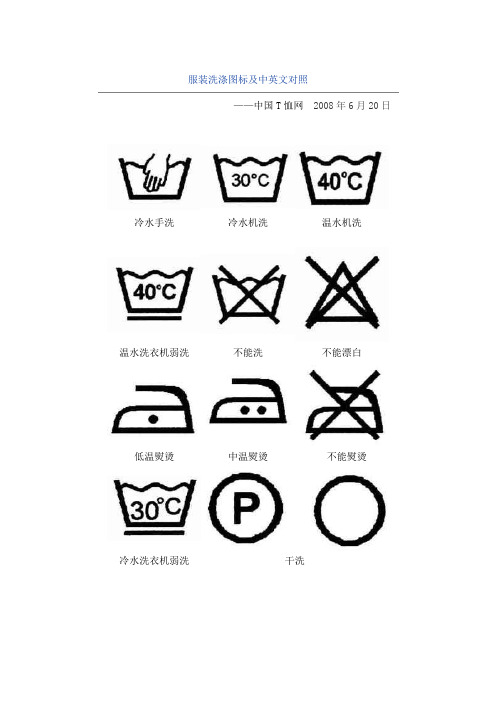
服装洗涤图标及中英文对照——中国T恤网2008年6月20日冷水手洗冷水机洗温水机洗温水洗衣机弱洗不能洗不能漂白低温熨烫中温熨烫不能熨烫冷水洗衣机弱洗干洗不能干洗不加热甩干脱水不能甩干脱水加热甩干脱水干洗-弱洗服装洗涤说明与中英文对照一、干洗 Dry Cleaning一般干洗 dryclean专业干洗 Professionally Dryclean商业干洗 Commercially Dryclean以干洗为最佳 Drycleanning Recommened短干洗周期 Short Cycle干洗剂抽脱时间最短 Minimum Extraction低水分 Reduced or Low Moisture干洗过程中不可加水分 No water In System不可用蒸汽 No Steam二、水洗 Washing可机洗 Machine Washable不可水洗 Do not Wash不可商业洗涤 Do not have Commercially Launder 可用家庭式洗涤 Home Launder手洗 Hand Wash手洗不可搓压 Hand Wash do not Rub冷水洗 Cold Wash温水洗 Warm Wash热水洗 Hot Wash不可水煮 Do not Boil少洗衣量 Small Load温和洗衣程序 Delicate/Gentle Cycle持久压力程序 Durable Press Cycle /Permanent 分开洗涤 Wash Separately可与类似色衣物同时洗涤 With Like Color与深色衣物分开洗涤 Wash Dark Color Separetely 翻出底面洗涤 Wash Inside Out不可拧干 No Wring/ Do not Wring不可拧绞 No Twist/ Do not Twist温水清洗 Warm Rinse冷水清洗 Cold Rinse彻底清洗 Rinse Thoroughly不可脱水 No Spin/ Do not Spin普通旋转速度脱水 Normal Spin较短较慢程序脱水 Reduced Spin不可浸泡 Do not Soak只可用皂片 Use Pure Soap Flake only只可抹洗或擦洗 Damp Wipe only三、漂白 Bleaching需要时漂白 Bleaching when Needed不可漂白 No bleach / Do not Bleach只可用非氯性漂白剂 Only Non—Chlorine Bleach 四、干衣 Drying滴干 Drip Dry挂干 Line Dry荫凉挂干 Line Dry in Shade避热挂干 Line Dry away from Heat用烘干机烘干 Tumble Dry用烘干机中温烘干 Tumble Warm用烘干机低温烘干 Tumble Cool平铺晒干 Flat Dry定位干衣 Block to Dry用蒸汽烘干 Steam Dry不用蒸汽 No Steam / Do not Steam风柜吹干 Cabinet Dry Cool五、熨烫 Ironing and Pressing热烫 Hot Iron温烫 Warm Iron低温烫 Cold Iron不可熨 Do not Iron反面熨 Iron on Wrong Side用蒸汽熨烫 Steam Press/Iron在湿润时熨烫 Iron Damp用布间隔熨烫 Use Press Cloth外包装 bale箱 carton件 package色号 colour number花号 design number批号 lot number唛头 marks装箱单 packing list漏验 omisson of examination漏验率 percentage of omisson of examination 复验 re—inspection索赔 claim indemnity毛重 gross weight净重 net weight外观质量 appearance quality内在质量 inherent quality外观疵点 appearance技术要求 technical requirement感观检验 subjective inspection取样 samoling品质检验单 inspection certificate for quality检验证书 inspection certificate织物重量 fabric weight断裂强力 breaking strength断裂强度 breaking tenacity缝纫强力 seam strength染色牢度 colour fasteness耐日晒色牢度 colour fasteness to sunlight耐磨擦色牢度 colour fasteness to rubbing汁渍色牢度 colour fasteness to perspiration耐熨烫色牢度 colour fasteness to ironing耐干洗色牢度 colour fasteness to dry cleaning灰色样卡 grey scale沾色样卡 grey scale for staining纤维含量 fibre content释放甲醛含量 releasable for maldehyde content防蛀性 insect resistance防污性 soil resistance防雨性 rain proofness织物厚度 fabric thickness透气性 air permeability色差 chromatic difference常见的洗水方法1、普洗(GARMENT WASH)普洗即普通洗涤,只不过将我们平日所熟悉的洗涤改为机械化而已,其水温在60°-90°C 左右,加一定的洗涤剂,经过15分钟的左右普通洗涤后,过清水加柔软剂即可,使织物更柔软、舒适,在视觉上更自然更干净。
- 1、下载文档前请自行甄别文档内容的完整性,平台不提供额外的编辑、内容补充、找答案等附加服务。
- 2、"仅部分预览"的文档,不可在线预览部分如存在完整性等问题,可反馈申请退款(可完整预览的文档不适用该条件!)。
- 3、如文档侵犯您的权益,请联系客服反馈,我们会尽快为您处理(人工客服工作时间:9:00-18:30)。
洗衣机使用需知
使用步骤:
1.查看电源和进水管是否正常
2.放衣服,投入适量洗衣粉(液),盖好上盖
3.根据选择的洗衣程序选择投币的数目(1-7),投币一元为单脱水、五元为快速洗、七元为标
准洗。
4.当选择单脱水程序时,投币一元后需要按动面板上的红色按钮,洗衣机开始运行单脱水程序;
当选择快速程序时,投币五元后按动面板上的红色按钮,洗衣机开始运行快速洗程序;当选择标准洗程序时,洗衣机自动进入洗涤。
5.完成全程后,洗衣机会自动停止,打开上盖取走衣物即可。
程序设定:
注意事项:
1.洗衣中尽量不要打开上盖.
2.洗衣过程中不要添加洗衣粉,防止留下污渍.
3.为了保证洗衣质量,干衣服的重量通常在
4.5公斤左右为宜.
4.带拉链衣服清洗时请拉好拉链,否则造成衣物损坏,后果自负.
5.洗衣粉最好提前用温水稀释并适量投放为宜.
6.洗衣机电源勿动,以免发生触动,后果自负.
7.洗衣时,谨防硬币、钥匙等在洗衣桶中洗涤,以免损坏洗衣机.
8.设备发生故障,请及时报修,切勿自行拆卸.
Washer instructions for use
Use by steps :
1.See whether the normal power supply and into the water
2.Put clothes into appropriate detergent (liquid), covered roof
3.Depending on the chosen number of coin laundry process choice (1-7), a dollar coin as a single dehydration,
five dollars for the quick wash, triple the standard wash.
4.when choose single dewatering program, pay one dollar to press the red button on the panel, washing
machine start running single dewatering program; When choosing fast programs, after five yuan coin, press the red button on the panel, washing machine start running fast wash program; When choosing standard wash program, washing machine into the washing.
5.The completion of the whole, the washing machine will automatically stop, open the cover of clothing can be
removed
Program settings:
Notes:
1.Do not open the cover Laundry as much as possible.
2.Do not add laundry during the washing powder, place the stain left behind.
3. To ensure the quality laundry, dry clothes, the weight of
4.5 kg is usually suitable.
4. Washing clothes with zippers good when you pull zipper, or cause damage to clothing, at your peril.
5. Detergent diluted with warm water ahead of the best and suitable amount of running.
6. Do not move the appliance to avoid touching, at your peril.
7. Laundry, guard against coins, keys, etc. in the laundry in the wash bucket to avoid damage to washing machines.
8. Equipment failure, please, and Times repair, do not disassemble.。