IxNetwork使用指南
Ixia操作指导手册
Ixia操作指导⼿册⽬录⽬ 录IxExplorer⼊门什么是IxExplorer (2)搭建测试环境 (2)发送你的第⼀个报⽂ (4)时延统计 (8)配置端⼝IP地址 (10)⾃定义报⽂统计 (12)使⽤ IxExplorer Ping DUT 接⼝地址 (13)抓包分析 (14)更改IxExplorer默认抓包⼤⼩ (15)报⽂回放 (15)统计表格计算 (16)强⼤的⾃定义域UDF (17)如何使⽤IxExplorer发送固定的突发报⽂(Burst) (20)IxNetwork什么是IxNetwork (22)IxNetwork的基础步骤 (23)使⽤ IxNetwork 进⾏⼆层测试 (25)使⽤ IxNetwork 进⾏三层以及 QoS 测试 (30)使⽤ IxNetwork 做延迟抖动完整性测试 (34)使⽤ IxNetwork 做 PRBS 测试 (35)使⽤ IxNetwork 做 Sequence Checking 测试 (36)IxNetwork深⼊测试使⽤ IxNetwork 做 OSPF 测试 (37)使⽤ IxNetwork 做 RFC2544 吞吐量测试 (42)使⽤ IxNetwork 做 RFC 2889 MAC地址表容量测试 (48)使⽤ IxNetwork Quick Flow 快速流 (52)如何在IxNetwork中显⽰L1层流量统计 (54)1. IxExp lorer⼊门Ixia仪表的管理⼝,参见上图蓝⾊的线。
被测设备和Ixia测试板卡端⼝连接,参见上图1.2.2. 仪表加电启动记下Ixia仪表的IP地址,请参见访问仪表。
21.2.4. 启动IxExplorer客户端并接⼊仪表1. 启动IxExplorer程序可以通过Start -> Programs -> Ixia -> IxOS -> Ixia IxExplorer来启动也可以通过桌⾯快捷⽅式启动2. 输⼊机框的IP地址,请参见访问仪表。
IXIA测试仪使用手册
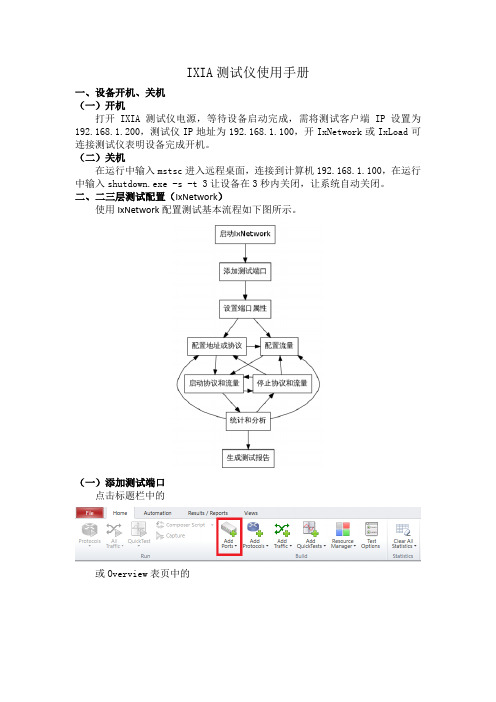
IXIA测试仪使用手册一、设备开机、关机(一)开机打开IXIA测试仪电源,等待设备启动完成,需将测试客户端IP设置为192.168.1.200,测试仪IP地址为192.168.1.100,开IxNetwork或IxLoad可连接测试仪表明设备完成开机。
(二)关机在运行中输入mstsc进入远程桌面,连接到计算机192.168.1.100,在运行中输入shutdown.exe -s -t 3让设备在3秒内关闭,让系统自动关闭。
二、二三层测试配置(IxNetwork)使用IxNetwork配置测试基本流程如下图所示。
(一)添加测试端口点击标题栏中的或Overview表页中的连接192.168.1.100测试板卡添加测试用端口然后点击OK键,完成测试端口添加。
(二)配置端口、协议启用测试端口Ping及ARP,如下图所示。
添加测试端口IP地址、网关,并使能端口,如下图所示,添加的网关地址需是实际存在的,可以是交换机的网关地址或测试端口对端IP地址。
(三)配置流量选择配置流量。
Type of Traffic选项可选择Raw、Ethernet/vlan、IPV4分别对应原始报文流(需手动编辑,用来打广播包流)、二层流、三层流(需配置IP地址及网关),Bi-Directional表示流是双向流。
1、IPV4(三层流)在设置好Type of Traffic、Traffic Mesh以及选择好端口后,点击添加Endpoint。
点击NEXT,在Packet/QoS、Flow Group Setup、Frame Setup、Rate Setup保持默认配置。
点击NEXT,进入Flow Tracking,选择Traffic Item选项。
点击NEXT,在后续Protocol Behaviors、Preview以及Validate中保持默认选项,同时检查配置的有效性。
2、RAW(二层或三层流,需手动编辑各个字段)——用来生成广播包及修改MAC 地址可在已有字段中修改或通过左上角协议搜索添加所需修改的协议字段。
ixnetwork

IxNetwork Overview
页码,3/14
ቤተ መጻሕፍቲ ባይዱ
流量向导
数据包编辑器 实时结果分析和日志 IxNetwork 自动取得实时测量数据来验证测试结果,使用的统计数据有很多种,包括协议状态转换和计数器、每个端口的 流量测量和每个数据流的 QoS 测量。实时统计数据的显示方法为在表格中显示即时的数字,或者是以图形方式显示的曲
电信级以太网是最新的联网发展,允许在基于以太网的网络中使用较低成本的交换机来替代路由器。除了以前支持的 MPLS 系列协议,IxNetwork 提供的全面测试解决方案还支持以太网 OAM、以太网 CFM、Y.1731 和 PBB-TE 等这些新 协议。
随着网络功能继续汇集到设备中,考虑安全性和像 NAC、PPP 和 L2TP 之类的封装协议变得愈加重要。IxNetwork 能对 仿真客户端进行身份验证,还可建立宽带会话。然后,可使用隧道协议对流量进行封装。
IxNetwork 允许用户灵活定制应用程序,以满足各种测试要求 — 测试由数以千计的网络设备组成的复杂网络拓扑结构。数 以百万计的路由器和可到达主机可在拓扑结构内得到仿真。IxNetwork 也允许用户定制数以百万计的流量流,以便对数据 层性能进行压力测试。可使用功能强大的向导和图形用户界面中的网格控件创建复杂的配置。使用其增强型的实时分析和 统计数据,IxNetwork 可以报告全面的协议状态和详细的、每个数据流流量的性能指标。
/products/test-applications/ixnetwork.html?tmp... 2009-9-24
IxNetwork Overview
Sixnet工业网络配件指南说明书

Accessory GuideSixnet Networking Series| +1 (518) 877-5173 | ****************Aug2012FPSALACadapterPower Supply AC/DC AdapterMolex Power supply AC adapter (AC-DC), 4 pin Molex and 6 ft. cable Used with BT-6600, BT-6800 and BT-5000 seriesFPSALACadapter2Power Supply AC/DC AdapterBarrelPower supply AC adapter (AC-DC), AC adapter with 12mm barrel and 6 ft. cableUsed with all BT-6000 seriesFCASTMXT100Serial Cable (RS232-DB9) Serial cable (RS232-DB9), 6 ft. DB9 male to DB9 female Used with all modemsFCAALUSBAMBMUSB Cable USB cable 3 ft. cable type Amail / type B maleUsed with BT-5000 seriesFCAALUSBMINIUSB mini Cable USB type A male / mini B male cable, 5 pin, black, 6ft.Used with BT-6000 seriesFWH1010FTMolexI/O Wire HarnessI/O wire harness 10 ft. wire harness 10-pin MolexUsed with BT-5000 seriesFCATAFUSEAUTOCigarette Lighter Adapter Car adapter 6 ft. 12V DC 3Amps, 250V fuse automobile adapterUsed with BT-6600, BT-6800 and BT-5000 seriesFCATAFUSECABLEDirect Current Fused PowerCableDirect current fused power cable 15ft. DC 2 Amps, 250Vfuse power cableUsed with BT-6600, BT-6800 and BT-5000 seriesDIN-CLIP-1Din Rail Clip 1"1 inch aluminum DIN-rail clipwith two screwsAll BT-6000 seriesDIN-CLIP-1.5Din Rail Clip 1.5" 1.5 inch aluminum DIN-rail clip with three screwsBT-6420, BT-6621 and BT-6821F-CO-ST-4pinScrew TerminalConnector terminal, 4-pinplug with screwsBT-6401, BT-6401EB, BT-6421, BT-6601, BT-6601EB, BT-6621, BT-6801, BT-6801EBand BT-6821As the global experts in communication, monitoring and control for industrial automation and networking, Red Lion has been delivering innovative solutions f or over f orty years. Our award-winning technology enables companies worldwide to gain real-time data visibility that drives productivity. Product brands include Red Lion, N-Tron and Sixnet. With headquarters in York, Pennsylvania, the company has offices across the Americas, Asia-Pacific and Europe. For more inf ormation, please visit . Red Lion is a Spectris company.w w w.r e d l i o n.n e tConnect. Monitor. Control.ADLD0198 011414 © 2014 Red Lion ControlsAmericas*****************Asia-Pacific ****************EuropeMiddle East Africa******************+1 (717) 767-6511FANTB721SMADORoof-Mount Dome Antenna Dual-Band (SMA)Roof-Mount dome antenna dual-band (SMA) threaded bolt (Drill 5/8” Hole) 694-894MHz & 1.7-2.7GHz with 15 ft. cable 3dB gainAll Modems (3G and 4G)。
Cisco Unified 攝影 快速入门

快速入門Cisco Unified 攝影機1 安裝適用於 Cisco Unified IP Phone 9971 及 9951。
1.取下攝影機鏡頭與機身上的塑膠護蓋。
2.取下電話螢幕面上的塑膠保護膜。
3.在電話閒置的狀態下,將攝影機的 USB 接頭插入電話的 USB 連接埠(位於電話螢幕的背面)。
4.在電話確認攝影機安裝之後,調整相關設定(請參閱「設定」一節)。
將攝影機架設在顯示器上若想將攝影機裝設在電腦顯示器上(而非電話螢幕上),請向系統管理員索取固定夾與 USB 延長纜線。
固定夾上提供大、小兩組可拆式滑動支架。
大支架適用於筆記型電腦的顯示器;小支架適用於桌上型電腦的顯示器(如圖示)。
取下未使用的支架。
將相機置於固定夾上,然後接上延長纜線。
2 撥打視訊通話撥打視訊通話的方法,與撥打一般通話相同。
通話對方的電話如有啟用攝影機功能,即可進行雙向視訊通話。
反之,若通話對方未啟用攝影機功能,則只能進行單向視訊通話(在通話對方電話上顯示您的視訊)。
同樣,即使您在通話期間並未啟用攝影機功能,您的電話仍可顯示通話對方的視訊。
3 選擇檢視您可以在視訊通話期間執行下列作業:• 啟用全螢幕視訊• 切換不同的檢視• 調整子母畫面的位置•隱藏視訊啟用全螢幕視訊若要從視窗檢視切換成全螢幕檢視,請按全螢幕軟鍵。
若要回復成視窗檢視,請按最小化軟鍵。
附註:使用全螢幕檢視時如有新來電,將會顯示快顯警示通知您。
切換不同的檢視依預設,您可以在電話螢幕一角的子母視窗中,顯示「自我檢視」(攝影機傳送給他人的影像)。
在全螢幕檢視模式中,您可以透過按切換軟鍵以全螢幕顯示「自我檢視」,並將通話對方的影像移至子母畫面 (PIP) 視窗中。
再次按切換則可將「自我檢視」移回 PIP視窗中。
調整子母畫面的位置按子母畫面(PIP) 軟鍵可將 PIP視窗移至電話螢幕的不同方位,或隱藏 PIP 視窗。
PIP 軟鍵上的圖示會指出再次按 PIP 軟鍵時 PIP 視窗會出現的位置(或會隱藏)。
IxNetwork NGPF-DHCP用户接入
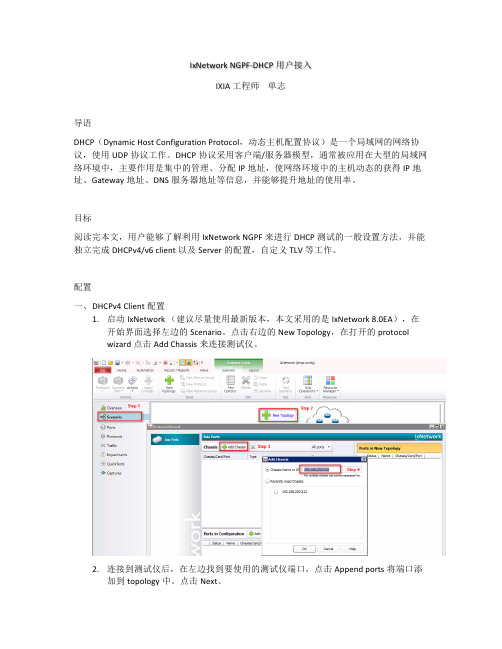
3. 点击 Topology 2 中的 10X,设置 DHCPv6 Server 的数量。
4. 点击 Device Group 2 中的 Ethernet 协议栈,设置 DHCPv6 Server 的 Mac 以及 Vlan 等信息。
5. 点击 Device Group 2 中的 IPv6 协议栈,设置 DHCPv6 Server 的 IPv6 地址。
8. 在 IxNetwork 快捷工具栏打开 Test Options 窗口,选择 DHCPv4 Server,设置 DHCPv4 Server 的计时器以及强制 renew 的速率及时间间隔。
9. 在 Test Options 窗口,选择 IPv4,设置 DHCPv4 Server 相关 ARP 参数,包括速率以 及是否抑制查询同一网关的重复 ARP 等。
10. 点击左上角的 Protocol 或者 Scenario Item 按钮来启动所有协议或者指定 Device Group。
11. 待协议运行后,在 Protocol Summary 窗口,选择 DHCPv6 Client,点击右键,依次 选择 Drill Down -> Per session,打开 DHCPv6 Client Drill Down 窗口。
IxNetwork NGPF-DHCP 用户接入 IXIA 工程师 单志 导语 DHCP(Dynamic Host Configuration Protocol,动态主机配置协议)是一个局域网的网络协 议,使用 UDP 协议工作。DHCP 协议采用客户端/服务器模型,通常被应用在大型的局域网 络环境中,主要作用是集中的管理、分配 IP 地址,使网络环境中的主机动态的获得 IP 地 址、Gateway 地址、DNS 服务器地址等信息,并能够提升地址的使用率。 目标 阅读完本文,用户能够了解利用 IxNetwork NGPF 来进行 DHCP 测试的一般设置方法,并能 独立完成 DHCPv4/v6 client 以及 Server 的配置,自定义 TLV 等工作。 配置 一、 DHCPv4 Client 配置 1. 启动 IxNetwork (建议尽量使用最新版本,本文采用的是 IxNetwork 8.0EA),在 开始界面选择左边的 Scenario。点击右边的 New Topology,在打开的 protocol wizard 点击 Add Chassis 来连接测试仪。
网络测试仪IXIA IxNetwork使用说明
IxNetwork5.30 --------使用指南目录IxNetwork5.30使用指南摘要IxNetwork是IXIA公司在路由、交换、接入领域最重要的测试软件,随着今年7月份IxNetwork5.30版的正式发布,众多新颖的测试特性得以面世,为了使更多人尽快掌握和了解IxNetwork的基本使用方法和一些操作技巧,本文从实战的角度,以样例的形式进行了有针对性的阐述,由于内容很多,本文将以分册形式进行发布。
端口及配置管理1. IxNetwork可以进行脱机配置,并在联机后通过端口赋予的方式完成配置的实际下发。
在上图中,占击右边的,再直接点击右边的,注意这一步的目的就是创建脱机端口,因为现在没有对机框进行操作。
之后,得到如下上图显示目前的4个端口均处于”Unassigned”状态。
接着是对这些脱机端口进行一系列的配置,包括协议、流量等,当需要将配置下发到实际的物理端口时,只需简单地添加机框,并将可用的物理端口赋予到上述脱机端口上。
赋予的方式有三种:Assign and add new ports,表示忽略以前的脱机端口及配置,重新创建新的脱机端口并直接关联到选中的物理端口。
Assign to selected ports,表示将左边的物理端口赋予到右边选定的脱机端口上。
Assign to remaining ports,表示将左边的物理端口赋予到右边未被选定的脱机端口上。
2. 清空某一端口的配置在脱机状态下,先删除相应脱机端口,再创建脱机端口即可。
在联机状态下,最简单快速的办法是”Set Factory Defaults”3. 端口模式IXIA的物理端口分别有两种发送和接收模式。
发送模式有顺序发送和交错发送两种,顺序发送的好处是,可以精确控制不同类型报文的出现时间,持续时间;而且对于突发报文的脉冲控制及变化能精确设定。
接收模式有抓包和流分析两种,抓包模式主要用于对进出端口的控制报文和流入端口的数据报文进行捕获;只有在该模式下,下图的配置才有效。
IXIA测试仪使用手册
IXIA测试仪使用手册一、设备开机、关机(一)开机打开IXIA测试仪电源,等待设备启动完成,需将测试客户端IP设置为192.168.1.200,测试仪IP地址为192.168.1.100,开IxNetwork或IxLoad可连接测试仪表明设备完成开机。
(二)关机在运行中输入mstsc进入远程桌面,连接到计算机192.168.1.100,在运行中输入shutdown.exe -s -t 3让设备在3秒内关闭,让系统自动关闭。
二、二三层测试配置(IxNetwork)使用IxNetwork配置测试基本流程如下图所示。
(一)添加测试端口点击标题栏中的或Overview表页中的连接192.168.1.100测试板卡添加测试用端口然后点击OK键,完成测试端口添加。
(二)配置端口、协议启用测试端口Ping及ARP,如下图所示。
添加测试端口IP地址、网关,并使能端口,如下图所示,添加的网关地址需是实际存在的,可以是交换机的网关地址或测试端口对端IP地址。
(三)配置流量选择配置流量。
Type of Traffic选项可选择Raw、Ethernet/vlan、IPV4分别对应原始报文流(需手动编辑,用来打广播包流)、二层流、三层流(需配置IP地址及网关),Bi-Directional表示流是双向流。
1、IPV4(三层流)在设置好Type of Traffic、Traffic Mesh以及选择好端口后,点击添加Endpoint。
点击NEXT,在Packet/QoS、Flow Group Setup、Frame Setup、Rate Setup保持默认配置。
点击NEXT,进入Flow Tracking,选择Traffic Item选项。
点击NEXT,在后续Protocol Behaviors、Preview以及Validate中保持默认选项,同时检查配置的有效性。
2、RAW(二层或三层流,需手动编辑各个字段)——用来生成广播包及修改MAC 地址可在已有字段中修改或通过左上角协议搜索添加所需修改的协议字段。
Ixia中文文档ch6 IxExplorer
6.1. 什么是IxExplorer
IxExplorer是随Ixia机框提供的基础工具。通过这个工具可以完全配置,控制和监控Ixia仪表的所有资源。 该工具可以构造和发送报 文,捕获和分析报文,统计时延、抖动和丢包率等。通过灵活的运用,可以构造,分析和统计百万级别的业务流。
6.2. 搭建测试环境
6.2.1. 物理连接
用户PC通过网络接入Ixia仪表的管理口,参见上图蓝色的线。被测设备和Ixia测试板卡端口连接,参见上图棕色的线。
6.2.2. 仪表加电启动
把仪表插上管理口的网线,接通电源并启动。大约过3分钟后仪表可以ping通。仪表启动的时候自动启动IxServer程序,这个程序控 制着客户端和板卡之间的通信。如果IxServer启动出现Ready字样,表示启动正常,否则客户端无法接入。 如果启动正常,板卡会加电,状态指示灯亮。如果IxServer启动过程中有错误,则板卡不会加电,所有板卡的指示灯灭。
3. 在 Ping 的对话框中输入目的 IP 地址,比如DUT的IP或者是Ixia对端的IP接口地址。如果 Ixia 的接口是 IPv6 类型的,对话框 中会自动变为 IPv6。如果既有 IPv4 和 IPv6 接口,你需要手动选择 IP 的类型。 如果显示“Response Received from x.x.x.x. Sequence Number x”就说明 Ping 成功了。
2. 在“Capture View”窗口的空白的处右击选择“Import”,然后在“Import Object”的窗口中选择需要导入的文件。 注意:此处要 选择 Sniffer enc 格式的文件,不如会出现导入错误的现象。
3. 在窗口中选择需要转成 Streams 的包,然后右击选择“Convert to Streams”;
北京派网软件有限公司 iXCache 网络应用层缓存加速引擎软件使用说明书
北京派网软件iXCache网络应用层缓存加速引擎软件使用说明书网络应用层缓存加速引擎软件iXCache使用说明书声明修订:● 派网保留不预先通知客户而修改本文档所含内容的权利。
责任:●派网仅对软件信息中预先说明的部分承担责任。
除此之外,不作其它任何担保。
●派网对于您的使用或不能使用本软件而发生的任何损害不负任何赔偿责任,包括但不限于直接的、间接的、附加的个人损害或商业损失或任何其它损失。
前言随着在线视频、软件下载以及移动端视频、应用商店等应用的飞速发展,用户对这些应用的体验要求越来越高,而这些应用的需求也导致了网络的拥堵和出口带宽成本的急剧增长,传统的做法是增加带宽或使用流控限速,而这些措施不仅会影响用户体验,且无法从根本上解决上述问题。
为了降低带宽成本,提高网络效率和给用户更好的体验,iXCache缓存产品应运而生。
iXCache缓存是基于派网公司自主研发的PanaOS操作系统上研发出来的,配合本公司智能应用网关产品Panabit联动部署,不仅使得iXCache分布式部署方便快捷,且能够在大流量网络环境下依旧保持高稳定性、高性能的输出。
iXCache目前支持web 视频、移动视频、应用商店、软件下载、直播加速等应用缓存。
目录网络应用层缓存加速引擎软件IXCACHE使用说明书 (1)前言 (1)使用原则: (4)系统硬件要求: (4)安装iXCache系统 (4)部署方式 (11)牵引模式 (11)实例一:Panabit作为网关或网桥(缓存输出经过Panabit) (12)实例二:iXCache输出走核心交换(缓存不经过Panabit转发。
) (15)镜像模式 (19)实例:与华为设备配置 (19)集群部署 (22)实例一:Panabit作为网关或网桥(缓存输出经过Panabit) (23)实例二:当网内无PANABIT时 (26)iXCache功能详解 (29)监控统计 (29)流量概况: (29)硬盘概况: (30)系统信息 (30)未知资源 (31)IP统计 (31)回源分析 (32)热门资源 (32)正在缓存 (33)正在输出 (33)正在代理 (34)直播拉取 (34)直播管理 (35)iXCache网络应用层缓存加速引擎软件使用说明书资源管理: (35)存储管理: (39)系统维护: (40)网络配置 (40)系统管理 (41)系统升级 (45)常见问题及解答。
- 1、下载文档前请自行甄别文档内容的完整性,平台不提供额外的编辑、内容补充、找答案等附加服务。
- 2、"仅部分预览"的文档,不可在线预览部分如存在完整性等问题,可反馈申请退款(可完整预览的文档不适用该条件!)。
- 3、如文档侵犯您的权益,请联系客服反馈,我们会尽快为您处理(人工客服工作时间:9:00-18:30)。
Ixia Software Release NotesIxNetwork 5.30 EA SP5 Patch1Build Number: 5.30.90.120 (June 22, 2009)About This ReleaseLicensingInstallation NotesTcl/Tk Support for Client ApplicationsHow to Report ProblemsAdditional DocumentationWhat's New in IxNetworkAbout This ReleaseIxNetwork 5.30 EA SP5 Patch1 is an "Early Adopter" release and now includessupport for IxNetwork-FT (Feature Test) replacing support for the legacy IxRouter application.See the specific IxNetwork-FT sections below for application compatibilityrequirements and known issues. See the Product Compatibility Matrix forIxNetwork-FT hardware support.Upgrading from a release prior to IXOS 5.10 SP2To ensure proper operation of an Ixia chassis with IxOS 5.10 EA SP3, prior toinstalling this release you must un-install all previous versions of Ixia applications,Ixia StatEngine, Ixia StatEngine PCPU packages and IxOS. You should use the Add/Remove utility in the Windows Control Panel. After the uninstallations are complete thechassis must be rebooted.IxOS CompatibilityIxNetwork 5.30 EA SP5 Patch 1 requires minimum IxOS 5.20 GA Patch 2 or IxOS 5.30EA SP2 Patch1 or later versions of IxOS 5.30 to be installed.Previous Release NotesPlease visit the IxNetwork support web page for more information on previous Release Notes.Application CompatibilityNOTE: When you are using one or more of the applications below on a singlechassis configuration, please use the correct application versions so they alignto a common version of IxOS.Application IxOS 5.20 GA Patch2 IxOS 5.30 EA SP2 Patch1IxNetwork 5.30 EA SP5 Patch1 5.30 EA SP5 Patch1IxNetwork-FT 5.30 EA SP5 Patch1 5.30 EA SP5 Patch1HLTAPI 3.40 GA 3.40 GAIxAccess 2.40 GA Patch2 N/AIxAdmin 1.00 GA SP2 1.00 GA SP2IxANVL 7.55 EA 7.55 EAIxAuthenticate 2.0 GA SP2 Patch2 N/AIxAutomate 6.60 GA 6.60 GAIxChariot 6.70 EA N/AIxDefend 3.20 EA 3.20 EAIxLoad-VoIP N/A 3.70 EAIxLoad 4.10 EA SP1 Patch1 4.20 EA (*)IxSAN N/A 1.00 EA SP1IxVPN 3.00 GA SP3 Patch3 3.00 GA SP3 Patch3Licensing 2.50 GA Patch3 2.70 EA SP1Stack Manager 3.35 EA 3.35 EATest Conductor 2.10 EA 2.10 EAVNIC 2.50 EA 2.50 EAFor the latest compatibility information to include releases occurring after thisdate, please refer to the online Product Compatibility Matrix at the link below.An Ixia website account is required before accessing./support/product_compatibility_matrixIxNetwork Load Module SupportNOTE: Not all hardware listed below is currently supported by IxNetwork-FT.See the online Product Compatibility Matrix for IxNetwork-FT specific Load Modulesupport.Module Type Supported Function M odule Part Number10G Ethernet Control Plane Testing LSM10G1-01, LSM10GXL6-01 (LAN), LSM10GXL6-02 (LAN/W AN), LSM10GXM3-01, LSM10GXMR3-01, LM10GE700F1-P, LM10GE700F1B-P, LM10GULF-P, LM10GUPF-XFP, LSM10GXM2XP-01, LSM10GXM4-01, LSM10GXM4XP-01, LSM10GXMR2-01, LSM10GXMR4-01, LSM10GXM8-01, LSM10GXM8XP-01, LSM10GXMR8-01, LSM10GR1-01, 10GBaseT-ADAP-01, LSM10GXM2S-01, LSM10GXM4S-01, LSM10GXM8S-01, LSM10GXMR2S-01, LSM10GXMR4S-01, LSM10GXMR8S-01Stateless Data Plane Test L SM10G1-01, LSM10GXL6-01 (LAN), LSM10GXL6-02 (LAN/W AN), LSM10GXM3-01, LSM10GXMR3-01, LSM10GL1-01, LSM10GXM2XP-01, LSM10GXM4-01, LSM10GXM4XP-01, LSM10GXMR2-01, LSM10GXMR4-01, LSM10GXM8-01, LSM10GXM8XP-01, LSM10GXMR8-01, LSM10GR1-01, 10GBaseT-ADAP-01, LSM10GXM2S-01, LSM10GXM4S-01, LSM10GXM8S-01, LSM10GXMR2S-01,LSM10GXMR4S-01, LSM10GXMR8S-01Application Traffic LM10GE700F1-P, LM10GE700F1B-P, LSM10G1-01, LM10GXM3-01, 10GBaseT-ADAP-01, LSM10GXM2XP-01, LSM10GXM4-01, LSM10GXM4XP-01, LSM10GXM8-01, LSM10GXM8XP-01, LSM10GR1-01, LSM10GXM2S-01, LSM10GXM4S-01, LSM10GXM8S-0110/100/1G Ethernet C ontrol Plane Testing ASM1000XMV12X-01, LM1000STXS2, LM1000STXS4, LM1000STXS4-256, LM1000TXS4, LM1000STXR4, OLM1000STXS24, LM1000SFPS4, ALM1000T8, ELM1000ST2, CPM1000T8, LSM1000XMS12-01, LSM1000XMSR12-01, LSM1000XMV4-01, LSM1000XMVR4-01, LSM1000XMV8-01, LSM1000XMVR8-01, LSM1000XMV12-01, LSM1000XMVR12-01, LSM1000XMV16-01, LSM1000XMVR16-01, ACCELERON-NP-01 (Non-Aggregate Mode), ACCELERON-XP-01 (Non-Aggregate Mode)Stateless Data Plane Test A SM1000XMV12X-01, LM1000STXS4, LM1000STXS4-256, LM1000TXS4, LM1000STXR4, OLM1000STXS24, LM1000SFPS4, LSM1000XMS12-01, LSM1000XMSR12-01, LSM1000XMV4-01, LSM1000XMVR4-01, LSM1000XMV8-01, LSM1000XMVR8-01, LSM1000XMV12-01, LSM1000XMVR12-01, LSM1000XMV16-01, LSM1000XMVR16-01, ACCELERON-NP-01 (Non-Aggregate Mode), ACCELERON-XP-01 (Non-Aggregate Mode)Application Traffic ASM1000XMV12X-01, LM1000STXS4, LM1000STXS4-256, LM1000TXS4, LM1000SFPS4, ALM1000T8, CPM1000T8, LSM1000XMS12-01, LSM1000XMV4-01, LSM1000XMV8-01, LSM1000XMV12-01, LSM1000XMV16-01OC192 SONET Control / Stateless Data Plane Testing MSM10G1-01, MSM10G1-02OC48 SONET Control / Stateless Data Plane Testing MSM2.5G1-01OC3/12 SONET/A TM Control / Stateless Data Plane Testing LM622MR, LSM622MR-512Load modules with 32MB or less of memory are not supported by IxNetwork 5.30 EA SP5 Patch1.There are several models of Ixia OC-192 and 10G Ethernet modules in thiscategory. Memory upgrades are available:- TRI-045: LMOC192c 128MB Memory Upgrade- TRI-046: LM10GE 128 MB Memory UpgradePlease contact Ixia for details.LicensingIxNetwork 5.30 EA SP5 Patch1 requires that a license for its use be installed for eachchassis used by IxNetwork. That license may be installed on each chassis or on aserver on your network, referred to as the central license server.NOTE: IxOS 5.00 SP2 and later versions of IxOS also require a license. Pleaseread the IxOS release notes for license operation and installationinstructions.IxNetwork 5.30 EA SP5 Patch1 ships with Ixia Licensing 2.70 EA SP1.Installing a LicenseIf you wish to use a central license server, make sure to install the Licensing Package on that server. This can be downloaded from the Ixia Support website.If you are upgrading from an earlier version of IxNetwork or IxRouter or are evaluating IxNetwork, please jump ahead to "Using a Temporary License".If this is a new installation of IxNetwork, you should have received an emailwith your Registration Number and Password. If you have not received it yet, please jump ahead to "Using a Temporary License".Your license is installed using the Ixia Registration Utility (IRU) from thestart menu (Start->Ixia->Licensing->IRU). You may run the IRU from the chassisor from any Windows host connected to the chassis. Select the Register choiceand press the Start button. Follow the instructions on the screen. In Step 2,enter the name or IP address of the chassis that the license will apply to. Instep 3, if you are using a central license server, select 'No' and enter the nameof the license server. If you are not using a central license server, select'Yes' instead.Using a License ServerIf you will be using a central license server with IxNetwork, make sure to setthe name of the server in IxNetwork's Settings->Preferences menu choice.To allow use of a central license server by the Tcl API, a new system environment variable "IXN_LICENSE_SERVER" must be set on the client PC. If you are running your Tcl program on a UNIX client, the environment variable must be set on the host running the Tcl Server. Environment variables are set on a UNIX host through the user's shell initialization script. Environment variables are set on a Windows host by using the following instructions:1. Right-click on the My Computer icon on the desktop and then left-click onProperties.2. Choose the Advanced tab from the System Properties dialog box.3. Press the Environment Variable button at the bottom of the page.4. In either the "User variables for..." or "System variables" list,if IXN_LICENSE_SERVER does not exist in the list, press New, otherwise pressEdit.5. The name of the variable should be IXN_LICENSE_SERVER and the value should bethe name or IP address of the license server machine.Updating LicensesIxia has made changes to its licensing technology to minimize license update requirements. In the past license updates were required with every software upgrade. Moving forward license updates will be required at most once every year when software maintenance is renewed.In order to move to this new licensing paradigm, current users of IxNetwork willneed to update their existing licenses once. For some customers (if you boughtor renewed maintenance for IxNetwork in the first couple of months of 2007) this process will not be necessary.The process to update a license is as follows:1. Run the Ixia Registration Utility (IRU) from the start menu (Start->Ixia->Licensing->IRU).2. You may run the IRU from the chassis or from any Windows host connected tothe chassis.3. Select the Update option and follow the instructions on the screen tocomplete this process.Using a Temporary LicenseIt is possible to use IxNetwork for a period of time prior to installation of a permanent license through the use of a temporary license. When you first connect IxNetwork to a chassis, if there is no license found for the chassis, you willbe offered the opportunity to install a temporary license. A permanent licenseshould be installed before the expiration of the temporary license. You willreceive warnings from IxNetwork prior to the expiration of the temporary license.Installing Licensing SoftwareThe Ixia licensing package is installed as part of the IxNetwork server component installation. In some cases you will receive the following message:"In order for Ixia licensing software to work correctly, it will be necessaryto make a change to your system. If you are connected to the Internet, all ofyour licenses for this chassis will automatically be adjusted. If not, pleasefollow the instructions in the Release Notes prior to rebooting.Other, non-Ixia applications may require re-licensing."If you receive this message and your computer is not connected to the Internet,please use the following instructions after rebooting:1) Using the IRU (Start->Ixia->Licensing->IRU):a. Use the Manage Licenses choice to identify all of the licenses on thechassis.b. For each:i. Find your original registration emails.ii. Deregister all of the licenses using the IRU's Deregister function.2) For each of the licenses identified in 1a:a. Register the license using the IRU's Register function.Installation NotesUpgrading from a release prior to IXOS 5.10 SP2To ensure proper operation of an Ixia chassis with IxOS 5.10 EA SP3 or later versionsof IxOS 5.10 EA, prior to installing this release you must un-install all previousversions of Ixia applications, Ixia StatEngine, Ixia StatEngine PCPU packages and IxOS. You should use the Add/Remove utility in the Windows Control Panel. After theun-installations are complete the chassis must be rebooted.Prerequisite Installation NotesAs part of the IxNetwork installation, the installer installs Microsoft SQL2005 Express, Microsoft .Net Framework 1.1 SP1 and Microsoft .Net Framework 2.0.If you experience any issue related to the installation of these prerequisites,please refer to the following notes.NOTE: During installation you may be presented with a error dialog declaring a 1935 error has occurred. One possible cause of this is the presenceof anti-adware or anti-virus software running on the target machine. Pleasedisable these applications prior to your next installation attempt.NOTE: IxNetwork requires Microsoft .NET 1.1 SP1 and 2.0. This can take several minutes to install.NOTE: Installation of Microsoft .Net 1.1 SP1 Framework may fail on Windows 2003 Server. Please refer to the following Microsoft knowledgebase item toattempt resolution: 830646.NOTE: Installation of .NET Framework service packs is not completed if you first install security update MS05-004. Please refer to the following Microsoftknowledgebase item to attempt resolution: 899619.NOTE: If you receive a "Microsoft .NET Framework 1.1 Service Pack 1 (KB867460) cannot be installed" error message when you install the .NET Framework1.1 Service Pack 1. Please refer to the following Microsoftknowledgebase item to attempt resolution: 889109.IxNetwork InstallationIxNetwork has two components. The 'chassis' component needs to be installed on the Ixia chassis being used. The 'client' component needs to be installed on the user workstation where the IxNetwork GUI will be run. The installer will determinewhich is appropriate depending on which IxOS components are installed. Generally, when IxServer is installed, the IxNetwork 'chassis' component is installed.It is also required to install IxOS before installing the IxNetwork 'chassis' component.IxNetwork Download from Ixia WebsiteIxNetwork is available either on a CD-ROM or as a download from the Ixia website.1. Download IxNetwork software from the Ixia website to an Ixia chassis orclient PC. The installer package is in the form of a self-extracting ZIPfile. To unzip the file, double-click on the file from within WindowsExplorer.2. Follow the on-screen instructions provided by the installer.NOTE: If you are upgrading from a CD-ROM, the installer will be launched automatically. The files on the CD-ROM will be the same files as the onesunzipped by the above process.Chassis Installation RequirementsWhen installing IxNetwork 5.30 EA SP5 Patch1 on a chassis, a minimum of 512MB of installed RAM and 200MB of free disk space on Drive C: is required. In addition,be sure to have 700MB of temporary space available. In heavily-loaded chassis configurations, it is recommended to have 1GB RAM installed on the chassis.If your chassis does not meet these requirements, please contact Customer Supportat support@ or 1-877-FOR-IXIA about appropriate upgrades.NOTE: When installing from CD, some virus scanning configurations presenta malicious code alert during execution of the Windows autorun feature. Ifthis occurs, right-click the CD-ROM drive icon in Explorer and 'Explore'the CD. At the root of the CD, double-click on the index.htm file.NOTE: IxNetwork installs the Ixia Stat Engine component. This component is shared by other Ixia applications. It can be manually uninstalled from thetarget machine by using the Windows Add/Remove Programs applet.The following sequence must be followed exactly for the setup to work properlyon Ixia chassis.1. Uninstall any previous versions of IxNetwork and IxOS and restart thechassis.2. Install the required IxOS version.3. Install IxNetwork, and the IxNetwork installer will automatically install theChassis Component. The client component of IxNetwork cannot be installed onthe Ixia Chassis.4. Restart IxServer.Client Installation RequirementsWhen installing IxNetwork 5.30 EA SP5 Patch1 on a client computer, a minimum of 1GB RAM, an Intel P4 Processor (or equivalent), and 500MB of free disk space on DriveC: is required. In addition, be sure to have 200MB of temporary space available.The minimum recommended display resolution is 1024x768, with a DPI setting of Normal size (96 dpi). For configurations involving large port counts , a minimum of 2GB RAMis recommended for the IxNetwork 'client'.Operating System Support* Windows 2000 Professional SP4(US English only)* Windows XP Professional SP2(US English only)* Windows 2003 Server (US English Only)* Windows Vista 32-bit (US English Only)* Linux Kernel 2.2.14, 2.2.15, 2.4.20 (Mandrake 7.2, RedHat 6.2, RedHat 7.0,RedHat 9.0) - Tcl API support only* Solaris 7 (SunOS 5.7), Solaris 8 (SunOS 5.8), Solaris 9 (SunOS 5.9) - Tcl API support onlyThe following sequence must be followed exactly for the setup to work properly on a client PC:1. Uninstall any previous versions of IxNetwork and restart the PC.2. Install IxNetwork. The IxNetwork installer will install only the Clientcomponent on the user PC.UNIX Installation NotesTcl API support on UNIX operating systems is for the Tcl API only.Other versions of Win32, Linux and Solaris platforms may operate properly, but they are not officially supported.To obtain build or install scripts for UNIX platforms not listed above, please contact Customer Support at support@ or 1-877-FOR-IXIA.UNIX Tcl Client Installation NotesIn order to run the GUI installer, your client machine must be configured withan operational X-windows server.Be sure to set your DISPLAY environment variable to the host name or IP address of the client machine on which you want the installer GUI to display. Below are examples for setting the DISPLAY environmental variable using various shell environments. If you need environment configuration assistance beyond this, please consult your System Administrator.// enable connections to X Serverxhost + or xhost [remote hostname]// set DISPLAY environment variable// determine shellecho $SHELL// depending on what shell you use - Bourne shell (bsh or sh),// Bash (bash - Bourne shell again), C shell (csh) or Korn shell (ksh);// set DISPLAY environment variable:// bash:export DISPLAY=hostname:0// bsh or kshDISPLAY=hostname:0export DISPLAY// csh:setenv DISPLAY hostname:0If you are updating an existing installation, be sure to run the installer as thesame user which initially installed the software.Always run the uninstaller prior to removing any files manually.If installing as root and the install location is a network-mounted filesystem, ensure root has write permission to the file system prior to startingthe installer.Tcl/Tk Support for Client ApplicationsInstallation of Tcl Server is required to support execution of UNIX-based legacy Tcl scripts. Installation of Tcl Server is not required to support execution of UNIX-based IxNetwork API (new) Tcl scripting, but utilizes a IxNet GUI client started inTcl Server mode. Please refer to the IxNetwork documentation for guidance on its usage.How to Report ProblemsNorth America Customer Support Hours: 6:00am PST to 6:00pm PSTEmail: support@Phone: Toll Free within USA:1-877-367-4942, Option #1 for SupportFrom outside the USA:1-818-871-1800, Option #1 for Supporte-Fax: 1-818-449-0992Europe, Middle East, and Africa Customer Support Hours: 07:00 to 17:30 GMT Email: eurosupport@Phone: +44-1628-405797India Customer Support Hours: 09:00 to 17:30 local timeEmail: support-india@Phone: +91-80-22161000Asia Pacific Customer Support Hours: 09:00 to 17:30 local time (Singapore) Email: support-asiapac@Phone: +65-6332-0126Fax: +65-6332-0127Additional DocumentationPlease refer to our website at /library. PDF and HTMLversions of all documentation are available there.You will be required to provide a login and password to enter this section ofthe web site. If you do not have the username and password, please forward yourrequest to mailto:support@.What's New in IxNetwork5.30 EA SP5 Patch1 FeaturesIxNetwork-Load ModuleSupport added for the new ACCELERON-NP and ACCELERON-XP Load Modules in 1GigE Non-Aggregate Mode。