frida 参数类型
frida hook 内部类overload 类型

题目:深入探讨Frida Hook技术在内部类和Overload类型中的应用一、Frida Hook技术简介Frida是一款强大的应用程序反编译和动态分析工具,它通过对应用程序进行Hook来实现代码注入和修改。
Frida Hook技术可以实现对应用程序中各种类和方法的监控和篡改,是移动应用逆向工程中常用的技术手段之一。
在实际应用中,Frida Hook技术常常会涉及到内部类和Overload类型的处理,因此对这两种情况的应用进行深入探讨有助于更好地理解Frida Hook技术的原理和实现方式。
二、内部类的Frida Hook应用1. 内部类的定义和使用内部类是指在一个类的内部再定义一个类,通常用于封装和隐藏某些功能。
在Frida Hook技术中,针对内部类的Hook操作需要特别注意内部类的调用和实例化方式,以确保Hook到目标类的内部类的方法和属性。
2. 内部类Hook的实现步骤在实现内部类Hook时,首先需要通过Frida的Java代码注入功能将Hook代码注入到目标应用程序中。
然后需要通过目标类的getClass()方法获取内部类的Class对象,并使用Frida的Interceptor来拦截内部类的方法调用,实现Hook操作。
3. 内部类Hook的注意事项在进行内部类Hook时,需要注意内部类和外部类的关系,以及内部类的访问权限。
另外,还需要注意内部类的实例化方式和内部类对象的引用方式,这些都是影响内部类Hook成功与否的关键因素。
三、Overload类型的Frida Hook应用1. Overload类型的定义和使用Overload类型是指在Java中函数重载的情况,即在同一个类中可以定义多个同名函数,但参数列表或参数类型不同。
在Frida Hook技术中,针对Overload类型的Hook操作需要考虑函数重载的不同情况和Hook方式。
2. Overload类型Hook的实现步骤在实现Overload类型Hook时,首先需要获取目标类的Method对象并使用Frida的Interceptor来拦截特定参数类型的函数调用。
frida overload 参数

文章标题:深度解析Frida Overload参数:为什么它如此重要?1. 介绍Frida是一款强大的反向工程工具,广泛被用于移动应用程序的渗透测试和安全研究。
在Frida的使用过程中,参数重载(overload)是一个非常重要的概念,它能够帮助我们更好地理解和分析应用程序的行为。
本文将通过深入讨论Frida overload参数的重要性和使用方法,帮助读者更好地掌握这一关键概念。
2. 什么是Frida Overload参数?在Frida的使用过程中,我们经常需要hook应用程序中的某个函数,以便在其执行前后做一些操作。
而在hook函数时,往往需要考虑到参数的重载。
参数的重载指的是同一个函数名,在不同情况下可能有不同数量和类型的参数。
为了正确hook函数并获取所需的参数信息,我们需要了解并处理这些参数重载的情况。
3. Frida Overload参数的重要性为什么Frida Overload参数如此重要呢?很多函数在调用时可能会传入不同数量和类型的参数,这就需要我们能够灵活地处理各种参数重载情况。
对于一些重要的函数,我们可能需要深入了解其参数的具体情况,以便更好地理解应用程序的行为和逻辑。
掌握Frida Overload参数的使用方法,能够帮助我们更好地进行应用程序的分析和研究。
4. 如何处理Frida Overload参数?在实际使用Frida进行hook时,处理参数重载是一项必备的技能。
通常,我们可以通过Frida提供的一些API来获取函数的参数信息,然后根据实际情况进行处理。
可以使用`Interceptor.attach`进行hook,然后使用`this.args`获取参数信息;也可以使用`Method.overload`来处理函数的不同重载情况。
了解和掌握这些API的使用方法,能够帮助我们更好地处理Frida Overload参数。
5. 我对Frida Overload参数的个人观点作为一名安全研究人员,我个人认为Frida Overload参数是非常重要的。
frida overload参数context

frida overload参数contextFrida Overload Parameters Context: Exploring the Power of Dynamic InstrumentationIntroductionIn the world of dynamic instrumentation, Frida has gained immense popularity for its ability to intercept, monitor, and modify the behavior of a wide range of applications. One of the key features that makes Frida so powerful is its ability to overload parameters dynamically at runtime. This allows developers and security researchers to modify the behavior of an application without the need for source code changes. In this article, we will explore the concept of Frida overload parameters context in depth, and how it can be used to achieve various goals in the context of application security, reverse engineering, and software development.What is Frida?Frida is a dynamic instrumentation framework that allows developers to inject JavaScript into running processes on a variety of platforms including Windows, macOS, Linux, iOS, and Android. Frida provides a powerful set of APIs for interacting with the underlying native code of anapplication and supports a wide range of use cases, including but not limited to debugging, reverse engineering, and bypassing security controls.One of the key features of Frida is its ability to overload parameters at runtime, which allows developers to modify the behavior of an application on the fly. This feature is particularly useful when working with closed-source applications or when source code is not available for inspection. By dynamically modifying function parameters, developers can achieve a wide range of goals, including bypassing security checks, manipulating data flows, and identifying vulnerabilities.Understanding Frida Overload Parameters ContextFrida overload parameters context refers to the process of intercepting function calls in a running application and modifying the parameters passed to these functions. This is achieved by hooking into the target process and injecting JavaScript code that intercepts the relevant function calls and modifies the parameters before they are passed to the original function. This allows developers to influence the behavior of the application without making any permanent changes to the underlying code.When working with Frida overload parameters context, it's important to understand the underlying native code of the application and the specific function calls that need to be intercepted. This often requires a deep understanding of the application's architecture and the ability to analyze the behavior of the application in real-time. By leveraging Frida's powerful APIs, developers can gain unprecedented insight into the inner workings of the application and manipulate its behavior in ways that would be difficult or impossible using traditional static analysis techniques.Use Cases for Frida Overload Parameters ContextFrida overload parameters context can be used to achieve a wide range of goals in the context of application security, reverse engineering, and software development. Some of the common use cases for this technique include:1. Bypassing Security Controls: By intercepting function calls that perform security checks, developers can modify the parameters passed to these functions to bypass authentication mechanisms, authorization checks, and other security controls. This can be particularly useful whenanalyzing the security posture of an application or when testing the effectiveness of security controls.2. Manipulating Data Flows: By intercepting function calls that process or manipulate data, developers can modify the parameters passed to these functions to change the behavior of the application. This can be useful for testing edge cases, identifying vulnerabilities, or understanding the impact of different data inputs on the application's behavior.3. Reverse Engineering: Frida overload parameters context can be invaluable when reverse engineering closed-source applications or when working with proprietary protocols. By intercepting function calls and modifying parameters, developers can gain insight into the inner workings of the application and understand how it processes and handles data.4. Testing and Debugging: By dynamically modifying function parameters, developers can test different scenarios and edge cases without the need for code changes. This can be useful for debugging, testing, and validating the behavior of an application under different conditions.Best Practices for Frida Overload Parameters ContextWhen working with Frida overload parameters context, it's important to follow best practices to ensure a successful outcome. Some of the best practices for using this technique include:1. Understand the Application's Architecture: Before attempting to overload parameters, it's essential to have a deep understanding of the application's architecture and the specific function calls that need to be intercepted. This often requires a thorough analysis of the application's behavior and a solid understanding of the underlying native code.2. Use Dynamic Analysis Techniques: Frida overload parameters context is most effective when combined with dynamic analysis techniques such as runtime instrumentation, code hooking, and function interception. This allows developers to gain real-time insight into the behavior of the application and dynamically modify its parameters.3. Test in Controlled Environments: When experimenting with Frida overload parameters context, it's important to test in controlled environments to avoid unintended side effects. This can help developers understand the impact of their modifications and assess the potentialrisks of their changes.4. Document Your Work: It's essential to document the process of overloading parameters using Frida to ensure that others can reproduce your findings and understand the rationale behind your modifications. This can be particularly helpful when working in a team or when sharing your work with the community.ConclusionFrida overload parameters context is a powerful technique that allows developers and security researchers to dynamically modify the behavior of an application at runtime. By intercepting function calls and modifying parameters, developers can bypass security controls, manipulate data flows, reverse engineer closed-source applications, and test different scenarios without the need for code changes. This technique is particularly useful when working in the context of application security, reverse engineering, and software development, and can help developers gain unprecedented insight into the inner workings of the application. By following best practices and leveraging Frida's powerfulAPIs, developers can achieve a wide range of goals using overload parameters context.。
frida range对象

frida range对象Frida Range对象Frida是一款功能强大的动态分析工具,可用于对移动应用程序进行逆向工程和漏洞挖掘。
在Frida中,Range对象是一种表示内存区域的数据结构,它具有一些重要的属性和方法,可以帮助我们对内存进行更深入的分析和操作。
Range对象的属性1. base:表示内存区域的起始地址。
可以通过base属性获取内存区域的起始地址,并进行进一步的分析。
2. size:表示内存区域的大小。
可以通过size属性获取内存区域的大小,并根据具体需求进行内存操作。
3. file:表示内存区域所属的文件。
可以通过file属性获取内存区域所属的文件,并进行进一步的分析。
4. protection:表示内存区域的保护方式。
可以通过protection 属性获取内存区域的保护方式,了解内存区域的访问权限。
Range对象的方法1. readByteArray(length):读取指定长度的字节数组。
可以使用readByteArray方法读取指定长度的字节数组,并对其进行分析和处理。
2. writeByteArray(data):将字节数组写入内存区域。
可以使用writeByteArray方法将字节数组写入内存区域,修改内存中的数据。
3. readUtf8String(length):读取指定长度的UTF-8编码字符串。
可以使用readUtf8String方法读取指定长度的UTF-8编码字符串,并对其进行分析和处理。
4. writeUtf8String(data):将UTF-8编码字符串写入内存区域。
可以使用writeUtf8String方法将UTF-8编码字符串写入内存区域,修改内存中的数据。
5. add(value):将指定值加到内存区域的地址上。
可以使用add方法将指定值加到内存区域的地址上,得到新的地址值。
6. sub(value):将指定值减去内存区域的地址上。
可以使用sub方法将指定值减去内存区域的地址上,得到新的地址值。
frida的用法--HookJava代码篇

frida的⽤法--HookJava代码篇frida是⼀款⽅便并且易⽤的跨平台Hook⼯具,使⽤它不仅可以Hook Java写的应⽤程序,⽽且还可以Hook原⽣的应⽤程序。
1. 准备frida分客户端环境和服务端环境。
在客户端我们可以编写Python代码,⽤于连接远程设备,提交要注⼊的代码到远程,接受服务端的发来的消息等。
在服务端,我们需要⽤Javascript代码注⼊到⽬标进程,操作内存数据,给客户端发送消息等操作。
我们也可以把客户端理解成控制端,服务端理解成被控端。
假如我们要⽤PC来对Android设备上的某个进程进⾏操作,那么PC就是客户端,⽽Android设备就是服务端。
1.1 准备frida服务端环境本⽂,服务端在Android平台测试。
服务端环境准备步骤如下:根据⾃⼰的平台下载frida服务端并解压执⾏以下命令将服务端推到⼿机的/data/local/tmp⽬录adb push frida-server /data/local/tmp/frida-server执⾏以下命令修改frida-server⽂件权限adb shell chmod 777 /data/local/tmp/frida-server注:Windows系统执⾏命令可以在CMD中进⾏;Linux和MacOS执⾏命令可以在终端中进⾏。
adb是Android⼀个调试⼯具,具体安装⽅法不是本⽂的重点。
1.2 准备客户端环境在PC上安装Python的运⾏环境,安装完成后执⾏下⾯的命令安装fridapip install frida-tools1.3 客户端命令参数下⾯是frida客户端命令⾏的参数帮助Usage: frida [options] targetOptions:--version show program's version number and exit-h, --help show this help message and exit-D ID, --device=ID connect to device with the given ID-U, --usb connect to USB device-R, --remote connect to remote frida-server-H HOST, --host=HOST connect to remote frida-server on HOST-f FILE, --file=FILE spawn FILE-n NAME, --attach-name=NAMEattach to NAME-p PID, --attach-pid=PIDattach to PID--debug enable the Node.js compatible script debugger--enable-jit enable JIT-l SCRIPT, --load=SCRIPTload SCRIPT-c CODESHARE_URI, --codeshare=CODESHARE_URIload CODESHARE_URI-e CODE, --eval=CODE evaluate CODE-q quiet mode (no prompt) and quit after -l and -e--no-pause automatically start main thread after startup-o LOGFILE, --output=LOGFILEoutput to log file1.3.1 将⼀个脚本注⼊到Android⽬标进程frida -U -l myhook.js com.xxx.xxxx参数解释:-U 指定对USB设备操作-l 指定加载⼀个Javascript脚本最后指定⼀个进程名,如果想指定进程pid,⽤-p选项。
frida send用法

frida send用法Frida Send 是 Frida 中的一个 API,可以很方便地在 JavaScript 和 native 之间传递数据。
通过 Frida Send,我们可以在运行时动态地注入数据到 Hook 进程中,并完成与目标进程的通信。
本篇文档将详细介绍 Frida Send 的使用方法,包括数据类型、API 接口、使用实例等方面。
一、Frida Send 的数据类型Frida Send 还支持一些基本数据类型的传输,开发者可以根据实际需求进行选择,如下:1、Number类型:支持整数和浮点数传输。
2、String类型:传输字符串类型。
3、Object类型:支持 JavaScript 对象传输。
4、Array类型:传输数组类型。
可以传输任意数据类型的数组。
5、Buffer类型:传输二进制数据,也就是字节数组。
二、Frida Send 的API接口Frida Send API 接口中提供了以下4个方法,开发者使用它们可以实现与目标进程的双向数据通信。
1、send(data): 向目标进程发送数据。
2、recv(): 接收目标进程发来的数据。
3、on(’input’,callback): 设置接收目标进程发送数据的回调函数。
4、off(’input’,callback): 取消接收目标进程发送数据的回调函数。
默认情况下,on() 方法注册的回调函数只接收来自target.process 的数据。
如果想要接收其它进程发来的数据,可以使用 on_all() 接口对所有进程开放。
三、使用实例下面给出两个实例展示了 Frida Send 的使用方法,供大家参考。
1、JS 调用 Native:这个例子将展示如何在 Javascript 中使用 Frida Send 向 Native 注入数据。
以获取应用程序版本号为例。
先随便思考一下实现思路:1、Hook 每个函数,找到带版本号的函数。
2、Hook 带版本号的函数,获取版本号后返回给Javascript 脚本。
安卓逆向8-Frida-脱壳,使用引力播这个app

安卓逆向8-Frida-脱壳,使⽤引⼒播这个app ###使⽤frida脱壳安卓逆向,写代码的难度是⽐较⼩的,难度⼤,是因为要分析原理,⽐如frida脱壳,这个其实代码很简单,⼗⼏⾏代码就好了,但是要懂得原理才可以,###之前使⽤的⼯具脱壳的就是Xposed的⼀个⼯具组件,现在我们使⽤frida 来开发脱壳,毕竟作为开发,还是需要了解这个的,###脱壳要懂得原理,这个难度⽐较⼤,真正写代码是⾮常简单的,⼏⼗⾏代码就搞定了,###使⽤frida脱壳的原理,还是壳加载源app到内存之后,从内存中取出这个源app的代码,然后使⽤frida把这个保存到本地,就实现了脱壳了###frida脱壳使⽤到的apifunction_address = Module.findExportByName(libname, function);Interceptor.attach(address, func);Interceptor.attach(address,onEnter: function (args) {},onLeave: function (retval) {})File 模块写⽂件流程new File(filepath, mode)write(data)flush()close()file = new File("yuanrenxue.dex", "wb")//data 是字符串或者 arrayBuffer // readByteArray() 返回的arrayBufferfile.write(data)file.flush()file.close()//把内存⾥的值转成字符串Memory.readUtf8String()//把内存⾥的值转换成整型Memory.readInt()//以begin为起始位置,从内存中读length长度的数据出来返回ArrayBuffer类型Memory.readByteArray(begin, length)//把地址转换成NativePointer类型 frida⾥操作内存地址需要NativePointer类型ptr()JS api#把其它进制转换成10进制parseInt(num, radix)###复习app加固和脱壳的原理你只有知道了这个加固壳是怎么运⾏的你才知道在哪⼀步脱壳,###了解dex⽂件格式###本质还是需要需要懂这个dex⽂件的格式,⾥⾯做了什么,是怎么保存的,⾥⾯有⼀个重要的属性,就是dex的数据具体有多⼤字节,这就是⽂件的长度,所以我们操作内存的依据就是这个,我们读取内存⾥⾯的dex数据的时候,就是从32个字节往后,⼀直加dex的⽂件⼤⼩,这就是dex⽂件我们要读取的起始位置,###内存的概念,因为我们是从内存把dex⽂件拿出来,所以还是需要知道这个内存怎么回事⽐如⼀个4G的内存,可能是分成了1万份,每⼀份都是有⼀个id的,关于内存的概念,还是理解不深刻,我需要单独学习⼀下计算机基础的知识,###怎么确定hook的点,我们要知道dex加载的时候经过了很多的流程,我们怎么知道在哪⼀个流程去取内存呢?第⼀个⽅法,就是你对安卓原理很通,熟悉代码逻辑,但是这个很难,真正做安卓app开发的,也未必搞得清楚,因为他们只是调⽤相关的api,做应⽤层的开发,对底层可能也不太清楚第⼆个⽅法,我们通过查资料,了解dex加载的流程,我们就是这种⼈,可能dex加载要经过10个⽅法,我们每⼀个做hook,看哪⼀个⽅法之后可以把内存dump出来,经过测试是这个openmemory的⽅法之后,会把dex加载到内存,所以我们hook这个函数,这个⽅法在libart.so库这个⾥⾯我们可以使⽤ida⼯具,打开这个库,查看这个⽅法的导出⽅法名,然后就知道了我们要hook这个⽅法,怎么查看这个⽅法的导出⽅法名?打开ida,主要使⽤ida,不要⽤ida64,左边就是so⽂件⾥⾯的函数,右边就是具体的函数信息,搜索openMemory,然后再IDA view-A,使⽤F5,把这个汇编语⾔,转换成为c语⾔,下⾯⼀长串就是⽅法名,底部这⼀长串就是这个导出⽅法名,我们使⽤ida的⽬的,就是为了找到这个导出⽅法名,###怎么找到这个libart.solibart.so位置是在 /system/lib/libart.soadb pull /system/lib/libart.so ~/Desktop这个libart.so和某⼀个app没有关系,我们找到这个so库,是为了知道⾥⾯的openmemory⽅法名,这个openmemory⽅法就是把dex⽂件读取进⼊内存的,所以我们要hook这个⽅法,###案例,还是使⽤的引⼒播这个app,我使⽤的是mumu模拟器+引⼒播+frida,进⾏脱壳,⾸先第⼀步,把这个libart.so拿出来,adb pull /system/lib/libart.so ~/Desktop第⼆步:使⽤ida⼯具,获取到这个openmemory的⽅法名,_ZN3art7DexFile100penMemoryEPKhjRKNSt3__112basic_stringIcNS3_11char_traitsIcEENS3_9allocatorIcEEEEjPNS_6MemMapEPKNS_100atDexFileEPS9_使⽤ida可以,还可以主要是要拿到安卓/system/lib/下的⼀个叫做libart.so,放到电脑然后在电脑端使⽤命令nm libart.so |grep OpenMemory来导出OpenMemory⾥⾯的名称第三步,开始写代码#######代码:import fridaimport syspackage = 'com.iCitySuzhou.suzhou001'def on_message(message, data):if message['type'] == 'send':print("[*]{0}".format(message['payload']))else:print(message)# a安卓七open_memory_7 = '_ZN3art7DexFile10OpenMemoryEPKhjRKNSt3__112basic_stringIcNS3_11char_traitsIcEENS3_9allocatorIcEEEEjPNS_6MemMapEPKNS_10OatDexFileEPS9_'open_memory_6 = '_ZN3art7DexFile100penMemoryEPKhjRKNSt3__112basic_stringIcNS3_11char_traitsIcEENS3_9allocatorIcEEEEjPNS_6MemMapEPKNS_100atDexFileEPS9_'# 所以安卓6和安卓7的这个名字是⼀样的,# 安卓九open_memory_9 = '_ZN3art7DexFile10OpenMemoryERKNSt3__112basic_stringIcNS1_11char_traitsIcEENS1_9allocatorIcEEEEjPNS_6MemMapEPS7_'# OpenMemory在libart.so中,在/data/lib/下 art是虚拟机# Hook OpenMemory 导出⽅法名# ⽤ nm libart.so |grep OpenMemory 查看导出导OpenMemory⽅法名# OpenMemroy的第⼀个参数是dex⽂件,在内存的起始位置# 根据dex⽂件格式,从起始位置开始第32个字节是该dex⽂件的⼤⼩# 知道dex起始位置和整个⽂件的⼤⼩,只是要把这段内存dump出来即可# 实⽤与安卓 6 7 8 9src = """var openMemory_address=Module.findExportByName('libart.so','_ZN3art7DexFile10OpenMemoryEPKhjRKNSt3__112basic_stringIcNS3_11char_traitsIcEENS3_9allocatorIcEEEEjPNS_6MemMapEPKNS_10OatDexFileEPS9_'); Interceptor.attach(openMemory_address,{onEnter: function(args){//dex⽂件的起始位置var dex_begin_address=args[1]//dex⽂件的前⼋个字节是magic字段//打印magic(会显⽰dex 035)三个字符可以验证是否未dex⽂件console.log('magic:'+Memory.readUtf8String(dex_begin_address))// 把地址转换成整型再加32//因为dex⽂件的第三⼗⼆个字节处存放的dex⽂件的⼤⼩var address=parseInt(dex_begin_address,16)+0x20//把address地址指向的内存值读出来,该值就是dex的⽂件⼤⼩//ptr(address)转换的原因是frida只接受NativePointer类型指针var dex_size=Memory.readInt(ptr(address))console.log('dex_size:'+dex_size)//frida写⽂件,把内存中的数据写到本地var timestamp=new Date().getTime();var file=new File('/data/data/%s/'+timestamp+'.dex','wb')//Memory.readByteArray(begin,length)//把内存的数据读出来,从begin开始,取length长度file.write(Memory.readByteArray(dex_begin_address,dex_size))file.flush()file.close()send('dex begin address:'+parseInt(dex_begin_address,16))send('dex file size:'+dex_size)},onLeave: function(retval){if (retval.toInt32()>0){}}});""" % (package)print('dex 导出⽬录为:/data/data/%s' % (package))deveice = frida.get_usb_device()pid = deveice.spawn([package])process = deveice.attach(pid)# 创建运⾏脚本script = process.create_script(src)# 输⼊打印,写死script.on('message', on_message)print('[*] Running CTF')# 写死script.load()# 重启程序deveice.resume(pid)# 写死sys.stdin.read()第四步,把app运⾏起来,然后运⾏我们的脱壳程序,ok,成功获得我们想要的dex⽂件,就是成功脱壳了,然后会有多个,我们使⽤jadx依次打开,其中查看是哪⼀个包含我们的代码###上⾯是代码操作步骤:1,要先把app运⾏起来,因为这个时候,就说明这个加固app的dex⽂件加载到了内存⾥⾯2,然后运⾏我们的脱壳程序,正常运⾏就是脱壳成功了3,在app对应的⽬录,看看,应该是⽣成了导出的dex⽂件,###难点,是找到hook的点,###你能开发出来这个脱壳程序,在爬⾍领域就是⽐较⽜逼的了,但是这个没有这么容易,⼤部分的app不是这么简单的,还做了混淆等其他的限制,没有办法单独使⽤frida就能脱壳出来,还需要其他的知识, ####。
利用Frida修改Android设备的唯一标识符
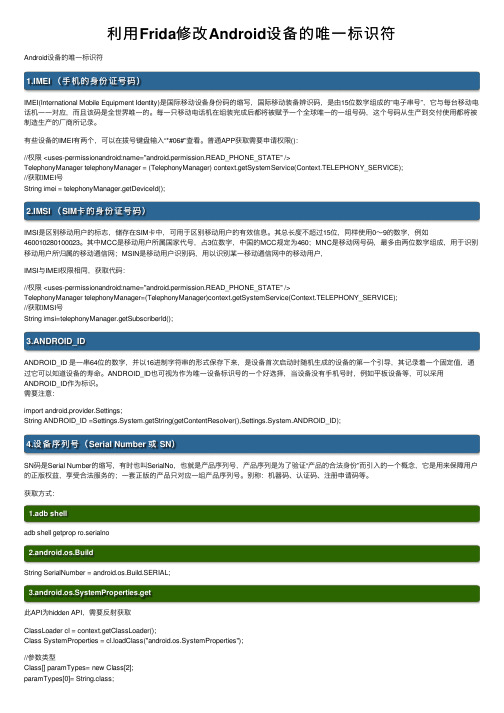
利⽤Frida修改Android设备的唯⼀标识符Android设备的唯⼀标识符1.IMEI (⼿机的⾝份证号码)IMEI(International Mobile Equipment Identity)是国际移动设备⾝份码的缩写,国际移动装备辨识码,是由15位数字组成的”电⼦串号”,它与每台移动电话机⼀⼀对应,⽽且该码是全世界唯⼀的。
每⼀只移动电话机在组装完成后都将被赋予⼀个全球唯⼀的⼀组号码,这个号码从⽣产到交付使⽤都将被制造⽣产的⼚商所记录。
有些设备的IMEI有两个,可以在拨号键盘输⼊“*#06#”查看。
普通APP获取需要申请权限()://权限 <uses-permissionandroid:name="android.permission.READ_PHONE_STATE" />TelephonyManager telephonyManager = (TelephonyManager) context.getSystemService(Context.TELEPHONY_SERVICE);//获取IMEI号String imei = telephonyManager.getDeviceId();2.IMSI (SIM卡的⾝份证号码)IMSI是区别移动⽤户的标志,储存在SIM卡中,可⽤于区别移动⽤户的有效信息。
其总长度不超过15位,同样使⽤0~9的数字,例如460010280100023。
其中MCC是移动⽤户所属国家代号,占3位数字,中国的MCC规定为460;MNC是移动⽹号码,最多由两位数字组成,⽤于识别移动⽤户所归属的移动通信⽹;MSIN是移动⽤户识别码,⽤以识别某⼀移动通信⽹中的移动⽤户,IMSI与IMEI权限相同,获取代码://权限 <uses-permissionandroid:name="android.permission.READ_PHONE_STATE" />TelephonyManager telephonyManager=(TelephonyManager)context.getSystemService(Context.TELEPHONY_SERVICE);//获取IMSI号String imsi=telephonyManager.getSubscriberId();3.ANDROID_IDANDROID_ID 是⼀串64位的数字,并以16进制字符串的形式保存下来,是设备⾸次启动时随机⽣成的设备的第⼀个引导,其记录着⼀个固定值,通过它可以知道设备的寿命。
- 1、下载文档前请自行甄别文档内容的完整性,平台不提供额外的编辑、内容补充、找答案等附加服务。
- 2、"仅部分预览"的文档,不可在线预览部分如存在完整性等问题,可反馈申请退款(可完整预览的文档不适用该条件!)。
- 3、如文档侵犯您的权益,请联系客服反馈,我们会尽快为您处理(人工客服工作时间:9:00-18:30)。
frida 参数类型
Frida是一款用于动态分析Android和iOS应用程序的工具,可以拦截和修改应用程序的函数调用,从而实现对应用程序行为的监控和控制。
在使用Frida进行Hook时,需要了解参数类型,以便正确
地使用函数。
Frida支持多种参数类型,包括整型、浮点型、布尔型、字符串等,还可以支持自定义类型。
在Hook函数时,需要根据函数参数类
型进行相应的转换,以便进行正确的操作。
以下是Frida支持的参数类型:
1.整型
整型是Frida最基本的参数类型,可以是有符号或无符号整数,常用的有int、long等。
在JavaScript中,可以使用Number类型表示整型,如下所示:
function hook_func(param1, param2) {
console.log('param1 is ' + param1 + ', and param2 is ' + param2);
}
2.浮点型
浮点型是一种表示实数的数据类型,可以是单精度浮点数(float)或双精度浮点数(double)。
在JavaScript中,可以使用Number类
型表示浮点型,如下所示:
function hook_func(param1, param2) {
console.log('param1 is ' + param1.toFixed(2) + ', and param2 is ' + param2.toFixed(2));
}
3.布尔型
布尔型是一种只有两个值的数据类型,即true和false。
在JavaScript中,可以使用Boolean类型表示布尔型,如下所示:
function hook_func(param1, param2) {
if (param1) {
console.log('param1 is true');
} else {
console.log('param1 is false');
}
}
4.字符串
字符串是一种由字符组成的数据类型,常用的有char*、wchar_t*等。
在JavaScript中,可以使用String类型表示字符串,如下所示: function hook_func(param1, param2) {
console.log('param1 is ' + param1 + ', and param2 is ' + param2);
}
5.自定义类型
除了上述基本类型外,Frida还支持自定义类型。
例如,可以定
义一个结构体类型,如下所示:
typedef struct {
int id;
char name[64];
float score;
} Student;
在JavaScript中,可以通过定义一个JavaScript对象来表示结构体类型,如下所示:
var student = {
id: 1,
na 'Tom',
score: 85.5
};
在Hook函数时,可以将JavaScript对象作为参数传递给函数,如下所示:
function hook_func(student) {
console.log('student id is ' + student.id + ', name is ' + + ', and score is ' + student.score);
}
总之,在使用Frida进行Hook时,需要了解被Hook函数的参数类型,以便进行正确的操作。
同时,也可以通过自定义类型来进行更加复杂的操作。