DEVO-10航模遥控中文手册
DEVO系列遥控器在线升级使用手册中文
使用手册如何使用Devention DfuSe USB升级工具―――――――――――――――――――――――――――――――――――――――――――――――――――――――――――――1. 目录1. 目录 (1)2. 介绍 (1)3. 系统要求 (2)4. 如何进入程序升级 (3)4.1 devention DfuSe USB升级工具安装 (3)5. 用户使用界面详解 (7)5.1 固件升级界面 (7)5.2 固件升级操作 (9)5.3 配置升级界面 (13)5.4 配置升级操作 (14)5.5 库文件升级界面 (18)5.6 库文件升级操作 (19)5.7 重要提示 (26)6. 修正历史 (26)2. 介绍devention DfuSe USB升级包分为三类:固件、配置、库文件。
“固件”是指基于控制器的程序文件;“配置”是指各个模型模块的配置参数;“库文件”是指主要的图标、语言包以及语言文本。
本工具主要用于升级devention 2.4G遥控器产品的固件、配置和库文件。
本文详细描述如何安装devention DfuSe USB的驱动,以及如何使用此升级工具。
devention DfuSe USB升级包可在官方网站下载。
3. 系统要求为了在Windows操作系统上使用devention DfuSe USB升级工具,您必须在电脑上安装常用的Windows版本,如Windows 98SE,Millennium,2000,XP,或VISTA。
您可以在桌面上右击“我的电脑”,然后点击弹出菜单的“属性”,查看Windows操作系统的版本。
在“系统属性”的“常规”中显示操作系统类型。
如图1。
图1:系统属性对话框4. 如何进入程序升级4.1 devention DfuSe USB升级工具安装l软件安装运行DevoDfuSe_V1.0_Setup.exe 文件:安装向导将指导您安装Devention DfuSe USB 升级工具。
零度探索者说明书

零度探索者说明书
1、把飞行器水平放置再打开飞行器。
2、等待机尾飞行状态显示为“黄灯慢闪”或“绿灯慢闪”。
3、将油门推到低端保持不动,同时连续按下遥控器IOC按键6次(3次按下,3次弹起),飞行器进入校准模式,此时尾灯变为绿色常亮。
4、抓住飞行器,保持飞行器尽量水平,慢慢水平旋转飞机720度,转动过程中必须保证尾灯绿色常亮,直到尾灯变成黄灯快闪。
5、抓住飞行器,保持飞行器机头朝下的垂直转态,慢慢水平旋转飞行器720度,转动过程中必须保证尾灯常亮直至尾灯变成“绿灯慢闪”或“黄灯慢闪”,此时校准完成。
10C中文说明书-固定翼部分学习资料

10C中文说明书-固定翼部分目录简介 (2)销售及使用区域的限定 (3)使用、出口和改装 (3)特殊标志的意义 (4)安全飞行 (4)对10C/10CG系统的简介 (7)部件和技术特性 (11)配件 (14)发射机控制项和开关设置 (17)对镍镉电池充电 (22)操纵杆松紧度调整 (24)调整显示屏的对比度 (24)改变模式(TX SETTING) (24)省电模式 (25)CAMPac卡的初始化方法和数据转换(T9C/T9CS到T10C): (26)遥控设备的安装和距离检测 (26)飞行频率 (34)发射机显示屏&按键 (36)警告和错误显示 (37)固定翼机(ACRO)的功能菜单 (39)ACRO基本功能导览 (41)设置4通道固定翼的快速向导: (42)固定翼机(ACRO)的基础功能菜单 (44)MODEL子菜单 (44)参数(PARAMETER)子菜单 (48)逻辑开关选择( LQGIC SW) (55)舵机反转(SRRVO REVERSING) (56)舵机行程量的调整( END FOINT/EPA): (57)发动机怠速控制管理 (59)双/三重比率和感度指数(D/R,EXP) (61)计时器(TIMER)菜单: (65)辅助通道功能AUX-CH: (67)教练功能TRAINER (68)微调TRIM和中立微调SUB-TRIM (70)舵机(SERVO)显示 (72)失控保护和电池低电量失控保护(F/S) (72)固定翼机(ACRO)高级功能菜单: (74)机翼类型(固定翼机/滑翔机ACRO/GLID): (74)襟副翼混控FLAPERON (76)襟翼—微调FLAP TRIM (78)副翼差动A1L-DIFF (79)使用5通道接收机的双副翼舵机 (80)尾翼类型 (81)升降舵副翼混控ELEVON (82)V型尾翼(V-TAIL) (84)快速横滚SNAP-ROLL (85)混控MIXS定义和类型 (88)升降舵-襟翼混控ELEV-FLAP (89)空气刹车AIRBRAKE/BUTTERFL Y(crow) (90)油针混控THROTTLE-NEEDLE (93)油门延迟功能THR-DELAY (95)油门曲线THR-CURVE (95)线性编程混控LINER (96)曲线编程混控CURVE (101)GY A型陀螺仪混控(陀螺仪感度) (103)其它设备 (105)简介感谢您购买Futaba○R 10C/10CG系列数字比例无线电遥控设备(FASST-2.4GHz*或PCM1024系统)。
Futaba10C-10CH中文说明书(1)

固定翼机(ACRO)的高级功能菜单............56 机翼类型.............................56 襟副翼混控 FLAPERON.................56
直升机的功能菜单........................94 子目录和参考信息....................94 从基本的直升机开始..................95
FUTABA10C航模遥控器简体中文使用说明
FUTABA 10C航模遥控器简体中文使用说明功能篇FUTABA对控上各开关和旋钮的定义是以ABCD这些字母来命名的,从左到右,从前到后的排列。
没有严格意义上的那个开关是管哪个功能。
在功能设定的操作上使用了4个按键(旋钮),菜单键(MODE)、退出键(END)、方向键(CURSOR)、调节及**旋钮(PUSH)。
菜单键(MODE):长按后可呼出操作菜单,在菜单状态下再次按此键可进行高级菜单。
退出键(END):退出当前的选择或者菜单方向键(CURSOR):在菜单和功能之间进行选择,可向上、下、左、右拔动调节及**旋钮(PUSH):通过旋转可快速修改选中的数值和选择,向下按压时起到**的作用。
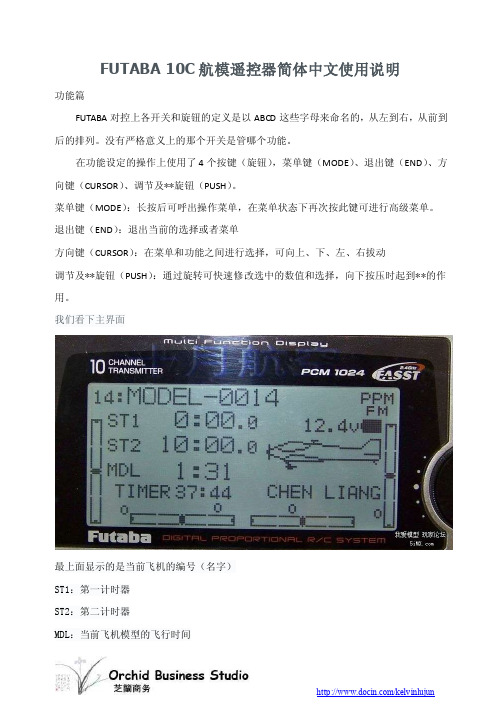
我们看下主界面最上面显示的是当前飞机的编号(名字)ST1:第一计时器ST2:第二计时器MDL:当前飞机模型的飞行时间TIMER:开机总时间以上各时间都可以在主界面通过“方向键”选择后长按“PUSH”键来进行归零清除!在主界面的右下角可设定使用者的名字如果不进行设定的话就是默认的FUTABA字样。
右主界面的右上角显示的是当前信号发射的制式“PPM”或者是“PCM”,下方还有电池的容量。
接下来将详细介绍每个功能的使用,先从固定翼开始介绍。
普通功能菜单介绍我们先**主菜单,开机后长按“MODE”会有如下界面:如下图使用“CURSOR”键进行选择并向下翻动可**普通菜单的第二页,如图:我们将普通菜单下的各功能分列并解释一下:MODEL:模型选择/数据复制/模型命名D/R,EXP:大小舵及EXP曲线END POINT:舵机行程SUB-TRIM:舵机微调(电子中立点设定)REVERSE:正反舵TRIM:微调设定及微调清除THROTTLE CUT:熄火开关设置IDEL-DOWN:油门低速混控F/S:失控保护(在PPM模式下没有此选项)AUX-CH:通道自定义PARAMETER:参数设置TIMER:计时器TRAINER:教练功能LOGIC SW:逻辑开关SERVO:通道状态显示/测试固定翼普通功能分解MODEL:模型选择/数据复制/模型命名此项有三个功能分别是:模型选择(10C在不插扩展卡的情况下可记忆15个模型数据)、模型间的数据复制、对记忆模型的命名模型选择见下图使用“CURSOR”键移动到模型数据的编号上,如上图“14”转动“PUSH”进行选择会出现下图要求长按“PUSH”的提示。
航模遥控器说明书

航模遥控器说明书篇一:MC6遥控器说明书USER MANUAL6 Channel Transmitter(6通发射机)Channel 5(5通道)Channel 6(6通道)FHSSRudder Trim(方向微调)Throttle Trim(油门微调)Elevator Trim(升降微调)V-tail Elevon Mix OnV-tail Elevon Mix Off混控开关V-tail On( V尾混控)Aileron Trim(副翼微调)On/Off switch 电源开关Switches in upper positionReverses direction(通道反向) of channels1-4 Elevon Off(三角翼混控)Switches in lower positionNormal direction(通道正向) of channels 1-4(发射机和接收机需绑定。
如果工厂没有绑定好发射机和接收机或需买第二个接收机,请按下面的步骤操作)一、接收机的操作描述1、跟接收机绑定连接2、接收机通电,接上对频线。
接收机上的绿灯闪3、拿起发射机,在打开发射机开关前,确保油门微调在最低位置,其他微调在中间位置4、保持绑定开关在上面的位置,现在打开发射机开关5、(发射机绿灯开始闪,然后接收机的灯停止闪动)6、断开发射机上的绑定键)7、移动接收机上的绑定开关,接收机上的绿灯现在会亮起来,就代表已经绑定好二、发射机的操作描述1、一通道副翼,控制机体的横向动作,比如翻滚之类的,当副翼横向机动出现反方向的时候,可以调节调节遥控器1-4通道正反开关的第一通道,来实现反方向的纠正,副翼微调当机体横向偏航的时候,可以调节副翼微调来修正。
2、二通道升降,实现飞机的俯仰、爬升与下降,当爬升与下降的幅度较小,或者暂无无反应可以调节升降微调,当爬升与升降出现相反的反向,可以调节二通道正反开关来实现修正3、三通道油门,控制机体的升降。
乐迪电子F110S定高竞速穿越机使用说明书
F110S 定高竞速穿越机使用说明书V1.2目录前言 (3)售后服务条款 (3)包装清单 (4)技术参数 (4)1. F110S介绍 (5)2. F110S初次飞行练习 (6)2.1 飞行前设备准备 (6)2.2飞行前知识准备 (7)2.2.1认识遥控器 (7)2.2.2认识F110S (7)2.2.3飞行器动作 (8)2.3 实际飞行练习 (12)2.3.1F110S上电 (12)2.3.2飞行时的注意事项 (12)2.3.3接收机对码 (12)2.3.4解锁与加锁 (13)2.3.5飞行模式设置 (14)2.4定高模式下的飞行练习 (15)2.4.1飞机爬升和下降 (15)2.4.2 飞机悬停 (15)2.4.3飞机平面定点飞行 (15)2.4.4 方向 (15)2.5自稳模式下飞行练习 (15)2.6低电压报警 (15)乐迪电子简介 (16)前言非常感谢您购买并使用深圳市乐迪电子有限公司(以下简称“乐迪电子”)研发生产的定高版MINI竞速穿越机F110S。
为了您更好的使用设备并保证安全飞行,请您仔细阅读使用手册。
本手册可能包含不准确的地方,与产品功能及操作不相符的地方,印刷错误,我司将根据产品更新而修改手册,更新的内容将会在首次的新版本中体现,恕不另行通知。
建议:在您阅读本说明书时,请打开遥控器和接收机并将接收机连接F110S,边阅读边操作。
您在阅读这些说明时,如遇到困难请查阅本说明书或致电我们售后(*************)及登陆我司官网或交流平台(,乐迪官方群,乐迪微信公众平台)查看相关问题问答。
乐迪微信公众平台乐迪官方群2群售后服务条款(1)本条款仅适用于深圳市乐迪电子有限公司所生产的产品,乐迪通过其授权经销商销售的产品亦适用本条款。
(2)产品整机保修承诺一年。
(3)在保修期内我司将免费维修和更换产品质量原因造成的零部件损坏;由用户人为因素造成的设备破坏或损坏,我司维修或提供的配件均按成本价计(用户需承担运费及产生的人工维修费用)。
微软模拟飞行10
空投物资SHIFT+D请求加油车SHIFT+F捕获截图V登机桥廊对接/分离CTRL+J飞机控制指令副翼左倾斜数字键盘4副翼右倾斜数字键盘6副翼左配平CTRL+数字键盘4 副翼右配平CTRL+数字键盘6 垂直尾翼左偏航数字键盘0 垂直尾翼右偏航数字键盘ENTER(回车键)垂直尾翼左配平CTRL+数字键盘0垂直尾翼右配平CTRL+数字键盘ENTER(回车键)副翼或垂直尾翼居中数字键盘5水平升降舵向下数字键盘8水平升降舵向上数字键盘2升降舵向下配平数字键盘7 升降舵向上配平数字键盘1 襟翼完全收起F5襟翼缓慢收起F6襟翼缓慢伸出F7襟翼完全伸出F8扰流板/减速板开/关/ (正斜线) 扰流板预位SHIFT+/ (正斜线) 水舵收/放CTRL+W发动机控制指令对于多引擎飞机上,除非你先按下E+引擎号(1-4)选择单个引擎,否则你的操作将对所有引擎生效。
要恢复对所有引擎的控制,先按住E,然后快速连续地按下所有引擎号(E, 1, 2,…等等) 选择引擎E+引擎编号(1-4)选择所有引擎E+1+2+3+4自动启动引擎CTRL+E切断节流阀(节流阀就是油门)F1 反冲力(涡扇发动机/喷气发动机)F2 (按住且保持)降低节流阀F2 or数字键盘3增加节流阀F3 or数字键盘9节流阀最大F4螺旋桨低转速CTRL+F1降低螺旋桨转速CTRL+F2增大螺旋桨转速CTRL+F3螺旋桨高转速CTRL+F4油气混合比设置为慢车低油状态CTRL+SHIFT+F1减小油气混合比CTRL+SHIFT+F2增大油气混合比CTRL+SHIFT+F3油气混合比设置为高油量状态CTRL+SHIFT+F4引擎除冰开/关H磁电机选择M选择主用电池组或者交流发电机SHIFT+M选择喷气发动机启动器J直升机旋翼离合器开/关SHIFT+. (句点)直升机旋翼调节器开/关SHIFT+, (逗点)直升机旋翼制动器开/关SHIFT+B增加选择项目= (等号)逐渐增加选择项目SHIFT+=(等号)逐渐减小选择项目SHIFT+-(减号)减小选择项目- (减号)通用飞机控制指令锁定/释放停机刹车CTRL+.(句点)后推开始/停止SHIFT+P (再按1或2使尾部向右或者向左)使用/释放刹车 . (句点)使用左刹车数字键盘+ (加号)使用右刹车数字键盘- (减号)收/放起落架G尾轮锁定开/关SHIFT+G手动放下起落架(若系统失效)CTRL+G燃料供应开/关CTRL+SHIFT+D子面板显示或隐藏SHIFT + 1到9烟雾系统开/关I整流罩(通风片)(逐渐)开启CTRL+SHIFT+V整流罩(通风片)(逐渐)关闭CTRL+SHIFT+C请求牵引飞机CTRL+SHIFT+Y释放牵引绳索SHIFT+Y舱门选择SHIFT+E(再按1-4以开启/关闭)灯光指令全部灯开/关L机外闪光警示灯开/关O面板灯开/关SHIFT+L降落灯开/关CTRL+L降落灯(下斜)CTRL+SHIFT+数字键盘2降落灯(左斜)CTRL+SHIFT+数字键盘4降落灯(右斜)CTRL+SHIFT+数字键盘6降落灯(上斜)CTRL+SHIFT+数字键盘8降落灯(归正)CTRL+SHIFT+数字键盘5无线电指令ATC窗口(显示/隐藏)` 重点符or SCROLL LOCK(SCROLL LOCK键)VOR 1识别开/关CTRL+1VOR 1识别开/关CTRL+2MKR识别开/关CTRL+3DME识别开/关CTRL+4ADF识别开/关CTRL+5备用频率切换XCOM 无线电选择CNAV 无线电选择NOBS 指示器选择SHIFT+V ADF 选择CTRL+SHIFT+A DME 选择F雷达收发器选择T增加选择项目= (等号)逐渐增加选择项目SHIFT+= (等号)逐渐减少选择项目SHIFT+- (减号)减少选择项目- (减号)自动驾驶指令自动驾驶主开/关Z自动驾驶飞行导向仪开/关CTRL+F自动驾驶机翼水平调整器开/关CTRL+V自动驾驶偏航阻尼器开/关CTRL+D自动驾驶高度保持开/关CTRL+ Z自动驾驶高度选择CTRL+SHIFT+Z自动驾驶航向保持开/关CTRL+H自动驾驶航向选择CTRL+SHIFT+H自动驾驶空速保持开关CTRL+R自动驾驶马赫数保持开/关CTRL+M自动驾驶空速保持开/关SHIFT+R自动驾驶自动油门起飞/重飞(TOGA)模式CTRL+SHIFT+G 自动驾驶NAV1保持开/关CTRL+N自动驾驶近进模式开/关CTRL+A 仪表命令重置高度表B尾气温度指针选择U重置航线指示D空速管加温开关Shift+H关闭观察窗口] (右方括号)建立新的俯视窗口Shift + ] (右方括号)建立新的观察窗口[ (左方括号)循环切换视角(面板,虚拟驾驶舱,塔台,现场)S反响循环切换视角Shift + S视点后移Ctrl + Enter视点前移Ctrl + Backspace视点下移(座位降低)Shift + Backspace视点上移(座位升高)Shift + Enter视点左移Ctrl+Shift + Backspace视点右移Ctrl + Shift + Enter视点重置SPACE仪表面板开关Shift + [ (左方括号)向前看Shift + NP 8向左前看Shift + NP 7向左前上看Ctrl + NP 7向右前看Shift + NP 9向右前上看Ctrl + NP 9向前上看Ctrl + NP 8向后看Shift + NP 2向左后看Shift + NP 1向左后上看Ctrl + NP 1向右后看Shift + NP 3向右后上看Ctrl + NP 3。
JJ-NAN-K、JJ-NAN-R模型无人驾驶遥控飞行器操作手册说明书
other drones, antennas or overhead lines or wires, or airborne toys like kites. • In or near airports or restricted areas. • In adverse conditions such as strong winds, temperature extremes, rain,
Transmitter Range: The transmitter range of ight is 75 feet (25 m). The transmitter will lose control of the drone if the drone ies beyond the range. Flight Time: The drone can y in a light breeze, if it is fully charged and within the range of the transmitter. Please recharge the drone’s battery if it does not y. Warning: Strong winds may limit control. In very windy conditions, your drone may y out of range of the transmitter, and become lost and/or damaged.
Drones are sophisticated precision devices capable of complex ight maneuvers. Please read these safety instructions before using your drone. Failure to operate your drone safely can degrade its performance and cause harm to people, animals, or property. Please do not y: • Near or around obstacles such as birds or pets, airplanes, helicopters,
RG-10 远程控制器使用说明书
TABLE OF CONTENTSHANDLING THE REMOTE CONTROLLER (2)FUNCTION BUTTONS (3)REMOTE CONTROLLERS (4)SERVICE INQUIRY CODES (6)INTRODUCTIONThis service manual provides the necessary information to use the service functions on the RG10 series wireless remote controller. Use the TABLE OF CONTENTS to locate a desired topic.Fig. 1 — RG10A(B2S)/BGEFU1 Fig. 2 — RG10B(B1)/BGEFU1Fig. 3 — RG10L(2HS)/BGEFU1Fig. 4 — RG10A5(B1)/BGCEFU1Fig. 5 — RG10A4(B1)/BGEFU1 NOTE:Remote part number can be found on the back of the wireless remote.TYPE: RG10*********Specifications subject to change without notice.HANDLING THE REMOTE CONTROLLERRemote Controller LocationKeep the remote controller within a distance where its signals can reach the indoor unit’s receiver (not to exceed 26 ft. (8m)).Fig. 6 — Remote Controller LocationReplacing BatteriesThe remote controller uses two alkaline dry batteries (AAA).1.Slide the battery compartment cover off, according to the arrowdirection, then replace the old batteries with new batteries.2.Insert the new batteries. Ensure the batteries are installed correctly,based on their (+) and (-) polarities.3.Slide the battery compartment cover back into position.NOTES:•Do not mix old and new batteries or batteries of different types.•Do not leave the batteries in the remote controller if the remote is not going to be used for 2 or 3 months.•Dispose old batteries in the appropriate recycle bins.Fig. 7 — Remove the back coverRemote Controller SpecificationTable 1 — Parts ListThe air conditioner will not operate if curtains, doors or other materials block the signals from the remote controller to the indoor unit.Prevent any liquid from falling on or into the remote controller. Do not expose the remote controller to direct sunlight or heat.If the infrared signal receiver on the indoor unit is exposed to directsunlight, the air conditioner may not function as designed. Use curtains to prevent sunlight from shining directly on the air conditioner.If other electrical appliances respond to the remote controller, either move the appliances or consult your local dealer.MODELSRG10L(2HS)/BGEFU1RG10A(B2S)/BGEFU1RG10B(B1)/BGEFU1RG10A5(B1)/BGCEFU1RG10A4(B1)/BGEFU1Rated Voltage 3.0V (dry batteries AAA)Signal Receiving Range26 ft. (8m)Environment23°F (-5°C) ~ 140°F (60°C)FUNCTION BUTTONSBefore you use your new system, familiarize yourself with the remote controller. The following is a brief introduction of the remote controller.Fig. 8 — Remote ControllerNOTE: To alternate between ︒C and ︒F, buttons must be pressed gently, otherwise the remote will not recognize the command.REMOTE CONTROLLERSFig. 9 — RG10A(B2S)/BGEFU1 Fig. 10 — RG10B(B1)/BGEFU1Fig. 11 — RG10A5(B1)/BGCEFU1 Fig. 12 — RG10A4(B1)/BGEFU1Fig. 13 — RG10L(2HS)/BGEFU1Accessing the INQUIRY Mode1.Simultaneously press ON/OFF and FAN SPEED for 8 seconds.a.The remote is now in the INQUIRY mode.b.The remote control remains in the INQUIRY mode for 1minute if no other button is pressed.c.While in the INQUIRY Mode, the remote display cancels allicons except AUTO, COOL, DRY, HEAT and BatteryStrength.d.The remote control digital display defaults to 0 upon enteringthe INQUIRY mode.e.In the INQUIRY mode, each digital code (from 0 to 30) isaccessed by pressing the UP or DOWN arrows .f.The INQUIRY information appears on the high wall indoorunit display in approximately 1 second after accessing thedigital code. Press OK to send as well.g.In the INQUIRY mode, all other buttons and operations areinvalid except for UP, DOWN and OK or the operation to exitthe INQUIRY mode.Remote Controller Service Mode FunctionsNote: While in the INQUIRY mode, refer to the followinginstructions to enter SERVICE mode for the applicable codes. Below is a list of INQUIRY modes and serviceable functions.a.Before using the remote’s service functions, turn OFF theindoor unit with the remote.b.Turn OFF the power to the outdoor unit for 2 minutes. Turnthe power back ON.c.Remove the batteries from the remote and wait for the remotescreen to clear. Within 30 seconds of replacing the batteries, useUP or DOWN to scroll through the INQUIRY modes.d.To enter the SERVICE mode for an applicable INQUIRYmode, press ON/OFF for 2 seconds.e.After SERVICE adjustments have been made, press ON/OFFfor 2 seconds to exit the SERVICE mode and return to theINQUIRY mode.f.Once operations in the INQUIRY mode are complete, pressON/OFF and FAN SPEED for 2 seconds to exit. All buttonson the remote controller are disabled for 60 secondsg.To ensure changes are locked, power down the outdoor unit forthree (3) minutes after all the service mode changes are made.Read and understand the function changes you wish to make inadvance. Neither the indoor unit nor the remote control displays the new level of any of the changes made while in the INQUIRY mode. Be sure to document the changes you've made to the system's programming using the INQUIRY mode. Once you complete the changes and exit the INQUIRY mode, if additional changes are made to the programming, the system will not show the new previously set level(s).For example, when you first access CODE 22, Heating Temperature Compensation, the remote control display defaults to 0. If you change it to -2, then save and exit out of the INQUIRY mode, the next time someone goes back in and accesses CODE 22, the remote’s display will not display -2. Instead it will show 0 because that's the default. If you are unsure of the previous changes, due to a lack of documentation, you could press the DOWN symbol to the maximum change range of -6, then press the UP symbol until you are back to 0, and make the new adjustments accordingly. Be sure to document the changes when you are done.SERVICE INQUIRY CODESTable 1 —Service and Inquiry Codes(Sheet 1 of 3)CODE INQUIRYINQUIRYDESCRIPTIONSERVICE/INQUIRYFOR SERVICE,PRESS ON/OFF FOR 2 SECONDS TO:SELECTION GUIDE/NOTES0Error Code Check SERVICE ANDINQUIRY Review error memory function. Displays “Ch”. Press OK to send the query error code memory.1T1 Indoor AmbientTemperature SERVICE ANDINQUIRYChange the power off memory selection. Thisfeature determines whether the unit memorizesthe set conditions prior to a power failure.Displays “Ch”. Press OK to return the currentsetting. Press UP or DOWN to cycle throughsettings 1 and 0.0. Memory settings are off1. Memory settings are on2T2Indoor CoilTemperature SERVICE ANDINQUIRYChange the option to control the indoor fanoperation after reaching the set temperature.Displays “Ch”. Press OK to return the currentsetting. Press UP or DOWN to cycle throughsettings 1 through 11. Next, press OK toconfirm the selection.1. Stop the fan2. Minimum fan speed3. Set speed4. intermittent fan-off 4 minutes/on 1 min5. Terminate after run time of 10 mins6. Terminate after run time of 15 mins7. Terminate after run time of 20 mins8. Terminate after run time of 30 mins9. Terminate after run time of 40 mins10. Terminate after run time of 50 mins11. Terminate after run time of 60 mins3T3Outdoor CoilTemperature SERVICE ANDINQUIRYChange the option to control the COOLING andHEATING modes available for use on the unit.Press UP or DOWN to cycle through thesettings CH, HH, CC or nU. Press OK toconfirm.CH - COOLING and HEATING: AUTO,COOLING, DRY, HEATING and FANmodes availableHH - HEATING Only: HEATING and FANmodes availableCC - COOLING without AUTO: COOLING,DRY and FAN modes availablenU - COOLING and HEATING withoutAUTO: COOLING, DRY, HEATING andFAN modes available4T4Outdoor AmbientTemperature SERVICE ANDINQUIRYChange the selection of the lowest settemperature.NOTE: Temperature range is 60°F ~ 75°F(16°C ~ 24°C).Press UP or DOWN to select temperaturesetting. Press OK to confirm.5TP(T5)CompressorDischargeTemperatureSERVICE ANDINQUIRYChange the selection of the highest settemperature.NOTE: Temperature range is 77°F ~ 86°F(25°C ~ 30°C).Press UP or DOWN to select the temperaturesetting. Press OK to confirm.6FT Compressortarget frequency INQUIRY ONLY7Fr Compressor runfrequency INQUIRY ONLY8dL Unit amperage SERVICE ANDINQUIRY Change the static pressure selection.Displays “Ch”. Press OK to return the currentsetting. Press UP or DOWN to cycle throughsettings 0 through 4 or AF (constant air volumetest). Press OK to confirm.Only available on ducted/40MBAA units.Refer to the ducted/40MBAA installationmanuals for Fan performances at varyingstatic pressures for airflow settings.9Uo Unit voltage INQUIRY ONLY10Sn Capacity test(special usage)INQUIRY ONLY 11----Not available INQUIRY ONLY12Pr Indoor fan speed SERVICE ANDINQUIRY Change the heating frequency lower limit selection.Displays “Ch”. Press OK to return the current heating minimum frequency limit selection code. Press UP and DOWN to select the minimum heating frequency limit value. Press OK to confirm.13LrElectronicExpansion Valve(EEV) openingSERVICE ANDINQUIRYChange the maximum operating frequency ofT4 Cooling Only intervals.Displays “Ch”. Press OK to return the currentoperating frequency code of the T4 CoolingOnly intervals. Press UP or DOWN to select thelimit value and then press OK.14ir Indoor fan speed INQUIRY ONLY Multiple the display number by 8 tocalculate the actual RPM15HU Relative Humidity INQUIRY ONLY Available in INQUIRY mode for the high tier/new mid tier units that have an RH sensor.16TTSetpointcompensationtemperatureINQUIRY ONLY17dTDustconcentration(not used)INQUIRY ONLY18WIFI Wi-Fi signalstrength INQUIRY ONLY The value is measured in dBm. The display values are 0, 1, 2, 3 and 4 (4 is the highest and 0 is the lowest)19----Not available SERVICE ONLY Change the cooling frequency upper limitselection in Hz.Displays “Ch”. Press OK to return the currentfrequency limit. Press UP or DOWN to selectthe preferred frequency upper limit value (inHz). Press OK to confirm.For example, the unit may be factory set tofluctuate between 40 and 84 Hz. If set to50, the unit will now be limited to operatingbetween 40 and 50 Hz.20oT Indoor fan targetfrequency SERVICE ANDINQUIRYChange the heating frequency upper limitselection in Hz.Displays “Ch”; press OK to return the currentfrequency limit. Press UP or DOWN to selectthe preferred frequency upper limit value (inHz). Press OK to confirm.For example, the unit may be factory set tofluctuate between 40 and 84 Hz. If set to50, the unit is limited to operating between40 and 50 Hz.21----CoolingTemperatureCompensationSERVICE ONLYChange the cooling temperature compensationvalue.Displays “Ch”. Press OK to return the currenttemperature compensation value code. PressUP or DOWN to select the cooling temperaturedifference compensation value.Press OK to confirm.This setting is used to adjust fortemperature differences due to the heightof the unit install. The offset value can beset at a range of -6° to +6°.22----HeatingTemperatureCompensationSERVICE ONLYChange the heating temperature compensationvalue.Displays “Ch”. Press OK to return the currenttemperature compensation value code. PressUP or DOWN to select the heating temperaturedifference compensation value.Press OK to confirm.This setting is used to adjust fortemperature differences due to the heightof unit installation. The offset value can beset at a range of -6° to +6°.23----Maximum CoolingFan Speed SERVICE ONLY Change the maximum cooling fan speed settingas it relates to RPM.Displays “Ch”. Press OK to return the currentmaximum cooling fan speed setting. Press UPor DOWN to select the maximum cooling fanspeed. Press OK to confirm.For example, the unit may be factory set tofluctuate between 300 and 1000 RPM. Ifset to 800, the unit is limited to operatingbetween 300 and 800 RPM.© 2021 Carrier. All rights reserved.A Carrier company Edition Date: 10/21Catalog No: SG-RG10-01Replaces: NEW24----Minimum CoolingFan Speed SERVICE ONLY Change the minimum cooling fan speed settingas it relates to RPM.NOTE: Changing this setting is notrecommended as it may trigger unitprotection protocols.Displays “Ch”. Press OK to return the currentminimum cooling fan speed setting. Press UPor DOWN to select the minimum cooling fanspeed. Press OK to confirm.For example, the unit may be factory set tofluctuate between 300 and 1000 RPM. Ifset to 500, the unit is limited to operatingbetween 500 and 1000 RPM.25----Maximum HeatingFan Speed SERVICE ONLY Change the maximum heating fan speedsetting as it relates to RPM.Displays “Ch”. Press OK to return the currentmaximum heating fan speed setting. Press UPor DOWN to select the maximum heating fanspeed. Press OK to confirm.For example, the unit may be factory set tofluctuate between 300 and 1000 RPM. Ifset to 800, the unit will now be limited tooperating between 300 and 800 RPM.26----Minimum HeatingFan Speed SERVICE ONLY Change the minimum heating fan speed settingas it relates to RPM.Note: Changing this setting is notrecommended as it may trigger unitprotection protocols.Displays “Ch”. Press OK to return the currentminimum heating fan speed setting. Press UPor DOWN to select the minimum heating fanspeed. Press OK to confirm.For example, the unit may be factory set tofluctuate between 300 and 1000 RPM. Ifset to 500, the unit is limited to operatingbetween 500 and 1000 RPM.27----Not available 28----Not available 29----Not available 30----Not available。