Canon CP910佳能照片打印机操作指引
Canon 打印机用户手册.pdf_1701924896.1765997说明书

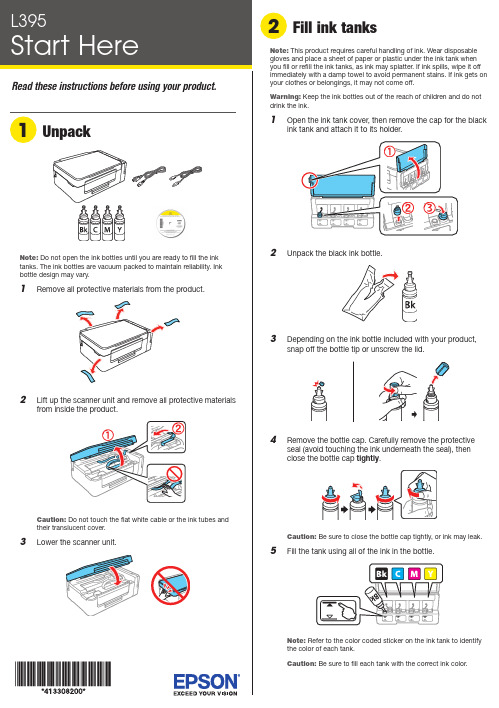
Do not open the ink bottles until you are ready to fill the inktanks. The ink bottles are vacuum packed to maintain reliability. Ink emove all protective materials from the product.Note:1 O 2 U 3 D 4 RC 5 F12 P ress and hold the button for 3 seconds untilthe power light starts flashing, to begin charging theink. Ink charging takes approximately 20 minutes. Ink charging is complete when the power light stopsflashing.20 minutesNote: The ink bottles included with the printer are designedfor printer setup and not for resale. After some ink is used forcharging, the rest is available for printing.Caution: Do not turn off the product or load paper while the product is charging or you’ll waste ink.See the online User’s Guide for information about loadingcapacity and available paper types and sizes.1 M ake sure the product is not charging. Then flip thefeeder guard forward, raise the paper support, and tilt itbackwards slightly.2 Slide the edge guide to the left.3 L6 C arefully seal the bottle using the reverse side of thebottle tip or screw on the lid for proper disposal.7 R8 R9 Close the ink tank cover.10 C onnect the power cord to the back of the product and toan electrical outlet.Caution: Do not connect to your computer yet.11 R aise the control panel and turn on the product. Wait forthe power light to stop flashing, then follow step 12 tocontinue ink charging.Note: If all the product lights are flashing, turn off the product and check that no protective material has been left inside the product.Caution: Do not lower the control panel without first squeezingthe release bar underneath or you may damage the product.Mobile printingConnect wirelessly from your smartphone, tablet, or computer.Print documents and photos from across the room or around the world:• Print directly from a smartphone or tablet using iOS orAndroid™ with Epson iPrint™. Simply connect your printer and device to the same network and tap the action icon to select the print option.• Print remotely with Epson Connect™. See your online User’s Guide for instructions or learn more at .jm/connect .Any problems?Network setup was unsuccessful• Make sure you select the right network name (SSID).• Restart your router (turn it off and then on), then try to connect to it again.• The printer can only connect to a network that supports 2.4 GHz connections. If your router offers both 2.4 GHz and 5 GHz connections, make sure the 2.4 GHz network is enabled.• If you see a firewall alert message, click Unblock or Allow to let setup continue.• If your network has security enabled, make sure you enter your network password (WEP key or WPA passphrase) correctly. Be sure to enter your password in the correct case.There are lines or incorrect colors in my printoutsRun a nozzle check to see if any of the print head nozzles are clogged. Then clean the print head, if necessary. See the online User’s Guide for more information.Setup is unable to find my product after connecting itwith a USB cableMake sure the product is on and securely connected as shown:4 S5 P Note: If your computer does not have a CD/DVD drive or you are using a Mac, an Internet connection is required to obtain the product software.1 M ake sure the product is NOT CONNECTED to yourcomputer.Windows ®: If you see a Found New Hardware screen, click Cancel and disconnect the USB cable.2I nsert the product CD or download and run your product’ssoftware package. For the latest software, visit: .jm/support/L396.3 F ollow the instructions on the computer screen to run thesetup program.4 W hen you see the Select Your Connection screen, selectone of the following:• Wireless connectionIn most cases, the software installer automatically attempts to set up your wireless connection. If setup is unsuccessful, you may need to enter your network name (SSID) and password.• Direct USB connectionM ake sure you have the USB cable ready.。
佳能喷墨打印机使用说明

佳能喷墨打印机使用说明
1.连供仓与打印机位于同一水平面
2.使用过程中连供仓小塞应打开(小塞口是压力仓,大塞口是墨水
仓)
3.压力仓内不能有墨水(如有墨水应斜着把墨水放到墨水仓中,注
意压力仓和墨水仓下面是通的)
4.运输过程中要夹上夹子,这样墨水盒就可以高位置放置。
5.打印机有2个开关,上面是电源开关,注意每次使用机器都要冲
洗,按住下面按键直到电源开关闪烁2次后松手,打印机自动清洗,按住下面的按键等电源开关闪一次放手,则打印测试页。
佳能打印机设置调整步骤

说明:本文档中的设置方法,只针对Canon iR C2880/C3380 UFR II这台打印机。
一 客户端打印机设置步骤
1.在开始菜单中选择“控制面板”,双击“打印机和传真”图标。
2.右键点击“Canon iR C2880/C3380 UFR II”这台打印机,选择“属性”
3. 在出现的打印机属性窗口中,点击上方的“设备设置”标签
4. 勾选上“作业统计”选项,然后点击“作业统计”右边的“设置(I)…”按钮
5.在弹出的ID/密码设置对话框中,勾选上“允许设置密码”,输入所属部门的ID号和密码。
3.点击“打印ห้องสมุดไป่ตู้选项”按钮
4.在弹出的对话框中,点击上方的“质量”标签,然后点击“色彩模式”下拉选择框,选择“黑白”,最后点击“确定”。
5.
6.如果要打印彩色的文档,则把步骤4中的“色彩模式”改为“彩色”即可。打印完成后,请记得再改回“黑白”。
7..
8.
9.
6. 点击“检验”按钮检查输入账号的有效性。如果弹出“指定的ID和密码正确”,则点击三次“确定”按钮,完成整个设置步骤;如果弹出“ID和/或 密码不正确”,请联系管理部。
二默认只打印黑白文档的设置步骤
1.开始菜单中选择“控制面板”,双击“打印机和传真”图标。
2.右键点击“Canon iR C2880/C3380 UFR II”这台打印机,选择“属性”
Canon 打印机用户手册.pdf_1701926357.803357说明书
Do not open the ink bottles until you are ready to fill the inktanks. The ink bottles are vacuum packed to maintain reliability. Ink emove all protective materials from the product.Note:1 O 2 U 3 D 4 RC 5 F12 P ress and hold the button for 3 seconds untilthe power light starts flashing, to begin charging theink. Ink charging takes approximately 20 minutes. Ink charging is complete when the power light stopsflashing.20 minutesNote: The ink bottles included with the printer are designed for printer setup and not for resale. After some ink is used for charging, the rest is available for printing.Caution:Do not turn off the product or load paper while the product is charging or you’ll waste ink.1 M ake sure the product is not charging. Then flip thefeeder guard forward, raise the paper support, and tilt itbackwards slightly.2 Slide the edge guide to the left.3 L4 S6 C arefully seal the bottle using the reverse side of thebottle tip or screw on the lid for proper disposal.789 C lose the ink tank cover.10 C onnect the power cord to the back of the product and toan electrical outlet.C aution: Do not connect to your computer yet.11 R aise the control panel and turn on the product. Wait forthe power light to stop flashing, then follow step 12 tocontinue ink charging.Note:If all the product lights are flashing, turn off the product and check that no protective material has been left inside the product.Caution: Do not lower the control panel without first squeezing the release bar underneath or you may damage the product.Any problems?Network setup was unsuccessful• For detailed instructions on setting up your product on awireless network, see the online Wireless Installation Guide .• Make sure you select the right network name (SSID).• Restart your router (turn it off and then on), then try to connect to it again.• The printer can only connect to a network that supports 2.4 GHz connections. If your router offers both 2.4 GHz and 5 GHz connections, make sure the 2.4 GHz network is enabled.• If you see a firewall alert message, click Unblock or Allow to let setup continue.• If your network has security enabled, make sure you enter your network password (WEP key or WPA passphrase) correctly. Be sure to enter your password in the correct case.There are lines or incorrect colors in my printoutsRun a nozzle check to see if any of the print head nozzles areclogged. Then clean the print head, if necessary. See the online User’s Guide for more information.Setup is unable to find my product after connecting it with a USB cableMake sure the product is on and securely connected as shown:Error indicatorsIf you see one of the error indicators below, follow the steps here to proceed:5 Pull out the output tray and raise the paper stopper.Note: If your computer does not have a CD/DVD drive or you are using a Mac, an Internet connection is required to obtain the product software.1 M ake sure the product is NOT CONNECTED to yourcomputer.W indows ®: If you see a Found New Hardware screen, click Cancel and disconnect the USB cable.2I nsert the product CD or download and run your product’ssoftware package:.jm/support/L3953 F ollow the instructions on the screen to run the setupprogram.4 W hen you see the Select Your Connection screen, selectone of the following:• Wireless connectionIn most cases, the software installer automatically attempts to set up your wireless connection. If setup is unsuccessful, you may need to enter your network name (SSID) and password.• Direct USB connectionM ake sure you have the USB cable ready.Mobile printing optionsConnect wirelessly from your smartphone, tablet, or computer.Print documents and photos from across the room or around the world. See your online User’s Guide for instruction or learn more at .jm/connect .。
佳能复印机操作说明
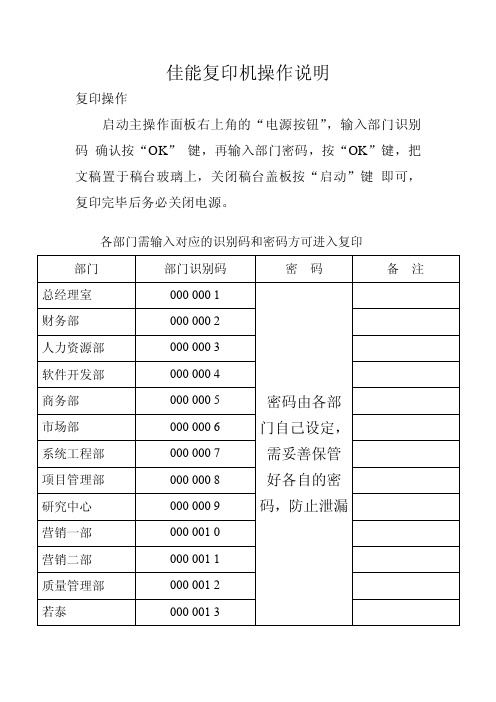
复印操作 启动主操作面板右上角的“电源按钮”,输入部门识别
码 确认按“OK” 键,再输入部门密码,按“OK”键,把 文稿置于稿台玻璃上,关闭稿台盖板按“启动”键 即可, 复印完毕后务必关闭电源。
各部门需输入对应的识别码和密码方可进入复印
部门
部门识别码
密码
总经理室
000 000 1
财务部
000 001 1
质量管理部
0设置 首先打开开始菜单,点击打印机和传真,选中默认的打印 机 Canon IR2018 进行设置,右击属性
选择设备设置菜单,选中作业统计,设置部门识别码和密 码即可打印
000 000 2
人力资源部
000 000 3
软件开发部
000 000 4
商务部
000 000 5
密码由各部
市场部
000 000 6
门自己设定,
系统工程部 项目管理部 研究中心
000 000 7 000 000 8 000 000 9
需妥善保管 好各自的密 码,防止泄漏
营销一部
000 001 0
营销二部
佳能打印机手册
预先注册部门 ID 和密码 . . . . . . . . . . . . . . . . . . . . . . . . . . . . . . . . . . . . . . 4-10 每次扫描时输入部门 ID 和密码 . . . . . . . . . . . . . . . . . . . . . . . . . . . . . . . . 4-11
Байду номын сангаас入门
安装软件. . . . . . . . . . . . . . . . . . . . . . . . . . . . . . . . . . . . . . . . . . . . . . . . . . . . . . . . .2-2 卸载过程. . . . . . . . . . . . . . . . . . . . . . . . . . . . . . . . . . . . . . . . . . . . . . . . . . . . . . . . .2-6
重要功能和设置汇总 . . . . . . . . . . . . . . . . . . . . . . . . . . . . . . . . . . . . . . . . . . . . . . 4-13 基本设置 . . . . . . . . . . . . . . . . . . . . . . . . . . . . . . . . . . . . . . . . . . . . . . . . . . . . 4-13 图像处理设置 . . . . . . . . . . . . . . . . . . . . . . . . . . . . . . . . . . . . . . . . . . . . . . . . . 4-13 从输送器扫描的设置 . . . . . . . . . . . . . . . . . . . . . . . . . . . . . . . . . . . . . . . . . . . 4-14 部门 ID 管理设置 . . . . . . . . . . . . . . . . . . . . . . . . . . . . . . . . . . . . . . . . . . . . . . 4-14 故障诊断 . . . . . . . . . . . . . . . . . . . . . . . . . . . . . . . . . . . . . . . . . . . . . . . . . . . . 4-15
Canon激光打印机简单说明书
Canon激光打印机简单说明书Canon激光打印机简单说明书章节一、产品介绍本章节主要介绍Canon激光打印机的基本信息和特点。
1.1 产品概述本款Canon激光打印机系列提供高质量的打印功能,适用于个人用户和小型办公室。
它具有快速打印速度、高分辨率和稳定性等特点,简化了打印任务,提高了工作效率。
1.2 主要特点该打印机系列的主要特点包括:- 高速打印:每分钟可打印多张页面;- 高分辨率:打印出的文档清晰、细腻;- 网络打印:可通过局域网连接多台电脑进行打印;- 操作简便:直观的操作界面,易于使用;- 节能环保:采用先进的节能技术,降低能源消耗。
1.3 产品规格以下是本款Canon激光打印机的基本规格:- 打印速度:每分钟页;- 打印分辨率: dpi;- 打印介质尺寸:A4、A5、B5等;- 连接方式:USB、有线网络等。
章节二、使用前的准备在开始使用Canon激光打印机之前,需要进行一些准备工作。
2.1确认包装内容打开打印机包装盒,确认以下物品是否齐全:- Canon激光打印机本体;- 电源线;- USB数据线;- 安装光盘;- 说明书。
2.2硬件连接将打印机连接到电源,并使用USB数据线将打印机与电脑或网络连接好。
2.3软件安装插入安装光盘,根据提示进行驱动程序和相关软件的安装。
章节三、操作和功能介绍本章节详细介绍Canon激光打印机的各项操作和功能。
3.1 打印操作使用打印机驱动程序进行打印前,确认以下事项:1、打开电脑和打印机电源;2、确认打印机与电脑的连接正常;3、打开需要打印的文件;4、配置打印机的打印参数(如纸张尺寸,打印质量);5、打印按钮。
3.2 打印设置可以根据需要对打印设置进行调整,例如纸张尺寸、打印质量、双面打印等。
3.3 扫描功能Canon激光打印机还具备扫描功能,用户可通过操作面板或电脑上的扫描软件进行扫描。
3.4 网络打印如果打印机连接到一个局域网,用户可以通过网络将多台电脑连接到打印机进行打印。
打印机操作方法怎么使用
打印机操作方法怎么使用
以下是使用打印机的一般步骤:
1. 确认打印机的电源已打开,纸张已放入纸盒或纸槽中。
2. 将需要打印的文件保存在计算机中,确保打印机与计算机连接正常(可以通过USB线或网络连接)。
3. 打开文档,点击文件菜单中的“打印”选项(或按Ctrl+P快捷键)。
4. 在弹出的打印对话框中,选择打印机名称。
5. 根据需要选择打印选项,如打印的页面范围、打印份数、双面打印等。
6. 点击“打印”按钮开始打印。
7. 在打印过程中,可以通过打印队列查看或取消正在进行的打印任务。
8. 打印完成后,检查打印出的文件是否与预期一致。
请注意,不同型号的打印机可能在操作上有些差异,建议参考具体打印机的说明书或生产商的指南以获取更详细的操作方法。
CANON LBP-910打印机 菜单全是日文
CANON LBP-910打印机菜单全是日文, 打印机打印墨浓度怎样设置设置悬赏分:30 - 解决时间:2010-6-26 12:35CANON LBP-910打印机菜单全是日文, 打印机打印墨浓度怎样设置设置提问者:匿名最佳答案1、开机正常预热后,按灭联机灯.2、按→键一下.再按↓键一下.3、按→键9下, (出现:=二木丿]) 再按↓键一下.4、按→键一下(见到:ENGLISH), 再按↓键一下,立即变回英文!然后就可以设置浓度了我的打印机只能打印A4R和B5R,其它纸如A3、B4、A4、B5等都不打印,请问怎样恢复出厂设置,或怎样设置才能正常打印,请高手帮我解决提问者:ww_qqc - 一级答复共1 条关于纸张规格的调节,要想正确的打印出文档,电脑输出和打印机设置的纸张规格必须一致,否则,打印出来的文档可能就不合要求。
先设置打印机,按灭联机灯(就是按一下最大的那个指示灯),然后按住那个扁平按键八秒钟(其它的按键都是圆的),屏幕显示"tray paper size" 下面的等号后面就是当时纸张规格,此时松开扁平按键,然后再按下,纸张规格就改变了,按一下,改变一下,直到自己需要的规格出现,然后再按一下右边最下面的那个按键(下面标有"实行"的那个)就OK 了。
再设置电脑打印输出,点击打印后,选择打印机(如果装有多台打印机)为"Canon LASER SHOT LBP-730",然后点属性,在"Page Setup"中的"Page Size"后面的下拉列表中选择需要的纸张规格(注意和打印机设置相同的纸张规格),就可以了,还有就是打印前注意一下打印输出的方向,一般A4 及以下规格都是横向输出,B4及以上规格都调整为竖向输出。
[分享]日本佳能730打印机使用说明书日本佳能LBP730打印机使用说明书 LBP730打印机使用说明书本机为日本原装机,电压为110V低压,使用前请接好110V电源转换器和插好打印线。
打印机使用者指南使用说明书
从智能手机或相机进行无线打印 ... 44
在SELPHY上设置Wi-Fi........................ 44 从智能手机打印 .................................... 46 从相机打印 ............................................ 49 后续打印 ................................................ 50 其他Wi-Fi功能 ....................................... 51 将打印机连接至接入点 ........................ 53 打印图像(Windows) .............................. 58 打印图像(Mac OS) ................................ 60 打印图像(Windows) .............................. 62 打印图像(Mac OS) ................................ 64
本指南编辑常规
• 在本指南中,产品称为“SELPHY”或“打印机”。 • 本指南中用图标表示SELPHY的按钮。有关详细信息,请参阅“控制部件” (= 12)。 • 屏幕上显示的文字或图标以方括号([ ])表示。 • :需要了解的重要信息 • :有关更专业使用的注意事项和提示 • =xx:相关信息页(本例中,“xx”代表页码。) • 本指南以打印机处于默认设置为前提进行说明。 • 为方便起见,将所有支持的存储卡简称为“存储卡”。 • 为方便起见,本指南中将智能手机、平板电脑和其他兼容的设备统称 为“智能手机”。
- 1、下载文档前请自行甄别文档内容的完整性,平台不提供额外的编辑、内容补充、找答案等附加服务。
- 2、"仅部分预览"的文档,不可在线预览部分如存在完整性等问题,可反馈申请退款(可完整预览的文档不适用该条件!)。
- 3、如文档侵犯您的权益,请联系客服反馈,我们会尽快为您处理(人工客服工作时间:9:00-18:30)。
Canon CP910照片打印指引
第一步:配置 Android™ 操作系统版本.
第二步:在Android™智能手机上安装Canon Easy-PhotoPrint.
第三步:将Android™智能手机与Selphy相连接。
在智能手机的 Wi-Fi 设置中,选择在打印机上显示的 SSID(CP910)。
将在打印机上显示的密码输入到密码字段中。
第四步:使用Slephy从Android™智能手机里选取一张照片,点击
打印接下来就等着您的美照吧!
HP3630照片打印指引
第一步:手机下载HP照片打印软件
第二步:连接wifi DIRECT-43-HP DeskJet 3630 Series
密码:12345678
第三步:在HP照片打印软件里选取一张照片,点击打印接下来就等
着您的美照吧!
HP3630照片打印指引
第一步:手机下载HP照片打印软件
第二步:连接wifi DIRECT-43-HP DeskJet 3630 Series
密码:12345678
第三步:在HP照片打印软件里选取一张照片,点击打印接下来就等
着您的美照吧!