佳能CP910使用说明书
Canon 打印机用户手册.pdf_1701924896.1765997说明书

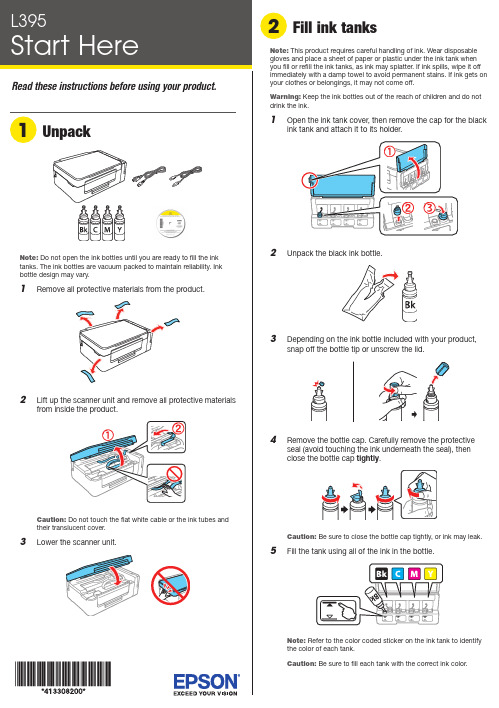
Do not open the ink bottles until you are ready to fill the inktanks. The ink bottles are vacuum packed to maintain reliability. Ink emove all protective materials from the product.Note:1 O 2 U 3 D 4 RC 5 F12 P ress and hold the button for 3 seconds untilthe power light starts flashing, to begin charging theink. Ink charging takes approximately 20 minutes. Ink charging is complete when the power light stopsflashing.20 minutesNote: The ink bottles included with the printer are designedfor printer setup and not for resale. After some ink is used forcharging, the rest is available for printing.Caution: Do not turn off the product or load paper while the product is charging or you’ll waste ink.See the online User’s Guide for information about loadingcapacity and available paper types and sizes.1 M ake sure the product is not charging. Then flip thefeeder guard forward, raise the paper support, and tilt itbackwards slightly.2 Slide the edge guide to the left.3 L6 C arefully seal the bottle using the reverse side of thebottle tip or screw on the lid for proper disposal.7 R8 R9 Close the ink tank cover.10 C onnect the power cord to the back of the product and toan electrical outlet.Caution: Do not connect to your computer yet.11 R aise the control panel and turn on the product. Wait forthe power light to stop flashing, then follow step 12 tocontinue ink charging.Note: If all the product lights are flashing, turn off the product and check that no protective material has been left inside the product.Caution: Do not lower the control panel without first squeezingthe release bar underneath or you may damage the product.Mobile printingConnect wirelessly from your smartphone, tablet, or computer.Print documents and photos from across the room or around the world:• Print directly from a smartphone or tablet using iOS orAndroid™ with Epson iPrint™. Simply connect your printer and device to the same network and tap the action icon to select the print option.• Print remotely with Epson Connect™. See your online User’s Guide for instructions or learn more at .jm/connect .Any problems?Network setup was unsuccessful• Make sure you select the right network name (SSID).• Restart your router (turn it off and then on), then try to connect to it again.• The printer can only connect to a network that supports 2.4 GHz connections. If your router offers both 2.4 GHz and 5 GHz connections, make sure the 2.4 GHz network is enabled.• If you see a firewall alert message, click Unblock or Allow to let setup continue.• If your network has security enabled, make sure you enter your network password (WEP key or WPA passphrase) correctly. Be sure to enter your password in the correct case.There are lines or incorrect colors in my printoutsRun a nozzle check to see if any of the print head nozzles are clogged. Then clean the print head, if necessary. See the online User’s Guide for more information.Setup is unable to find my product after connecting itwith a USB cableMake sure the product is on and securely connected as shown:4 S5 P Note: If your computer does not have a CD/DVD drive or you are using a Mac, an Internet connection is required to obtain the product software.1 M ake sure the product is NOT CONNECTED to yourcomputer.Windows ®: If you see a Found New Hardware screen, click Cancel and disconnect the USB cable.2I nsert the product CD or download and run your product’ssoftware package. For the latest software, visit: .jm/support/L396.3 F ollow the instructions on the computer screen to run thesetup program.4 W hen you see the Select Your Connection screen, selectone of the following:• Wireless connectionIn most cases, the software installer automatically attempts to set up your wireless connection. If setup is unsuccessful, you may need to enter your network name (SSID) and password.• Direct USB connectionM ake sure you have the USB cable ready.。
OKI 910DN彩色激光打印机

目录
02 基本参数 04 介质规格
目录
05 耗材
07 激光打印机附件
06 其它参数
OKI C910dn彩色A4幅面打印速度为每分钟36页,单色每分钟40页,达到这一领域中主流应用水平,C910dn 彩色和单色首页输出时间也达到了10.5秒和9秒。C910dn物理分辨率600×1200dpi,图像增强模式下可以达到 2400dpi。另外,C910dn在打印介质的适应能力上有了新的突破,基于LED技术的水平成像方式,支持单页打印重 量范围64-300gsm,这在同类产品中是极为罕见的,双面打印重量范围也提升至64-188gsm。同时,C910dn的最 大打印幅面为328mm×1200mm,能够为图文输出和大型办公用户带来更多的应用。
激光打印机附件
包装清单:主机x1 耗材x1 电源线x1 用户手册x1 建议安装手册x1 安装软件光盘x1 保修卡x1 可选附件:纸盒x2 大容量纸盒x1 40GB硬盘x1 256MB/512MB内存x1
谢谢观看
介质规格
介质尺寸:A3,A3NOBI,A3WIDE,B4,A4,B5,A5,A6 介质重量:64-300gsm 进纸盒容量:标配纸盒:530页 多功能进纸器:230页 选配第2/3纸盒:530页 选配大容量纸盒:1590页 出纸盒容量:正面朝下500页,正面朝上250页
耗材
耗材类型:鼓粉分离 墨粉盒型号:OKIC910 墨粉盒容量:标准页,随机5000页(A4幅面5%的覆盖率) 硒鼓型号:OKIC910 硒鼓寿命:页(A4幅面,3页/作业)
其它参数
产品尺寸:599×625×471mm 系统平台:Windows2000/XP/Server2003/Vista/Server2008 MacOSX 电源电压:AC220-240V,50Hz(±2Hz) 电源功率:最大:780W,节能:33W,待机:200W(平均) 工作噪音:打印:54dB(A),待机:低于42dB(A),节能:28dB(A) 环境参数:工作温度:10-32℃,工作湿度:20-80% 存储温度:-10-43℃,存储湿度:10-90%(相对湿度) 其它特点:整机寿命5年(或页) 上市日期:2009年08月
Canon 打印机用户手册.pdf_1701926357.803357说明书
Do not open the ink bottles until you are ready to fill the inktanks. The ink bottles are vacuum packed to maintain reliability. Ink emove all protective materials from the product.Note:1 O 2 U 3 D 4 RC 5 F12 P ress and hold the button for 3 seconds untilthe power light starts flashing, to begin charging theink. Ink charging takes approximately 20 minutes. Ink charging is complete when the power light stopsflashing.20 minutesNote: The ink bottles included with the printer are designed for printer setup and not for resale. After some ink is used for charging, the rest is available for printing.Caution:Do not turn off the product or load paper while the product is charging or you’ll waste ink.1 M ake sure the product is not charging. Then flip thefeeder guard forward, raise the paper support, and tilt itbackwards slightly.2 Slide the edge guide to the left.3 L4 S6 C arefully seal the bottle using the reverse side of thebottle tip or screw on the lid for proper disposal.789 C lose the ink tank cover.10 C onnect the power cord to the back of the product and toan electrical outlet.C aution: Do not connect to your computer yet.11 R aise the control panel and turn on the product. Wait forthe power light to stop flashing, then follow step 12 tocontinue ink charging.Note:If all the product lights are flashing, turn off the product and check that no protective material has been left inside the product.Caution: Do not lower the control panel without first squeezing the release bar underneath or you may damage the product.Any problems?Network setup was unsuccessful• For detailed instructions on setting up your product on awireless network, see the online Wireless Installation Guide .• Make sure you select the right network name (SSID).• Restart your router (turn it off and then on), then try to connect to it again.• The printer can only connect to a network that supports 2.4 GHz connections. If your router offers both 2.4 GHz and 5 GHz connections, make sure the 2.4 GHz network is enabled.• If you see a firewall alert message, click Unblock or Allow to let setup continue.• If your network has security enabled, make sure you enter your network password (WEP key or WPA passphrase) correctly. Be sure to enter your password in the correct case.There are lines or incorrect colors in my printoutsRun a nozzle check to see if any of the print head nozzles areclogged. Then clean the print head, if necessary. See the online User’s Guide for more information.Setup is unable to find my product after connecting it with a USB cableMake sure the product is on and securely connected as shown:Error indicatorsIf you see one of the error indicators below, follow the steps here to proceed:5 Pull out the output tray and raise the paper stopper.Note: If your computer does not have a CD/DVD drive or you are using a Mac, an Internet connection is required to obtain the product software.1 M ake sure the product is NOT CONNECTED to yourcomputer.W indows ®: If you see a Found New Hardware screen, click Cancel and disconnect the USB cable.2I nsert the product CD or download and run your product’ssoftware package:.jm/support/L3953 F ollow the instructions on the screen to run the setupprogram.4 W hen you see the Select Your Connection screen, selectone of the following:• Wireless connectionIn most cases, the software installer automatically attempts to set up your wireless connection. If setup is unsuccessful, you may need to enter your network name (SSID) and password.• Direct USB connectionM ake sure you have the USB cable ready.Mobile printing optionsConnect wirelessly from your smartphone, tablet, or computer.Print documents and photos from across the room or around the world. See your online User’s Guide for instruction or learn more at .jm/connect .。
佳能打印机手册
预先注册部门 ID 和密码 . . . . . . . . . . . . . . . . . . . . . . . . . . . . . . . . . . . . . . 4-10 每次扫描时输入部门 ID 和密码 . . . . . . . . . . . . . . . . . . . . . . . . . . . . . . . . 4-11
Байду номын сангаас入门
安装软件. . . . . . . . . . . . . . . . . . . . . . . . . . . . . . . . . . . . . . . . . . . . . . . . . . . . . . . . .2-2 卸载过程. . . . . . . . . . . . . . . . . . . . . . . . . . . . . . . . . . . . . . . . . . . . . . . . . . . . . . . . .2-6
重要功能和设置汇总 . . . . . . . . . . . . . . . . . . . . . . . . . . . . . . . . . . . . . . . . . . . . . . 4-13 基本设置 . . . . . . . . . . . . . . . . . . . . . . . . . . . . . . . . . . . . . . . . . . . . . . . . . . . . 4-13 图像处理设置 . . . . . . . . . . . . . . . . . . . . . . . . . . . . . . . . . . . . . . . . . . . . . . . . . 4-13 从输送器扫描的设置 . . . . . . . . . . . . . . . . . . . . . . . . . . . . . . . . . . . . . . . . . . . 4-14 部门 ID 管理设置 . . . . . . . . . . . . . . . . . . . . . . . . . . . . . . . . . . . . . . . . . . . . . . 4-14 故障诊断 . . . . . . . . . . . . . . . . . . . . . . . . . . . . . . . . . . . . . . . . . . . . . . . . . . . . 4-15
打印机使用说明书

打印机使用说明书1. 引言感谢您选择我们的打印机产品。
本使用说明书将为您提供详细的操作指南,帮助您正确、高效地使用打印机。
在开始使用之前,请确保您已仔细阅读本说明书。
如有任何疑问,敬请随时与我们联系。
2. 安全注意事项在使用打印机之前,请务必注意以下安全事项:- 请勿将打印机暴露在潮湿或过热的环境中。
- 请确保打印机插头与电源插座相匹配,且连接牢固。
- 在清洁打印机时,请确保已将其断电并等待冷却。
- 请勿尝试修理打印机,如有故障,请联系我们的客户服务团队。
3. 打印机的组装与连接在使用打印机前,请按照以下步骤进行组装与连接:步骤一:打开打印机包装箱,取出打印机主机及配件。
步骤二:根据说明书将打印机主机与其支架进行组装。
步骤三:将打印机与您的电脑或其他设备进行连接。
根据设备的接口类型,选择合适的连接线,并将其插入打印机和设备之间的接口插槽。
4. 驱动程序安装在首次使用打印机之前,您需要安装相应的驱动程序。
请按照以下步骤进行安装:步骤一:将随附的驱动光盘或U盘插入电脑的光驱或USB接口。
步骤二:运行驱动程序安装向导,并按照提示完成安装过程。
步骤三:重新启动电脑以使驱动程序生效。
5. 打印机设置与调整一般情况下,驱动程序安装完成后,您可以进行一些基本的打印机设置与调整,以满足您的具体需求。
以下是一些常见设置项:- 纸张类型与尺寸的设置:根据需要选择合适的纸张类型和尺寸。
- 打印质量的调整:您可以根据需要调整打印质量,如选择普通模式、草稿模式或高质量模式等。
- 打印机对齐:在打印机打印不准确时,您可以进行打印机对齐操作,以确保印刷位置准确。
6. 打印文件现在,您已经完成了打印机的设置与调整,可以开始打印文件了。
步骤一:打开您要打印的文件(如Word文档、Excel表格、PDF文档等)。
步骤二:点击文件菜单中的“打印”选项。
步骤三:根据需要选择打印设置,如打印份数、打印范围等。
步骤四:点击“打印”按钮,开始打印文件。
Canon 多功能打印机说明书.pdf_1701692546.3466492

REVOLUTIONIZE TODAY’S WORKSPACE• E asily connect your mobile devices without a router using Wi-Fi ® Direct Connection.*• P rint at speeds of up to 42 pages per minute ,** with your first print in your hands in 7.5 seconds or less .***• P rint on-the-go with Canon PRINT Business ,†Apple ®AirPrint ®,†† Mopria ™ Print Service ,††† and GoogleCloud Print ™.■• S eamlessly navigate through all the features with the user-friendly 3.5-inch , Color , Touch-Panel LCD .• L egal-sized platen glass accommodates your diverse scanning and copying needs.• S upports host-based UFR II , PCL 6, and Adobe ®PostScript ® languages to provide printing versatility.• S ecure Print helps protect the privacy of yourprinted documents.•P assword-protected Department ID feature monitors and controls device usage for up to 300 IDs.• E asily print from, and scan to, your USB flash drive in JPEG, TIFF, and PDF formats.• E co-friendly, all mode, two-sided printing out-of-the- box saves paper and related costs.• G enerous, expandable paper capacity allows for up to 1,600 sheets .■■• L ow energy consumption; uses 1.4 W or less inEnergy Saver mode .• E mbedded uniFLOW capability allows for print security,follow-me printing, and output management and reporting.All-in-One, Wireless, Duplex, Laser PrinterPRINT SCAN COPY FAXPrint On-the-GoPrint a variety of file types, Web pages, and images on- the-go with Canon PRINT Business,†Apple AirPrint,††Mopria Print Service,††† and Google Cloud Print■ using your compatible mobile device. You can also scan hard- copy originals to your mobile device using Canon PRINT Business.Secure PrintThe imageCLASS MF515dw featuresSecure Print to help protect theprivacy of your printed documents. Department ID ManagementThe imageCLASS MF515dw features password-protected Department ID Management. To help reduce costs, device usage can bemonitored andcontrolled forup to 300 IDs.Environmentally ConsciousHelp decrease power consumption and energy costs with Canon’s efficient Energy Saving mode. In this mode, the MF515dw uses less than two watts of energy and meets ENERGY STAR® guidelines.Color, Touch-Panel LCDThe intuitive, seven-line, color,touch-panel LCD allows usersto navigate through the menuseamlessly. The user-friendlywide-screen and color displayare easy to read, helping youto complete tasks more quickly.2ADVANCED TECHNOLOGIESFOR YOUR OFFICE*W i-Fi® is a registered trademark of the Wi-Fi Alliance®. The Wi-Fi CERTIFIED™ Logo is acertification mark of the Wi-Fi Alliance®.**P rint speed is based on internal testing. Print speed may vary depending on the numberof copies selected as well as the settings for size, type, and orientation of paper.***M ay vary based on the output environment.C anon PRINT Business is a free app available on the App Store® and Google Play™ Store. Usersof Canon Mobile Printing can simply update the app to use Canon PRINT Business; users whohave installed Canon Mobile Scanning for Business should install Canon PRINT Business on theircompatible device. After Canon PRINT Business is installed, users can re-register their CanonMobile Scanning for Business device list and local documents.A pple AirPrint functionality requires an iPad, iPad Mini, iPad 2, the new iPad, iPhone 3GS or later,or iPod touch 3rd generation or later device running iOS 7.0 - 8.0 or later, and an AirPrint-enabledprinter connected to the same network as your iOS device. A printer connected to the USB portof your Mac, PC, AirPort Base Station, or Time Capsule is not supported.M opria Print Service, available free at the Google Play Store, requires a compatible Android 4.0 orlater smartphone or tablet. The printer must be either wirelessly connected to the network routeror with an Ethernet cable. The mobile device and printer must be connected to the same network.■Google Cloud Print requires an Internet connection and Google Account. Printer firmware updatemay be necessary for Google Cloud Print™ function. Certain exceptions may apply. A PC runningWindows XP or later or a Mac running OS 10.4.11 or later and USB cable are required to performfirmware update.■■Based on 20 lb. Bond paper.3** P rint speed is based on internal testing. Print speed may vary depending on the number of copies selectedas well as the settings for size, type, and orientation of paper. *** M ay vary depending on the output environment.† C anon PRINT Business is a free app available on the App Store ® and Google Play™ Store. Users of CanonMobile Printing can simply update the app to use Canon PRINT Business; users who have installed Canon Mobile Scanning for Business should install Canon PRINT Business on their compatible device. After Canon PRINT Business is installed, users can re-register their Canon Mobile Scanning for Business device list and local documents. †† A pple AirPrint functionality requires an iPad, iPad Mini, iPad 2, the new iPad, iPhone 3GS or later,or iPod touch 3rd generation or later device running iOS 7.0 - 8.0 or later, and an AirPrint-enabled printer connected to the same network as your iOS device. A printer connected to the USB port of your Mac, PC, AirPort Base Station, or Time Capsule is not supported. ††† M opria Print Service, available free at the Google Play Store, requires a compatible Android 4.0 orlater smartphone or tablet. The printer must be either wirelessly connected to the network router or with an Ethernet cable. The mobile device and printer must be connected to the same network.■G oogle Cloud Print requires an Internet connection and Google Account. Printer firmware update may be necessary for Google Cloud Print™ function. Certain exceptions may apply. A PC running Windows XP or later or a Mac running OS 10.4.11 or later and USB cable are required to perform firmware update. ■■ B ased on 20 lb. Bond paper. ■■■ L etter-sized, after being restored from Energy Saver mode. ▲ W ireless performance may vary based on terrain/distance between printer and wireless network clients. ▲▲A 5 paper is supported in Simplex mode only. ▲▲▲B ased on Letter-sized scanning at 300 x 300 dpi. u T he Public Switched Telephone Network currently supports fax modem speeds of 28.8 Kbpsor lower, depending on telephone line conditions. Sending and receiving fax machines need to conform to ITU-T v.34 guidelines. uu B ased on ITU-T #1 Chart (standard mode). u uu W arranty program is subject to certain conditions and restrictions. See warranty card for details. D eclared noise emission in accordance with ISO 9296.As an ENERGY STAR partner, Canon U.S.A., Inc. has qualified this model as meeting the ENERGY STAR energy imageCLASS MF515dw Supplies and AccessoriesimageCLASS MF515dw0292C008MF515dw shown with two optional Paper Feeders and optional Cabinet Type-M1。
打印机使用说明手册说明书
打印机使用者指南使用说明书
从智能手机或相机进行无线打印 ... 44
在SELPHY上设置Wi-Fi........................ 44 从智能手机打印 .................................... 46 从相机打印 ............................................ 49 后续打印 ................................................ 50 其他Wi-Fi功能 ....................................... 51 将打印机连接至接入点 ........................ 53 打印图像(Windows) .............................. 58 打印图像(Mac OS) ................................ 60 打印图像(Windows) .............................. 62 打印图像(Mac OS) ................................ 64
本指南编辑常规
• 在本指南中,产品称为“SELPHY”或“打印机”。 • 本指南中用图标表示SELPHY的按钮。有关详细信息,请参阅“控制部件” (= 12)。 • 屏幕上显示的文字或图标以方括号([ ])表示。 • :需要了解的重要信息 • :有关更专业使用的注意事项和提示 • =xx:相关信息页(本例中,“xx”代表页码。) • 本指南以打印机处于默认设置为前提进行说明。 • 为方便起见,将所有支持的存储卡简称为“存储卡”。 • 为方便起见,本指南中将智能手机、平板电脑和其他兼容的设备统称 为“智能手机”。
热升华打印机基本参数比较
打印方式 打印分辨率 打印速度 打印尺寸 染料热升华打印 300x300dpi 明信片尺寸:约47秒,L尺寸:约39秒,卡片尺寸:约27秒 明信片尺寸(无边框)100x148mm;卡片尺寸(无边框)54x86mm 佳能CP910
无线打印 PicBridge 支持存储卡类型
其它参数
产品尺寸 产品重量 操作系统 178x127x60.5mm 约810g Windows 8.1/Windows 8/7 SP1 Mac OS X v1.0-10.9 环境参数 工作温度:5-40℃,工作湿度:20-80%
随机附件
照片打印机 电源适配器 尺寸纸盒 防尘盖 1 1 1 2
打印机解决方案光盘 情节组件
支持 支持 SD卡,SDHC卡,SDXC卡,需要适配器的存储卡:miniSD卡, miniSDHC卡,microSD卡,microSDHC卡,microSDXC卡
液晶显示屏 介质类型 色阶 耗材 接口
2.7英寸可倾斜角度液晶显示屏 明信片尺寸,L尺寸,卡片尺寸,卡片尺寸方形贴纸 256 专用墨盒(Y,M,C,覆膜) 连接到PictBridge兼容设备:USB兼容Type A接口 连接到电脑:USB兼容Mini-B接口
178x12பைடு நூலகம்x60.5mm 约810g Windows 7 SP1/Vista SP2/XP SP3,Mac OS X v10.6-10.7
工作温度:5-40℃,工作湿度:20-80%
1 1 1 1
1 2012年7月 1年 1028-1150元(天猫电器城)
1
上市日期 产品保修 价格
1033—1288元(天猫电器城) 1年
2014年1月
佳能CP900
佳能LBP打印机使用指南
左边:中间:右边:1. 离线脱机 1. 准备就绪 1. 工作设置(上)2. 工作取消 2. 错误信息 2. 状态重置(下)3. 进纸选择 3. 工作状态 3. 重新建立(左)4. 效果设置(右)5.执行打印纸张规格设置如下:电脑桌面-开始菜单-设置-打印机和传真-右键选择您的打印机-打印首页选项。
佳能00----02----11----12----13----14----16----17----41---5F-505F-515F-54/55佳能12按→键一下.3按→键13下4按→键一下,佳能1、开机正常预热后,按灭联机灯.2、按→键一下.再按↓键一下.3、按→键13下, 再按↓键一下.4、按→键一下, 再按↓键一下.只要发现单词“language”ENGLISH,就可以按“实行”确定。
佳能CANON LBP-840/850/870/880 日文转英文的方法1、开机正常预热后,按灭联机灯.2、按→键一下.再按↓键一下.3、按→键9下, (出现:=二木丿]) 再按↓键一下.4、按→键一下(见到:ENGLISH), 再按↓键一下,立即变回英文!佳能CANON LBP-720/730/740/750 日文转英文的方法1、开机正常预热后,按灭联机灯.2、按→键一下.再按↓键一下.3、按→键8下, 再按↓键一下.4、按→键一下, 再按↓键一下佳能A6\46A0-A0-A4-E0 DRUM WE8……5F-(如果拔掉打印线问题消失,将是与数据传输有关,重起电脑)5F-51 SERVICE……激光头故障5F-54 SERVICE 070 主电机问题(彩机)5F-54/55 机器两侧排气风扇出现故障,停转或卡死。
(黑白型号机器)5F-55 SERVICE 030 鼓架废粉满(彩色机)98 DRUM CHEK 鼓计数器故障99 ITD UNIT、CHK11……没纸12……仓门没关紧13……夹纸14……没鼓,或检测不到16……碳粉少17……纸仓没有纸41……纸张大小设置不对51……Superrf ine rej 1200dpi打印时,内存容量设置的不对(内存溢出)9A MP……没纸了(这个有点不正确)8F-84 SERVICE CTL SFT E E……电源接触问题(如有网卡,请拔掉)8F-28……鼓接触不良。