小翼管家定制版路由器说明书
路由器设备用户手册说明书

Entering Personal Addresses..... 53 Updating a Personal Address..... 57 Selecting a Personal Address As
a Destination........................... 58 System Setup.................................... 60
Bright............................................ 60
Volume.......................................... 60 Display.......................................... 60 Reroute......................................... 61 Address......................................... 61 Location Correction..................... 62 Personal PIN ................................63 Clock............................................. 63 Information................................... 63 Show Icon on Map....................... 64 System Security............................... 65 System Limitations.......................... 66 Customer Assistance....................... 68 DVD Removal.............................. 69 Non-detailed Coverage................ 70 Detailed Coverage Areas............ 71
CD定制路由器操作指南说明书

November 14, 2016Audience: CLEC, ISP, IXC, Resellers, WirelessIndustry LetterSubject: Loyalsock Main Class 5 DCO Switch Retirement, (LYLCPAXLDS0)As set out in the Verizon North LLC “Short Term Pub lic Notice of Network Change Under Rule 51.333(a)”dated November 14, 2016, on or after February 24, 2017, the Loyalsock Main Class 5 DCO Switch (LYLCPAXLDS0) will be retired and removed from the Verizon network as part of ongoing efforts to modernize the network.General Information: The Exchange Code (435) in Numbering Plan Area (NPA) 570 currently residing in the Loyalsock Main Class 5 DCO Switch (LYLCPAXLDS0) will be moved to the Selinsgrove switch (SLGVPAXSDS0) (see details in Table A below).Table ANetwork Changes and Trunk Rearrangements:The Selinsgrove switch (SLGVPAXSDS0) will be the recipient office of traffic migrated from the Loyalsock Main Class 5 DCO Switch (LYLCPAXLDS0). Traffic bound for the code listed in Table A will be delivered via the Bloomsburg 71T tandem (BMBGPABL71T).After all traffic is migrated off of the Loyalsock Main Class 5 DCO Switch (LYLCPAXLDS0), this switch will be retired and removed from the network.All carriers including CLECs, IXCs, IECs, and wireless and paging carriers, will need to secure new trunk groups built to the Selinsgrove switch (SLGVPAXSDS0) or have existing trunk groups to that switch augmented. Carriers that are code holders for access connectivity in the Loyalsock Main Class 5 DCO switch (LYLCPAXLDS0) will be required to reposition the codes to the Selinsgrove switch (SLGVPAXSDS0).All ASRs for the Selinsgrove switch (SLGVPAXSDS0) must be received no later than February 4, 2017 in order to provide sufficient time to migrate the traffic described above.All traffic must be moved by February 18, 2017. All ASRs for the Selinsgrove switch (SLGVPAXSDS0) must carry the project code of LYLCPAXLRS0.Please adhere to industry standards using normal procedures that pertain to updates and changes to the Local Exchange Routing Guide (LERG) for all NXX codes subject to the retirement of the Loyalsock Main Class 5 DCO switch (LYLCPAXLDS0).For inquiries related to the proposed network reconfiguration, or to arrange a meeting with Verizon Network Engineering and Planning personnel, please contact your Verizon Account Manager. Sincerely,。
路由器设置指南说明书

Installation Guideb. Connect an Ethernet cable fromthe access point to the PC (pointA in the illustration).c. Securely insert the other end ofthe cable into the access pointEthernet port (point B in theillustration).d. Connect the power adapter to theaccess point and verify thefollowing:• Power. The Power LED blinkswhen the access point is firstturned on. After a few seconds it should stay on (steady green). If after 30seconds the Power LED is off or is still blinking, check the connectionsand check to see if the power outlet is controlled by a wall switch that isturned off.• ACTIVE. The ACTIVE LED blinks when there is network traffic.• LAN. The LAN LED indicates LAN speeds; green for 1000 Mbps, amberfor 100Mbps, and no light for 10Mbps.• 2.4G Hz (WLAN).This LED indicates 2.4 G Hz traffic.• 5 G Hz (WLAN). This LED indicates 5 G Hz traffic.2. Configure LAN and wireless accessa. From your PC, configure the access point Ethernet port for LAN access.Connect to the access point by opening your browser and enteringhttp://192.168.0.100 in the address field.b. A login window displays. Whenprompted, enter admin for the username and password for thepassword, both in lower caseletters.The access point user interfacedisplays.NETGEAR CableABWNDAP360Ethernetportc. Select Configuration > System > Basic > Genera l from the menu. Fill inthe Access Point Name field and select your Country/Region of operationfrom the drop-down list.d. Select Configuration > IP > IP Settings from the menu and configure theIP settings for your network.e. If you use DHCP, reserve an IP address (based on the access point’s MACaddress) on the DHCP server. You can then use that address to log in tothe access point.f. Select Configuration > Wireless > Basic > Wireless Settings and selectthe Turn Radio On setting.g. Select Configuration > Security > Profile Settings and configure securityprofiles for your network.See the online help or the Reference Manual for full instructions.3. Test wireless connectivity.Using a PC with a wireless adapter, verify that you can establish a wirelessconnection to the access point.Now that you have finished the setup, you are ready to deploy the access pointin your network. If needed, you can reconfigure the PC you used in step 1 backto its original TCP/IP settings.Deploy the Access Point1. Disconnect the access point and position it where you will deploy it. The bestlocation is elevated such as wall or ceiling mounted, at the center of yourwireless coverage area, and within line of sight of all mobile devices.2. Connect an Ethernet cable from your access point to a LAN port on yourrouter, switch, or hub.3. Connect the power adapter to the wireless access point and plug the poweradapter into a power outlet. The Power and LAN LEDs should go on.Tip: The access point supports Power over Ethernet (PoE). If you havea switch that provides PoE, you do not need to use the power adapterto power the access point. This can be especially convenient when theaccess point is installed in a high location far from a power outlet.ProSafe® Dual Band Wireless-N Access Point WNDAP360Package ContentsUnpack the box and verify the contents:• ProSafe® Dual Band Wireless-N Access Point WNDAP360• Straight through Category 5 Ethernet cable• Power adapter and cord (12V, 1A)• Wall mount kit• Installation Guide• Resource CD, which includes link to the Reference ManualSet Up the Access PointFollow these instructions to set up your wireless access point. Before proceeding with the WNDAP360 installation, familiarize yourself with the contents of the Resource CD. See the Reference Manual for instructions on advanced configuration options.Estimated Completion Time: 3 minutes.Tip: Before mounting the access point in a high location, first set upand test the unit to verify wireless network connectivity.1. Connect the wireless access point to your computer.a. Prepare a PC with an Ethernet adapter. If this PC is already part of yournetwork, record its TCP/IP configuration settings. Configure the PC with a static IP address of 192.168.0.210 and 255.255.255.0 as the subnet mask.February 2011This symbol was placed in accordance with the European Union Directive 2002/96 on the Waste Electrical and Electronic Equipment (the WEEE Directive). If disposed of within the European Union, this product should be treated and recycled in accordance with the laws of your jurisdiction implementing the WEEE Directive.©2011 by NETGEAR, Inc. All rights reserved. NETGEAR, the NETGEAR logo, and ProSafe® are registered trademarks of NETGEAR, Inc. in the United States and/or other countries. Other brand and product names aretrademarks or registered trademarks of their respective holders. Information is subject to change without notice.Verify Wireless ConnectivityUsing a computer with an 802.11b/g/n wireless adapter, verify connectivity by using a browser to connect to the Internet, or check for file and printer access on your network.Note: If you cannot connect, see Troubleshooting Tips in this guide or the Reference Manual .If You Use an External AntennaTo use an external 2.4 GHz antenna:1. Mount the accessory antenna(s).2. Attach the antenna(s) to the connector(s) on the access point rear panel.3. Log into the access point and configure it to use the external antenna. Theaccess point cannot use the internal and external 2.4GHz antennas at the same time.Troubleshooting TipsHere are some tips for correcting simple problems you may have.No LEDs are lit on the access point.The wireless access point has no power.• Make sure the power cord is connected to the wireless access point andplugged in to a working power outlet or power strip.• Make sure you are using the correct NETGEAR power adapter supplied withyour wireless access point.• If using PoE, ensure that the PoE switch is providing power to the access point.The LINK/ACT LED is not on.There is a hardware connection problem.• Make sure the cable connectors are securely plugged in to the access point andto the network device (hub, switch, or router).• Make sure the connected device is turned on. If the Ethernet link is a 10 Mbpslink, then the 10/100/1000 light is off, but the Link/Act light blinks if traffic is present.The WLAN LEDs are off.The wireless connection is not working.• If a Wireless LAN activity LED stays off, disconnect the power adapter from itspower source and then plug it in again.• Log in to the access point and verify that the radio is turned on.• Contact NETGEAR if the Wireless LAN LED remains off.I cannot configure the access point from a browser.Check these items:• The access point is correctly installed, it is powered on, and LAN connectionsare OK. Check that the LAN LED is on to verify that the Ethernet connection is OK.• If you are using the Net BIOS name of the access point to connect, ensure thatyour PC and the access point are on the same network segment or that there is a WINS server on your network.• If your PC uses a fixed (static) IP address, ensure that it is using an IP addressin the range of the access point. The access point default IP address is192.168.0.100 and the default subnet mask is 255.255.255.0. The access point default setting is for a static IP address. If the network where you are connecting it is using DHCP, configure it accordingly. See the Reference Manual for details.I cannot access the Internet or the LAN with a wireless capable computer.There is a configuration problem. Check these items:• You might not have restarted the computer with the wireless adapter to haveTCP/IP changes take effect. Restart the computer.• The computer with the wireless adapter might not have the correct TCP/IPsettings to communicate with the network. Restart the computer and check that TCP/IP is set up correctly for that network. The usual setting for Windows on the Network Properties is set to “Obtain an IP address automatically.”• The wireless access point’s default values might not work with your network.Check the wireless access point default configuration against the configuration of other devices in your network.• For full instructions on changing the default values of the wireless access point,see the Reference Manual .Statement of ConditionsIn the interest of improving internal design, operational function, and/operability, NETGEAR reserves the right to make changes to the product described in this document without notice. NETGEAR does not assume any liability that may occur due to the use or application of the product(s) or circuit layout(s) described herein.Technical SupportThank you for selecting NETGEAR products.After installing your device, locate the serial number on the label of your product and use it to register your product at /register . Registration is required before you can use our telephone support service. Registration via our web site is strongly recommended.Go to for product updates and Web support. ForWarranty and Regional Customer Support information, see the Resource CD that came with your product.For complete DoC please visit the NETGEAR EU Declarations of Conformity website at: /app/answers/detail/a_id/11621/。
智能路由器用户手册

智能路由器用户手册欢迎使用智能路由器。
本用户手册将为您详细介绍智能路由器的功能和使用方法,以帮助您更好地享受无线网络体验。
在开始使用之前,请确保已正确连接和设置路由器。
1. 路由器概述智能路由器是一种用于创建和管理无线网络的设备。
它可以提供稳定的无线信号,将互联网连接分享给多个设备,并提供高速的无线网络连接。
2. 连接和设置在开始使用智能路由器之前,请确保已将其正确连接到电源和宽带接入设备。
一般情况下,您只需将宽带接入设备的网络线缆插入路由器的WAN口,然后将路由器的电源适配器插入电源插座即可。
3. 登录和管理路由器要使用智能路由器的所有功能,您需要通过浏览器登录到管理界面。
在浏览器的地址栏中输入路由器的默认IP地址,然后按回车键。
输入您的用户名和密码,即可登录到路由器的管理界面。
4. 设置无线网络在管理界面中,您可以设置无线网络的名称(SSID)、加密方式和密码。
SSID是您的无线网络的名称,可以自定义设置;加密方式用于保护您的无线网络安全,建议选择高级的加密方式(如WPA2);密码是其他设备连接您的无线网络所需的,应确保足够强度以防止未经授权的访问。
5. 连接设备使用无线网络时,您需要将各个设备连接到智能路由器。
在设备的无线网络设置中,搜索并选择您所设置的无线网络名称(SSID),然后输入密码进行连接。
一旦连接成功,设备就能够访问互联网并享受高速的无线网络。
6. 定期更新固件为了保持智能路由器的稳定性和安全性,建议定期检查并更新路由器的固件。
您可以在管理界面的设置菜单中找到相应的升级选项,并按照提示完成固件更新。
7. 其他功能介绍除了基本的无线网络功能,智能路由器还提供了一些附加功能,如访客网络、家长控制、QoS等。
您可以根据个人需求,在管理界面中进行相应的设置。
8. 常见问题解答在使用智能路由器的过程中,您可能会遇到一些常见问题。
以下是一些常见问题的解答:- 如何重置路由器到出厂设置?- 为什么我的无线网络连接不稳定?- 如何修改无线网络名称和密码?- 如何设置访客网络?- 如何启用家长控制功能?感谢您阅读本用户手册。
普联技术有限公司网络摄像头快速安装指南说明书
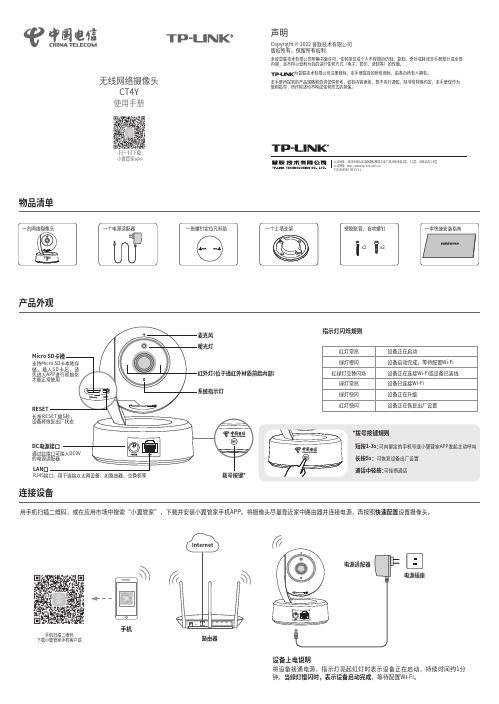
物品清单一个电源适配器产品外观连接设备电源插座将设备接通电源,指示灯亮起红灯时表示设备正在启动,持续时间约1分钟。
当绿灯慢闪时,表示设备启动完成,等待配置Wi-Fi。
设备上电说明路由器用手机扫描二维码,或在应用市场中搜索“小翼管家”,下载并安装小翼管家手机APP。
将摄像头尽量靠近家中路由器并连接电源,再按照快速配置设置摄像头。
手机手机扫描二维码下载小翼管家手机客户端扫一扫下载小翼管家APP声明未经普联技术有限公司明确书面许可,任何单位或个人不得擅自仿制、复制、誊抄或转译本手册部分或全部内容,且不得以营利为目的进行任何方式(电子、影印、录制等)的传播。
为普联技术有限公司注册商标。
本手册提及的所有商标,由各自所有人拥有。
本手册所提到的产品规格和资讯仅供参考,如有内容更新,恕不另行通知。
除非有特殊约定,本手册仅作为使用指导,所作陈述均不构成任何形式的担保。
Copyright © 2022 普联技术有限公司 版权所有,保留所有权利公司地址:深圳市南山区深南路科技园工业厂房24栋南段1层、3-5层、28栋北段1-4层 公司网址: 7103504509 REV1.0.1无线网络摄像头CT4Y使用手册有毒有害物质含量声明部件名称PCB PCBA焊点元器件(含模块)金属结构件塑胶结构件纸质配件玻璃光盘线缆铅(Pb)及其化合物○:表示该有害物质在该部件所有均质材料中的含量均在GB/T 26572规定的限量要求以下。
本表格依据SJ/T 11364的规定编制。
表示该有害物质至少在该部件的某一均质材料中的含量超出GB/T 26572规定的限量要求。
(但该项目仅在库存或已加工产品中有少量应用,且按照计划正在进行环保切换,切换后将符合上述规定。
):安装设备本产品可直接放置于桌面,也可吊顶安装,本手册介绍吊顶安装方法。
参照下图示意,将螺钉定位孔标贴粘贴于天花板,然后按照定位标贴打出底孔并塞入塑胶胀管,最后以自攻螺钉固定上墙支架位置。
路由器基本手册

路由器基本手册目录一、基本使用 (4)1.路由器简介 (4)2.登陆路由器管理界面 (5)2.1线路连接 (5)2.2用户侧IP设置 (5)2.3登陆管理界面 (6)3.设置拨号连接 (6)3.1 TP-LINK (6)3.2 D-Link (9)4.连接网络 (11)4.1 连接有线网络 (11)4.2 连接无线网络 (11)二、性能测试 (14)1.现网情况 (14)2.主流路由器测试分析 (15)2.1路由器选取 (15)2.2测试过程 (15)2.3测试结果 (16)三、故障处理 (17)1.单机测试 (17)2.网络无法连接 (21)3.网速慢 (22)4.网络连接频繁掉线 (23)四、推荐用语 (25)1.上门预约 (25)2.宽带安装 (26)3.故障维修 (27)一、基本使用1.路由器简介家用路由器(含无线功能)从外观上一般包括指示灯和功能接口两个方面(如下图所示)。
家用无线路由器指示灯通常分为5种:电源指示灯、系统指示灯、无线指示灯、广域网指示灯及局域网指示灯,各指示灯功能及工作状态描述如下表所示;路由器接口一般包括电源接口、WAN口、LAN口、Reset复位健,其中WAN口连接光猫,LAN口连接用户终端,Reset复位键用于恢复默认设置。
通过查看路由器的指示灯工作状态可以初步定位用户网络故障问题所在。
2.登陆路由器管理界面2.1线路连接首先用网线将用户光猫或入户网线和路由器的WAN口相连,然后再用一根网线通过路由器的LAN口连接到用户电脑,一般来说家用路由器上有3-4LAN 口,分别用数字1、2、3、4标识,连接任何一个LAN口均可。
2.2用户侧IP设置WIN7系统:点击开始——控制面板——网络和internet——网络和共享中心——更改适配器——本地连接——属性,然后双击“internet协议版本(TCP/IPv4)”,选择“自动获取IP地址”、“自动获得DNS服务器地址”,确定完成。
智能路由器安全系统使用说明书
智能路由器安全系统使用说明书第一章:引言欢迎使用智能路由器安全系统!本使用说明书旨在帮助用户了解智能路由器安全系统的基本功能和操作方法,以便更好地保护用户的网络安全和隐私。
在开始使用之前,请仔细阅读本手册并按照指示操作。
第二章:产品概述1.1 产品介绍智能路由器安全系统是一款专为家庭和办公网络设计的全面安全解决方案。
它结合了传统路由器的网络连接和智能安全设备的功能,可以有效地防御网络攻击和保护用户的隐私信息。
1.2 主要功能特点- 防火墙保护:智能路由器安全系统具有强大的防火墙功能,可以检测和阻止来自外部网络的潜在攻击。
- 流量监控:通过对网络流量进行实时监控和分析,智能路由器安全系统可以帮助用户识别和阻止恶意流量。
- 家长控制:智能路由器安全系统提供了家长控制功能,可以限制特定设备的上网时间和内容访问权限,保护未成年人的上网安全。
- 安全更新:智能路由器安全系统会定期检查并下载最新的安全更新,以应对新的网络威胁和漏洞。
第三章:使用指南2.1 设备连接在开始使用智能路由器安全系统之前,请先将其正确连接到您的网络。
将路由器的WAN口连接到宽带调制解调器,然后将计算机或其他设备连接到路由器的LAN口。
2.2 初始设置按照以下步骤进行初始设置:1. 将路由器连接到电源并打开电源开关。
2. 打开您的计算机或移动设备的浏览器,并输入默认的管理界面地址。
3. 输入默认的用户名和密码登录管理界面。
4. 根据向导完成基本的网络设置,包括设置无线网络名称、密码和管理员密码等。
2.3 主要功能的使用2.3.1 防火墙设置在管理界面中找到防火墙设置选项,您可以根据自己的需求设置防火墙的安全级别和对特定协议或端口的阻止或放行。
2.3.2 流量监控与防御智能路由器安全系统会实时监控网络流量,并对发现的异常流量进行报警和阻止。
您可以在管理界面中查看流量监控日志,并对异常流量进行进一步处理。
2.3.3 家长控制智能路由器安全系统的家长控制功能可以帮助家长限制特定设备的上网时间和内容访问权限。
skyworth路由器说明书
skyworth路由器说明书
1、首先把电源接通,然后插上网线,进线插在wan口(一般是蓝色口),然后跟电脑连接的网线就随便插哪一个lan,做好这些工作后,然后你会看到路由器后面有个地址跟帐号密码,连接好后在浏览器输入在路由器看到的地址,一般是192.168.1.1(当然如果你家是用电话线上网那就还要多准备一个调制调解器,俗称“猫”)。
2、然后进入,输入相应的帐号跟密码,一般新买来的都是admin。
3、确实后进入操作界面,你会在左边看到一个设置向导,进击进入(一般的都是自动弹出来的)。
4、进入设置向导界面。
5、点击下一步,进入上网方式设置,我们可以看到有三种上网方式的选择,如果你家是拨号的'话那么就用PPPoE。
动态IP一般电脑直接插上网络就可以用的,上层有DHCP服务器的。
静态IP一般是专线什么的,也可能是小区带宽等,上层没有DHCP服务器的,或想要固定IP的。
因为我拨号所以选择pppoe。
6、选择PPPOE拨号上网就要填上网帐号跟密码,这个应该大家都明白,开通宽带都会有帐号。
7、然后下一步后进入到的是无线设置,我们可以看到信道、模式、安全选项、SSID等等,一般SSID就是一个名字,你可以随便填,然后模式大多用11bgn.无线安全选项我们要选择wpa-
psk/wpa2-psk,这样安全,免得轻意让人家破解而蹭网。
8、下一步就设置成功啦。
9、点击完成,路由器会自动重启。
成功后出现的界面。
2023年高级无线路由器设置与使用说明书
2023年高级无线路由器设置与使用说明书一、产品简介2023年高级无线路由器是一款功能强大、性能卓越的网络设备,具备快速稳定的无线信号传输能力,适用于家庭和办公环境。
本说明书将介绍如何正确设置和使用该路由器,以最大化发挥其功能。
二、硬件连接1. 连接电源插头:将路由器的电源适配器插头插入电源插座,并将适配器的另一端连接到路由器的电源接口。
2. 连接宽带线:将您的宽带网络线缆连接到路由器的WAN(宽带)接口。
3. 连接局域网线:将一根局域网线连接到路由器的LAN(局域网)接口,另一端连接到您的计算机或其他网络设备的网口上。
三、基本设置1. 打开浏览器:在电脑或移动设备上打开浏览器应用程序,输入默认网关IP地址,并按下回车键。
2. 登录路由器:输入默认的用户名和密码,在登录页面中进行身份验证并登录到路由器控制面板。
3. 更改管理员密码:为了增加安全性,请在初始登录后立即更改管理员密码,确保密码复杂且不易被猜测。
4. 设置Wi-Fi网络:在控制面板的设置选项中,为您的路由器创建一个唯一的Wi-Fi网络名称(SSID),并设置一个安全的密码,以保护您的网络免受未经授权的访问。
四、高级功能1. 网络加速:通过启用Quality of Service(QoS)功能,您可以优化网络带宽使用,确保重要的任务和应用程序具有最佳的网络性能。
2. 家长控制:通过配置家长控制功能,您可以限制特定设备的上网时间,过滤成人内容,以及进行儿童安全设置。
3. 客户端管理:在路由器控制面板中,您可以查看连接到路由器的所有客户端设备,并监控其活动。
4. VPN设置:如果您需要安全地远程访问您的家庭网络,可以在路由器上设置虚拟专用网络(VPN)连接。
5. 双频并行:部分高级无线路由器支持双频并行功能,可以同时支持2.4GHz和5GHz频段的无线信号,提供更稳定和快速的连接体验。
五、故障排除1. 重启路由器:如果您遇到无法连接互联网或其他网络问题,尝试通过将路由器从电源中拔出并重新插入来重启设备,有时可以解决暂时的故障。
tplink无线路由器配置手册说明书
Win7如何配置tp-link无线路由器
项目背景:湖南网络工程职业学院远教楼505办公室局域网。
设备:tp-link无线路由器,无线网卡,PC,网线若干
第一步:打开网络和共享中心
第二步:项目拓扑图:
①LAN口默认地址:192.168.1.1
②WAN口默认地址:210.42.200.84
③PC的IP地址:192.168.1.100~192.168.1.199 第三步:在浏览器中输入
管理员登录密码:123456
校园局域网IP地址,绑定一个静态IP
第四步:台式机安装好无线网卡(水星牌)
第五步:通过浏览器登录网外
查看本机IP地址
本机IP:192.168.1.100,测试ping无线路由器LAN端口
本机IP:192.168.1.100,测试ping无线路由器WAN端口
共享一个无线路由器的PC做ping测试
熟悉无线路由器的配置和管理1.查看运行状态
2.设置网络参数
WAN口设置
LAN口设置
3.无线设置
4.DHCP服务
5.无线安全设置
6.无线MAC地址过滤。
- 1、下载文档前请自行甄别文档内容的完整性,平台不提供额外的编辑、内容补充、找答案等附加服务。
- 2、"仅部分预览"的文档,不可在线预览部分如存在完整性等问题,可反馈申请退款(可完整预览的文档不适用该条件!)。
- 3、如文档侵犯您的权益,请联系客服反馈,我们会尽快为您处理(人工客服工作时间:9:00-18:30)。
小翼管家定制版路由器说明书
1、配置路由器网络管理工具— NAS
打开小翼管家路由 APP,点击“NAS管理”,在右侧输入路由器的密码。
根据自己家中条件,输入自己常用的路由代码,如:162.16.1.1。
之后,可以在右侧选中“NAS管理”,然后再点击下拉菜单中的“NAS管理”选项即可设置路由器管理。
需要注意的是,您的路由器只能由一个路由器品牌授权。
另外,如果您使用小翼管家路由 APP远程访问路由器,需要提供用户名、密码及 SSH证书,才能访问路由器连接的网络,否则无法正常管理整个路由器网络(如不能连接到电脑等)。
而且,如果您不使用小翼管家路由器 APP,您也将无法访问其它电脑上的管理功能(如不能保存文件等)。
2、选择路由器产品名称—小翼管家官网下载/APP
打开小翼管家官网,输入你的姓名及,进行登录。
填写完后,点选确定即可。
注意事项:需要注意您的产品名称是否与其产品型号对应,是否为官网提供,如:小翼管家官网,则需进行产品名称的更改哦;如果您是“电WiFi”型号,则可在路由器上下载小翼管家 APP,打开小翼管家路由器。
如果使用宽带(家庭和公司等),可选择安装小翼管家定制版(手机/平板);如果选择无线上网,会自动绑定你的宽带和无线路由器了。
3、选择路由器品牌—中国电手机终端注册--下载/APP
操作方法:第一步——选择“我的手机”--进入智能路由器
官网--输入码或验证码;第二步——点击“继续”--选择 APP (目
前部分品牌支持此操作);第三步——点击下一次【设置】,进
入下一次【网络配置】界面;第四步:依次填写需要的息,最后点击【下一次】返回完成界面即可!
4、使用小翼管家 APP进行上网配置。
在上网时,点击“开始”→“下一步”;下拉菜单中的“下一步”是网络配置和设置,包括系统、网管、终端等多个岗位
(详见“下一步”步骤);在路由器中,依次点击“连接”→“连接设备”→“自动连接设备”;在路由器上网过程中,需注意四点:1、查看手机型号是否正确;2、路由器连接电脑后,需要查看该设
备是否为手机;3、查看无线局域网是否安全;4网的安全密码。
在这些选项中任选其一即可。