3140胶技术说明书
CP-EX GT桌上型条码打印机系列使用手册说明书

CP-EX / GT桌上型条码打印机系列使用手册CP-2140EX /CP-3140EX / GT-820 / GT-880https:///cn/本手册为简易手册,完整版请上官网下载版号:1.8目录1.简介 (1)专属声明 (1)产品改良 (1)FCC相容声明 (1)GB/T 9254.1 - 2021 ............................. 錯誤! 尚未定義書籤。
赔偿声明 (2)2.开始使用 (3)打开打印机包装 (3)包装内容物 (4)前视图 (5)后视图 (5)内部检视I (5)内部检视II (7)连接电源 (8)装入纸张 (9)准备纸张 (9)装入纸卷 (9)纸张感测器设定 (14)由软件/驱动程序设定并排标签 (14)装入碳带 (15)准备碳带 (15)装入碳带卷 (16)3.打印机操作 (21)打印纸校正及设定 (21)开始进行纸张校准及设定的步骤 (21)打印自检页范例 (22)将打印机重设为原厂默认值 (23)打印机控制按键和指示灯 (24)恢复程序 (29)4.通讯 (30)接口和需求 (30)USB 接口需求 (30)打印机通讯 (30)5.维护打印机 (37)打印头维护指南 (37)清洁周期 (37)清洁材料 (37)清洁方向 (38)6.产品规格 (39)一般规格 (39)打印机程序语言:PPLA (41)打印机程序语言:PPLB (42)打印机程序语言:PPLZ (43)7.附录 (44)接口规格 (44)USB界面 (44)串口接头 (45)连接主机 (46)8.尺寸图 (48)1. 简介专属声明本手册包含立象科技股份有限公司拥有之专属信息。
这些信息仅供负责操作及维护手册中所述之设备的相关人士参考及使用。
未经过立象科技股份有限公司书面同意,不论任何情况下均不得对此类专属信息进行使用、再制,或泄露给任何第三方。
产品改良持续改良产品是立象科技股份有限公司奉行的原则之一。
注射式植筋胶说明

一、产品信息产品名称:卡本注射试植筋胶存储方法:干燥、通风、远离火源,不宜暴晒、雨淋并不得与尖锐东西碰撞。
存储期:一年执行标准:GB 50367—2013 《混凝土结构加固设计规范》GB 50550—2010 《建筑结构加固工程施工质量验收规范》GB 50728—2011 《工程结构加固材料安全性鉴定技术规范》二、注射式植筋胶介绍双组分改性环氧树脂胶粘剂,A组份为触变性膏状体,B组份为棕黄色粘稠液体,配胶比例为A:B=4:1。
三、注射式植筋胶特性1、承载快,锚固强度高,锚固效果如同预埋;2、高抗酸碱性,耐老化;3、抗拉,抗压,抗震动,抗冲击动荷载;4、可在潮湿混凝土上植筋;5、触变性,水平植筋不流淌。
四、注射式植筋胶应用范围1、建筑植筋,螺杆锚固;2、砌体拉结筋生根;3、建筑物补强与改造;4 、幕墙、钢结构的后加埋件的安装;5、石材干挂支架固定;6、设备基础固定;7、适用于各种建筑基材,如混凝土、砖墙、岩石等。
五、注射式植筋胶施工流程1、打开植筋胶封盖,换上并拧紧混胶嘴;2、装入胶枪,扣动胶枪把手挤出胶液;3、最初挤出未混合均匀的胶液应被舍弃,直至挤出的混合胶液色泽完全一致时,方可使用;4、混胶嘴端头开始时应伸至孔的底部,边挤胶边后退,以保证孔内不含空气。
六、注射式植筋胶储存与安全1、本品储存在阴凉,干燥,通风的库房内;储存期为12个月,超过储存期,经测试性能合格后,仍可使用;2、本产品不属于易燃、易爆、有毒危险品,能以一般交通工具运输;3、施工人员应采取必要的防护措施,如不慎触及皮肤时,请用丙酮擦拭,再用水冲洗;严禁小孩接触;4、丙酮等清洗溶剂应远离火源,现场保持通风良好。
七、使用注意事项1、注射式未用完一支时,用封口盖封住注射口,更换胶嘴可再次使用;2、在5℃以下施工时,甲、乙组份分别适当加热,增加流动性,提高施工性能;3、植筋后若需焊接,焊接位置离植筋表面不应小于400mm,并用湿布包覆钢筋根部。
环氧树脂胶 木头

环氧树脂胶木头
环氧树脂胶可以用于木头的粘接。
以下是关于使用环氧树脂胶粘接木头的相关信息:
1.种类选择:
•JL-611:1h环氧树脂AB胶,固化后粘接强度高、硬度较好,韧性佳;固化后耐酸碱性能好,防潮防水、防油防尘性能佳,耐湿热和大气老化。
固化后具有良好的绝缘、抗压、粘接强度高等特性。
•JL-610:耐120度高温快干AB胶:粘度5000-8000cps;外观透明液状体快速固化系列、透明粘稠状环氧树
脂粘接剂;可低温或常温固化,固化速度快;固化后粘接强度高、硬度较好,应用于电子元器件及工艺品、礼品的粘接固
定,对于金属、陶瓷、木材、玻璃及硬质塑胶橡胶之间的封装粘接,有优异的粘接强度。
•JL-605:5分钟快干透明AB胶:为透明无色常温固化,固化速度快,粘接强度高、硬度较好透明光亮,韧性佳不脆。
主要用于:粘合,修补,灌封。
2.使用注意事项:
•粘木头时,建议采用环氧树脂AB胶、耐120度高温快干AB胶或5分钟快干透明AB胶。
•根据具体需求选择合适的胶水,并遵循使用说明。
3.维护和保养:
•避免在潮湿的环境中使用。
•避免长时间暴露在阳光下。
•避免与油、酸、碱等物质接触。
总的来说,环氧树脂胶是一种非常有效的木头粘接剂,但使用时需注意上述事项,以保证最佳效果。
如需更多信息,建议咨询专业人士。
本公司产品使用说明书
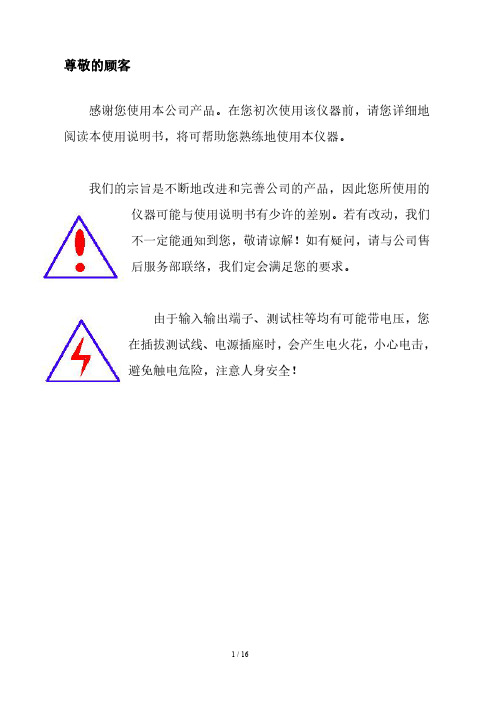
尊敬的顾客感谢您使用本公司产品。
在您初次使用该仪器前,请您详细地阅读本使用说明书,将可帮助您熟练地使用本仪器。
我们的宗旨是不断地改进和完善公司的产品,因此您所使用的仪器可能与使用说明书有少许的差别。
若有改动,我们不一定能通知到您,敬请谅解!如有疑问,请与公司售后服务部联络,我们定会满足您的要求。
由于输入输出端子、测试柱等均有可能带电压,您在插拔测试线、电源插座时,会产生电火花,小心电击,避免触电危险,注意人身安全!◆慎重保证本公司生产的产品,在发货之日起三个月内,如产品出现缺陷,实行包换。
一年(包括一年)内如产品出现缺陷,实行免费维修。
一年以上如产品出现缺陷,实行有偿终身维修。
◆安全要求请阅读下列安全注意事项,以免人身伤害,并防止本产品或与其相连接的任何其它产品受到损坏。
为了避免可能发生的危险,本产品只可在规定的范围内使用。
只有合格的技术人员才可执行维修。
—防止火灾或人身伤害使用适当的电源线。
只可使用本产品专用、并且符合本产品规格的电源线。
正确地连接和断开。
当测试导线与带电端子连接时,请勿随意连接或断开测试导线。
产品接地。
本产品除通过电源线接地导线接地外,产品外壳的接地柱必须接地。
为了防止电击,接地导体必须与地面相连。
在与本产品输入或输出终端连接前,应确保本产品已正确接地。
注意所有终端的额定值。
为了防止火灾或电击危险,请注意本产品的所有额定值和标记。
在对本产品进行连接之前,请阅读本产品使用说明书,以便进一步了解有关额定值的信息。
请勿在无仪器盖板时操作。
如盖板或面板已卸下,请勿操作本产品。
使用适当的保险丝。
只可使用符合本产品规定类型和额定值的保险丝。
避免接触裸露电路和带电金属。
产品有电时,请勿触摸裸露的接点和部位。
在有可疑的故障时,请勿操作。
如怀疑本产品有损坏,请本公司维修人员进行检查,切勿继续操作。
请勿在潮湿环境下操作。
请勿在易爆环境中操作。
保持产品表面清洁和干燥。
-安全术语警告:警告字句指出可能造成人身伤亡的状况或做法。
拼板胶使用说明书
拼板胶使用说明书1. 固化剂用量,一般标准用量为12%的重量比,即1kg胶+0.12kg固化剂。
固化剂的添加量在少于10%时,胶膜的耐溶剂性,耐候性及耐水性将会达不到要求,强度会大为降低,产品性能只能介于欧洲DIN EN204-D2至D3之间, 固化剂的添加量在10%-12%时,胶膜的耐溶剂性,耐候性及耐水性只能介于欧洲DIN EN204-D3至D4之间; 固化剂的添加量在12%-15%时,胶膜的耐溶剂性,耐候性及耐水性将会随固化剂的增加,产品性能符合到欧洲DIN EN204-D4及日本JAS K6806-2003的标准.2. 夏天气温在30℃以上时,因气温高,固化剂和胶水的反应速度会加快并产生大量气泡,而且气温升高,胶水表面易结皮,所以必须提高胶水的涂布量10%,气温升高至35℃时胶水的粘度会快速上升,表面容易形成胶膜,易形成干燥胶合,建议涂胶量增加20%或改用双面涂胶并在涂胶后立即拼合,夏天高温时,在涂胶后最好不要置在空气中超过两分钟,同时检视胶面,必须保证胶面湿润无形成一层胶皮。
在冬季,气温在0~10℃时胶合作业场所应加温,最低冷压作业温度应在5℃以上;气温在20℃以下时要适当增加固化剂的添加量,保证在13%-15%之间,冷压时间应延长。
标准涂胶量为220(冬天)~280(夏天)g/m2,注意平均分布不可缺胶或局部涂胶过多。
3. 不要由于天气太热(如35℃或以上)而减少固化剂的用量,最好是减少胶水的调配量,以在40分钟内用完为好,例如原来用2kg胶+0.24kg固化剂的,则改用1kg胶+0.12kg 固化剂(2000cc胶水+ 200cc固化剂则改为用1000cc胶水+100cc固化剂),适时的管理可确保粘合质量,才能有良好稳定的粘合品质。
4. 胶水使用前必须搅拌使上下均匀之后才可使用,因胶液放置过久时上下的粘稠度可能会不一样。
在加入固化剂后要用木棍或电钻搅拌至胶液成均匀浅米黄色,静置五分钟后方可使用。
环氧树脂高硬度打磨胶说明书
环氧树脂高硬度打磨胶说明书主剂8104A 固化剂8104B产品特性:本品为透明环氧胶,固化后可打磨、抛光,也叫打磨胶,流动性好、消泡性能好;需加温固化,固化速度适中;固化后具有良好的耐溶性、抗创性,硬度高、耐黄变、透明性佳、附着力好,打磨时不起皱、不松脱;使用时可添加透明膏、不透明色膏、萤光色膏、珠光色膏、夜光粉、金葱银粉等颜料根据不同工艺加以调配。
应用领域:适用于皮带扣、抽屉把手、拉手、相框、徽章、标牌、匙牌、假珐琅等工艺品的滴胶后打磨;其它产品如大理石、工艺品、陶瓷、五金、塑胶、电子、木材等产品的表面滴胶及抛光打磨。
三、使用及固化工艺:1、配比: A :B = 3 : 1(重量比)2、可使用时间:25℃,40-45分钟。
2、表干时间:25℃,4-6小时3、固化工艺:前期40℃*3小时后期100℃*2小时四、注意事项:1、本品在混合后就开始逐步固化,粘度会逐渐上升,且会放出热量。
2、一次配胶量越多,固化速度越快,放热量越大,所以应控制一次配胶量,以免由于固化速度快而缩短可使用时间,混合后的胶水要在最短的时间内使用完。
3、有极少数人长时间接触胶水会产生轻度皮肤过敏,有轻度痒痛,建议使用时戴防护手套,粘到皮肤上请用丙酮或酒精擦去,并使用清洁剂清洗干净。
4、在大量使用前,请先小量试用,掌握产品的使用技巧,以免差错。
五、固化后特性:产品特性单位数值硬度SHORE D 86-88抗压强度Kg/mm2 22-25冲击强度Kg/mm2/cm2 8-9吸水率(25℃*24小时) % ≤0.1弯曲强度Kg/mm2 14-15热变形温度90最高耐温130六、储存:远离明火,于阴凉干燥处密封保存,存放环境温度不宜太高,10-30℃,湿度70%以下,过期后,如经试验合格,仍可继续使用。
七、产品包装:20KG/箱(4壶/箱)。
树脂打磨胶技术参数说明书
产品特点:1、透明环氧ab胶,固化后可打磨、抛光,也就常说的打磨胶,流动性好、消泡性能好。
2、可常温固化、加温固化则能加快速度提高至更佳的硬度:3、固化后具有良好的耐溶剂性、抗划伤,硬度高、透明性佳、附着力好,打磨时不起皱、不松脱:4、使用时可与透明色膏或各种色浆加以调色。
适用范围:适用于皮带扣、门把手、拉手、相框等五金工艺品的滴胶、打磨:其它产品、工艺品等产品的表面滴胶以及抛光打磨。
产品外观及物性:使用方法:1、配比:A : B = 3 : 1:(重量比)可使用时间:25℃× 40-45分钟(100g混合量)表干时间:25℃,4-6小时固化工艺:前期40℃×3小时后期100℃×2小时2、要滴胶的产品表面需要保持干燥、清洁;3、按配比取量且称量准确,切记配比是重量比而非体积比,A B剂混合后需充分搅拌均匀,以避免固化不完全;4、混合后的胶量能进行抽真脱泡处理,可使液中的气泡安全排除;5、搅拌均匀后请及时进行灌胶,并尽量在可使用时间内使用完已混合的胶液;6、固化过种中,请保持环境干净,以免灰尘或杂质落入未固化的胶水中。
固化后特性:注意事项:1、混合在一起的胶量越多,其反应就越快,固化速度也会越快,注意控制一次配胶的重量;由于反应速度加快,可使用的时间也会缩短,混合后的AB胶液尽量在短时间内使用完。
2、可使用时间:是指在25℃条件下,100g混合后的胶液粘绸度增加一倍的时间,并非可操作时间之后,胶液绝对不能使用;3、有极少数人长时间接触胶液会产生轻度的皮肤过敏,有轻度痒痛,建议使用时戴上防护手套,粘到皮肤上请用丙酮或洒精擦去,并使用清洁剂清洗干净;4、在大量使用该产品前,请先小量试用,掌握产品的使用技巧,以免造成不必要的损失。
BLT自闭防水胶产品说明
BLT自闭防水胶BLT自闭型树脂乳液聚合物水泥防水胶(速凝型)一、产品概要BLT自闭防水胶是由韩国建筑材料尖端科技技术开发研制的高性能环保型防水胶。
BLT自闭防水胶,液料由天然树脂高分子乳液、及降解性聚烯烃抗接技高聚物、防老剂、防霉剂与多种助剂经特定工艺条件生产的水性浆状黏、稠、厚的物料。
粉料为合成迁移金属矿物粉末。
现场将两者按设计比例混合拌匀涂刷或涂刮。
BLT自闭防水胶利用混凝土和水泥的自然相容性,在涂刷混凝土或砂浆基层、渗透和成膜后,形成带根带刺的无缝半刚半韧性连续弹性防水胶模。
BLT自闭防水胶具有无机材料的刚性和有机材料的韧性,是两者完美结合产生双重高性能的防水胶。
在韩国及亚洲地区建筑防水工程领域中被广泛应用,现具有40余年历史的技术沉淀。
壁立特牌BLT自闭防水胶液料壁立特--特殊骨材混合料现场按设计比例搅拌液料和混合料施工现场涂刮二、产品性能特点1、BLT自闭防水胶独特的龟裂自闭性(自封闭性)。
2、自闭防水胶渗透结构毛细通道起到结构自防水和结膜防水层的双重防水效果。
3、极强的抗振动、抗振荡性。
4、独有的不可剥离性(同类产品比较)。
5、独有的对水分平衡调节功能,因此涂层不起泡、不起鼓。
6 、防水层上面可以上人,可以做其它施工。
7、极强的粘结力和耐压力(测试数据)。
8、优良的延伸率。
9、绿色环保、安全无毒,耐酸、耐碱、难燃、无污染。
10、一次性修补小于5mm的裂缝。
11、潮湿基面、干燥基面、复杂结构、细部处理的随意性。
12、延长建筑物的寿命。
13、无需打保护层。
14、广泛的应用性。
15、BLT自闭防水胶的使用寿命和整体防水效果。
16、工期短、经济实用。
产品性能特点展示及说明:1、独特的龟裂自闭性(自封闭性)。
当混凝土产生裂缝时,防水层将入侵的水分加以吸收膨胀,来控制水的再度流入,在表面含有活性凝结体化剂的作用下,会形成碳酸钙吸收而将漏水止住。
产品自闭性检验方法:(采用GB/T 23445-2009)产品涂膜试件自闭性试验仪器里加水水位高度300mm 壁立特涂膜试件0.5mm厚壁纸刀在暴露的涂膜中心水至少渗漏2h后渐渐不渗漏为合格切割出长5mm的裂缝,让涂膜渗漏水2、渗透结构毛细通道起到结构自防水和结膜防水层的双重防水效果。
乐泰使用说明
乐泰使用说明LOCTITE 577管螺纹密封剂粗螺纹触变性,高粘度,快速固化,高强度。
用于M80以下不锈钢高压锥/直螺纹。
允许用于饮用水系统.loctite416 乐泰胶416,用于间隙填充,适用于塑料粘接,高粘度,适合于在塑料,弹性体和金属间隙填充应用。
粘接粗糙或不规则的表面。
Loctite? 444—中粘度瞬干胶中粘度,用于电器元件跳线固定。
超强快干跳线胶。
高粘度,耐高温,用于跳线固定,大部件应力释放,IC粘接。
正品乐泰603容油性一种具有容油性及其他污染物的通用型高强度固持胶。
密封并固持圆柱形零件总成,其最大填充径向间隙为0.13mm在30分钟内初固化,它能防止微振磨损及金属配合件的腐蚀乐泰620--耐高温◎高粘度,高强度,不流淌。
固持气门套管、注塑机芯套、阀套、缸套、键槽等。
◎可耐高温到200℃,对钢提供19.0N/mm2以上的剪切强度。
锁固及固持圆柱形配合件至0.4mm直径间隙。
能防止金属微振磨损及腐蚀。
密封防止泄漏。
loctite7452乐泰胶7452粘附性能促进剂。
用于聚烯烃或其它低能表面材料的表面上,与乐泰瞬干胶配合使用。
其特点是干燥时间短,及在零件寿命长正宗乐泰270厌氧密封胶Loctite270螺纹锁固剂高强度,是一种永久锁固的螺纹锁固剂,在极端的化学/环境条件下有优良的防锈及耐腐蚀性能乐泰518:厌氧型平面密封剂通用型,柔韧性好,耐流体性能优良,无腐蚀性。
特别适用于铝表面。
它能形成一个柔性,耐溶剂的密封层,不会撕裂或老化。
可以用于柔性金属装配包括铝的表面。
方便折卸及清除243耐机油,中强度,快速固化,可用于惰性表面,容油性好。
易拆卸,可在轻微油质污染的工作表面上使用。
用于乐泰预涂剂Dri-Loc螺栓拆装后重装时锁固。
用于M20以下螺纹的锁固与密封。
乐泰262螺纹锁固剂中高强度●适用于大多数金属表面。
触变性粘度,耐化学性好。
●用于M20以下螺纹的永久性锁固与密封。
●是一种永久锁固的螺纹锁固剂,在极端的化学/环境条件下有优异的防锈及耐腐蚀性能。
Mapelastic 315 专业水漏性泥坯水漏性胶水说明书
DESCRIPTIONMapelastic 315 is a trowel-applied, flexible, fiber-mesh-reinforced waterproofing and crack-isolation membrane for installation under ceramic tile or stone on indoor/ outdoor residential, commercial and industrial intermittent wet or submerged applications. Mapelastic 315 provides an excellent barrier to prevent water from migrating into other areas. Mapelastic 315 is compatible with any polymer-modified cement-based mortar (ANSI A118.4 or better) or epoxy mortar (ANSI A118.3). Mapelastic 315 exceeds ANSI A118.10 requirements for waterproofing and is IAPMO-listed for use as a shower-pan liner.FEATURES AND BENEFITS• Dual protection: provides waterproofing and crack isolation• Prevents in-plane floor cracks up to 1/16" (1,5 mm) wide from transmitting through tile or stone• Compatible with MAPEI’s Fiberglass Mesh and Mapeband™ accessories • Compatible with MAPEI mortars and grouts for complete system protection • Eliminates most surface preparation; excellent for smoothing over porous, uneven substrates• Durable and flexible; bonds to a wide range of surfaces• Install tile or stone after 8- to 12-hour cure.• Flood-test after 72-hour cure.INDUSTRY STANDARDS AND APPROVALS • ASTM C627 (Robinson): Extra Heavy Service Rating• ANSI A118.10 (Waterproofing Membranes For Thin-Set Ceramic Tile Installations): Exceeds; see “Product Performance Properties” section • ANSI A118.12 Standard (Crack Isolation Membranes For Thin-Set Ceramic Tile Installations): Meets Standard Performance (1/16" [1,5 mm]) WHERE TO USE• Interior/exterior floors, walls, countertops and ceilings of residential (homes, apartments, condominiums), commercial (airports, malls, office buildings, restaurants, fountains, pools) and industrial (dairies, breweries, food-processing plants)• Bathrooms (tub surrounds, showers, shower pans) as well as kitchens and laundries (floors, walls, ceilings, countertops)• Ideal for multi-family or multi-story buildings where high-quality waterproofing is imperative to prevent water damage in rooms adjacentor below• Excellent for submerged applications such as swimming pools, spas, fountains, water features and steam rooms (when used in conjunctionwith a vapor barrier; see SR613-07 and SR614-07 in TCNA handbook,or TTMAC 321SR) when completely covered with ceramic tile or stone • Balconies, decks and terraces over unoccupied space• Interior/exterior building facadesLIMITATIONS• Do not use over substrates containing asbestos.• Do not apply directly over gypsum-based patching or leveling compounds (see “Suitable Substrates” section below), sheet vinyl, vinyl composition tile (VCT), self-stick tile, laminate surfaces, metal or fiberglass surfaces, or poured epoxy floors.i cs t®315• Do not apply directly over substrates consisting of plank wood flooring, presswood, particleboard, chipboard,oriented strand board (OSB), pressure-treated plywood,oil-treated plywood, Luaun plywood, Masonite or otherdimensionally unstable materials.• Do not use over cracks or control joints subject to out-of-plane movement, or in-plane movement greater than1/16" (1,5 mm).• Do not use where excessive substrate moisture and/ or where negative hydrostatic pressure exists. Themaximum amount of acceptable moisture in a concretesubstrate for Mapelastic 315 is 3 lbs. per 1,000 sq.ft. (1,36 kg per 92,9 m2) per 24 hours as determinedby a calcium chloride test kit. When moisture vaporemissions are in excess of 3 lbs. per 1,000 sq. ft. (1,36 kgper 92,9 m2) per 24 hours, call MAPEI’s TechnicalServices for recommendations.• Do not use as a roof deck membrane or wear surface, or on plywood in exterior applications.• Do not use with solvent-based materials.• Do not use premixed mastics to set tile over Mapelastic 315.• Use only a MAPEI epoxy or urethane setting material when installing moisture-sensitive natural stone or manmadetiles, such as agglomerates, over Mapelastic 315.Note: On occasion, dimensionally weak natural stonetile that normally would not be categorized as moisture-sensitive (such as travertine, limestone, marble andagglomerates) can exhibit doming, cupping or curlingwhen using wet-set or medium-bed mortar methods ofinstallation over impervious sheet membranes such asMapelastic 315. For this reason, areas requiring morethan 3/8" (10 mm) buildup require the use of a self-leveling underlayment or cured mud-bed applicationbefore installation of Mapelastic 315.When installing natural stone, always do a mockuparea of the proposed installation and allow materials toreach full cure to ensure achieving the desired effect. Formore information regarding these methods or materials, contact MAPEI’s Technical Services before installationor design.SUITABLE SUBSTRATESInterior and exterior• Fully cured concrete at least 28 days old (See“Limitations section”)• Masonry walls of cement block or brick• Cured cement mortar beds (at least 3 days old)• Cement backer units (CBUs)Interior only• Gypsum wallboard (walls only, in approved application areas only)• Cured leveling coats (at least 3 days old)• Approved gypsum underlayments. For specific instructions, see the technical bulletin “Installingover gypsum” at or contact MAPEI'sTechnical Services Department.• Radiant-heated substrates• Well-bonded, unglazed ceramic, porcelain and quarry tile, and cement terrazzo floors• Spot-bonding to PVC, copper, brass and stainless steel pipes (abraded)• Exterior-grade plywood for interior residential floors and countertops in dry areas only. Plywood must be Group1, CC-type, conforming to APA classification and U.S.Product Standard PS 1-95 or COFI exterior plywood“Select” or “Select Tight Face” conforming to CSA-0121standard for Douglas fir. (See TCA handbook for additional information and the following statement regardingdeflection.)Consult MAPEI’s Technical Services Department for installation recommendations regarding substrates and conditions not listed.Tile Council of North America (TCNA)Statement on Deflection CriteriaFloor systems, including the framing systemand subfloor panels, over which tile will beinstalled should be in conformance with the IRC[International Residential Code] for residentialapplications, the IBC [International Building Code]for commercial applications, or applicable buildingcodes.Note: The owner should communicate in writingto the project design professional and generalcontractor the “intended use” of the tile installation,in order to enable the project design professionaland general contractor to make necessaryallowances for the expected live load, concentratedloads, impact loads, and dead loads including theweight of the tile and setting bed. The tile installershall not be responsible for any floor framing orsubfloor installation not compliant with applicablebuilding codes, unless the tile installer or tilecontractor designs and installs the floor framing orsubfloor.SURFACE PREPARATION• Apply when substrate and ambient temperatures are between 40°F and 95°F (4°C and 35°C).• All suitable substrates must be smooth, structurally sound and free of any substance that could preventadhesion.• Do not use chemical means (acid etching or stripping) to prepare approved substrates. Use mechanical methodsonly.• To remove any bond-inhibiting materials, concrete substrates should be mechanically cleaned and preparedby diamond-cup grinding or other engineer-approvedmethods to obtain the International Concrete RepairInstitute (ICRI) concrete surface profile (CSP) of #2. Whenconcrete requires more mechanical preparation, the profilewill typically increase. In such cases, the surface can bemade smooth by applying coats of Mapelastic 315 notexceeding 5/64" (2 mm) per coat.• For details, see MAPEI’s Surface PreparationRequirements document for tile and stone installationsystems at or contact MAPEI’sTechnical Services Department.MIXING1. M ix in full units only according to the followingpremeasured ratios: 1 U.S. gal. (3,79 L) of latex, plus 25lbs. (11,3 kg) of powder (components of small kit); 2 U.S.gals. (7,57 L) of latex, plus 50 lbs. (22,7 kg) of powder.2. P our all of the Mapelastic 315 latex into a clean mixingcontainer. Gradually add all of the Mapelastic 315 powderwhile mixing with a low-speed drill (at about 450 rpm). 3. M ix for 2 to 3 minutes to a smooth, homogenous, lump-free consistency. Do not overmix, which will trap air andaffect waterproofing integrity.4. W hen mixing complete units, the mortar will be somewhatfluid. If a stiffer mix is preferred for vertical applications, the latex quantity can be reduced by up to 10% by volume. 5. D o not dilute latex or add more than the recommendedquantity of latex.6. Promptly wash tools with water after each mix. PRODUCT APPLICATIONFor General Waterproofing1. Pre-treat existing cracks1.1 M apelastic 315 may be applied directly to thesubstrate area that has existing in-plane cracks(up to 1/16" [1.5 mm] wide).1.2 C ut Fiberglass Mesh to cover the entire length andwidth of the crack, plus 3 times the width of thelargest tile being used (see following table for ratiosof tile size versus mesh width).Tile Size Minimum Width of MeshCentered Over Crack8" x 8" (20 x 20 cm) or less24" (61 cm)10" x 10" (25 x 25 cm)30" (76 cm)12" x 12" (30 x 30 cm)36" (91 cm)16" x 16" (41 x 41 cm)48" (122 cm)24" x 24" (61 x 61 cm)72" (183 cm)1.3 C enter the cut mesh over the crack’s width andlength. Mark on the floor where the mesh is to start.1.4 Set aside pre-cut sections (or entire rolls) of mesh.1.5 W ith the trowel’s flat side, key a liberal amount ofMapelastic 315 into substrate.1.6 I mmediately apply additional Mapelastic 315 andcomb with a 3/16" x 5/32" (4,5 x 4 mm) V-notchedtrowel to ensure the proper thickness.1.7 E mbed Fiberglass Mesh into fresh Mapelastic 315.Lap all seams and ends in the Fiberglass Mesh by2" (5 cm).1.8 U sing the trowel’s flat side, immediately flatten thematerial to a smooth, voidless membrane with athickness of up to 5/64" (2 mm).2. Pre-treat coves and corners2.1 P re-cut Fiberglass Mesh (or flexible Mapebandcove roll for superior surface transition protection)to length and 8" (20 cm) wide. Fold to leave 4" (10cm) of mesh on each side of the crease. This willhelp in fitting the material tightly into the corner.2.2 W ith the trowel’s flat side, key in a liberal amountof Mapelastic 315, at least 5" (12,5 cm) on eachside of the internal corners. This will ensure bondingto the substrate.2.3 I mmediately apply additional Mapelastic 315 andcomb with a 3/16" x 5/32" (4,5 x 4 mm) V-notchedtrowel to ensure the proper thickness.2.4 E mbed the pre-cut mesh (or Mapeband cove roll)into the fresh Mapelastic 315. Lap all seams andends in the mesh (Mapeband cove roll) by 2" (5 cm).2.5 U sing the trowel’s flat side, immediately flatten thematerial to a smooth, voidless membrane with athickness of up to 5/64" (2 mm).3. Pre-treat drains3.1 D rains must have a locking (bolt-down) collar.3.2 C oncrete should be removed within an 8" to 10"(20 to 25 cm) radius around the drain and anglingdown toward the drain flange.3.3 O nce the drain flange is exposed, loosen the boltson the locking collar and remove the collar fromthe flange.3.4 U sing MAPEI’s Planipatch®, smooth the rougharea around the drain where concrete was removed.3.5 P re-cut a 20" x 20" (51 x 51 cm) piece of FiberglassMesh. In the center, cut out a hole identical in sizeto the opening in the drain flange. (Note: Mapebanddrain flashing at 16-3/4" (43 cm) square can beused instead of Fiberglass Mesh for even greaterwaterproofing protection.3.6 W ith the trowel’s flat side, key in a liberal amountof Mapelastic 315 around the drain at least 1" to 2"(2,5 to 5 cm) greater than the size of the pre-cutmesh.3.7 I mmediately apply additional Mapelastic 315 andcomb with a 3/16" x 5/32" (4,5 x 4 mm) V-notchtrowel.3.8 E mbed the pre-cut Fiberglass Mesh (or Mapebanddrain flashing) into the fresh Mapelastic 315.3.9 W ith the trowel’s flat side, immediately flattenmaterial to a smooth, voidless membrane witha thickness of up to 5/64" (2 mm).4. Complete the waterproofing system4.1 A llow any previously treated areas to dry for about4 to 6 hours.4.2 Install Mapelastic 315 over the entire area.4.3 W ith the trowel’s flat side, key a liberal amountof Mapelastic 315 into substrate.4.4 I mmediately apply additional Mapelastic 315 andcomb, using the V-notched side of a 3/16" x 5/32"(4,5 x 4 mm) trowel to ensure proper thickness.4.5 E mbed Fiberglass Mesh into fresh Mapelastic 315.Lap all seams and ends in the Fiberglass Meshby 2" (5 cm). Then, using the trowel’s flat side,immediately flatten the material over the mesh toa smooth, voidless membrane with a thicknessof up to 5/64" (2 mm).4.6 I f needed to fully cover the Fiberglass Mesh(for a continuous waterproof membrane), applyadditional thin coats of Mapelastic 315 up to5/64" (2 mm) in thickness, per coat, to completelyencapsulate the Fiberglass Mesh. Do not exceed5/64" (2 mm) per coat.4.7 A llow 4 to 6 hours of drying time between coats.4.8 A pply a bead of commercial-grade silicone caulkaround the top outer edge of the drain flange. Thenset and bolt down the drain collar.4.9 F ill the depressed area around the drain with sandand cement mortar mix to the desired height.4.10 L et Mapelastic 315 cure 8 to 12 hours at an ambienttemperature of 73°F (23°C) before applying tile,stone or bonded mortar toppings. Curing timesdepend on ambient and substrate temperature,substrate porosity and jobsite humidity. Expectshorter drying times in warmer jobsite conditions,and longer drying times in cooler jobsite conditions. For IAPMO-Listed Shower Pan Liner Installation1. F ollow directions from General Waterproofing instructions2.1 through 4.6, and allow to dry.2. T o meet IAPMO requirements for a shower pan liner,apply a thin top coat of Mapelastic 315 (without anyadditional mesh). Do not exceed 5/64" (2 mm) thicknessper coat.3. A llow 4 to 6 hours of drying time between coats.4. A pply a bead of commercial-grade silicone caulk aroundthe top outer edge of the drain flange. Then set and boltdown the drain collar.5. L et Mapelastic 315 cure for 8 to 12 hours at an ambienttemperature of 73°F (23°C). It is then ready to receivetile, stone or bonded mortar toppings. Curing timesdepend on ambient temperature, substrate temperature, substrate porosity and jobsite humidity. Expect shorterdrying times in warmer jobsite conditions, and longerdrying times in cooler jobsite conditions.6. I f flood-testing the complete Mapelastic 315 system, waitat least 72 hours at 73°F (23°C) after the last applicationof Mapelastic 315 (without mesh, tile or stone) beforeflood-testing (per ASTM standard).For Crack Isolation Only1. Existing cracksP er the section “Pre-treat existing cracks” in the General Waterproofing instructions, address any existing cracks that are to be isolated from ceramic tile or stone.2. Full floor for potential cracks up to 1/16" (1,5 mm)2.1 A llow any previously treated areas to dry about4 to 6 hours. Then install Mapelastic 315 over theentire area (no mesh required).2.2 W ith the trowel’s flat side, key a liberal amountof Mapelastic 315 into the substrate.2.3 I mmediately apply additional Mapelastic 315 andcomb, using the V-notched side of a 3/16" x 5/32"(4,5 x 4 mm) trowel to ensure proper thickness.2.4 W ith the trowel’s flat side, immediately flattenmaterial to a smooth, voidless membrane witha thickness of up to 5/64" (2 mm).2.5 L et Mapelastic 315 cure 8 to 12 hours at an ambienttemperature of 73°F (23°C) before receiving tile,stone or bonded mortar toppings. CLEANUP• Excess material should be removed from surface, hands and tools while fresh with a damp sponge and clean water.• Cured material must be mechanically removed. PROTECTION• Provide for dry, heated storage on site and deliver materials at least 24 hours before work begins.• Do not store Mapelastic 315 powder or latex in direct sunlight.• Do not allow Mapelastic 315 latex to freeze.• Protect installed Mapelastic 315 installation from contamination and damage by other trades beforeinstalling tile or stone.• ProtectMapelastic 315 installation from rain and freezing for at least 7 days.• Protect Mapelastic 315 installation from sharp point loading that may gouge it and compromise thewaterproofing integrity.• Protect finished floors from heavy equipment (fork lifts or scissor lifts, etc.) during remainder of construction.• Protect walls from impact, vibration and hammering on adjacent and opposite walls for at least 7 days afterMapelastic 315 installation.• Cure times depend on ambient and substrate temperature, substrate porosity and jobsite humidity. Expect shorterdrying times in warmer jobsite conditions, and longerdrying times in cooler jobsite conditions.Continued on Page 6Product Performance PropertiesPackagingequipment, thickness applied and applications methods used.Continued from Page 4。
- 1、下载文档前请自行甄别文档内容的完整性,平台不提供额外的编辑、内容补充、找答案等附加服务。
- 2、"仅部分预览"的文档,不可在线预览部分如存在完整性等问题,可反馈申请退款(可完整预览的文档不适用该条件!)。
- 3、如文档侵犯您的权益,请联系客服反馈,我们会尽快为您处理(人工客服工作时间:9:00-18:30)。
3140胶技术说明书
道康宁DOW CORNING 3140 RTV硅橡胶包装规格:
100ml/支,300ml/支产品特性:
1)道康宁3140RTV敷形涂料是一种单组配方、通用配制、高粘度、自流平、室温固化的的硅酮弹性体。
2)固化时产生的副产品是非腐蚀性的。
因此,道康宁3140 RTV敷形涂料可用于易于腐蚀的电气/电子设备。
粘度的液体,固化后成为坚韧、耐磨的弹性体,主要用于改善引出端与焊料结合处的覆盖性能和薄层密封。
4)道康宁3140 RTV敷形涂料是一种清彻、半透明的材料,便于对被涂覆的元器件进行目测识别、检查和修复。
它具有良好的耐磨性和坚韧性,适用于要求坚固耐用的应用场合。
5)特别适合用于室温固化操作的工艺,典型的应用如:缆
线终端,连接器,晶体振荡器,印刷电路板及厚薄混合电路板的涂层。