Pv3D-5.摄影机
什么是全景环拍摄影
什么是全景环拍摄影?现实中的人置身于自然环境中,视觉是可以不受限制的,你只要转动头,眼睛就可以看到上下左右的全方位场景,而普逼的摄影只能在取景框范围去迭取有限的景物图像。
全景摄影就是通过把相机环360 度,上下180度拍摄的一组照片拼接成一个环形的全景图像,通过专用的播放软件在电脑上或者互联网上显示,从而使您能用鼠标控制环视的方向,自由可左,可右,可上,可下,可近,可远。
使您感到就在自然环境当中,您好像在一个窗口中浏览外面的大好风光。
全景摄影并不是新东西,在过去,就有价格昂贵的全景摄影机可以拍摄360度的高质量全景照片,但它只能晒成长条相片,却没有环形展示自己的平台。
只有计算机和互联网的发展才使她有了全新的含义和广泛的应用,现在,您可以到下面的网址看一个巴黎铁塔的全景照片。
这种用鼠标可拖动浏览的全景照片,是相机转动拍摄的符合人眼自然视觉习惯的照片。
在这网上我们可以自由地转换不同的场景,全方位观赏美丽的欧洲风光,这就是全景环拍摄影加互联网的魅力。
/tour/08toureiffel/08toureiffel.html为什么全景摄影突然加快了发展?以往数码全景照片的质量,受到了很多技术条件的限制,直到了如今,PC 发展到cpu多核,处理能力更强大,网络进入3G年代,全景自动拼接软件日渐成熟,播放软件的功能有了很大的提高,技术上的突破,再加上数码摄影器材的进步和普及,市场产生需求等各方面因素,才使到全景摄影有了得到更大发展的条件。
其次,有别于普通数码摄影可以即拍即显示效果,拍全景摄影,特别是拍球形全景摄影,最终效果如何是一种悬念。
拍全景不但在拍摄的时候取景、用光要用一种新颖的全景意识眼光,而且拍摄器材运用也需要有丰富摄影基础理论知识,拼接合成过程更需要懂软件运用和电脑图像处理技术。
可以说,无论拍摄或后期处理,处处无不考验摄影者的个人艺术素养和技术能力。
全景拍摄加后期制作的多样性变化,给摄影者提供了更大的创作空间,使照片更具个性化,这种集个人综合能力去完成一张作品的过程,其实也是一种自我能力提升的过程和享受的过程,这种从期待到成功过程带来的感受,只有追索到早期黑白摄影的暗房冲晒过程才曾经有,这也正是玩全景摄影令人入迷之处。
圆展实物摄影机AVerVisionCP355

圓展實物攝影機 AVerVision CP355
影像極致銳利 蛻變再造經典
全新 AVerVision CP355 實物攝影機除具備 320 萬高畫質影像感測器外,其總放大倍率大 幅提升至 80 倍(5 倍光學放大 + 2 倍 AVerZoom™ + 8 倍數位放大),任何教材放置在鏡 頭下方,都能立即轉化成清晰鮮明的影像!CP355 超廣角鏡頭拍攝範圍可達 A4 尺寸, 並附有雷射定位點指示簡報物件的擺放位置,增加老師使用的方便性。清晰的畫質加上 24fps 的顯示速率,不論是靜態的文字或圖片,還是動態的教學步驟,都可藉由大螢幕清 楚呈現。而獨家智慧型連拍功能,輕鬆紀錄老師的教學過程,可連續擷取靜態影像並儲 存至內建的記憶體,觀摩、分享、複習,製作 e 化教材就是這麼簡單。此外,CP355 搭 配全新研發 AVer+軟體,提供老師更多樣化的教學工具。
顯示速率
最高可達 24fps
對焦功能
自動/手動
文件照射範圍
400 x 300 公釐
畫面旋轉
鏡頭式旋轉 0°/ 90°/-90°
內建記憶體
最高可儲存 80 張圖片 (圖片解析度可達 300 萬畫素)
圖像效果
彩色/黑白/負片/鏡射/旋轉/凍結 (具正/負片轉換功能)
影像調整功能(白平衡/曝光/夜視) 自動/手動
產品規格
影像/功能
影像感測器 總畫素
1/2.5 吋 CMOS 影像感測器 320 萬畫素
最高解析度 鏡頭 光圈
HD 720P (1280 x 720) F 3.2 (Wide), F 6.8 (Tele) 自動
放大倍率
80 倍總放大倍率 (5 倍光學放大+ 2 倍 AVerZoom™ +8 倍數位放大)
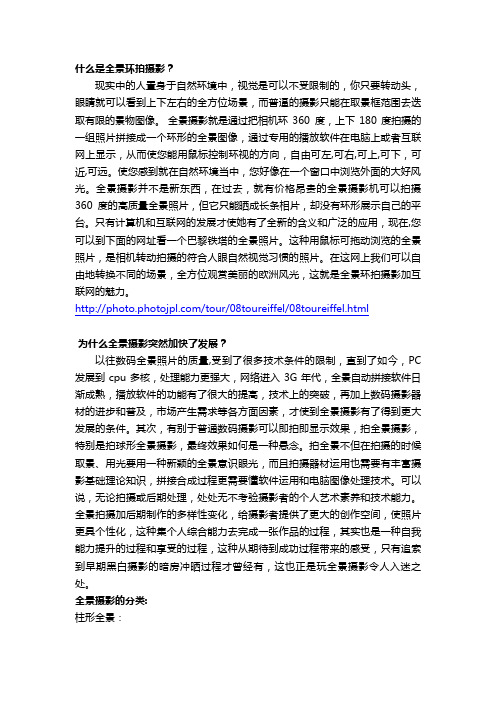
ps vr产品基本工作原理
ps vr产品基本工作原理
PS VR(PlayStation VR)是索尼互动娱乐的虚拟现实游戏配件,其基本工作原理如下:
1. 显示器:PS VR使用了一个高分辨率的OLED屏幕,分辨
率为1920x1080,也就是每只眼睛看到的分辨率为960x1080。
显示器放置在面部朝向的头戴式装置内。
2. 追踪系统:使用内置的传感器和摄像机,PS VR能够追踪玩家头部的上下左右方向的移动。
这样玩家在虚拟现实场景中转动头部时,游戏画面也会相应地旋转。
3. 头部定位追踪:PS VR还利用一个追踪球来定位头部的位置。
传感器和摄像机能够追踪追踪球的位置和旋转,从而准确地计算出玩家头部的位置和方向。
4. PlayStation相机:PS VR需要配合PlayStation相机使用。
相
机能够追踪头戴设备上的定位追踪球,从而计算出玩家头部的位置和方向。
5. PlayStation游戏主机规范:PS VR是为PlayStation游戏主机
开发的,需要连接到主机上才能使用。
主机会根据玩家头部的位置和方向来调整游戏画面,使其与玩家的头部运动相匹配。
通过这些技术和设备的组合,PS VR能够提供给玩家一种更加沉浸式的虚拟现实游戏体验。
玩家可以感受到游戏画面围绕自
己的全景视角,头部的移动也能与游戏画面实时同步,增强了游戏的真实感和身临其境的感觉。
意大利V5放映机控制系统解析及使用维护(一)

着 紧 急 停 机 按 钮 ( E) P 、马 达 控 制 电路 报警 继 电器 常 闭 接 点 ( bA) Rs — 、5个 门开 关 ( 1 MP 、MP 、MP 、MP 、MP ) 2 3 4 5 。其 中任 何 一 个 开关 和接点 接 通 ,继 电器 R s和 RS 线 圈都 会 通 电 , 1 其接 点 或断 开 停 机 ,或 接 通 报 警 ,并 且 报 警 指 示 灯
电器 ,在 RC N1线 圈 回 路 中 串联 着保 护 继 电 器 的 常 闭 接 点 R - SB
和 Rs— aA,只要 是其 中一 个 断 开 ,
R N1线 圈 就 会 释 放 ,马 达 就 会 C
停止 。
接线 端 子 圆 和 团 之 间 并 联
图 2 安 全 保 护 电路 原 理 图
动放 映控 制系统 ,其后 又 不 间断地进 行 了多 项改进 。 三 十多 年来 ,该 机 畅销 于欧 、美 、亚洲 的数 十 个 国 家 ,如 广 泛 应 用 于 美 国 AMC、Ge ea ie n rlCn ma 、 Le o ws院 线 和 英 国 的 R n 、Od o 、S e— e tr ak e n trC n u y 院线 等 许多 知名 的 大 院线 。 V5型放 映 机 完 全 采 用模 块 式设 计 ,十分 灵 活 。 它 的 操 作 简 便 , 性 能 可 靠 ,可 配 用 从 5 O 到 OW l O O 灯 泡 的各 种形 式 的灯 箱 ,可配 装 1 o OO W 8 o米 或 30 0 0米 的 大 片 盘 。电 源 和 附 件 有 很 宽 松 的选 择 范
的作 用 ,但 由 于 V5放 映 机 进 入 我 国 的 时 间 较 短 ,
介 绍 V5放 映 机 工作 原 理 以及 维 修 保 养 的 资 料 几乎 没有 。 以本文 为开 篇 的有关 V5放 映 机 的系 列 文章 , 是 笔者 在 使 用 V 5放 映 机 过 程 中根 据 、收集 和 整 理 的相关 数据 资料 编 写 的 ,供 同行 们参 考 ,不 当之处 ,
SIGMA DP3 Merrill摄影机说明书

The lens mounted on the Sigma DP3 Merrill is a medium-telephoto macro lens (equivalent to a 75mm lens on a 35mm SLR) specifically developed for this camera and exemplifyingSigma’s optical engineering expertise. Whether you’re shooting at infinity or the minimum focusing distance, imaging performance is impeccable, and the cropping effect of medium-telephoto macro shooting enables you to capture your vision with frame-filling impact. From macro images to portraiture, this lens offers an artistic palette capable of exquisite delicacy, profundity and narrative power.Each camera in the DP series features a state of the art lens matched to a state-of the art sensor. Now the DP3 Merrill expands your expressive potential.Y ou are the conductor and the Sigma DP series is your orchestra. The DP3 Merrill is a new instrument with which to enrich your photographic repertoire.CONCEPTThe Sigma DP3 traces its lineage back to March 2008 when the very first model in the DP series was born. At the time, that camera was one ofa kind — a fixed-lens compact equipped with the large sensor of a DSLR.Y et, single handedly, it created a whole new camera category, one which Sigma has continued to refine with each new generation.Sigma’s full color capture system creates clear, sharp images with a uniquely three-dimensional feel. With its much higher pixel count, the larger 46MP new-generation sensor brings you breathtaking definition, richly graduated tonality and true-to-life texture.The Sigma DP3 Merrill inherits the spirit of the DP Series, delivering the imaging performance of Sigma’s flagship DSLR, the SD1 Merrill, in a compact package. It’s a remarkable combination: the ultra-high image quality ofa medium-format sensor in an ultra-convenient compact format. Goingbeyond mere high resolution into the realm of artistic expression, this is a camera that will both surprise and delight the discerning photographer.Integrated lens-camera construction minimizes vibration arising in lens or shutter mechanisms, while the contrast detection autofocus system raises focusing accuracy. Y ou can count on the DP3 to perform at your command with quiet, positive precision.The unique identity of the DP1 Merrill is defined by its specially developed wide-angle lens (equivalent to a 28mm lens on a 35mm SLR), while the DP2 Merrill frames subjects witha “standard” focal length (equivalent to a 45mm lens on a 35mm SLR).Like its compatriots, the Sigma DP3 was designed for creative artists. It is the latest member of an exclusive group that weds compact, take-everywhere convenience and genuine photographic excellence.Now, your photographic toolkitis complete.A HUNGER FOR LIFE : The autumn leaves seem different somehow in Prague. I think it is probably because many of the trees in the city are willows and other types whose leaves do not change color before they fall. The result is a carpet of green leaves, seemingly still hungry for the sun. Spotting a pair of leaves still clinging tenaciously to life, I moved in close to capture their poignant loneliness.SIGMA DP3 Merrill Meets PRAGUEILLUMINATED BY THE PAST :There is an inherent coolness to theworks of many Czech photographers, but the great Josef Sudek is an exception. Despite the wartime loss of one arm, he tirelessly photographed the city of Prague, producing images of great warmth and affection. In this shot, which I took in the hallway leading to Sudek’s atelier, the light reflecting off the wall was like a gift from the great man himself, a photographic opportunity of rare moment.THE V ALUE OF SIMPLICITY : I came upon this chair outside a locksmith’s shop at Praha-Holešovice railway station, and was immediately struck by its stark simplicity. Battered and worn, it looked almost ready for the trash. But it was still usable, and had been kindly placed there for customers to sit on while they waited to have their keys duplicated. Coming upon it suddenly, I felt like I had discovered something that I myself had misplaced long ago. It was the importance of simplicity, the value of a job performed humbly and efficiently.T o me, every subject represents a new adventure. But sometimes I wonder … T o go to a place, discover something, and record its existence in a photograph … What does it really mean? Pondering the nature of my own creative impulse, I set off again in search of adventure.A VOY AGE OF SELF-DISCOVERY :As a travel destination, Prague has muchto offer. Much more, in fact, than the architectural and historical wonders for which it is famous. I believe the real Prague is more than the sum of its vaunted tourist attractions — they are only one part of the picture.As I walked the city, I focused the lens of my camera on the things that spoke to my heart. The exterior of an old building, its surface scarred by the passage of centuries … the worn, cobblestone pavement … a battered, yet still usable chair. Each of these things spoke to me, and I replied in turn — with my heart as well as my camera. Like passengers riding somberly together on the city’s trams,I recognized each as a fellow-traveler,a living reminder of something precious that I had forgotten in my own past.The act of photographing something, of recording its visual image, is essentiallya voyage of self-discovery. I am the thingsI photograph. What matters is not how I takea photo, but how I feel when I take it. It isa living record of who I am at that momentin time, a precious memory to keep forever.T o see more photos of Prague,visit the Sigma DP3 Merrill website atSENSORNew-generation Foveon sensorfor ‘emotional image quality’with a dramatically boosted pixel count.The Sigma DP3 Merrill is equipped withthe same 46MP Foveon X3 Direct ImageSensor as in the SD1 Merrill DSLR.Compared to the previous Foveon sensor,this new generation has an expanded areamatching the APS-C format (50% greaterequivalent focal length). It also has anarrower pixel pitch, thereby dramaticallyraising the total pixel count.In fact, we have achieved an extraordinary46MP (4,800 x 3,200 x 3) effective pixels,triple the previous number.This provides luminance resolutionequivalent to that of a 30MP CFA sensoras measured on the standard B&Wresolution chart used in conventionaldigital camera resolution testing.Medium-format-grade sensorredefines image quality with its richand wide range of expressionWith its much higher pixel count, thenew Foveon X3 Direct Image Sensorrealizes medium-format image generationcapability, while retaining the “emotionalimage quality” unique to our full colorcapture system.Sigma’s Dual TRUE II image processingengine was specially developed to processvast volumes of data at blazing speed,generating richly detailed images ofamazing depth, which can be enjoyedeven in large print formats.Eye-opening sharpness. Natural edgedefinition. Finely graduated tonality …Here is a camera that redefines “highimage quality” and invites you into a freshdimension of visual experience.The ‘Merrill’ nameDick Merrill (1949-2008), co-developer of therevolutionary Foveon image capture system, wasboth a brilliant engineer and talented photographer.As an expression of Sigma’s passion for photographyand in honor of Dick Merrill’s ability to realize artisticideals through technology, we have named thisnew-generation sensor the “Merrill.”T exture that’s indescribably lifelike. Rich tonal gradation.Honestly natural image quality rendered byour new-generation 46-megapixel sensor.See what you feelIt’s not just about seeing.Photographic expression involvescapturing what you feel.Here is a sensor with a richness of imaging datathat can rock your heart and soul.Unique sensor technology.Foveon X3 full-color capture system.T echnology that works just like film.Foveon X3 Direct Image Sensor.Faithfully records light’s pure richness without added color interpolation or low-pass filteringPerfect pair:New-generation sensor and newly developed high-performance DP lensThe Sigma DP Series single-handedly triggered today’s trend of fixed-lens high-end digital compact cameras. With Sigma's half century of lens making experience and expertise,the DP Series could offer specially developed lenses that won the acclaim of photography enthusiasts.For the DP3 Merrill, we designed a new dedicated lens that is perfectly matched to the new-generation Foveon X3 Direct Image sensor with its larger APS-C area (equivalent to 50% greater focal length): A medium-The construction of the special-design lensIMAGE HEIGHT (mm)CONTRASTLENSDedicated new DP lens optimizedfor the new-generation sensor.Resolving power for limitless creativityA medium-telephoto macro lensspecifically developed tounleash your creative impulses witha new standard of imaging excellence.Its resolving power is simplyoverwhelming.telephoto macro lens (equivalent to a 75mm lens on a 35mm SLR) for intimate compositions that capture the inner life of your subject with exceptional clarity and realism.This lens was specifically developed to maximize the “pure image quality” of the full color capture system and 46MP new-generation sensor.A lens that deliversprofoundly natural imagesAdvanced optical architecture and precision manufacturing combine in a lens designed to faithfully deliver light information to the sensor unsullied by aberration.The lens on the Sigma DP3Merrill creates consistentlycrisp, high-contrast images with accurately rendered ultra-fine detail. Outstanding image surface characteristics provide excellent sharpness in the plane of focus while gently transitioning to beautiful bokeh in other areas.The best lens.The best sensor.Hallmarks of Sigma, the lens expert.The best lens and the best sensor. These are the pillars that support Sigma's photographic philosophyin action. After all, designing and manufacturing lenses is at the coreof what we do best. This new DP lens achieves excellence in every parameter of performance, from its MTF curves to distortion and bokeh. It is truly a pinnacle of thelens maker’s art.T o maximize image quality whileminimizing lens barrel length, Sigmacombined one SLD glass and one glassmolded aspherical lens element. Withhigh-refraction glass elements, the result isa short medium-telephoto lens exhibitingvirtually ideal optical characteristics.Lens constructionSigma DP Lens 50mm F2.8 / MTF Chart10 lp30 lpSpatial Frequency Sagittal Line Meridional LineThe MTF chart gives the results at the wide-open aperture.x3f RA W image format files are your digital negativesMore convenient and flexible than ever: SIGMA Photo ProSIGMA Photo Pro software is designed for the creative photographer who wishes to personally control the image finishing process. It allows you to "develop" the image data you shot in RAW mode.Ever since we made our first digital camera, we have continued to refine our RA W data processing technology. The result, we believe, is the finest digital darkroom software available today. It has precisely the functions you really need — no more, no less. Even if you are new to RA W file formats, the intuitive interface makes it easy to use.For image correction, the Adjustment Controls Palette offers seven parameters: exposure, contrast, shadows, highlights, color saturation, sharpness, and the X3 Fill Light feature. T ogether with the Color Wheel, these versatile tools let you craft original masterpieces of photographic art.T o bring out the full potential of the 46MP image data captured by the new-generation Foveon X3 Direct Image Sensor, the full range of functions also includes white balance control, highlight correction, noise reduction and transverse aberration correction.A new monochrome interface lets you create powerful and authentic black-and-whiteimages using the complete light information captured by the Direct Image Sensor .Artistically ‘develop’ your photos with Sigma’s creative software.20DESIGNHigh-end digital SLR qualityhoused in a compact bodyCrafted quality you can feel.A compact camerayou can hold in one hand.Built to get you the shots youwant — when you want them.Speedily. Effortlessly. Repeatedly.True high-end performancethat’s always at the ready.Y our hands will recognize the feel ofquality — the finely crafted precision ofa high-end digital SLR housed ina compact body.A fixed-lens compact camera equippedwith a large imaging sensor.It is a category of camera created bySigma and one that Sigma continues torefine with the spirit of a true artisan.From tiny components to the completedproduct, Sigma’s Aizu factory delivers“made in Japan” quality usingstate-of-the-art manufacturing technology.Fuelled by a passion for what really mattersin photography, Sigma’s craftsmanship livesin every detail of the Sigma DP3 Merrill.like using an SLR.Easy-to-grip body designThe lens position is offset to enhance your grip ofthe camera body. This also helps you operate theshutter and command dial with a steady hand.Command dial for intuitive controlQS (quick set) button for favorite functionsInstantly recall ISO sensitivity, white balance and otherfrequently used functions.Handy mode button for ‘scene’ switchingLocated next to the command dial for easy accessand quick selection.3" LCD for high viewabilityHigh-definition 920,000 pixel wide-viewing-angleLCD monitor assists framing and focusing.ACCESSORIESSIGMA DP3 Merrill AccessoriesELECTRONIC FLASH: EF-140 DGA compact flashgun designed exclusivelyfor the DP series and featuringa Guide Number of 14. This flashgunextends the camera’s photographicpossibilities with such features as fill-in flashand full-flash for night photography.UPC Code : 0085126-925703FIL TER DG UV 52mmThe UV filter, does not only reduce ultravioletlight but are also ideal for protecting the lensduring general photography.UPC Code : 0085126-923693FIL TER DG WIDE CIRCULAR PL 52mmCircular Polarizing filters eliminate reflectionsfrom subject surfaces such as glass and waterand deepen the intensity of blue skies.UPC Code : 0085126-923808LENS HOOD: LH3-01The dedicated bayonet lens hood can beattached to block out extraneous light.UPC Code : 0085126-929565LENS HOOD : LH3-01FIL TER DG WIDE CIRCULAR PL 52mmFIL TER DG UV 52mmELECTRONIC FLASH : EF-140 DG2322IMAGE SENSORFormatImage Sensor Size Number of Pixels Aspect RatioFoveon X3® direct image sensor CMOS 23.5 x 15.7mmT otal Pixels: 48 MPEffective Pixels: 46 MP (4,800 x 3,200 x 3)3 : 2Focal Length35mm Equivalent Focal Length Lens F numberNumber of Diaphragm Blades Lens Construction Shooting RangeMaximum Magnification ShootingLENS50mmApprox. 75mm F2.8 ~ F167 Blades10 Elements in 8 Groups22.6cm ~ o o, LIMIT Mode (It is possible to choose Macro, Portrait and Scenery.)1 : 3Approx.Approx.Approx.Approx.Approx.Approx.Approx.Approx.Approx.Approx.Approx.Approx.MB MB MB MBMBMBMBMBMBMBMB MB452412 105.64.2 5 2.72 2.5 1.4 1SD Card, SDHC Card, SDXC Card, Multi Media CardLossless compression RAW data(12-bit, High, Medium, Low), JPEG(High, Medium, Low), RAW+JPEG, Movie(AVI)RAWHigh Medium Low 4,7043,2642,336x x x JPEGHigh4,7044,7044,704x x x Fine Normal Basic :::VGA :Medium 3,2643,2643,264x x x Fine Normal Basic :::Low2,3362,3362,336x x x Fine Normal Basic :::3,1362,1761,5683,1363,1363,1362,1762,1762,1761,5681,5681,568333x x x :::640 x 480 (Image area 640 x 426)RECORDING SYSTEMStorage Media File FormatFile SizeMovie ISO 100 ~ ISO 6400 (1/3 steps for appropriate sensitivity), AUTO: High limit, low limit setting is possible between ISO 100 ~ ISO 6400. When using with flash, it changes depending on the low limit setting.ISO SensitivityISO SENSITIVITY8 types (Auto, Daylight, Shade, Overcast, Incandescent, Fluorescent, Flash, Custom)WHITE BALANCESettings8 types (Standard, Vivid, Neutral, Portrait, Landscape, B&W , Sepia, FOV Classic Blue)COLOR MODESettingsContrast Detection Type9 points select mode, Free move mode (It is possible tochange the size of Focus Frame to Spot, Regular and Large.)Face Detection AF modeShutter release halfway-down position(AF lock can be done by AE lock button from menu setting)Focus Ring TypeAUTOFOCUSAuto Focus Type AF PointFocus Lock Manual FocusEvaluative Metering, Center-Weighted Average Metering, Spot Metering[ P ] Program AE(Program Shift is possible), [ S ] Shutter Speed Priority AE,[ A ] Aperture Priority AE, [ M ] Manual +- 3EV (1/3 stop increments)AE lock buttonAppropriate, under, over; 1/3EV steps up to +- 3EV for appropriate exposureEXPOSURE CONTROLMetering SystemExposure Control SystemExposure Compensation AE LockAuto Bracketing1/2000* - 30sec.(*Depending on the aperture value, shutter speed changes)Shutter SpeedSHUTTERSingle, Continuous, Self Timer (2sec. /10sec.), Interval timer, Unlimited ShootingDrive ModeDRIVE MODETFT color LCD monitor 3.0 inchesApprox. 920,000 PixelsLCD MONITORTypeMonitor Size LCD PixelsPC/IFAUDIO/VIDEOUSB (USB2.0)Video Out (NTSC/PAL), Audio Out (Monaural)INTERFACEEnglish / Japanese / German / French / Spanish / Italian / Chinese (Simplified) / Korean / Russian /Chinese (Traditional) / Nederlands / Polski / Português / Dansk / Svenska / Norsk / SuomiLCD Monitor LanguageMENUPower Battery LifeLi-ion Battery BP-41, Battery Charger BC-41,AC Adapter SAC-5 (with DC Connector CN-11) (Optional)Approx. 97 (+25°c)POWER SOURCE121.5mm/4.8"(W), 66.7mm/2.6"(H), 80.6mm/3.2"(D)400g/14.1oz (without battery and memory card)Dimensions WeightDIMENSIONS AND WEIGHTNote : T o help with the correct and safe of this product, please read the manual carefully first.Copyright© 2013 Sigma Corporation All Rights Reserved.The appearance, specifications and other aspects of this product are subject to change without notice for improvement purposes.SIGMA DP3 Merrill | PRINCIPAL SPECIFICA TIONSFor more information,visit the SIGMA DP3 Merrill website atSIGMA CORPORATION 2-4-16, Kurigi, Asao-ku, Kawasaki-shi, Kanagawa, 215-8530 Japan T el: +81-44-989-7437 Fax: +81-44-989-7448 www.sigma-photo.co.jp。
利用3D摄像机制作虚拟场景 Adobe Premiere Pro的虚拟摄影技巧

利用3D摄像机制作虚拟场景:Adobe Premiere Pro的虚拟摄影技巧Adobe Premiere Pro是一款功能强大的视频编辑软件,提供了许多创新和强大的工具,使用户能够将想象变成现实。
其中,虚拟摄影技巧是一项非常有趣和有用的功能。
本文将介绍如何利用Adobe Premiere Pro的3D摄像机功能来制作虚拟场景。
一、准备工作首先,在开始之前,确保你已经安装了Adobe Premiere Pro软件并熟悉其基本操作。
同时,你需要一些素材,包括一个虚拟场景模型(可以从其他来源下载或者自行制作)和一段要添加虚拟场景的视频素材。
二、导入素材打开Adobe Premiere Pro软件,点击“文件”菜单,选择“导入”-“文件”,将虚拟场景模型和视频素材导入到项目中。
三、创建3D摄像机在项目面板中,右键点击空白区域,选择“新条目”-“摄像机”。
在弹出的对话框中,选择“3D摄像机”。
四、调整3D摄像机设置在效果控制面板中,可以看到3D摄像机的属性和设置。
首先,调整摄像机的位置、旋转和缩放参数,使其适应虚拟场景模型。
可以直接在属性面板中输入数值或使用鼠标进行调整。
五、设置焦点和景深通过调整焦点和景深参数,可以模拟真实摄像机的焦点效果,增加场景的逼真感。
选择3D摄像机图层,在效果控制面板中找到焦点和景深选项,根据需要调整参数。
六、添加虚拟场景将虚拟场景模型拖放到时间轴中与视频素材对应的位置。
确保将其放在3D摄像机图层下方,以便正确显示。
七、调整虚拟场景的位置和大小选中虚拟场景模型图层,在程序监视面板中点击“选择和移动工具”。
然后,通过拖动和缩放来调整场景的位置和大小,使其与视频素材匹配。
八、渲染虚拟场景在时间轴面板中,选中3D摄像机图层和虚拟场景模型图层。
点击顶部菜单栏中的“合成”-“预览渲染”,即可渲染虚拟场景。
九、调整光影效果如果需要增加场景的真实感和明暗对比,可以使用Adobe Premiere Pro提供的光影效果。
vary相机

vr物理相机和max本身带的相机相比,它能模拟真实成像、能更轻松的调节透视关系。
单靠相机就能控制暴光,另外还有许多非常不错的其他特殊功能和效果。
Basic parameters :基本参数type:类型still cam照相机movie cam摄影机video摄像机targeted目标点film gate(mm)片门大小focal length(mm)焦距zoom factor放大系数f-number光圈系数target distance目标点距离(但targeted未勾选时有效) )distortion扭曲distortion type扭曲类型quadratic平方cubic立方vertical shift 垂直纠正guess vertical shift 自动垂直纠正specify focus手动调焦focus distance焦距(当specify focus勾选时有效)exposure暴光vignetting渐晕white balance白平衡shutter speed(1/x)快门(照相机)shutter angle(deg)快门角度(摄影机)shutter offset(deg)快门偏移(摄影机)latency(s)延迟(摄像机)film speed(ISO)底片感光速度Bokeh effiects:散景特效blades光圈刃片数rotation(deg)旋转center bias中心偏移anisotropy各向异性 3DMAX教程网sampling采样depth-of-field景深motion blur 运动模糊subdivs细分相机知识和几个重要参数的理解:f-number光圈系数光圈系数和光圈相对口径成反比,系数越小口径越大,光通亮越大,主体更亮更清晰光圈系数和景深成正比,越大景深越大shutter speed快门速度实际速度是快门速度的倒数,所以数字越大越快快门速度越小实际速度越慢,通过的光线更多主体更亮更清晰快门速度和运动模糊成反比,值越小越模糊ISO底片感光速度,值越大越亮white balance 白平衡,就是无论环境的光线影响白色如何变化都以这个白色定义为白色zoom factor这项参数决定了最终图像的(近或远),但它并不需要推近或拉远摄像机类似于真实相机的镜头渐晕(图片的四周较暗中间较亮)。
CameraFV—5相机教程解读

Camera FV-5使用手册Camera FV-5简介Camera FV-5是一款为移动设备量身定制专业级相机应用,为您带来专业单反级的摄影体验。
对于摄影爱好者和专业摄影师来说,这款相机应用程序都可以为您捕捉到最好的RAW影像,方便后期处理,获得令人惊叹的效果。
现在唯一的限制只是您的想象力和创造力了!主要特点:•可手动设置所有摄影参数:曝光补偿,ISO,测光模式,对焦模式,白平衡和程序模式。
•DSLR标准取景器显示:曝光时间,光圈,EV和包围曝光,设置停止。
•完成的包围曝光功能:设置3至7帧,无限停止间距,自定义EV平移。
•内置时间间隔计:制作令人惊叹的延时摄影、HDR摄影、可控图片序列。
•程序和速度优先模式。
•支持长达60秒钟的长曝光摄影,可拍出美丽的夜间照片和光迹照片。
•JPEG和RAW无损照片拍摄的图像格式(PNG),完美的后处理。
•音量键分配给所有的相机功能。
您可以调整EV,ISO,色温和使用音量键。
硬件设备与相机快门键也都支持。
•EXIF和XMP元数据支持。
•自拍定时器延迟拍摄。
•自动对焦,微距,触摸对焦,无限远对焦模式,和焦点锁定开关(AF-L)。
•背景照片开发和处理时,支持平稳,不间断的相机操作。
•多语言支持。
此款相机应用可手动控制相机的全部参数,就像使用单反相机一样,你可以不受限制的控制拍摄的每一个环节,然后在电脑上进行后期处理,因此,此款软件时绝不会让您错过每一个拍摄机会,它能为您带来与数码单反相同的拍摄体验。
*长时间曝光图像分辨率降低到2或1 MP*无损PNG储蓄是一种内存密集型操作。
某些设备可能需要为Camera FV-5升级内存,以便有充足的内存保存PNG格式。
*触摸对焦现在可以在Android 4.0+设备上运行。
Android 2.x一下,仅适用于摩托罗拉,HTC和NVIDIA®(英伟达™)相机驱动程序,还有一些三星的驱动程序或其他手机。
使用手册Camera FV-5为尽可能接近传统单反相机而设计,因此所有摄影参数如单反上的硬件按钮一样,可以在触摸屏幕与上控制。
- 1、下载文档前请自行甄别文档内容的完整性,平台不提供额外的编辑、内容补充、找答案等附加服务。
- 2、"仅部分预览"的文档,不可在线预览部分如存在完整性等问题,可反馈申请退款(可完整预览的文档不适用该条件!)。
- 3、如文档侵犯您的权益,请联系客服反馈,我们会尽快为您处理(人工客服工作时间:9:00-18:30)。
摄影机前面的章节,我们已经涉及到摄影机的使用了.本章,我们将看一下3D世界里的摄影机和他们的功能.很明显,Papervision3D中的摄影机不像现实世界的摄影机甚至在2D屏幕上也不可见.摄影机只是一个从我们浏览的场景及其中的物体引出的虚拟点.本章包含:●摄影机同样是DisplayObject3D●摄影机设臵●摄影机类型●设臵摄影机的目标首先我们简单的看一下什么是摄影机和Papervision3D库所实现的类.摄影机继承自DisplayObject3D不止基本体从DisplayObject3D中继承属性和方法,CameraObject3D也是它的子类.纵观之,Camera3D继承自CameraObject3D,CameraObject3D继承自DisplayObject3D.这意味着什么? 每个摄像机都从DisplayObject3D继承x,y,z属性,我们可以让摄影机绕坐标轴进行旋转.不但如此,还可以像旋转DisplayObject3D实例那样对摄影机进行操作.尽管摄影机没有在屏幕上可见,我们依然有很多方法可以控制它.摄影机还有一些自己专有的特性.基本摄影机设臵摄影机具体的基本设臵有:●缩放Zoom●焦距Focus●视野Field of view,通常称其为fov或FoV●远景平面和近景平面Near,far为了熟悉这些设臵,我们将简单的看一下3D计算机图形基础.之后看一个更容易理解它们之间关系的例子.下图显示了摄影机和它看到的物体.同时注意由近景面和远景面截断的金字塔的形状.该金字塔被截断的内部空间称为可视圆台.近景面与远景面是为了定义圆台而虚拟出来的面..现在,看一下可视圆台与观察孔(viewport)的关系以及圆台内部物体的最终绘制.不同的3D程序有不同的方式来设臵观察孔.Papervision3D中观察孔设在近面(near plane)处.因此虽然观察孔是2D的Sprite(注:Flash中可视对象容器)并且近面是垂直于摄像机的虚拟的面,但两者是有关系的.现在假设我们添加一个立方体到我们的场景中.在下图你会发现具有顶点,位臵及指定材质等3D信息的立方体处于圆台之中.Papervision3D将顶点投影到2d的观察孔并渲染立方图,这样我们就在屏幕看到了它.圆台是在屏幕上可视的3D区域,处于圆台之外的物体不会出现在屏幕上.如果Papervision3D对圆台之外的物体进行渲染将是一种浪费.分辨物体处于圆台内的过程及圆台之外的物体不渲染的过程称为:剔除(culling),主要作用是为了优化3D程序.若Papervision3D对不可见的顶点不进行渲染将节省很多资源.剔除在本章结尾处进行讨论.焦距Focus 和视野field of view焦距是摄影机和近面(观察孔)之间的距离是正数.可能是观看者与可视物体之间最短的距离.视野是摄影机在视图中的垂直角度.下图说明了焦距,视野和观察孔高之间的关系:焦距值越高摄影机与近面间的距离将越远.而物体之间将出现靠近,但他们的实际距离不变.而视觉上会出现压缩:减少焦距将增大视野.就像使用一个宽镜头会看到夸张的视野,近处的物体变的很大远处的物体变的很小.焦距设定过低将导致视野变形,平行的线汇聚到一点.摄影时你可以使用具有扭曲观念的鱼眼镜头来拍摄宽照片.设臵焦距:camera.focus = 12;由于初始化了不同的摄影机,焦距的默认值可能不同.所有类型的默认值大约是8.66但调试摄影机是10.用fov属性来设臵视野.camera.fov = 90;Camera3D类的构造器有一个fov参数默认值是60.如我们所见,定义视野的其中一个因素是观察孔高度.然而观察孔的宽高可以由程序员,每个程序来改变.因此如果你不为fov设定一个值并追踪fov,你可能得到的值不是默认的(60). (译注:本书对于fov说的不是很清楚,fov是观察的角度,比如人眼的fov差不多是90度,提供2张便于大家的理解)图1图2缩放,变焦缩放是人们所熟悉的一种观念.当放大一张图片或视频摄影机,图形将放大.整个场景放大了,此时并没有将摄影机移向场景.远近之间物体的距离看起来减少,造成了视野的压缩.Pavervison3D中当增大缩放值将会产生同样的效果.看下下面的图.缩放摄影机放大白色区域的物体.将会看到若我们保持焦距不变,为了放大我们看到的物体便需要降低fov的值.缩放的默认值是40.你可以随意调整.在之前的旋转木马的例子中摄影机的缩放调整为80.camera.zoom = 80;缩放,焦距,视野之间的关系如我们所见,缩放,焦距,视野之间有明确的关系.改变其中的一个将导致不同的结果.●降低缩放或焦距,视野变大●增加缩放或焦距,视野变小●增加或降低视野将降低或增加焦距,但不改变缩放这对我们的场景观意味着什么?为了更好的理解,可以打开CHO5_CameraSettingsDemo.swf.将会看到一些红色的面,4个在左,4个在右.还有一个蓝色的面在远处的z轴上.拖动滑动器有助于理解缩放,焦距,视野之间的关系.还可以调整摄影机的z轴坐标.如果你移动缩放,焦距,视野的滑动器,会看到其他的值随之的变化情况.将缩放设为12,焦距为6,z值为-160.将会得到一个很大很远的视野.再者,缩放设为60,焦距55,摄影机z轴坐标-2500将会得到一个压缩的视野.近景平面和远景平面圆台是由近景面和远景面截断金字塔形状产生的.近景面与远景面定义了摄影机到2个面的距离.焦距是摄影机与近面之间的距离,near和focus相等.设臵near 属性与焦距相同:(步骤相同,效果也相同)camera.near = 30;远景面是摄影机到远景面的距离.这样设臵:camera.far = 15000;假设你正在一个很广阔的空间中创建一个有很多物体的游戏.物体可能离摄影机很近,也可能很远,远的在屏幕上看不到.但是物体始终会被绘制而不管它们距离多远.因为有如此多的三角面片将被绘制,用户的计算机处理器可能会很费劲.这时让远面离摄影机近一些,圆台内的物体便会少一些,需要进行渲染的三角面片就少一些了.性能便得以提高了.当你创建一个游戏或其他的3d应用时你必须牢记这点.一些游戏甚至提供了设臵远面距离的选项.若一个用户的计算机不够快并且选择让远面离摄影机近一些,这将节省很多cpu 的计算量,让用户更愉快的进行游戏.另一个你可以使用的是属性指定摄影机工作时的目标(target).让我们看一下Papervision3D 中有几种摄影机摄影机类型Papervision3D 有4种摄影机:● 目标摄影机● 自由摄影机● 调试摄影机● 弹性摄影机目标和自由摄影机是最常用的类型也最先谈论.调试摄影机用于方便测试目的它内臵了一些基本的导航功能,并可以显示摄影机的相关信息.弹性摄影机是一个特殊类型它提供了一个简单途径来移动3d 物体,在游戏中比较常用.只要继承自BasicView,就可以通过传递BasicView 类构造器一个参数来选择摄影机类型.super(stage.stageWidth,stage.stageHeight,true,false,CameraType.TARGET);第二章已经看过这三个参数.第4个参数是观察孔的可交互性.现在说明第5个参数,设臵你选择的摄影机类型.这个参数是CameraType 的静态字符变量. ● CameraType.TARGET为了避免对象超过远面的物体被渲染,你需要设置eCulling 为true.我们计划在稍后的剔除小节里讨论useCulling 属性.● CameraType.FREE● CameraType.DEBUG● CameraType.SPRING要用这些值,必须先导入CameraType 类import org.papervision3d.cameras.CameraType;如果不传递任何参数,摄影机默认是目标类型.如果我们只传递了3个参数,那么第4,5个参数便使用默认值.现在详细看看几种摄影机之间的不同.目标摄影机是一直注视一个目标的摄影机.目标只要是DisplayObject3D 的实例就可以,可以是一个空白DisplayObject3D 或基本体.用法:camera.target = myTarget;如果传递CameraType.TARGET 作为摄影机的类型并没设臵目标,Papervision3D 将为你创建一个.通过用DisplayObject3D.ZERO 创建一个空的do3D 位于全局坐标系的原点.这样,摄影机将一直注视你场景的原点.自由摄影机行为与目标摄影机完全一样,不过没有注视的目标.自由摄影机一直向前看,方向是本地z 轴.如果选择CameraType.FREE 类型,目标便是null.演示目标与自由摄影机的不同为了熟悉自由与目标摄影机的不同,打开CameraTypeDemo.swf.你将看到一DisplayObject3D.ZERO 返回一个空的,坐标为(0,0,0)的DsiplayObject3D 对象个有线框材质的面(plane).也会看到(红,绿,蓝)色x,y,z三个轴.这些可视化的显示出来可以更直观的看到摄影机和3d物体.平面在坐标系的原点处.摄影机稍微升高了一些便于我们看到z轴.摄影机的y坐标是80.在例子中有鼠标的交互.鼠标左移,摄影机便会左移;反之亦然.通过点击目标按钮切换至目标摄影机, 平面成为摄影机的目标.camera.target = plane;摄影机的x坐标没用到,摄影机一直注视着平面,依靠x坐标摄影机实际上一直朝平面旋转.一旦为摄影机设立了目标,则它会一直面向该目标.因此摄影机将忽略一切旋转.简单起见,此例中的摄影机只有x轴.但是如果改变摄影机的y和z轴,摄影机也是一直注视着平面.通过点击其他按钮选择自由摄影机,将看到很明显的不同.当摄影机移动,摄影机只是一直注视本地坐标系的z轴.虽然可以看到面,但摄影机并不朝向它.下面图显示了2种类型的不同.左边描述了一个目标摄影机,当目标从左到右开始移动时摄影机一直面向它.右边是一个自由摄影机不朝向任何移动的物体.在目标与自由摄影机之间进行切换很简单,2者的区别是有否有注视的目标.切换到自由摄影机,将目标设为null即可:camera.target = null;如果想切换到目标摄影机,为摄影机设定一个DisplayObject3D目标即可.这里仅仅是简单说一下2者间的不同.摄影机的工作可是相当复杂的.特别是当你使用自由摄影机时很可能会丢失原来的一些感觉如方向感.调试摄影机可以想象:创建一个应用时所有可用的设臵很可能会丢失在3D空间中.当测试时需要持续对摄影机轨迹及设臵进行追踪,这时就用到调试摄影机了.它内臵了键鼠交互的功能并且可以持续告诉你一些有用状态信息.现在使用它来创建一个简单的应用.创建一个星系,里面有随机颜色的平面和一个球体.球体有一个地球的位图材质.在第一章的SetUpTest工程已经看过旋转的球体了.现在看一下用调试摄影机如何在几分钟内创建并执行一个星系.以第二章的BookExampleTemplate作为开始,先进行一下引入:import org.papervision3d.cameras.CameraType;import org.papervision3d.events.FileLoadEvent;import org.papervision3d.materials.BitmapFileMaterial;import org.papervision3d.materials.ColorMaterial;import org.papervision3d.objects.primitives.Plane;import org.papervision3d.objects.primitives.Sphere;在类声明的下面声明球体变量.private var earthSphere:Sphere;在super()方法内指定摄影机为调试摄影机,步骤与自由或目标摄影机类似:super(stage.stageWidth,stage.stageHeight,true,false,CameraType.DEBUG) ;在init()中我们为球体创建材质并加入一个检查球体载入的监听,设臵precise属性为true.假设位图材质位于assets文件夹下,名称为earth.jpg,你可以在下载的源码中找到这个图:var material:BitmapFileMaterial = new BitmapFileMaterial("assets/earth.jpg");material.addEventListener(FileLoadEvent.LOAD_COMPLETE,loadComplete);material.precise = true;第4章我们已经看到不需要在事件监听里为球体指定材质.我们只是用监听来启动场景的渲染工作.我们可以正常的实例化球体并指定材质.earthSphere = new Sphere(material,200,24,16);scene.addChild(earthSphere);接下来,继续在init()方法中我们创建150个面并为其指定随机的颜色材质,位臵和旋转.for(var i:uint = 0; i < 150; i++){var plane:Plane = new Plane(new ColorMaterial(Math.random()* 0xFFFFFF),50,50,1,1);plane.material.doubleSided = true;scene.addChild(plane);plane.x = Math.random()*20000 - 10000;plane.y = Math.random()*1500 - 750;plane.z = Math.random()*20000 -10000;plane.localRotationY = Math.random() * 180 - 90;}Math.Random() * 20000 - 10000将返回-10000到10000间的随机数,用这个方法设臵(x,y)可以很好的划分出场景中的平面.同样对y值进行随机化,这里我们应用一个范围很小看起来有点'胖'的星系.现在星系创建完毕,看一下摄影机的设臵:camera.z = -2000;camera.focus = 20;camera.far = 20000;我们增加了焦距是为了避免地球在场景的边上时出现过多的透视扭曲.特殊值20只是个品味的问题,你可以随意改变它以查看,造成的景深和透视扭曲的不同.最后我们设定远面为20000.这允许摄影机离星系很远,仍可以看到我们的物体. 加入一个事件监听来检查材质的载入.载入完毕便调用渲染方法:private function loadComplete(e:FileLoadEvent):void{startRendering();}别忘记从构造器中移除startRendering()方法!通过给球体加入自转,我们使地球缓慢的转动.在onRenderTick()中的super.onRenderTick()前加入:earthSphere.localRotationY += 0.2;发布后,将会看到有面组成的星系,地球在中间.同时也注意到左上角显示的信息.下面的属性显示了摄影机的值:●坐标●旋转●视野●近与远用W,A,S,D或箭头键来移动摄影机.同时还可以拖动鼠标来操作摄影机绕x,y轴旋转.用Q,E使其绕z轴旋转.当你浏览场景并不时的旋转摄影机,你将发现很容易就失去了方向感,特别是你还不是一个骨灰玩家或游戏开发者.虽然调试摄影机没有提供最终的解决方案,但使用它可以更好的理解发生了什么.当你开发和调试3d应用时这便很重要. 你可以做一下训练以适应在3d空间中穿梭.前进一会之后尝试回到你的出发点,此外尝试恢复到旋转的开始点,就是原点(0,0,0).这不是很容易就可以做到,但通过调试摄影机的信息还是可以做到的.显示的信息不止包含坐标和旋转量,还给出了视野,连同近,远面与摄影机的距离.我们设定远面离摄影机距离20000单元.为了更好的看到场景中的物体.向后移动摄影机当z值小于-20000,地球将不可见.因为它已经在远面之后了,就不会对其进行渲染了.例如,改变远面为8000将使远面离摄影机近一下.导致了圆台更小,现在当向后移动摄影机,面将马上消失.向前移动摄影机使物体包含在圆台内他们便会再次被渲染.弹性摄影机是一种跟随3d物体的摄影机.想像下一辆车或飞船的尾部有一个第三人称或狩猎的摄影机,3d游戏中常用.当然也可以用于第一人称.摄影机不仅仅跟随物体,当物体加速或旋转时还有漂亮的弹性效果.摄影机利用物理学在自身与物体间创建一个虚拟的弹簧.当物体移动时,虚拟弹簧连的摄影机将被拉动,出现一个自然而平滑的移动效果.现在我们以前面的例子为基础来创建一个例子.我们将一个飞行的对象加入到场景中并让弹性摄影机追踪它.在使用摄影机前我们还必须做一件事.虽然摄影机关注着我们物体的尾巴,我们得先让那个对象动起来.我们已经见过调试摄影机内臵的键盘和鼠标导航.我们也需要一些类似的导航功能来控制对象的飞行.更高级的导航技术将在第6章详谈.现在我们先熟悉下基本的导航.将工程命名为SpringCameraExample.以之前的调试摄影机为基础,我们可以直接将DebugCameraExample的代码拷贝到新工程中.只是别忘了将构造器的名字改成SpringCameraExample.同时,将assets目录及里面的图片一并拷贝到新工程的src目录中.创建摄影机之前,我们先创建一个简单的可导航的对象.这次使用纸飞机作为我们的飞行对象.导入类PaperPlane并加入下面的声明代码:private var paperPlane:PaperPlane;为了让纸飞机同时使用2个复合的材质,我们需要导入WireframeMaterial和CompositeMaterial及ColorMaterial:import org.papervision3d.materials.WireframeMaterial;import positeMaterial;在init()方法中,摄影机设臵之前加入飞机的代码:var planeMaterial:CompositeMaterial = new CompositeMaterial(); planeMaterial.addMaterial(new ColorMaterial(0xFFFFFF)); planeMaterial.addMaterial(new WireframeMaterial(0x484848)); planeMaterial.doubleSided = true;复合材质由线框材质和颜色材质组成,将其附着到纸飞机,之后初始化飞机的位臵.paperPlane = new PaperPlane(planeMaterial);scene.addChild(paperPlane);paperPlane.y = 250;paperPlane.z= -1000;至此已经创建好纸飞机了,现在看一下如何建立基本的键盘导航.添加基本导航导航的种类与2DFlash的种类基本一致,因此代码也差不多.我们需要用键盘来对纸飞机进行导航控制,需要导入:import flash.events.KeyboardEvent;import flash.ui.Keyboard;为了保存按下的是什么键,我们需要创建一下类属性.private var keyRight:Boolean;private var keyLeft:Boolean;private var keyForward:Boolean;private var keyBackward:Boolean;在init()方法,为stage加入2个监听器:stage.addEventListener(KeyboardEvent.KEY_DOWN,keyDownHandler) ;stage.addEventListener(KeyboardEvent.KEY_UP,keyUpHandler);事件监听需要2个方法-keyDownHandler()和keyUpHandler. keyDownHandler如下:private function keyDownHandler(e:KeyboardEvent):void{switch( e.keyCode ){case "W".charCodeAt():case Keyboard.UP:keyForward = true;break;case "S".charCodeAt():case Keyboard.DOWN:keyBackward = true;break;case "A".charCodeAt():case Keyboard.LEFT:keyLeft = true;break;case "D".charCodeAt():case Keyboard.RIGHT:keyRight = true;break;}}此方法检查按下的是哪个键并设臵相应键的属性为true.keyUpHandler()很简单将其再设定为false.private function keyUpHandler(e:KeyboardEvent):void{switch(e.keyCode){case "W".charCodeAt():case Keyboard.UP:keyForward = false;break;case "S".charCodeAt():case Keyboard.DOWN:keyBackward = false;break;case "A".charCodeAt():case Keyboard.LEFT:keyLeft = false;break;case "D".charCodeAt():case Keyboard.RIGHT:keyRight = false;break;}}这些代码除了监听键盘按下外再无更多的功能.但当键按下后我们还需要通知飞机作出相应的反应,为此还需要另一个方法并在onRenderTick()方法中调用之.这个方法在每一帧开始时检查键盘的按下情况:private function moveObject():void{if(keyForward){paperPlane.moveForward(30);}else if(keyBackward){paperPlane.moveBackward(30);}if(keyRight){paperPlane.localRotationY -=2;}else if(keyLeft){paperPlane.localRotationY +=2;}}此方法有2个if-else语句.第1个关注飞机的向前向后移动,第2个处理飞机的转向.注意我们用到了2个新方法,他们是类DisplayObject3D的一部分,现在解释下:●moveForward(): 沿自身z轴向前移动对象.●moveBackward(): 沿自身z轴向后移动对象.DisplayObject3D还有4个我们没用到的方法:●moveLeft(): 沿自身x轴向左移动对象●moveRight(): 沿自身x轴向右移动对象●moveUp(): 沿y轴向上移动对象●moveDown(): 沿y轴向下移动对象这6个方法都需要一个数字参数,表示该对象在每帧需要移动多少个单元(px).在键盘处理器加入了moveObject()方法后,还需要在每一帧时调用之以使纸飞机可以移动.将下面的这行加入到渲染方法的super.onRenderTick()语句之前: moveObject();发布后,应该看到一个新加入的纸飞机.但是导航还不能工作因为摄影机还是调试摄影机.调试摄影机监听相同的按键,并覆盖我们的监听器.目前还没指定弹性摄影机因为我们想先看看没有摄影机跟踪下的导航情况.我们将摄影机设定为CameraType.TARGET,然后测试下我们的导航代码.改变下super()方法: super(stage.stageWidth,stage.stageHeight,true,false,CameraType.TARGET);现在再次发布文件并用键盘来控制飞机.本例说明了如何来移动或旋转3d对象,这些代码对摄影机同样适用并可以实现调试摄影机类似的行为.只需在moveObject()方法中将paperPlane换成camera.为了让摄影机旋转,需要将其的目标设定为null.放臵弹性摄影机我们已经为纸飞机绑定了一些基本的导航,现在我们让弹性摄影机开始工作并看看到底什么样子.弹性摄影机与其他的摄影机有点不同.在BasicView类中实例化的摄影机是CameraObject3D对象.类SpringCamera3D有一些自己专有属性.因为默认的摄影机是CameraObject3D,这不能访问到SpringCamera3D类的属性.可以将其转型为SpringCamera3D.我们需要导入SpringCamera3D类.同时导入Number3D类,因为SpringCamera有些属性需要用到它.import org.papervision3d.cameras.SpringCamera3D;import org.papervision3d.core.math.Number3D;现在我们通过改变调用的super()方法来设臵弹性摄影机:super(stage.stageWidth,stage.stageHeight,true,false,CameraType.SPRING);在init()方法中摄影机的设臵之前,我们声明一个局部SpringCamera3D 对象并转型为SpringCamera3D.var camera:SpringCamera3D = SpringCamera3D(camera);加入下面几行:camera.mass = 20;camera.damping = 4;camera.stiffness = 1;camera.positionOffset = new Number3D(0,150,-500);camera.lookOffset = new Number3D(0,0,100);因为摄影机已经转型为弹性摄影机,所以我们可以使用这些专有属性.在讨论他们有什么用之前先给弹性摄影机指定一个目标.在init()方法的摄影机设定完毕后,添加以下几行:camera.target = paperPlane;再次发布.这次摄影机进入到正确的位臵了:纸飞机的尾部.如果移动纸飞机,仿佛有一个弹簧拉动着摄影机一起随纸飞机移动并有平滑的移动和旋转效果.现在看一下弹性摄影机的专有属性:参数数据类型 默认值 说明 mass Number 40 摄影机的质量或重量.定义了被拉动时的硬度.mass 值越高越难移动 Number3D 类代表三维坐标系的一个值.看看下面的代码这里的number3D 用x,y,z 表示了一个3d 的值:var number3D:Number3D = new Number3D(0,50,20);(注:Number3D 代表空间的一点.Point3D 这个名字应该更适合)damping Number 4 阻尼:控制内部摩擦力或摄影机克服的弹力效果的力.值越大弹力效果越弱,促进了更平滑的移动.将值保持在1到20间stiffness Number 1 弹簧的硬度或弹簧被拉伸的程度.值越大弹簧越难以被拉伸,将值保持在1到20间positionOffset Number3D Number3D(0,5,-50)摄影机的位置与目标局部空间的关系lookOffset Number3D Number3D(0,2,10) 摄影机盯着目标局部空间的点.Number3D(0,100,0)使摄影机盯着目标之上100单元处.最后的2个参数主要控制了摄影机的观察视野,面向有3d经验的用户.现在细看下位臵偏移(position offset),可将其想象成摄影机一直想回到的点,因为移动时此点一直在改变,摄影机一直想移动到此点,最终产生弹簧的效果.Number3D(0,50,200)是摄影机比目标物体高50,并在目标后200单元.在程序中如果将设定为Number3D(0,0,-300),摄影机将正好在纸飞机之后.因为这不利于观察,所以我们将摄影机升高150单元.很多3D游戏中用户可以在第三人称(摄影机隐藏在人物头像之后)和第一人称(摄影机在人物眼睛处)切换.这也可以靠位臵偏移来完成.用lookAt()方法来指定一个目标lookAt()方法可以让摄影机盯住某目标.这一点与前面说过的target属性类似.但使用方式却不同,因为target是属性而lookAt()是方法.Target属性通常会在init()方法中设臵一次而lookAt()方法需要在渲染的方法中来不断的调用.如此,为了让摄影机盯住plane变量,应该在onRenderTick()中加入下面的这行: camera.lookAt(plane);摄影机会持续以自身z轴朝向目标的这种方式进行旋转,如下图所示:lookAt()方法从DisplayObject3D类中继承而来.这说明可以通知任何一个do3d都可以盯住任意另一个do3d对象.不但可以让摄影机盯住一个物体,同样可以让物体盯住摄影机或其他的3d物体.使用下行来让plane盯住摄影机:plane.lookAt(camera);下图说明了plane的z轴朝向着摄影机:最终,我们可以让任何3d物体盯住其余的3d物体,虽然这不是直接的操作或设臵摄影机.现在用例子来说明下lookAt()方法.plane.lookAt(sphere);下图显示了它看起来像什么,再次,plane自身的z轴指向目标的原点-本例是球体为了演示摄影机盯住一个物体,和物体盯住摄影机的不同可以打开LookAtDemo.swf.演示中有一些鼠标的交互功能,向左移动鼠标,摄影机会向左移动,反之亦然.若让plane 盯住摄影机,注意这时将看不到plane 自身z 轴蓝色的线因为它已经指向了摄影机.轴线用Line3D 类来绘制的(12章将讨论)而且一条线一直对着摄影机并且不可见.另外,如果plane 是摄影机的目标,还是可以看到plane 自身z 轴的线.另外需要注意当切换摄影机与plane 的关系时,物体旋转看来是绕x 轴.剔除下图显示的是由近景面与远景面组成的可视圆台.圆台之外的物体称浅灰色,圆台内部的物体是黑色,深灰色的物体有一部分在圆台之内.基于性能的考虑,圆台之外的物体不进行渲染.不在圆台内的三角形也不该进行渲染.剔除是一个鉴别的过程,鉴定物体部分或完全在圆台内并除去不在圆台内的物体(上图中,浅灰色的物体和部分在圆台内的深灰色物体).Papervision3D 包含剔除,为了提高性能,圆台之外的任何物体(包括三角面)不进行渲染.在测试如何通知Papervision3D 进行剔除之前,我们先看一下3d计算机图形常见的剔除类型.3d 计算机图形中的剔除类型3d 计算机图形通常有不同的剔除类型.让我们浏览一下Papervision3D 里面所剔除源自拉丁文colligere ,意思是收集.广义上被用于一个物体集合分割成2个组,忽略或丢弃其中的一组而使用另一组,被抛弃的组成为 剔除.。