word 2 page
如何页码设置——WORD文档中插入页码的问题

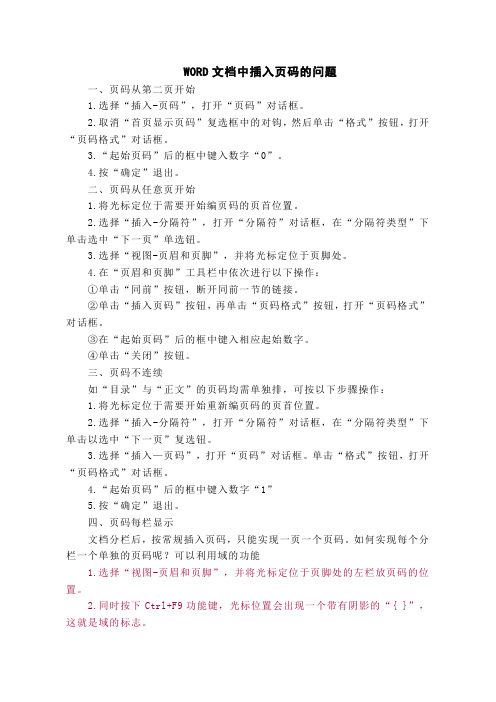
WORD文档中插入页码的问题一、页码从第二页开始1.选择“插入-页码”,打开“页码”对话框。
2.取消“首页显示页码”复选框中的对钩,然后单击“格式”按钮,打开“页码格式”对话框。
3.“起始页码”后的框中键入数字“0”。
4.按“确定”退出。
二、页码从任意页开始1.将光标定位于需要开始编页码的页首位置。
2.选择“插入-分隔符”,打开“分隔符”对话框,在“分隔符类型”下单击选中“下一页”单选钮。
3.选择“视图-页眉和页脚”,并将光标定位于页脚处。
4.在“页眉和页脚”工具栏中依次进行以下操作:①单击“同前”按钮,断开同前一节的链接。
②单击“插入页码”按钮,再单击“页码格式”按钮,打开“页码格式”对话框。
③在“起始页码”后的框中键入相应起始数字。
④单击“关闭”按钮。
三、页码不连续如“目录”与“正文”的页码均需单独排,可按以下步骤操作:1.将光标定位于需要开始重新编页码的页首位置。
2.选择“插入-分隔符”,打开“分隔符”对话框,在“分隔符类型”下单击以选中“下一页”复选钮。
3.选择“插入—页码”,打开“页码”对话框。
单击“格式”按钮,打开“页码格式”对话框。
4.“起始页码”后的框中键入数字“1”5.按“确定”退出。
四、页码每栏显示文档分栏后,按常规插入页码,只能实现一页一个页码。
如何实现每个分栏一个单独的页码呢?可以利用域的功能1.选择“视图-页眉和页脚”,并将光标定位于页脚处的左栏放页码的位置。
2.同时按下Ctrl+F9功能键,光标位置会出现一个带有阴影的“{ }”,这就是域的标志。
3.在“{ }”内输入“=”后,再同时按下Ctrl+F9功能键,在这次出现的花括号内输入“page”(表示插入“当前页”域代码)。
4.将光标移到内部一对花括号之后,输入“*2-1”,此时,在页脚处得到这样一行域代码:“{={page}*2-1}}”。
5.将光标停留在这个域代码上,按右键选择“更新域”,即可看到当前页左栏的页码。
[中学]word中,“第几页、共几页”从第二页算起,怎么设置?
![[中学]word中,“第几页、共几页”从第二页算起,怎么设置?](https://img.taocdn.com/s3/m/a71533c03086bceb19e8b8f67c1cfad6195fe9b6.png)
word中,“第几页、共几页”从第二页算起,怎么设置?2010-07-27 14:38我们通常在装订打印的文件或材料时,要求封面不显示页码,而页码“1”要从第二页开始显示,也就是正文开始页。
很多人的习惯是把封面和正文做成两个文档来解决,但这样毕竟不太正规,而且有时显得杂乱,能不能在一个文档中解决这个问题呢?回答是肯定地,方法如下:第一步,将光标移到封面中最后一行的末尾处(切记必须如此执行,不然封面和正文会连续显示页码),执行“插入→分隔符”命令,弹出“分隔符”对话框,选择“分节符”类型中的“下一页”一项,单击[确定]按钮。
第二步,选择菜单栏中→视图→“页眉和页脚”第三步:于浮动工具条上,点击一下“连接到前一个”,以取消作用于上一个节。
如下图:那么,页脚处类似下图的字样就会消失,也就是,第一页的页脚,不会提示“第1页共7页”的文字!第四步,把鼠标定位到第二页的页脚。
然后在浮动工具条的→ 插入‘自动图文集’→第X页共X页。
如下图:第五步:设置页码格式(该功能在浮动工具条上的这个按钮),做相应的设置即可,此处就不作赘述了如此一来,我们就可以在一个文档中实现从正文页开始显示页码“1”,而不必将封面和正文做成两个文档那么麻烦了,大家还等什么,快去试试吧。
但是!前面有插入“分隔符”的,虽然“第几页”设置好了,但操作系统还是默认从文档的第一页到最末页为“共几页”。
要只计算你设置范围的页数就要一番设置:1、菜单栏——视图——页眉和页脚——(出现浮动工具栏)——光标置于页脚——点“插入‘自动图文集’”(第一个按钮)下拉菜单选择“第X页共Y页”。
2、前面的“第X页”你已经会设置了,这里就别赘述。
这时页码显示为:第1页共10页(假设总共10页吧)。
3、按Alt+F9,这时页码转换为域代码,变成:第 { PAGE } 页共 { NUMPAGES } 页。
4、复制域代码符号变成:第 { PAGE } 页共 { { NUMPAGES } } 页,(注意符号不能直接从键盘上输入),修改后项为:共 { ={ NUMPAGES }-2 } 页,(注意=的前面和-2的后面有空格)。
word文档使用第域来设置页码时提示语法错误要怎样解决

word文档使用第{={page}*2}页设置页码时提示”语法错误“要怎样解决——页码的格式不能设成“-1-,-2-,-3-……”等其它格式,而要设为“1,2,3……“因为在域中要对页码进行计算,所以其它格式不可以!自己摸索的经验!!!!!自己赞一个先!附——word页码设置技巧在Word文档中设置分栏后,尽管一页中有两栏或者多栏文字,但使用“插入页码”命令,却只能在该页中插入同一个页码。
如何给每栏分别设置页码?也就是说,每页分两栏的话,每页要占两个页码,也就是第一张纸的页码是1、2,第二张纸的页码是3、4,依此类推……一、下面我们以分两栏为例,介绍一下为分栏设置不同的页码的方法:1.单击“视图”菜单下的“页眉和页脚”,切换至第一页的页脚。
2.在与左栏对应的合适位置输入“第页”,将光标插在两字中间,连续按两下“Ctrl+F9”键,出现两个大括号“{{}}”。
3.然后在"{}”中输入字符,形成这个样子:{={page}*2-1},注意用英文状态来输。
如果只要显示页码,左栏就输成:{={page}*2-1}右栏:{={page}*2}如果要显示成:第X页,左栏就输成:第{={page}*2-1}页右栏:第{={page}*2-1}页4.完成后选中(一定要选中)“{={PAGE}*2-1}”,单击鼠标右键选择快捷菜单中的“更新域”,出现“第1页”。
5.在与右栏对应的合适位置输入“第页”,将光标插在两字中间,连续按两下Ctrl+F9键,出现两个大括号“{{}}”。
6.然后在大括号“{}”中输入如下字符“{={PAGE}*2}”。
7.完成后选中“{={PAGE}*2}”,单击鼠标右键选择快捷菜单中的“更新域”,出现“第2页”。
如果你的文档分为三栏,并要在每栏下显示页码,可以将“第页”之间的域代码修改为“{={PAGE}*3-2}”、“{={PAGE}*3-1}”和“{={PAGE}*3}”(更多分栏时同理)。
word中分页符的使用技巧

word中分页符的使⽤技巧在建⽴新⽂档时,Word将整篇⽂档认为就是⼀节。
为了便于对⽂档进⾏格式化,可以将⽂档分割成任意数量得节,然后⽤户就可以根据需要分别为每节设置不同得格式。
应⽤“分节符”可以将整个⽂件分成若⼲个节,并对每个节进⾏不同得格式设置.例如,要想⾸页不编页码,⽽就是从第2页由“1”开始排页码,应⽤分节操作就可以实现。
使⽤分节符:1。
插⼊分节符如果需要改变⽂档中分节符类型,可以使⽤两种⽅法进⾏:(1)单击需要修改得节。
单击【⽂件】|【页⾯设置】|【版式】命令或选项卡,在出现得【页⾯设置】对话框中,在【节得起始位置】下拉列表框中选择所需得分节符类型.按照表3、1所列分节符类型与作⽤,在【新建页】、【新建栏】、【接续本页】、【奇数页】中根据需要选择要更改得分节符类型。
、接续本页:表⽰不插⼊分页符,紧接前⼀节排版⽂本。
、新建栏:表⽰在下⼀栏顶端开始打印节中得⽂本。
、新建页:表⽰在分节符位置进⾏分页,并且在下⼀页顶端开始新节.、偶数页:表⽰在下⼀个偶数页开始新节(常⽤于在偶数页开始得章节)。
、奇数页:表⽰在下⼀个奇数页开始新节(常⽤于在奇数页开始得章节)。
(2)切换到【普通视图】下来查瞧分节符得类型,然后选定分节符,按【Delete】按钮,把分节符删除,再重新插⼊需得得分隔符.要在页⾯视图或⼤纲视图中显⽰分隔符,也可以单击【常⽤】⼯具栏上得【显⽰/隐藏编辑标记】按钮,来显⽰分隔符。
3。
删除分节符删除分节符得操作步骤如下:(1)先单击【常⽤】⼯具栏上得【显⽰/隐藏编辑标记】按钮,来显⽰标记,然后选定要删除得分节符,也可以切换到【普通视图】下来查瞧分节符得类型。
查瞧分节符得类型如图3、42所⽰.(2)选中分节符后,按Detele 键。
就可以删除指定分节符了.如果在页⾯视图中⽆法选中分隔符,可以把光标定位在分切符前⾯,然后按【Delete】按钮,同样可以像删除普通字符⼀样把分节符删除.特别注意:在删除分节符得同时,也将删除该分节符前⾯⽂本得分节格式。
WORD文档中插入页码的问题

WORD文档中插入页码的问题一、页码从第二页开始1、选择“插入-页码”,打开“页码”对话框。
2、取消“首页显示页码”复选框中的对钩,然后单击“格式”按钮,打开“页码格式”对话框。
3、“起始页码”后的框中键入数字“0” 。
4、按“确定”退出。
二、页码从任意页开始1、将光标定位于需要开始编页码的页首位置。
2、选择“插入-分隔符”,打开“分隔符”对话框,在“分隔符类型”下单击选中“下一页”单选钮。
3、选择“视图-页眉和页脚”,并将光标定位于页脚处。
4、在“页眉和页脚”工具栏中依次进行以下操作:①单击“同前”按钮,断开同前一节的链接。
②单击“插入页码”按钮,再单击“页码格式”按钮,打开“页码格式”对话框。
③在“起始页码”后的框中键入相应起始数字。
④单击“关闭”按钮。
三、页码不连续如“目录”与“正文”的页码均需单独排,可按以下步骤操作:1、将光标定位于需要开始重新编页码的页首位置。
2、选择“插入-分隔符”,打开“分隔符”对话框,在“分隔符类型”下单击以选中“下一页”复选钮。
3、选择“插入—页码”,打开“页码”对话框。
单击“格式”按钮,打开“页码格式”对话框。
4、“起始页码”后的框中键入数字“1”5、按“确定”退出。
四、页码每栏显示文档分栏后,按常规插入页码,只能实现一页一个页码。
如何实现每个分栏一个单独的页码呢可以利用域的功能1、选择“视图-页眉和页脚”,并将光标定位于页脚处的左栏放页码的位置。
2、同时按下Ctrl+F9功能键,光标位置会出现一个带有阴影的“{ }”,这就是域的标志。
3、在“{ }”内输入“=”后,再同时按下Ctrl+F9功能键,在这次出现的花括号内输入“page”(表示插入“当前页”域代码)。
4、将光标移到内部一对花括号之后,输入“*2-1”,此时,在页脚处得到这样一行域代码:“{={page}*2-1}}”。
5、将光标停留在这个域代码上,按右键选择“更新域”,即可看到当前页左栏的页码。
[论文]Word中分隔符(分页符、分栏符、换行符、分节符)的用法
![[论文]Word中分隔符(分页符、分栏符、换行符、分节符)的用法](https://img.taocdn.com/s3/m/94f9de836aec0975f46527d3240c844769eaa083.png)
在写论文时,论文格式要求目录需要用“Ⅰ、Ⅱ、Ⅲ、...”作为页码,正文要用“1、2、3、...”作为页码。
而有的用户此时就要将目录存为一个单独的文件,再设置不同的页码格式,最后分开打印并装订成册。
但是,如果书的前面还有扉页、前言等,这样的页一般不需设置页码。
如果再把它们都分为不同的文件,管理起来就不太方便了,特别是在批量打印时就非常被动。
合理正确的使用Word 中的分隔符,可以帮你轻松解决这个问题。
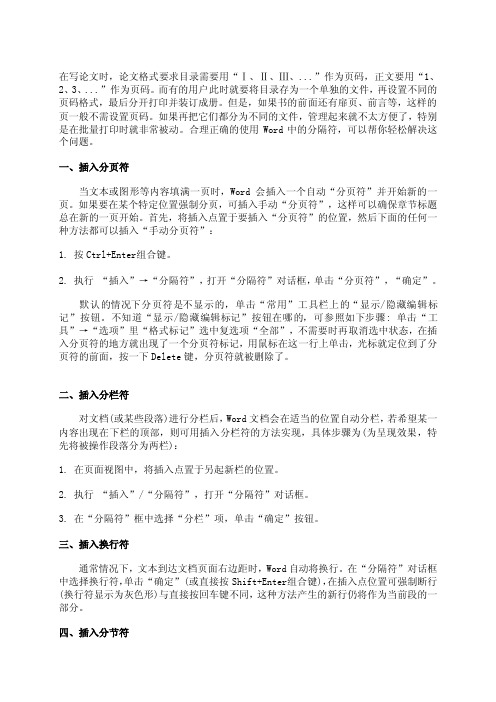
一、插入分页符当文本或图形等内容填满一页时,Word会插入一个自动“分页符”并开始新的一页。
如果要在某个特定位置强制分页,可插入手动“分页符”,这样可以确保章节标题总在新的一页开始。
首先,将插入点置于要插入“分页符”的位置,然后下面的任何一种方法都可以插入“手动分页符”:1. 按Ctrl+Enter组合键。
2. 执行“插入”→“分隔符”,打开“分隔符”对话框,单击“分页符”,“确定”。
默认的情况下分页符是不显示的,单击“常用”工具栏上的“显示/隐藏编辑标记”按钮。
不知道“显示/隐藏编辑标记”按钮在哪的,可参照如下步骤: 单击“工具”→“选项”里“格式标记”选中复选项“全部”,不需要时再取消选中状态,在插入分页符的地方就出现了一个分页符标记,用鼠标在这一行上单击,光标就定位到了分页符的前面,按一下Delete键,分页符就被删除了。
二、插入分栏符对文档(或某些段落)进行分栏后,Word文档会在适当的位置自动分栏,若希望某一内容出现在下栏的顶部,则可用插入分栏符的方法实现,具体步骤为(为呈现效果,特先将被操作段落分为两栏):1. 在页面视图中,将插入点置于另起新栏的位置。
2. 执行“插入”/“分隔符”,打开“分隔符”对话框。
3. 在“分隔符”框中选择“分栏”项,单击“确定”按钮。
三、插入换行符通常情况下,文本到达文档页面右边距时,Word自动将换行。
在“分隔符”对话框中选择换行符,单击“确定”(或直接按Shift+Enter组合键),在插入点位置可强制断行(换行符显示为灰色形)与直接按回车键不同,这种方法产生的新行仍将作为当前段的一部分。
Word中分隔符(分页符、分栏符、换行符、分节符)的用法

在写论文时,论文格式要求目录需要用“Ⅰ、Ⅱ、Ⅲ、...”作为页码,正文要用“1、2、3、...”作为页码。
而有的用户此时就要将目录存为一个单独的文件,再设置不同的页码格式,最后分开打印并装订成册。
但是,如果书的前面还有扉页、前言等,这样的页一般不需设置页码。
如果再把它们都分为不同的文件,管理起来就不太方便了,特别是在批量打印时就非常被动。
合理正确的使用Word中的分隔符,可以帮你轻松解决这个问题。
一、插入分页符当文本或图形等内容填满一页时,Word会插入一个自动“分页符”并开始新的一页。
如果要在某个特定位置强制分页,可插入手动“分页符”,这样可以确保章节标题总在新的一页开始。
首先,将插入点置于要插入“分页符”的位置,然后下面的任何一种方法都可以插入“手动分页符”:1. 按Ctrl+Enter组合键。
2. 执行“插入”→“分隔符”,打开“分隔符”对话框,单击“分页符”,“确定”。
默认的情况下分页符是不显示的,单击“常用”工具栏上的“显示/隐藏编辑标记”按钮。
不知道“显示/隐藏编辑标记”按钮在哪的,可参照如下步骤: 单击“工具”→“选项”里“格式标记”选中复选项“全部”,不需要时再取消选中状态,在插入分页符的地方就出现了一个分页符标记,用鼠标在这一行上单击,光标就定位到了分页符的前面,按一下Del ete键,分页符就被删除了。
二、插入分栏符对文档(或某些段落)进行分栏后,Word文档会在适当的位置自动分栏,若希望某一内容出现在下栏的顶部,则可用插入分栏符的方法实现,具体步骤为(为呈现效果,特先将被操作段落分为两栏):1. 在页面视图中,将插入点置于另起新栏的位置。
2. 执行“插入”/“分隔符”,打开“分隔符”对话框。
3. 在“分隔符”框中选择“分栏”项,单击“确定”按钮。
word页码设置技巧及快捷键

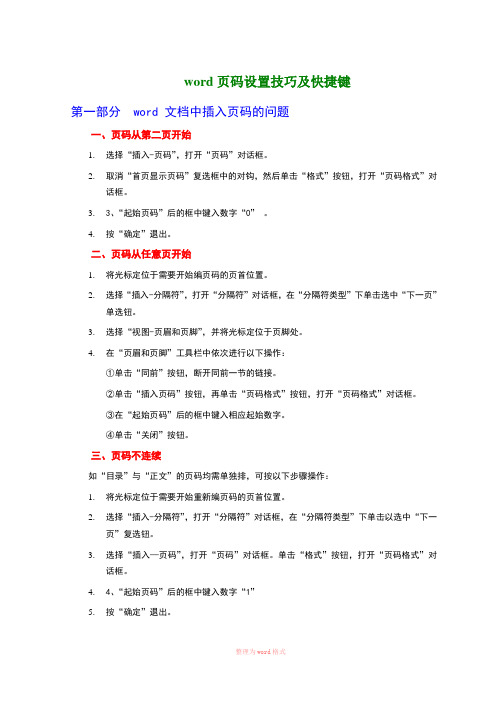
word页码设置技巧及快捷键第一部分 word 文档中插入页码的问题一、页码从第二页开始1.选择“插入-页码”,打开“页码”对话框。
2.取消“首页显示页码”复选框中的对钩,然后单击“格式”按钮,打开“页码格式”对话框。
3.3、“起始页码”后的框中键入数字“0”。
4.按“确定”退出。
二、页码从任意页开始1.将光标定位于需要开始编页码的页首位置。
2.选择“插入-分隔符”,打开“分隔符”对话框,在“分隔符类型”下单击选中“下一页”单选钮。
3.选择“视图-页眉和页脚”,并将光标定位于页脚处。
4.在“页眉和页脚”工具栏中依次进行以下操作:①单击“同前”按钮,断开同前一节的链接。
②单击“插入页码”按钮,再单击“页码格式”按钮,打开“页码格式”对话框。
③在“起始页码”后的框中键入相应起始数字。
④单击“关闭”按钮。
三、页码不连续如“目录”与“正文”的页码均需单独排,可按以下步骤操作:1.将光标定位于需要开始重新编页码的页首位置。
2.选择“插入-分隔符”,打开“分隔符”对话框,在“分隔符类型”下单击以选中“下一页”复选钮。
3.选择“插入—页码”,打开“页码”对话框。
单击“格式”按钮,打开“页码格式”对话框。
4.4、“起始页码”后的框中键入数字“1”5.按“确定”退出。
四、页码每栏显示文档分栏后,按常规插入页码,只能实现一页一个页码。
如何实现每个分栏一个单独的页码呢?可以利用域的功能1.选择“视图-页眉和页脚”,并将光标定位于页脚处的左栏放页码的位置。
2.同时按下Ctrl+F9功能键,光标位置会出现一个带有阴影的“{ }”,这就是域的标志。
3.在“{ }”内输入“=”后,再同时按下Ctrl+F9功能键,在这次出现的花括号内输入“page”(表示插入“当前页”域代码)。
4.将光标移到内部一对花括号之后,输入“*2-1”,此时,在页脚处得到这样一行域代码:“{={page}*2-1}}”。
5.将光标停留在这个域代码上,按右键选择“更新域”,即可看到当前页左栏的页码。
- 1、下载文档前请自行甄别文档内容的完整性,平台不提供额外的编辑、内容补充、找答案等附加服务。
- 2、"仅部分预览"的文档,不可在线预览部分如存在完整性等问题,可反馈申请退款(可完整预览的文档不适用该条件!)。
- 3、如文档侵犯您的权益,请联系客服反馈,我们会尽快为您处理(人工客服工作时间:9:00-18:30)。
word 2 pageVideo provides a powerful way to help you prove your point. When you click Online Video, you can paste in the embed code for the video you want to add. You can also type a keyword to search online for the video that best fits your document.To make your document look professionally produced, Word provides header, footer, cover page, and text box designs that complement each other. For example, you can add a matching cover page, header, and sidebar. Click Insert and then choose the elements you want from the different galleries.Themes and styles also help keep your document coordinated. When you click Design and choose a new Theme, the pictures, charts, and SmartArt graphics change to match your new theme. When you apply styles, your headings change to match the new theme.Save time in Word with new buttons that show up where you need them. To change the way a picture fits in your document, click it and a button for layout options appears next to it. When you work on a table, click where you want to add a row or a column, and then click the plus sign. Reading is easier, too, in the new Reading view. You can collapse parts of the document and focus on the text you want. If you need to stop reading before you reach the end, Word remembers where you left off - even on another device.Video provides a powerful way to help you prove your point. When you click Online Video, you can paste in the embed code for the video you want to add. You can also type a keyword to search online for the video that best fits your document.To make your document look professionally produced, Word provides header, footer, cover page, and text box designs that complement each other. For example, you can add a matching cover page, header, and sidebar. Click Insert and then choose the elements you want from the different galleries.Themes and styles also help keep your document coordinated. When you click Design and choose a new Theme, the pictures, charts, and SmartArt graphics change to match your new theme. When you apply styles, your headings change to match the new theme.Save time in Word with new buttons that show up where you need them. To change the way a picture fits in your document, click it and a button for layout options appears next to it. When you work on a table, click where you want to add a row or a column, and then click the plus sign. Reading is easier, too, in the new Reading view. You can collapse parts of the document and focus on the text you want. If you need to stop reading before you reach the end, Word remembers where you left off - even on another device.Video provides a powerful way to help you prove your point. When you click Online Video, you can paste in the embed code for the video you want to add. You can also type a keyword to search online for the video that best fits your document.To make your document look professionally produced, Word provides header, footer, cover page, and text box designs that complement each other. For example, you can add a matching cover page, header, and sidebar. Click Insert and then choose the elements you want from the different galleries.Themes and styles also help keep your document coordinated. When you click Design and choose a new Theme, the pictures, charts, and SmartArt graphics change to match your new theme. When you apply styles, your headings change to match the new theme.Save time in Word with new buttons that show up where you need them. To change the way apicture fits in your document, click it and a button for layout options appears next to it. When you work on a table, click where you want to add a row or a column, and then click the plus sign. Reading is easier, too, in the new Reading view. You can collapse parts of the document and focus on the text you want. If you need to stop reading before you reach the end, Word remembers where you left off - even on another device.Video provides a powerful way to help you prove your point. When you click Online Video, you can paste in the embed code for the video you want to add. You can also type a keyword to search online for the video that best fits your document.To make your document look professionally produced, Word provides header, footer, cover page, and text box designs that complement each other. For example, you can add a matching cover page, header, and sidebar. Click Insert and then choose the elements you want from the different galleries.Themes and styles also help keep your document coordinated. When you click Design and choose a new Theme, the pictures, charts, and SmartArt graphics change to match your new theme. When you apply styles, your headings change to match the new theme.Save time in Word with new buttons that show up where you need them. To change the way a picture fits in your document, click it and a button for layout options appears next to it. When you work on a table, click where you want to add a row or a column, and then click the plus sign. Reading is easier, too, in the new Reading view. You can collapse parts of the document and focus on the text you want. If you need to stop reading before you reach the end, Word remembers where you left off - even on another device.Video provides a powerful way to help you prove your point. When you click Online Video, you can paste in the embed code for the video you want to add. You can also type a keyword to search online for the video that best fits your document.To make your document look professionally produced, Word provides header, footer, cover page, and text box designs that complement each other. For example, you can add a matching cover page, header, and sidebar. Click Insert and then choose the elements you want from the different galleries.。
