PBRT安装全攻略
ABB Ability ODM zenon 8.20快速安装指南说明书

—APPLICATION NOTEABB Ability ODM zenon 8.20Quick Installation GuideBefore installing ABB zenon 8.20:1.All current operating system updates must be installedNote: If you always use the latest version (Service Pack) of your operating system, you not only avoid compatibility issues but also security problems.2.There must not be a restart pending.3.The system requirements are checked before installation. If the requirements are not met, you areshown these on a separate page with notices on how to rectify this.4.Automatic Windows updates influence the installation. If an update of the Windows operatingsystem is carried out while the zenon setup is running, it can cause problems during the zenon installation.To prevent this: Deactivate the automatic Windows update during the time of installation and carry out the Windows update before starting the zenon installation5.With Windows 7 Embedded Standard, zenon is installed using the normal installation routine. Youcan find the hardware requirements in the Runtime under Windows Embedded Standard chapter.6.During the installation of zenon, the ABB Multiple Network Protocol Driver (cdprotdrv.sys) isinstalled. To start the driver, the operating system must be restarted after installation.7.Activate Windows feature - .NET framework 3.5 before installation.Frequent sources of error during installation:1.The virus scanner is active and blocks the installtion because the scanner thinks it´s a virus.Solution: Seperate the system from the network, disable the virus scanner, execute the installation again.2.The firewall was not configured correctly. Solution: Seperate the system from the network, disablethe firewall, execute the installation again.3.Erroneous SQL-installation on the system. Solution: Create project backups; if possible, deinstallSQL server, rename the SQL folder, and restart installation.Get started with download:1.Download ABB zenon 8.20 setup from ABB website (use direct link as mentioned below):ABB zenon 8.20 download link2.Run installer as administrator.3.Select the language for the installation.4.Read and agree to the license terms. Print button will print the EULA and previous button go back tothe language selection page.5.Select options for download:a.Main Release – ABB zenon editor and runtime standard packageb.Zenon PDF Help Files - Besides the Online Help which is installed with zenon software bydefault, the same help content in PDF format can be downloaded and installed.c.ZEE600 - ABB zenon Electrification Edition for seamless integrator of diverse devices such asABB and 3rd party make protection relays, meters, substation equipment condition monitoring units, Programmable Logic Controllers (PLC) and Remote Terminal Units (RTUs),6.Download in progress.7.Downloaded package will be saved in selected target folder.Get started with installation:1.You can start installation on the same machine or download setup can be copied to anothermachine for installation.2.Right click on Start.exe and run as administrator.3.Select language again for installation:4.Also accept license terms again.5.Select options for installation (We suggest youto select all options during download and later youcan choose desired options for installation).a.Zenon 8.20 – You can select Editor (complete development package withruntime), or standalone runtime option. Additionally zenon web sevrer and clientcan be selected for installation.b.Zenon PDF Help Files – in English and German.c.ZEE600 package.6.You will get installation successful message once all selected components are installed properly.7.In case of failed installation please click Show logs link to collect logs and contact us via*********************.。
Power Xpert软件快速入门指南说明书

Note: The PowerVision service is automatically installed, running and configured for Power Xpert software.
allows for PowerNet Software integration. The diagram to the left and descriptions below outline how to set up the six different application scenarios of Power Xpert Software.
Power Xpert® Software Quick Start Guide
Power Xpert Software Pre-Installation Check List
1. Verify minimum server hardware requirements. See system requirements on the back of this guide.
B. Install Power Xpert software on a designated server by choosing Option 1 on the Install Wizard setup menu.
C. Connect to the existing PowerNet system using Power Xpert Configuration Manager.
/powerxpert 1.800.525.2000
Power Xpert, PowerChain, and PowerChain Management are trademarks of Eaton Electrical, Inc. All other trademarks are property of their respective owners.
OBTR安装程序指南说明书

OBTR Installer Index Oracle Banking Treasury ManagementRelease 14.5.2.0.0[August] [2021]Table of Contents1.ABOUT THE MANUAL ................................................................................................................................. 1-11.1I NTRODUCTION........................................................................................................................................... 1-1 1.2A UDIENCE .................................................................................................................................................. 1-1 1.3A BBREVIATIONS AND A CRONYMS.............................................................................................................. 1-12.INDEX .............................................................................................................................................................. 2-12.1S ECURITY G UIDELINES............................................................................................................................... 2-1 2.2E NVIRONMENT S ETUP ................................................................................................................................ 2-1 2.3S UPPORT FOR E XTENSIBILITY..................................................................................................................... 2-2 2.4I NSTALLER I NSTALLATION ......................................................................................................................... 2-3 2.5I NSTALLATION............................................................................................................................................ 2-3 2.6M AINTENANCE ........................................................................................................................................... 2-3 2.7I NSTALLER U TILITIES ................................................................................................................................. 2-3 2.8T ROUBLESHOOTING.................................................................................................................................... 2-31. About the Manual 1.1 IntroductionThis manual is designed to help acquaint you with the installation of Oracle Banking Treasury Management.1.2 AudienceThis manual is intended for the following User/User Roles:The user of this manual is expected to have basic understanding of Application servers like Oracle Weblogic, IBM Websphere and Oracle Database.1.3 Abbreviations and AcronymsThis guide may refer to the following abbreviations:2. Index 2.1 Security GuidelinesThe user of this manual should ensure security guidelines for this release of OBTR are adhered to as mentioned in the Security Guide document. This is a pre-requisite before proceedingfurther.2.2 Environment SetupThis section helps you get an outline of the chapters included in the Installation Manuals and provides a summary of each chapter. You can identify the chapters containing the details of each activity that you will perform during Oracle Banking Treasury Management installation.The Installation Manuals are organized as follows:2.3 Support for Extensibility2.4 Installer InstallationInstaller support installation of Oracle FLEXCUBE in two modes Graphical mode and silent mode.2.5 Installation2.6 Maintenance2.7 Installer Utilities2.8 TroubleshootingOracle OBTR Installer IndexAugust [2021]Version 14.5.2.0.0Oracle Financial Services Software LimitedOracle ParkOff Western Express HighwayGoregaon (East)Mumbai, Maharashtra 400 063IndiaWorldwide Inquiries:Phone: +91 22 6718 3000Fax: +91 22 6718 3001https:///industries/financial-services/index.htmlCopyright © [2020], [2021]Oracle and/or its affiliates. All rights reserved.Oracle and Java are registered trademarks of Oracle and/or its affiliates. Other names may be trademarks of their respective owners.U.S. GOVERNMENT END USERS: Oracle programs, including any operating system, integrated software, any programs installed on the hardware, and/or documentation, delivered to U.S. Government end users are "commercial computer software" pursuant to the applicable Federal Acquisition Regulation and agency-specific supplemental regulations. As such, use, duplication, disclosure, modification, and adaptation of the programs, including any operating system, integrated software, any programs installed on the hardware, and/or documentation, shall be subject to license terms and license restrictions applicable to the programs. No other rights are granted to the U.S. Government.This software or hardware is developed for general use in a variety of information management applications. It is not developed or intended for use in any inherently dangerous applications, including applications that may create a risk of personal injury. If you use this software or hardware in dangerous applications, then you shall be responsible to take all appropriate failsafe, backup, redundancy, and other measures to ensure its safe use. Oracle Corporation and its affiliates disclaim any liability for any damages caused by use of this software or hardware in dangerous applications.This software and related documentation are provided under a license agreement containing restrictions on use and disclosure and are protected by intellectual property laws. Except as expressly permitted in your license agreement or allowed by law, you may not use, copy, reproduce, translate, broadcast, modify, license, transmit, distribute, exhibit, perform, publish or display any part, in any form, or by any means. Reverse engineering, disassembly, or decompilation of this software, unless required by law for interoperability, is prohibited.The information contained herein is subject to change without notice and is not warranted to be error-free. If you find any errors, please report them to us in writing.This software or hardware and documentation may provide access to or information on content, products and services from third parties. Oracle Corporation and its affiliates are not responsible for and expressly disclaim all warranties of any kind with respect to third-party content, products, and services. Oracle Corporation and its affiliates will not be responsible for any loss, costs, or damages incurred due to your access to or use of third-party content, products, or services.。
PostGreSQL数据库安装配置说明

PostGreSQL数据库安装配置说明windows 10 x64 pro 1703安装postgresql-9.6.3-2-windows-x64.exe数据库,步骤如下:第⼀:下载数据库安装程序,下载地址为:第⼆:下载完毕之后双击执⾏安装程序,如下图所⽰:点击Next进⼊下⼀步,如下图所⽰:更改安装路径为,D:\Development\PostgreSQL\PostgreSQL\9.6,并点击Next进⼊下⼀步,如下图所⽰:这⼀步不做更改,采⽤默认路径,点击Next进⼊下⼀步,如下图所⽰:输⼊密码,111111,如下图所⽰:点击Next进⼊下⼀步,如下图所⽰:端⼝号采⽤默认,即5432端⼝,点击Next进⼊下⼀步,图下图所⽰:选择语⾔,这⾥选择简体中⽂,如下图所⽰:注:针对12.2版本,locale在安装的时候选择C,选择简中会安装失败,安装成功后,可以将data⽂件夹删除,重新创建data⽂件夹,赋权,然后执⾏命令⾏: initdb -D ******\data --locale=zh_CN -E UTF-8 -U postgres -W,然后根据提⽰进⾏相关配置⽂件修改即可。
点击Next进⼊下⼀步,如下图所⽰:准备安装,点击Next进⼊下⼀步,如下图所⽰:因为要修改注册表,所以如果开启了杀毒软件的话,会弹出警告,同意修改即可,之后如下图所⽰:上图的勾选默认是不选中的,我这⾥选中,然后点击Finish进⼊下⼀步,如下图所⽰:选择PostgreSQL 9.6(x64) on port 5432,点击下⼀步,如下图所⽰:因为并不需要,所以没有选择任何⼀项,点击取消即可。
什么时候需要了,可以通过开始菜单中的快捷⽅式继续安装。
转载请注明出处,未经许可请勿私⾃添加⽔印,否则有权追究法律责任。
⽤爬⾍的家伙们,不许私⾃加⽔印,必须注明出处,否则依旧有权追究法律责任。
华盛顿数据保护器单服务器版安装指南说明书

Installing the Data Protector Single Server Edition Installing the Data Protector Single ServerEditionThe Single Server Edition (SSE) of Data Protector is designed for smallenvironments where backups run on only one device connected to a CellManager. It is available for supported Windows and for HP-UX andSolaris platforms.To install the Cell Manager and (optionally) Installation Server, followthe instructions in “Installing the Data Protector Cell Manager (CM) andInstallation Server(s) (IS)” on page15.Limitations When considering the SSE license, be aware of the following limitations: Limitations of SSE for Windows•SSE supports backups to only one device concurrently, connected to asingle Cell Manager.•One 10-slot DDS autochanger only is supported.•UNIX (also HP-UX) clients and servers are not supported. If a backupis attempted to a UNIX machine, the session is aborted.•If a cell has a Windows Cell Manager, you can back up only Windowsclients. Backup to Novell Netware clients is not supported.•Adding extension products is not supported with SSE.•Clustering is not supported with SSE.•Disaster Recovery is not supported with SSE.The number of Windows clients is not limited.For supported devices, please refer to the HP OpenView Storage DataProtector Software Release Notes.Limitations of SSE for HP-UX and Solaris•SSE supports backups to only one device concurrently, connected to asingle Cell Manager.•One 10-slot DDS autochanger only is supported.135Installing the Data Protector Single Server Edition 136•On a UNIX Cell Manager, you cannot back up servers - only UNIX clients, Windows clients, Solaris clients, and Novell NetWare clients.•Adding extension products is not supported with SSE.•Clustering is not supported with SSE.The number of clients (UNIX, Windows) is not limited.For supported devices, please refer to the HP OpenView Storage Data Protector Software Release Notes .Installing aPassword For the step-by-step instructions on how to install a password on the Cell Manager, refer to “Installing a Password on the Cell Manager” onpage 280.。
申报软件安装
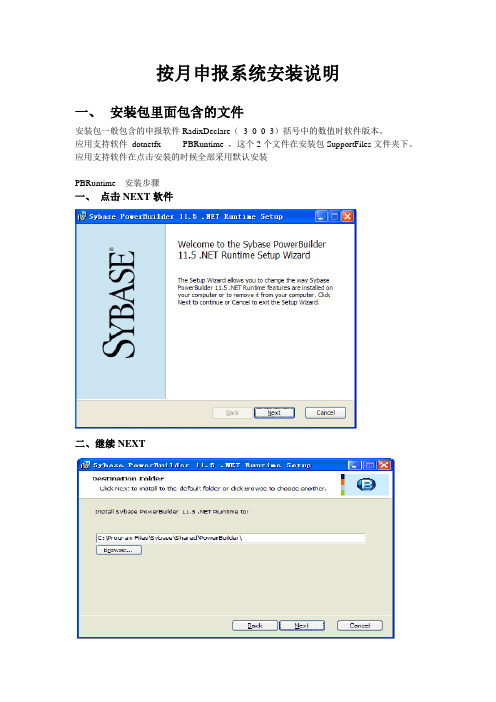
按月申报系统安装说明
一、安装包里面包含的文件
安装包一般包含的申报软件RadixDeclare(_3_0_0_3)括号中的数值时软件版本。
应用支持软件dotnetfx PBRuntime ,这个2个文件在安装包SupportFiles文件夹下。
应用支持软件在点击安装的时候全部采用默认安装
PBRuntime 安装步骤
一、点击NEXT软件
二、继续NEXT
三、点击Install系统开始自动安装
四、点击Finish完成安装
dotnetfx 安装说明
如果出现这个界面也就是你的电脑中已经有相应的软件不用再安装。
一、在安装的时候先关闭你的浏览器保证安装的顺利完成。
点击下一步开始安装。
二、点击下一步默认安装。
在许可协议中打钩确认点击安装。
软件会自动安装。
申报系统的安装
点击RadixDeclare_3_0_0_4 系统会弹出安装界面点击Install系统自动安装。
安装完成后显示系统登录界面,使用社保部门发放的用户和密码就可以登录申报系统了。
TIBCO OpenSpirit Extension for ArcGIS 安装指南说明书
TIBCO OpenSpirit®Extension for ArcGIS Installation GuideArcMap Desktop Add-In Software Release 2019.0.0September 2019Important InformationSOME TIBCO SOFTWARE EMBEDS OR BUNDLES OTHER TIBCO SOFTWARE. USE OF SUCH EMBEDDED OR BUNDLED TIBCO SOFTWARE IS SOLELY TO ENABLE THE FUNCTIONALITY (OR PROVIDE LIMITED ADD-ON FUNCTIONALITY) OF THE LICENSED TIBCO SOFTWARE. THE EMBEDDED OR BUNDLED SOFTWARE IS NOT LICENSED TO BE USED OR ACCESSED BY ANY OTHER TIBCO SOFTWARE OR FOR ANY OTHER PURPOSE. USE OF TIBCO SOFTWARE AND THIS DOCUMENTIS SUBJECT TO THE TERMS AND CONDITIONS OF A LICENSE AGREEMENT FOUND IN EITHER A SEPARATELY EXECUTED SOFTWARE LICENSE AGREEMENT, OR, IF THERE IS NO SUCH SEPARATE AGREEMENT, THE CLICKWRAP END USER LICENSE AGREEMENT WHICH IS DISPLAYED DURING DOWNLOAD OR INSTALLATION OF THE SOFTWARE (AND WHICH IS DUPLICATED IN THE LICENSE FILE) OR IF THERE IS NO SUCH SOFTWARE LICENSE AGREEMENT OR CLICKWRAP END USER LICENSE AGREEMENT, THE LICENSE(S) LOCATED IN THE “LICENSE” FILE(S) OF THE SOFTWARE. USE OF THIS DOCUMENT IS SUBJECT TO THOSE TERMS AND CONDITIONS, AND YOUR USE HEREOF SHALL CONSTITUTE ACCEPTANCE OF AND AN AGREEMENT TO BE BOUND BY THE SAME. This document contains confidential information that is subject to U.S. and international copyright laws and treaties. No part of this document may be reproduced in any form without the written authorization of TIBCO Software Inc. TIBCO, OpenSpirit, and TIBCO OpenSpirit Extension for ArcGIS are either registered trademarks or trademarks of TIBCO Software Inc. in the United States and/or other countries.All other product and company names and marks mentioned in this document are the property of their respective owners and are mentioned for identification purposes only.THIS SOFTWARE MAY BE AVAILABLE ON MULTIPLE OPERATING SYSTEMS. HOWEVER, NOT ALL OPERATING SYSTEM PLATFORMS FOR A SPECIFIC SOFTWARE VERSION ARE RELEASED AT THE SAME TIME. SEE THE RELEASE NOTES FOR THE AVAILABILITY OF THIS SOFTWARE VERSIONON A SPECIFIC OPERATING SYSTEM PLATFORM.THIS DOCUMENT IS PROVIDED “AS IS” WITHOUT WARRANTY OF ANY KIND, EITHER EXPRESS OR IMPLIED, INCLUDING, BUT NOT LIMITED TO, THE IMPLIED WARRANTIES OF MERCHANTABILITY, FITNESS FOR A PARTICULAR PURPOSE, OR NON-INFRINGEMENT.THIS DOCUMENT COULD INCLUDE TECHNICAL INACCURACIES OR TYPOGRAPHICAL ERRORS. CHANGES ARE PERIODICALLY ADDED TO THE INFORMATION HEREIN; THESE CHANGES WILL BE INCORPORATED IN NEW EDITIONS OF THIS DOCUMENT. TIBCO SOFTWARE INC. MAY MAKE IMPROVEMENTS AND/OR CHANGES IN THE PRODUCT(S) AND/OR THE PROGRAM(S) DESCRIBED IN THIS DOCUMENT AT ANY TIME. THE CONTENTS OF THIS DOCUMENT MAY BE MODIFIED AND/OR QUALIFIED, DIRECTLY OR INDIRECTLY, BY OTHER DOCUMENTATION WHICH ACCOMPANIES THIS SOFTWARE, INCLUDING BUT NOT LIMITED TO ANY RELEASE NOTES AND "READ ME" FILES.Copyright © 2002-2019 TIBCO Software Inc. ALL RIGHTS RESERVED.TIBCO Software Inc. Confidential InformationiiiTable of ContentsOverview (4)Installation (6)Prerequisites (6)Installation Steps (6)Uninstall Steps (13)OverviewWith the OpenSpirit Extension, a user can extend ArcGIS functionality to allow a user to browse well, seismic, and interpretation data coming from a variety of G&G data stores and to bi-directionally share interaction events with other OpenSpirit enabled applications. Specifically this extension adds the ability to connect ArcMap to OpenSpirit in order to: •Read well, seismic, and interpretation data from OpenSpirit enabled data stores anddisplay in ArcMap•Send and receive OpenSpirit data selection events (exchange references to data with other applications)•Send and receive OpenSpirit GIS events (exchange point, polyline and polygon features with other applications)•Send and receive OpenSpirit grid events (exchange surface grids with other applications)•Send and receive OpenSpirit cursor tracking events (exchange mouse cursor x,y,z positions with other applications)•Send and receive OpenSpirit map view events (synchronize map view extents with other applications)•Send OpenSpirit map image events (synchronize map view extents with other applications and display an image of the map)•Establish a selection highlighting synchronization session (send and receive instructions to select features)InstallationPrerequisitesIn order to use the TIBCO OpenSpirit Extension for ArcGIS you must have the following applications installed on your Windows PC (running Windows 7, or Windows 10): •ArcGIS Desktop (ArcView or ArcEdit license) version 10.6 or 10.7.•OpenSpirit Runtime version 4.2.0 w/ Runtime HotFix 06 or OpenSpirit Runtime4.3.0 Installation StepsInstallation StepsThe TIBCO OpenSpirit Extension for ArcGIS is delivered as an ArcGIS Desktop Add-In.1.Download the OpenSpirit.ArcMapExtension.UI.esriAddIn file to a convenientlocation on your PC.2.Make sure the file is not blocked by right clicking on the .esriAddin file and selectingthe Unblock option if it is present.3.Install the Extension by double-clicking on the esriAddin file. This will display theESRI Add-In Utility:Then click on "Install Add-In".Your company may choose to install add-ins from a shared network drive, in which case you may just put the OpenSpirit Add-In in this directory and ArcGIS willdiscover it the next time it is run.4.Create a Windows firewall exemption rule for the ArcMap executable to enable theOpenSpirit extension to receive events.Open a Windows command window or a power shell window with administrator privilege and execute the command:netsh.exe firewall add allowedprogram program="C:\Program Files (x86)\ArcGIS\<version>\bin\ArcMap.exe" name="ArcMap"mode=ENABLE scope=ALL profile=ALLwhere <version> is the version of ArcGIS Desktop you have installed.For example, if running with ArcGIS Desktop 10.5 installed in the default location:: netsh.exe firewall add allowedprogram program="C:\ProgramFiles (x86)\ArcGIS\Desktop10.5\bin\ArcMap.exe"name="ArcMap" mode=ENABLE scope=ALL profile=ALLunch ArcGIS Desktop6.If the OpenSpirit toolbar is not visible make sure it is enabled for display bynavigating to the Customize-> Extensions menu item and make sure the toolbar isenabled for display. It should look like this:Check your ArcGIS Add-In Manager options if the OpenSpirit toolbar does not appear in the list of extensions. ArcGIS will not load the OpenSpirit Extension if the Load only ESRI provided Add-Ins option is selected on the Add-In Manager's Options tab. Use the Require Add-Ins to be digitally signed by a trusted publisher option or the Load all Add-Inswithout restrictions option. ArcMap must be restarted for the OpenSpirit Extension to appear in the extension list after changing the setting.7.The OpenSpirit toolbar should appear as a dockable toolbar like this:In order to dock it simply drag it by it's light blue header and deposit it on the arrow icon indicating where you want the toolbar docked:Toolbar docked at North of map window:Uninstall StepsThe TIBCO OpenSpirit Extension for ArcGIS is uninstalled using the ArcMap Add-In Manager. In the ArcMap menu select Customize>Add-in Manager... menu item. The Add-in Manager window will open, under the My Add-ins section, select the TIBCO OpenSpirit Extension for ArcGIS entry, finally click the Delete this Add-in button. This will uninstall the add-in.。
abb connect win10 版安装指南说明书

—ABB Connect Win10 版安装指南欢迎大家使用ABB Connect。
它将给您带来便捷与效率,让您迅速获取ABB电气的各种资料和信息。
安装步骤1.进入MS Store点击Win10 界面左下角的 Windows 图标, 滑动鼠标,在分类M中找到“Microsoft Store”, 然后点击进入微软应用商店。
或在屏幕左下角的搜索框里输入”store” 后,找到并进入 MS Store。
2.找到“ABB Connect” APP点击“Search” 图标, 输入”ABB Connect“。
然后点击找到的应用:”ABB Connect”。
或者,您也可以点击此处直接进入MS Store 的ABB Connect下载界面。
3.点击“Get” , 开始安装4.登录微软应用商店在此,会出现微软应用商店的登录界面,如下图所示。
因为下载APP需要提示您登录应用商店。
在此,如果您不清楚您的微软账号,建议您选择不登录,即您不要点击【Sign in”】 而是点击 - 【“No, Thank”】。
选择“No,Thanks” 后,通常情况下也能继续安装。
也不影响您的后续使用。
若不登录下载不了,就需要输入您的微软账号。
通常情况下,若您使用的是个人电脑,您会以个人名义注册微软账号,在此,就请输入您个人的微软账号密码,而不是公司给您配置的电脑上的账号密码。
若您使用的是公司派发的电脑, 请联系您公司的电脑部门,看是否您有微软的账号。
(注意:此微软帐号不是您电脑的开机账号与密码)5.下载APP点击“install”后,会出现右图所示的下载过程示意,表明正在下载ABB Connect应用程序。
6.安装APP点击“Launch”, 开始安装。
7.隐私声明首先在隐私声明的弹窗(可能是英文界面)出现后选择“接受”后进入内容选择界面8.登录“Login” 选择若您已经有myABB账号,则点击【LOGIN】,输入您的账号(邮箱、密码),然后点击【login】。
- 1、下载文档前请自行甄别文档内容的完整性,平台不提供额外的编辑、内容补充、找答案等附加服务。
- 2、"仅部分预览"的文档,不可在线预览部分如存在完整性等问题,可反馈申请退款(可完整预览的文档不适用该条件!)。
- 3、如文档侵犯您的权益,请联系客服反馈,我们会尽快为您处理(人工客服工作时间:9:00-18:30)。
Install PBRT for Windows 7 & Visual Studio 20101.Get PBRTDownload from the official website: /downloads.phpChoose prbt-v2-src.zip, for Windows(14MB).Unzip the pbrt archive into a local directory. I'll refer to the fully qualified path to the root pbrt directory (your_local_dir/pbrt-v2) as PBRTSRC_ROOT.Here I choose the directory: C:\pbrt-v22.Build PBRT on Windows Using Visual Studio 20101) Open the src/pbrt.vs2010/pbrt.sln Visual Studio solution file.2) Select either Debug or Release, and x86 (win32) or x64.3) Build the solution.3.Set the PBRT_SEARCHPATH for WindowsPBRT compiles each of its modules as dynamically linked libraries and uses PBRT_SEARCHPATH to find these libraries when running. Create a system environment variable called PBRT_SEARCHPATH and set its value to PBRTSRC_ROOT/bin. You may also find it convenient to add the directory to your system path.Here I set to PBRT_SEARCHPATH to C:\pbrt-v2\bin.PBRT should now be ready to go.4.If you need to modify the PBRT parsing code, follow these steps first:1) Install Bison and Flex programs if they are not already installed.Choose either Cygwin or GnuWin32; either one will work.IMPORTANT NOTE:Do not install under "Program Files" or "Program Files (x86)".The installation path should not contain any spaces. Use C:\cygwin or C:\gnuwin32, for example.Option A: GnuWin32 /Install Bison and Flex via setup packages.Option B: Cygwin </>Install Cygwin with Bison and Flex packages.These may not be selected by default, so be sure to select them.2) Add Bison and Flex executable paths to the system PATH, so that they can be run from any directory or location.a) Right-click "My Computer" or "Computer".b) Click Properties.c) Click "Advanced system settings" or "System Properties".d) Click the Advanced tab.e) Click the "Environment Variables..." button.f) Add the path(s) of the Flex and Bison programs to the PATH variable, under the system variables group box. Use the semi-colon (;) character to separate path items. Example path to add: C:\gnuwin32\bin;g) Press the OK button.h) Press the OK button.i) Either log off and log back on the computer, or restart it for the updated PATH to take effect.5.Set PBRT path for CygwinNow you must modify your PATH and PBRT_SEARCHPATH environment variables so PBRT knows where to look for plugins etc. To do this edit your .bashrc file (in your Cygwin user directory, note that if you don't have a .bashrc file you can create one from scratch, or worst case, edit the systemwide .bashrc at /etc/bash.bashrc) and add the following lines:export PBRT_SEARCHPATH=/cygdrive/c/pbrt-v2/bin:$PATHexport PATH=$PBRT_SEARCHPATH:$PATH6.Let’s try a small exampleThere are several example scenes in the folder PBRTSRC_ROOT/scenes (For example, C:\pbrt-v2\scenes in my computer). Also, you can download more scenes from the PBRT homepage /scenes.php.Open Cygwin Terminal, and change to the scenes directory and render the bunny by writing:$ pbrt bunny.pbrtRemember that rendering is a time-consuming task.After the rendering have been done, you can now visualize the image by converting the *.exr format to *.tiff format by writing:$ exrtotiff bunny.exr bunny.tiffPBRT is a physically based renderer, thus it generates High Dynamic Range images. In practice the pixels’ values stored on the output file have floating point values that can range from 0 to any maximum number. To visualize the image using exrtotiff to convert the High Dynamic Range format to the TIFF format, you can adjust exposure by setting parameters.The quality of the rendered image depends on many parameters and on the particular choice of algorithms used. The noise you see on the image depends, among others, on the number of samples, i.e. rays, taken per pixel.Edit the Bunny.pbrt file such that it uses the “path” surface integrator and only shoots 4primary rays per pixel. You can open the Bunny.pbrt file by Notepad and replacethe lines:Sampler "lowdiscrepancy" "integer pixelsamples" [32]in the original file, with the following lines:Sampler "bestcandidate" "integer pixelsamples" [4]SurfaceIntegrator "path"Render the image again and visualize it. The first thing you will notice is that the image is full of noise. Variance, or noise, can be reduced by increasing the number of samples taken. Unfortunately, rendering time increases linearly with the number of samples but variance reduces with the square of the number of paths. In practice, you’ll have to take 4 times more samples to have half variance.Figure 1. The left is the image rendered with original file bunny.prbt, the right one is the image rendered with uses the “path” surface integrator and only shoots 4 primary rays per pixel.。