TouchKit触摸屏使用手册1.0
易捷通触摸屏收款机使用说明书XXXX0310
前言非常感谢您选用易捷通触摸屏系列产品,本手册适用于易捷通生产的部份触摸屏产品。
在安装和使用产品之前,请您详细阅读本手册,以便您对它的性能有深入的了解。
请保存好此手册,将来如果您遇到使用问题时以便参考。
本公司为改进产品,将尽可能采用新技术、新元器件。
因此本公司有权更改而不另行通知。
本手册所描述的特性、功能和操作也许与本公司在各地所销售机器的性能并不完全一致,有些情况下,图片只是设备原型,在使用本手册前,应向本公司或经销商询问当前适用的资料。
本手册只适用于在中国境内使用的易捷通部分触摸屏。
本手册包括截止到该手册印刷时的最新信息。
本公司全权负责该手册的修订与说明,并保留该手册印刷后更改产品而不另行通知的权利。
本手册中部分示意图,仅供参考,若图片与实物不符,请以实物为准。
本设备必须由售后服务人员或经销商进行安装。
对于未经授权对本设备的更改、不按规定替换连接设备及电缆所造成的一切后果,本公司不负任何责任。
本手册最终解释权归深圳市易捷通科技有限公司所有2013年3月目录一、安全使用注意事项---------------------------------------------------3二、初始安装---------------------------------------------------------------4三、触摸屏外型--------------------------------------------------------5-7四、产品说明(1)、液晶品牌和型号以及技术参数的说明----------------- 7 (2)、触摸屏型号以及技术参数的说明------------------------8 (3)、主板接口图一--------------------------------------------9-10 (4)、主板接口图二-------------------------------------- --------11 五、双屏系统设置(1)、BIOS双屏显示设置-----------------------------------12-14 (2)、 WindowsXP系统双屏显示设置---------------------14-18 六、软件操作指南(1)、触摸屏驱动安装--------------------------------------19-24 (2)、触摸设置及应用---------------------------------------25-27七、常见问题-------------------------------------------------------------28八、保修条款--------------------------------------------------- ---------29安全使用注意事项1、选择平整且无振动的台面放置收款机;2、收款机的位置应选在避免阳光直射、温度变化不大、远离水源及灰尘较少的地方;3、请保持收款机远离强电磁场;4、避免阻塞或覆盖通风口,避免将任何物品塞入或掉入机器内。
【精品】触摸屏操作手册
触摸屏操作手册中国·湖南·长沙市拓创科技发展有限公司2008。
01。
121.1、系统开机1.2、送控制柜电源,观察面板中间的触摸屏上电源灯及DC24V指示灯是否有显示,如无显示请检查电源输入是否正常。
1.3、检查药剂贮存池的存药情况。
1.4、打开进给药箱的进药开关。
1.5、开始加药:将操作柜上“加药机"开关置于“开"的位置,上方运行指示灯亮,系统开始加药。
系统开始加药后请到给药室检查各药点的执行阀工作是否正常。
触摸屏操作说明当主机通电开机以后,在触摸屏上显示如图一所示启动主画面.(图一)PWE灯为触摸屏的电源指示灯,CPU灯亮表示触摸屏正在运行,COM灯闪烁表示触摸屏与PLC通迅正常.在屏幕共设置了[流量设定]、[累计量显示]、[参数设定]、[动作状态]等四个功能启动按钮,点击各功能键就可进入相应的功能模块.点击[流量设定]按钮可进入各药点的流量设定屏幕,点击[累计量显示]按钮可进入各药点的已设定的阀容、一次时间参数和药耗累计量监视,点击[参数设定]按钮进入阀门的工作参数、触摸屏系统时间设定.点击[动作状态]按钮可监视到各加药点工作和PLC输入的运行状态等.2.1、药点流量设定值的输入操作:点击主画面中[流量设定]按钮进入了如下图所示的流量设定画面。
(图二)在此画面中显示的为8个药点的[设定量]、[最大量]、[最小量]和[实际量]分别为对应加药地址给药阀的当前设定流量、最小量添加量、最大量添加量、阀门实际流量数。
[最大量]、[最小量]栏中显示数据是由[参数设定]屏幕并且具有操作权限的技术人员来设定的;[实际量]为阀门实际流量数,[设定量]栏中的数据可以按以下操作进行修改。
2.1。
1、点击屏幕中要修改的添加地址对应的流量数栏,右边的地址区即弹出一个数字健盘.2.1.2、点击右边键盘中的数字键输入合适的流量数(最大量和最小量之间数据)后按[ENT]输入的数据被写入PLC,数字健盘即消失;按[ESC]取消当前操作,数字健盘即消失.2.1.3、当输入的流量数为[0]时(或将暂停开关打到关的位置),则该药点停止加药。
触摸屏使用说明
触摸屏使用实验、实验目的1、通过实际触摸屏的编程及相关操作,熟悉触摸屏的基本特性和操作流程。
2、通过实验,加深理解触摸屏的编程软件。
、实验步骤EasyBuider 500 的使用创建一个新的空白的工程。
1) 安装好EB500 软件后,在[ 开始] 中选择[ 程序]/[EasyBuilder]/[EasyBuilder 500]EasyBuilder 软件启动如图所示:图EasyBuilder 启动2) EB500 软件会自动载入上次打开的工程,如果是第一次进入系统或者上次进入系统时最后一次打开的是一个空白的工程,将弹出触摸屏型号选择对话框。
触摸屏型号选择界面如图所示:图触摸屏型号、显示方式、语言选择界面选择将使用的触摸屏类型、以及显示模式和默认的语言。
这里选择MT506T/C/M,按下[ 确认] 即可进入EB500 编辑画面。
编辑画面如图所示,其中黑色区域为模拟的触摸屏窗口,在上面可以添加各种元件。
以后每次进入 EB500 组态软件的编辑界面, 打开的是最近一次打开的工程。
如果要新建工程, 先选择菜单 [ 文件]/[ 关闭] 来关闭当前工程, 再选择菜单 [文件]/[ 新建]或 按钮来新建一 个工程。
例如:本次实验需要新建一个空白工程,触摸屏类型选择 [MT506T/C/M320*240] , 按下 [ 确认 ] 。
3) 新工程创建完成后, 选择菜单 [ 文件]/[ 保存] 可保存当前工程。
保存工程文件如下图所示, 工程文件命名为,按下 [ 保存 ] 。
4) 选择菜单 [工具 ]/[ 编译 ] 或 按钮,这时将弹出编译工程对话框如图所示,按下[编译 ]按钮,编译完毕后关闭编译对话框。
5) 选择菜单 [工具 ]/[ 离线模拟 ]或按钮 。
这时就可以看到创建的新空白工程的模拟图 如下图所示 :图 EB500 编辑界面图 保存工程文件图 编译对话框图模拟触摸屏程序可以看到该工程没有任何元件,并不能执行任何操作。
触控一体机使用手册说明
触控一体机使用手册说明触派电子;只为让触控一体机市场更透明,“技术透明”、“成本透明”、“服务透明”、打造标准,从触派开始,优胜劣汰由大众抉择。
它是一种结合平板电脑的触摸、液晶电视机的尺寸还有台式电脑的所有配件而成。
当然它所发挥的功能也是非常的强大,具备的能力在下面会详细提到。
它适合在各种不同的地方场合使用,凭借着出色的功能丰富性已经牢牢占据着如;银行柜台、展会信息展示、房产信息展示、会议交流等等。
功能上基本可以完成电脑和平板电脑上的任何操作应用、而更细化的功能需要根据软件实现。
大部分软件可以找专门人员制作。
储存空间足够的情况下,可以安装很多软件种类。
触摸点数上普遍采用10点触控,12点触控。
其实太高很少能派上用场,反而会增加出现故障等情况发生。
当然在我们普遍选取的时候,会面临太多不可控问题,例如触摸一体机内部采用的配件,防水密封性,延保服务,在一样可靠的牌子情况下、价太高可以忽略。
但是特别低的你就当心了,当然这个低是参考平均标准的哦,很多无良的拿二手配件翻新给你,根本查不到,用起来感觉是一样的,但是触摸屏一体机核心在使用寿命上,比如一般触摸屏点击六千万次(当然这是触派电子产的才有这么高)而你500万次就挂了,这里需要注意,在所有配件相同的情况触摸寿命很关键,所以选择些科技能力强,有些知名度的。
标准配置通常只够会展。
特别要求的需要自行额外沟通。
处理器i5四核已经算高配,通常配i3双核。
实事证明i3在当今已不足以硬度各类大型处理类软件。
所以需i5四核处理器时要特别声明否则一旦装机完成很难重新加装。
一般都用W8系统,也有个别用安卓系统。
这个需要根据习惯而定,作为需展示资料的工具都会采取和U盘对接导入内容。
从这点上看安卓系统是有一定复杂性。
不像W8那种可快速便捷的运用起来。
而且市面文件展示归纳软件很少有针对安卓开发。
.英文全译. Jane Wei did not return my message, probably because I was the phrase "I wish your company be on the upgrade" let between us have a great sense of distance, but I do so is now quiet, yes, I most need at the moment is quiet, and theneir work in the stillness.The next day, I got up early, then had a quick breakfast, he embarked on a long road of the candidates, till sunset at dusk after temporarily idle, but the results are not just as one wishes, at least not encountered is the company has intention to me, mostly let me the patience to wait for the candidates for the results, although heart very anxious indeed, but also within an expected result, after all, the society is the lack of talent, which I find work in Xuzhou have deep experience, finally just under Li Xiaoyun's help, only to get a satisfactory job.Dark some, I took a tired to that often play racing with rice color of the square, to find a wooden chair and sat down, and then some absence of those who watched the children playing the car, say in the heart envy, not the more helpless, helpless childhood away, helpless life is not just as one wishes."Uncle Uncle, can you buy me flowers?"I looked up and found standing next to a flower girl, smiled and asked her: "how do you know that uncle take?""Because you have a girl friend, I have seen several times you bring her here to play the car, but at that time I haven't started selling flowers Hee hee!"I anyway boring with this little girl chatted: "now why are you going to the flower?""Our class had a friend is sick, she is my friend, can be beautiful, but no money to see a doctor, we have these good friends can use after school time to square flower, make money to cure her, our most close to the square, I am here to flower Uncle, you buy some flowers, and I thank you for the beans!"。
TOUCHLOCK K和KP系列指纹识别器说明书
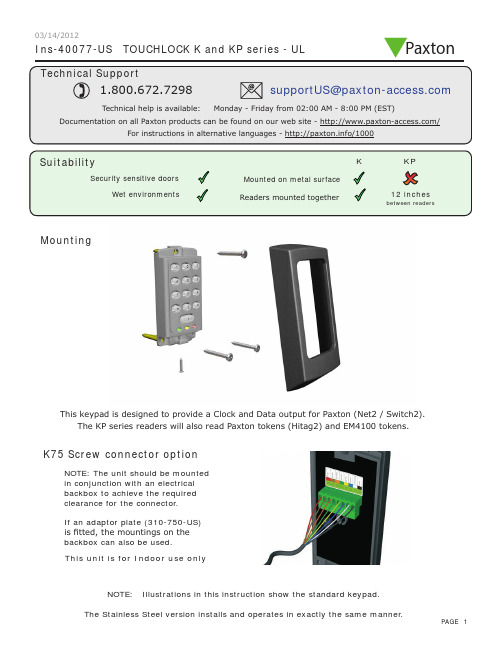
Ins-40077-US TOUCHLOCK K and KP series - ULMountingK75 Screw connector optionNOTE: The unit should be mounted in conjunction with an electrical backbox to achieve the required clearance for the connector .If an adaptor plate (310-750-US) is fitted, the mountings on the backbox can also be used.This keypad is designed to provide a Clock and Data output for Paxton (Net2 / Switch2).This unit is for Indoor use onlyNOTE: Illustrations in this instruction show the standard keypad.The KP series readers will also read Paxton tokens (Hitag2) and EM4100 tokens.Paxton03/14/2012Cable extensionsWiringNet2 control unitSwitch2 control unitStandard Unit - Drill a hole in the surface for the rear data cable. Secure the unit to the surface with three screws as per fitting diagram on page 1. 3 suitable screws and fixings are provided for fitting the unit to a wall. Ensure the data cable has free access at the rear .A choice of black and white covers are also provided. Hook the required cover over the top of the reader , press home at the bottom and secure with the single fixing screw.Screw Terminal Unit - The adapter (310-750-US) is mounted to a standard backbox using the fixing screws provided. The 75mm reader is then mounted onto the adapter using the fitting kit provided with the reader .KP series - When chosing a location for the reader , ensure that it is a least 12 inches from other readers. This will include readers mounted on the other side of the same wall as the radio signal will cause interference and reduce the read range. The reader should not be used on metal surfaces as the reflected signal will also reduce the range.Powering up the keypad will cause all the LEDs to come on. Once the control unit has been configured to accept keypad input (see controller instructions) pressing any key will make the keypad sound a bleep. Check the following FAQ section for assssistance if any problems are encountered.FCC ComplianceClass B digital devices.This equipment has been tested and found to comply with the limits for a Class B digital device, pursuant to Part 15 of theFCC Rules. These limits are designed to provide reasonable protection against harmful interference in a residential installation. This equipment generates, uses and can radiate radio frequency energy and, if not installed and used in accordance with the instructions, may cause harmful interference to radio communications. However , there is no guarantee that interference will not occur in a particular installation. If this equipment does cause harmful interference to radio or television reception, which can be determined by turning the equipment off and on, the user is encouraged to try to correct the interference by one or more of the following measures:-- Reorient or relocate the receiving antenna.-- Increase the separation between the equipment and receiver .-- Connect the equipment into an outlet on a circuit different from that to which the receiver is connected.-- Consult the dealer or an experienced radio/TV technician for help.Class A digital devices.This equipment has been tested and found to comply with the limits for a Class A digital device, pursuant to part 15 of the FCC Rules. These limits are designed to provide reasonable protection against harmful interference when the equipment is operated in a commercial environment. This equipment generates, uses, and can radiate radio energy and, if not installed and used in accordance with the instruction manual, may cause harmful interference to radio communications. Operation of this equipment in a residential area is likely to cause harmful interference in which case the user will be required to correct the interference at his own expense.This device complies with Part 15 of the FCC Rules. Operation is subject to the following two conditions:(1) this device may not cause harmful interference, and (2) this device must accept any interference received, including interference that may cause undesired operation. Changes or modifications not expressly approved by the party responsible for compliance could void the user's authority to operate the equipment.This unit is for Indoor use onlyFollowing the completed installation of this equipment, no further maintenance or testing is required.It is advisable to ensure that any third party backup power supplies or recovery procedures are checked regularly to ensure that the operation of the Paxton system is not compromised.Unit installation / test Maintenance/The use of any add-on, expansion, memory or other module manufactured or supplied by the manufacturer's representative will invalidate the CAN/ULC-S319 certification.For CAN/ULC-S319 installations, terminals, leads and wiring methods must comply with CSA, C22.1, Canadian electrical code, Part 1, safety standards for electrical installations.Product compliance and limitationsTo comply as a UL listed installation, the following conditions must apply:-Server based functions (Antipassback, Time and Attendance, etc) have not been evaluated by UL and cannot be used for UL 294 installations.The use of Wiegand readers and the configuration software has not been evaluated by 'UL' Wiring: - Where an equivalent cable / wire is used it must be ' UL Listed ' All interconnecting devices must be UL Listed.Wiring methods shall be in accordance with the National Electrical Code (ANSI/NFPA70), local codes, and the authorities having jurisdiction.This device complies with Industry Canada licence-exempt RSS standard(s). Operation is subject to the following two conditions: (1) this device may not cause interference, and (2) this device must accept any interference, including interference that may cause undesired operation of the device.。
TouchWin手册
TouchWin使用手册Human Machine InterfaceTouchWin使用手册●安全注意事项●在设计系统时,请仔细阅读相关手册,同时要非常注意安全。
此外,实习时请特别注意以下几点,正确操作设备。
◎实习注意事项◎注意●请遵照讲师或说明书上的展开实习。
●请不要随意安装实习机的模块,改装接线。
否则会引起故障、误动作、损失、火灾。
●实习机发出异臭/弄音时,请关闭电源开关。
危险●通电时请不要接触端子,以免引起触电。
●请不要打开盖板。
TouchWin使用手册前言PLC(Programmable Logical Controller)通常称为可编程逻辑控制器,是一种以微处理器为基础,综合现代计算机技术、自动控制技术和通信发展起来的一种通用的工业自动控制装置,由于它拥有体积小、功能强、程序设计简单、维护方便等优点,特别是它适应恶劣工业环境的能力和它的高可靠性,使它的应用越来越广泛,已经被称为现代工业的三大支柱(即PLC、机器人和CAD/CAM)之一。
人机界面是在操作人员与机器设备之间作双向沟通的桥梁,用户可以自由的组合文字、按钮、图形、数字等来处理或监控管理及应付随时可能变化信息的多功能显示屏幕。
随着机械设备的飞速发展,以往的操作界面需要熟练的操作员才可以操作,而且操作困难,无法提高工作效率。
但是使用人机界面能够明确指示并告知操作员机器设备目前的状态,使操作变得简单生动,并且减少操作上的失误,即使是新手也可以很轻松地操作整个机器设备。
使用人机界面还可以使机器的配线标准化、简单化,同时也能减少PLC监控器所需的I/O点数,降低生产成本,同时由于面板控制的小型化及高性能,相对地提高了整个设备的附加价值。
TouchWin使用手册目录前言------------------------------------------------------------------------------------------------------4目录-----------------------------------------------------------------------------------------------------5硬件篇--------------------------------------------------------------------------------------------------71 产品概述------------------------------------------------------------------------------------------------------------71-1 功能------------------------------------------------------------------------------------------------------------8 1-2 一般规格------------------------------------------------------------------------------------------------------9 1-3 各部分名称--------------------------------------------------------------------------------------------------112 外形尺寸----------------------------------------------------------------------------------------------------------132-1 TP460-L尺寸-----------------------------------------------------------------------------------------------13 2-2 TP560-L/TP560-T尺寸------------------------------------------------------------------------------------133 安装方法----------------------------------------------------------------------------------------------------------14软件篇-------------------------------------------------------------------------------------------------151 关于作图软件----------------------------------------------------------------------------------------------------151-1 软件的安装-------------------------------------------------------------------------------------------------15 1-2 软件画面的构成-------------------------------------------------------------------------------------------162 入门须知----------------------------------------------------------------------------------------------------------192-1 新建工程----------------------------------------------------------------------------------------------------192-1-1 新建画面或窗口--------------------------------------------------------------------------------------21 2-2 画面或窗口标题的设定----------------------------------------------------------------------------------23 2-3 图形的制作-------------------------------------------------------------------------------------------------262-3-1 画直线、长方形、圆-------------------------------------------------------------------------------262-3-2 画多边形、折线--------------------------------------------------------------------------------------272-3-3 画圆弧--------------------------------------------------------------------------------------------------282-3-4 尺寸的变更--------------------------------------------------------------------------------------------282-3-5 选中对象的移动--------------------------------------------------------------------------------------292-3-6 选中对象的剪切、复制和粘贴-------------------------------------------------------------------30 3部件----------------------------------------------------------------------------------------------------------------31 3-1 文字串设置-------------------------------------------------------------------------------------------------31 3-2 动态文字串-------------------------------------------------------------------------------------------------33 3-3 指示灯-------------------------------------------------------------------------------------------------------35 3-4 位操作按钮-------------------------------------------------------------------------------------------------37 3-5 指示灯按钮-------------------------------------------------------------------------------------------------39 3-6 画面跳转----------------------------------------------------------------------------------------------------41 3-7 数据显示----------------------------------------------------------------------------------------------------42 3-8 报警数据显示----------------------------------------------------------------------------------------------44 3-9 字符显示----------------------------------------------------------------------------------------------------45 3-10 数据输入---------------------------------------------------------------------------------------------------45 3-11 小键盘------------------------------------------------------------------------------------------------------46 3-12 用户输入---------------------------------------------------------------------------------------------------46 3-13 窗口调用---------------------------------------------------------------------------------------------------47 3-14 垂直棒图---------------------------------------------------------------------------------------------------48 3-15 水平棒图---------------------------------------------------------------------------------------------------50 3-16 动态图片---------------------------------------------------------------------------------------------------524 系统参数----------------------------------------------------------------------------------------------------------544-1 系统设置----------------------------------------------------------------------------------------------------54TouchWin使用手册4-1-1 启动画面和背景设定-------------------------------------------------------------------------------54 4-1-2 口令设置-----------------------------------------------------------------------------------------------54 4-1-3 屏幕保护-----------------------------------------------------------------------------------------------54 4-2 交互控制----------------------------------------------------------------------------------------------------55 4-3 PLC类型选择-----------------------------------------------------------------------------------------------55 5 保存与下载-------------------------------------------------------------------------------------------------------565-1 保存工程----------------------------------------------------------------------------------------------------56 5-2 下载----------------------------------------------------------------------------------------------------------57 6 特殊功能----------------------------------------------------------------------------------------------------------58应用篇-------------------------------------------------------------------------------------------------591 TP系列操作方法------------------------------------------------------------------------------------------------591-1 TP系列连机通讯-------------------------------------------------------------------------------------------59 1-2 TP系列触摸屏口令----------------------------------------------------------------------------------------59 附录----------------------------------------------------------------------------------------------------62 1 PLC连接方法--------------------------------------------------------------------------------------------------621-1 信捷FC系列-----------------------------------------------------------------------------------------------62 1-2 三菱FX系列-----------------------------------------------------------------------------------------------64 1-3 西门子S7-200系列---------------------------------------------------------------------------------------67 1-4 欧姆龙C系列----------------------------------------------------------------------------------------------68 1-5 光洋S系列-------------------------------------------------------------------------------------------------70 1-6 台达DVP系列---------------------------------------------------------------------------------------------73 1-7 LG Master-k系列PLC------------------------------------------------------------------------------------75 1-8 松下FP系列PLC-----------------------------------------------------------------------------------------77 1-9 施耐德PLC-------------------------------------------------------------------------------------------------80TouchWin 使用手册硬件篇1 产品概述TP 系列触摸屏工业显示器是代替控制面板和键盘的又一新突破,是机器的又一新面孔。
Overlay Touch KT-T Series 多点触摸屏幕覆盖说明书
Overlay Touch KT-T Series is an attachable touch screen that easily changes standard signage products into touch products. With Overlay Touch, your screen will turn into interactive display which enables smooth writing and drawing experience with ten-point multi-touch function. This interactivity will bring a new experience into your places such as schools, companies, shops and etc.Key FeaturesMulti-Touch with Slim BezelBezelDepthMulti-touch function is added on the existing display with the sleek and clean looking.27mm 23.5mmAdd Interactive Experiences to Digital ScreenOverlay Touch KT-T Series27mm10 Point Multi-TouchIt provides a more realistic interactive sense with ten simultaneous touches.10PointsGhost-Free TouchLG proprietary touch technology can draw clean and accurate diagonal lines through controlling multi-touch gestures in great precision. Clean multi-touch experience with IR Spread is based on our in-house IR-Spread technology which provides betteraccuracy compared to conventional IR Matrix.asily nce LG may make changes to specifications and product descriptions without notice.Copyright © 2015 LG Electronics Inc. All rights reserved. “LG Life’s Good” is a registered of LG Corp. The names of products and brands mentioned here may be the trademarks of their respective owners.More info /c/LGECommercialDisplayDownload LG Commercial Display Mobile AppApple App Store Google Play Store• Application software for school and business • Integration of board page and application • Character recognition function • GUI for FHD/UHD resolution• Supports over 65" screen display only.LG IWB SoftwareOS Windows XP / Vista / 7DRAWING Pen / Brush / Spray / Eraser / Shape EDIT Copy / Paste / Clone / Undo / RedoDATA FORMAT Intrinsic / PDF / JPG MEDIA Image, Audio, VideoAPP LINKAGE PowerPoint, Excel, Word, Internet Explorer E-MAIL Share writing/drawing data via e-mailSCREEN SPLIT 2 horizontal ScreensUSAGE CONVENIENCEPreview / Navigation / Screen Lock CAPTURE Full / Window / Automatic Copy & PasteRECORDING Full / Window / Rectangle ZOOMIn / Out (100% ~ 400%)WRITING SPACE RESIZEResize From 1,920 x 1,080 to 3,840 x 2,160KT-T SeriesSpecificationsTOUCHTouch typeIR(Infrared Rays) Spread IR(Infrared Rays) Spread IR(Infrared Rays) Spread IR(Infrared Rays) Spread IR(Infrared Rays)Spread Available object size for touch Ø 8mm Ø 8mm Ø 8mm Ø 8mm Ø 8mm Scan Time 13 ~ 30ms 9 ~ 15ms 9 ~ 14ms 9 ~ 14ms 8 ~ 13ms Accuracy 1mm 1mm 1mm 1mm 1mm InterfaceUSB 2.0USB 2.0USB 2.0USB 2.0USB 2.0Protection Glass Thickness 2.8T (Anti-Glare) 2.8T (Anti-Glare) 2.8T (Anti-Glare) 2.8T (Anti-Glare) 2.8T (Anti-Glare)Protection Glass Transmission 85 5%85 5%85 5%85 5%85 5%Operating Systme Support Windows 7, Windows 8 / Mac OS X (10.7 or later) / Android / Linux (Kernel 3.9 or later)Multi touch point Max 10 Point Max 10 Point Max 10 Point Max 10 Point Max 10 Point Touch Resolution 1428 x 8031428 x 8031428 x 8031428 x 8031428 x 803PANELScreen Size 65"55"49"43"32"Compatible Products65LS33A 55SE3B, 55SM5B, 55SE3KB, 55SM5KB, 55SM3B, 55SL5B 49SE3B, 49SM5B, 49SE3KB, 49SM5KB, 49SM3B, 49SL5B 43SE3B, 43SM5B,43SE3KB, 43SM5KB,43SM3B, 43SL5B32SE3B, 32SM5B,32SE3KB, 32SM5KBBrightness N/A (20% brightness reduction with protection glass)N/A (20% brightness reduction withprotection glass)N/A (20% brightness reduction with protection glass)N/A (20% brightness reduction with protection glass)N/A (20% brightnessreduction with protection glass)Orientation Landscape & Portrait Landscape & Portrait Landscape & Portrait Landscape & Portrait Landscape & PortraitCONNECTIVITYInput USB USB USB USB USB PHYSICAL SPECIFICATIONColorBlack Black Black Black Black Bezel Width27.0mm 27.0mm 27.0mm 27.0mm 27.0mm Overlay Dimension (W x H x D)1485.5 x 859.5 x 23.5 mm (Max 62.1 mm)1266 x 739 x 23.5 mm (Max 60 mm)1132 x 660 x 23.5 mm (Max 60 mm)997 x 586 x 23.5 mm (Max 60 mm)756 x 449 x 23.5 mm(Max 75.7 mm)Weight (Head)18.5kg 9.7kg 8kg 6.5kg 4.1kg Carton Dimensions (W x H x D)1548 x 942 x 176 mm(Inner Dimension)1420 x 980 x 185 mm 1285 x 810 x 185 mm 1150 x 735 x 185 mm 900 x 600 x 185 mmPacked Weight 21.9kg 15.4kg 13.6kg 11.4kg 7.6kgSPECIAL FEATURES Language (Manual)English, Spanish, Korean, FrenchENVIRONMENTAL CONDITIONS Operation Temperature 0 °C to 40 °C 0 °C to 40 °C 0 °C to 40 °C 0 °C to 40 °C 0 °C to 40 °C Operation Humidity 10 % to 80 %10 % to 80 %10 % to 80 %10 % to 80 %10 % to 80 %POWER Power Supply USB USB USB USB USB Typ. 2.5W 1.31W 1.31W 1.31W 1.31WSOFTWARE COMPATIBILITY IWB Software YesNo No No No ACCESSORYAccessoryManual (Overlay),CD (Writing S/W), Pen (2), Tray, Install AccessoriesManual (Overlay), Install AccessoriesManual (Overlay), Install AccessoriesManual (Overlay), Install AccessoriesManual (Overlay), Install AccessoriesApplication ScenarioBenefi ts of using LG Overlay TouchFits the screen perfectlyIncludes single point of support serviceOverlay models are designed to fi t compatible screens and provide better touch accuracy and performance.Delivers supports of both screen and overlay.Meeting RoomWayfi nding KioskCompatible Base ModelsKT-T320(32”) : 32SE3B, 32SM5B* 32SL5B not compatible with touch overlayKT-T430(43”) : 43SE3B, 43SM3B, 43SL5B, 43SM5B KT-T490(49”) : 49SE3B, 49SM3B, 49SL5B, 49SM5B KT-T550(55”) : 55SE3B, 55SM3B, 55SL5B, 55SM5B KT-T650(65") : 65LS33AOverlay TouchStandard ModelKT-T Series Class Room Cinema。
交互式触摸显示器用户使用手册
交互式触摸显示器用户使用手册使用手册交互式触摸显示器使用手册敬告用户敬爱的用户:感谢您购买我公司新一代交互式触摸显示器产品,衷心希望本产品能为您带来全新的视听享受。
在使用本产品前,请您仔细阅读本说明书中所有的安全操作的说明。
它会让您享受到本机的各种功能,为你的使用提供方便。
为了方便您快速掌握产品的基本操作,我们编撰了本使用说明书。
说明书的内容在编撰过程中我们尽力避免错误,确保说明书的信息准确,可靠,然而篇幅所限,说明书的内容不可能涵盖用户使用过程中可能碰到的所有问题,有些内容虽然能够涵盖,但是可能没有提供非常详尽的说明。
由此产生的不便,敬请谅解。
本公司一直致力于不断改善其产品的性能和可靠性。
因此,本使用说明书的硬件等配置可能与您实际购买的产品略有不同,但是此差异不会实质性地影响您使用此产品。
谢谢你的合作!重要安全事项在使用本产品无比阅读1.预读这些注意事项。
2.妥善保管这些注意事项。
3.遵循所有警告。
4.遵循所有知道说明。
5.不要在靠近水的地方使用本产品。
6.仅使用干布进行清洁。
7.不要挡住任何通风口。
按照制造商知道说明进行安装。
8.不要将本产品安装在热源旁边,如散热器、调温器、火炉或其它产生热量的设备。
9.不要損坏极性或接地型插头的安全设计。
极性插头有一宽一窄两个插片。
接地型插头有两个插片和一个接地插片。
宽插片或接地插片用于安全目的。
当提供的插头无法插入插座时,请与电工联系,以换成合适的插座。
10.不要踩踏电源线,不要在插头、便利插座、与本產品连接的部位等处卡主电源线。
11.仅使用制造商指定的连接件/附件。
仅使用制造商指定的或隨本产品一起销售的推车、平台、三腳架、支架或桌子等。
使用推车移动本产品实,应小心谨慎一避免因翻倒而受伤。
12.在雷電天气条件下或者长时间不使用时,请拔掉本产品的电源线。
13.委托专业维修人员进行维修。
当本产品由于任何原因而损坏时,如电源线或插头损坏、液体溅入或物品掉入本产品内部、遭受雨淋或受潮、工作不正常、或掉落等,应维修本产品。
易捷通触摸屏收款机使用说明书
前言非常感谢您选用易捷通触摸屏系列产品,本手册适用于易捷通生产的部份触摸屏产品。
在安装和使用产品之前,请您详细阅读本手册,以便您对它的性能有深入的了解。
请保存好此手册,将来如果您遇到使用问题时以便参考。
本公司为改进产品,将尽可能采用新技术、新元器件。
因此本公司有权更改而不另行通知。
本手册所描述的特性、功能和操作也许与本公司在各地所销售机器的性能并不完全一致,有些情况下,图片只是设备原型,在使用本手册前,应向本公司或经销商询问当前适用的资料。
本手册只适用于在中国境内使用的易捷通部分触摸屏。
本手册包括截止到该手册印刷时的最新信息。
本公司全权负责该手册的修订与说明,并保留该手册印刷后更改产品而不另行通知的权利。
本手册中部分示意图,仅供参考,若图片与实物不符,请以实物为准。
本设备必须由售后服务人员或经销商进行安装。
对于未经授权对本设备的更改、不按规定替换连接设备及电缆所造成的一切后果,本公司不负任何责任。
本手册最终解释权归深圳市易捷通科技有限公司所有2013年3月目录一、安全使用注意事项---------------------------------------------------3二、初始安装---------------------------------------------------------------4三、触摸屏外型--------------------------------------------------------5-7四、产品说明(1)、液晶品牌和型号以及技术参数的说明----------------- 7(2)、触摸屏型号以及技术参数的说明------------------------8(3)、主板接口图一--------------------------------------------9-10 (4)、主板接口图二-------------------------------------- --------11 五、双屏系统设置(1)、BIOS双屏显示设置-----------------------------------12-14 (2)、WindowsXP系统双屏显示设置---------------------14-18 六、软件操作指南(1)、触摸屏驱动安装--------------------------------------19-24 (2)、触摸设置及应用---------------------------------------25-27 七、常见问题-------------------------------------------------------------28八、保修条款------------------------------------------------------------29安全使用注意事项1、选择平整且无振动的台面放置收款机;2、收款机的位置应选在避免阳光直射、温度变化不大、远离水源及灰尘较少的地方;3、请保持收款机远离强电磁场;4、避免阻塞或覆盖通风口,避免将任何物品塞入或掉入机器内。
TouchKit四线产品规格书
GuangZhou Yulian Electronic Co.,Ltd
产品标准规格书 发行日期:20010501
(线性式)
修定日期:20050501
外观检验规范
页 次:10
注:a、上表针对可视区尺寸(25~35 平方厘米)而言,每增加或减少 10 平方厘米,总缺 点数量则相对增加 1 或减少 1。
b、以上尺寸均以 mm 为单位。 c、D=(W+L)/2,(D:直径、W:宽度、L:长度) d、每个缺点间距不可小于 5mm e、与斑马线垂直的边为 X,与斑马线平行的边为 Y 。 f、垂直与玻璃平面(即垂直与 X 和 Y)的边为 Z。 g、玻璃厚度为 T h、斑马线长为 附:a、对于检验标准未列出的缺点在非可视区,在不影响功能的情况下,这些缺点可忽
在 X1、X2 回路端加 5V 基准电压,照 Y 轴线性度测试方法,在 Y1 端
测各点的电压;
(c) 线性度的计算:
1 以 Y 轴的 A 行为例:线性度=
2
Vmax-Vmin Varv
*100%
地址:中国 广东广州市天河车陂路黄洲工业区四栋 4 楼 TEL:86-20-28872554 FAX:86-20-28872654
(线性式)
修定日期:20050501
SET
信赖性试验
页 次:07
(3) 高温、高湿测试
放置于 60℃、90%RH 之环境中,测试 72hr,取出室温放置 2 小时测,需
满足下列X≤900Ω
300Ω ≤X≤900Ω
▲绝缘阻抗
20MΩ ↑ @ DC25V
(4)高、低温冲击测试
广州市宇联电子科技有限公司
GuangZhou Yulian Electronic Co.,Ltd 产品标准规格书 发行日期:20010501