Pentax 540 闪光灯 说明书
全景闪光灯专家用户手册说明书
®The All-Round Flashlight ExpertUser ManualTIP/TIP CRIFeaturesMetallic keychain lightMultiple colour temperature options availableTIP: Fitted with a CREE XP-G2 S3 LED capable of outputting 360 lumens • TIP CRI: Fitted with a Nichia 219B LED, CRI≥90Integrated “Precision Digital Optics Technology” provides extreme reflector performance Built-in Li-ion batteryUSB rechargeable with onboard charging circuit Dual switch design4 brightness levels with direct access to ultralow and turbo outputs Memory functionHigh-efficiency regulation circuit provides unwavering output Advanced temperature regulation (ATR)Built-in power indicator (Patent No. ZL201220057767.4) Rear suspension ring capable of sustaining 30kg weight HAIII military grade hard-anodized Impact resistant to 1.5 metreDimensionsSize: 2.39” ×0.96” ×0.53”(60.8mm×24.5mm×13.8mm)Weight: 0.75oz (23.5g, with battery )AccessoriesKey ringOutput & RuntimeNOTICE: Stated data has been measured in accordance with the international flashlight testing standards ANSI/NEMA FL1 using an integrated and fully charged 3.7V 500mAh rechargeable Li-ion battery under laboratory conditions. End-user results may vary due to individual usage habits and environmental conditions.*Runtime for turbo mode is calculated based on theoretical arithmetic .Operating InstructionsON/OFFPress the power switch to turn the light on, press again to turn it off.Brightness AdjustmentWith the light turned on, press the mode switch to adjust the brightness to the next available level, brightness will cycle through the sequence of ultralow-mid-high. There is a memory function accompanying these modes, it will resume the last setting where the TIP /TIP CRI was turned off when turning it on again.Direct Access to Turbo/UltralowPress and hold the mode switch for more than 1 second to enter turbo mode (360 lumens/220 lumens).With the light turned off, press and hold the power switch for more than 1 second to enter ultralow mode (1 lumen).Note: The TIP/TIP CRI will step down its output from turbo after staying in this mode for 30 second, this is designed to prevent overheating and to protect the built-in battery.ATRBoth TIP and TIP CRI come with incorporated Advanced Temperature Regulation module, allowing the units to regulate their outputs and adapt to the ambient environment, therefore maintaining optimal performance.Lockout/UnlockHold down both switches until the main led flashes once to enter lockout mode, the product will be rendered inoperative to prevent accidental activation. To unlock, hold downboth switches again.Power IndicationPressing the mode switch while the light is turned off to activate the built-in power indicator, the number of flashes gives an approximation of battery level:1. 3 flashes represent battery level above 50%.2. 2 flashes represent battery level below 50%.3. 1 flash represents battery level below 10%.RechargingPrecautions1. Avoid direct eye exposure.2. Output will be dim and brightness may not be adjustable when battery level drops to to certain threshold, recharge the product when either occurs.3. This packaging contains small assembly parts, keep away from children to avoid danger of suffocation.4. Do not disassemble, modify this product, doing so voids the warranty.Warranty ServiceAll NITECORE products are warranted for quality. Any defective / malfunctioning NITECORE can be repaired free of charge for a period of 12 months from the date of purchase. Beyond 12 months, a limited warranty applies, covering the cost of labor and maintenance, but not the cost of accessories or replacement parts.The warranty is nullified in all of the following situations:1.The product(s) is/are broken down, reconstructed and/or modified by unauthorized parties.2. The product(s) is/are damaged through improper use.For the latest information on NITECORE products and services, please contact a local NITECORE distributor.※All images, text and statements specified herein this user manual are for reference purpose only. Should any discrepancy occurs between this manual and information specified on , information on our official website shall prevail. Sysmax Industry Co., Ltd. reserves the rights to interpret and amend the content of this document at any time without prior notice.Thanks for purchasing NITECORE!SYSMAX Industry Co., Ltd.TEL: +86-20-83862000 FAX: +86-20-83882723 E-mail: *****************Web: Address : Rm1401-03, Glorious Tower, 850 East Dongfeng Road,Guangzhou, China 510600Please find us on facebook: NITECORE Flashlights201608091.Connect the TIP/TIP CRI to a power supply with a USB cord as illustrated in the diagram. Fully charges the battery takes 2 hours approximately.2.The built-in red indicator will turn on to indicate the battery is taking a charge, and will turn green upon charging completion.Note: Recharge the product when the built-in red indicator flashes.150360351*30min 1h 30min 6h 30min 46h 74m (Beam Distance)1,400cd (Peak Beam Intensity)IP54 (Rated)1.5m (Impact Resistant)95240221*30min 1h 30min 6h 30min 46h56m (Beam Distance)810cd (Peak Beam Intensity) IP54 (Rated)1.5m (Impact Resistant)TIPTIP CRI。
PENTAXME中文说明
2011-01-22 13:03:45 来自: kukunya(Not Nice)近日觅得ME彩版说明书,遂通览,获益良多,择要翻译并注,作备忘及参考。
主楼用作目录及勘误,按章节在跟帖中翻译,欢迎讨论!1、术语解释2、规格说明3、更换镜头4、更换电池5、基本操作6、装片与过片7、底片速度设定8、快门锁9、100X档与B档10、卸片11、自拍器12、闪光同步13、红外摄影14、多重曝光15、使用螺口太苦马镜头16、极限温度与温差抗力17、其他== 补充==上弦提示窗:规格说明部分提到的“上弦指示”是过片扳手旁的一个圆形小窗,快门上弦后呈红色,释放后为黑色;== 勘误==. 2011-01-22 13:39:24 kukunya (Not Nice) Pentax ME 术语解释(部分):3、自拍拨杆:机身前面,镜头卡口左侧(正视);7、快门表盘:机身上面,快门旁,刻有L、AUTO、100X及B四档标识;8、热靴:机顶最上方,单点式;9、曝光补偿表盘:机身上面,倒片转盘外围,刻有1/4x - 4x五档标识;13、凸起式校准点:手动镜头上凸起的“白点”,亦有的镜头为黄色或绿色等;19、X同步接口:镜头卡口右侧面(正视);21、过片/倒片指示:机身后面,过片扳手下方“小窗”,内红黑相间;22、导针通道:机身底面,手柄通信接口(下述)旁的圆形凹孔;23、手柄通信接口:机身底面,黑色条形,上有三个圆形金属触点;30、倒片钮:机身底面,凹槽内黑色按钮;31、输片接口:倒片钮旁边圆形接口,上有金属盖;33、承片轴:机内右侧(后视),上有多根白色细轴;> 删除. 2011-01-22 14:40:55 kukunya (Not Nice) Pentax ME 规格说明(部分):类型:35mm全幅SLR相机,光圈优先自动曝光,电子焦平面快门,全开光圈中央重点式TTL测光;镜头卡口:宾得K卡口;标准镜头:SMC 50/1.2,SMC-M 50/1.4,SMC-M 50/1.7,SMC-M 40/2.8;快门:精工(Seiko)MFC 纵走式金属焦平面,电子自动控制8 - 1/1000秒;手动控制机械1/100秒;B门;具有快门锁定和上弦指示("Cocked" indicator);闪光同步:X同步接口,热/冷靴接口,闪光同步1/100秒;自拍器:4 - 12秒延时快门;取景器:镀银五棱镜取景器,裂像及微棱对焦屏,92%视野率,0.97x放大率(50mm镜头,无穷远),目镜屈光度-0.5,取景器内LED红点快门速度指示和过/欠曝警告,目镜框可安装M型镜片校正转换器、M型放大器和M型直角取景器;过片及倒片:单次扳动过片,过片行程135°,预备角30°,快速倒片手柄;自动手柄:ME机身可安装使用1.5张/秒的自动连拍手柄,连续或单张曝光;测光表:全开光圈中央重点TTL测光,GPD测光元件快速响应,LED曝光读数,卷片手柄及快门按钮兼做测光快关;测光范围EV1 - EV19(ASA100,f/1.4),胶片ISO设定范围12 - 1600;电池:两节1.5V银芯电池(G13),测光LED指示电池电量;后背:可换ME日期后背;> 删除. 2011-01-22 14:49:45 kukunya (Not Nice) Pentax ME 更换镜头:1、镜头红点对准机身卡口红点,按下并顺时针旋至“滴答”一声为锁定;2、暗处难以看见红点时,将镜身凸起式校准点对齐机身卡口释放按键,按下并顺时针旋至“滴答”一声为锁定;注意:1、在没有前后盖时若需放置镜头,务必将镜头前组向下放置,切勿(NEVER)后组向下放置;2、室外更换镜头时,若机身内装有底片,注意避免阳光直射;> 删除. 2011-01-22 15:04:42 kukunya (Not Nice) Pentax ME 更换电池:1、安装电池用硬币旋开底面电池仓盖,放入两节电池,正极向下,旋紧电池仓盖;LR44碱性纽扣电池亦可;2、检查电池:正常情况下,一组新电池可使用一年或支撑快门动作约10000次;半按快门若取景器内一个LED指示灯亮起则电池为激活状态,若LED指示灯闪烁则电力不足,应尽快更换,若无LED指示灯亮起,则电池已不可使用;请随身携带备用电池;> 删除. 2011-01-22 15:15:00 kukunya (Not Nice) Pentax ME 基本操作(从略,重点翻译测光部分):基本步骤1 - 7:上卷- 曝光补偿置为0 - 设定对应底片速度- 设定镜头光圈- 快门表盘置为AUTO - 过片- 对焦8、测光:将过片扳手稍外拉至预备角(约30°,将开启一个电池开关),轻按快门释放钮(即半按,将开启另一个电池开关),开启测光系统,取景器内某个LED指示灯将会亮起,指示自动选择的曝光快门速度;若预设的光圈值会导致过曝或欠曝,“OVER”或“UNDER”旁的LED指示灯将亮起以示警告;9、完全按下快门释放钮,电子快门将按照LED指示的速度释放,完成曝光;> 删除. 2011-01-22 15:45:29 kukunya (Not Nice) Pentax ME 装片与过片:1、向上拉动倒片旋钮即可打开后盖;2、胶卷置入片仓,按下倒片旋钮,拉出片头并插入承片轴上任意两根白色细轴之间;3、交替扳动过片扳手和释放快门按钮,直至胶片上下边缘小孔均准确套上齿轮,合上后盖;4、扳动过片扳手并确认倒片旋钮随之逆时针转动,则装片正确,底片随过片而从片盒内移动至承片轴上;如果装片正确,过片/倒片指示窗口会“闪动”;按动快门,过片至计数器指示为“1”,即可开始拍摄;注意:1、上述步骤3、4应在快门表盘置为100X情况下操作,以避免不必要的电力浪费(同时可以避免慢速快门带来的等待时间,译注);2、拍摄前切记将快门表盘置回AUTO档;> 删除. 2011-01-22 16:05:10 kukunya (Not Nice) Pentax ME 底片速度设定:轻提曝光补偿表盘边缘,并旋转至底片对应的ASA指示值即可;表盘上可用的ASA依次为:1600,#1250,#1000,800,#640,#500,400,#320,#250,200,#160,#125,100,#80,64,#50,#40,32,#25,20,#16,12;其中加#的为表盘上仅以圆点标出而未注明具体数值的档位;> 删除. 2011-01-22 16:20:07 kukunya (Not Nice) Pentax ME 快门锁:为避免上弦后的快门被误操作,可按下快门表盘旋钮上的白色按钮,并旋转至“L”档,即可锁住快门;当希望转回至AUTO档时,无需按下白色按钮,直接旋转即可,当转至AUTO 档后,白色按钮会自动弹起并锁定旋钮;注意:当未取下镜头盖或在极暗的环境下时,按下处于AUTO档的快门,反光镜可能会锁定,进行超长时间的曝光;此时若需修正,请将快门表盘旋钮旋至100X档即可迅速关闭快门;下次拍摄前请确认快门表盘旋钮置回了AUTO档;> 删除. 2011-01-22 16:32:33 kukunya (Not Nice) Pentax ME 100X档与B档1、100X档为1/100秒机械快门,快门将维持工作在1/100秒速度,可以在没有电源的情况下配合光圈完成正确曝光;2、100X档同时用于配合电子闪光灯使用,后述;3、B档(Bulb)用于长于8秒的曝光控制,使用时先安装快门线至快门释放按钮,档快门线上的活塞按下期间,快门将持续开启;对于长达几分钟至几小时的曝光,请使用带有锁定装置的快门线;> 删除. 2011-01-22 16:41:57 kukunya (Not Nice) Pentax ME 卸片当一卷底片拍完最后一张后,过片扳手将会无法扳动(此时切勿用力扳动!),则需要更换底片;翻出倒片手柄,按下底面倒片钮,顺时针转动扳手从而将底片卷回片盒;若倒片顺利,过片/倒片指示窗口将会“闪动”,当倒片手柄上的紧张感突然减弱,说明片头已从承片轴上脱离,打开后盖,取出片盒;注意:1、卸片操作时尽量避免光线直射;2、片头脱落后即无需再旋动倒片扳手,以免片头缩入片盒造成不便——译注;> 删除. 2011-01-22 16:48:00 kukunya (Not Nice) Pentax ME 自拍器:自拍器延时范围为4 - 12秒,取决于自拍钮被拨动的程度;要使用自拍,将自拍钮逆时针拨动至静止状态,轻轻回拨自拍钮即可开始计时;> 删除. 2011-01-22 17:00:12 kukunya (Not Nice) Pentax ME 闪光同步:ME具有一个X同步接口和一个位于热/冷靴插槽内的独立X触点;热/冷靴触点在未插入闪光灯至热/冷靴时将不会接通,这是由靴内插槽下方的一个微型开关控制的,可以有效避免使用X同步接口时此处造成触电的危险;如果您使用的闪光灯有靴型插口,请将其插入机顶热/冷靴使用,如果您的闪光灯不适用于靴型插槽,请将其引线插至机身上的X同步接口;当使用电子闪光点时,务必将快门表盘旋钮旋至100X档,这是可供闪光灯使用的最高快门速度;> 删除. 2011-01-22 17:06:48 kukunya (Not Nice) Pentax ME 红外摄影:当希望拍摄红外照片时,请使用镜头景深表中橙色线标出的红外对焦标记,步骤如下:1、正常对焦至拍摄对象清晰;2、从对焦环上读出拍摄对象至相机的距离;3、调整对焦环,将红外对焦标记对准对焦环上刚才读到的距离;例如当对焦于无穷远处时,即将对焦环上无穷远位置对准红外对焦标记即可;注意:1、使用黑白红外底片时需要作上述对焦修正,使用彩色红外底片则不需要;2、红外对焦标记即镜头景深表上除中线外的橙色细线,亦有用红点或“R”标识的——译注,感谢smallandred、方方和quitsky同学提供帮助;> 删除. 2011-01-22 17:18:35 kukunya (Not Nice) Pentax ME 多重曝光:当试图多重曝光时,步骤如下:1、使用正常的曝光操作进行第一次曝光;2、旋转倒片手柄,将片盒内的底片旋紧,并保持倒片手柄位置(keep hold of the rewind knob);3、按下倒片钮并过片,这将在不过片的情况下为快门上弦;4、最后,释放快门完成第二次曝光;注意:1、完成多重曝光之后,请空拍一张,防止底片上影像重叠;2、由于计数器在每次快门上弦均会计数,两重曝光的一次拍摄将会在计数器上反映为两张;> 删除. 2011-01-22 17:47:00 kukunya (Not Nice) Pentax ME 使用螺口太苦马镜头:通过K型转接环,传统的螺口Takumar镜头(包括Super-Takumar和SMC Takumar)可以很容易地使用在您的ME机身上,然而,使用转接时会有以下问题:1、由于耦合系统的差异,自动光圈将无法工作;2、全开光圈测光的镜头将工作在收缩光圈测光状态;具体转接部分从略;--PS:验证码居然是mount,天意啊~~~> 删除. 2011-01-22 18:04:36 kukunya (Not Nice) Pentax ME 极限温度与温差抗力:您的ME相机将在摄氏50°至零下20°范围内正常工作,然而低温下被污染的润滑油可能会影响其对低温的耐受力,因此为确保相机在低温下正常工作,需要彻底检查并更换润滑油;突然的温度变化可能会导致相机内部受潮,并可能造成生锈,对相机机械结构造成极大伤害;如果从温暖环境突然进入低温环境,可能导致冷凝而造成更大伤害;因此应当尽量避免突然的温度变化,我们建议在温差超过10摄氏度的环境间应采取分步适应的方法,并保持30分钟以上适应时间,如果难以实现,将相机装入保护袋或相机包中可以减小温度突变带来的伤害;另外,低温将会影响电池的性能,所以应尽量避免低温使用,或尝试仅在拍摄前即时安装电池;温度极低时,应使用新电池;> 删除. 2011-01-22 18:19:33 kukunya (Not Nice) Pentax ME 其他以上是我的选择翻译,没有翻译的部分包括:1、曝光补偿的使用场合及方法;2、不同场合建议的光圈设定值(类似阳光十六法);3、裂像微棱对焦屏的使用方法;4、保持相机稳定的拍摄姿势;5、景深表的使用;6、全开光圈测光镜头与收缩光圈测光镜头;7、日常相机保养;8、免责条款;9、ME腰带夹:这个是ME的配件,可以装上机身,然后别在腰带上,亮骚利器,见过淘宝有人卖,比相机还贵,>_<10、以上翻译中另有说明从略的部分;以上如有需要,可以跟帖说明,我补充翻译;另外由于包含一些基于个人经验的注释,限于水平有限,如有错误或疑问之处欢迎讨论,我将在主楼设置勘误;。
Pentax LX 快捷使用指南 参考手册说明书
Quick Help/Reference Guide for LX Winder CONTENTSFour 1.5-volt AA-size batteries are required to operate the winder. Alkaline, manganese or rechargeable Nickel Cadmium (Nicad) types may be used• Press the battery cartridge lock release button (BATT.) at the base of the winder until the cartridge pops out slightly• Remove the cartridge from the chamber and insert the four AA-size batteries into the cartridge in accordance with the (+) (-) diagrams on the sides of the cartridge.• Place the loaded cartridge inside the battery chamber by sliding it all the way inside until it locks in place.Battery Care* Battery performance tends to vary in accordance with the brand and type. When doing a lot of shooting with the winder, high performance alkaline batteries are recommended, Rechargeable Nicad batteries are also convenient when used in conjunction with a commercially available battery charger, * When replacement is required, replace all four batteries at the same time with equivalent 1.5-volt batteries.* Protect the winder from battery leakage by removing the batteries whenever the winder will not be in use for long periods of time.IMPORTANT! NEVER THROW USED BATTERIES INTO FIRE OR EXCESSIVE HEAT TO PROTECT AGAINST EXPLOSION: ALWAYS KEEP BATTERIES OUT OF THE REACHOF CHILDREN.ATTACHING/DETACHING THE WINDERAttaching the Winder• Hold the base of the camera away from the light and remove the caps covering the camera film transport and auto rewind couplings. Screw both caps into the cap holders on top of the winder to prevent loosing them.CAUTION: When attaching the winder with film already loaded in the camera, be sure to hold the base of the camera away from sunlight or other bright lighting sources. Until the winder is fully coupled with the camera, there is possibility that bright lighting seeping through the auto rewind coupling could adversely affect your exposures. Likewise, when detaching the winder before the film roll has been completed and rewound, be sure to replace the auto rewind coupling cap on the camera immediately.• Set the winder C/S dial to OFF. Attach the winder to the camera by lining up the attachment screw with the tripod socket at the base of the camera. Making sure that all contact points line up properly, secure the winder to the camera by turning the thumbscrew clockwise. Be sure to tighten the screw firmly to ensure proper electrical contact.To Detach the WinderLoosen the screw and separate the winder and the camera. Replace the coupling caps over the couplings at the base of the camera immediately. Be sure to replace the auto rewind cap immediately to avoid the danger of ruining future exposures when shooting without the winderFilm Loading/Blank Exposures (With Unloaded Cameras):Set the camera shutter dial to a manual shutter speed and load the film in the usual manner by extending the film leader and inserting it between the magic needles of the take-up sPool. At this point, you may continue by making blank exposures in the usual manner (provided the winder C/S dial is set to OFF) or you can make them with the winder as follows:• Set the winder C/S dial to S, and press the shutter button so that the film wraps around the take-up spool. Then, press the shutter button again until the film perforations engage both sides of the sprocket. Close the back cover and take up slack with the film rewind crank. Press the shutter button successively until the dot representing "1" registers in the exposure counter window. Make your exposures as described in the "Shooting" on the next page.Praparations with Loaded Cameras:If the shutter is uncocked, temporarily set the C/S dial to''S" and press the shutter button once to cock the shutter: proceed to the "Shooting" section beginning on the next page. If the shutter is already cocked (the shutter cocked indicator on top of the camera wili be red) proceed directly to the "Shooting" section on the next page.SHOOTINGThe Winder LX features two modes of film advance which are controlled by the C/S dial on the back of the winder. The S setting permits single-frame film advance, and the "C" setting, consecutive or sequential film advance. When the dial is set to OFF, the automatic film advance system disengagesfrom the camera."S" (Single-Frame) Setting:If you wish only to use the winder to advance the film after each individual exposure, set the winder C/S dial to S and press the shutter button: when the exposure is completed, the film advances automaticaliv to the next exposure and prepares the shutter for shooting. Press the shutter button again for each additional exposure. (It is not necessary to hold the shutter button depressed for the duration of the exposure with long exposures.)NOTE: If the shutter is not cocked when you set the dial to "S" it will be necessary to press the shutter button twice before you can take the picture: once to cock the shutter (the shutter cocked indicator on top of the shutter will turn red) and again to release the shutter."C" (Consecutive Exposure) Setting:When you wish to use the winder to capture the action in sequence as it happens, set the dial to "C" and release the shutter: the winder advances the film continuously in sequence until you let go of the shutter button or the film runs out. Film advance rate varies in synchronization with shutter operation and battery condition; synchronization is not featured at the "B" shutter speed setting~ When shutter speeds in excess of 1/60 sec. are used the top film advance rate of 2 frames-per-second is possible.NOTE: If the shutter is not cocked when you set the dial to "C' shutter release will be delayed when you press the shutter button until the film advances. To avoid this delay, press the shutter button once quickly and let go before beginning the shooting sequence (the shutter is cocked if the shutter cocked indicator on top of the camera turns red).Exposure Check:When the winder is attached to the camera the stroke required for shutter release is shortened somewhat. As a precaution against accidental shutter release while checking the exposure with the winder attached press the shutter button very lightly. (If you; fingers aren't steady, temporarily set the C/S dial to OFF before checking the exposure.)LED Indicator:The LED Indicator on the back of the winder flickers each time the take-up spool turns and again when you release the shutter as a signal that the winder is functioning properly. When you reach the end of the film, it glows continuously to indicate that it's time to rewind the film (see page 16).IMPORTANT: Although the LED flickers when the take-up spool rotate', it does not confirm that the film is taking up. For this reason, when you make your blank exposures after loading the camera be sure to check that the film rewind knob is rotating.SHOOTING PRECAUTIONSThe OFF-SettingWhen the CIS dial is set to OFF, the winder is disengaged from the camera, so it's a good idea to keep the dial set to "C" or "S" while shooting so as not to miss shooting opportunities, However, when storing the camera and the winder, the dial should be set to OFF.Also, when not using the winder for long periods of time, set the dial to OFF and remove the battery cartridge to guard against battery leakage.IMPORTANT: When you reach the end of the film roll and do not intend to rewind the film immediately, promptly set the C/S dial to OFF. Batteries wili deplete with the C/S dial set to "C" or "S" while the LED is continuously lit.Self-TimerTo use the self-timer with the winder attached, set the C/S dial to OFF beforehand. The self-timer does not function while the automatic film advance system is engaged.Multiple ExposuresTo make multiple exposures with the winder attached, set the C/S dial to OFF before releasing the shutter. Make the exposure in the same manner as you would without the winder attached, but by pressing the winder film rewind release button once for each additional exposure on the same frame. The C/S dial may be set back to C or S before the last multiple exposure for automatic advance to the next frame. NOTE: Do not use the automatic film rewind system to make multiple exposures on previously exposed frames (see page 19).TripodWhen required, a tripod may be affixed swiftly to the tripod socket at the base of the winder, Be sure that the length of the tripod screw does not exceed the depth of the socket: if the screw is too long and tightened tightly it could damage the camera's internal mechanism.Shooting in Cold ClimatesBattery performance tends to deteriorate when temperatures drop to near or below freezing, Although normal functioning will return when the batteries have been subjected to warmer temperatures for sometime, when shooting in cold climates, it's a good idea to have spare sets of batteries on hand wrapped or stored in a pocket etc., to keep warm.Low BatteriesWhen the film advance rate becomes sluggish, it indicates that batteries are low. When this occurs, change all four batteries promptly to ensure uninterrupted winder operation. If batteries become too weak to advance the film, the winder will stop in-between frames and the LED indicator will glow continuously. Normal operation will resume when you change the batteries. If this should occur and you are caught without spares, set the C/S dial to OFF and wind the film manually the rest of the way for the frame in use.Shooting Without Camera BatteriesShould camera battery failure occur while operating the camera in the automatic mode or within the electronically controlled manual shutter speed range (1/60 sec. - 4 sec.), the mirror will lock up as a warning. To continue picture-taking, leave the Winder C/S dial where it is, and turn the shutter speed dial to any of the mechanically operated shutter speeds (112000 sec. to "X").AUTOMATIC FILM REWINDWinder LX is equipped with a convenient automatic film rewind mechanism that enables you to rewind a complete 36-exposure film roll in just seconds.• When you reach the end of the film, the winder will cease to operate and the LED indicator on the back will light continuously as a signal that it's time to rewind the film. As a precaution, however, double check by glancing at the exposure counter to make sure that it has reached the last exposure (this is because the LED also lights continuously when battery voltage is low).• Keeping the C15 dial set either to S or C, press the film rewind button at the base of the winder and slide the film rewind lever clockwise. The LED indicator will go out and the film will rewind automatically. When the film is rewound inside its cartridge, the motor will stop and the film rewind lever will disengage. Glance at the exposure counter to make sure that the film is rewound all the way back; then, open the camera back to remove the cartridge.NOTE: If the film fails to rewind when you slide the film rewind lever clockwise, you may have pressed the battery chamber lock release instead of the film rewind button by mistake. If so, push the battery cartridge back in, press the film rewind button and try again.Manual Film Rewind: The film also may be rewound manually during emergencies such as battery failure. In this instance, set the C/S dial to OFF and press the film rewind button. Keeping the button depressed, rewind the film with the camera film rewind crank all the way back into the cartridge.CAUTION: During automatic film rewind, synchronization with the camera's two-way exposure counter is not sufficiently accurate to permit use of the random access multiple exposure feature of the LX as described in the,camera instruction manual. If you wish to make random access multiple exposures while the winder is attached, set the CiS dial to OFF, and keeping the film rewind button depressed, rewind the film manually, Make the multiple exposure as described in the camera instruction manual.REMOTE CONTROL OPERATION(with optional Remote Control Cord)The winder may be used both for single-frame and consecutive remote control shutter release when it is used in conjunction with the optional Remote Control Cord.Cord Hook-up:• Remove the cap over the remote controlsocket at the side of the winder by grasping itbeneath the rim with your fingernail and pullingit off. Place the cap over the remote releasebutton of the Remote Control Cord to preventloss• Connect the plug of the Remote Control Cordto the winder remote control socket by liningthe plug up with the guides on the terminal andplugging it in.• Other instructions for remote control operationare identical to those for operating the winderwith the camera shutter release. The remoterelease button operates in the same manner asthe camera shutter release button, except thatexposure readings are made with the camerashutter release.• Replace the cap over the winder remotecontrol terminal when no longer using theRemote Control Cord.。
宾得ME super说明书(中文翻译版)
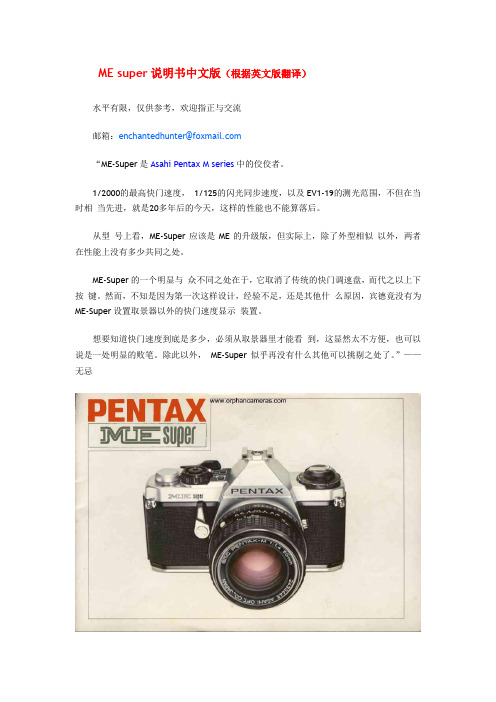
ME super说明书中文版(根据英文版翻译)水平有限,仅供参考,欢迎指正与交流邮箱:enchantedhunter@“ME-Super是Asahi Pentax M series中的佼佼者。
1/2000的最高快门速度,1/125的闪光同步速度,以及EV1-19的测光范围,不但在当时相当先进,就是20多年后的今天,这样的性能也不能算落后。
从型号上看,ME-Super应该是ME的升级版,但实际上,除了外型相似以外,两者在性能上没有多少共同之处。
ME-Super的一个明显与众不同之处在于,它取消了传统的快门调速盘,而代之以上下按键。
然而,不知是因为第一次这样设计,经验不足,还是其他什么原因,宾德竟没有为ME-Super设置取景器以外的快门速度显示装置。
想要知道快门速度到底是多少,必须从取景器里才能看到,这显然太不方便,也可以说是一处明显的败笔。
除此以外,ME-Super似乎再没有什么其他可以挑剔之处了。
”——无忌重要所有宾得镜头及相关系列产品均由宾得公司精心制作。
然而,市面上许多其他公司制作的镜头及相关产品不能保证与宾得产品完全兼容,可能会损坏宾得产品。
因此,宾得公司不承担任何由于使用其他公司的镜头或附件而造成损失的责任。
. 目录基本操作说明“你的ME SUPER 快速教程” (2)部件描述 (4)镜头安装 (6)装入电池 (7)装片和转片 (8)设定胶卷感光速度 (9)曝光模式盘 (10)光圈设置.................................................................:.. (13)对焦和拍摄 (14)在"AUTO"模式下拍摄 (15)曝光补偿 (18)手动曝光.................................:.. (20)握持相机 (26)卸下底片 (27)自动闪光拍摄(AF 200S/AF 160) (28)其他闪光单元 (29)自拍定时/多重曝光 (30)在“Bulb”下使用三脚架/自拍定时拍摄 (31)拍摄指示 (32)景深控制 (34)景深表 (35)测光表耦合范围 (36)红外摄影 (37)使用螺口takumar镜头 (38)光圈全开和自动收缩测光镜头 (40)耐温情况 (41)相机维护 (42)取景器图示 (44)主要规格 (46)欢迎来到我们成长的宾得大家庭!我们知道你即将开始使用你的宾得ME SUPER,我们在2页和3页提供一个“ME SUPER 快速教程”,其中包含“AUTO”模式(也是主要的操作模式)下的基本操作指南,所以你可以马上开始你的摄影之行。
亚瑟海全自动闪光灯说明书

AC -l00V/120V (50/60 Hz) 220V / 240V (50/60 Hz)
73 for ASA100 black-&-white (FEET)
66 for ASA100 colour
(FEET)
22 for ASA100 black-&-white (METRES)
20 for ASA100 co lour
@ The Su per- Lite II also operates on AC, powered by the AC Power Pack accessory.
@ The circuitry of the Super-Lite II is designed for economical power consumption. Pen-light batteries are inexpensive-and you will not waste the battery power.
@ The Super-Lite II has a unique automatic light output stabilizer. The light output of many other electronic flash units considerably decreases as you keep flashing the units. This means you will have to open up your lens aperture. The light output of some unjts goes down to as much as one f/stop extent after 40 flashes . The light output stabilizer of the Super-Lite II constantly maintains its output at its maximum at each flash.
《佳能闪光灯混合配图加强版说明书》,新手适合
第一部分佳能原厂闪光灯购买问题一、没有必要买闪光灯?闪光灯在哪些场合有用?答:前半个问题,我的回答是:580EXII,摄影路上必须有一只!如果你拍照经常涉及一下题材,并且机器高感不满意,你有必要买个闪光灯:首先职业摄影。
这不是买不买的问题,是买多少个的问题。
其次就是经常拍摄新闻、会议、外拍美女、展览会、舞台、婚礼、微距、产品照要上一个。
最后要亮骚必须上一个!二、市场上佳能有什么原厂数码闪光灯(环闪除外)出售?答:在产的有:580EXII、430EXII、270EX。
停产的有:580EX、550EX、430EX、420EX、380EX、220EX等。
二手市场以上各种全部都有出售。
PS:即将上市的有:320EX、270EXII。
三、如此多的闪光灯我应该买哪一个?答:通常对于这种无解的问题,我一般都是只考虑预算,看菜下饭(什么开店做生意的就不在讨论范围了,以下只针对影友个人玩玩)。
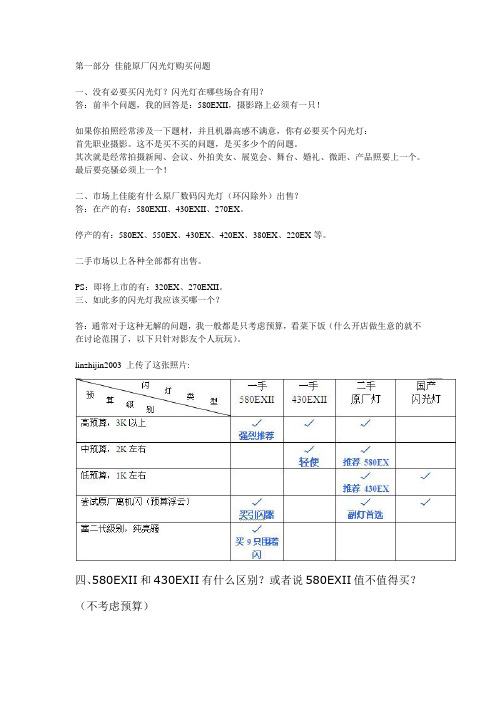
linzhijin2003 上传了这张照片:四、580EXII和430EXII有什么区别?或者说580EXII值不值得买?(不考虑预算)答:我觉得回答这个月经问题要考虑两个方面:1、两者的重量、体积区别。
580EXII体积非常大,比430EXII重和大(见下图)。
长时间手持和经常外出必须要考虑重量和体积的问题,这是要首先考虑的。
2、要是你不怕重量,那好我们再看看两者的功能区别,主要见下表。
主要你要弄清楚需不需要更大的指数、频闪功能,还有无线主控功能。
搞明白了也就可以做出判断了。
重量差别linzhijin2003 上传了这张照片:功能差别五、想玩离机闪,以上提到的那么多闪光灯中哪些可以做主控单元(下文统称主灯),那些可以做从属单元(下文统称副灯)?答:可以做主控单元:580EXII、580EX、550EX、ST-E2引闪器。
可以做从属单元:580EXII、580EX、550EX、430EXII、430EX、420EX,即将上市的320EX、270EXII六、买原厂新闪光灯时,要注意检查那些方面?答:包装什么的就不说了。
闪电系列高性能闪光灯使用说明书2.4.0-无司标
闪电闪电系列闪光灯系列闪光灯系列闪光灯FL12FL12050505V V数字闪光灯使用说明书版本:V2.4.0版权声明版权声明本手册中所提及的其它软硬件产品的商标与名称,都属于相应公司所有。
本手册的版权属于本公司所有。
未得到本公司的正式许可,任何组织或个人均不得以任何手段和形式对本手册内容进行复制或传播。
本手册的内容若有任何修改,恕不另行通知。
产品概述闪电系列数字闪光灯(工业级)是专门针对治安卡口治安卡口治安卡口、超速抓拍、闯红灯等室外电子警察的工作环境和功能要求而研制开发的大功率高性能数字脉冲闪光灯。
该产品采用独特的数字控制电路,具有回电快寿命长、精确控制闪光时间、闪光瞬间内持续以大功率方波形式输出(功率密度大),大大提高相机曝光期内光输出能量等特点。
通过调节闪光长度触发延时能够使发光与摄像机曝光时间达到最完美的结合,从而大大降低对人眼的影响和最大限度的减少环境光对拍照的干扰。
能够满足在各种光线条件下,辅助摄像系统实现对车辆和驾驶员最清晰的拍照要求。
产品特点1、使用寿命长,是目前普通闪光灯 寿命的3~10倍2、闪光时间可精确控制3、即时触发/延时触发(触发延时 可精确控制)4、光输出瞬时功率大5、光输出瞬时内始终以大功率均匀输出6、可支持大功率每秒一次连续闪光7、瞬间回电,能保证连续多次闪光8、光谱连续9、可选模拟摄像机视频同步功能1010、对人眼的影响低,不易引起司机的注意 1111、所有参数均可通过RS RS485485总线进行在线设置(掉电不会丢失),包括闪光长度、闪光延时、视频同步等技术指标技术指标型 号:FL1205V供电电源:AC220V(165V~265V),50Hz,3.5A每闪能量:0~120 Ws 可调灯管功率:100 W灯 管:美国(德国技术)闪光次数:大于1000万次 ,小功率使用时>1亿次回电时间:0.001~0.1秒闪光时间:10us~1000us(以微秒为单位连续可调)触发延时:0~10秒(以微秒为单位连续可调)闪光频率:0~100 Hz触发方式:电平(上升沿有效)、RS485指令触发电压:5V~15V(驱动电流≥2mA)反光碗反光角度:±15°(可调至±20°)外壳防护级别:IP65色 温:5600K工作温度:-25~+80℃存储温度:-40~+85℃重 量:3.5 kg外形尺寸:376x228x91 (mm)硬件接口FL1205V型闪光灯下端有两个航空头接口,分别为AC220V电源接口和控制信号接口。
宾得胶片单反使用说明书
宾得胶片单反使用说明书文档冲亿季,好礼乐相随mini ipad移动硬盘拍立得百度书包包里来尽量减小温度快速改变所带来的影响。
极低的温度将会降低电池的使用效率。
因此相机在低温下工作时应采取保护措施。
在拍摄前才放入电池。
在极低的温度下使用新的电池。
Page 41 相机维护清洁:.始终确保取景器目镜,镜头,滤镜干净。
首先,使用气吹和镜头刷去除表面的浮尘,不要尝试用力去除颗粒状的灰尘—这极有可能划伤玻璃。
.像指印一样的污迹可以使用镜头纸或者是薄布小心清理,最好是干净的,洗过几次的柔软棉手帕。
可以在擦拭前向镜头上吹口气,但要确保完全擦除水汽。
商业镜头清洁工具也是非常有效的。
.不要触碰反光镜和快门叶片,反光镜上的灰尘或污点不影响你拍出来好的照片。
.小心不要让相机与任何固体发生磕碰,意外或者粗心的使用可能会损坏机器的内部结构,尽管外面看起来没有损伤。
Page42保持相机干燥:.你的相机是不防水的。
相机上有几个地方可能会进水而导致巨大的损坏。
当下雨或者是碰到喷溅的水的时候注意保护好相机和镜头。
如果你的相机被弄湿了,立刻用干的洁净的布将它弄干。
如果你的相机被水浸透,它可能会出现故障,这种情况下,请尽可能早的将它送到宾得公司的维修中心。
储藏:.当你不使用相机时,相机的放置也是很重要的。
最好存放在凉爽,干燥,清洁,通风的地方。
存放在壁橱或者柜子里可能会因为其湿度太大而对相机造成损害,将相机放在包或者箱子里也是不错的选择。
电池维护:.在装入电池前使用干布将电池擦干净,同时捏住电池的边缘进行操作。
油质的接触可能会导致电池轻微的腐蚀。
.在冰点以下的温度,电池可能会由于温度太低而出现故障。
在这种情况下,使用已经温暖的备用电池,直到原来的电池回复室温。
.养成随时准备备用电池在手边的习惯以便有时电池用完了。
另外使用Eveready S76E或者Mallory MS76H或者equvalent。
.不要让孩子玩相机快门按钮。
经常激活测光将大幅度减少电池寿命,同时不要让小孩子玩弄电池。
佳能闪光灯混合配图使用技巧加强版说明书
佳能闪光灯混合配图使用技巧加强版说明书前言拥有一个闪光灯,你将开辟一个全新的摄影世界。
很多佳能器材新手烧完机身、镜头之后都在思量:要不要上一个闪光灯呢?作为完全没有使用过的外闪的你,对各佳能旗下的闪光灯的各项参数、功能感到一头雾水。
买了以后什么后帘同步啊、频闪啊的一大堆概念弄不明白,加上现在的佳能闪光灯说明书简单得令人发指。
书看着挺厚的,可是除以三就剩下那么几页。
这和尼康说明书事无巨细不厌其烦的进行各种情况说明真是差远了。
有感于此,我根据所接触过的佳能品牌EX系列闪光灯和阅读过的说明书,回答一些完全没有闪灯使用经验的朋友常遇到的问题。
其实下面文章中有些问题和摄影效果毫无关系,但是我十分乐于研究这些边边角角,这才是一个器材党应有的精神嘛!声明及注意事项:1、由于本人不是专业人士,所以在术语的解释有些地方难免会有误差,请各位自行辨别是否正确,本文说法只做参考。
2、本文想通过通俗易懂的说明及实例图来说明闪光灯的最基本功能及常见疑问,不涉及闪光灯的原理讨论。
想完全了解闪光专业术语及效果产生物理过程,请买正规的书籍了解。
本人用闪光灯拍的都是到此一游的照片,所以本文不会(也不懂)讨论如何拍出精美照片。
3、本人没有测光表,里面一些闪光指数的计算公式计算出的结果与手持测光表实际测量值相比可能并不完全一致。
4、以下内容主要针对佳能420EX、430EX、430EXII、550EX、580EX、580EXII及永诺ST-E2引闪器。
其他的EZ和EX灯并不在本文讨论范围之内。
若你使用佳能其他的闪光灯,下文所述和你得出的结果可能并不一致5、下文所得出的结论都是基于测试器材:40D+18-55IS+24-105L,相机拍摄模式使用AV、TV和M档,并不涉及P档和全自动档。
若你使用佳能其他的机身镜头或其他拍摄模式,那么下文所述和你得出的结果可能并不一致。
6、由于用老灯的新手毕竟较少,本文着重论述430EXII和580EXII,举例子尽量以430EXII和580EXII为主。
索尼闪光灯使用说明书
方向按钮
括号中的数字表示此说明所在的页码。
CS 8
关于 LCD 背光
每次按下闪光灯装置上的某个按钮或使用控制拨轮 时,LCD 背光都会亮起并保持约 8 秒钟。 • 当 LCD 背光亮起时,可通过按下本机上的按钮或操作
控制拨轮来延长其亮起时间。 • 要关闭 LCD 背光,请按 MENU 按钮并选择
拍摄................................................................................... 23
拍摄................................................................................ 23 手动闪光拍摄 (MANUAL) ............................................... 25 高速同步拍摄 (HSS) ....................................................... 26 多重闪光拍摄 (MULTI).................................................... 27 无线闪光拍摄(通过无线电或光学通信) ......................30 无线闪光拍摄(通过无线电无线通信).......................... 32 无线闪光拍摄(通过光学无线通信) ............................. 37 视频拍摄照明(LED 照明).............................................41 执行测试闪光 ................................................................. 42 选择闪光覆盖(变焦) ................................................... 43 反射闪光拍摄 .................................................................46 关于 AF 照明灯...............................................................48 分配自定义键 .................................................................49 注册/调用内存设置 .........................................................51