DataService操作手册
Genesys全中文操作手册

Genesys全中文操作手册×××客服中心系统March 22, 20101 前言 ..................................................................... ........................... 5 2 系统运行...................................................................... ..................... 6 2.1 系统启动方式 ..................................................................... ..... 6 2.2 启动顺序 ..................................................................... ............ 6 2.3 系统工具部分 ..................................................................... ..... 6 3 Genesys系统描述 ..................................................................... ...... 7 3.1 Genesys系统服务器组成 ....................................................... 7 3.2 Genesys 数据库访问内容 . (7)3.3 Genesys应用说明及Port配置 ............................................... 8 4 Genesys License管理 ....................................................................8 4.1 License更新 ............................................................................ 9 4.2 License运行情况检查 ............................................................. 9 5 资源管理(CME) ................................................................ ......... 10 5.1 登录CME .................................................................... ......... 10 5.2 新建DN ..................................................................... ........... 10 5.3 删除DN ..................................................................... ........... 11 5.4 新增分机 ..................................................................... .......... 12 5.5 新增路由点 ..................................................................... ...... 13 5.6 新增队列 ..................................................................... .......... 14 5.7 新增话务员登录账号 ............................................................. 15 5.8 删除话务员登录账号 ............................................................. 16 5.9 新增位置 ..................................................................... .......... 17 5.10 删除位置 ............................................................................. 18 5.11 新增位置组 ..................................................................... ..... 18 5.12 新增人员 ..................................................................... ........ 20 5.13 删除人员 ..................................................................... ........ 22 5.14 新增话务员组 ......................................................................23 5.15 删除话务员组 ......................................................................242 北京白矾科技有限公司.6 系统运维管理(SCI)................................................................. ... 24 6.1 登录SCI .................................................................... ........... 24 6.2 应用程序管理 ..................................................................... ... 25 6.3 观察应用程序的信息 ............................................................. 25 6.4 启动单个应用程序 (26)6.5 停止单个应用程序 (26)6.6 管理日志 ..................................................................... .......... 27 6.7 主机管理 ..................................................................... .......... 29 6.8 观察主机的信息 ....................................................................297 实时资源监控(CCP) ................................................................ .. 30 7.1 登录CCP .................................................................... .......... 30 7.2 新建实时监控视图 (30)7.3 保存实时监控视图 (32)7.4 打开已保存的实时监控视图.................................................. 33 7.5 使用实时资源状态监视 (33)7.6 使用整体试图 ..................................................................... ... 35 7.7 使用试图模板设计 (38)8 历史报表管理—设计(CCA—DMA) ........................................... 42 8.1 登录DMA .................................................................... ......... 42 8.2 新增过滤器 ..................................................................... ...... 43 8.3 新增时间区间 ..................................................................... ... 45 8.4 新增时间设定 ..................................................................... ... 46 8.5 格式模板管理 ..................................................................... ... 48 8.6 新增格式模板 ..................................................................... ... 49 8.7 修改数据项目 ..................................................................... ... 54 8.8 删除格式模板 ..................................................................... ... 57 8.9 新增报表格式 ..................................................................... ... 58 8.10 删除报表格式 ......................................................................61 8.11 激活报表格式 ......................................................................623 北京白矾科技有限公司.8.12 关闭报表格式 ......................................................................63 8.13 浏览数据 ..................................................................... ........ 64 9 历史报表管理(CCA—ETLAssistant) ........................................ 65 9.1 登录ETL Assistant ...............................................................65 9.2 浏览数据 ..................................................................... .......... 67 10 路由策略设计器(IRD) .................................................................68 10.1 登录IRD .................................................................... ......... 68 10.2 新建路由策略 ......................................................................68 10.3 修改已有路由策略 (69)10.4 加载路由策略 ......................................................................69 10.5 查看路由运行情况 (70)4 北京白矾科技有限公司.CTI(Computer Telephony Interface)服务器是一台与排队机CTI链路相连的设备,它使用户能够通过计算机来操作全部的电话功能,实现呼叫中心系统的计算机化管理。
中国移动飞信平台软件手册-软件版本介绍
飞信软件版本介绍Microsoft Corporation2008年1月1.什么是飞信飞信是中国移动推出的一款跨越互联网和通信网络的即时通信产品,通过PC或手机终端,用户可随时随地实现文字、语音沟通,满足了手机用户之间对于深度沟通的需求,只要中国移动网络覆盖到的地方,您就不会失去与您好友的联系.飞信为用户提供了一个不受约束的、无限制的通讯沟通和交流平台。
飞信为中国移动的广大用户提供了一项即时通信基础服务,将成为中国移动重要的数据业务之一。
飞信的推出,对国内的即时通信市场产生了重要和深远的影响。
2.飞信应用平台介绍目前飞信平台支持的终端如下:➢短信终端:指飞信的短信终端,包括短信/STK客户端(以及SmartPhone的短信终端)。
也可以称作SMS终端➢智能手机终端:指智能手机上的飞信胖客户端,目前包括的平台有Windows Mobile、Symbian、Linux 、java等。
特别说明不支持MIDP2.0的Java手机客户端不算作智能手机客户端➢Java终端:指飞信的Java手机客户端,也可以称作J2ME终端➢WAP终端:指飞信的WAP手机客户端➢Web终端:指飞信的Web客户端(在PC上运行)➢PC终端:指飞信的PC胖客户端3.飞信功能介绍3.1.会话⏹功能说明两个人之间的文本通信,不限用户类型(飞信用户、手机好友)和客户端类型;特别的,根据上下文,在“即时消息”的章节范围内,“两人会话”可能指飞信用户之间的两人即时消息会话。
⏹涉及服务●SAP(SIP Access Proxy)●LCS (Live Communications Service)3.2.多人会话⏹功能说明多个人之间的文本通信。
飞信只支持飞信用户使用智能终端进行多人会话,而短信终端或手机好友均不能参与,因此“多人会话”一定指“多人即时消息会话”。
⏹涉及服务●SAP(SIP Access Proxy)●LCS (Live Communications Service)●TGS(Temp Group Service)3.3.短信功能3.3.1.发送短信⏹功能说明用户可以通过飞信终端向一个好友或者自己发送短信。
DataService-操作手册

DataServices培训总结-操作手册目录一、DS简介 (2)二、DS数据加载方式 (2)三、DS进行数据抽取模型开发的基本过程 (3)四、DS创建数据源系统和目标系统的数据存储 (3)1、Oracle数据库作为数据源系统 (3)2、ECC作为数据源系统 (4)3、HANA数据库作为目标系统 (5)五、全量加载过程 (5)1、创建Project和Job (5)2、导入源表的元数据到资源库 (6)3、创建Data Flow (6)4、设置源表和目标表 (7)5、手工执行Job (7)六、基于表比较的增量加载 (8)1、在Job下定义工作流 (8)2、在工作流中定义数据流 (8)3、加入Table_Comparison控件 (9)4、设置Table_Comparison控件 (9)七、基于时间戳的增量加载 (10)1、在Job下定义工作流 (10)2、定义Script控件 (10)3、定义处理新增数据的数据流和处理更新数据的数据流 (11)八、DS中常用控件介绍 (13)1、Key_Generation (13)2、Case (13)3、Merge (14)4、Validation (15)5、设置过滤器和断点 (15)九、定义Job定期执行 (16)1、登录Data Services Management Console (16)2、定义Batch Job Schedules (17)十、其他注意事项 (18)一、DS简介SAP BusinessObjects Data Services是通过SAP HANA认证的ETL工具。
采用数据批量处理的方式,定期执行后台作业,将数据从多个业务系统中抽取出来,并进行必要的处理(转换,合并,过滤,清洗),然后再加载到HANA数据库中。
DS的组件之间的关系:◆Management Consol:管理控制台是网页版DS管理工具,可以进行一些系统配置和定义Job执行◆Designer:Designer是一个具有易于使用的图形用户界面的开发工具。
NMX6.4操作手册
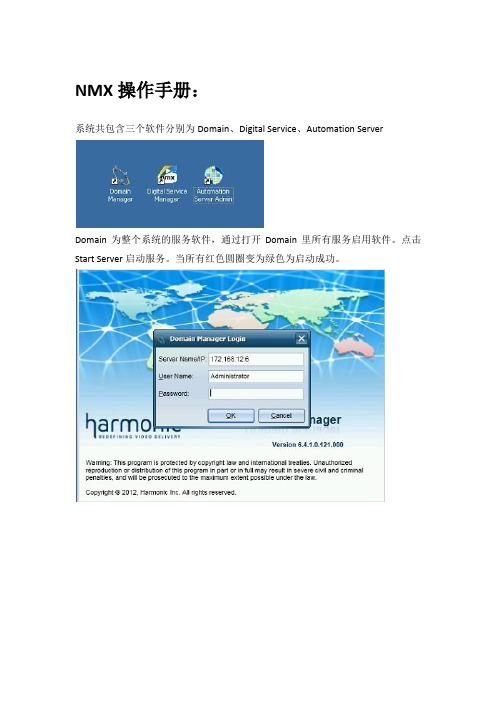
NMX操作手册:系统共包含三个软件分别为Domain、Digital Service、Automation ServerDomain为整个系统的服务软件,通过打开Domain里所有服务启用软件。
点击Start Server启动服务。
当所有红色圆圈变为绿色为启动成功。
当Domain启动成功后,打开Digital Service软件,配置复用部分打开后,显示为常用基础界面,在此界面可以查看报警和配置信息打开图标,可以显示出当前配置的逻辑连接图。
在此界面绿色线缆为主用信号,黄色为备用信号。
双击复用器图标(ProStream-1或ProStream-2),可以查看设备后面板状态在常用基础界面output service view里,打开linzhou-1,可以看到所有输出传输流,在每个传输流中可以看到包含的节目、PSI表格等信息。
并且,当传输流中出现报警,会在传输流前出现报警。
进行复用配置,在New Service Configuration右键选择Edit Service Configuration,进入配置页面复用配置界面左侧为复用器输入部分,A/V Streams为模拟输入,本系统不做使用Transports选项内包含IP输入和ASI输入的码流信息Inserted Data选项为PSI信息和加扰信息右侧为输出的传输流,每个流中包含所当前流规划的节目,加扰ECM、EMM信息,PSI表等信息当复用所有节目配置完成后,进入加扰配置阶段点击OK直接进入配置基础页面,在基础页面打开linzhou-1/New Service Configuration/MUXGROUP001,可显示出所有在复用阶段配置的传输流。
在New Service Configuration下点击Create New Batch进入配置页面进入后点击Next进入后可以看到三个选项InputsOutputs,CAS,SpreadSheet;其中加扰部分主要使用前两个选项首先,在InputsOutputs选项中,左侧Inputs选项卡内的ECM属性里配置AC信息配置完成后,进入CAS选项,配置每一个节目的加扰。
数据分析系统—用户操作手册范本
数据分析系统—用户操作手册范本数据分析系统操作手册一、前言1.1 编写目的本操作手册编写的目的是为了帮助用户更好地使用数据分析系统,提高工作效率。
1.2 读者对象本操作手册适用于所有使用数据分析系统的用户,包括但不限于数据分析师、市场营销人员等。
二、系统综述2.1 系统架构数据分析系统采用分布式架构,由前端界面、后端服务器、数据库等多个模块组成。
其中,前端界面采用响应式设计,兼容主流浏览器。
2.1.1 系统浏览器兼容数据分析系统支持主流浏览器,包括但不限于Chrome、Firefox、Safari等。
三、功能说明数据分析系统提供多项功能,包括数据导入、数据清洗、数据可视化等。
用户可以根据自己的需求选择相应的功能进行操作。
其中,数据可视化功能支持多种图表类型,如折线图、柱状图、饼图等,用户可以根据需要选择合适的图表类型进行展示。
另外,数据分析系统还支持数据导出功能,用户可以将分析结果导出为Excel或CSV格式的文件,方便后续处理和分享。
3、系统操作3.1、服务器监控服务器监控模块主要用于对服务器的性能进行监控。
用户可以通过该模块查看服务器的CPU、内存、磁盘等资源的使用情况,以及网络流量的情况。
同时,用户还可以设置自定义的监控项,以满足不同的监控需求。
3.2、日志源配置日志源配置模块主要用于对各类设备的日志进行采集。
用户可以通过该模块对设备进行配置,包括设备的IP地址、登录账号、密码等信息。
同时,用户还可以设置采集规则,以满足不同的采集需求。
3.3、日志查询与搜索日志查询与搜索模块主要用于对采集到的日志进行查询和搜索。
用户可以通过该模块对日志进行检索,以满足不同的查询需求。
同时,用户还可以设置查询条件,以进一步精确查询结果。
3.4、告警功能告警功能模块主要用于对采集到的日志进行告警。
用户可以通过该模块设置告警规则,以满足不同的告警需求。
同时,用户还可以设置告警方式,包括邮件、短信等方式。
3.5、系统管理系统管理模块主要用于对系统进行管理。
DataService-操作手册
DataServices培训总结-操作手册目录一、DS简介 (3)二、DS数据加载方式 (4)三、DS进行数据抽取模型开发的基本过程 (5)四、DS创建数据源系统和目标系统的数据存储 (6)1、Oracle数据库作为数据源系统 (6)2、ECC作为数据源系统 (6)3、HANA数据库作为目标系统 (7)五、全量加载过程 (8)1、创建Project和Job (8)2、导入源表的元数据到资源库 (8)3、创建Data Flow (8)4、设置源表和目标表 (9)5、手工执行Job (10)六、基于表比较的增量加载 (11)1、在Job下定义工作流 (11)页脚内容12、在工作流中定义数据流 (11)3、加入Table_Comparison控件 (12)4、设置Table_Comparison控件 (13)七、基于时间戳的增量加载 (13)1、在Job下定义工作流 (13)2、定义Script控件 (14)3、定义处理新增数据的数据流和处理更新数据的数据流 (15)八、DS中常用控件介绍 (16)1、Key_Generation (16)2、Case (17)3、Merge (18)4、Validation (19)5、设置过滤器和断点 (20)九、定义Job定期执行 (21)1、登录Data Services Management Console (21)2、定义Batch Job Schedules (22)十、其他注意事项 (24)页脚内容2一、DS简介SAP BusinessObjects Data Services是通过SAP HANA认证的ETL工具。
采用数据批量处理的方式,定期执行后台作业,将数据从多个业务系统中抽取出来,并进行必要的处理(转换,合并,过滤,清洗),然后再加载到HANA数据库中。
DS的组件之间的关系:Management Consol:管理控制台是网页版DS管理工具,可以进行一些系统配置和定义Job执行页脚内容3Designer:Designer是一个具有易于使用的图形用户界面的开发工具。
埃顿压力过滤器DA EDA系列操作与维护手册说明书
This manual contains operation and maintenance information for series DA/EDA 106, 256, 406, 636, 1006 and related specifications. For customer specific models, there are additional instructionson those data sheets. The pressure filters listed above are intended for the filtering of liquid media.1. Safety instructionsWARNING: Avoid injury. Read and understand this manual before operating the filter.FAILURE TO FOLLOW THIS WARNING COULD LEAD TO DEATH, SEVERE INJURY,OR PROPERTY DAMAGE. Eaton does not assume liability for any damage that occurs todue misuse of equipment.WARNING:This filter is a pressure vessel designed to operate under specificpressure, temperature, and other engineering parameters.Follow the operatingconditions specified on each data sheet. Operating outside of these parameters can causedamage to important pressure holding parts and sealing. Pay special attention to excesspressure, temperature range, and operating fluid. The compatibility of filter components withthe operating fluid should always be considered before operation. USE OFINCOMPATIBLE MATERIALS COULD LEAD TO PRODUCT FAILURE, LEAKAGE,DEATH, SEVERE INJURY OR PROPERTY DAMAGE.WARNING: Always wear safety goggles and gloves when working on the filter. Underworking conditions, the filter housing is pressurized. Do not try to loosen or remove any partof the filter or the filter housing during operation. The operating fluid could escape at highpressure and high temperatures. This does not apply to the offline vessel that is not underoperation. FAILURE TO FOLLOW THIS WARNING COULD LEAD TO DEATH, SEVEREINJURY, OR PROPERTY DAMAGE.WARNING: Leaking operating fluid can cause injury and burns. Equipment should beshut down and isolated from energy sources and other equipment before anyinspection or servicing to prevent risk of shock or process fluid leakage. Do not openthe filter housing until you make sure it is not pressurized. The filter surface may be hot andcause burns. When changing the filter, check the operating temperature before touchingany surface during operation. If you come into contact with the operating fluid, please followthe safety instructions provided by the fluid manufacturer. FAILURE TO FOLLOW THISWARNING COULD LEAD TO DEATH, SEVERE INJURY, OR PROPERTY DAMAGE.To ensure proper fit and function, only use Eaton spare parts.2. InstallationThe filter is supplied and delivered ready to be installed. The mounting position of the filter is vertical. The filter has to be fitted with fastening screws in size and amount according to the corresponding fastening bore holes of the filter housings. The filter should be mounted to minimize tensile forces on the filter housing and change-over valve. The piping should be connected with flanges.During installation ensure that:-No dirt and no impurities of foreign fluids penetrate the filter.-The connections for input and output are correctly attached to the pipe system.-The pipe system is connected to the filter to minimize stress on the filter.-Ensure the filter element is accessible for service and change out.Clogging indicators should be installed according to the instructions on the unit specific data sheet and the instructions in this manual.Fitting the counter flangesWhen fastening the counter flanges, use the torque values in the table below. Ensure faces are parallel before fastening connections.3. CommissioningEnsure the filter installation is complete and the system is clean before commissioning. Follow these instructions to purge the filter before commissioning the system:1. Before commissioning, ensure that the filter element and seals are clean and properly installed.2. Place the switchgear lever in the middle position.3. Fill both sides of the filter housing at the regular operating fluid flow.4. Open the air bleed screws or connections. Connect tubes that lead to a drain pan (air-bleedconnection information can be found on data sheet 1659).5. Allow the operating fluid to drain (reduce volume flow from 10 to 50 l/min (2.6 to 13.2 GPM))untilit is bubble-free and flows out of both air bleeding tubes.)6. Shut off application flow.7. Remove the air bleeding tubes and close the air-bleed bore holes or air-bleed connections.8. Switch to the filter housing you would like to operate first by using the switch gear lever.9. After finishing step 7, tighten the locking screws.After following these instructions for commissioning, the serviced filter vessel is ready for operation.DA/EDA 106-1006 (illustration can slightly differ for different sizes)WARNING: Equipment should be shut down and isolated from energy sources and otherequipment before any inspection or servicing to prevent risk of shock or process fluidleakage. Utilize proper application of PPE for the process conditions. FAILURE TOFOLLOW THIS WARNING COULD LEAD TO DEATH, SEVERE INJURY, ORPROPERTY DAMAGE.4. Change of elementsChange the filter elements when the unit pressure differential on the clogging indicator reaches the maximum pressure differential specified for each unit on the data sheet. Do not allow the pressure differential to exceed 6 bar (87 psi) before replacing the elements. Follow these instructions to change the filter element without interrupting filter operation:1. Open the pressure balance valve.2. Move the switchgear lever from the operating vessel to the vessel you need to service.Switch gear instructions are located on a label on the filter vessel.3. Close the pressure balance valve.4. Open the air-bleed and the drain plug and connect with suitable hoses to a oil catch panto drain the vessel.5. Keep the air bleed and drain plug open until no more operating fluid drains out.6. Loosen the screws of the lid on the vessel that needs servicing and remove the filter lid.7. Remove the filter element.The element can be easy pulled out by using a commercialavailable screw (M10).Hexagon boltHexagon nutM108. Clean the filter housing. Ensure that no dirt or cleaning fluid get into the clean side(center tube) of the filter element9. Insert the clean filter element into the filter housing.10. Place the filter lid back onto the filter housing and tighten the screw plugs. The screwsneed to be tightened in an X pattern. Recommended tightening torques listed in the tablebelow:Type DA/EDA 106 DA/EDA 256, 406, 636, 1006Screw M10 M12Torque Nm [lbf.-ft. ]45..50 [33..37 ]65..70 [48..52 ]11. Close the drain plugs.12. Open the pressure balance valve until operating fluid flows out of the air bleed connectionwithout bubbles.13. Close the pressure balance valve and air bleed connection.14. Retighten the screws on the lid after the vessel was pressurized for the first time.After following these instructions to change the filter element, the serviced filter vessel is ready for operation.North America44 Apple StreetTinton Falls, NJ 07724Toll Free: 800 656-3344(North America only)Tel: +1 732 212-4700Europe/Africa/Middle EastAuf der Heide 253947 Nettersheim, Germany Tel: +49 2486 809-0Friedensstraße 4168804 Altlußheim, Germany Tel: +49 6205 2094-0An den Nahewiesen 2455450 Langenlonsheim, Germany Tel: +49 6704 204-0 ChinaNo. 3, Lane 280,Linhong RoadChangning District, 200335Shanghai, P.R. ChinaTel: +86 21 5200-0099Singapore100G Pasir Panjang Road #07-08Singapore 118523Tel: +65 6825-1668BrazilAv. Ermano Marchetti, 1435 -Água Branca, São Paulo - SP,05038-001, BrazilTel: +55 11 3616-8461For more information, pleaseemail us at ********************or visit /filtration© 2019 Eaton. All rights reserved. All trademarks andregistered trademarks are the property of their respectiveowners. All information and recommendations appearing inthis brochure concerning the use of products describedherein are based on tests believed to be reliable. However,it is the user’s responsibility to determine the suitability forhis own use of such products. Since the actual use byothers is beyond our control, no guarantee, expressed orimplied, is made by Eaton as to the effects of such use orthe results to be obtained. Eaton assumes no liabilityarising out of the use by others of such products. Nor is theinformation herein to be construed as absolutely complete,since additional information may be necessary or desirablewhen particular or exceptional conditions or circumstancesexist or because of applicable laws orgovernment regulations. EN 11-2019CAUTION: Ensure the absolute cleanliness of the filter element is maintained during theentire servicing period. No dirt or impurities should penetrate the filter. The new elementsshould remain packaged until they are installed to prevent contamination. While removingan element from the a recently out of operation filter housing, make sure the element isfully discharged from any voltage caused by static charging during operation with certainfluidsDo not damage element seals during servicing. All sealing have to be checked on aregular basis to avoid leakage and potential development of an explosive atmosphere.Any damaged seals will need to be replaced. Any damaged seals have to be replaced.FAILURE TO FOLLOW THIS WARNING COULD LEAD TO DEATH, SEVERE INJURY,OR PROPERTY DAMAGE.5. Filter element cleaningMicroglass (VG) or paper (P) filter media CANNOT be cleaned and need to be replaced when it reaches the dirt holding capacity. Wire mesh (G) filter media can be cleaned and used again. Follow the cleaning specification for Eaton filter elements, sheet no. 21070-4 and 39448-4 to clean wire mesh filter media.6. Pressure difference measuringIf the filter assembly includes a clogging indicator, the indicator will measure the pressure difference across the filter element. The method of pressure reading varies depending on the type of indicator installed. It can be a visual, visual-electric or electronic reading. Additionally, the G ¼" (BSPP ¼") connections from the switchgear can be used for external pressure gauges. Measuring connections are recommended on data sheet 1650.7. Special applicationsThis filter can be used in the special applications listed below. Please follow the instructions if you are operating the filter in these environments.Operation in explosive areasWARNING:There are additional requirements for filters that are installed in explosiveareas. Please follow the instructions on Eaton Document No. 41269. FAILURE TOFOLLOW THIS WARNING COULD LEAD TO DEATH, SEVERE INJURY, ORPROPERTY DAMAGE.8. ServiceFor product technical support and service, please contact the local Eaton support team. All locations and contact information are listed below.Order spare parts and wearing parts according to the spare parts list on the filter data sheet.。
建华版操作经验——全国党员管理信息系统(基层版)操作手册(修改)

全国党员管理信息系统操作手册市直机关工委组织处二〇一三年十二月全国党员管理信息系统操作手册目录第一章软件安装1.1 安装准备1.2 软件安装1.3 软件卸载第二章常见问题及解决方法2.1 安装问题2.2 登录问题2.3 管理系统问题2.3.1 日常管理模块2.3.2 关系接转模块2.3.3 流动党员模块2.3.4 党费管理模块2.3.5 换届选举模块2.3.6 组织生活模块第三章管理系统模块操作步骤3.1 党组织信息填写规范3.1.1 日期格式说明3.1.2 党组织信息填写规范3.1.2.1 组织情况信息集3.1.2.2 班子届次信息集3.1.2.3 组织奖惩信息集3.1.2.4 单位信息集3.2 党员信息填写规范3.2.1 日期格式说明3.2.2 党员信息填写规范3.2.2.1 基本信息集3.2.2.2 学历学位信息集3.2.2.3 工作岗位信息集3.2.2.4 职务信息集3.2.2.5 技术职务信息集3.2.2.6 党籍信息集3.2.2.7 组织关系信息集3.2.2.8 民主评议信息集3.2.2.9 奖惩情况信息集3.2.2.10 其他党团信息3.3 申请入党人信息填写规范3.3.1 日期格式说明3.3.2 申请入党人信息填写规范3.3.2.1 申请培养信息集3.3.2.2 申请入党人的其他信息集的填写说明第四章管理系统模块操作步骤4.1 系统校核4.1.1 校核党组织信息4.1.2 校核党员信息4.1.3 二次校核4.2 建立信息库4.3 新建党支部4.4 撤销党支部4.5 维护单位变化情况4.6 录入入党积极分子、预备党员4.7 维护发展党员4.8 录入转入党员4.9 维护转出党员4.10 维护死亡党员、出党党员4.11 维护党员信息变化情况4.12 维护困难党员4.13 维护奖惩情况4.14 维护换届选举4.15 维护组织生活4.16 维护民主评议第五章统计报表模块操作步骤5.1 接收报表模板5.1.1 接收报表(国表)模板5.1.2 接收报表(省表)模板5.2 设置报告期5.3 填写报表封面5.4 直统报表5.5 录改报表5.6 报表说明4.7 校核报表5.8 打印报表5.9 上报报表第六章系统工具模块操作步骤6.1 信息备份6.2 信息恢复6.3 信息上报6.4 信息接收第一章软件安装1.1 安装准备如计算机已安装360、瑞星、北信源等安全厂商的安全产品(防火墙、审计系统等),建议在安装前将其升级至最新版本,且在安装过程中当安全产品提示您本软件将对计算机进行相应操作时,请您选择同意本软件对计算机的操作。
- 1、下载文档前请自行甄别文档内容的完整性,平台不提供额外的编辑、内容补充、找答案等附加服务。
- 2、"仅部分预览"的文档,不可在线预览部分如存在完整性等问题,可反馈申请退款(可完整预览的文档不适用该条件!)。
- 3、如文档侵犯您的权益,请联系客服反馈,我们会尽快为您处理(人工客服工作时间:9:00-18:30)。
DataService操作
手册
DataServices培训总结-操作手册
目录
一、DS简介 (3)
二、DS数据加载方式 (4)
三、DS进行数据抽取模型开发的基本过程 (5)
四、DS创建数据源系统和目标系统的数据存储 (5)
1、Oracl e数据库作为数据源系统 (5)
2、ECC作为数据源系统 (6)
3、HANA数据库作为目标系统 (7)
五、全量加载过程 (8)
1、创建Project和Job (8)
2、导入源表的元数据到资源库 (8)
3、创建Data Flow (9)
4、设置源表和目标表 (9)
5、手工执行Job (10)
六、基于表比较的增量加载 (11)
1、在Job下定义工作流 (11)
2、在工作流中定义数据流 (11)
3、加入Table_Comparison控件 (12)
4、设置Table_Comparison控件 (13)
七、基于时间戳的增量加载 (13)
1、在Job下定义工作流 (13)
2、定义Script控件 (14)
3、定义处理新增数据的数据流和处理更新数据的数据流 (15)
八、DS中常用控件介绍 (16)
1、Key_Generation (16)
2、Case (17)
3、Merge (18)
4、Validation (19)
5、设置过滤器和断点 (19)
九、定义Job定期执行 (21)
1、登录Data Services Management Console (21)
2、定义Batch Job Schedules (22)
十、其他注意事项 (23)
一、DS简介
SAP BusinessObjects Data Services是经过SAP HANA认证的ETL工具。
采用数据批量处理的方式,定期执行后台作业,将数据从多个业务系统中抽取出来,并进行必要的处理(转换,合并,过滤,清洗),然后再加载到HANA数据库中。
DS的组件之间的关系:
◆Management Consol:
管理控制台是网页版DS管理工具,能够进行一些系统配置和定义Job执行
◆Designer:
Designer是一个具有易于使用的图形用户界面的开发工具。
它允许开发人员定义包括数据映射,转换和控制逻辑的数据管理应用程序,创立包含工作流(作业执行定义)和数据流(数据转换定义)的应用程序
◆Repository:
应用程序设计器使用的本地资源库用来存储Data Services 对象(如项目,作业,工作流,和数据流)的定义和源和目标的元数据
◆Job server:
作业服务器启动数据移动的从多个不同种类的源集成数据的引擎,执行复杂的数据转换,并管理从ERP系统和其它源的抽取和事务
二、DS数据加载方式
◆全量加载
◆增量上载
a)基于表比较
作业在执行时读取数据源和目标中的全部数据,在服务器的内存中进行比较,计算数据差异
b)时间戳增量
需要在数据源中添加时间戳字段,一般为创立时间和最后修改时间,在抽取作业中定义对两个时间戳字段进行对比,符合条件的创立时间条目进行插入,符合条件的修改时间条目进行更新
c)利用数据库CDC(changed data capture)
首先需要开启数据库的CDC服务,为数据库实例启用CDC功能,为源表启用CDC功能。
在这种模式下,DS的增量更新不再直
接访问源表,而是在与源表相关的变更记录表中读取增量
三、DS进行数据抽取模型开发的基本过程
◆为数据源创立数据存储
◆导入源表的元数据到资源库
◆为SAP HANA目标系统创立数据存储
◆新建DS项目和批量作业
◆新建DS数据流:定义源表和目标表,定义变量、编辑Query
和Map_CDC_Operation
◆执行批量作业
四、DS创立数据源系统和目标系统的数据存储
1、Oracle数据库作为数据源系统
登录Data Services Designer,在本地对象库的数据存储页签中单击鼠标右键,选择新建菜单。