ZB拓扑教程
Topogun操作说明

一、基本操作及简介1.导入参考模型:一般来说,导入的参考模型都是面熟比较小的。
点击“load Ref”就可以导入。
“load scene”是直接导入全部。
2.创建面的封口:需要按住ctrl然后点击点就能封面。
(ctrl常用语操作点)3.Tgs格式:保存整个场景,既可以保存参考,又可以保存拓扑的低模。
二、创建工具SimpleCreat Tool下的操作1.操作方式:在此工具下,直接点击就可以创建出来点。
2.切换/另起:切换到编辑工具再切换回来就可以重新创建,当然“右键”是切换快捷键。
3.激活点/从已经创建的出发:按住ctrl就可以操作。
4.连接成面:按住ctrl去连接下一个点,就会将激活点和选择点连接。
而且创建的选点要按照顺序来进行选择,不能直接跳跃。
5.加点:按住shift点击边,就会创建点。
6.位移点:鼠标中键拖动7.属性栏——Make Face:勾选状态下,随着自己创建点,会自动产生面。
8.注意:有的是后产生错误的连线,需要手动给删除掉,del为快捷键。
三、编辑工具SimpleEdit Tool下的操作1.属性栏——select:有三种模式,都是复选框,用于控制你想选择什么,根据需要来激活,比如你只需要点的时候,就保留点的勾选就可以,其他都关闭。
快捷键为“1”“2”“3”单选点、边、面的快捷键,如果说在当前情况下增加一个复选,那么就是“shift”+“1/2/3”。
2.属性栏——Backface:不开启时为“忽略背面”,选择的时候不会选到后面。
3.属性栏——Marquee:选择的方式,分别为,矩形、圆形、拉索、笔刷。
4.加选/减选【相反状态】命令:按住“shift+选择”5.减选:快捷键“Ctrl+选择”6.加选:快捷键“Ctrl+shift+选择”7.合并点:按住ctrl拖动点,当附近的点变红就会被合并。
8.属性栏——Transform:操作轴。
9.选择环形线:在边的层级下,出现R光标时右键,或者双击10.选择循环先:在边的层级下,出现L光标是右键11.合并环形线:在环形线激活下,出现R光标时,按住shift+中键+单击12.添加循环线:在环形线激活下,出现L光标时,按住shift+中键+拖动13.属性栏——Negscale:允许反向缩放,就是缩放到中间时能够还能负向操作14.创建对称:右边creat sym按钮。
机械模型次时代建模流程
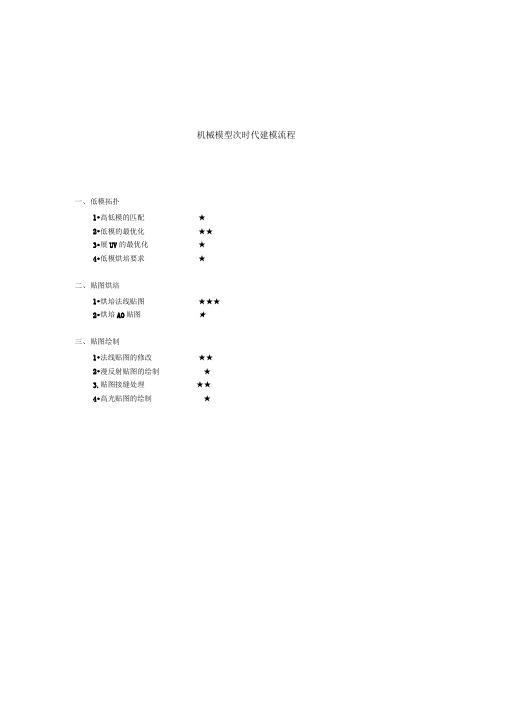
机械模型次时代建模流程一、低模拓扑1•高低模的匹配★2•低模的最优化★★3•展UV的最优化★4•低模烘培要求★二、贴图烘培1•烘培法线贴图★★★2•烘培AO贴图★三、贴图绘制1•法线贴图的修改★★2•漫反射贴图的绘制★3.贴图接缝处理★★4•高光贴图的绘制★一低模的拓扑1.高低模的匹配(注:本文所有图片看不清可放大观看)高模与底模本身面数差距很大,所以高低模只需要做到相切或者包裹就行,前提是尽量贴合。
高模的制作就不阐述了,总之高模细节越多,越好看最终效果就越好。
用低模去匹配高模的目的只是为了底模在形状大小上与高模看起来一样。
2.低模的最优化做到低模面数和模型结构的最优结合,既用最少的面去最大可能的表现模型的结构。
要求:1.机械模型的制作主要是对模型结构的了解,熟练布线,合理的分配有限的面数,不要浪费面数。
2.了解什么样的细节和形状可以用法线贴图表现,能用法线贴图在低模上表现的细节和结构不用做。
中。
时魁02】三SF^:360巔:廊FFS: ⑶.922上图中低模加上法线贴图后的效果,凹槽和齿轮都能体现出来,在面数和结构上取个折上图箭头所指的切角、凹槽和凸起都不用制作,在低模上用法线贴图可以直接表现。
上图是低模加法线贴图的效果, 箭头所指地方都是法线贴图表现出来的细节。
一般的小凹槽和小突起不起到模型柱体结构的细节都可以在法线贴图上体现。
3.展UV 的最优化上图是尽量把 uvUV 框,不浪费,UV 的摆放位置利于绘制贴 图。
肿|畋□ L口 0dlll\—limn niriiii I I I I I I I i ■i ~~r rMV I* S'r «■・■上图UV格子的大小可看出UV比重的分配,分配原则是按模型细节多少和模型结构的主次关系来定。
图二图一红色UV是自动展平后的大小,图二是经过放大后的UV。
因为此处为齿轮齿面的UV,包含的细节很多,所以需要更大的UV空间来表现细节,特别是法线贴图的细节表现,如果UV所占空间过小,而模型细节多,法线贴图表现非常不理想。
Zbrush基础使用手册(建模插件)

Zbrush基本操作*界面定义:隐藏SHELF:tab键恢复标准/自定界面:最上方,standar/custom优先设置(prferene>interface)iconized:图标显示,不显示文字auto collapes:自动折叠paletteleft/right tray:左右tray只展开一个paletteaccelerated 加速滚动float menu=tab*edit工具的视角调整:转动:右平面转动:shift+右平移:alt+右缩放:1,ALT+右2,放开ALT不松鼠标3,拖动鼠标回到中心:ALT+右,单击空白处*轴向:右,tray中local:所选部分的轴向PTsele:匡选/碰选sPivot:设置轴向,在mesh部分可见时,以可见部分中心为轴向CPivot:还原轴向转动、移动、缩放的轴向:内空白,吸附灰色,平面轴向,无Z轴彩色,环所在的平面彩交,自身单方向外面,Z方向*部分的隐藏和显示:只显示匡选部分:CTROL+Shift+右匡选隐藏匡选部分:1,CTROL+Shift+右2,松键盘,不松鼠标3,继续拖也可以单点一个poly组显示全部:CTROL+Shift+右点空白*曲线编辑:打开曲线:在斜线上单击加点:在线上单击,可拖动去点:把点拖到外面改变点的硬度:拖动点外面的圈局部放大显示单击一个激活的点水平调节:focal shift (焦点调节)噪音:noise滑块曲线可以save load copy paste*draw的设置rbg和material的切换mrgb材质和颜色rgb只有颜色m只有材质zadd加高zub减低zitensitiy z的多少无论2D还是3D,画了一笔后上述设置均可调整按contrl时画的数个笔划可同时调整设置快捷键填充:contrl+f清除画布:contrl+n拾取颜色:alt+左部分遮蔽:ctrl+右放大画布“+”缩小画布“-”缩小笔刷“[ ”放大笔刷“]”反选“CTRL+i”细化“CTRL+D“清除选择“CTRL+SHIFT+A”stroke笔划调控板Dot:R:Direstional:定向,只认第一个方向Replaylast:重复上次Spacing:间距placement variance:飞沫型笔刷的飞溅度color Intensity:颜色变化度Flow Variance:流量Main Repeat count:Secondary Reapeat Count: mouse:*InventoryRecord:纪录笔刷Add:添加入纪录strokes Count:当前纪录的笔刷数Exportlast:输出最后的Export all:输出所有的document调控板Revert Document:Back:用当前色设置背景Border:用当前色设置画布周边颜色Half:一半大小Double:双倍大小Pro:宽高比例crop:调整为新比例resize:恢复大小Store Depth history:存储深度历史Delete Depth history:删除深度历史Transform调控板Draw:绘制Edit:编辑Move:移动scal:缩放Rotate:旋转照相机:快照一个三维物体作为二维图案的一部分m+箭头:标记物体位置m-箭头:取消标记物体位置std:标准笔刷std Dot:点状标准笔刷Inflat:膨胀笔刷InflatDot:点状笔刷Inflat Dot:点状膨胀笔刷aalayer:单层笔刷pinch:压缩笔刷Nudge:推拉涂抹smooth:平滑化Edit curve:笔刷外形spin:平转Quick:快速交互Frame:网格Dots:(空box图标)点local:局部中心ptsel:匡选/碰选S.pivot:设置目前显示部分的中心点C.pivot:清除中心点>x<,>y<,>z<,>m<:对称(R):多个对称半径[3DMAX教程网:收集整理!] Radial count:对称轴的数量x/y/z res:新z球转为多边形的密度(可以保证其他地方的线不要太多)*modifiers:xyz:雕刻的有效方向画笔外形*info:移动缩放旋转的数量输入x/y/z component:3个方向的变动量3d copy:3维复制,将画布上的纹理投射到3d物体上s:着色,只用基本色A.I:自动强度Z spinner: 转动物体spinIt:转速!用3d复制投射纹理的方法:1,marker板中打开texture2,导入一个模型3,在texure板中建立一个新纹理4,把物体移动到适当位置5,Transform板中"m+箭头"标记位置6,3dcopy转动平移物体再copy直到投射完毕7,ctrol+nZscript调控板Load:载入Reload:重载Previos:上一个Next:下一个Hide zscript:隐藏播放窗口Show action:高亮显示&Notes:文字注解skip notes:跳过注解skip AudioBeg:开始记录End:结束记录Rec:显示记录Cmd:显示命令Txt:显示文本Run:运行Repeat show actions:重复显示命令次数Reply dely:每一步的停顿Minimal stroke:最小笔划Minimal update:最小更新Export command:输出命令Zplugin调控板Zplugin*Zbrush Help*Misc Utilites*Multi DisplacementGet mesh IngoCreat MissingUdimInitial File IndexMax Map sizeMapsize AdjustDosubpixBorder*Projection Mastr投射控制器,用于将物体在2d和3d之间转换*Web Access网络帮助layer调控板Clear:Fill:填充Creat:Dup:复制<</>>:上/下移动Mrg:向下合并Bake:烘培B blend:烘培混合量FlipH:水平翻转FlipV:W:包裹模式,循环空间,(用来做无缝贴图不错呀)Displace H:水平位移Displace V:垂直位移Display Z:z位移Auto select:自动选择stencil蒙板(编辑区域)调控板创建模板:alpha调控板>make st stencil on:打开模板Invr:反相Interative:相互strech:伸展(视配)Horiz:水平视配Actual:实际大小Vert:垂直视配Wrap Mode:视配它下面的物体外形wrap Resolution:分辨率smooth:光滑度show/hid:显示模板rgb:elevation made:只显示结果Tool调控板clone:make polymesh3d:转为3d网格clone3d:R:重新导入架构*Display Properties:显示方式sh水平平滑bh水平导角sv垂直平滑bv垂直导角Dres笔划分辨率Double双面显示Flip翻转法线*Geometry几何体lower Res转入更低一层Highter Res转入更高一层sDiv层级转换滑块cage细分笼子ssmt细分平滑Dellower删除较低一层Del higher删除较高一层(Reconstruct subdiv surface)重建细分面Divide再次细化一个层smt细化时平滑sym细分平滑的三角面(subdivide Merge Triangle)(Inner Extrude)Refitsuv平滑UVI-grp内部重组o-grp外部重组Edge loop在隐藏的边缘加线crispDisplace AmountDelet HiddenCrease生成硬边Crease crease lvl硬边硬度Un crease清除硬边!局部细分:在ZB中按住CTRL拖动鼠标左键把想要细分的部分用蒙板档住,再按CTRL在画布空白出单击鼠标左键反选,然后细分!*Deformation变换(可用于单一笔划)Unify在预览中统一物体比例为理想大小Mirror镜像[3DMAX教程网:收集整理!]Resym对齐offset偏移Rotate转动size大小Bend弯曲sbend平滑弯曲Skew平滑偏斜R Flatten压平Flatten径向压平S Flatten球状压平Twist扭曲Taper锥化Squeeze压缩Noise噪波smooth平滑inflat膨胀spherize球化Gravity重力perspective透视morph变化optimize优化细分*Masking遮蔽(在1.55中名为SELECTION用于局部的编辑,建立遮蔽区,可用ctrol+右键,可绘制,可匡选)viewmaske:观察遮蔽区域Inverse:反相Clear:清除Mask All:遮蔽全部Row:撤销遮蔽区的行Col:撤销遮蔽区的列Crd:撤销遮蔽区的行和列(网格)Sel:选择,撤销时影响行和列的宽度Skp:跳过,撤销时跳过行和列的宽度Intens:强度,撤销时执行的强度Blend:新的遮蔽和旧的遮蔽的混合Int:应用纹理的强度Hue:应用纹理的色调Sat:应用纹理的饱和度Alp:生成来自当前alpha位图上的遮蔽Creat Alpha:用当前遮蔽区创建alpha位图HidePt:隐藏被遮蔽的部分ShowPt:显示被隐藏的分部*polygroups多边形分组auto groups 自动分组Uv groups 根据uv所在象限分组Group visible将当前可见多边形分为一组*Texture纹理colorize:用所选的颜色填充每个面Grd:混合相邻面之间的颜色Txr>col:纹理>颜色UV>Txr:uv>纹理UV check:UVc:圆柱形uvUVp:平面型uvUVs:圆球形uvUV Title:指定相同的图像到每个面Guv Titles:成组的自动uvAuv Tiles:改变uv贴图,自适应uv平铺,仅用于多边形Auv Radio:自适应评不比率,值大于1时,较大的面得到较大纹理空间Hrepeat:水平重复次数Vrepeat:垂直重复次数Adju:Adjv:(apply uv adjustment)Fix seam (border):合并固定接缝边界,uv接风的最大合并值(Fix Tetur seam):合并固定接缝,uv无接缝*Moph Target变化(相当于maya的blend,在transform调控板中调整moph值)StoreMT:储存当前几何体为变化目标Switch:储存当前几何体为变化目标而还原其为先前目标DeIMT:删除变化目标Creat Diff:根据存储的目标生成不同的网格结构Morph:向目标变化的程度(Morph distanse)!目标变化的使用方法:1,建立或导入一个3维物体2,storeMT存为目标3,进行雕刻4,Creat Diff5,在morph里调整变化度*Unified skin统一蒙皮Resolution蒙皮分辨率,一般很小的值就够了sdns球体不透明,耦合球体数量smt球体光滑度,0时为方形Auto size自动调整预览窗口,一定要选Make Unified Skin制作蒙皮*Adaptive skin自适应蒙皮Preview预览(A)Density网格密度Ires交叉分辨率,如果值为3,则任何拥有多于3个子球的Z球将被转为高多边形Mbr薄膜Mc子球网格最小化Mp母球网格最小化Make adapitve skin生成Insert local mesh在Z球上插入多边形,将激活的Z球转为其他3D物体Insert comector mesh在耦合球上插入多边形,将耦合球转为其他3D物体*Displacement置换贴图(丛zb的雕刻导出为置换贴图)Dpsubpix 像素精确度DPRes 贴图分辨率Adaptive 自动扫描分辨率smoothuv 平滑uvcreate DispMap 生成置换贴图Intensity 置换强度Mid 置换中间量mode 置换模式Apply Displaysment!生成置换贴图的过程:1,在导入3d物体时,在编辑之前就要用Moph Target>StoreMT,存储变化目标2,进行细化和雕刻后(有时需要点击Switch),调整参数,点击smooth uv和create dismap 生成alpha,3,将alpha转换为texture并输出*Alpha Bump*Initialize初始化x/y/z size:各个方向的大小H Divide:水平细分V Divide:垂直细分Coverage:覆盖范围Tcurve:曲度Twist:扭曲[3DMAX教程网:收集整理!]S Divide:剖面细分L Divide:长度细分Itwist:初始扭曲*Import:Mrg:合并相同空间的点add:添加导入下一个网格Tri2quad:转换一定角度内的三角面为四边面weld:合并一定距离内的点*Export:obj:四边多边形Dxf:三边Qud: 四边Tri:三边Txr: 包括uv坐标Flp:翻转纹理顶底Mrg:合并相同空间的电Grp:成组Scale:缩放Export:导出light调控板单击球体,变为背光load:save:Intensity:强度Intensity curve:强度曲线,竖:边缘,横:强度通用环境光,可贴图Gdm:漫反射Gdi:漫反强度Gsm:镜面反射Gsi:镜反强度Gdio:[3DMAX教程网:收集整理!] Gsio:*type灯光类型sun:太阳point:点spot:斑点Glow:发光Radial:镜像*Palcement方位P:局部灯光位置x/y/z Pos:x/y/z位置Radius:半径*shadow阴影shadow:开关Intersity:强度Length:长度zMode:z模式优良效果Blur:模糊Rays:准确性Aperture:孔径,阴影边缘柔化Texture纹理调控板import:emport:Transparent:width:Height:clone:New:clone:New:Make Alpha:生成alpha纹理remove:cd:清除深度crop and fill:用当前纹理填充画布GradDoc:用当前画布生成纹理render调控板再渲染:ctrol+RCursor:最佳渲染,拖到工作区某处Render:渲染Best:最佳Rreview:预览Fast:快速Flat:普通Fog:雾Shadow:阴影Depth Cue:深度Soft rgb:Flatten:压平层,渲染所有的层,无法显示透明3d shading 100:着色度*Antialiasing:抗锯齿Blur:模糊edge:边缘Size:大小Supersample:多次渲染,选最好,值为“次方”*Depth cue:深度模糊Intensity:强度Softness:柔化Depth1/2:近端点/远端点*fog:雾*fast Render:快速渲染*Environment:环境*Adjustments调节是否可调对比度亮度曲线级别Picker拾取器模板(在绘画过程中比划拾取当前位置的信息方式) Active:只拾取当前层other:包括其他层All:所有层Dynamic:动力学,评估一到两个图像来指定数值Selected Orientation:自己选择的方向Once Ori:拾取笔划第一次接触画布时的方向Cont ori:连续拾取笔划所在的画布方向Z:设定的z值once z:一次z值cont z:连续z值once col:一次颜色contcol:连续颜色once Mat:一次材质cont mat:连续材质Marker调控板优先设置>marker>marker Radius(标记半径) Transfer中进行标记on/off:所有标记的开关Reorder Markes:重排,反向产生标记顺序Delete Markes:删除show:显示标记tool:创建工具Draw /psition/Normal/color:允许获取这些信息Draw调控板Draw size:绘制大小Focal shift:边缘模糊Mrgb/Rgb/M:材质+颜色/颜色/材质Rgb/Z Inensity:rgb/z的强度z add/ub/cut:加/减/移走内部Width:笔刷2d宽度Heigh:笔刷2d高度Depth:笔刷3d深度refract-intensity:-Blur:Imbed:嵌入,画笔在表面和物体中心的相对位置Perspective Distortion:透视变形Refract:折射强度Blur:折射模糊*channls通道Infront:近遮蔽Behind:远遮蔽Z Tolerance:z误差Mat overwrite:材质覆盖*笔刷预览窗口:弯箭头:上一步+:观看方向ALPHA调控板可以根据画布上的alpha创建3d地形import:bmp psd jpg pickEP:输出R:MRes:产生创建的3d网格蒙皮的网格分辨率MDep:产生创建的3d网格蒙皮的层次,设置网格平滑度MS:创建的3d网格蒙皮的网格平滑度Dbls:创建的3d网格蒙皮为双面Mske 3D:创建3d网格蒙皮,沿z轴对称,自动指定auv平铺坐标Make Tx:创建一个纹理到tecture调控板Make st:创建并激活蒙板Make modified alpha:Cc:清除颜色Cropandfill:获取alpha并填充GrabDoc:获取文件中的新alphaAlpha Depth Factorcolor调控板swith color:切换颜色Fill 3D object:填充物体Fill layer:填充层SysPalette:系统调色板clear:清除。
银行系统的安全设计与网络拓扑图

银行系统的安全设计与网络拓扑图1 银行系统的安全设计 11.1 非法访问 (1)1.2 窃取PIN/密钥等敏感数据 (1)1.3 假冒终端/操作员 (1)1.4 截获与篡改传输数据 (1)1.5 网络系统可能面临病毒的侵袭与扩散的威胁 (1)1.6 其他安全风险 (1)2 银行系统的网络拓扑图及说明 (2)3 银行系统的网络安全部署图及说明 (3)3.1 敏感数据区的保护 (3)3.2 通迅线路数据加密 (3)3.3 防火墙自身的保护 (4)4 系统的网络设备选型及说明 (5)4.1 核心层交换机 (5)4.2 汇聚层交换机 (5)4.3 接入层交换机 (6)4.4 路由器 (6)4.5 服务器 (7)5 安全配置说明 (8)5.1 防火墙技术 (8)5.2 网络防病毒体系 (8)5.3 网络入侵检测技术 (8)5.4 网络安全审计技术 (9)5.5 VPN技术 (9)总结 (10)一.银行系统的安全设计银行网络作为一个金融网络系统,由于涉及信息的敏感性自然会成为内部与外部黑客攻击的目标,当前银行面临的要紧风险与威胁有:1.1非法访问:银行网络是一个远程互连的金融网络系统。
现有网络系统利用操作系统网络设备进行访问操纵,而这些访问操纵强度较弱,攻击者能够在任一终端利用现有的大量攻击工具发起攻击;由于整个网络通过公用网络互连同样存在终端进行攻击的可能;另一方面银行开发的很多增值业务、代理业务,存在大量与外界互连的接口这些接口现在没有强的安全保护措施存在外部网络通过这些接口攻击银行,可能造成巨大缺失。
1.2窃取PIN/密钥等敏感数据:银行信用卡系统与柜台系统使用的是软件加密的形式保护关键数据,软件加密使用的是公开加密算法(DES),因此安全的关键是对加密密钥的保护,而软件加密最大的安全隐患是无法安全储存加密密钥,程序员可修改程序使其运行得到密钥从而得到主机中敏感数据。
1.3假冒终端/操作员:银行网络中存在大量远程终端通过公网与银行业务前置机相连国内银行以出现多起在传输线路上搭接终端的案例。
轻松掌握Blender的动态拓扑技巧
轻松掌握Blender的动态拓扑技巧在本教程中,我们将介绍一些有助于掌握Blender动态拓扑技巧的方法。
动态拓扑是一种在Blender中用于创建和编辑多边形几何体的技术,它允许我们以一种灵活且高效的方式进行建模。
首先,让我们来学习如何在Blender中使用动态拓扑功能。
打开Blender软件后,创建一个新的基本立方体对象。
选择该对象并进入编辑模式。
在侧边栏中,你将找到一个名为"动态拓扑"的选项卡。
点击它以展开相关工具。
现在我们将学习如何在对象上创建动态拓扑。
选择"画笔"工具,在选项卡中你可以调整画笔的参数,例如强度、半径等。
开始在对象上绘制笔刷,你会看到对象表面的几何体开始变形。
你可以使用不同的笔刷类型,例如平滑、吹膨等,以实现不同的效果。
在绘制过程中,你可以使用一些快捷键来调整绘制的方式。
比如使用"Ctrl"键来平滑绘制的区域,使用"Shift"键来减小绘制的区域。
这些快捷键可以帮助你更好地控制动态拓扑的结果。
此外,你还可以使用其他工具来进一步完善模型,例如剪切、旋转、拉伸等。
这些工具可以在动态拓扑选项卡中找到。
它们可以帮助你调整模型的形状和拓扑结构,以达到你需要的效果。
当你完成了模型的动态拓扑后,可以使用一些其他工具来优化模型的拓扑结构。
点击顶部菜单栏中的"对象",然后选择"应用",再选择"细分曲面"。
这将使模型的拓扑结构更加平滑和细致。
最后,我们还可以对模型进行一些其他的调整和修饰。
比如在对象模式下使用顶点组来选择和编辑特定区域,或者使用材质和纹理来给模型添加颜色和纹理效果。
总结起来,掌握Blender的动态拓扑技巧是一项需要练习和熟练的技术。
通过熟悉各种功能和工具,我们可以创造出非常逼真和精细的3D模型。
希望本教程对你学习Blender动态拓扑技巧有所帮助,祝你成功!。
zbrush基本操作(zbrush基本操作)

zbrush基本操作(zbrush基本操作)Basic operation of Zbrush* interface definition:Hide SHELF:tab keyRecovery standard / custom interface: top, standar/custom Priority setting (prferene>interface)The iconized: icon does not display textAuto collapes: auto folding paletteTray tray: only launches a palette around left/right Accelerated accelerates scrollingFloat menu=tabPerspective adjustment of *edit tools:Rotation: rightPlane rotation: shift+ rightTranslation: alt+ rightZoom: 1, ALT+ right2, release ALT without loosing the mouse3, drag the mouseBack to the center: ALT+ right, click the blank* axial:Right, trayLocal: the axial part of the selected partPTsele: selection / collision selectionSPivot: set axial, in the mesh part visible, with the visible part of the center of the axialCPivot: reduced axialThe axis of rotation, movement, and scaling:Internal blank, adsorptionGray, plane axial, without Z axisColor, the plane where the ring isColor intersection, its own single directionOutside, Z direction* hiding and displaying parts:Only show the selected part: right CTROL+Shift+Hidden pick part: 1, CTROL+Shift+ right2, loose keyboard, not loose the mouse3, continue to dragYou can also have a poly group at a single pointShow all: CTROL+Shift+ right point blankCurve editing:Open the curve: click on the slashAdd points: click on the line, dragGo to the point: drag the points outsideChange the hardness of the point: the outside of the drag point Local zoom display, click an active pointHorizontal adjustment: focal shift (focus adjustment) Noise: noise sliderThe curve can be save load copy paste*draw settingsSwitching between RBG and materialMrgb material and colorRGB only colorM only materialHeightening zaddZub decreaseHow much is zitensitiy Z?Whether 2D or 3D, after drawing a pen, the above settings can be adjustedAccording to contrl, several strokes can be adjusted at the same timeShortcut keyFill: contrl+fClear canvas: contrl+nPick Color: alt+ leftPartial shadowing: ctrl+ rightEnlarge canvas +"Reduce the canvas -"Reduce the brush ["Zoom brushes """Reverse election "CTRL+i""Refine "CTRL+D""Clear selection "CTRL+SHIFT+A""Paintbrush tool -- 2D(Tool>modify)*sphere brush: sphere brushesModi/soft colorblend: allows mixed colors*alpha brush:alpha brush can use alpha textureModi/soft color*simple brush: ordinary brush*smudge: smudge tool, press control button to change toordinary brushModi/ Retain Center: the degree of color mixingRetain center: hold center*Hook Brush: deformation line, pull out straight line Modi/ mixed color resolution*fiber brush: fiber, hairModi/D densityG gravityG cardT disorderF ordinary colorBack color delayed colorS color sourceR anti aliasingT concentration [3DMAX tutorial network: collection!Shape ordinary color*snke Hook brush: snake line, pull out oneModi: resolution, polygon subdivision*Bump Brush: concave convex, similar to a single layer brush, but perpendicular to the surfaceModi /constant: MobileColor bland color mixingSample size high value time slip*depth brush: level brushes, drawing in the normal direction*singlelaye brush: single layer brush, the effect does not overlap in a penModi/ bilateral*paintbrush: brushesModi/ burr*cloner: rubber stamp control key samplingModi/: layer pattern, coloring, hold center, Z offset*MRGB: crawler, used to captureModi/shaded RGB: material + basic colorAuto Crop: automatically removes empty canvas *Blur fuzzy*磨刷锐化*噪声噪波*高光高光莫迪/自动,相反,白色,主要色*辉光发光*强度强度*成型剂刷着色增强器,增减亮度莫迪/强度*着色:彩色化,着色工具莫迪/最大强度,重复使用时不变暗*饱和饱和度刷* hueshifter:色调移动器,微调色调莫迪/转换比例,α转换*亮点:高光*对比:对比度*自定义过滤器:自定义过滤器,变为”立体”莫迪/强度,自动大小,附加画笔工具——三维* multimarkers多重标记工具么做polygmesh制作多边形网格纹理大小纹理尺寸,制作多边形时贴图大小复位改变位置,重新定位使用方法:1、标记板中打开纹理和材料2、建立多个多边形物体并在每建好一个后,变换板中点M +(标记)3,Ctrl + N4、用多在画布上拖,不要碰到标记5、用变换板进行编辑然后转为多边形:1,莫迪中使聚网2、退出编辑器3,Ctrl + N4、用新的3d工具在网格上拖拉,储存工具* Z球工具先绘制出根球,其本身是敞开的在编辑模式中画出球体在绘制大小中改变子球的大小在编辑状态下一键预览蒙皮效果Z球的编辑:按住移键建立子球,和上个子球相同大小在画的情况下,Alt +右键删除子球体移动,缩放和转动Shift +右45度约束Alt +右“IK式”移动无子级Z球可洼入其他网格,变换Z球本身和变换耦合球的效果不同!吸引球体:画时,用Alt +右键单击一个末级Z球的结合部耦合球,且对称值(交叉X / Y / Z轴分辨率)为0,这时,末级子球及其结合部变为透明的吸引球体,其远近大小将影响蒙皮形态再用Alt +右点结合部,恢复为普通球体和Z球有关的工具选项:*显示性能显示密度:耦合球密度颜色:耦合球的明暗度尺寸:显示关联的大小*统一的皮肤统一蒙皮分辨率蒙皮分辨率,一般很小的值就够了球体不透明SDNS,耦合球体数量SMT球体光滑度,0时为方形汽车大小的自动调整预览窗口,一定要选制定统一的皮肤制作蒙皮*自适应皮肤自适应蒙皮预览预览(一)密度网格密度IRES交叉分辨率,如果值为3,则任何拥有多于3个子球的Z球将被转为高多边形MBR薄膜[ 3dmax教程网:收集整理!]MC子球网格最小化MP母球网格最小化使皮肤生成自适应将局部网格在Z球上插入多边形,将激活的Z球转为其他3d物体插入comector网格在耦合球上插入多边形,将耦合球转为其他3d物体*几何多边形低分辨率转入更低一层高分辨率转入更高一层史迪夫层级转换滑块笼细分笼子SSMT细分平滑dellower删除较低一层德尔高删除较高一层(重建细分表面)重建细分面分再次细化一个层SMT细化时平滑对称细分平滑的三角面(细分合并三角形)(Inner Extrude)改装SUV平滑UV出内部重组o-grp外部重组边环在隐藏的边缘加线脆位移量删除隐藏生成硬边折痕单板层积材硬边硬度折痕折痕联合国清除硬边折痕!局部细分:在ZB中按住Ctrl拖动鼠标左键把想要细分的部分用蒙板档住,再按Ctrl在画布空白出单击鼠标左键反选,然后细分!*位移dpsubpixdpres适应的smoothuv创建dispmap强度中间模式应用displaysment主投射控制器投影可将3d物体变为画布的一部分(降)在2d绘制后拾取为3d物体(接)然后清空画布可绘制:颜色颜色阴质感材料材质双双面边缘退色褪色变形:3d编辑按法线方向归一化:脑卒中笔划调控板Dot:R:direstional:定向,只认第一个方向replaylast:重复上次间距:间距位置:飞沫型笔刷的飞溅度方差颜色:颜色变化度流流量方差:主重复计数:二次重复计数:鼠标:*库存记录:纪录笔刷地址:添加入纪录笔画数:当前纪录的笔刷数exportlast:输出最后的出口:输出所有的文件调控板恢复文件:回:用当前色设置背景边境:用当前色设置画布周边颜色半:一半大小双:双倍大小亲:宽高比例作物:调整为新比例调整:恢复大小存储深度的历史:存储深度历史删除历史:删除深度历史深度变换调控板得出:绘制编辑:编辑移动:移动规模:缩放旋转:旋转照相机:快照一个三维物体作为二维图案的一部分M +箭头:标记物体位置M:取消标记物体位置箭头性病:标准笔刷点:点状标准笔刷性病通货膨胀:膨胀笔刷inflatdot:点状笔刷通过点状膨胀笔刷点:一一层:单层笔刷捏:压缩笔刷提醒:推拉涂抹光滑:平滑化编辑曲线:笔刷外形自旋:平转快速:快速交互框架:网格点:(空箱图标)点当地人:局部中心ptsel:匡选/碰选S.pivot:设置目前显示部分的中心点C.pivot:清除中心点> x <,> < > Y,Z <,> M:对称(R):多个对称半径[ 3dmax教程网:收集整理!]径向计数:对称轴的数量X、Y、Z分辨率:新Z球转为多边形的密度(可以保证其他地方的线不要太多)*修正:XYZ:雕刻的有效方向画笔外形*信息:移动缩放旋转的数量输入X、Y、Z分量:3个方向的变动量三维复制:3维复制,将画布上的纹理投射到3d物体上S:着色,只用基本色我:自动强度Z:转动物体微调精神:转速用3d复制投射纹理的方法:1、标记板中打开纹理2、导入一个模型3、在纹理板中建立一个新纹理4、把物体移动到适当位置5、变换板中“M +箭头”标记位置6,3dcopy转动平移物体再复制直到投射完毕7、控制+ Nzscript调控板负载:载入重载:重载Previos:上一个下一步:下一个隐藏zscript:隐藏播放窗口行动:高亮显示&注:文字注解跳过注释:跳过注解如果音频求:开始记录结束:结束记录录音:显示记录Cmd: display commandTxt: display textRun: runningRepeat show actions: repeated display command times Reply dely:'s pause at every stepMinimum stroke of Minimal stroke:Minimum update of Minimal update:Export command: output commandZplugin control boardZplugin*Zbrush Help*Misc Utilites*Multi DisplacementGet mesh IngoCreat MissingUdimInitial File IndexMax Map sizeMapsize AdjustDosubpixBorder*Projection MastrProjection controller is used to convert objects between 2D and 3D*Web AccessNetwork helpLayer control boardClear:Fill: fillingCreat:Dup: replication<</>>: move up / downMrg: downward mergeBake: bakingB blend: baking mixFlipH: horizontal flipFlipV:W: wrapping mode, circular space (used to make seamless maps) Horizontal displacement of Displace H:Vertical displacement of Displace V:Display Z:z shiftAuto select: automatic selectionStencil mask (edit area) control boardCreate template: alpha control board >make stStencil on: opens the templateInvr: antiphaseInterative: mutualStrech: stretch (see fit)Horiz: horizontal matchingActual: actual sizeVert: vertical view matchingWrap Mode: looks at the shape of the object underneath it Resolution of wrap Resolution:Smooth: smoothnessShow/hid: display templateRgb:Elevation made: displays only resultsTool control boardClone:Make polymesh3d: convert to 3D mesh Clone3d:R: re import the architecture*Display Properties: display mode SH level smoothingBH horizontal guide angleSV vertical smoothingBv vertical guide angleDres stroke resolutionDouble double sided displayFlip flip normals*Geometry geometryLower Res goes to lower level Highter Res goes to the next level SDiv level transfer sliderCage subdivision cageSSMT subdivision smoothingDellower deletes a lower layerDel higher deletes a higher layer(Reconstruct subdiv surface) reconstructing subdivision surfacesDivide refines one layer againSMT smoothing when thinningSYM subdivision smooth triangles(subdivide Merge Triangle)(Inner Extrude)RefitSUV smoothing UVI-grp internal reorganizationExternal restructuring of o-grpEdge loop in the hidden edge lineCrispDisplace AmountDelet HiddenCrease generates hard edgesHard edge hardness of Crease crease LVLUn crease clears hard edges! The local subdivision in ZB press CTRL dragging the left mouse button to put the broken part with blocking mask,Then click CTRL in the canvas blank, click the left mouse button to select, and then subdivide!*Deformation transform (for single stroke)Unify in the preview unified object ratio is ideal sizeMirror mirror [3DMAX tutorial network: collection!Resym alignmentOffset offset Rotate rotationSize size Bend bendingSbend smooth bending Skew smooth skewR Flatten flat Flatten radial flatteningS Flatten spherical flattening Twist twistTaper cone Squeeze compressionNoise noise smooth smoothingInflat expansion spherize spheroidizationGravity gravity perspective PerspectiveOptimize optimization subdivision of morph change*Masking masking(in 1.55, SELECTION is used for local editing, building shaded areas, ctrol+ can be right-click, can be drawn, can be selected)Viewmaske: observation masking areaInverse: invertingClear: clean upMask All: cover allRow: undo the line in the shaded areaCol: cancel the shaded area columnCrd: rows and columns that cancel the shaded area (grid)Sel: select, undo, affect the width of rows and columnsSkp: skip and undo the width of rows and columnsIntens: intensity, intensity of execution at the time of cancellationBlend: a mixture of new shelter and old shelterInt: apply the intensity of textureHue: apply texture tonesSat: apply texture saturationAlp: generates shadowing from the current alpha bitmapCreat Alpha: create a alpha bitmap with the current shaded areaHidePt: hiding the obscured partShowPt: displays the hidden segments*polygroups polygon groupingAutomatic grouping of auto groupsUv groups grouped according to the quadrant in which UV islocatedGroup visible divides current visible polygons into a group*Texture textureColorize: fill each face with the selected colorGrd: the color between the adjacent facesTxr>col: texture > ColorUV>Txr:uv> textureUV check:UVc: cylindrical UVUVp: planar UVUVs: spherical UVUV Title: specify the same image to each surfaceGuv Titles: Group automatic UVAuv Tiles: changing the UV map, adaptive UV tiling, only for polygonsAuv Radio: adaptive evaluation of the ratio, when the value is greater than 1, the larger face to get a larger texture spaceHrepeat: horizontal repetitionsVrepeat: vertical repetitionsAdju:Adjv:(apply UV adjustment)Fix seam (border): joint combined with fixed boundary, the largest combined UV a value(Fix Tetur seam): fixed joint, UV seamless*Moph Target change(equivalent to the Maya of blend, adjusting MOPH value in the transform control panel)StoreMT: stores the current geometry as a change targetSwitch: stores the current geometry as a change target and restores it as a previous goalDeIMT: delete change targetCreat Diff: generates different grid structures based on stored targetsMorph: the degree of change to the target(Morph distanse)! The use of target change:1, create or import a 3 dimensional object2, storeMT as the goal3, carving4, Creat Diff5, adjust the change degree in morph*Unified skin unified skinThe resolution of the Resolution skin is small enoughSDNS sphere opacity, coupling sphere numberSMT sphere smoothness, 0 is squareAuto size automatically adjust the preview window, you must chooseMake Unified Skin make skin*Adaptive skin adaptive skinningPreview preview (A)Density mesh densityIres cross resolution, if the value is 3, then any Z ball with more than 3 sub spheres will be converted to high polygonMbr filmMinimization of Mc sub sphere meshMp ball grid minimizationMake adapitve skin generationInsert local mesh inserts a polygon on the Z sphere, turning the active Z sphere into other 3D objectsInsert comector mesh is inserted into the polygon in the Coupling balls, the Coupling balls into other 3D objects*Displacement displacement mapping(carving of plexus ZB is derived as displacement mapping)Dpsubpix pixel accuracyDPRes texture resolutionAdaptive automatic scanning resolutionSmoothuv smoothing UVCreate DispMap generates displacement mapsIntensity replacement strengthMid replacement intermediate quantityMode replacement modelApply Displaysment! The process of generating permutation maps:1, when importing 3D objects, you need to use Moph Target>StoreMT to store the change target before editing2, refine and carve (sometimes click Switch), adjust the parameters, click smooth UV and create dismap to generate alpha,3, convert alpha to texture and output*Alpha Bump*Initialize initializationThe size of each direction of x/y/z size:H Divide: horizontal subdivisionVertical subdivision of V Divide:Coverage: coverageTcurve: curvatureTwist: twisted [3DMAX tutorial network: collection!Subdivision of S Divide: profileLength subdivision of L Divide:Itwist: initial twist*Import:Mrg: merging points in the same spaceAdd: add import next gridTri2quad: converts triangles in a certain angle to four sidesWeld: merge points within a certain distance*Export:Obj: quadrilateralDxf: three sidesQud: quadrilateralTri: three sidesTxr: includes UV coordinatesFlp: flip texture top and bottomMrg: merging the same space of electricityGroup Grp:Scale: zoomExport: exportLight control boardClick the ball and turn it back into the backlightLoad:Save:Intensity: strengthIntensity curve: strength curve, vertical: edge, transverse: strengthGeneral ambient light, texturingGdm: diffuse reflectionGdi: diffuse strengthGsm: specular reflectionInverse strength of Gsi: mirrorGdio:[3DMAX tutorial network: collection! Gsio:*type lighting typeSun: sunPoint: pointSpot: spotsGlow: luminescenceRadial: mirror*Palcement azimuthP: local light positionX/y/z Pos:x/y/z positionRadius: radius*shadow shadowShadow: switchIntersity: strengthLength: lengthExcellent effect of zMode:z modeBlur: fuzzyRays: accuracyThe diameter of Aperture:, the shadow edge blur Texture texture control boardImport:Emport:Clear:Grad:Transparent:Width:Height:Clone:New:Clone:New:Make Alpha: generates alpha texturesRemove:Cd: clear depthCrop and fill: fills the canvas with the current texture GradDoc: generates textures from the current canvas Render control boardRendering again: ctrol+RCursor: best render, drag somewhere in the workspace Render: renderingBest: bestRreview: PreviewFast: fastFlat: ordinaryFog: fogShadow: shadowDepth Cue: depthFiber:SoftZ:Soft rgb:Flatten: flatten layer, render all layers, can not display transparency3D shading 100: colouring degree*Antialiasing: anti aliasingBlur: fuzzyEdge: edgeSize: sizeSupersample: many times render, choose the best, the value is"sub square""Depth blur of *Depth cue:Intensity: strengthSoftness: softenDepth1/2: near endpoint / remote point*fog: fogFast rendering of *fast Render:*Environment: environment*Adjustments regulationIs it adjustable?contrast ratiobrightnessCurve levelPicker template picker (in the painting process, the current position of the mode of information pick-up gestures)Active: only picks up the current layerOther: includes other layersAll layers of All:Dynamic: dynamics, evaluate one or two images to specify valuesThe direction of Selected Orientation:'s own choiceOnce Ori: pick up the direction of the stroke when you first touch the canvasCont ori: continuously picking the direction of the canvas where the stroke is locatedZ value set by Z:Once Z value of once z:Continuous Z value of cont z:Once col: a colorContcol: continuous colorOnce Mat: once materialCont mat: continuous materialMarker control boardPriority setting >marker>marker Radius (Mark radius)Mark in TransferOn/off: all tag switchesReorder Markes: rearrangement, reverse generation of marker sequenceDelete Markes: deletionShow: display tagTool: creation toolDraw /psition/Normal/color: allows access to this informationDraw control boardDraw size: drawing sizeFocal shift: edge blurMrgb/Rgb/M: material + color / color / materialThe strength of Rgb/Z Inensity:rgb/zZ add/ub/cut: add / subtract / move insideWidth: brush 2D widthHeigh: brushes 2D heightDepth: brush 3D depthRefract-intensity:-Blur:Imbed: embedding, the relative position of the brush on the surface and the center of the objectPerspective Distortion: perspective deformationRefract: refractive indexBlur: refraction blur*channls channelInfront: near shieldBehind: far maskingZ Tolerance:z errorMat overwrite: material coverage* brush preview window:Curved arrow: the last stepWatch directionALPHA control boardYou can create 3D Terrain Based on alpha on canvasImport:bmp PSD JPG pickEP: outputR:MRes: generates grid resolution of created 3D mesh skinsMDep: generates the hierarchy of the created 3D mesh skins and sets the mesh smoothnessMesh smoothness of 3D mesh skin created by MS:The 3D mesh skin created by Dbls: is two-sidedMske 3D: creates 3D mesh skins, symmetrically along the Z axis, and automatically specifies the AUV tile coordinatesMake Tx: creates a texture to the tecture control board Make st: create and activate the maskMake modified alpha:Cc: clear colorCropandfill: gets alpha and fills GrabDoc: gets the new alpha in the file Alpha Depth FactorColor control boardSwith color: switch colorsFill 3D object: filled objectsFill layer: filling layerSysPalette: system paletteClear: cleanup。
CAD_三维建模方法
(3)计算机内部模型。 一个CAD系统的计算机机内模型是将 信息模型传递结计算机可接受的且同时转换成二进制代码的— 种标准结构形式(可描述的元素及其相互关系)。以此可实现中央 处理机的数据处理和数据存储。也就是: z 将信息模型的信息单元以数学形式加以定义; z 确定其相互关系; z 转化为二进制代码形式;
z四叉树与八叉树适应网格
当一个对象要被分解时,出现三种类型,空、满、 半满,主要取决于被分解的对象是否完全在单元的 外边、完全在里面或者部分在里边。半单元可以进 一步分解成空、满、半满单元。显然,半单元尺寸 决定其分辨率。因为单元信息无法告诉单元是如何 填充的或单元填充了多少,所以计算机将认为半满 单元都是一样的,除非做进一步的分解。
沿扫描变化截面的形状和大小,或者当移动该形 状通过某空间区间时,可以变化截面相对于扫描 路径的方向
② 半空间法(Semi Space Representation)
(3)三维实体的表达
①构造实体几何(Constructive Solid Geometry)
复杂的实体定义为较简单实体(体素)的组合,这 种组合是通过布尔运算来实现的。通过集合运算生 成的几何实体过程可用一个二叉树结构表示,其中 树根是生成的几何实体;中间结点(子树)是集合 运算符号,包括并、差、交,它代表某一中间形体; 叶结点是体素或变换参数。
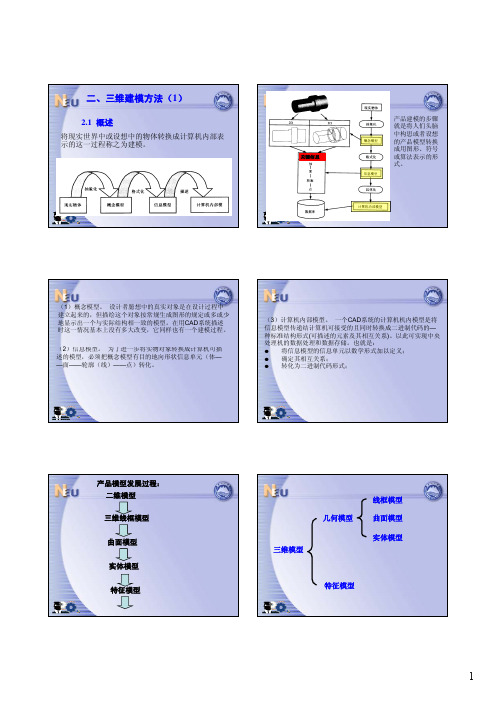
二、三维建模方法(1)
2.1 概述
将现实世界中或设想中的物体转换成计算机内部表 示的这一过程称之为建模。
关键信息
产品建模的步骤 就是将人们头脑 中构思或者设想 的产品模型转换 成用图形、符号 或算法表示的形 式。
ZBrush4R2基础入门教程技巧总结姬盛路整理

ZBrush-4R2基础入门教程-技巧总结-姬盛路整理好用的笔刷:move, clay, clay buildup, dam-standard;Move:用于调整大型,和初步的形体设计。
类似ps中的液化;Clay:与拓扑结构无关;Clay buildup:大体同clay,差异类似ps中笔刷的流量。
不送鼠标可持续绘制;Dam-standard:可以在低细分级别绘出清晰的挤出边缘,绘制眼皮。
可用来改变模型较软,较平滑的情况。
注意dynamesh分辨率64即可。
遮罩:按住Ctrl,鼠标在模型上刷取;模型之外看建立矩形遮罩。
Ctrl+Alt为减选遮罩。
Ctrl+单击,可翻转遮罩。
Ctrl+drag,取消遮罩。
保存:模型可保存为.ZPR[File-Save as]或者.ZTL[Tool-Save as]Ctrl+N:清除画布镜像:如果雕刻过程中,发现忘开对称,可通过-关比对称,将模型的一半进行遮罩,在Deformation-Smart ReSym。
每个细分级别均需镜像,可现在最低细分级别镜像,D-Smart ReSym-D-Smart ReSym直到最高细分。
最后别忘了重开对称。
快捷键:Ctrl+Alt单击笔刷,按下数字键1,即可设置快捷键成1. Preference-Hot Key-Store可保存快捷键。
用户界面:preference-Config-Enable Customize,Ctrl+Alt拖动图标到目标区域。
删除图标:Ctrl+Alt拖动图标到画布即可。
关闭Enable Customize-Store Config可保存设置。
Tool-layers:新建一个图层(有记录功能),非常类似ps中的快照。
Clay buildup笔刷:可在Brush-depth中改变值。
Alpha texture中设置alpha tile可改变笔触的拼贴数。
Tray-dynamic笔刷:压平笔刷。
也有polish brush,也用类似效果。