LiveUpdate Administrator Users Guide_CH
如何重新安装SEPM服务器端LiveUpdate更新组件
如何重新安装SEPM服务器端LiveUpdate更新组件此文作者:李洋(Young Li)发生环境:Windows XPWindows VistaWindows 7Windows Server 2003 / R2Windows Server 2008 / R2Windows Server 2012发生现象:SEP 客户端(仅限11.x版本)或SEPM服务器端的病毒定义中的一项或多项不能正常更新,并且重新尝试更新后无法解决并提示没有新定义。
原因:有可能下载的定义文件由于网络,断电等原因被损坏,从而使LiveUpdate组件无法修复。
解决办法:请按照以下的方法和截图重新安装LiveUpdate组件。
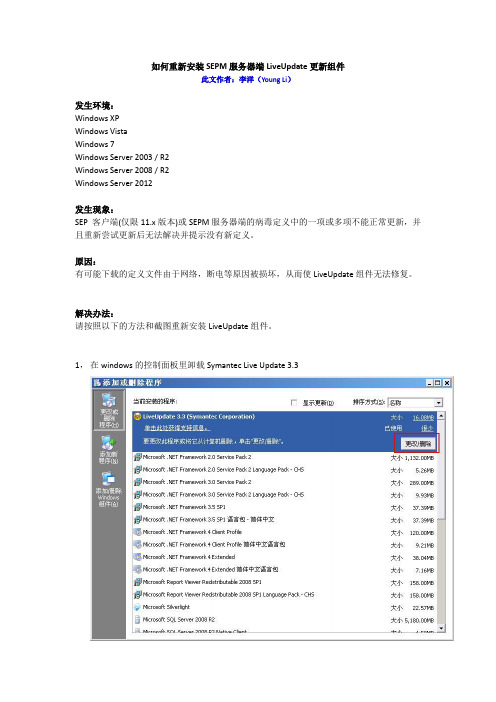
1,在windows的控制面板里卸载Symantec Live Update 3.32,删除残留的Live Update更新文件。
Windows server 2003下:SEPM 11.x 版本请删除以下目录和其中的内容:C:\Program Files\Symantec\LiveUpdate\SEPM 12.x 版本请删除以下目录和其中的内容:Windows server 2003下:C:\Documents and settings\All Users\Application Data\Symantec\LiveUpdate\Windows Server 2008 及以上(需要在文件夹选项中打开隐藏文件夹和系统保护的文件夹的显示,如下图):C:\ProgramData\Symantec\LiveUpdate3,重新安装Live Update 组件,这个组件的安装文件是在光盘中的SEPM下,叫LUSETUP.exe4,安装完成后,需要重新初始化Live Update的下载内容。
请启动命令提示行窗口(开始菜单-> 运行-> 输入cmd回车)cd到SEPM的安装目录中的bin下,例如:C:\Program Files\Symantec\Symantec Endpoint Protection Manager\bin\,注意如果目录中有空格,前后要加上引号,如下图5,执行以下2条命令,正确时不会有任何提示LuCatalog.exe -cleanupLuCatalog.exe -update6,手动更新Live Update 病毒库并完成:从控制面板中打开Symantec Live update7,打开后选择Interactive Mode交互模式(第1项)后,OK确定(如下图),同时将下面的错误支持等级从OFF(关闭)改成ENHANCED(增强)。
Storage Center 更新实用程序管理员指南说明书
Storage Center Update Utility Administrator’s GuideAbout This GuideThis guide describes how to update your storage system using the Storage Center Update Utility.The Storage Center Update Utility is used to update Storage Center series storage systems that cannot connect to the SupportAssist server. The Update Utility updates the Storage Center Operating System and firmware on any storage system running software version 6.6.5 or later.Revision HistoryDocument Number: 680-118-002Table 1. Document Revision HistoryRevision Date DescriptionA May 2016Initial release in support of Storage Center OS Version 7B April 2017Feature release to address distribution typesC March 2018Add Unisphere 2018 R1 informationD August 2019General updateAudienceThe information provided in this guide is intended for users who cannot use the SupportAssist functionality to perform Storage Center updates.Recovery of Storage Center software or system state is not possible without support assistance. Dell EMCContacting DellDell provides several online and telephone-based support and service options. Availability varies by country and product, and some services might not be available in your area.To contact Dell for sales, technical support, or customer service issues, go to /support.•For customized support, type your system service tag on the support page and click Submit.•For general support, browse the product list on the support page and select your product.Notes, Cautions, and WarningsA NOTE indicates important information that helps you make better use of your product.A CAUTION indicates either potential damage to hardware or loss of data and tells you how to avoid theA WARNING indicates a potential for property damage, personal injury, or death.© 2018 - 2019 Dell Inc. or its subsidiaries. All rights reserved. Dell, EMC, and other trademarks are trademarks of Dell Inc. or its subsidiaries. Other trademarks may be trademarks of their respective owners.2019 - 08Rev. D1 Storage Center Update Utility (5)Application Overview (5)Download the Storage Center Update Utility and Software Distro (5)Install the Storage Center Update Utility (5)Configure SupportAssist Settings (6)Configure SupportAssist Settings with Dell EMC Storage Manager (6)Configure SupportAssist Settings with Unisphere (7)Update Storage Center Software Using a Distro Directory (7)Update Storage Center Software Using a Distro File (8)Manage the Update Utility Information (9)4ContentsStorage Center Update UtilityApplication OverviewReview the following guidelines before downloading and installing the Storage Center Update Utility.Storage Center version 7 and later is managed using either the Dell EMC Storage Manager or Unisphere user Storage Manager Administrator’s Guide or the Unisphere and Unisphere .System RequirementsThe Storage Center Update Utility requires the following software versions.•Storage Center version 6.6.5 or later.•Windows 7, 8, and 8.1; Windows Server 2008 R2, and Windows Server 2012 R2.•.NET Framework version 4.5 or later.System PreparationThe inbound TCP port needs to be open to allow the Update Utility to serve updates. Use either of the following methods to open the inbound TCP port:•Open the inbound TCP port in the Windows firewall. The default port is 9005.•Open the inbound TCP port during the Storage Center Update Utility installation procedure by selecting the Automatically configure Windows Firewall to allow port traffic checkbox in the Preferences dialog box. See Install the Storage Center Update Utility .Download the Storage Center Update Utility and Software DistroYou will need both the Storage Center Update Utility and the software update distro to perform the software update.Steps1.Download the Storage Center Update Utility software from the Drivers and Downloads page of your product on /storagemanuals .2.Download the update distro.•For SCv2000 series, SCv3000 series, SC5020 series, and SC7020 series Storage Centers, download the update distro either from the Dell Digital Locker or using an FTP link provided by technical support •For CT-SC040, SC4020, SC8000, and SC9000, download the update distro using an FTP link provided by technical support.Install the Storage Center Update Utility Use this procedure to install the Storage Center Update Utility.PrerequisitesInstall the Update Utility on a computer that is on the same network as the Storage Center that you want to 1Storage Center Update Utility 5Steps1.To start the installation, double-click the ScuuSetup-1.xx.xx.xx.exe file.2.If prompted, allow the installation program to install the Update Utility.The Update Utility is installed in the C:\Program Files (x86)\Dell\Storage Center Update Utility\ directory and the Update Utility window opens when the installation is complete.The Preferences dialog box opens for new Update Utility installations.Figure 1. Storage Center Update Utility Preferences Dialog BoxSpecify the following information in the Preferences dialog box:•IP address on which the Update Utility listens for update requests. You can specify a specific address, or listen on all IP addresses.•Port through which the Update Utility communicates.Next stepsThe firewall must be disabled on the inbound TCP port to allow the Update Utility to provide updates to theConfigure SupportAssist SettingsTo allow the Storage Center Update Utility to communicate with the Storage Center and provide updates, connect to the Storage Center using either the Dell EMC Storage Manager or Unisphere and configure the SupportAssist settings.Configure SupportAssist Settings with Dell EMC Storage ManagerUse the Dell EMC Storage Manager to connect to the Storage Center and configure the SupportAssist settings.About this taskFor more information about using Storage Manager, refer to the Dell EMC Storage Manager Administrator’s.Steps1.If the Storage Manager Client is connected to a Data Collector, select a Storage Center from the Storage view.2.In the Summary tab, click Edit Settings.The Edit Storage Center Settings dialog box opens.6Storage Center Update Utility3.Click the SupportAssist tab.4.Disable SupportAssist. Click Turn Off SupportAssist.5.Under Configure Update Utility, select the Enabled checkbox.6.In the Update Utility Host or IP Address field, type the host name or IP address of the Storage Center Update Utility.7.In the Update Utility Port field, type the port of the Storage Center Update Utility. The default port is 9005.8.Click OK.Configure SupportAssist Settings with UnisphereUse Unisphere to connect to the Storage Center and configure the SupportAssist settings.About this taskFor more information about using Unisphere, refer to the Unisphere and Unisphere Central for SC Series.Steps1.If you are using Unisphere Central, select a Storage Center from the drop-down list in the left navigation pane.2.Click Summary.The Summary view is displayed.3.Click (Settings).The Storage Center Settings dialog box opens.4.Click the SupportAssist tab.5.Disable SupportAssist. Click Turn Off.6.Under Use Update Utility, select the Enabled checkbox.7.In the Update Utility Host or IP Address field, type the IP address of the Storage Center Update Utility.8.In the Update Utility Port field, type the port of the Storage Center Update Utility.9.Click OK.Update Storage Center Software Using a Distro DirectoryUse these instructions to update Storage Center software using a distro directory.PrerequisitesRecovery of Storage Center software or system state is not possible without assistance from technical About this taskFor more information about using Storage Manager or Unisphere, refer to the Dell EMC Storage Manageror the Unisphere and Unisphere Central for SC Series Version Administrator’s Guide,Steps1.Start the Update Utility.Storage Center Update Utility7Figure 2. Storage Center Update Utility2.Unzip the distro file to a folder on the computer, then click Distro Directory.The Browse For Folder dialog box opens.3.Select the folder that contains the distro files, then click OK.If Validate upgrade distro after selection is selected in the Preferences dialog box, the Update Utility displays a progress message on the main window while the distro is validated. If the distro is valid, the Start button turns green and the message Distro successfully validated displays in the Info pane.4.If Start serving distro for upgrade immediately after selection is selected in the Preferences dialog box, the hosting service isstarted automatically. If not, click Start.The Update Utility hosts the update to the Storage Center, that allows the Storage Center to download the update.5.(Optional) To stop the update service, click Stop.If any update sessions are in progress, a warning displays before the Update Utility stops the update service.6.After starting the Update Utility, connect to the Storage Center to be updated using Storage Manager or Unisphere.•Storage Manager – From the Storage view, select a Storage Center. (Data Collector connected Storage Manager only.)•Unisphere Central only – From the drop-down list in the left navigation pane, select a Storage Center.7.Check for updates.•Storage Manager – In the right pane, select Actions > System > Check for Update.•Unisphere/Unisphere Central – In the right pane, click (More Actions) and select Check for Update.The Update Storage Center dialog box opens and checks for an update.Update Storage Center Software Using a Distro FileUse these instructions to update Storage Center software using a distro ZIP file.PrerequisitesRecovery of Storage Center software or system state is not possible without assistance from technical About this taskFor more information about using Storage Manager or Unisphere, refer to the Dell EMC Storage Manageror the Unisphere and Unisphere Central for SC Series Version Administrator’s Guide,8Storage Center Update UtilitySteps1.Start the Update Utility.Figure 3. Storage Center Update Utility2.Click Distro File.3.Locate and select the distro ZIP file, then click Open.The Update Utility performs the following actions:•Update Utility extracts the ZIP file to the directory specified in the Preferences dialog box.•Update Utility opens the distro.•If Validate upgrade distro after selection is selected in the Preferences dialog box, the Update Utility displays a progress message on the main window while the distro is validated. If the distro is valid, the Start button turns green and the message Distro successfully validated displays in the Info pane.4.If Start serving distro for upgrade immediately after selection is selected in the Preferences dialog box, the hosting service isstarted automatically. If not, click Start.Update Utility now responds to update requests from Storage Centers.5.(Optional) To stop the update service, click Stop.If any update sessions are in progress, a warning displays before the Update Utility stops the update service.6.After starting the Update Utility, connect to the Storage Center to be updated using Storage Manager or Unisphere.•Storage Manager – From the Storage view, select a Storage Center. (Data Collector connected Storage Manager only.)•Unisphere Central only – From the drop-down list in the left navigation pane, select a Storage Center.7.Check for updates.•Storage Manager – In the right pane, select Actions > System > Check for Update.•Unisphere/Unisphere Central – In the right pane, click (More Actions) and select Check for Update.The Update Storage Center dialog box opens and checks for an update.Manage the Update Utility InformationConfigure the Update Utility to use with a different Storage Center and remove the data in the Info and Errors log panes.Steps1.Start the Update Utility.2.Update the options and settings in the Preferences dialog box.a)Select Tools > PreferencesThe Preferences dialog box opens.b)Specify new information in the IP address, port and directories fields.c)Clear or select different Update Utility instruction checkboxes.Storage Center Update Utility93.To delete the data in the Info log pane, select Tools > Clear Info Log Pane.The data is immediately deleted.4.To delete the data in the Errors log pane, select Tools > Clear Error Log Pane.The data is immediately deleted.10Storage Center Update Utility。
win7家庭版打开Adiminastrator
问题描述:Windows 7 家庭版如何启用Administrator账户问题分析:Windows7出于安全考虑,将(Administrator)超级管理员帐户隐藏了,不允许“普通用户”登录使用。
如果想登录Windows7超级管理员administrator 账户,必须首先启用这个超级管理员帐户。
Windows7专业版以上请参考知识库39121、39921和41642,Windows 7 家庭版无法通过以上方式开启Administrator账户,但可以通过其他方式开启该账户。
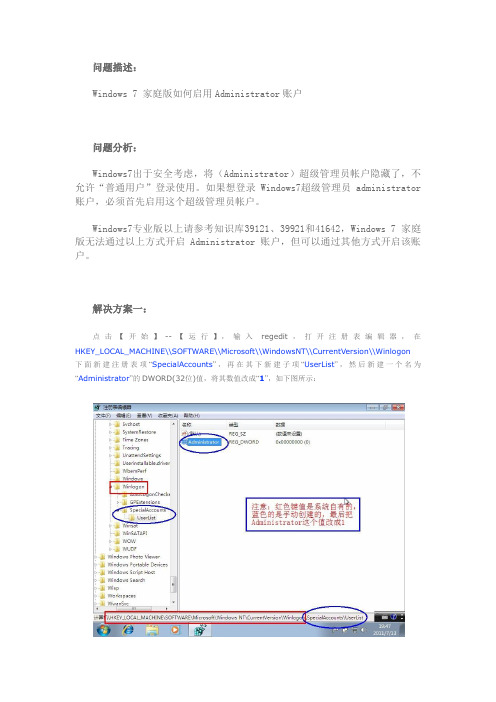
解决方案一:点击【开始】--【运行】,输入regedit,打开注册表编辑器,在HKEY_LOCAL_MACHINE\\SOFTWARE\\Microsoft\\WindowsNT\\CurrentVersion\\Winlogon下面新建注册表项“SpecialAccounts”,再在其下新建子项“UserList”,然后新建一个名为“Administrator”的DWORD(32位)值,将其数值改成“1”,如下图所示:待完成以上步骤后,以管理员模式运行命令提示符,输入net user administrator /active:yes,会提示命令成功完成,如下图:命令成功完成后,按Win+L切换用户或者重启电脑,即可看到已经成功启用了Administrator账户,如下图:解决方案二:直接把以下蓝色文字复制粘贴到记事本中,然后另存为一个后缀为bat格式的文件,在该文件上点右键,管理员模式运行即可直接启动超级管理员账户;也可以下载附件,管理员模式运行里面的“自动启用超级管理员账户.bat”即可@echo offclsecho.Windows Registry Editor Version 5.00>>c:\\administrator.reg echo.>>c:\\administrator.regecho.[HKEY_LOCAL_MACHINE\\SOFTWARE\\Microsoft\\Windows NT\\CurrentVersion\\Winlogon\\SpecialAccounts\\UserList]>>c:\\ad ministrator.regecho."Administrator"=dword:00000001>>c:\\administrator.reg echo.>>c:\\administrator.regreg import c:\\administrator.regdel c:\\administrator.regnet user administrator /active:yes exit附加文档1:自动启用超级管理员账户.rar安装或初始化windows7或vista的时候,系统让你输入管理员帐户名称。
windows更新提示某些设置由你的系统管理员管理的解决办法windows系统管理员

正常情况下,只有加入域的用户会遇到此提示。
如果只是个人用户,并没有加入过域,遇到此提示,应该是相关设置或者权限被修改了。
对此,我们可以尝试以下两种办法来解决这个问题:方法一:对于专业版及以上版本的系统,可以修改组策略来解决问题1、在开始搜索框中键入 gpedit.mc, 回车,打开组策略编辑器。
2、若弹出用户账户控制窗口,请允许以继续。
3、依次定位到下面位置:用户配置——管理模板——Window 组件——Window Update4、确认关于Window Update 的策略是否都是未配置的状态,如果不是,那么请将其改成未配置。
5、同理,定位到计算机配置——管理模板——Window 组件——Window Update,并确认关于Window Update 的策略都处于未配置的状态。
方法二:如果使用的家庭版的操作系统,可以稍稍修改一下注册表1、在键盘上按“Alt+R”调出运行命令框,键入 regedit.e某e,回车,打开注册表编辑器。
2、若弹出用户账户控制窗口,请允许以继续3、找到以下键值:HKEY_LOCAL_MACHINE/SOFTWARE/Policie/Microoft/Window/WindowUpdate提示:由于注册表修改不当可能会引起严重问题,因此最好在修改之前做好备份。
这样,如果问题没有得到解决,我们还可以将注册表进行还原。
现在,我们首先备份注册表键值WindowUpdate。
右击 WindowUpdate,选择“导出”。
4、文件名字您可以随意输入,如 WindowUpdate。
文件类型默认为“注册文件(某REG)”不要改动,保存位置选择“桌面”就行。
5、以后需要还原注册表时,到桌面上找到这个文件双击导入即可6、完成备份后,我们接下来就可以大胆修改注册表了。
依然选中键值WindowUpdate,右击,选择“删除”。
7、弹出确认窗口时,按“是”继续。
8、最后,退出注册表编辑器。
9、再次进入“控制面板->Window Update”,尝试更改 Window Update的设置,现在该可以自由设置了。
win8怎么修改用户名 Win8修改用户名与目录名的办法
win8怎么修改用户名Win8修改用户名与目录名的办法win8怎么修改用户名Win8修改用户名与目录名的办法点评:大家还记得win7下可以重命名账户名,但是在win8下貌似这功能没有了省略号怎么办呢,想改用户名的话需要把本地用户和windows live账户关联起来才行大家还记得win7下可以重命名账户名,但是在win8下貌似这功能没有了省略号怎么办呢,想改用户名的话需要把本地用户和windows live账户关联起来才行。
首先进入你的windows live页面,把显示姓名改成你想要的,在Setting里面的Change PC setting中的Users选项中的,switch to a windows live account,然后输入你的windows live的登录用户名和密码就OK了。
记得以后登录用widnows live ID的密码,如果windows live更改密码的话windows也会更改密码……假如windows live更改密码而windows没有联网那么windows将会按照上次的密码进行登录。
如果你还要更改目录的名字,那么就按照下面的办法:在Computer上右击,选择Manager,在Local Users and Groups里的Users选项卡中找到Administrator,双击,勾掉Account is disabled,然后重启一下,登录Administrator。
在Administrator用户中打开C盘下的Uesr文件夹,把原来的目录rename一下。
按win+R快捷键打开运行窗口,输入regedit,打开注册表编辑器打开,HKEY_LOCAL_MACHINE\SOFTWARE\Microsoft\Windows NT\CurrentVersion\Profilelist 在里面的一个子键中有ProfileImagePath键,把路径改成你的用户名就OK。
Liveupdate安装配置手册
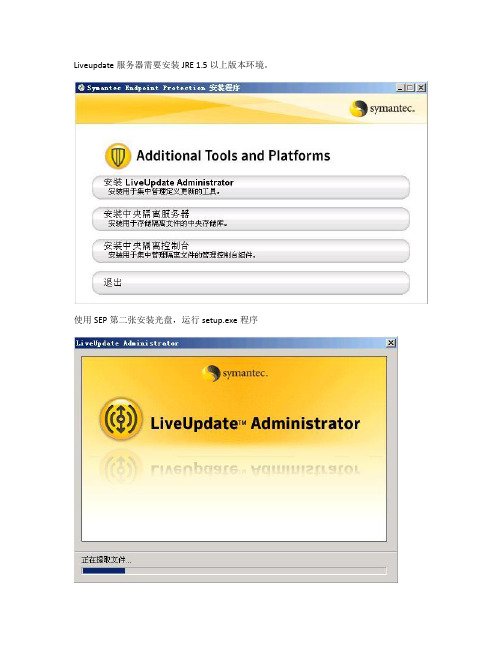
Liveupdate服务器需要安装JRE 1.5以上版本环境。
使用SEP第二张安装光盘,运行setup.exe程序选择安装程序安装目录选择Liveupdate下载更新保存的目录输入系统用户名、密码,此为系统登录帐号密码。
安装完成远程登录访问地址: http://IP_address_of_LUA_computer:8080/lua将 Symantec 更新从外部 Symantec 站点下载到内部 Symantec LiveUpdate Administrator 服务器。
您可以选择从该服务器将更新立即发送到生产分发中心以供 LiveUpdate 客户端下载,或者发送到测试中心来进行测试。
一旦更新通过测试,即可按照您设定的调度将其发送到生产中心。
首先选择更新下载的产品。
建议选择SEP 11中文、英文和SNAC 11 中文、英文这四项。
Liveupdate服务器,则需要添加源服务器通过主Liveupdate服务器升级。
Liveupdate服务器默认会建立两个分发中心,一个测试分发中心,一个生产分发中心,这两个地址会提供客户端下载。
http://IP:8080/clu-prod和http://ip:8080/clu-test在“下载和分发”页面中设置“添加下载调度”,选择下载的产品。
选择调度时间,测试状态建议选择“跳过测试”。
分发”页面中选择“添加分发调度”,选择分发的产品。
设置分发调度的时间,以及下载的内容更新是分发到“测试中心”或者“生产中心”。
Liveupdate服务器建好后需要在SEPM控制台中配置客户端通过Liveupdate服务器进行升级。
“测试中心”的地址。
bmr配置说明
BMR配置手册1. 配置bmr main 服务器登入master server,双击[Bare Metal Restore – Master Server Setup] 配置bmr main server第一次安装系统自动创建bmr相关的database点击[下一步]点击[下一步],完成对于bmr数据库和bmr main server配置2. 安装配置 boot server for windows 点击windows的介质, [Launch.bat]点击 [Additional Products]点击[BMR Boot Server]进行安装点击 [Next]进行安装点击 [完成],完成对于boot server的安装安装完成后,确定bmr server启动完成C:\Program Files\Veritas\NetBackup\bin>bmrsetupbootC:\Program Files\Veritas\NetBackup\bin>通过以上命令进行启动在master server上查看点击[nbusrv]- -[bare metal restore management]-[hosts]-[boot server] 查看已经安装的boot server3. 安装配置boot server for aix systemAix boot server介质在 Unix options 中Aix setup boot server# ./install**********Installing NetBackup Bare Metal Restore Boot ServerDo you wish to continue? [y,n] (y)NOTE: A license key for NetBackup Bare Metal Restore Boot Serverwill be required on the master server in order for itto function properly.Installing NetBackup Bare Metal Restore Boot ServerDo you want to install NetBackup Bare Metal Restore Boot Server for rs6000? [y,n] (y)NetBackup Bare Metal Restore Boot Server will be installed in/usr/openv/netbackup/baremetal/server/dataand /usr/openv/netbackup/bin.x usr/openv/netbackup/bin/bmrbd, 15445964 bytes, 30168 tape blocksx usr/openv/netbackup/bin/bmrsetupboot, 15158488 bytes, 29607 tape blocksx usr/openv/netbackup/bin/bmrsrtadm, 15959956 bytes, 31172 tape blocksx usr/openv/netbackup/bin/install_bmrboot, 4074 bytes, 8 tape blocksx usr/openv/netbackup/bin/mkfifo, 12408 bytes, 25 tape blocksx usr/openv/netbackup/bin/mkisofs, 885545 bytes, 1730 tape blocksx usr/openv/netbackup/bin/rc.bmrbd, 2564 bytes, 6 tape blocksx usr/openv/share/version_bmrboot, 29 bytes, 1 tape blocksStarting the NetBackup Bare Metal Restore Boot Server daemon.usage: lscfg [-vps] [-l Name ]LiveUpdate is not installed, skipping registration step...Please refer to the NetBackup Bare Metal RestoreAdministrator's Guide for complete details on use andconfiguration of NetBackup Bare Metal Restore Boot Server.NetBackup Bare Metal Restore Boot Server installation completed.**********Execution of ./install is complete.File /usr/openv/tmp/install_addon_trace.250360 contains a trace of this install. #在master server上查看点击[nbusrv]- -[bare metal restore management]-[hosts]-[boot server] 查看已经安装的boot server点击[Bare Metal Restore – Boot server Assistant]进入配置界面点击第一选项[share resource Tree administration winzard]点击[下一步]5 . Aix 配置srt资源5.1 创建新的srt资源/usr/openv/netbackup/bin/bmrsrtadmSelect one of the following options:1. Create a new Shared Resource Tree.2. Create a new CD image based Shared Resource Tree.3. Copy an existing Shared Resource Tree to a new location.4. Import a Shared Resource Tree.5. Modify an existing Shared Resource Tree.6. Delete an existing Shared Resource Tree.7. List Shared Resource Trees available on this server.8. Quit.Enter your selection (1-8) [1] : 1Enter the name of the SRT to create : aix5371Enter the description of the new SRT : aix5371Enter desired OS level of AIX (5.1, 5.2 or 5.3) [5.3] :Enter the directory in which to place the new SRT [/archlog/AIX_server/srt] : Source of AIX install images [/dev/cd0] :[Info] V-125-202 Installing AIX OS filesets.rpm.rte 3.0.5.42 USR APPLY SUCCESS rpm.rte 3.0.5.42 ROOT APPLY SUCCESS devices.pci.14105300.rte 5.3.7.0 USR APPLY SUCCESS devices.pci.14105300.rte 5.3.7.0 ROOT APPLY SUCCESS devices.msg.en_mon.IB 1.2.0.1 USR APPLY SUCCESS devices.msg.en_mon.IB 1.2.0.0 USR APPLY SUCCESS devices.msg.en_US.chrp.IBM. 1.2.0.0 USR APPLY SUCCESS devices.msg.en_US.chrp.IBM. 1.2.0.0 USR APPLY SUCCESS mon.IBM.sni.rte 1.2.0.10 USR APPLY SUCCESS mon.IBM.sni.rte 1.2.0.10 ROOT APPLY SUCCESS devices.chrp.base.ServiceRM 1.3.0.80 USR APPLY SUCCESS devices.chrp.base.ServiceRM 1.3.0.80 ROOT APPLY SUCCESS devices.chrp.IBM.HPS.rte 1.2.0.11 USR APPLY SUCCESS devices.chrp.IBM.HPS.rte 1.2.0.11 ROOT APPLY SUCCESS devices.msg.en_US.chrp.IBM. 1.2.0.2 USR APPLY SUCCESS开始复制os的系统文件.installp: * * * A T T E N T I O N ! ! !Software changes processed during this session requireany diskless/dataless clients to which this SPOT iscurrently allocated to be rebooted.Preparing boot files - please stand by...Enter the source of the Veritas NetBackup install images.Specify a device name or an NFS path (host:/path form), or a local directory [/archlog/AIX_server/client/NBClients/anb/Clients/usr/openv/netbackup/client/RS 6000/AIX5] : /archlog/AIX_server/client/(netbackup client的安装文件install的位置)Symantec Installation ScriptCopyright 1993 - 2007 Symantec Corporation, All Rights Reserved.Installing NetBackup Client SoftwareNOTE: To install NetBackup Server software, insert the appropriateNetBackup Server cdrom.Do you wish to continue? [y,n] (y)Do you want to install the NetBackup client software for this client? [y,n] (y) This package will install RS6000/AIX5 client.This package will install NetBackup client 6.5.Enter the name of the NetBackup server : nbusrvWould you like to use "restoredb" as the configuredname of the NetBackup client? [y,n] (y)x openvx openv/libx openv/lib/libvxSigScheduleJNI2.so, 2542212 bytes, 4966 tape blocksx openv/lib/libVmangle.so, 18654 bytes, 37 tape blocksx openv/lib/libVnbatST.so_new, 278530 bytes, 545 tape blocksx openv/lib/libVnbat.so, 487649 bytes, 953 tape blocksx openv/lib/libVnbatST64.so_new, 16488 bytes, 33 tape blocksx openv/lib/libVnbat64.so, 16488 bytes, 33 tape blocksx openv/lib/libnbmangleMT.so, 2548589 bytes, 4978 tape blocksx openv/lib/libVcvcomb.so, 662872 bytes, 1295 tape blocksx openv/lib/libVcvcombMT.so, 661019 bytes, 1292 tape blocksx openv/lib/libVxSS_helper.so_new, 942126 bytes, 1841 tape blocksx openv/lib/libVxSS_helperMT.so, 1143035 bytes, 2233 tape blocksx openv/lib/libVcvcomb_noul.so, 595679 bytes, 1164 tape blocksx openv/lib/libVcvcomb64.so, 674219 bytes, 1317 tape blocksx openv/lib/libVcvcombMT64.so, 664499 bytes, 1298 tape blocksx openv/lib/libVxSS_helper64.so_new, 719482 bytes, 1406 tape blocksx openv/lib/libVxSS_helperMT64.so, 705108 bytes, 1378 tape blocksx openv/lib/libVcvcomb64_noul.so, 673592 bytes, 1316 tape blocksx openv/lib/libvnoauth.so_new, 221240 bytes, 433 tape blocksx openv/lib/libvnoauth64.so_new, 247693 bytes, 484 tape blocksx openv/lib/libvopie.so_new, 750392 bytes, 1466 tape blocks开始复制netbackup client的文件File /usr/openv/tmp/install_trace.848358 contains a trace of this install.That file can be deleted after you are sure the install was successful.[Info] V-125-668 SRT "aix5371" has been initialized successfully.------------------------------------------------------------------------------ SRT name: aix5371Location: /usr/openv/netbackup/srt/aix5371Description: aix5371Exclusive use: (none)------------------------------------------------------------------------------You may make modifications to this SRT.Select one of the following options:1. Install Veritas NetBackup Maintenance Pack.2. Install Veritas Volume Manager and Veritas File System.3. Update Veritas Volume Manager and Veritas File System.4. Install Veritas Security Services.5. Install maintenance levels (MLs) OR additional filesets.6. Change SRT description.7. Change client exclusive use of this SRT.8. Quit.Enter your selection (1-8) [8] :[Info] V-125-669 SRT "aix5371" has been created successfully.[创建srt 的说明]创建 AIX SRT 时,将出现以下提示。
LiveBackup Client使用指南
Live Backup 如何保护您的数据 . . . . . . . . . . . . . . . . . . . . . . . . . . . . . . . . . . . . 6 保护断开连接的计算机上的数据 . . . . . . . . . . . . . . . . . . . . . . . . . . . . . . . . 6 Live Backup 在做什么——任务托盘 . . . . . . . . . . . . . . . . . . . . . . . . . . . . . 7
Atempo 保留未经通知定期修改此文档的所有权利。未经 Atempo 明确书面许可, 不得以任何方式复制或传输本指南的任何部分或将其用于任何用途。
Atempo、 Atempo 徽标和 Atempo Live Backup 是 Atempo 的注册商标。
本指南中提及的所有品牌或产品名称均为其各自公司或组织的商标或注册商标。
恢复丢失的文件 . . . . . . . . . . . . . . . . . . . . . . . . . . . . . . 29
需要记住的有关文件恢复的事项 . . . . . . . . . . . . . . . . . . . . . . . . . . . . . . . . . . 30 使用恢复助手恢复单个文件 . . . . . . . . . . . . . . . . . . . . . . . . . . . . . . . . . . . . . . 31 使用恢复助手恢复多个文件 . . . . . . . . . . . . . . . . . . . . . . . . . . . . . . . . . . . . . . 36 从 Windows 资源管理器恢复文件 . . . . . . . . . . . . . . . . . . . . . . . . . . . . . . . . . 44
SEP LiveUpdate Adminstrator配置手册
LiveUpdate Adminstrator配置手册
第一种模式: LUA 从Symantec官网LiveUpdate服务器下载更新. 1.登陆LUA控制台
图1
2.添加Symantec Endpoint Protecton v11.0
图2
3. 查看源更新服务器
图3
4.选中源更新服务器后点上图中的“编辑”后查看具体设置,最后测试连通性,如下图,:
图4
5.查看分发中心(注意:分发中心分生产和测试)
图5
6.编辑分发中心(生产),注意要在下面添加产品,如下图
图6
7. 选中上图分发中心(生产)的“编辑”,作具体设置,如下图:
图7
8. 分发中心(测试)的设置与生产大致相同,根目录应设为clu-test
9.创建下载和分发的调度
10.下载调度具体配置
11. 分发调度具体配置
第二种模式:LUA 从内部的另外一台LUA服务器下载更新.
1.添加内部另一台LUA服务器发布出来的更新包的目录.
(注: 在IE中输入http:// IP:端口号/clu-prod 即可浏览更新目录)
2.输入源服务器(即另一台LUA服务器)的IP、根目录,然后测试是否可以连接成功!
3.上一步已将源服务器配好,从这步开始分发填写的主机名都是当前服务器的,如下图:
4.接下来的其它配置和第一种模式是一样的.
SEPM和SEP客户端更新源设置
1.若SEPM服务器不能上外网,可设置为从内部LUA来更新(注意:这里的设置只是指定SEP服务器的更新源,与客户端无关节),如下图:
在LiveUpdate策略中设置让客户端直接从内部LUA上取得更新,而不通过SEPM更新。
win7系统administrator用户提示没有管理员权限造装驱动安装错误软件无法使用
win7系统administrator用户提示没有管理员权限造装驱动安装错误软件无法使用当Win7系统的administrator用户提示没有管理员权限时,会影响到装驱动安装错误以及软件无法使用。
在这种情况下,有一些解决方法可以帮助您解决这个问题。
首先,您可以尝试通过以下步骤来解决该问题:1. 确认是否处于管理员模式:在Win7系统中,有时需要以管理员身份登录才能获得管理员权限。
您可以右击计算机桌面上的“计算机”图标,然后选择“管理”选项。
在弹出的窗口中,点击“本地用户和组”>“用户”,找到“Administrator”用户,并确保其状态为启用。
如果不是,请右键单击并选择“启用”。
2. 设置UAC(User Account Control):UAC是Windows操作系统的安全功能之一,可以帮助防止未经授权的更改。
如果administrator用户提示没有管理员权限,可以尝试调整UAC的设置。
您可以打开“控制面板”,然后选择“用户帐户”>“更改用户帐户控制设置”。
将滑块移至“从不通知”或“仅在通知我更改的时候保护我”位置,并点击“确定”。
3. 使用管理员权限运行程序:在一些情况下,即使以管理员身份登录,仍然可能需要以管理员权限运行一些程序才能正常使用。
您可以右键单击要运行的程序快捷方式或安装程序,并选择“以管理员身份运行”选项。
如果没有此选项,请进入程序所在文件夹(通常是“C:\Program Files”或“C:\Program Files (x86)”),找到程序的可执行文件,右键单击它并选择“以管理员身份运行”。
5. 重新创建administrator用户:如果以上步骤都无效,可以尝试重新创建administrator用户。
您可以进入“控制面板”>“用户帐户”>“管理其他帐户”,然后选择“创建新帐户”。
按照向导的指示创建一个新的administrator用户,并登录该用户,查看是否还存在管理员权限问题。
- 1、下载文档前请自行甄别文档内容的完整性,平台不提供额外的编辑、内容补充、找答案等附加服务。
- 2、"仅部分预览"的文档,不可在线预览部分如存在完整性等问题,可反馈申请退款(可完整预览的文档不适用该条件!)。
- 3、如文档侵犯您的权益,请联系客服反馈,我们会尽快为您处理(人工客服工作时间:9:00-18:30)。
Symantec™ LiveUpdate™Administrator 2.3.3 安裝操作指南Symantec LiveUpdate Administrator 2.3.3 安裝操作指南說明文件版本:1版權聲明Copyright © 2014 Symantec Corporation. 版權 © 2014 賽門鐵克公司。
All rights reserved. 版權所有。
Symantec、Symantec 標誌及勾選記號標誌均為賽門鐵克或其附屬公司在美國及其他國家的商標或註冊商標。
其他名稱可能為其個別所有者的商標。
本賽門鐵克產品可能包含第三方軟體(以下稱為「第三方程式」),賽門鐵克在此聲明其所有權歸第三方所有。
部分第三方程式係採開放原始碼或免費軟體授權方式取得。
本軟體隨附之授權許可協議並未改變依開放原始碼或免費軟體授權所規定之任何權利或義務。
請參閱本說明文件之「第三方版權聲明附錄」或本賽門鐵克產品隨附之讀我檔,以取得第三方程式相關資訊。
本文件中所述產品的派送受到授權許可協議的規範,限制其使用、複製、派送及解譯/逆向工程。
未事先獲得賽門鐵克公司及其授權者 (如果有) 的書面授權,本產品的任何部分均不得以任何方式、任何形式複製。
本文件完全依「現狀」提供,不做任何所有明示或暗示的條件、聲明及保證,其中包含在任何特定用途之適售性與適用性的暗示保證、任何特定用途或不侵害他人權益,除了此棄權聲明認定的不合法部分以外。
賽門鐵克公司對與提供之效能相關的意外或必然損害,或這份說明文件的使用,不負任何責任。
本說明文件所包含的資訊若有變更,恕不另行通知。
根據 FAR 12.212 定義,本授權軟體和文件係「商業電腦軟體」,應遵守 FAR 第 52.227-19節「商業電腦軟體限制權利」和 DFARS 第 227.7202 節「商業電腦軟體或商業電腦軟體文件權利」中的適用法規,以及所有後續法規中定義的限制權利。
美國政府僅可根據此協議條款對授權許可的軟體和文件進行任何使用、變更、複製發行、履行、顯示或披露。
Symantec Corporation350Ellis StreetMountain View,CA94043技術支援「賽門鐵克技術支援」維護全球的支援中心。
「技術支援」的主要角色是回應有關產品特性與功能的特定查詢。
「技術支援」小組亦負責編寫線上「知識庫」。
「技術支援」小組會與賽門鐵克的其他部門協力合作,以期在極短的時間內回答您的問題。
例如,「技術支援」小組會與「產品工程」以及「賽門鐵克安全機制應變中心」合作,提供警示服務及病毒定義檔更新。
賽門鐵克的維護工作,包含下列項目:■廣泛的支援選項,讓您在面對任何規模的組織時都能彈性選取正確的服務量■電話和網路支援,提供迅速回應和最新資訊■升級保證,可傳遞軟體升級■全年無休的全球支援■進階功能,包括了「專案管理服務」如需關於賽門鐵克維護服務方案的詳細資訊,您可以造訪我們的網站,網址為:/zh/tw/support/index.jsp聯絡技術支援具有現行維護服務合約的客戶,可以透過下列網址存取「技術支援」資訊:/zh/tw/support/index.jsp在聯絡「技術支援」前,請確認是否符合列示於產品文件中的系統要求。
另外,您應位於發生問題的電腦前,以防需要重新建立問題。
在聯絡「技術支援」時,請準備好以下資訊:■產品版次■硬體資訊■可用的記憶體、磁碟空間和 NIC 資訊■作業系統■版本和修正程式等級■網路拓樸■路由器、閘道和 IP 位址資訊■問題說明:■錯誤訊息和日誌檔■在聯絡賽門鐵克前所執行的疑難排解■最新的軟體架構變更及網路變更授權與註冊如果您的賽門鐵克產品需要註冊或授權碼,請存取我們的技術支援網頁,網址為:https:///acctmgmt/index.jsp?localeStr=zh_TW客戶服務您可以在下列網址取得客戶服務資訊:/zh/tw/support/index.jsp您可以使用「客戶服務」來協助解決一些非技術性問題,例如下面這些問題:■產品授權或序列化等相關問題■產品註冊更新,如地址或姓名變更■一般產品資訊 (功能、可用的語言、當地代理商)■產品更新及升級的最新資訊■升級保證與維護合約的相關資訊■與賽門鐵克採購計畫相關的資訊■對賽門鐵克技術支援選項的相關建議■非技術性的預售問題■與光碟或手冊相關的問題維護合約資源如果您要與賽門鐵克聯絡和現有維護合約相關的事項,請聯絡您所在地區的維護合約管理小組,聯絡資訊如下:國家/地區銷售熱線電子郵件中國大陸China-Sales@800810882600801611391台灣Taiwan-Sales@中國香港特別行政區HongKong-Sales@800963421技術支援 (3)第 1 章LiveUpdate 管理員簡介 (7)關於 LiveUpdate 管理員 (7)LiveUpdate Administrator 2.3.3 的新增功能 (8)取得 LiveUpdate Administrator 詳細資訊的位置 (9)第 2 章安裝與執行 LiveUpdate 管理員 (10)安裝之前 (10)LiveUpdate 管理員的系統需求 (11)安裝 LiveUpdate 管理員 (13)移除 LiveUpdate Administrator (14)登入 LiveUpdate 管理員 (14)遠端連線到 LiveUpdate 管理員 (15)第 3 章設定 LiveUpdate 管理員 (16)LiveUpdate 管理員入門指南 (16)您可以從 LiveUpdate 管理員首頁執行的工作 (18)關於 LiveUpdate 管理員圖示 (18)更新賽門鐵克產品目錄 (19)將賽門鐵克產品新增到產品清單 (19)架構來源伺服器 (20)使用容錯移轉伺服器 (21)新增派送中心 (22)建立主機檔供 LiveUpdate 用戶端接收更新 (23)第 4 章管理下載和派送排程 (25)排程下載 (25)在完成下載之後自動執行派送排程 (27)排程派送 (27)檢視下載工作和派送工作 (28)第 5 章架構 LiveUpdate 管理員 (29)架構 LiveUpdate 管理員偏好 (29)管理產品更新 (30)刪除修訂版次 (31)鎖定和解除鎖定修訂版次 (31)新增或修改使用者帳戶 (33)強制使用者登出「LiveUpdate 管理員」 (34)備份和還原 LiveUpdate 管理員架構 (34)提升「LiveUpdate 管理員」安全性的最佳實務 (37)第 6 章檢視事件和疑難排解資訊 (38)檢視事件日誌中的資訊 (38)關於疑難排解檔案 (38)產生疑難排解檔案 (39)索引 (406)目錄1LiveUpdate 管理員簡介本章包含以下主題:■關於 LiveUpdate 管理員■LiveUpdate Administrator 2.3.3 的新增功能■取得 LiveUpdate Administrator 詳細資訊的位置關於 LiveUpdate 管理員Symantec LiveUpdate Administrator 是一個企業 Web 應用程式,可讓您在多部內部 LiveUpdate 伺服器上管理賽門鐵克更新。
您可以將更新從外部網站下載到內部「LiveUpdate 管理員」伺服器,稱為「派送中心」。
您可以將更新立即傳送至生產派送中心以供 LiveUpdate 用戶端下載,或是傳送至測試中心,以便您可以測試更新。
在更新通過您的測試要求之後,它們將傳送至生產派送中心。
您可以依照排程派送更新,讓您建立不需太多維護的可靠系統,只要設定一次,之後就自動執行。
也可以視需要手動下載和派送更新。
圖 1-1說明典型的「LiveUpdate 管理員」環境。
圖 1-1Symantec LiveUpdate Administrator 環境賽門鐵克來源伺服器Symantec LiveUpdateAdministrator 運作型派送中心測試派送中心位置位置123123LiveUpdate用戶端LiveUpdate Administrator 2.3.3 的新增功能「LiveUpdate 管理員」包含下列新功能和增強功能:表 1-1LiveUpdate Administrator 2.3.3 的新增功能優點功能■您可以從 2.2.2.9 到 2.3.2 升級到 2.3.3。
■LiveUpdate 與 Apache Tomcat 7.0.54 版和 PostgreSQL 9.3.1 版封裝在一起。
請參閱第 11 頁的「LiveUpdate 管理員的系統需求」。
系統需求安裝「LiveUpdate 管理員」時,安裝資料夾、暫存資料夾和下載資料夾不得為空白。
此外,根磁碟機 (如 C:\ 或 D:\) 也必須使用不包含其他檔案的子資料夾。
子資料夾應使用本機路徑,因為不允許使用網路路徑。
安裝變更「LiveUpdate 管理員」現在將從「賽門鐵克產品目錄」和「派送中心」移除不受支援的舊版產品。
在賽門鐵克不再支援特定版本之後,「LiveUpdate 管理員」會根據清除排程移除較舊版本以取得更新。
您可以在「架構」>「偏好」標籤上變更清除排程。
請參閱第 29 頁的「架構 LiveUpdate 管理員偏好」。
請參閱第 19 頁的「更新賽門鐵克產品目錄」。
從「賽門鐵克產品目錄」移除舊產品版本LiveUpdate Administrator 2.3.3 的新增功能取得 LiveUpdate Administrator 詳細資訊的位置功能優點「LiveUpdate 管理員」內的 URL 現在使用 HTTPS 通訊協定,而非 HTTP 通訊協定。
使用 HTTPS 通訊協定HTTPS 較 HTTP 更為安全,後者容易遭受竊聽攻擊,會讓攻擊者可以存取網站帳戶和機密資訊。
密碼需求為提升安全性,所有用於登入「LiveUpdate 管理員」的管理員密碼最少必須有 8 個字元,且必須是英數字元,並包括一個特殊字元。
您可以在「偏好」頁面上增加必要的字元數下限。
請參閱第 29 頁的「架構 LiveUpdate 管理員偏好」。
請參閱第 33 頁的「新增或修改使用者帳戶」。
匯入架構檔若要將「LiveUpdate 管理員」架構從舊版還原到 2.3.3,請勿匯出復原備份檔再匯入它。
請匯入您從其他兩個備份檔所建立的壓縮檔,而不是匯出再匯入復原備份檔。
請參閱第 34 頁的「備份和還原 LiveUpdate 管理員架構」。
取得 LiveUpdate Administrator 詳細資訊的位置賽門鐵克網站會定期更新 LiveUpdate Administrator 的相關資訊。