SR配置规范
JuniperSR防火墙简明配置手册

Juniper SRX防火墙简明配置手册卞同超Juniper 服务工程师Juniper Networks, Inc.北京市东城区东长安街1号东方经贸城西三办公室15层1508室邮编:100738电话:目录Juniper SRX防火墙简明配置手册SRX系列防火墙是Juniper公司基于JUNOS操作系统的安全系列产品,JUNOS集成了路由、交换、安全性和一系列丰富的网络服务;目前Juniper公司的全系列路由器产品、交换机产品和SRX安全产品均采用统一源代码的JUNOS操作系统,JUNOS是全球首款将转发与控制功能相隔离,并采用模块化软件架构的网络操作系统;JUNOS作为电信级产品的精髓是Juniper真正成功的基石,它让企业级产品同样具有电信级的不间断运营特性,更好的安全性和管理特性,JUNOS软件创新的分布式架构为高性能、高可用、高可扩展的网络奠定了基础;基于NP架构的SRX系列产品产品同时提供性能优异的防火墙、NAT、IPSEC、IPS、SSL VPN和UTM等全系列安全功能,其安全功能主要来源于已被广泛证明的ScreenOS操作系统;本文旨在为熟悉Netscreen防火墙ScreenOS操作系统的工程师提供SRX防火墙参考配置,以便于大家能够快速部署和维护SRX防火墙,文档介绍JUNOS操作系统,并参考ScreenOS配置介绍SRX防火墙配置方法,最后对SRX防火墙常规操作与维护做简要说明;一、JUNOS操作系统介绍层次化配置结构JUNOS采用基于FreeBSD内核的软件模块化操作系统,支持CLI命令行和WEBUI两种接口配置方式,本文主要对CLI命令行方式进行配置说明;JUNOS CLI使用层次化配置结构,分为操作operational和配置configure两类模式,在操作模式下可对当前配置、设备运行状态、路由及会话表等状态进行查看及设备运维操作,并通过执行config或edit命令进入配置模式,在配置模式下可对各相关模块进行配置并能够执行操作模式下的所有命令run;在配置模式下JUNOS采用分层分级模块下配置结构,如下图所示,edit命令进入下一级配置类似unix cd命令,exit命令退回上一级,top命令回到根级;JunOS配置管理JUNOS通过set语句进行配置,配置输入后并不会立即生效,而是作为候选配置Candidate Config等待管理员提交确认,管理员通过输入commit命令来提交配置,配置内容在通过SRX语法检查后才会生效,一旦commit通过后当前配置即成为有效配置Active config;另外,JUNOS允许执行commit命令时要求管理员对提交的配置进行两次确认,如执行commit confirmed 2命令要求管理员必须在输入此命令后2分钟内再次输入commit以确认提交,否则2分钟后配置将自动回退,这样可以避免远程配置变更时管理员失去对SRX的远程连接风险;在执行commit命令前可通过配置模式下show命令查看当前候选配置Candidate Config,在执行commit后配置模式下可通过run show config命令查看当前有效配置Active config;此外可通过执行show | compare比对候选配置和有效配置的差异;SRX上由于配备大容量硬盘存储器,缺省按先后commit顺序自动保存50份有效配置,并可通过执行rolback和commit命令返回到以前配置如rollback 0/commit可返回到前一commit配置;也可以直接通过执行save 手动保存当前配置,并执行load override / commit调用前期手动保存的配置;执行load factory-default / commit命令可恢复到出厂缺省配置;SRX可对模块化配置进行功能关闭与激活,如执行deactivate security nat/comit命令可使NAT 相关配置不生效,并可通过执行activate security nat/commit使NAT配置再次生效;SRX通过set语句来配置防火墙,通过delete语句来删除配置,如delete security nat和edit security nat / delete一样,均可删除security防火墙层级下所有NAT相关配置,删除配置和ScreenOS不同,配置过程中需加以留意;SRX主要配置内容部署SRX防火墙主要有以下几个方面需要进行配置:System:主要是系统级内容配置,如主机名、管理员账号口令及权限、时钟时区、Syslog、SNMP、系统级开放的远程管理服务如telnet等内容;Interface:接口相关配置内容;Security:是SRX防火墙的主要配置内容,安全相关部分内容全部在Security层级下完成配置,如NAT、Zone、Policy、Address-book、Ipsec、Screen、Idp等,可简单理解为ScreenOS防火墙安全相关内容都迁移至此配置层次下,除了Application自定义服务;Application:自定义服务单独在此进行配置,配置内容与ScreenOS基本一致;routing-options:配置静态路由或router-id等系统全局路由属性配置;二、SRX防火墙配置对照说明初始安装2.1.1 登陆Console口通用超级终端缺省配置连接SRX,root用户登陆,密码为空login: rootPassword:--- JUNOS built 2009-07-16 15:04:30 UTCroot% cli /进入操作模式/root>root> configureEntering configuration mode /进入配置模式/editRoot2.1.2 设置root用户口令设置root用户口令root set system root-authentication plain-text-passwordroot new password : root123root retype new password: root123密码将以密文方式显示root show system root-authenticationencrypted-password "$1$xavDeUe6$"; SECRET-DATA注意:强烈建议不要使用其它加密选项来加密root和其它user口令如encrypted-password加密方式,此配置参数要求输入的口令应是经加密算法加密后的字符串,采用这种加密方式手工输入时存在密码无法通过验证风险;注:root用户仅用于console连接本地管理SRX,不能通过远程登陆管理SRX,必须成功设置root 口令后,才能执行commit提交后续配置命令;2.1.3 设置远程登陆管理用户root set system login user lab class super-user authentication plain-text-password root new password : lab123root retype new password: lab123注:此lab用户拥有超级管理员权限,可用于console和远程管理访问,另也可自行灵活定义其它不同管理权限用户;2.1.4 远程管理SRX相关配置run set date /设置系统时钟/set system time-zone Asia/Shanghai/设置时区为上海/set system host-name SRX3400-A/设置主机名/set system name-server 1.1.1.1 /设置DNS服务器/set system services ftpset system services telnetset system services web-management http/在系统级开启ftp/telnet/http远程接入管理服务/set interfaces ge-0/0/ family inet address 10.1.1.1/24或set interfaces ge-0/0/0 unit 0 family inet address 10.1.1.1/24set interfaces ge-0/0/1 unit 0 family inet address 10.1.2.1/24set routing-options static route 0.0.0.0/0 p 10.1.1/配置逻辑接口地址及缺省路由,SRX接口要求IP地址必须配置在逻辑接口下类似ScreenOS的子接口,通常使用逻辑接口0即可/set security zones security-zone untrust interfaces ge-0/0//将ge-0/0/接口放到untrust zone去,类似ScreenOS/set security zones security-zone untrust host-inbound-traffic system-services ping set security zones security-zone untrust host-inbound-traffic system-services http set security zones security-zone untrust host-inbound-traffic system-services telnet /在untrust zone打开允许远程登陆管理服务,ScreenOS要求基于接口开放服务,SRX要求基于Zone开放,从SRX主动访问出去流量开启服务,类似ScreenOS/PolicyPolicy配置方法与ScreenOS基本一致,仅在配置命令上有所区别,其中策略的允许/拒绝的动作Action需要额外配置一条then语句将ScreenOS的一条策略分解成两条及以上配置语句;Policy 需要手动配置policy name,policy name可以是字符串,也可以是数字与ScreenOS的policy ID 类似,只不过需要手工指定;set security zones security-zone trust address-book address pc1 10.1.1.10/32set security zones security-zone untrust address-book address server1 10.0.2.1/32 /与ScreenOS一样,在trust和untrust zone下分别定义地址对象便于策略调用,地址对象的名称可以是地址/掩码形式/set security zones security-zone trust address-book address-set addr-group1 address pc1/在trust zone下定义名称为add-group1的地址组,并将pc1地址放到该地址组中/set security policies from-zone trust to-zone untrust policy 001 match source-address addr-group1 destination-address server1 application anyset security policies from-zone trust to-zone untrust policy 001 then permit/定义从trust 到untrust方向permit策略,允许addr-group1组的源地址访问server1地址any服务/NATSRX NAT较ScreenOS在功能实现方面基本保持一致,但在功能配置上有较大区别,配置的主要差异在于ScreenOS的NAT与policy是绑定的,无论是MIP/VIP/DIP还是基于策略的NAT,在policy 中均要体现出NAT内容除了缺省基于untrust接口的Souec-NAT模式外,而SRX 的NAT则作为网络层面基础内容进行独立配置独立定义地址映射的方向、映射关系及地址范围,Policy中不再包含NAT相关配置信息,这样的好处是易于理解、简化运维,当网络拓朴和NAT映射关系发生改变时,无需调整Policy配置内容;SRX NAT和Policy执行先后顺序为:目的地址转换-目的地址路由查找-执行策略检查-源地址转换,结合这个执行顺序,在配置Policy时需注意:Policy中源地址应是转换前的源地址,而目的地址应该是转换后的目的地址,换句话说,Policy中的源和目的地址应该是源和目的两端的真实IP地址,这一点和ScreenOS存在区别,需要加以注意;SRX中不再使用MIP/VIP/DIP这些概念,其中MIP被Static静态地址转换取代,两者在功能上完全一致;DIP被Source NAT取代;基于Policy的目的地址转换及VIP被 Destination NAT取代;ScreenOS中基于Untrust zone接口的源地址转换被保留下来,但在SRX中不再是缺省模式SRX中Trust Zone接口没有NAT模式概念,需要手工配置;类似ScreenOS,Static属于双向NAT,其他类型均属于单向NAT,此外,SRX还多了一个proxy-arp概念,如果定义的IP Pool可用于源或目的地址转换与接口IP 在同一子网时,需配置SRX对这个Pool内的地址提供ARP代理功能,这样对端设备能够解析到IP Pool地址的MAC地址使用接口MAC地址响应对方,以便于返回报文能够送达SRX;下面是配置举例及相关说明:2.3.1 Interface based NATNAT:set security nat source rule-set 1 from zone trustset security nat source rule-set 1 to zone untrustset security nat source rule-set 1 rule rule1 match source-address 0.0.0.0/0 destination-address security nat source rule-set 1 rule rule1 then source-nat interface上述配置定义NAT源地址映射规则,从Trust Zone访问Untrust Zone的所有流量用Untrust Zone 接口IP做源地址转换;Policy:set security policies from-zone trust to-zone untrust policy 1 match source-address 10.1.2.2set security policies from-zone trust to-zone untrust policy 1 match destination-address anyset security policies from-zone trust to-zone untrust policy 1 match application anyset security policies from-zone trust to-zone untrust policy 1 then permit上述配置定义Policy策略,允许Trust zone 10.1.2.2地址访问Untrust方向任何地址,根据前面的NAT配置,SRX在建立session时自动执行接口源地址转换;2.3.2 Pool based Source NATNAT:set security nat source pool pool-1 address to security nat source rule-set 1 from zone trustset security nat source rule-set 1 to zone untrustset security nat source rule-set 1 rule rule1 match source-address 0.0.0.0/0 destination-address security nat source rule-set 1 rule rule1 then source-nat pool pool-1set security nat proxy-arp interface ge-0/0/2 address to 上述配置表示从trust方向any到untrust方向any访问时提供源地址转换,源地址池为pool1 ,同时ge-0/0/2接口为此pool IP提供ARP代理;需要注意的是:定义Pool时不需要与Zone及接口进行关联;配置proxy-arp目的是让返回包能够送达SRX,如果Pool与出接口IP不在同一子网,则对端设备需要配置指向的Pool地址路由;Policy:set security policies from-zone trust to-zone untrust policy 1 match source-address 10.1.1.2set security policies from-zone trust to-zone untrust policy 1 match destination-address anyset security policies from-zone trust to-zone untrust policy 1 match application any set security policies from-zone trust to-zone untrust policy 1 then permit上述配置定义Policy策略,允许Trust zone 10.1.2.2地址访问Untrust方向任何地址,根据前面的NAT配置,SRX在建立session时自动执行源地址转换;2.3.3 Pool base destination NATNAT:set security nat destination pool 111 address security nat destination rule-set 1 from zone untrustset security nat destination rule-set 1 rule 111 match source-address 0.0.0.0/0set security nat destination rule-set 1 rule 111 match destination-address security nat destination rule-set 1 rule 111 then destination-nat pool 111上述配置将外网any访问地址映射到内网地址,注意:定义的Dst Pool是内网真实IP地址,而不是映射前的公网地址;这点和Src-NAT Pool有所区别;Policy:set security policies from-zone trust to-zone untrust policy 1 match source-address anyset security policies from-zone trust to-zone untrust policy 1 match destination-address security policies from-zone trust to-zone untrust policy 1 match application anyset security policies from-zone trust to-zone untrust policy 1 then permit上述配置定义Policy策略,允许Untrust方向任何地址访问Trust方向,根据前面的NAT配置,公网访问时,SRX自动执行到的目的地址转换;ScreenOS VIP功能对应的SRX Dst-nat配置:set security nat destination pool 222 address port 8000set security nat destination rule-set 1 from zone untrustset security nat destination rule-set 1 rule 111 match source-address 0.0.0.0/0set security nat destination rule-set 1 rule 111 match destination-address security nat destination rule-set 1 rule 111 match destination-port 8000set security nat destination rule-set 1 rule 111 then destination-nat pool 222上述NAT配置定义:访问地址8000端口映射至地址8000端口,功能与ScreenOS VIP端口映射一致;2.3.4 Pool base Static NATNAT:set security nat static rule-set static-nat from zone untrustset security nat static rule-set static-nat rule rule1 match destination-address security nat static rule-set static-nat rule rule1 then static-nat prefix security policies from-zone trust to-zone untrust policy 1 match source-address anyset security policies from-zone trust to-zone untrust policy 1 match destination-address security policies from-zone trust to-zone untrust policy 1 match application anyset security policies from-zone trust to-zone untrust policy 1 then permitStatic NAT概念与ScreenOS MIP一致,属于静态双向一对一NAT,上述配置表示访问时转换为,当访问Internet时自动转换为;IPSEC VPNSRX IPSEC VPN支持Site-to-Site VPN 和基于NS-remote的拨号VPN,和ScreenOS一样,site-to-site VPN也支持路由模式和Policy模式,在配置方面也和ScreenOS基本一致;SRX 中的加密/验证算法在命名上和ScreenOS存在一些区别,配置过程中建议选择ike和ipsec的proposal为 standard模式,standard中包含SRX支持的全部加密/验证算法,只要对端设备支持其中任何一种即可;SRX中通道接口使用st0接口,对应ScreenOS中的tunnel虚拟接口;下面是图中左侧SRX基于路由方式Site-to-site VPN配置:set interfaces st0 unit 0 family inet address 10.2.0.1/24set security zones security-zone untrust interfacesset routing-options static route 10.1.2.0/24 next-hop定义st0 tunnel接口地址/Zone及通过VPN通道到对端网络路由set security ike policy ABC mode mainset security ike policy ABC proposal-set standardset security ike policy ABC pre-shared-key ascii-text juniper定义IKE Phase1 policy参数,main mode,standard proposal及预共享密钥方式set security ike gateway gw1 ike-policy ABCset security ike gateway gw1 address 10.0.2.1set security ike gateway gw1 external-interface ge-0/0/定义IKE gaeway参数,预共享密钥认证,对端网关10.0.2.1,出接口ge-0/0/1位于untrust zoneset security ipsec policy AAA proposal-set standardset security ipsec vpn vpn1 bind-interfaceset security ipsec vpn vpn1 ike gateway gw1set security ipsec vpn vpn1 ike ipsec-policy AAAset security ipsec vpn vpn1 establish-tunnels immediately定义ipsec Phase 2 VPN参数:standard proposal、与接口绑定,调用Phase 1 gw1 ike网关; set security policies from-zone untrust to-zone trust policy vpn-policy match source-address anyset security policies from-zone untrust to-zone trust policy vpn-policy match destination-address anyset security policies from-zone untrust to-zone trust policy vpn-policy match application anyset security policies from-zone untrust to-zone trust policy vpn-policy then permitset security policies from-zone trust to-zone untrust policy vpn-policy match source-address anyset security policies from-zone trust to-zone untrust policy vpn-policy match destination-address anyset security policies from-zone trust to-zone untrust policy vpn-policy match application anyset security policies from-zone trust to-zone untrust policy vpn-policy then permit 开启双向policy以允许VPN流量通过Application and ALGSRX中自定义服务及ALG使用方法与ScreenOS保持一致,系统缺省开启FTP ALG,为TCP 21服务提供FTP应用ALG;自定义服务如果属于FTP类应用,需要将此自定义服务非TCP 21端口与FTP 应用进行关联;下面举例定义一个FTP类服务ftp-test,使用目的端口为TCP 2100,服务超时时间为3600秒,并将此自定义服务与FTP应用关联ALG,系统将识别此服务为FTP应用并开启FTPALG来处理该应用流量;set applications application ftp-test protocol tcp destination-port 2100 inactivity-timeout 3600set applications application ftp-test application-protocol ftpJSRPJSRP是Juniper SRX的私有HA协议,对应ScreenOS的NSRP双机集群协议,支持A/P和A/A模式,JSRP对ScreenOS NSRP协议和JUNOS Cluster集群技术进行了整合集成,熟悉NSRP协议有助于对JSRP协议的理解;JSRP和NSRP最大的区别在于JSRP是完全意义上的Cluster概念,两台设备完全当作一台设备来看待,两台设备的接口板卡顺序编号、运维变更将对两台设备同时进行操作,无需额外执行ScreenOS的配置和会话同步等操作,而ScreenOS NSRP可看作在同步配置和动态对象session基础上独立运行的两台单独设备;JSRP要求两台设备在软件版本、硬件型号、板卡数量、插槽位置及端口使用方面严格一一对应;由于SRX 是转发与控制层面完全分裂架构,JSRP需要控制层面配置同步和数据层面Session同步两个平面的互联,建议控制和数据层面互联链路使用光纤链路直连部分平台强制要求光纤链路直连;JSRP接口命名方式采用多个机箱抽象成一个逻辑机箱之后再统一为各个槽位进行编号,如上所示的SRX5800,每个SRX5800机箱有12个业务槽位,节点0槽位号从0开始编号,节点1槽位号从12开始往后编;整个JSRP配置过程包括如下7个步骤配置Cluster id和Node id 对应ScreenOS NSRP 的cluster id并需手工指定设备使用节点id指定Control Port 指定控制层面使用接口,用于配置同步及心跳指定Fabric Link Port 指定数据层面使用接口,主要session等RTO同步配置Redundancy Group 类似NSRP的VSD group,优先级与抢占等配置每个机箱的个性化配置单机无需同步的个性化配置,如主机名、带外管理口IP地址等配置Redundant Ethernet Interface 类似NSRP的Redundant冗余接口配置Interface Monitoring 类似NSRP interface monitor,是RG数据层面切换依据SRX JSRP配置样例:配置Cluster id和Node idSRX-A>set chassis cluster cluster-id 1 node 0 reboot注意该命令需在operational模式下输入,Cluster ID取值范围为1 – 15,当Cluster ID = 0时将unsets the clusterSRX-B>set chassis cluster cluster-id 1 node 1 reboot指定Control Port如果主控板RE上有固定control-ports,则无需指定:set chassis cluster control-ports fpc 11 port 0set chassis cluster control-ports fpc 23 port 0指定Fabric Link Portset interfaces fab0 fabric-options member-interfaces ge-1/0/0set interfaces fab1 fabric-options member-interfaces ge-13/0/0注:Fabric Link中的Fab0固定用于node 0,Fab1固定用于node 1配置Redundancy GroupRG0固定用于主控板RE切换,RG1以后用于redundant interface切换,RE切换独立于接口切换set chassis cluster reth-count 10 指定整个Cluster中redundant ethernet interface 最多数量set chassis cluster redundancy-group 0 node 0 priority 200高值优先,与NSRP相反set chassis cluster redundancy-group 0 node 1 priority 100set chassis cluster redundancy-group 1 node 0 priority 200高值优先,与NSRP相反set chassis cluster redundancy-group 1 node 1 priority 100每个机箱的个性化配置,便于对两台设备的区分与管理set groups node0 system host-name SRX-Aset groups node0 interfaces fxp0 unit 0 family inet address 1.1.1.1/24 带外网管口名称为fxp0,区别ScreenOS的MGT口set groups node1 system host-name SRX-Bset groups node1 interfaces fxp0 unit 0 family inet address 1.1.1.2/24set apply-groups ${node} 应用上述groups配置配置Redundant Ethernet InterfaceRedundant Ethernet Interface类似ScreenOS里的redundant interface,只不过Redundant Ethernet interface是分布在不同的机箱上这一特性又类似ScreenOS 的VSI接口;Set interface ge-0/0/0 gigether-options redundant-parent reth0 node 0的ge-0/0/0接口Set interface ge-13/0/0 gigether-options redundant-parent reth0 node 1的ge-0/0/0接口Set interface reth0 redundant-ether-options redundancy-group 1 reth0属于RG1 Set interface reth0 unit 0 family inet address 配置Interface Monitoring,被监控的接口Down掉后,RG1将自动进行主备切换与ScreenOS类似,Set cluster redundancy-group 1 interface-monitor ge-0/0/0 weight 255Set cluster redundancy-group 1 interface-monitor ge-0/0/1 weight 255Set cluster redundancy-group 1 interface-monitor ge-13/0/0 weight 255Set cluster redundancy-group 1 interface-monitor ge-13/0/1 weight 255 JSRP维护命令a)手工切换JSRP Master,RG1 原backup将成为Masterrootsrx5800a> request chassis cluster failover redundancy-group 1 node 1b)手工恢复JSRP状态,按照优先级重新确定主备关系高值优先rootsrx5800b> request chassis cluster failover reset redundancy-group 1c)查看cluster interfacerootrouter> show chassis cluster interfacesd)查看cluster 状态、节点状态、主备关系labsrx5800a run show chassis cluster statuse)取消cluster配置srx5800aset chassis cluster disable rebootf)升级JSRP软件版本SRX目前暂不支持软件在线升级ISSU,升级过程会中断业务;升级步骤如下:1.升级node 0,注意不要重启系统2.升级node 1,注意不要重启系统.3.同时重启两个系统g)恢复处于disabled状态的node当control port或fabric link出现故障时,为避免出现双master split-brain现象,JSRP 会把出现故障前状态为secdonary的node设为disabled状态,即除了RE,其余部件都不工作;想要恢复必须reboot该node;三、SRX防火墙常规操作与维护设备关机SRX因为主控板上有大容量硬盘,为防止强行断电关机造成硬件故障,要求设备关机必须按照下面的步骤进行操作:1.管理终端连接SRX console口;2.使用具有足够权限的用户名和密码登陆CLI命令行界面;3.在提示符下输入下面的命令:userhost> request system halt…The operating system has halted.Please press any key to reboot除非需要重启设备,此时不要敲任何键,否则设备将进行重启4.等待console输出上面提示信息后,确认操作系统已停止运行,关闭机箱背后电源模块电源;3.2设备重启SRX重启必须按照下面的步骤进行操作:1.管理终端连接SRX console口;2.使用具有足够权限的用户名和密码登陆CLI命令行界面;3.在提示符下输入下面的命令:userhost> request system reboot4.等待console设备的输出,操作系统已经重新启动;3.3操作系统升级SRX操作系统软件升级必须按照下面的步骤进行操作:1.管理终端连接SRX console口,便于升级过程中查看设备重启和软件加载状态;2.SRX上开启FTP服务,并使用具有超级用户权限的非root用户通过FTP客户端将下载的升级软件介质上传到SRX上;3.升级前,执行下面的命令备份旧的软件及设定:userhost> request system snapshot4.加载新的SRX软件:userhost>request system software add validate reboot5.软件加载成功后, SRX将自动重启,重启完成后检查系统当前软件版本号:userhost> show system software3.4密码恢复SRX Root密码丢失,并且没有其他的超级用户权限,那么就需要执行密码恢复,该操作需要中断设备正常运行,但不会丢失配置信息,这点与ScreenOS存在区别;要进行密码恢复,请按照下面操作进行:1.Console口连接SRX,然后重启SRX;2.在启动过程中,console上出现下面的提示的时候,按空格键中断正常启动方式,然后再进入单用户状态,并输入:boot -sLoading /boot/defaults//kernel data=…… syms=……Hit Enter to boot immediately, or space bar for command prompt.loader>loader> boot -s3.执行密码恢复:在以下提示文字后输入recovery,设备将自动进行重启Enter full pathname of shell or 'recovery' for root password recovery or RETURN for /bin/sh: recovery4.进入配置模式,删除root密码,并重现设置root密码:userhost> configureEntering configuration modeuserhost delete system root-authenticationuserhost set system root-authentication plain-text-passworduserhostNew password:userhostRetype new password:userhost commitcommit complete3.5常用监控维护命令下列操作命令在操作模式下使用,或在配置模式下run show…Show system software 查看当前软件版本号show system uptime 查看系统启动时间Show chassis haredware 查看硬件板卡及序列号show chassis environment 查看硬件板卡当前状态show chassis routing-engine 查看主控板RE资源使用及状态show route 查看路由表show arp 查看ARP表show log messages 查看系统日志show interface terse 查看所有接口运行状态show interface ge-x/y/z detail 查看接口运行细节信息monitor interface ge-x/y/z 动态统计接口数据包转发信息monitor traffic interface ge-x/y/z 动态报文抓取Tcpdump,类似ScreenOSsnoop命令show security flow session summary 查看当前防火墙并发会话数show security flow session 查看当前防火墙具体并发会话clear security flow session all 清除当前sessionshow security alg status 检查全局ALG开启情况SRX对应ScreenOS debug flow basic跟踪报文处理路径的命令:set security flow traceoptions flag basic-datapath 开启SRX基本报文处理Debugset security flow traceoptions file 将输出信息记录到指定文件中set security flow traceoptions file size <file-size> 设置该文件大小,缺省128kset security flow traceoptions packet-filter filter1 destination-prefix 5.5.5.2设置报文跟踪过滤器run file show 查看该Log输出信息SRX对应ScreenOS get tech命令,开Case时需要抓取的信息:request support information。
sr policy策略配置

sr policy策略配置
SR(Segment Routing)策略配置是指在网络设备中配置特定的路由策略,以实现分段路由的功能。
分段路由是一种新型的路由技术,它将路由信息分解为多个段(Segment),每个段对应网络路径中的一个特定节点或者特定的服务。
SR策略配置可以从以下几个方面进行详细的讨论:
1. 配置目的,首先需要明确配置SR策略的目的是什么,比如是为了提高网络的性能、实现流量工程、改善服务质量(QoS)等。
不同的目的会对策略的具体配置产生影响。
2. 策略制定,在进行SR策略配置之前,需要制定详细的策略方案,包括需要应用策略的网络设备、策略的生效范围、具体的路由转发规则等。
这些都需要在制定策略时充分考虑。
3. 设备配置,针对不同的网络设备,SR策略的配置方式可能会有所不同,比如在Cisco、Juniper等厂商的设备上配置SR策略的命令会有所差异。
需要根据具体设备的要求进行相应的配置。
4. 策略参数,在配置SR策略时,需要设置一些参数,比如
Segment Identifier(SID)的分配、策略的优先级、策略的生存时间(TTL)等。
这些参数的设置会直接影响到策略的实际效果。
5. 策略验证,配置完成后,需要进行策略的验证和测试,确保策略能够按照预期的方式进行路由转发,同时不会对网络造成不必要的影响。
总的来说,SR策略配置是一个复杂而又关键的网络配置任务,需要充分考虑各种因素才能够保证配置的正确性和有效性。
在实际操作中,建议在专业人士的指导下进行配置,以确保网络的稳定和安全。
广东移动IP城域网SR业务配置规范7750分册V1.0(试行稿)

广东移动IP城域网SR业务配置规范上海贝尔7750分册-试行稿(V1.0)中国移动通信集团广东有限公司2010年1月编制说明为保证城域网的运行质量,必须在设备能力、网络设计、网络配置、维护流程、支撑系统等环节予以保障。
网络配置主要是指通过在设备上实施具体配置命令,开启设备控制层面和转发层面的功能,实现网络的互通,保证网络具备预期的业务承载能力。
同样的物理网络在不同的配置下所提供的业务承载能力可能差距甚远,此外,由于网络规模不断扩大,设备特性不断变化,配置工作正日益变得复杂,全网配置发生错误的概率也在增加,因此很有必要对城域网网络设备的网络配置予以规范。
本课题涉及的对象就是城域网网络设备配置的相关规范标准,目的是为城域网维护人员提供实用维护工具。
考虑到城域网网络设备维护分工明确,配置规范按分册进行编写,本篇只针对阿尔卡特7750设备制定相关业务配置规范。
版本变更记录目录1. 概述 (5)1.1 目标网络结构 (5)1.2 配置原则 (6)1.3 说明 (6)2. 基本业务介绍及配置 (6)2.1 固定IP专线业务概述 (6)2.2固定IP专线业务配置 (6)3.1VPN业务概述 (12)3.2 VPN业务配置 (12)3.2.1 MPLS-VPN配置方式接入 (12)3.2.2 VPLS配置方式接入 (15)3. 业务常用检查命令 (22)3.1 IES 业务 (22)3.2 vprn 业务 (22)3.3 vpls 业务 (22)1. 概述1.1 目标网络结构IP 城域网的定位:1、网络定位:IP 城域网是位于用户驻地网和CMnet 网之间的网络,既要满足用户的需求也需要适应企业未来的发展。
IP 城域网与城域传送网共同构成了我公司城域综合业务承载平台。
2、业务定位:(1)为公司内部业务应用系统 (营业厅、OA 、BOSS 等)提供接入以及实现自有机楼数据互连等。
(2)为用户提供互联网接入、集团客户接入、VPN 接入等业务。
SR配置规范

1/1/31/1/110.1.1
Idp
keep-alive
shutdow n
exit
no shutdow n
exit
exit
2)配置Mirror目的,指向本地创建的SDP(如是本地镜像则指向本地端口)
在当前环境下列出所有命令。
stri ng?
列出所有在当前环境下可用的以string开头的
命令。
Comma nd?
显示命令标识符及相关关键词。
Comma nd
keyword?
在comma nd中列出与keyword相关的自变量
stri ng<Tab>
输出未完全输入的命令(自动完成功能)或 列示
stri ng<Space>
remote-source 10.1.1 ing-svc-label 3001 exit sap 1/1/3:0 create p 10.0.0.…
entry 100 All use subject to applicable lice nse agreeme nts.
Built o n Tue Aug 29 11:54:54 PST 2006 by builder in /b1/R5/pa nos/main
7750SR>c on fig>card# card-type iom-20g-b
7750SR>c on fig>card# no shutdow n
配置MDA模块,事先需确认MDA模块的准确类型:
7750SR>co nfig>card# mda 1
SR基本配置
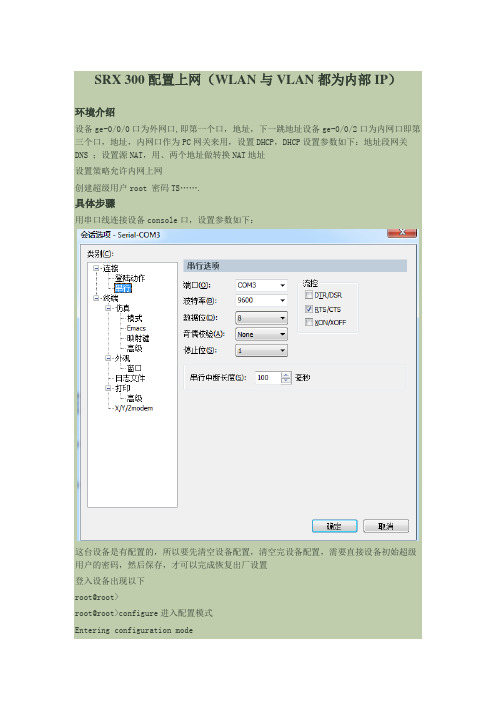
SRX 300配置上网(WLAN与VLAN都为内部IP)环境介绍设备ge-0/0/0口为外网口,即第一个口,地址,下一跳地址设备ge-0/0/2口为内网口即第三个口,地址,内网口作为PC网关来用,设置DHCP,DHCP设置参数如下:地址段网关DNS ;设置源NAT,用、两个地址做转换NAT地址设置策略允许内网上网创建超级用户root 密码TS…….具体步骤用串口线连接设备console口,设置参数如下:这台设备是有配置的,所以要先清空设备配置,清空完设备配置,需要直接设备初始超级用户的密码,然后保存,才可以完成恢复出厂设置登入设备出现以下root@root>root@root>configure进入配置模式Entering configuration mode[edit]root@root# load factory-default恢复出厂设备warning: activating factory configuration[edit]root@root# set system root-authentication plain-text-password设置超级用户密码New password:Retype new password:[edit]root@root# commitcommit complete[edit]此时回复出厂设置完成,下一步开始配置login: root输入默认用户名rootPassword:输入重置设备前输入的密码root@root% cli敲入cli进入执行模式root@root> configure敲入configure进入配置模式,执行模式代表符号“>”Entering configuration mode[edit]root@root#配置模式“#”root@root# set system login user lvlin class super-user authentication plain-text-password建立用户名为“wangjian”的超级用户New password:为用户“root”设置密码Retype new password:重复输入密码[edit]root@root# delete interfaces ge-0/0/删除接口相关配置,接口默认处于交换[edit]模式Ethernet-switching模式下,要想设置成三层必须先把这个属root@root# delete interfaces fe-0/0/2 unit 0性删除,“.0”和unit0在意义上一样[edit]wangjian# set interfaces ge-0/0/ family inet address 设置ge-0/0/为三层接口地址set interfaces ge-0/0/ family inet address set interfaces fe-0/0/ family inet address 设置Ge-0/0/为三层接口地址 set routing-options static route next-hop routing-options static route next-hop 设置默认路由wangjian# set security zones security-zone untrust interfaces ge-0/0/[edit]设置ge-0/0/口为untrust安全域接口wangjian# set security zones security-zone trust interfaces ge-0/0/[edit]设置fe-0/0/口为trust安全域接口wangjian# delete security nat source rule-set trust-to-untrust[edit]删除系统自带的源nat规则wangjian# set security nat source pool wangjian address to 设置源nat地址池set security nat source pool wangjian address to set security nat sourcerule-set wangjiannat from zone trust[edit]设置nat源安全域wangjian# set security nat source rule-set wangjiannat to zone untrust[edit]设置nat目的安全域wangjian# set security nat source rule-set wangjiannat rule wangjiannat1match source-address 设置nat源地址[edit]wangjian# set security nat source rule-set wangjiannat rule wangjiannat1 then source-nat pool wangjian设置nat关联地址池[edit]wangjian# set security zones security-zone untrust interface ge-0/0/ host-inbound-traffic system-services http[edit]打开接口http管理wangjian# set system services web-management http[edit]打开http全局开关wangjian# delete security policies from-zone trust to-zone untrust policytrust-to untrust删除系统自带策略delete security policies from-zone trust to-zone untrust policy trust-to untrust[edit]wangjian# set security policies from-zone trust to-zone untrust policy wangjian match source-address any[edit]配置策略源地址wangjian# set security policies from-zone trust to-zone untrust policy wangjian match destination-address any配置策略目的地址[edit]wangjian# set security policies from-zone trust to-zone untrust policy wangjian match application any配置策略应用[edit]wangjian# set security policies from-zone trust to-zone untrust policy wangjian then permit配置策略动作[edit]wangjian# set security policies from-zone trust to-zone untrust policy wangjian then log session-init开启策略日志—会话开始[edit]wangjian# set security policies from-zone trust to-zone untrust policy wangjian then log session-close开启策略日志—会话结束[edit]wangjian# delete system services dhcp[edit]删除系统默认dhcpwangjian# set system services dhcp router DHCP参数默认网关wangjian# set system services dhcp pool address-range low DHCP参数地址池开始地址[edit]wangjian# set system services dhcp pool address-range high DHCP参数地址池结束地址[edit]wangjian# set system services dhcp maximum-lease-time 95[edit]DHCP参数分配地址租约时间wangjian# set system services dhcp name-server[edit]DHCP参数DNS服务器wangjian# set system services dhcp name-server[edit]DHCP参数DNS服务器wangjian# set system services dhcp propagate-settings ge-0/0/[edit]设置DHCP信号发散端口wangjian# delete interfaces ge-0/0/[edit]删除接口fe-0/0/所有属性wangjian# set security zones security-zone trust interfaces ge-0/0/ host-inbound-traffic system-services all[edit]设置接口ge-0/0/接口为trust安全域wangjian# set security nat proxy-arp interface ge-0/0/0 address to nat地址池地址在外网接口上做arp代理set security nat proxy-arp interface ge-0/0/0 address to delete interfaces vlan[edit]删除vlan接口wangjian# delete interfaces ge-0/0/3[edit]删除物理接口属性wangjian# delete interfaces fe-0/0/4[edit]wangjian# delete interfaces fe-0/0/5[edit]wangjian# delete interfaces fe-0/0/6[edit]wangjian# delete interfaces fe-0/0/7[edit]wangjian# delete interfaces ge-0/0/1[edit]wangjian# delete vlans[edit]删除vlan这样就可以了,DHCP获取到地址Ping外网附加show命令wangjian# run show interfaces terse查看物理接口属性InterfaceAdmin Link ProtoLocalRemotege-0/0/0upupge-0/0/upupinetupupip-0/0/0upuplsq-0/0/0upuplt-0/0/0upupmt-0/0/0upupsp-0/0/0upupsp-0/0/upupinetsp-0/0/upupinet--> --> 0/0 --> --> 0/0ge-0/0/1updownfe-0/0/2upupfe-0/0/upupinetfe-0/0/3updownfe-0/0/4updownfe-0/0/5updownfe-0/0/6updownfe-0/0/7updownfxp2upupupuptnp0x1greupupipipupupirbupuplo0upupupupinet--> 0/0upupinet--> 0/0--> 0/0--> 0/0--> 0/0--> 0/0upuplsiupupmtunupuppimdupuppimeupuppp0upupppd0upupppe0upupst0upuptapupupvlanupup[edit]wangjian# show | compare跟上次commit前对比敲过的命令[edit security zones security-zone untrust interfaces] ge-0/0/ { ... }+ge-0/0/;[edit]wangjian# rollback 0返回上次commit时的配置load complete[edit]。
CR.BRAS.SR配置示例

四川电信IPTV城域网一平面设备配置模板中国电信股份有限公司四川分公司2011年9 月目录第一章实施规范 (2)1.1 设备命名规范 (2)1.2 端口描述规范 (2)1.2.1 环回接口描述 (2)1.2.2 物理接口描述 (3)1.3 ISIS规范 (4)第二章CR基础配置模板 (6)2.1 系统基本配置.................................................................................... 错误!未定义书签。
2.2 功能配置............................................................................................ 错误!未定义书签。
第三章SR配置模板 (18)3.1 华为ME60配置................................................................................ 错误!未定义书签。
3.1.1 系统基础配置......................................................................... 错误!未定义书签。
3.1.2 功能配置................................................................................. 错误!未定义书签。
3.2 中兴M6000 ....................................................................................... 错误!未定义书签。
3.2.1 系统基本配置......................................................................... 错误!未定义书签。
e4国联通城域网BAS、SR设备配置规范(试行)

内部资料注意保密中国联通城域网BAS/SR设备配置规范(试行)中国联通集团网络公司运维部二零一一年九月目录说明 (3)1.基本配置 (3)1.1 设备名称 (3)1.2 系统时间配置 (4)1.3 NTP配置 (4)1.4文件管理 (4)1.5 Banner配置 (4)2.网管配置 (5)2.1登录AAA (5)2.2 SNMP (5)2.3用户 (6)2.4 SYSLOG (6)2.5 TELNET (7)2.6 SSH (7)2.7 NETFLOW/NETSTREAM (7)2.8带外网管 (8)3.端口配置规范 (8)3.1端口命名格式描述 (8)3.2 loopback (9)3.3 GE/TG (9)3.4端口捆绑 (9)3.5POS (9)4. 路由配置 (10)4.1 静态路由配置 (10)4.2 OSPF配置 (10)4.3 ISIS配置 (11)4.4 BGP配置 (11)4.5 MPLS配置 (12)4.6 BFD配置 (12)5.安全配置 (13)5.1 ACL (13)5.2服务管理 (13)5.3引擎防护 (14)6. 业务实现 (14)6.1 PPPOE业务 (14)6.2 专线业务 (14)6.3 VPDN业务 (15)6.4 WLAN业务 (15)6.5 MPLS VPN 业务 (16)6.6 VPLS业务 (16)6.7 VRRP (16)附录:配置规范执行要求 (17)说明为了加强对城域网设备的管理,规范城域网主要设备的配置,避免人为操作造成的网络故障,集团网络公司组织相关省级分公司,制定了《中国联通城域网BAS/SR设备配置规范(试行)》。
考虑到各省业务发展可能存在的差异性,规范对具体配置要求进行了分级,按照执行的强度分为A、B、C等3级,分别为全国统一、省内统一、可选配置,详见附录“配置规范执行要求”。
1.基本配置1.1 设备名称【配置描述】: 配置设备名称【规范要求】:1.1.1 设备名称要求符合命名规范;要求格式为AAAA-BBBB-CCCC-DE。
H3C SR8800 万兆核心路由器接口管理配置指导-整本手册

H3C SR8800万兆核心路由器接口管理配置指导杭州华三通信技术有限公司资料版本:5PW101-20100910产品版本:SR8800-CMW520-R3328Copyright © 2010 杭州华三通信技术有限公司及其许可者版权所有,保留一切权利。
未经本公司书面许可,任何单位和个人不得擅自摘抄、复制本书内容的部分或全部,并不得以任何形式传播。
H3C、、Aolynk、、H3Care、、TOP G、、IRF、NetPilot、Neocean、NeoVTL、SecPro、SecPoint、SecEngine、SecPath、Comware、Secware、Storware、NQA、VVG、V2G、V n G、PSPT、XGbus、N-Bus、TiGem、InnoVision、HUASAN、华三均为杭州华三通信技术有限公司的商标。
对于本手册中出现的其它公司的商标、产品标识及商品名称,由各自权利人拥有。
由于产品版本升级或其他原因,本手册内容有可能变更。
H3C保留在没有任何通知或者提示的情况下对本手册的内容进行修改的权利。
本手册仅作为使用指导,H3C尽全力在本手册中提供准确的信息,但是H3C并不确保手册内容完全没有错误,本手册中的所有陈述、信息和建议也不构成任何明示或暗示的担保。
前言H3C SR8800万兆核心路由器配置指导共分为十三本手册,介绍了SR8800万兆核心路由器各软件特性的原理及其配置方法,包含原理简介、配置任务描述和配置举例。
《接口管理配置指导》主要介绍了以太网端口、WAN接口、POS接口、CPOS接口、E-CPOS接口、Loopback接口和Null 接口等内容。
前言部分包含如下内容:z读者对象z本书约定z产品配套资料z资料获取方式z技术支持z资料意见反馈读者对象本手册主要适用于如下工程师:z网络规划人员z现场技术支持与维护人员z负责网络配置和维护的网络管理员本书约定1.命令行格式约定格式意义粗体命令行关键字(命令中保持不变、必须照输的部分)采用加粗字体表示。
- 1、下载文档前请自行甄别文档内容的完整性,平台不提供额外的编辑、内容补充、找答案等附加服务。
- 2、"仅部分预览"的文档,不可在线预览部分如存在完整性等问题,可反馈申请退款(可完整预览的文档不适用该条件!)。
- 3、如文档侵犯您的权益,请联系客服反馈,我们会尽快为您处理(人工客服工作时间:9:00-18:30)。
7750SR路由器配置规范上海贝尔阿尔卡特股份有限公司互联网事业部二零零六年十一月目录1.概述阿尔卡特7750SR路由器是业内第一个专为高级互联网和虚拟专用网络(VPN)业务而设计和优化的IP/MPLS业务路由器。
阿尔卡特7750SR有三种尺寸可供选择:单槽、7槽和12槽,可提供具有卓越性能和高密度的各种接口。
作为目前业内最具扩展性的路由器平台,阿尔卡特7750SR具有为高效传送基于服务等级协议(SLA)的业务而设计的软件和硬件架构,因此阿尔卡特7750SR不仅仅是强大的互联网路由器,更是一个灵活、强大的业务供应平台。
为正确配置7750SR系列路由器,需完成引导文件配置,系统管理功能配置,IOM/MDA/Port等板卡端口配置,相关路由协议配置,以及7750SR定义的各种Service和QoS配置等。
本规范针对用户日常维护工作中常用的配置任务编写,并提供配置实例,未涉及的内容用户可参考7750SR配置指导手册,表1列出各配置任务对应的指导手册名称便于用户进行针对性查找。
2.3.硬件板卡配置7750SR路由器的IOM和MDA板卡只有在配置命令与板卡类型匹配后方可启动,可以事先将IOM和MDA板卡类型部署上,防止错误板卡插入;当板卡在未配置时插入后,可通过show card/mda命令查看板卡类型,此时板卡运行状态为down。
配置IOM模块,事先需确认IOM模块的准确类型:7750SR# configure card 37750SR>config>card# card-type ?- card-type <card-type>- no card-type<card-type> : iom-20g|iom2-20g|iom-20g-b7750SR>config>card# card-type iom-20g-b7750SR>config>card# no shutdown配置MDA模块,事先需确认MDA模块的准确类型:7750SR>config>card# mda 17750SR>config>card>mda# mda-type ?- mda-type <mda-type>- no mda-type<mda-type> : m60-10/100eth-tx|m10-1gb-sfp|m16-oc12/3-sfp|m8-oc12/3-sfp|m16-oc3-sfp|m8-oc3-sfp|m4-oc48-sfp|m1-oc192|m5-1gb-sfp|m12-chds3|m1-choc12-sfp|m1-10gb|m4-choc3-sfp|m2-oc48-sfp|m20-100eth-sfp|m20-1gb-tx|m2-10gb-xfp|m4-atmoc12/3-sfp|m16-atmoc3-sfp|m20-1gb-sfp|m4-chds3|m1-10gb-xfp|vsm-cca|m5-1gb-sfp-b|m10-1gb-sfp-b|m4-choc3-as-sfp7750SR>config>card>mda# mda-type m10-1gb-sfp7750SR>config>card>mda# back7750SR>config>card# info----------------------------------------------card-type iom-20g-bmda 1mda-type m10-1gb-sfpexit----------------------------------------------删除MDA模块:7750SR>config>card# mda 17750SR>config>card>mda# shutdown7750SR>config>card>mda# exit7750SR>config>card# no mda 1删除IOM模块(事先需确保该IOM下所有MDA模块均已删除): 7750SR>config>card# back7750SR>config# no card 32.4.设备名称配置配置内容:配置设备名称规范要求:设备名称要求符合配置有关命名规范;配置示例:#configure system name “R1-C-xxx-1”2.5.系统时间配置配置内容:配置系统时间;规范要求:系统时间要求采用标准北京时间;配置示例:#configure system time zone GMT8 08 10.1.1 key 2 preferserver 10.1.1.2 key 2no shutdown2.6.主备卡切换配置配置内容:配置系统引擎冗余模式规范要求:系统支持NSR功能配置示例在版本,配置了双SF/CPM的7750SR路由器在主备CPM切换时可保证不间断路由(Non stop routing)、不间断业务(Non stop service)Nonstop Routing (NSR)NSR可保证CPM切换时BGP,LDP,OSPF,ISIS等路由Session不终断,对端路由器不会感知到任何变化。
NSR不需要任何扩展协议,也不存在互通问题。
转发信息始终处于最新状态,不会出现转发环路。
NSR不需要配置命令激活,当系统配置了双SF/CPM,NSR的功能就已经存在。
验证双SF/CPM正常工作,即验证了NSR。
7750SR# show card==============================================Card Summary==============================================slot card card card admin operationalallowed provisioned equipped state state-------------------------------------------------------------------------------2 all supported iom-20g iom-20g up upA all supported sfm-400g sfm-400g up up/activeB all supported sfm-400g sfm-400g up up/standby==============================================2.7.AAA配置(登录用户)配置内容:启用AAA认证规范要求:根据AAA认证服务器的类型指定采用RADIUS认证还是TACASS+认证;指定认证密钥;本地配置用户名和密码作为备份的认证方式配置示例若指定配置Radius认证,则:router>config>system>security# info----------------------------------------------passwordauthentication-order radius localattempts 60 time 5 lockout 0exitradiusauthorizationaccountingserver 1 address secret "timetra"exituser "test"password xxx hash 1/1/31/1/31/1/42.5G1/2/11/1/31/1/31/1/3p1/1/31/1/110.1.1ldpkeep-aliveshutdownexitno shutdownexitexit2)配置Mirror目的,指向本地创建的SDP(如是本地镜像则指向本地端口)configure mirror mirror-dest 1000 createsdp 3001 egr-svc-label 3001no shutdownexit3)配置镜像的源端口,使镜像数据指向Mirror-destdebug mirror-source 1000 port 1/1/2 ingress egressdebug mirror-source 1000 no shutdown注:该处port 1/1/2的配置实现1/1/2端口上所有数据的镜像,如希望镜像对应某个用户的子端口的数据,即实现基于业务的镜像,可以使用sap 端口配置。
在PE1上配置:mirrormirror-dest 1000 createremote-source 10.1.1 ing-svc-label 3001exitsap 1/1/3:0 create p 10.0.0....entry 100 All use subject to applicable license agreements.Built on Tue Aug 29 11:54:54 PST 2006 by builder in /b1/R5/panos/main这些内容为网络攻击提供了重要的参考信息,建议将其屏蔽;#configure system login-control no login-banner配置系统登录警告,要求非授权用户立即退出:>config>system>login-control# pre-login-message"********************************************************\n* [WARNING]*\n* This system is owned by XX-Telecom. If you are not *\n* authorized to access this system, exit immediately. *\n********************************************************\n"完成上述修改后,登录界面如下:********************************************************* [WARNING] ** This system is owned by XX-Telecom. If you are not ** authorized to access this system, exit immediately. *********************************************************Login:3.网管配置5.1.网管地址配置配置内容:配置网管地址规范要求:正常情况下采用LOOPBACK地址作为网管地址配置示例:见 LOOPBACK端口配置采用带内网管需确保system(loopback)地址纳入IGP中;如需配置CPM板卡上的带外网口地址,参照如下:# bof address primary ....entry 100 ....entry 200dst-port 161 65535action denyexit----------------------------------------------5.2.SYSLOG配置内容:配置log信息显示的时间;配置log信息触发的级别;配置log server配置示例router>config>log#logfile-id 1location cf3:rollover 600 retention 24exitlog-id 10 (保存日志文件到syslog服务器上) from mainto syslog 1no shutdownexitlog-id 20 (保存日志文件到本地flash卡上) from mainto file 1no shutdownexitsyslog 1description “To-Syslog-Server”address level xxxport xxx (syslog tcp port number)exitexit注:7750的LOG事件流分为四种:Debug-trace:用于分析协议细节的debugChange:用于记录配置修改或节点运行状态改变等logSecurity:用于记录用户登录,登录失败,越级操作尝试等安全方面的内容Main:除上述内容外的其他log内容。