千里眼C71PoE说明书
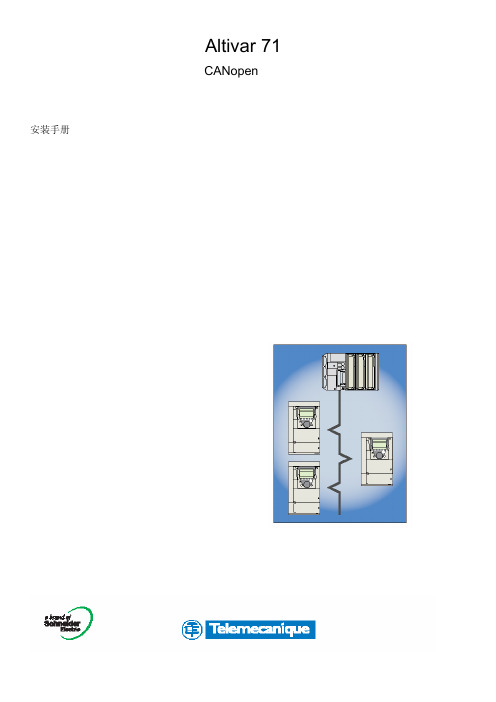
ATV71 CANopen_CH
Altivar 58/58F移植手册
本手册讲述了Altivar 71与Altivar 58/58F之间的区别。 本手册中将介绍如何更换Altivar 58或58F,包括如何更换通过总线或网络进行通信的变频器。
概述________________________________________________________________________________________________6 符号________________________________________________________________________________________________6 硬件设置_________________________________________________________________________________________________ 7 安装CANopen适配器__________________________________________________________________________________ 7 连接至CANopen总线__________________________________________________________________________________ 8 配置______________________________________________________________________________________________________10 配置通信参数_________________________________________________________________________________________10 控制信号配置_________________________________________________________________________________________11 配置被监测参数_______________________________________________________________________________________14 配置通信故障管理_____________________________________________________________________________________15 诊断_____________________________________________________________________________________________________ 16 LED________________________________________________________________________________________________16 通信诊断____________________________________________________________________________________________17 控制信号诊断_________________________________________________________________________________________19 通信故障____________________________________________________________________________________________21 软件设置_________________________________________________________________________________________________ 22 概述________________________________________________________________________________________________22 PDO (处理数据给定)________________________________________________________________________________23 SDO (服务数据给定)________________________________________________________________________________26 其他可用服务_________________________________________________________________________________________26 涉及的标识符说明_____________________________________________________________________________________27 使用PL7与SyCon的软件设置__________________________________________________________________________________28 服务的详细说明_____________________________________________________________________________________________40 NMT命令____________________________________________________________________________________________40 CANopen NMT状态表__________________________________________________________________________________41 Bootup服务__________________________________________________________________________________________43 同步给定- SYNC______________________________________________________________________________________43 紧急给定- EMCY______________________________________________________________________________________43 PDO1_______________________________________________________________________________________________44 PDO2_______________________________________________________________________________________________48 PDO3_______________________________________________________________________________________________49 SDO服务____________________________________________________________________________________________50 节点保护服务_________________________________________________________________________________________53 脉动服务____________________________________________________________________________________________55 给定目录_________________________________________________________________________________________________ 56 通信配置文件区给定____________________________________________________________________________________57
中维红外网络摄像机使用说明书

目录第一章产品说明 (2)1.产品简介 (2)2.产品参数 (2)3.功能特性 (3)4.注意事项 (4)第二章安装操作 (5)1.安装网络摄像机所在网络环境 (5)2..监控系统连接摄像机 (5)第三章远程连接 (6)1客户端分类 (6)1.1中维云视通网络监控系统 (7)1.2 浏览器访问 (7)1.3 手机访问 (7)2远程连接方式 (7)2.1 云视通 (7)2.2 IP地址 (7)3中维云视通网络监控系统 (7)3.1 监控系统安装 (7)3.2 连接参数设置 (8)3.3 连接主控 (9)3.4 通道录像 (10)3.5 录像回放 (10)3.6 现场拍照 (10)3.7远程管理 (10)3.9更多功能 (20)4.W EB CC (21)4.1安装 (21)4.2连接主控 (21)4.3云视通号登陆 (22)4.4cc账号登陆 (23)4.5录像 (24)4.6 录像回放 (24)4.7抓图 (25)第一章产品说明1. 产品简介JVS-N71B(C或D)红外高清网络摄像机是中维公司精耕细作的又一款产品,它由高品质的视频采集模块、高性能的视频编码模块、稳定的夜视模块和精密的防水机壳四部分组成,软件以嵌入式Linux操作系统为基础,嵌了中维云视通服务。
此产品除了具备中维产品共有的:设置简单、操作方便、连通率高等特点外,还具备:画质清晰,宽动态、夜视效果好、图像延迟短、功耗低等特点。
2. 产品参数3. 功能特性• 预览、压缩分辨率均支持1280×720• 网络远程监控嵌云视通功能,无需复杂设置,轻松网传• 支持双码流,用户可选择码流并调节分辨率、帧率、视频质量• 支持红外灯、双滤光片自动切换,真正实现昼夜监控• 支持移动侦测,移动侦测报警自动发送提醒• 支持软件升级,可用升级/本地升级• 支持网络参数的静态配置/DHCP/ADSL• 支持手机监控,图像质量/帧率可调,无需复杂设置• 支持画面移动侦测/画面遮挡,可设置4个不同区域• 支持断电/意外故障后自动重启功能• 支持系统时间及OSD的容修改• 支持远程实时监看/远程开启主控录像/远程录像回放/远程下载• 支持网络用户管理、网络时间同步、CC、WebCC• 客户端可选择监控系统软件/浏览器/手机进行远程监控,实现方式多样,远程连通率高• 可通过公司自主研发的云视通网络监控系统(CV)进行集中管理、观看和录像等4. 注意事项中维JVS-N71B(C或D)摄像机为专业的安防监控设备,在安装使用时注意以下事项:1.网络摄像机在易遭雨淋场所要加防水罩。
华迈千里眼用户手册说明书

华迈千里眼用户手册华迈智能家居手机客户端说明书版本号:V2.7.1重要声明首先感谢您选用成都华迈通信技术有限公司出品的【华迈千里眼】网络摄像机。
在使用本产品之前,请认真阅读本使用手册。
本手册编写过程中力求内容正确与完整,但并不保证本说明书没有任何错误或漏失。
在您使用此产品时,华迈通信将认为您已经阅读过本产品手册。
成都华迈通信技术有限公司只对机器本身存在问题负有保修和维修责任,对于用户在非指定产品维修机构维修或者其他人为因素、火灾、地震等不可抗力所引起的设备损坏不负任何责任,也不对因此原因而造成的任何间接损失负责。
非指定维修人员打开设备而引起的任何故障以及安全问题均与成都华迈通信技术有限公司无关。
在安装设备时请将设备置于坚固的水平面上,使设备远离暖气片、水源或其他热源,请勿使用受损设备,包括开裂、磨损或损坏的电源线。
请勿在潮湿环境下使用设备,防止液体流入设备。
如果设备运行不正常,特别是有任何异常的声响或味道从设备中发出时请立即断开电源并联系经授权的代理商或维修中心。
本产品软件及硬件或者说明书所涉及的内容发生改变时,恕不另行通知,成都华迈通信技术有限公司拥有最终解释权。
版权警告成都华迈通信技术有限公司出品的【华迈千里眼】网络摄像机系列产品仅供购买用户使用,其使用方式不得触犯或侵害国际与国内之法律和法规。
一旦因使用不当而发生触犯或侵犯国际和国家法律及法规的行为,华迈通信将不为此负担任何民事和刑事责任。
通过本产品观看的视频内容仅供购买用户使用,用户复制,截图,以及利用该视频从事的任何不法行为,华迈通信都将不为此负担任何民事和刑事责任。
成都华迈通信技术有限公司——专注于网络音视频产品研发及服务提供——专注于电信增值业务系统集成及服务提供华迈通信是中国领先的民用网络摄像机及远程监控系统供应商,面向全球的中小企业和家庭提供领先的产品和解决方案。
公司的目标是让客户更加方便的使用网络摄像机。
华迈通信坐落于成都高新区天府软件园。
1C执法记录仪操作说明书新版

1C执法记录仪操作说明书新版PLUSTEK警务通执法记录仪操作说明一.外观按键说明功能指示灯显示屏录像键拍照键开机键待机键USB电源指示/充电指示摄像头红外滤光片喇叭开关机/录像/返回拍照键/回放上浏览下浏览/菜单灯控键对讲麦克风麦克风红外补光灯复位按键二、 1、操作说明开关机USB接口开机:按住【开关机/录像】键红灯亮,2秒“嘀”一声开机。
关机(待机):任何模式下,按住【开关机/录像】键2秒“嘀嘀嘀”三声关机,关机前会自动保存正在录制的视频。
关机时,主机遥控接收为待机状态,随时可使用遥控器开机。
自动关机:开机后,不进行任何操作,30秒钟后自动关机。
2、拍照模式按住【开关机/录像】键2秒“嘀”一声开机,进入主模式。
短按一下【拍照】键,转到拍照模式,“咔嚓”一声提示已拍照一张, 3、录像模式1.短按一下【开关机/录像】键“嘀”一声,开始录像,再按一下【开关机/录像】键“嘀嘀”两声提示表示停止录像,录像并已保存2.录像分辨率选择: 在主模式下,短按【菜单】键, 进入菜单模式进行图像分辨率的转换(分辨率为:1280x720 720x576 720x480 640x480), 【拍照】键确认并返回主模式,默认模式为720x480格式. 4、浏览模式可进行照片的浏览与录像文件的播放。
进入浏览:在主模式下,短按【上浏览】键进行到上下浏览模式,用上下键选中相应录像或拍照文件夹,按【回放】键进入,选中相应文件后即可按【回放】键播放.退出浏览:浏览模式下,短按【开关机】键,返回到主模式下。
切换浏览:短按【上浏览】键或【下浏览】键切换图片及录像,浏览时:图片文件标志,屏右上角有蓝色三角标志;录像文件标志,屏右上角有红色录像机标志。
录像回放:浏览模式下,如浏览对象为录像文件,短按【回放】键启动播放,在播放时按【上浏览】键为减小音量按【下浏览】键按为增加音量,再次短按【回放】键可暂停回放,再按一次将返回上级模式.备注:浏览模式不能直接切换至拍照模式,需短按【开关机】键,进入主模式后再操作相应功能。
神奇科技数字无线摄像头系统用户指南说明书
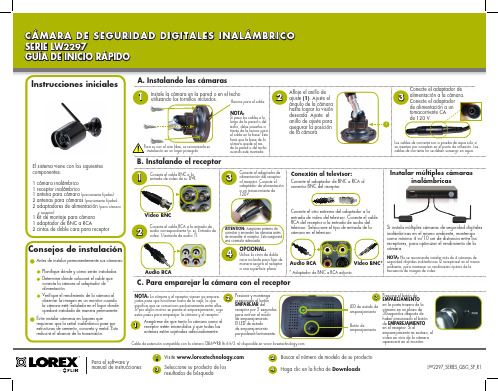
Instrucciones iniciales
El sistema viene con los siguientes componentes:
1 cámara inalámbrico 1 receptor inalámbrico 1 antena para cámara (previamente fijadas) 2 antenas para cámaras (previamente fijadas) 2 adaptadores de alimentación (para cámara
Para el software y manual de instrucciones:
1 Visite
3
Seleccione su producto de los resultados de búsqueda
2 Buscar el número de modelo de su producto 4 Haga clic en la ficha de Downloads
Utilice la cinta de doble
cara incluida para fijar de
manera segura el receptor
a una superficie plana.
Conecte el otro extremo del adaptador a la entrada de video del televisor. Conecte el cable RCA del receptor a la entrada de audio del televisor. Seleccione el tipo de entrada de la cámara en el televisor.
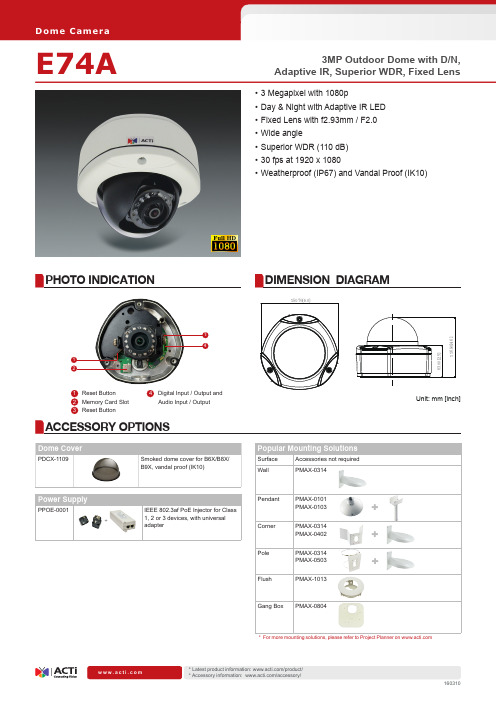
ACTI E74A 3MP Outdoor Dome摄像头说明文档说明书
Firmware Access Browser
Auto Firmware Upgrade GPS Position
E74A
Outdoor Dome Camera Progressive Scan CMOS
1/3" 2048(H) X 1536(V) (3.15 MP)
4 configurable regions User defined text on video
Image flip and mirror
8 kHz, Mono, PCM, 16 bit encoding; G.711 Terminal block Terminal block
TCP, UDP, HTTP, HTTPS, DHCP, PPPoE, RTP, RTSP, IPv4, IPv6, DNS, DDNS, NTP, ICMP, ARP, IGMP, SMTP, FTP, UPnP, SNMP, Bonjour 1, Ethernet (10/100 Base-T), RJ-45 connector
1, Terminal block 1, Terminal block MicroSDHC/MicroSDXC memory card slot (card not included)
PoE Class 2 (IEEE802.3af) / 6.48 W (IR on) 1006 g (2.218 lb)
CE (EN 55022 Class B, EN 55024), FCC (Part15 Subpart B Class B), IK10, IP67, NEMA 4X, UL (for optional PoE injector)
迪乐克 DCS-7110 全高清室外昼夜网络摄像机 使用说明书

HD Outdoor Day & Night IP CameraDCS-7110Key Features• 1/4” megapixel progressive CMOS sensor• HD resolution: 1280 x 800 (megapixel) at 30 fps• IP-66 certi ed weatherproof housing• PoE powered – no need for a separate power supply• Built-in IR LEDs for Day & Night operation(15 m. illumination distance)• Built-in IR-Cut Removable (ICR) lter, for enhanced colourrendering in the day and good results in low light conditions• Simultaneous streaming in H.264, MJPEG and MPEG-4compression• Hardware-based motion detection• Tamper detection• IPv6 support• Privacy mask function• 3GPP support – watch live video from a compatible smartphone• Digital I/O support for sensors and alarms• Open Network Video Interface Forum (ONVIF) compliant• D-ViewCam TM (DCS-100) monitoring software included(support for up to 32 cameras)The D-L ink DCS-7110 is a high-de nition outdoor IP Camera, equipped with a1/4” megapixel CMOS sensor and 4 mm F1.5 xed-focus lens. The DCS-7110 is capableof capturing videos in both dark and light environments with its built-in IR L EDs andremovable IR-cut (ICR) lter, which provides high quality videos day or night. The ICR ltercan be manually applied via the web or set to automatically adjust based on lightningconditions. Capture crisp color images during the daytime and detailed greyscale imagesat night or in or low-light conditions.Multiple Video StreamsThe DCS-7110 supports simultaneous streaming of H.264, MPEG-4, and MJPEGvideo to provide both high-quality and bandwidth-e cient compression formats.MJPEG delivers excellent le integrity, ideal for situations which require extensive imagedetail. H.264 produces a small le size, making it more useful for extended recording orfor use in low-bandwidth networks. Additionally, the DCS-7110 supports multicast H.264streaming, allowing users to view the camera images by subscribing to a multicast groupon the network.Flexible ConnectivityThe DCS-7110 includes input and output ports for connectivity to external devices suchas IR sensors, switches, and alarm relays. It also comes with an RS-485 interface, providingconnectivity to an optional pan/tilt enclosure. The DCS-7110 also incorporates Powerover Ethernet (PoE), allowing it to be easily installed in a variety of locations without theneed for supplemental power cabling.Tamper DetectionDesigned to be mounted outdoors, the DCS-7110 includes an IP66 certi ed enclosure which protects against the environmental elements. This makes it suitable for tamper-prone locations such as transportation hubs, schools,or correctional facilities. The tamper detection feature can sense whenever the camera has been redirected, de-focused, blocked or spray-painted and respond promptly with a visible or audible alarm.Removable IR-Cut FilterThe DCS-7110 comes with a ICR Filter which can be manually applied via a web interface or can be set to automatically adjust based on lighting conditions. This feature allows the camera to capture crisp colour images during the daytime and greyscale images at night.Open Network Video Interface Forum(ONVIF) compliantThe Open Network Video Interface Forum (ONVIF) is standards relating to open IP video networking. The DCS-7110 is ONVIF compliant and therefore interoperable with other manufacturer’s products on the same network such as cameras, storage systems, video analytics products and Video Management Systems. Centralised management with D-ViewCam™The included D-L ink D-ViewCam™ IP camera surveillance software is a comprehensive surveillance system designed to centrally manage multiple IP cameras. Supporting up to 32 IP cameras, D-ViewCam™ is compatible with all current D-L ink IP cameras, Video Servers and o ers digital monitoring and recording capabilities of video, audio, and events for various security applications. This software provides users with a wide array of features for added convenience, including video recording, playback, video live view, o ering users powerful surveillance software that’s easy to use. If the worst should happen to your network you need the very best support and fast. Downtime costs your business money. D-L ink Assist maximises your uptime by solving technical problems quickly and e ectively. Our highly trained technicians are on standby around the clock, ensuring that award-winning support is only a phone call away.With a choice of three a ordable service o erings covering all D-Link business products, you can select the package that suits you best:D-Link Assist Gold - for comprehensive 24-hour supportD-Link Assist Gold is perfect for mission-critical environments where maximum uptime is a high priority. It guarantees four hour around-the-clock response. Cover applies 24/7 for every day of the year including holidays.D-Link Assist Silver - for prompt same-day assistanceD-Link Assist Silver is designed for ‘high availability’businesses that require rapid response within regular working hours. It provides a four hour response service Monday to Friday from 8am to 5pm, excluding holidays.D-Link Assist Bronze - for guaranteed response on the next business dayD-Link Assist Bronze is a highly cost-e ective support solution for less critical environments. Response is guaranteed within eight business hours Monday to Friday from 8am to 5pm, excluding holidays.D-L ink Assist can be purchased together with any D-L ink business product. So whether you’re buying switching, wireless, storage, security or IP Surveillance equipment from D-Link, your peace of mind is guaranteed. D-Link Assist also o ers installation and con guration services to get your new hardware working quickly and correctly.Technical Speci cationsVideo Algorithms Supported• H.264/MPEG4/MJPEG format compression simultaneously• JPEG for still image• H.264/MPEG-4 multicast streamingHardware Profile• Sensor: 1/4” megapixel progressive CMOS sensor• SDRAM: 256 Mbytes• Flash Memory: 128 Mbytes• ICR: Built-in Infrared-Cut filter Removable module • Lens: 4 mm fixed lens , F1.5• View Angle: Horizontal 65.4 degrees• IR LED: 15 meter illumination distance and light sensorImage Features• Adjustable image size, quality, and bit rate• Time stamp and text overlays• 3 configurable motion detection windows • 5 configurable privacy masks• Flip & mirror• Configurable brightness, saturation, contrast, sharpnessNumber of Ports• 176x144 @ 30 fps• 320x240 @ 30 fps• 640x480 @ 30 fps • 1280x720 @ 30 fps • 1280x800 @ 30 fpsNetwork Protocols• IPv4, IPv6• TCP/IP, UDP, ICMP• DHCP Client• NTP Client (D-Link)• DNS Client, DDNS Client (D-Link)• SMTP Client• FTP Client• HTTP / HTTPS• Samba Client• PPPoE• UPnP Port Forwarding • RTP / RTSP/ RTCP • IP filtering• 3GPP• LLTD• CoS/QoS• SNMP/IGMP • SNMP• IGMP• 802.1x• ONVIF Complian3GPP Mobile Surveillance• Packet Video Player 3.0• QuickTime 6.5• Real Player 10.5 System Requirements for Viewing• Internet Explorer 6 or laterD-ViewCam™ System Requirements• Operating System: Microsoft Windows®7 / Vista / XP • Web Browser: Internet Explorer 6 or higher • Protocol: Standard TCP/IPPower Input• 12 VDC 1.25 A, 240 VAC 50/60 Hz• PoE: IEEE 802.3af Maximum Power Consumption• 6 WOperating Temperature• -20 to 50 ˚C (-4 to 122 ˚F)Storage Temperature• -20 to 70 ˚C (-4 to 158 ˚F)Humidity• 783 gCertifications• CE (Class A)• CE LVD (EN60965-1)• FCC (Class A)• ICES-003, ICES-006• C-TickCamera DimensionsFor more information: D-Link European Headquarters. D-Link (Europe) Ltd., D-Link House, Abbey Road, Park Royal, London, NW10 7BX.Speci cations are subject to change without notice. D-Link is a registered trademark of D-Link Corporation and its overseas subsidiaries.All other trademarks belong to their respective owners. ©2012 D-Link Corporation. All rights reserved. E&OE.Updated 28/01/2013。
ACTI E41 1MP Bullet 摄像头硬件用户手册说明书
E411MP Bullet with D/N, IR, Basic WDR, Vari-focal lensHardware User’s Manual(PoE)Ver. 2013/01/18Table of Contents0.Precautions 31.Introduction 4Package Contents (4)Features and Benefits (5)Safety Instructions (6)Physical description (8)Basic Connections (9)Product Specification (10)2.Installation 10How to Do the Waterproof with Conduit Installation (11)How to replace pre-installed network cable with cable gland (14)3.Accessing Camera 17If you have DHCP server / router in your network: (17)If you do NOT have DHCP server / router in your network: (17)2Read these instructionsY ou should read all the safety and operating instructions before using this product.Heed all warningsY ou must adhere to all the warnings on the product and in the instruction manual. Failure to follow the safety instruction given may directly endanger people, cause damage to the system or to other equipment.ServicingDo not attempt to service this video device yourself as opening or removing covers may expose you to dangerous voltage or other hazards. Refer all servicing to qualified service personnel.TrademarksAll names used in this manual are probably registered trademarks of respective companies.LiabilityEvery reasonable care has been taken during the writing of this manual. Please inform your local office if you find any inaccuracies or omissions. We cannot be held responsible for any typographical or technical errors and reserve the right to make changes to the product and manuals without prior notice.FCC/CE RegulationNOTE: This equipment has been tested and found to comply with the limits for a Class B digital device, pursuant to Part 15 of the FCC Rules. These limits are designed to provide reasonable protection against harmful interference when the equipment is operated in a commercial environment. This equipment generates, uses, and can radiate radio frequency energy and, if not installed and used in accordance with the instruction manual, may cause harmful interference to radio communications. Operation of this equipment in a residential area is likely to cause harmful interference in which case the users will be required to correct the interference at their own expense.34Package ContentsE41 (Included camera stand/sun shield)AccessoriesConduit GlandWarranty Card QIGFeatures and BenefitsThis is a cutting-edge digital video surveillance camera. It can compress and transmit real time images with outstanding image quality through a standard TCP/IP network. This camera is your best choice to build an intelligent IP surveillance system.H.264 High Profile/MJPEG Multi-Codec Dual StreamingThis device supports 2 compression formats, H.264 High Profile and MJPEG. It brings superior image quality at 30 frames per second up to a resolution of 720p (1280 x 720) pixels and VGA (640 x 480) pixels.Built-in Hardware Motion DetectionNo more external motion sensors are required. Y ou may assign up to 3 video motion detection areas. By tuning the object size and sensitivity, it will reliably detect objects passing though is view. Hardware motion detection also offers better sensitivity and faster response time than software motion detection.Powerful Bundled Surveillance SoftwareTo extend the capabilities of the IP Camera series, a powerful surveillance video management software can be downloaded from ACTi website for free. Users can easily use an existing PC as a digital video recorder. Scheduled recording and manual recording keep every important video recorded in the local hard disk. Reliable and accurate motion detection with instant warning enables immediate response in every condition. Quick and simple search and playback function lets you easily find the images and video you want. To experience ACTi NVR3, please go to: /nvr3.Software Development Kit SupportThis IP Camera can be integrated or controlled by applications from third party software developers. Software developers can save considerable efforts by using our Streaming Library or ActiveX control. Please contact us for details on integration support.5Safety InstructionsDon’t open the housing of the productCleaningDisconnect this video product from the power supply before cleaning.AttachmentsDo not use attachments not recommended by the video product manufacturer as they may cause hazards.Water and MoistureDo not use this video product near water, for example, near a bathtub, washbowl, kitchen sink, or laundry tub, in a wet basement, or near a swimming pool and the like.Don’t use accessories not recommended by the manufacturerOnly install this device in a dry place protected from weatherServicingDo not attempt to service this video product yourself as opening or removing covers may expose you to dangerous voltage or other hazards. Refer all servicing to qualified service personnel.Damage Requiring serviceDisconnect this video product from the power supply immediately and refer servicing to qualified service personnel under the following conditions.1) When the power-supply cord or plug is damaged2) If liquid has been spilled, or objects have fallen into the video product.3) If the video product has been directly exposed to rain or water.4) If the video product does not operate normally by following the operating Instructions inthis manual. Adjust only those controls that are covered by the instruction manual, as an improper adjustment of other controls may result in damage, and will often requireextensive work by a qualified technician to restore the video product to its normaloperation.6Safety CheckUpon completion of any service or repairs to this video product, ask the service technician to perform safety checks to determine if the video product is in proper operating condition.7Physical description1) Reset ButtonStep 1: Press and continue to hold the Reset Button for 15 seconds (with a sharp tipped object, like a pen.) after the unit has successfully completed the boot process.Step 2: The Ethernet LED light will turn off for about 1~2 seconds and flash on for another second. By this time the reset to default operation is already completed. Y ou may then releasethe reset button. This length of time fluctuates slightly with the environment. The unit will come back on and stay on after a few more seconds. The unit will start up with factory defaultsettings automatically.2) Power LEDLED light will light up while the power is on. LED light will light off after the unit has successfully completed the boot process.3) Ethernet PortThe IP device connects to the Ethernet via a standard RJ45 connector. Supporting NWAY, thisIP device can auto detect the speed of local network segment (10Base-T/100Base-TX Ethernet).8Basic ConnectionsFollow the procedures below to connect the IP device to the respective apparatuses.Please use a PoE (Power over Ethernet) supported switch or injector:1) Connect your IP Camera to the PoE Switch / Injector by CA T5 or CA T6 cables with RJ45connector.2) Connect your PoE Switch / Injector to PC with another CA T5 / CA T6 network cable.910All specifications are subject to change without notice. Please check Data Sheet on our website for latest specifications.112. InstallationHow to Do the Waterproof with Conduit InstallationBeside the bundled network cable, you also can use conduit and follow the installation procedure to make the camera be water-resistant even for the situations where the camera can easily be flooded by pouring rain.The important part to focus on during the installation: The protection of the cabling has to be done by a proper flex conduit. The size of the flex conduit that matches with the conduit gland is 1/2”. Please note that the conduit gland is included to the package of the bullet camera.The following images show the step-by-step procedure of completing the water-proof installation.Disassemble the conduit gland as shown on the photo. 1.Pull the network cable through the flex conduit.Please note that the size of the conduit and the gland is big enough to let the RJ-45 connector pass through all the way. 2.Two pieces from the conduit gland set will beattached to flex conduit first.123.Remove the bundled network cable andconnector from back side cover of the camera. 4.The third piece of conduit gland goes throughthe back side cover of the camera. 5.The fourth piece (locking nut) is used to lockthe gland firmly from the inside of the back side cover. 6.Pull the network cable through the back sidecover of the camera. 7.Connect the flex conduit to the back side coverof the camera.138. Tighten the domed sealing nut.9.Plug the network cable into the camera ’s RJ-45 connector before closing the back side of the camera. If you are not using PoE and need an additional power cord then please connect it at this stage, too.10. Tighten the screws of the back side of the camera properly.11. Finally, the bullet camera with properly mounted flex conduit as well as with proper outdoor bracket would look like this. The camera is now ready to withstand even the most severe rain storms.14How to replace pre-installed network cable with cable glandThe camera bundled cable gland with pre-installed network cable is M20 X 1.5 Matric thread. It is resistant to salt water, weak acid, alcohol, oil, grease and common solvency.The cable gland consists of five parts: Lock Nut, Body, Seal, Claw and Sealing Nut as shown below.The cable gland can hold cable firmly and have a wide range of network cable sizes, you can change suitable network cable quickly and easily to fulfil the installation environment. It is not necessary to dismantle the cable gland any further than illustrated below.The naked length of pre-installed network cable is around 14 cm.14 cmSealing NutClawSeal15The following images show the step-by-step procedure of replacing network cable and completing the water-proof installation.1.Open the back side cover from camera, and remove the network cable, and loosen the sealing nut to release the network cable from camera.2.Separate the seal from the claw.3.Squeeze the seal and then pull out the bundled network cable.4.Pull the new network cable through Sealing Nut, Claw, Seal and cable gland on the back side cover of camera sequentially.12165.Assemble the Seal and Claw, and then Insert thenetwork cable to RJ-45 PoE connector.6. Tighten the screws of the back side cover on the camera properly7.Tighten the sealing nut as far as possible.8.Finally, the bullet camera is now properly mounted with waterproof cabling and is ready to attach to the proper outdoor bracket.213.Accessing CameraIf you have DHCP server / router in your network:Many network server / routers are able to automatically provide IP addresses through DHCP. If you are using such a network, just plug in your computer and IP Camera into the network and your IP device will acquire network address by itself. Find and access the device with our IP Utility program. Y ou may download it at:/UtilityIf you do NOT have DHCP server / router in your network:1. Configure your PC to use the same subnet by changing your PC’s IP address to thesubnet with prefix 192.168.0.XXX. The last number should be anything from 1 to 254except 100 and other occupied IP addresses. Subnet mask should be 255.555.255.0.2. The default IP used by this device is 192.168.0.100. Please make sure your PC isNOT using this address and that no two equipments use the same IP address in the network.3. Change your IP address by going to Control Panel ->Manage Network Connections ->Right click on the connection to change -> Option -> TCP/IP IPv4 Properties.174. Open Internet Explorer (Version 6.0 or above) , and type in the Default IP:192.168.0.1005. When you see the login window, please input default user and password:Default User: Admin Password: 123456Please set the settings as below.●IP address: 192.168. 0.xxx●Subnet mask: 255.255.255. 0(NOTE: xxx should be a numberfrom 1 to 254 except 100, which isused by the IP device. Please alsomake sure that no two equipmentsuse the same IP address in thesame network.) 18196. After logging in, you will see the video from camera. To go to the main menu, click the“Setup” button on the top left.If you are using a single camera, this is enough to access the device.If you are using multiple devices, you need to change the current device to another unused IP address, so that when the next device is connected to the network, no two devices use the same IP . Please perform the following steps.7. Go to IP Settings -> Connection Type8. Change the IP mode to Static.9. Change the IP to 192.168.0.101 or any other unused IPs. Do NOT use the PC ’s IPaddress or 192.168.0.100.). If this is not the first device you add to the network, please also avoid other devices ’IPs.2010. Click “Apply ”11. Please go to System -> Save & Reboot, and click “Apply ”. Internet Explorer will closeafter a few seconds. This is normal.12. Wait for 30 seconds, and open IE again to connect to the new IP . (In this example,192.168.0.101). For the second device or more you add into the network, please type the correct IP .13. Adjust the default Video setting by going to Video -> VideoPlease refer the firmware manual for the detail information.。
- 1、下载文档前请自行甄别文档内容的完整性,平台不提供额外的编辑、内容补充、找答案等附加服务。
- 2、"仅部分预览"的文档,不可在线预览部分如存在完整性等问题,可反馈申请退款(可完整预览的文档不适用该条件!)。
- 3、如文档侵犯您的权益,请联系客服反馈,我们会尽快为您处理(人工客服工作时间:9:00-18:30)。
千里眼C71PoE说明书
目录
一.产品描述 (3)
二.目标客户 (3)
三.产品功能 (3)
四.产品卖点 (3)
五.产品定购/退定流程 (4)
六.产品使用流程 (4)
七.产品计费 (6)
八.FAQ(常见问题解答) (6)
九.售后技术支持 (7)
一、产品描述
“千里眼”业务是一项基于3G 可视电话技术,借助视频终
端设备,为家庭及企事业单位提供无线监控、报警及图像存储功能的产品。
用户使用支持视频通话的WCDMA 手机(“千里眼端”),拨打
设备端,该设备自动接通,即可实时观看所拍摄的画面,收听所接收到的声音。
二、目标客户
“千里眼”的目标客户:
1、家庭客户:可以照看家中的老人、儿童及宠物。
2、零售批发业:各零售批发业的店铺及仓库。
3、中小企业:中小企业需要监控的地方。
4、企事业单位:企事业单位需要监控的地方及无人职守的
库房。
三、产品功能
1. 日常监控
客户可以实时观看店铺或家里的情况,想看就看,只要用
3G 手机通过可视电话拨通监控点号码,监控情况尽收眼底。
用户即可实时观看监控器所拍摄的画面,收听所接收到的声音。
2. 日常录像
日常录像有离线录像和在线录像两种,并且客户可以自行
选择时间段进行录像并存储回放。
设备必须要插入T-FLASH 存储
卡,此卡用于保存监控器所拍摄的视频记录。
3. 报警
系统提供三种报警方式:可视电话、录相加短信及图片彩
信的方式,客户可根据习惯自由选择。
4. 喊话
客户可以通过此功能对不法分子进行警示或与监控点人员
进行交流。
四、产品卖点
1. 操作简便,通用性强
利用3G 可视电话功能,通过数字键控制方向。
任何支持WCDMA 可视电话的手机都可以使用该设备。
2. 应用环境广泛
家庭、店铺、医疗、学校、库房……,为特定用户群打造
的专门业务服务。
3. 可以使用千里眼设备随时随地获得监控图像。
五、产品定购及退定流程
(一)、定购流程:
用户到营业厅申请开通“千里眼”业务
1、“千里眼端”录入要求。
营业员通过营帐系统中的“产品
管理”下的“产品业务新装”开户,套餐选择:本地通话费0. 40 元,同时开通可视电话、GPRS 上网功能。
营业员还需按如下要
求录入:“结算入网方式”选择“大连“千里眼”业务”。
2、专款录入流程:“专项存款类型”选择“预存话费”、“月
转移金额”:3G 号码选择录入100,2G 号码录入20、“首月计”勾选(即当月生效)。
3、可视电话亲情号码录入流程:
“千里眼端”:选择产品管理—产品信息变更—输入号码—
查询
包月费分组—选择“3G 可视电话亲情号码可选包-月租
30 元”
亲情优惠分组—选择3G 可视电话亲情号码可选包—在界
面下方输入“千里眼”业务设备端手机号码“”—预算
—提交。
“设备端”:选择产品管理—产品信息变更—输入号码—查
询
亲情优惠分组—选择3G 可视电话亲情号码可选包—在界
面下方输入“千里眼”业务设备端手机号码“”—预算
—提交。
(二)、退定流程:
同营业销户流程。
六、产品使用流程
1、插入有效的SIM 卡、插入T-FLASH 卡。
2、设置管理员号码:
第一个拨通设备号码的合法用户自动成为管理员。
按提
示要求输入用户PIN 码(默认PIN 码为0000)并按“*”键结束。
3、摄像头的调节:
用户可对摄像头的角度、图像亮度和变焦进行调节,控
制摄像头角度向上、下、左、右分别最大旋转40°、5°、45°和45°,以及3 倍数字变焦。
按“2”键控制摄像头上转;
按“4”键控制摄像头左转;
按“6”键控制摄像头右转;
按“8”键控制摄像头下转;
按“5”键将画面转动180 度;
按“1”键摄像头图像缩小;
按“3”键摄像头图像放大;
按“7”键降低画面亮度;
按“9”键提高画面亮度
在视频电话接通后,管理员可按“0”键进入菜单,再
按照提示进行安全信息设置、用户管理、录像管理、运动检
测设置、设置等操作。
七、产品计费
“设备端”资费:选用2G 资费套餐,月租费5 元,本地市话主被叫0. 4 元/分钟,其他执行标准资费。
“千里眼端”资费:3G 基本套餐A、B 资费,可设置一个亲
情号码,“千里眼端”为主计费号码,包月费30 元,与“设备端”业务设备每月各免1000 分钟可视电话主叫通话时长,超出按照
标准资费收取。
促销政策
客户办理“千里眼”业务,在“千里眼端”预存1800 元话
费,每月转存100 元,在“设备端”预存200 元话费,每月转存
20 元,即可获得“千里眼”设备终端。
八、FAQ(常见问题解答):
问:同一个管理员可以管理多个设备端吗?
答:可以,因为每个设备端是不同的号码,管理员只要拨打需管
理的设备端号就可以进行管理。
问:为什么千里眼的设备端开不了机?
答:请先检查电量指示灯的显示。
如果指示灯未点亮,或者开机
时没有播放音乐,请给设备端充电。
如果指示灯点亮且为蓝绿色,
请检查您的USIM 卡是否有效并且已解锁(您可以找一部手持设
备试验一下,如果该设备启动时有要求输入PIN 码的提示,请将
PIN 码验证的功能关闭)。
在您确认USIM 卡可正常使用后,将其
插回设备端的USIM 卡槽,并按重启键再次启动。
问:为什么我无法拨打视频电话?
答:请检查信号指示灯的颜色。
如果信号指示灯没有点亮,则说
明设备端没有正常启动。
请按电源开关重新开机。
如果信号指示
灯呈闪烁的红色,则说明3G 信号不好或者无3G 信号。
如果指示
灯呈闪烁的绿色,则表明设备端可正常工作。
如您依然无法拨通,请检查您的手持设备是否正在漫游或者设置成拨号时隐藏本机
号码。
出于安全原因,不发送(隐藏)本机号码的手机不能和设备端进行视频通话。
问:为什么通话不稳定或者我在某些地方无法打视频电话?
答:当您在的地点信号不稳定时,通话可能会不稳定或者无法进行视频通话。
请联系您的网络服务提供商或者换个地点试试。
问:当视频电话接通时为什么没有提示音?
答:在设备端终端中有相关设置。
您可用管理员号码发送短信指令到设备端终端设置打开或关闭提示音功能。
问:为什么在某些地点通话有回声?
答:这叫“回声现象”。
当音量设置过大或者您的手机离设备端
终端太近时,这种现象就会发生。
问:为什么我的手机显示不了主菜单并且不能通过短信控制设备端?
答:这是因为您的手机号码不是管理员号码。
为了安全,只有管理员可以设置设备端的参数。
问:设备端工作正常,为什么还是打不通视频电话?
答:请检查您的手机,是否正在漫游或者设置为隐藏号码。
如果设备端无法识别拨入的号码,通话就不能接通。
如果您收到提示短信:“白名单已满,您的电话无法接通”,您可以通过管理员号码发送短信清除不包括管理员在内的20 个号码,或者删除部分
白名单用户。
问:如果发生意外使设备端无法工作,我应该怎么办?
答:您可按重启键将其重新启动。
问:如果我忘记密码或者管理员号码怎么办?
答:请将设备端交给零售店或指定的维修点。
问:T-FIASH 存储卡能录多长时间录像?
答:2G 的T-FLASH 卡能录30 个小时,如果录像时间超过3 小时,录像内容将会分多个文件保存。
九、售后技术的支持
中兴通讯股份有限公司联系人:刘意189********。