Windows或者linux下安装HP Lights
HP ProLiant DL365 第五代(G5)服务器 说明书

采用全新的AMD 四核处理器,高达32GB 的DDR 2-667MHz 内存,PCI-E 技术为两路处理器系统提供了强劲的IO 性能。
在1U 高的服务器中,支持6个2.5英寸的SAS 或SATA 的硬盘。
这款服务器非常适合运行多种要求不断扩充处理性能的应用程序。
借助远程管理功能实现虚拟的现场控制与管理,包括电源的打开与关闭,通过图形化的控制终端,可以将远端的远程介质如光驱、软驱映射给服务器,从而实现虚拟设备的使用。
通过机柜的优化设计,在一个超高密度的机箱中,容纳了冗余的风扇,冗余的电源以及其它多种可升级的选件。
全新特性HP ProLiant DL365 G5所使用的处理器是最新的AMD 四核处理器。
高性能•两路AMD 皓龙四核处理器2300•PC5300 DDR2-667增强的ECC 内存技术,最多支持大32GB ,8个内存插槽•全新的SmartArray E200i 以及SmartArray P400i 磁盘阵列卡,可以为用户提供高性价比和高性能的磁盘IO特性HP ProLiant DL365第五代(G5)服务器DL365 G5是一个基于机柜优化模式的高密度机柜服务器,可应用于数据中心和多种应用环境,在1U 高的机箱当中,集成了优异的远程管理功能和高处理性能。
•支持2.5英寸SAS 和SATA 硬盘,可扩展至6块,最大存储容量:SAS 硬盘容量876GB ,SATA 硬盘容量720GB 高扩展性:•两个PCI-E 插槽,一个全长一个半长•4个USB 接口,1个前置,1个内置,2个后置管理特性•标准配置带有集成的远程控制功能iLO2•前置的可滑动的状态显示面板,可直观查看系统组件状态•ProLiant 精华基础软件包可选附件•可选的冗余电源模块和风扇模块•可选的电缆管理导向臂。
便于管理与维护设计与连接•冗余的风扇•前置的显示器端口•双端口多功能千兆以太网卡•通用的机柜安装滑轨,可以应用于方形或圆形的多种定位孔的机柜产品编号说明447598-AA1(1) 个AMD Opteron™ (皓龙™)处理器2352 (2.1GHz,75瓦),标配1GB (2 x 512MB)、PC2-5300 DDR2 DIMM (667MHz),机架式(1U)标准配置处理器AMD Opteron™ (皓龙™)处理器2354 (2.2GHz,75瓦)AMD Opteron™ (皓龙™)处理器2352 (2.1GHz,75瓦)内存类型PC2-5300 DDR2 DIMM (667MHz)取决于产品型号标配(基本机型)1GB (2 x 512MB)最大32GB (8 x 4GB)注:DIMM必须依容量递减安装,最大的DIMM安装在距每个处理器最远的插槽内。
惠普 瘦客户机 用户指南

HP 瘦客户机©Copyright 2018 HP Development Company, L.P.Windows 是 Microsoft Corporation 在美国和/或其他国家/地区的注册商标或商标。
本文档中包含的信息如有更改,恕不另行通知。
HP 产品和服务附带的明示保修声明中阐明了此类产品和服务的全部保修服务。
本文档中的任何内容均不构成任何额外保证。
HP 对本文档中出现的技术错误、编辑错误或遗漏之处不承担任何责任。
第一版:2018 年 5 月文档部件号:L18409-AA1产品通告本用户指南介绍大多数机型的常见功能。
您的笔记本计算机上可能未提供某些功能。
并非所有功能在所有 Windows 版本中都可用。
系统可能需要升级和/或单独购买硬件、驱动程序或 BIOS 更新,以充分利用 Windows 功能。
Windows 10 会自动更新,此功能始终处于启用状态。
可能会收取 ISP 费用,在更新过程中可能还会有其他要求。
请参阅。
要获取最新版本的用户指南,请访问/support,然后按照说明查找您的产品。
然后选择用户指南。
软件条款如果安装、复制、下载或以其他方式使用此计算机上预安装的任何软件产品,即表明您同意受 HP 最终用户许可协议(EULA) 条款的约束。
如果您不接受这些许可协议条款,只需将未使用的产品(包括硬件和软件)在 14 天内完整地退回给您的经销商,并依据其退款政策申请全额退款即可。
有关任何其他信息或申请计算机的全额退款,请联系您的经销商。
关于此手册指示一种危险情况,如果不避免,可能导致设备损坏或信息丢失。
切记:表示重要但与危险无关的信息(例如,与财产损失相关的消息)。
系统会发出一个通知,提醒用户如果不完全按照所述的步骤进行操作,将可能导致数据丢失或硬/软件损坏。
此外还包含用于解释概念或完成任务的基本信息。
注:包含其他信息,以强调或补充正文的要点。
提示:提供完成任务的有用提示。
HP iLO 详细介绍

HP iLO 详细介绍一、HP iLO 简介iLO 就是一组芯片,内部就是vxworks得嵌入操作系统,在服务器得背后有一个标准RJ45口对外连接生产用交换机或者带外管理得交换机。
iLO 全名就是Integrated Lights-out,它就是惠普某些型号得服务器上集成得远程管理端口,它能够允许用户基于不同得操作系统从远端管理服务器,实现了虚拟存取与控制,从而进行智能型基础构架与管理。
iLO自己有处理器,存储与网卡,默认网卡配置就是DHCP,可以在服务器启动得就是欧进入iLO 得ROM based configuration utility 修改ip, dpch->;static。
服务器买得时候,在面板左侧,会有一个白色得纸吊牌,上面写着iLO 网卡上得DNS name与Username Password。
请勿随便更改,更改了不要遗失。
iLO得使用很简单、用网线把iLO口与您得LAN switch或者专门得OB(带外管理) switch 相连。
如果您准备让iLO 默认方式工作,您需要有一个LAN内得DHCP与DNS 服务器存在。
如果您在服务器启动得时候修改dhcp 到static ip,就无所谓了。
在您得笔记本或者pc上,开一个IE(支持java), 然后地址那里书写iLO DNS name(写在纸吊牌上得,您需要DHCP DNS 服务器在局域网内)。
就可以瞧到iLO界面了。
或者直接填写iLO得ip地址也可以。
iLO界面除了报告一些硬件信息之外,主要提供了三大类控制:Virtual console, 就就是类似pc anywhere 得远程控制了,但就是与软件得控制不一样,它就是完全硬件级得,哪怕您得服务器没有操作系统,或者硬盘损坏,或者重新启动,都可以完整得进行控制,所以除非更换被管理服务器得硬件,正常得操作都可以用iLO来做,根本不用进入机房。
(当然得保证网络通畅)。
第二类就是Virtual power, 虚拟电源,模拟所有得电源开关动作,比如按住不放,按住就放等等、、、第三类就是Virtual media ,虚拟介质,您可以将pc或者笔记本上得光驱软驱,通过LAN, 虚拟给被管理得服务器。
HP Development Company, L.P. Windows系统内存模块安装指南说明书

User Guide© Copyright 2017 HP Development Company, L.P.Windows is either a registered trademark or trademark of Microsoft Corporation in the United States and/or other countries.Intel and Core are trademarks of Intel Corporation in the U.S. and other countries. The information contained herein is subject to change without notice. The only warranties for HP products and services are set forth in the express warranty statements accompanying such products and services. Nothing herein should be construed as constituting an additional warranty. HP shall not be liable for technical or editorial errors or omissions contained herein.First Edition: June 2017Document Part Number: 937232-001Table of contents1 Introduction (1)Warnings and cautions (1)Your responsibilities (1)System requirements (2)2 Installing the memory module in your computer (3)Models with M.2 connectors (3)Models without M.2 connectors (4)3 Installing the Intel Optane software (6)Installing the Intel RST software and driver (6)Installing the Intel RST driver into the operating system Recovery image (6)4 Using the Optane memory application (8)Initialization errors (8)Statistics page (8)5 Using Intel Optane memory with the Intel Rapid Storage Technology driver (9)Enabling Intel Optane memory (9)Disabling Intel Optane memory (9)6 Troubleshooting (10)iiiiv1IntroductionOptane memory is an M.2 module that is meant to boost system performance when used with a SATA storagedevice (hard drive) on 7th Generation Intel® Core™ processor-based computers. For detailed information onIntel Optane memory, go to /support/optane-memory.Warnings and cautionswith this symbol.Guide also provides important electrical and mechanical safety information. This guide is located at/ergo and on the documentation CD (if one is included with the product).injury from a hot component, allow the surface to cool before you touch it.IMPORTANT:Static electricity can damage the electronic components of the computer. Before beginningthese procedures, be sure you discharge static electricity by briefly touching a grounded metal object.IMPORTANT:To prevent damage to the computer, observe the following Electrostatic Discharge (ESD)precautions while performing the system parts removal and replacement procedures:●Work on a static-free mat.●Wear a static strap to ensure that any accumulated electrostatic charge is discharged from your body tothe ground.●Create a common ground for the equipment you are working on by connecting the static-free mat, staticstrap, and peripheral units to that piece of equipment.NOTE:HP accessories are for use in HP computer products. They have been extensively tested for reliabilityand are manufactured to high quality standards.Your responsibilitiesYou are responsible for determining whether the product is appropriate for your use and will interface withother equipment without malfunction or damage. You are also responsible for backing up data beforeinstalling any product and for regularly backing up data after installing the product. HP is not liable for anydamage to equipment or data loss resulting from the use of any product. To determine the compatibility ofthis product with your computer or workstation, view QuickSpecs at /go/productbulletin.Warnings and cautions1System requirements●Intel 7th Generation Core i3, i5, or i7 processors●Intel Rapid Storage Technology (Intel RST) driver, Version 15.5 or later●Operating system: Windows® 10 Spring 2017 Creator’s Update (1703) or later installed on a supportedstorage deviceIMPORTANT:Only Windows 10 Spring 2017 Creator’s Update (1703) or later is supported.● A supported backend (slow media system disk) storage device connected to the Intel AHCI controller offthe chipset with Windows 10 64-bit installed, formatted for the GUID partition table (GPT), and at least 5MB of continuous, unallocated space at the end of the boot volume●HP BIOS Version 02.06 or newerNOTE:To locate the latest BIOS for your product, go to /support.●BIOS configured for Optane●The Intel Optane memory module populated in an M.2 connectorIMPORTANT:Intel Optane memory does not support self-encrypting or Federal Information ProcessingStandard (FIPS) 140-2 drives.2Chapter 1 Introduction2Installing the memory module in your computerThe procedure to install the module differs depending on your computer model. If you need help preparingyour computer model for this installation, refer to the documentation provided with the computer, or go to/support to locate the manual for your model.Models with M.2 connectorsNOTE:If there are two M.2 connectors on the system board, install the memory module in the second M.2connector to avoid potential Electromagnetic interference.Install the module onto the system board.1.Locate the supported M.2 connector on your system board. The connector is labeled SSD.2.If necessary, install the screw standoff into hole near the connector.3.Insert the module into the M.2 connector (1).Models with M.2 connectors34.Rotate the module downward (2), and then install the screw (3).Models without M.2 connectorsInstall the module into a PCIe carrier card, and then install the carrier card in the x4 expansion slot.IMPORTANT:Do not install the carrier card into the x16 expansion slot.1.Install the module into a PCIe carrier card:a.Insert the module into the M.2 connector (1), and then insert the screw into the slot in the module(2).IMPORTANT:Be sure that the slot in the screw is facing the module so that the screw inserts fullyonto the module.b.Rotate the module downward (3), and then tighten the screw (4).4Chapter 2 Installing the memory module in your computer2.Insert the PCIe carrier card into the computer expansion slot (1), and then install the screw into thecarrier card bracket (2).Models without M.2 connectors53Installing the Intel Optane softwareThis section describes the process of installing the Intel Optane memory software and driver on a computer.You must use the Setup Utility to enable Optane memory. After enabling Optane in the Setup Utility, you mustenable it in the Intel RST software.NOTE:The system board requires a BIOS update to Version 02.06 or later before the Intel Optane memoryand software driver package can be installed. To locate the latest BIOS for your product, go to /support, and follow the on-screen instructions to find your product and locate downloads.To enable Intel Optane in the Setup Utility:1.Go to the Setup Utility by restarting the computer and repeatedly pressing F10 to enter setup.2.Select Advanced>System Options, and then select Configure Storage Controller for Intel Optane.NOTE:You can configure Optane memory programmatically with BiosConfigUtility.exe or WMI BIOSSettings commands.3.Restart the computer.IMPORTANT:Once you install the Intel Optane System Accelerator, reverting back to a BIOS version olderthan 02.06 will disable your Intel Optane System Accelerator and could keep your system from booting. Installing the Intel RST software and driverThis section provides an overview of steps to install and set up Intel Optane memory with the Intel RST userinterface.IMPORTANT:Update BIOS to Version 02.06 or later before installing the software and driver.1.Go to /support, and select the most recent Intel Rapid Storage Technology softwareand driver.2.Run setupRST.exe and install the defaults.3.Restart the computer.4.From the Windows desktop, launch the Intel RST user interface, and then click the Intel Optane Memorytab. The Status page opens.5.Click Enable.6.After the enable process is complete, reboot the computer.After the system restarts, installation continues in safe mode. When installation is complete, the systemagain restarts. You can now use the Intel Optane memory application.Installing the Intel RST driver into the operating system Recovery imageThe current Microsoft Intel Rapid Storage Technology driver does not support Intel Optane memory.Therefore, if the operating system image is damaged (for example, by hard drive corruption, file corruption, 6Chapter 3 Installing the Intel Optane softwaremissing files) and enters the Windows Recovery process, the operating system recovery image/tools must contain the Intel Rapid Storage Technology driver Version 15.5 or later. You can insert this driver into the operating system Recovery image/tools before you install Intel Optane.Requirements:●Windows Assessment and Deployment Kit (ADK) installed●Windows 10 64-bit image●Windows 10 Spring 2017 Creator’s Update (1703)●Intel Rapid Storage Technology software and driver, Version 15.5 or later, available from /support●USB flash drive for installationTo install the driver:1.Create a bootable USB flash drive from the Windows 10 operating system image.2.Create a temporary working directory on the local computer (for example, C:\Win10USB).3.In the working directory, create three subdirectories named Windows, Winre, and Drivers.4.Extract the Intel Rapid Storage Technology driver to the Drivers subdirectory.5.From the Windows 10 USB flash drive, copy the install.wim file from the Sources directory on the flashdrive to the working directory (for example, C:\Win10USB).6.Close all folders and File Explorer.7.Open a command prompt as Administrator and change to the working directory (for example, cd C:\Win10USB).8.Determine which index number to modify based on the installed version of Windows 10. Choose theindex that matches the Windows 10 version.To determine the index, run the command dism /get-wiminfo /wimfile:install.wim.IMPORTANT:This example modifies Index 2. You can repeat steps to modify additional versions.9.Modify the install.wim file by running the following commands:●Mount the Windows Image: dism /mount-image /imagefile:install.wim /index:2 /mountdir:windows●Add the Intel Rapid Storage Technology drivers to the Windows image: dism /image:windows /add-driver /driver:drivers /forceunsigned /recurse●Mount the Windows Recovery Image: dism/mountimage/imagefile:c:\Win10USB\windows\windows\system32\recovery\winre.wim /Index:1 /mountdir:winre●Add the Intel Rapid Storage Technology driver to the Windows Recovery Image: dism /image:winre /add-driver /driver:drivers /forceunsigned /recurse●Unmount the Windows Recovery Image: dism /unmount-wim /mountdir:winre /commit●Unmount the Windows Image: dism /unmount-wim /mountdir:windows /commit●Copy the updated install.wim file in the working directory back to the Sources directory on the USBflash driveInstalling the Intel RST driver into the operating system Recovery image74Using the Optane memory application Initialization errorsYou can open the application by selecting Intel Optane Memory on the Start menu.This section includes examples of errors that could occur if your computer is not ready to enable Intel Optanememory.Error Cause and solutionYour System is Intel Optane Memory Ready No Intel Optane memory modules are detected on your computer. Please insert amodule and try again.Error Initializing Intel Optane Memory There is a pending restart for this product. Please restart before running theapplication.Error Initializing Intel Optane Memory The Intel Optane memory application was not installed correctly. Please repair orreinstall the application.Your system is not fully compatible with Intel Optane memory.Your System is Not Intel Optane MemoryReadyIntel Optane Memory is Disabled If more than one Intel Optane memory module is installed, select the module to use,and then click Enable.Statistics pageTo display statistics, Intel Optane memory must be enabled.The Optimization schedule will be shown for only 32 GB or larger memory modules.8Chapter 4 Using the Optane memory application5Using Intel Optane memory with the Intel Rapid Storage Technology driverEnabling Intel Optane memoryTo enable Intel Optane memory using the Intel Rapid Storage Technology application, open the Intel RapidStorage Technology application, and then click the Intel Optane memory tab.NOTE:The Intel Optane memory tab displays only in the software for Intel Rapid Storage TechnologyVersion 15.5 or later.1.Click Enable.2.Select a compatible fast drive, and then click Yes. The compatible drive option displays only if more thanone Intel Optane memory module is installed in the computer.3.After the enable process is complete, click Reboot to restart the computer.IMPORTANT:The computer must be restarted, not shut down. Shutdown may cause incorrect displayof drive volumes.Disabling Intel Optane memoryIMPORTANT:Do not disable Optane memory in BIOS unless you first disable the feature in the Intel RSTapplication.Before removing the SATA storage device being accelerated by the memory or removing the memory modulefrom the system, you must disable Intel Optane memory.To disable Intel Optane memory using the Intel Rapid Storage Technology application:IMPORTANT:Do not remove the Intel Rapid Storage Technology driver after disabling Intel Optane memory.1.Open the Intel Rapid Storage Technology application, and then click the Intel Optane memory tab.2.Click Disable, and then click Yes to confirm.3.After the disable process is complete, click Reboot to restart the computer.IMPORTANT:The computer must be restarted, not shut down. Shutdown may cause incorrect displayof drive volumes.Enabling Intel Optane memory96TroubleshootingThis section includes examples of errors that could occur during installation of the Intel Optane memorysoftware and driver. For more information and help on these errors, please contact support at /support.Error Cause and solutionUnsupported CPU Intel Optane memory requires a 7th generation Intel Core processor or later.Unsupported Chipset Intel Optane memory requires a supported Intel 200 Series Chipset or later.Unsupported Operating System Intel Optane memory requires Windows 10 64-bit Spring 2017 Creator’s Update(1703) or later.Unsupported BIOS Intel Optane memory requires BIOS Version 02.06 or later.Unsupported BIOS mode Intel Optane memory requires BIOS Version 02.06 or later.Unsupported System Drive An MBR system drive partition table is not supported. To resolve this issue,change the system drive partition table type to GPT, and then reinstall theoperating system.Unsupported System Drive The last partition cannot be resized because it is blocked for resizing.Unsupported System Drive Last Partition The last partition cannot be resized because it does not have enough free space.Intel Rapid Storage Technology is Already Installed To resolve this issue, uninstall the Intel Rapid Storage Technology user interfaceand then install the Intel Optane memory application.Error Checking System Compatibility The installation failed to check for chipset compatibility.– or –The installation failed to check for the drive partition table.– or –The installation failed to check the available space on the last partition of thesystem drive.Intel Optane Memory is Currently Disabled You tried to uninstall the Intel Optane memory application with Intel Optanememory enabled. To uninstall the Intel Optane memory application, open theapplication and disable Intel Optane memory before uninstalling the Intel Optanememory application.10Chapter 6 Troubleshooting。
Linux中LAMP环境安装配置...

Linux中LAMP环境安装配置...一个站长朋友写的一篇linux+apache+mysql+php安装配置环境,他分为了几篇文章来讲但我这里把它整理成一篇完整的文章,希望整个配置流程更简洁好用,。
安装Centos6.5一、VirtualBox虚拟机安装Centos6.51、新建虚拟电脑、选择一些参数以及配置2、进入Centos6.5的引导界面,选择”Install or upgrade an existing system”3、按照步骤一步步走下去,到了选择安装方式的时候,选择URL 方式。
5、继续按照步骤走,设置网络安装镜像6、接收安装7、下面的一系列步骤按照提示一步一步好了。
8、重要的一步:分区,选择“创建自定义布局”。
/boot 分区:200M/ 根分区:20000M/opt 分区:剩下的SWAP :20489、继续一步一步跟着选择下去。
选择安装包,我们选择“Basic Server”10、进入安装过程,等待安装。
11、重启完成。
安装MySQL1、安装MySQL之前,需要安装cmake,因为cmake对软件源码进行编译。
前提:通过挂载把U盘中所需要的软件全部拷贝到系统的/root/softcmake源码包cmake-2.8.8.tar.gz,/root/soft/soft目录下[root@localhost ~]# cd /root/soft/soft[root@localhost /root/soft/soft]# tar -xzvf cmake-2.8.8.tar.gz [root@localhost /root/soft/soft]# cd cmake-2.8.8[***********************.8]#./bootstrap---------------------------------------------CMake 2.8.4, Copyright 2000-2009 Kitware, Inc.---------------------------------------------Error when bootstrapping CMake:Cannot find appropriate C compiler on this system.Please specify one using environment variable CC.See cmake_bootstrap.log for compilers attempted.---------------------------------------------Log of errors: /usr/local/src/cmake-2.8.4/Bootstrap.cmk/cmake_bootstrap.log---------------------------------------------出现以上错误提示:缺少C的编译器解决方案安装gcc编译器可以简单地用yum安装[root@localhost ~]# yum install gcc继续cmake的安装[***********************.8]#./bootstrap---------------------------------------------CMake 2.8.4, Copyright 2000-2009 Kitware, Inc.C compiler on this system is: cc---------------------------------------------Error when bootstrapping CMake:Cannot find appropriate C++ compiler on this system.Please specify one using environment variable CXX.See cmake_bootstrap.log for compilers attempted.---------------------------------------------Log of errors: /usr/local/src/cmake-2.8.4/Bootstrap.cmk/cmake_bootstrap.log---------------------------------------------再次报错:缺少C++编译器。
Linux(深度)系统安装富士施乐(网络)打印机
Linux(深度)系统安装富⼠施乐(⽹络)打印机⼀般来讲,linux系统识别打印机没有问题,重点难点在于后⾯设置。
此⽂特别感谢:河北⽯龙的陈⼀繁销售代表。
P288dw施乐官⽹并未提供Linux的驱动并在安装过程中遇到很多问题,其不厌其烦的为我联系⼚家提供技术⽀持。
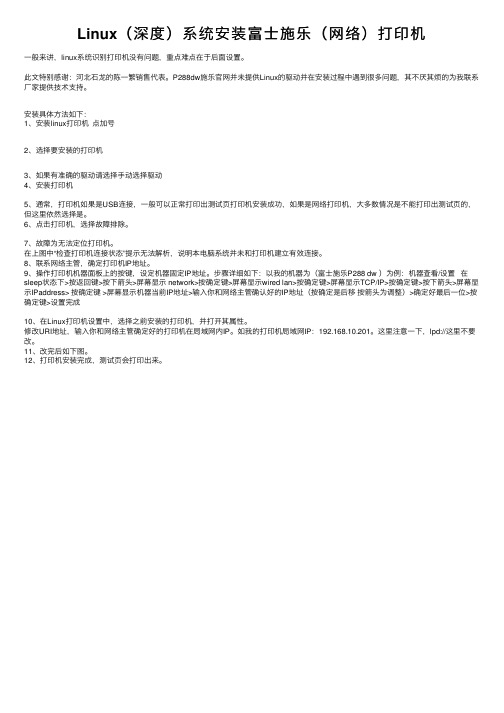
安装具体⽅法如下:1、安装linux打印机点加号2、选择要安装的打印机3、如果有准确的驱动请选择⼿动选择驱动4、安装打印机5、通常,打印机如果是USB连接,⼀般可以正常打印出测试页打印机安装成功,如果是⽹络打印机,⼤多数情况是不能打印出测试页的,但这⾥依然选择是。
6、点击打印机,选择故障排除。
7、故障为⽆法定位打印机。
在上图中“检查打印机连接状态”提⽰⽆法解析,说明本电脑系统并未和打印机建⽴有效连接。
8、联系⽹络主管,确定打印机IP地址。
9、操作打印机机器⾯板上的按键,设定机器固定IP地址。
步骤详细如下:以我的机器为(富⼠施乐P288 dw )为例:机器查看/设置在sleep状态下>按返回键>按下箭头>屏幕显⽰ network>按确定键>屏幕显⽰wired lan>按确定键>屏幕显⽰TCP/IP>按确定键>按下箭头>屏幕显⽰IPaddress> 按确定键 >屏幕显⽰机器当前IP地址>输⼊你和⽹络主管确认好的IP地址(按确定是后移按箭头为调整)>确定好最后⼀位>按确定键>设置完成10、在Linux打印机设置中,选择之前安装的打印机,并打开其属性。
修改URI地址,输⼊你和⽹络主管确定好的打印机在局域⽹内IP。
如我的打印机局域⽹IP:192.168.10.201。
这⾥注意⼀下,lpd://这⾥不要改。
11、改完后如下图。
12、打印机安装完成,测试页会打印出来。
Hp服务器配置ilo方法

Hp服务器配置ilo方法标题:HP服务器配置ILO方法HP服务器是许多企业和组织的重要IT基础设施,而ILO(Integrated Lights-Out)则是HP服务器上的一种远程管理技术。
通过配置ILO,用户可以实现对服务器的远程管理、监控和维护,提高管理效率并降低成本。
本文将介绍HP服务器配置ILO的方法。
一、了解ILOILO是HP服务器上的一种远程管理技术,它提供了一种简单、高效的方式来监控和控制远程服务器。
ILO通过将服务器的键盘、鼠标和显示器集成到一起,使得用户可以在远程对服务器进行操作和管理。
ILO还提供了告警通知、电源管理、虚拟媒体等功能,使得用户可以更加方便地管理服务器。
二、配置ILO1、硬件配置要配置ILO,首先需要确保服务器上已经安装了支持ILO的网卡和显示卡。
对于HP服务器,通常需要使用HP指定的网卡和显示卡。
还需要确保服务器的BIOS已经更新到最新版本,以保证支持ILO功能。
2、软件配置在软件方面,需要安装HP的ILO软件和Web浏览器。
HP提供了一个名为“HP iLO”的软件包,其中包括了ILO的驱动程序和Web界面。
安装完成后,可以通过浏览器访问ILO界面,对服务器进行远程管理。
3、配置步骤(1)登录到ILO界面在浏览器中输入服务器的IP,即可登录到ILO界面。
默认情况下,ILO使用HTTP协议,使用默认端口80进行通信。
如果需要使用HTTPS 协议进行加密通信,可以在“HTTPS”选项卡中进行设置。
(2)设置用户名和密码在ILO界面中,可以设置用户名和密码来保护远程访问的安全性。
在“System”选项卡中,找到“Login Information”选项,输入用户名和密码即可。
建议设置一个强密码,并定期更换密码以保证安全性。
(3)配置远程管理选项在“Advanced”选项卡中,可以配置远程管理选项,包括远程重启、关机、监控等功能。
可以根据需要进行设置,例如设置定时重启、自动监控等。
HP ProLiant 服务器 ILO 100 配置以及使用
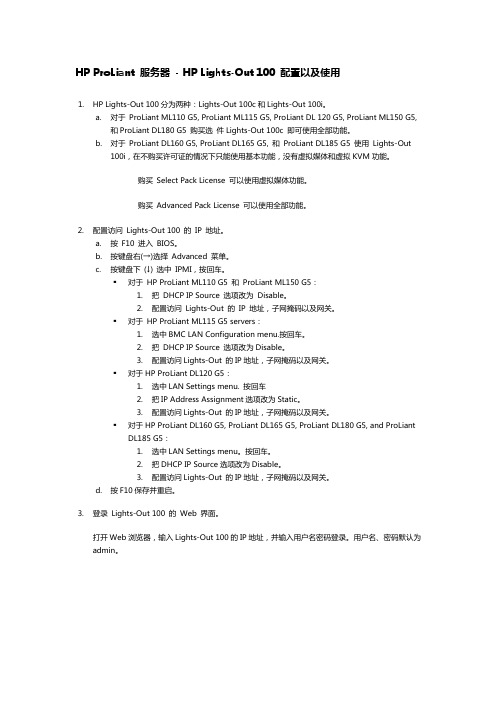
硬件要求:
对于 ProLiant ML110 G5, ProLiant ML115 G5, ProLiant DL 120, ProLiant ML150 G5, ProLiant DL180 G5 购买选件 Lights-Out 100c 可以虚拟 KVM 和虚拟 KVM 功 能。
对于 ProLiant DL160 G5, ProLiant DL165 G5, ProLiant DL185 G5 使用 Lights-Out 100i, 购买 Select Pack License 可以使用虚拟媒体功能。 购买 Advanced Pack License 虚拟媒体和虚拟 KVM 功能。
o
Monitoring Sensors 监控传感器。可以监控服务器温度,风扇和电压。
点击右侧的 PEF 按钮,可以选择需要监控的单元。
o
System Event Log
系统事件日志。记录服务器的事件日志,包括事件的类型,日期,时间,发生源,描述和趋向。
o
Virtual KVM/Media 虚拟 KVM/媒体
o
Network Settings 网络设置。设置访问 LO100 的 IP 地址。
o
IMPI PET Configuration IPMI 事件触发陷阱设置。设置事件日志的触发条件和报警规则。
o
Application License Key 应用许可证密钥。许可证的输入界面。
o
Security Settings 安全性设置。设置 LO100 的访问安全性,提供个人证书验证和密码验证两种方式。
对于 HP ProLiant ML115 G5 s DL120 G5: 1. 2. 3.