ENCLive-电子海图用户指南
电子海图SMIS系统操作说明

本船动态(可扩展):显示本船的信息,在主页面的右侧,图1-5所示。
图1-5本船信息
激活的本船信息如1-6图所示。
图1-6本船信息
鼠标实时动态,根据鼠标在海图上的操作获取实时信息,包含内容如图1-7所示。
图1-7本船信息
AIS船舶信息:显示当前选中的船舶信息,具体如图1-8所示。
图1-8AIS船舶信息
单击“刷新”按钮,可清除对话框的内容,以便重新统计;单击“保存”按钮,关闭该对话框,所得的航线保存到“航线管理”的详细航线列表中。
图6-4大圆航线设计
7
本船参数
单击菜单栏中的“本船信息”按钮,会出现“本船参数”、“三维视图”两个按钮,选择“本船参数”按钮,会弹出本船参数的对话框,如图7-1所示。
在参数值来源中,选择用户设置,用户需要在文本框中填写本船相应的信息,然后单击“保存”按钮,系统会将本船信息保存到数据库中。如果选择了AIS设备,用系统会从设备中读取到本船信息,不需要用户手动输入。
大连海事大学科技开发总公司
地址:辽宁省大连市凌海路1号
邮编:116026
联系电话:0411-84723118
电子邮箱:hq0518@
电子海图系统
(型号:SMIS-10V1)
操作说明书
大连海事大学科技开发总公司
2010年9月
1
系统启动界面
图1-1系统启动界面
系统成功启动之后,就会进入系统正常运行时的主界面,主界面由工具栏、菜单栏、主视图、本船信息、AIS船舶信息及信息栏组成,如图1-2所示。
图3-1 当前报警
报警记录
点击“报警记录”按钮,会弹出报警记录对话框,如图3-2所示。
该页主要用来查询过去一段时间内的报警记录。选择查询条件:日期(系统默认的起始日期相差一个月)、报警类别、设备名称,点击查询按钮,在查询结果中会出现符合查询条件的所有报警记录的详细信息。
ECDIS电子海图操作规程

FMD-3100 型ECDIS电子海图操作规程1.开关机按电源开关,开机和关机。
2.选择背景颜色单击PALAETTE背( 景)按钮,根据需要选择DAY(白天)、DUSK (黄昏)、NIGHT(夜晚)。
再根据需要选择背景颜色。
3.亮度调整操作BRILL(亮度)控制钮调整亮度。
顺时针转动增加亮度;逆时针转动降低亮度。
4.设计航线点击PLAN→PLANNING→ROUTE打, 开航线计划对话框,单击NEW按钮后,使用光标在海图上选择航路点,根据需要在ROUTEPLAN(航线计划) 对话框中输入名称、操舵模式、半径、计划速度等所有航点完成后点击SAVE(保存)→OK完成。
5. 航线检查单击CHECKROUTE开始检查,检查通过后点击SAV(E保存)。
6. 调用航线在航行模式中,右键单击ROUTE INFORMATION航(线信息) ,选择SELECT ROUTE选( 择航线) 单击OPEN(打开)。
在界面中点击ROUTE PLA→N PLANNING→ROUT→E选择所需航线打开。
AVCS ENC使用指南使用NAVTOR-AVC海S 图所用的海图安装和更新都可以用NAVSTICK这个U 盘完成,请务必保存好。
7.互联网更新海图的方法使安装有NAVTOR NAVSYNC的电脑,链接到互联网,双击NAVTOR NAVSYNC图标,等待程序联网结束,按提示将NAVSYNC 这个U 盘插入到电脑,系统会自动检测上次更新的内容,提示更新所需的流量,按START开始。
更新完毕后,计算机会自动生成一个UPDATE REPOR。
T保存该文件并打印签字,备查。
断开联网,拔出U 盘。
8.根据下列步骤导入PERMIT(1)将STICK U 盘插入USB 接口,在ECDIS界面,上面点击CHARTS,右侧点击License,出现搜索界面点击OK。
(2)选ENC后点击右下角Install license,在出现的菜单中,点击USB Flash/INFO/Navtor/Primit/ECDIS1内的Pemit.txt 文件上,再点击OK。
ENCLive-电子海图用户指南

ENCLive海图在线电子海图用户指南北京思拓海洋信息技术有限公司2010年9月引言 (1)1、ENCLive电子海图 (2)2、ENCLive电子海图选图 (2)3、ENCLive电子海图许可(License) (4)4、加载ENCLive基础光盘电子海图数据 (5)5、更新ENCLive电子海图 (5)6、再版ENCLive基础光盘 (6)7、新的ENCLive电子海图许可 (6)8、许可有效期到期 (6)9、许可重建 (6)10、技术支持 (7)11、快速提供应急海图支持 (7)附件:参考资料 (8)ENCs范围和标识符 (8)ENCs核查与确认 (8)ENCs数据一致性 (8)ENCs比例尺最小属性 (9)ENCs真实性检查 (9)自述文本文件 (9)产品文本文件 (9)ENCLive更新服务 (10)在ECDIS中使用ENCLive电子海图 (10)培训 (10)海图精确性 (10)源数据质量 (11)海图显示范围 (11)海图显示内容 (11)使用其他海图格式数据 (12)ECDIS和GPS一起使用 (12)精确性和有效性 (12)GPS参考基准和海图基准 (12)分析解决问题 (13)错误信息与加载ENCLive电子海图时的标准错误代码 (13)解锁失败 (14)转换错误 (14)版权信息 (15)反馈意见 (15)引言感谢使用“海图在线-电子海图服务”(,以下简称“ENCLive”)。
ENCLive是北京思拓海洋信息技术有限公司提供的电子海图服务业务。
公司目标是为航运、海事、港口管理等企事业单位提供满足航海专业要求的、符合国际标准的电子海图服务。
图1:海图在线-电子海图服务网站ENCLive提供的电子海图是国家海道测量机构按IHO国际海道测量组织颁布的S57标准生产的电子航海图(以下简称ENCs)。
ENCs可以满足SOLAS公约船舶运输要求。
在用户海图订单许可有效期内,ENCLive提供每周一次的海图更新服务。
海底摄影相机使用指南说明书
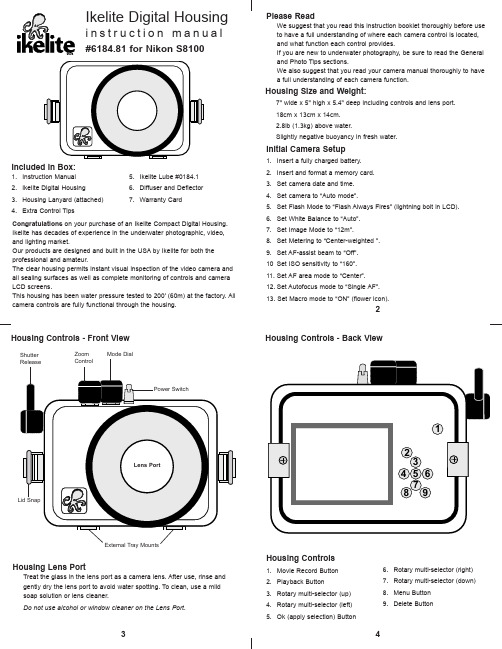
Please ReadWe suggest that you read this instruction booklet thoroughly before use to have a full understanding of where each camera control is located,and what function each control provides.If you are new to underwater photography, be sure to read the General and Photo Tips sections.We also suggest that you read your camera manual thoroughly to have a full understanding of each camera function.I nitial Camera Setup 1.Insert a fully charged battery.2.Insert and format a memory card.3.Set camera date and time.4.Set camera to “Auto mode”.5.Set Flash Mode to “Flash Always Fires” (lightning bolt in LCD).6.Set White Balance to “Auto”.7.Set Image Mode to “12m”.8.Set Metering to “Center-weighted ”.9.Set AF-assist beam to “Off”.10Set ISO sensitivity to “160”.11.Set AF area mode to “Center”.12.Set Autofocus mode to “Single AF”.13. Set Macro mode to “ON” (flower icon).213546789Housing Lens PortTreat the glass in the lens port as a camera lens. After use, rinse and gently dry the lens port to avoid water spotting. To clean, use a mild soap solution or lens cleaner.Do not use alcohol or window cleaner on the Lens Port.2Housing Size and Weight:7" wide x 5" high x 5.4" deep including controls and lens port.18cm x 13cm x 14cm.2.8lb (1.3kg) above water.Slightly negative buoyancy in fresh water.Housing Controls1.Movie Record Button2.Playback Button3.Rotary multi-selector (up)4.Rotary multi-selector (left)5.Ok (apply selection) Button6.Rotary multi-selector (right)7.Rotary multi-selector (down)8.Menu Button9.Delete ButtonHousing Controls - Front ViewHousing Controls - Back ViewIkelite Digital Housingi n s t r u c t i o n m a n u a l#6184.81 for Nikon S8100Congratulations on your purchase of an Ikelite Compact Digital Housing.Ikelite has decades of experience in the underwater photographic, video,and lighting market.Our products are designed and built in the USA by Ikelite for both the professional and amateur.The clear housing permits instant visual inspection of the video camera and all sealing surfaces as well as complete monitoring of controls and camera LCD screens.This housing has been water pressure tested to 200’ (60m) at the factory. All camera controls are fully functional through the housing.Included in Box:1. Instruction Manual2.Ikelite Digital Housing3.Housing Lanyard (attached)4.Extra Control Tips5.Ikelite Lube #0184.16.Diffuser and Deflector7.Warranty CardChecking ControlsOnce the housing has been closed, make sure the housing controls line up with the corresponding camera controls. If the housing controls are misaligned slightly, make sure the camera hold down bolt has been tightened down firmly so the camera is flat against the tray.Turn Camera OnTurn the camera on and operate each of the housing controls to get a feel for using the camera in the housing. Take a few pictures above water with the camera in the housing.Zoom Control(NOTE:) After you have used the housing's zoom control, it must be returned to the center position to disengage. If the housing zoom control is pushing the zoom lever in either direction, you may not be able to take a picture or access any other function because the camera is receiving a signal from the engaged zoom control.Closing the Housing1.2.the housing back and that it is clean and in its proper location.3.Guide the back into the housing front.The o-ring should touch the housing all the way around. There should be an even gap all the way around between the housing and the housing back.4.Lift the lid snaps so they are extendedand place each lid snap into the corresponding hook on the housing back. 5.To close the housing, push down onthe lid snaps until they snap intoplace. Lid snaps on opposite sides of the housing should be closed at the same time. Be sure they are down far enough to engage the lock. Double check - Once the housing isclosed, check the o-ring seal. Checkthe gap between the housing back and the housing. It should be even all the way around the housing.Look through the clear plastic back at the o-ring. You should see a darkened area where the o-ring is compressed against the housing back. If you do not see an even black compression seal all the way around the back, open the lid snaps, reseat the housing back and close the lid snaps. Visually check the seal again.CAUTION:Some camera tripod socket threads are plastic. The mounting bolt is metal. Do not cross thread or over tighten as you may damage the camera tripod socket threads.Installing the Camera1.Pull out on each housing control until it stops. This will get the controlsout of the way for installation of the camera.2.Remove the back from the housing.3.The mounting tray for the camera is secured to the housing back.Position the camera on the tray.ing a coin or screwdriver (preferred), secure the camera with the traymounting bolt which threads into the camera’s tripod socket: Diagram A .Opening the HousingLid Snaps have a Lock .To open housing, push Lid Snap Lock forward and lift as shown.Keep pressure on the Lid Snap so it does not fly open quickly.Some lid snaps have a lot of spring tension once they go overcenter, so keep a firm grip on the lid snap.Lid Snaps may be opened one at a time.Diagram A56EngagedCenter Position DisengagedUsing the Camera’s Built-in FlashFor the best results, we recommend using an external Ikelite Substrobe. If you do not have an external flash, the camera’s built-in flash can be used with a diffuser installed. This use is limited due to the housing port blocking a portion of the built-in camera flash. Install the Diffuser and zoom in slightly to eliminate any dark areas noted in your photographs. See Diffuser/Deflector Installation below.NOTE: The camera’s built-in flash CANNOT be used with optional Wide-Angle or Accessory lenses.Diffuser UseThe diffuser should be installed when using the camera flash. When shooting close-up photographs with the camera flash and at the camera lens’s widest angle setting, the lens port on the housing can block a portion of the light from the camera flash. This can result in a shadow in a lower corner of the frame. Zoom the lens to eliminate the shadow (You can test this above water).Deflector UseThe deflector should be installed when using an Ikelite external strobe.The deflector will block and redirect the camera’s flash to the AF35 slave unit or EV-controller which controls the external strobe’s output.Remove the diffuser before attempting to install the deflector.A diffuser and deflector are included with the housing. TheThe deflector is also white but is not transparent.To install the diffuser or deflector,push the “Cut-out” Section into the port groove until it stops.Note the Small Hole. To avoidlosing the diffuser or deflector, you this hole.Diffuser and Deflector InstallationOptional AccessoriesBack o-ring #0109O-rings last for several years if properly maintained. (See maintenancesection). Always carry a spare o-ring in case the original becomesdamaged or lost.Replacement Lanyard #0321.10Tray with Dual Release Handles #9523.32Dual Tray and Release Handles are required to mount two externalDS-series Substrobes.WD-4 Wide-Angle Conversion Dome #6430.4The removeable WD-4 corrects light refractionunderwater, restoring the camera’s original angleof coverage. Approximately 3/4 of the camera'szoom range can be used with the dome in place.Slight vignetting may occur at camera’s widestangle setting.External Macro Adaptor #9306.82Allows attachment of 67mm threaded macrolenses from Inon and Epoque. NOT for use with67mm threaded wide-angle lenses.SubstrobeDS51Actual Size:8 cm dia x 12 cm3.2" dia x4.7"AF35 Strobe Package #4035The AutoFlash AF35 kit is a great compliment,to your new Ikelite point-and-shoot camerasystem. Everything you need to get started isin the box. Just attach it to the bottom of yourhousing and start taking pictures!AF35 AutoFlash kit includes:AF35 strobe - Flex arm - AutoFlash sensorHandle with rubber grip - Tray (single or dual)Mounting hardware.Substrobe DS51The Substrobe DS51 covers the equivalent of a 28mm lens. It is the idealchoice when using only the camera lens with no accessory wide anglelenses attached.Using Strobes (continued)DS161(continued)equivalent of an 18mm lensor 100 degrees w/diffuserinstalled. It is the idealchoice when using widedegrees. It also features a225 flashes per full charge.its 1" diameter ball is idealstem mount allows easysystem allows easy strobebutton.DS161 Movie SubstrobeThe DS161 Movie Substrobe combines all of the functionality of ourrenowned DS160 with a powerful 500 lumen LED video light. Threesuper-bright LEDs are arranged behind a special optical element to provide45 degrees angle of coverage free of hotspots.Using Ikelite Strobes910NOTE: Other Accessory and Wide-Angle Conversion lenses cannot be usedwith this housing. For additional information regarding recommendedstrobe packages and optional accessories, go to . Recommended Strobe PackagesSubstrobe AF35 AutoFlash Kit #4035 includes Single Tray.Substrobe AF35 AutoFlash Kit #4035.1 includes Dual Tray.Substrobe DS-51 Package #3944.54 includes #4086.61 ArmSystem with EV Manual Controller.Substrobe DS-160 Package #3944.91 includes #4086.61 ArmSystem and 1.5 hour Smart Charger with EV Manual Controller.Substrobe DS-161 Package #3945.03 includes #4086.61 ArmSystem and 1.5 hour Smart Charger with EV Manual Controller.Please Read If Using an EV Manual ControllerThe EV-Controller used with Ikelite DSSubstrobes has two user settings. Onesetting is for strobe selection, the otheris for pre-flash “P” or non pre-flash ”P”.This camera uses pre-flash, (except inmanual mode), thus the EV-Controllershould be set to the pre-flash “P”position when used with this camera asa slave. If manual mode is desired, setthe EV-controller to the non-pre-flash “P”position.Ikelite Lube #5020 (4 - 1cc tubes)For light lubrication of the mainhousing o-ring.Ikelite Lube - 1cc TubeControl MaintenanceIkelite controls are designed to provide years of reliable service with minimal maintenance.1.Push button controls require no maintenance other than rinsing in freshwater after saltwater use. If a push button control becomes difficult to push or if it sticks when depressed, soak the housing in luke warm fresh water. After a few minutes, operate the push button. If this does not correct the problem, return the housing to Ikelite for maintenance.2.Some of the controls have long shafts. These controls can be pulled out,exposing the shaft see Diagram B - Page 15and Diagram C - Page 16. To lubricate the control, gently pull on the knob until the stainless steel shaft is exposed. Lightly lubricate the shaft, then move the shaft in and out several times. This will lubricate the x-ring in the Ikelite control gland.This should be done before using the housing after a prolonged storage period, or once a week when the housing is in constant use.Lubricants1.Ikelite provides silicone lubricant with the housing. We recommend you useonly Ikelite lubricant (included with housing - Page 12) on Ikelite products as some other brands may cause the o-ring to swell and not seal e only enough lubricant to lightly cover control shafts and o-rings.Wipe off any excess lubricant with a clean cloth. Lubricant is not asealant, it is used to reduce friction. Excessive lubricant can collect sand and dirt which may interfere with proper sealing.CAUTION:Never use spray lubricants as the propellant ingredient can cause the plastic housing to crack.1314Diagram CHousing MaintenanceThe Ikelite Digital Housing should be given the same care and attention as your other photographic equipment. In addition to normal maintenance, we recommend that the housing be returned to Ikelite periodically to be checked and pressure tested.1.Do Not leave the camera and housing in direct sunlight for prolongedperiods. Heat may damage the camera.2.Do Not ship the camera in the housing.3.Before using the housing, always check the tightness of the set screwin each control knob.Check each control gland penetrating the housing to make sure they are tight. There is a slight chance that either could vibrate loose during travel.4.Keep the back o-ring clean and lightly lubricated. To lubricate, removethe o-ring from the back. Put a small amount of lkelite lubricant on your fingers. Pull the o-ring through your fingers to apply a light coating of lubricant. Only apply enough lubricant to make the o-ring feel slick. Do Not stretch the o-ring . This light coating of lubricant will help to keep the o-ring from drying out and will help to show a dark sealing line when the housing back is properly sealed.5.Keep the area where the o-ring fits and the sealing surface of thehousing clean.6.Rinse the housing exterior thoroughly in freshwater after each saltwateruse. Dry with a soft cloth. Dry lens port to eliminate water spotting.After several uses in saltwater, soak the housing exterior in a mild soap solution, rinse and dry before storing. When storing the housing, remove the back o-ring, lightly lubricate, and place in a plastic bag. Place the plastic bag with o-ring inside the housing for safe keeping.7. If removing a housing push button, Do Not re-use the E-clip. ContactIkelite for replacement E-clips (part #0319.12).8.Leave lid snaps in the open position when not using the housing forextended periods.Control Maintenance Cont.3.Some of the controls have a short shaft and cannot be pulled outexposing the shaft for lubrication. In the unlikely event one of these controls sticks or becomes difficult to operate, you can remove thecontrol from the housing and lubricate it, or return the housing to Ikelite for maintenance. To remove the control - Diagram B , loosen the set screw in the knob (allen wrench required); remove the knob. If there is salt or dirt build-up on the exposed control shaft, clean the shaft. Open the housing and gently slide the control shaft out of the control gland.Clean and lightly lubricate the shaft, including the end of the shaft.Slide the shaft back into the control gland and gently slide it back and forth a few times without fully removing the shaft from the gland.Replace the knob noting the flat area on the shaft. The set screw in the knob should tighten down against the flat area on the control, so the knob does not turn on the shaft.before reinserting into glandDiagram BGeneral Tips1. Before placing your camera in the housing, it is a good idea to immersethe closed housing in a bucket or rinse tank to make sure it is watertight.2.Due to the power required to operate the camera and LCD screen, it is agood idea to start each dive with a fully charged camera battery.3.As soon as you enter the water, take a moment and check the housingto see that it is properly sealed.4.Next, check to see if there are any bubbles on the face of the lens port.If there are, take your finger and remove them. If there are bubbles on the lens port they can produce soft focus spots in your video.NOTE:Fogging of the port glass may occur due to a variety ofenvironmental factors. To prevent fogging issues, always assemble the housing in a cool, dry area, such as an air conditioned room, and keep the housing out of direct sunlight. If fogging persists, insert a fresh desiccant packet inside the housing before each day of diving.Desiccant packages are not available from Ikelite, however most camera stores carry them.1817Returning Products for Service (outside the United States)For the separate international customs documentation form that you complete to accompany the shipment, please state or designate that the enclosed products were originally manufactured in the USA and are being returned to the manufacturer for repair service. Value of the equipment listed for customs purposes should be zero.Ikelite Technical SupportE-mail:*******************Phone 317.923.4523Fax 317.924.7988Ikelite Underwater Systems50 West 33rd Street Indianapolis, IN 46208 USAReturning Products for ServiceIkelite is most interested in performing any service to ensure that all products perform as intended. Evidence of purchase date must be provided to obtain warranty service.No prior authorization is required. You may return directly to us or through your dealer. Please include a brief description of the problem, any relevant e-mail correspondence, and/or instructions on what you want us to do.Always include name, shipping address, e-mail address, and phone number inside of the package.You may also want to insure the package. Send Postage Pre-Paid to:Ikelite Underwater Systems ATTN: Repair Dept.50 West 33 StreetIndianapolis, IN 46208 USANo reimbursements for return freight will be issued.Ikelite Limited WarrantyAll Ikelite products are warranted against any manufacturing defects for a period of one year from the original date of purchase. Defective products should be returned prepaid to Ikelite. Ikelite will, at its discretion, repair or replace such products, and will return to customer prepaid. All other claims of any nature are not covered. Housing is pressure tested and warranted to 200’ (60m) maximum underwater depth. Except as mentioned above, no other warranty expressed or implied, applies to this Ikelite product .Photo Tips (continued)7.Many photographers transfer their images to the computer where theycan fine tune the appearance of the image. Many of the imagemanipulation programs make you think you can magically correct any image taken and make a good picture. Remember when using an image manipulation program such as Photoshop, that if the image isoverexposed, much of the color is missing. If the color is missing you cannot adjust it. If images are slightly underexposed, the color is there,but it is just dark and you can adjust it to some degree. So, if you error in exposure, it is better to have the image slightly underexposed rather than overexposed.Photo Tips1.The number one rule in underwater photography is to eliminate as muchwater between the camera and subject as possible. Get as close as you can to the subject, then use the zoom. If you are using flash for still photos, subjects beyond 6 feet (1.8m) will not have much color regardless of strobe power.2.The camera’s built-in flash is very close to the camera lens. The flashcan light up any suspended particles in the water and they can berecorded in your picture. This effect is called backscatter. To eliminate as much backscatter as possible, photograph close or use an externalstrobe. Photograph in clear water; do not stir up the sand or silty bottom.If backscatter becomes a problem in the environment you are photographing, an external flash will help eliminate much of the backscatter.3.Many digital cameras have a slight lag time between when you pressthe shutter release button and the camera actually takes the picture.Hold the camera steady a second or two after pressing the shutter release button.4.Do not shoot down on subjects as they will quite often blend into thebackground and be difficult to see in the photograph. Shoot subjects straight on or shoot up at a slight angle using the blue water as a contrasting background.5.Underwater flash is used to restore the warmer colors filtered out by thewater as well as to illuminate the subject. When photographingunderwater, set the camera to use flash on every shot. If the camera’s flash is set to AUTO and the sun is behind your subject, the camera may see enough light and not fire the flash. With the sun behind the subject,the subject is shaded (dark) and needs flash for a good exposure.6.When using daylight or flash, if your camera consistently over orunderexposes the image, you may want to adjust your camera’s exposure compensation settings.NOTE:To shoot photographs closer than 2 feet (0.6m), we recommendusing an external strobe such as the DS51 or DS160. An external strobe can be positioned so nothing blocks the light path between the strobe and the subject.6184.81_Nikon_S8100_01-0211。
电子海图操作说明

电子海图重装操作说明E盘。
CD1,CD2压缩文件是通过虚拟光驱安装。
1.把航线(当前)从C:NS2500——route——航线名保存到别的地方(别的盘)2.在控制面板——添加删除程序中删除程序NAV_SAILOR2500删除3.在控制面板——性能与维护——系统——硬件——设备管理器——端口——通讯端口com1——端口设置——每秒位数384004.点击桌面ALCOHOL120%——右键单击cd1——载入设备(m)——(k:\AYVCD/DVD_ROM(O)——蓝色小界面——关闭界面5.双击(在我的电脑里)MY CD (K:)——蓝色小界面—SELECT PRODUCT BY LICENSE——选择K:FLOPPY—image——OK——双击SETUP——NAV .2500——NEXT——Y ——将C: /NS2500的空格去掉——NEXT——NEXT——上选Y。
下面路径为K;/FLOPPY IMAGE点安装——确定——NEXT——START——关掉——退出——重新启动计算机6.当ALCOHOL 12090打开:——我的电脑——C盘——windows/inf/SNTNLVSB.INF文件删掉——关闭——在我的电脑中单击右键打开K盘【my cd(k:)】在K:/drivers/sentinel/other_pc中双击install bat (此时出现一个小黑屏)——将电脑重启一次7.打开ALOCOHOL120%右键单击K盘打开——双击K:\CRACK下的SENTEMU .BAT(小黑屏)复制到该目录下的3个文件NAVYS.SP;SP.EXE CRACK BAT到C:/NS2500下面然后双击C:/NS2500/CRACK BAT (出现安装小黑屏)该三个文件运行完后可删除可不删除8.打开电子海图(在程序中)是否能打开(应能打开)9.将ALCOHOL 120%打开右键单击CD2载入(K:AXV CD/DVD-ROM(O)后在我的电脑中双击K盘安装上去INSTALL LICENSED CHARTS )——NEXT——C:\NS2500不用改直接点击NEXT——NEXT——YES下面选择K;/LICENS——安装——NEXT——NEXT——START)——OK——EXIT(时间较长)10.将原先第一步复制的航线再重新粘贴到原来的地方使用在程序中打开的海图、点击CONFIC——ATTACH SENSORS——输入密码(TRANSAS空格)position1 选择2 positio2选择0 universal AIS选择1在ship 中primery postion 选择1如有警报CONFIC——sound选——sand card 在route中将航线载入。
电子海图enc数据问题及应对措施

一线手记 Site Notes电子海图ENC 数据问题及应对措施ENC 覆盖问题(ENC Coverage)安全、有效使用海图的前提条件是要有足够的,能适用船舶在航行、进港及泊位各个环节的需求,从IHO 网站查ENC 情况,全球航行水域能够被ENC 海图覆盖(六种用途电子海图),但在查看不同用途的海图时,情况就不那么乐观与所有新技术一样,电子海图也会根据实际需要不断改进以满足终端用户的期待。
然而,由于产品的数字化特性以及生产工艺的技术局限性,与矢量电子海图(ENC )相关的一些问题还是会存在,其中一些问题目前还很难解决,给船舶航行安全带来一定的不确定性,也在某种程度上影响了一些航运公司推行无纸化航行的信心和进度。
虽然UKHO 声称全球航行区域被ENC 无缝覆盖,但是由于ECDIS 海图以及ENC 海图数据存在的不足,船舶在实际使用电子海图时也反映出了很多问题,只有更深入了解ENC 还存在性能特征方面的问题,我们才能有的放矢地寻求解决方案,为此,本文从以下几个方面做探讨(相关图示解说来自于“挪瑞”的ECDIS 设备):了,区域“GAP ”比较明显,如南北两极、南美洲沿海、西北非、马达加斯加、印度东海岸、索马里、也门以及红海等地区还做不到无缝连接。
IHO 在2009年表示,到2010年会实现“适当”的ENCs 覆盖率,由小比例尺(制定计划用)、中等比例尺(沿海航行)以及大比例尺(港口)的ENCs100%覆盖全球。
但这个“适廖才明 2010年12月正式担任船长,并先后在中海油运、中远海能(原上海海运集团油轮公司)灵便型和超大型油轮任船长,从事海船驾驶工作至今,具有比较丰富的船舶安全管理经验。
中远海运能源运输股份有限公司 廖才明当”只能理解为国际贸易中主要港口和主要贸易航路,因此,准确理解是指:虽然ENC已充分覆盖了贸易的主要干线,但是仍然有大量水域还需特别注意。
随着航运科技的发展,极地电子海图也将应用于极地考察船及极地航线的商船。
航海家操作手册201(内河)

20电子海图使用操作规程

下面是赠送的中秋节演讲辞,不需要的朋友可以下载后编辑删除谢谢中秋佳节演讲词推荐中秋,怀一颗感恩之心》老师们,同学们:秋浓了,月圆了,又一个中秋要到了!本周日,农历的八月十五,我国的传统节日——中秋节。
中秋节,处在一年秋季的中期,所以称为“中秋”,它仅仅次于春节,是我国的第二大传统节日。
中秋的月最圆,中秋的月最明,中秋的月最美,所以又被称为“团圆节”。
金桂飘香,花好月圆,在这美好的节日里,人们赏月、吃月饼、走亲访友……无论什么形式,都寄托着人们对生活的无限热爱和对美好生活的向往。
中秋是中华瑰宝之一,有着深厚的文化底蕴。
中国人特别讲究亲情,特别珍视团圆,中秋节尤为甚。
中秋,是一个飘溢亲情的节日;中秋,是一个弥漫团圆的时节。
这个时节,感受亲情、释放亲情、增进亲情;这个时节,盼望团圆、追求团圆、享受团圆……这些,都已成为人们生活的主旋律。
同学们,一定能背诵出许多关于中秋的千古佳句,比如“举头望明月,低头思故乡”、“但愿人长久,千里共婵娟”、“海上生明月,天涯共此时”……这些佳句之所以能穿透历史的时空流传至今,不正是因为我们人类有着的共同信念吗。
中秋最美是亲情。
一家人团聚在一起,讲不完的话,叙不完的情,诉说着人们同一个心声:亲情是黑暗中的灯塔,是荒漠中的甘泉,是雨后的彩虹……中秋最美是思念。
月亮最美,美不过思念;月亮最高,高不过想念。
中秋圆月会把我们的目光和思念传递给我们想念的人和我们牵挂的人,祝他们没有忧愁,永远幸福,没有烦恼,永远快乐!一、活动主题:游名校、赏名花,促交流,增感情二、活动背景:又到了阳春三月,阳光明媚,微风吹拂,正是踏青春游的好时节。
借春天万物复苏之际,我们全班聚集在一起,彼此多一点接触,多一点沟通,共话美好未来,与此同时,也可以缓解一下紧张的学习压力。
相信在这次春游活动中,我们也能更亲近的接触自然,感悟自然,同时吸收万物之灵气的同时感受名校的人文气息。
三、活动目的:下面是赠送的励志散文欣赏,不需要的朋友下载后可以编辑删除!!上面才是您需要的正文。
- 1、下载文档前请自行甄别文档内容的完整性,平台不提供额外的编辑、内容补充、找答案等附加服务。
- 2、"仅部分预览"的文档,不可在线预览部分如存在完整性等问题,可反馈申请退款(可完整预览的文档不适用该条件!)。
- 3、如文档侵犯您的权益,请联系客服反馈,我们会尽快为您处理(人工客服工作时间:9:00-18:30)。
ENCLive海图在线电子海图用户指南北京思拓海洋信息技术有限公司2010年9月引言 (1)1、ENCLive电子海图 (2)2、ENCLive电子海图选图 (2)3、ENCLive电子海图许可(License) (4)4、加载ENCLive基础光盘电子海图数据 (5)5、更新ENCLive电子海图 (5)6、再版ENCLive基础光盘 (6)7、新的ENCLive电子海图许可 (6)8、许可有效期到期 (6)9、许可重建 (6)10、技术支持 (7)11、快速提供应急海图支持 (7)附件:参考资料 (8)ENCs范围和标识符 (8)ENCs核查与确认 (8)ENCs数据一致性 (8)ENCs比例尺最小属性 (9)ENCs真实性检查 (9)自述文本文件 (9)产品文本文件 (9)ENCLive更新服务 (10)在ECDIS中使用ENCLive电子海图 (10)培训 (10)海图精确性 (10)源数据质量 (11)海图显示范围 (11)海图显示内容 (11)使用其他海图格式数据 (12)ECDIS和GPS一起使用 (12)精确性和有效性 (12)GPS参考基准和海图基准 (12)分析解决问题 (13)错误信息与加载ENCLive电子海图时的标准错误代码 (13)解锁失败 (14)转换错误 (14)版权信息 (15)反馈意见 (15)引言感谢使用“海图在线-电子海图服务”(,以下简称“ENCLive”)。
ENCLive是北京思拓海洋信息技术有限公司提供的电子海图服务业务。
公司目标是为航运、海事、港口管理等企事业单位提供满足航海专业要求的、符合国际标准的电子海图服务。
图1:海图在线-电子海图服务网站ENCLive提供的电子海图是国家海道测量机构按IHO国际海道测量组织颁布的S57标准生产的电子航海图(以下简称ENCs)。
ENCs可以满足SOLAS公约船舶运输要求。
在用户海图订单许可有效期内,ENCLive提供每周一次的海图更新服务。
本指南目的是帮助你在ENCLive的服务中获得最大益处。
用户同时应该结合你的电子海图显示及其信息系统(以下简称ECDIS)用户手册一起使用本指南。
1、ENCLive电子海图目前,ENCLive可以提供中国人民解放军海军司令部航海保证部(以下简称“航保部”)生产出版的ENCs电子海图。
不久的将来,ENCLive将可以提供世界各国官方海道测量机构出版的ENCs电子海图,范围覆盖世界主要海区,实现广泛、官方、专业的电子海图服务。
2、ENCLive电子海图选图在ENCLive服务中,用户购买ENCs的最小单位是“Units”。
Units是电子海图生产机构所允许的最小销售单位,通常,Units与纸海图一致。
ENCLive也提供用户“Folios”的购图选择,Folios即海图“资料袋”。
每个Folios 包括的ENCs取决于Folios的定义,如按港口地理范围定义的Folio,包括了港口范围内所覆盖的全部ENCs。
目前,ENCLive仅支持与港口相关的Folio选择。
不久的将来,ENCLive将陆续推出与海区、航线等相关的依据Folio选择电子海图。
为方便用户选图,ENCLive提供给用户三种选图方法(工具):一是下载电子海图目录列表文件(ENCLiveCatalogueList),见图2;二是下载电子海图选图软件(ENCLiveCatalogue2010beta1),见图3;三是通过网上交互式方式选图,见图4。
详细使用方法见帮助文件。
图2:ENCLive - 电子海图目录列表图3:ENCLive - 电子海图选图软件图4:ENCLive - 网上交互式方式选图3、ENCLive电子海图许可(License)ENCLive电子海图许可文件包含了所有得到许可使用的电子海图的许可证。
电子海图许可仅允许用户使用购买的电子海图数据。
电子海图许可文件将用于解锁加密的Units和Folios电子海图。
电子海图许可通常用电子邮件提供(也可自己下载),并通过CD或USB优盘将电子海图数据加载到ECDIS上使用。
电子海图许可包含2个文件:ENC.PMT和PERMIT.TXT。
通常,在许可期限内,上述电子海图许可文件没有变化,可以持续用于解锁用户订购的、加密的电子海图数据。
用户购买的ENCLive电子海图数据许可可以为3、6、9、12个月。
数据许可期限可以订到ENCLive电子海图许可有效期内的任何时间点,不必要求所有数据有效期终止到一个共同的时间。
用户使用ENCLive电子海图,通常需要先签订一份数据购买合同(包括一份用户订购电子海图许可文件确认清单)。
4、加载ENCLive基础光盘电子海图数据购买ENCLIVE电子海图的用户都会收到一套ENCLIVE电子海图基础光盘数据。
光盘数量可能多于一张。
用户只需要加载获得许可的电子海图数据。
基础光盘电子海图数据每季度更新一次,在许可期内的用户可免费获得。
加载ENCLive基础光盘数据的方法依ECDIS的不同而不同,但基本规则都一样。
用户需要详细查阅ECDIS系统安装手册。
根据ECDIS制造商程序提示,用户需要输入电子海图许可文件或插入许可光盘或其他许可媒介到ECDIS中。
一些ECDIS会要求用户按正确的光盘编号顺序来加载基础光盘。
因此,持有多张基础光盘许可的用户必须始终确保用正确的编号顺序加载基础光盘数据(即基础光盘1在基础光盘2之前)。
如果基础光盘数据用错误的编号顺序加载了,用户应该卸载所有之前错误加载的海图数据后再重新加载基础光盘数据。
大多数ECDIS允许你选择是否加载所有许可海图或只选择你需要的海图。
用户最初加载海图数据时,可能需要较长时间,主要原因是ECDIS在使用海图之前需要将海图格式转换为本系统的电子海图格式(SENC)。
如果你需要快速访问海图数据,建议你只加载需要的海图数据,以满足你的即时要求。
5、更新ENCLive电子海图ENCLive电子海图每周更新一次。
更新包括了所有最新的航海通告改正以及改版、新版海图。
在许可有效期内,用户可通过网站在线下载周更新数据。
新版、再版的新海图数据,也将同时免费提供。
基础光盘可能也包括周电子海图更新资料。
作为上述安装中单独的过程,一些ECDIS 系统要求用户运行一个“更新ENC”的过程。
如果用户不先从基础光盘中更新,由于顺序打乱,随后下载的周更新可能无法进行。
用户的ECDIS在更新过程中会偶尔报告警告或错误。
由于这一问题不具确定性,建议用户接受不可能损坏已加载数据的警告,应小心处理提示的错误,数据可能未反应最新的航海通告改正,要小心使用。
6、再版ENCLive基础光盘ENCLive定期(每个季度)再版基础光盘以整合临时放在周更新上的数据。
之前所有的更新资料和新版、再版的海图均包括在新的ENCLive基础光盘中。
在收到再版ENCLIVE基础光盘时,你只需按常规运行更新,没必要再次加载所有的海图。
注意:由于再版ENCLIVE基础光盘包含了新版和一些海图更新,则只有安装了新的基础光盘之后才能继续海图的后续更新。
7、新的ENCLive电子海图许可在许可期限内,对用户新购买的海图,ENCLive将提供新的海图许可,以便访问新增的或替代的海图。
新许可文件累积增加新的海图许可。
8、许可有效期到期许可期限一旦到期,ECDIS系统将禁止加载进一步的更新。
但用户仍可以看到所有在许可有效期前加载的ENCs和更新。
注意:用户从ENCLive订购的ENCs电子海图必须保持最新,才能达到IMO SOLAS的要求。
在用户订购的ENCs电子海图有效期到期后,使用ENCs电子海图的ECDIS不能够满足海图运输的要求。
9、许可重建大概许可期限到期前四周,用户会从ENCLive收到一份重建提醒。
为确保ENCLive 服务的连续性,请用户在许可有效期满前至少24小时确认许可重建要求。
10、技术支持ENCLive提供全方位的技术支持和服务。
任何ENCLive产品问题都可以通过联系ENCLive的服务台解决。
用户也可通过电子邮件support@或电话+86 010 ********联系ENCLive服务台。
在中国工作时间(09:00-17:30)内可提供标准的产品支持。
11、快速提供应急海图支持船舶由于天气变化和商业等原因改变航线,用户可以通过ENCLive或供应商增加海图订单。
ENCLive将很快将新增加或变化的海图许可提供给你。
在某些情况下,船舶在很短的时间内需要访问一幅ENCLive海图,例如,由于医药或安全的紧急情况,船舶必须改变航线。
在紧急的情况下,特殊的ENCLive海图许可可于24小时内从ENCLive获得。
这些海图许可可以通过电子邮件、传真或简单的读取电话字符直接传送给用户。
每幅海图许可由64个字符组成,详见如下:NO5E08112010120693966827C5BDD98BA40F557BC55650AAE1A0AA76DE4EF979要获得ENCLive应急海图许可,正常办公时间,请联系ENCLive服务台;非办公时间,请通过电子邮件、电话和传真联系ENCLive值班员。
联系时请用户报出船舶名称,你的ECDIS系统的许可号(Userpermit)及购买的海图号即可。
余下的订购信息在用户方便时尽快补办提供。
附件:参考资料ENCs范围和标识符ENCLive提供基于ENCs的服务,销售ENCs以Units和Folios为单位。
每个ENCs 都有一个8字符的标识符。
前两个字符指出生产机构(例如,C1代表中国航保部生产的海图,NL代表荷兰生产的海图),第三个字符代表海图的“使用范围”或用途,代表ENCs预期的航海目的,编码方案如下:编码英文标识中文译文1 Overview 总图2 General 一般航行图3 Coastal 沿岸航行图4 Approach 近岸航行图5 Harbour 港口图6 Berthing 锚泊图后5个字符代表ENCs的唯一标识(或图号),例如,GB500005代表一幅英国(UKHO)生产的港口图。
ENCs核查与确认在ENCLive,所有的ENCs在销售前均需要进行综合的核查和确认,以确保ENCs与IHO标准的一致性。
这项工作大大减少了由于ENCs生产商和ECDIS制造商对IHO标准的细微解释性差异所造成的在海图加载过程中ECDIS上显示错误或警告的机会。
任何人发现了关于海图数据质量的任何问题,欢迎通过联系ENCLive服务台反应给我们,以便核实和改正错误。
ENCs数据一致性船员遇到海图数据在两个不同ENCs生产机构的界限处(实际上一般发生在两国交界处)数据显示不一致是可能的(例如轮廓不匹配等)。
IHO已经意识到这一点,并已指导ENCs生产机构解决此类问题。
ENCs比例尺最小属性ENCs的每个对象都被赋予SCAMIN值。