流动层焙煎机使用说明书(DOC)
烹饪机用户指南说明书

Overview of water hardness settings
Tip: Connect your appliance to a mobile device. You can con- You can find an overview of the Medium 1.5 - 1.8 H:02
veniently change all settings using the Home Connect app.
of the impeller.
7. Insert the pump cover and press
down .
2
a The pump cover clicks into position.
1
8. Install the filter system.
Troubleshooting
Fault
E:32-00 will light up alternately or indicator for water supply lights up.
washers. Remove large remnants of food from 3. Switch on the appliance .
the tableware. Check that the spray arms can ro-
4. Select the programme. 5. Start the programme . 6. Remove the tableware at the end of the pro-
6. Re-assemble the filter system.
7. Insert the filter system into the appliance and turn the coarse filter clockwise. Make sure that the arrow markings match up.
Grindmaster-Cecilware 电子深炸油煎器操作手册说明书

Electric Deep-Fat FryerOperator ManualEFP40, EFS40, EFS65Grindmaster-Cecilware4003 Collins Lane, Louisville, KY 40245 USA Phone: 502.425.4776 Toll Free: 800.695.4500Fax: 502.425.4664Web:Email:*************Safety Information.....................................2Specifications..............................................3Unpacking...................................................3Installation..................................................4Operation....................................................5Cleaning (6)Maintenance (6)Troubleshooting.........................................8Parts Diagram.............................................9Parts List....................................................10Wiring Diagram. (11)Thank you for purchasing this quality fryer. For your safety and the safety of others, read all warnings and the operator’s manual before installing or using the product. Properly instruct all operators. Keep training records. For future reference, record serial number here:Table of Contents©2016 Grindmaster-CecilwarePrinted in USA0916 Form # CW-336-01Part # 390-00083Grindmaster-Cecilware provides the industry’s BEST warranty. Visit for warranty terms and conditions.Model: EFS-65Model: EFS-40Both fryers are shown with optional casters.2Cecilware ®FryerSafety InformationWARNINGCAUTIONthe product.DANGER:This term warns the user of imminent hazard that will result in serious injury or death.WARNING:This term refers to a potential hazard or unsafe practice, which could result in serious injury or death.CAUTION:This term refers to a potential hazard or unsafe practice, which could result in minor or moderate injury.This term refers to information that needs special attention or must be fully understood.Fryer Cecilware ®3UnpackingWith the container upright, cut the plastic straps around shipping container and lift off top, exposing the fryer.Carefully lift unit out of shipping container, and inspect immediately for shipping damage. Accessories are packed inside the fryer tank. Your fryer was shipped in a carton designed to give it maximum protection. It was thoroughly inspected before leaving the factory. File any claims for shipping damage or irregularities directly with the carrier.1869 1/24 1/233 1/41 3/4WIDTH35454 3/4INCLUDING HANDLE1 3/16KNOCKOUT 2 1/2DRAIN VALVEELEMENTSWORKING HEIGHTDEPTHACCESSORIES WITH UNIT 1 Basket Hanger 2 Baskets1 Drainpipe ExtensionOPTIONAL ACCESSORIES 1 Cover1 Twin Basket 4 Swivel Casters 1 RestrainerSpecificationsElectrical Specifications Model kW V SINGLE PHASETHREE PHASEAMPS AWGAMPS AWG EF‐4018.020886.5450.0618.024075.0443.3618.0220/380‐‐47.3/27.4618.0240/415‐‐43.3/25.16EF‐6521.0208101.0458.4621.024087.5450.6621.0220/380‐‐55.2/31.9621.0240/415‐‐50.6/29.66InstallationLocation and Restraint of FryerThe fryer must be placed in operating position in such a way that accidental tipping of unit, or spilling of hot oil, cannot occur.The unit may be restrained by either:• Connecting unit in battery with others, or• Locating unit in an alcove, or• Additional mechanical means of restraint.Air Supply and Ventilation -The area around the appliance must be kept clear to avoid obstruction to the flow of ventilation air as well as for ease of maintenance and service.UNDER NO CIRCUMSTANCE SHOULD THE INTERIOR OF THE FRYER'S CABINET BE USED FOR STORAGE.Means must be provided for any commercial, heavy-duty cooking appliance to exhaust cooking vapors to the outside of the building.Filters and drip troughs should be part of any industrial hood. Consult local codes before constructing and installing any hood.ClearancesMinimum clearance from combustible and noncombustible construction is 6” from the sides and 6” from the back. This unit can be placed on either a combustible or non-combustible surface. At least 16”clearance must be provided between the frying surface of the fryer and the surface flames of any adjacent cooking unit.Mechanical InstallationMOUNTING LEGS OR CASTERS - Carefully tip fryer up on its back and screw legs or (optional) casters into the threaded base of fryer. When installing casters make sure the swivel lock casters are mounted towards the front of the fryer. A high strength Restrainer must be installed when casters are used. Avoid putting any strain on rear legs or casters when tipping fryer back to an upright position.POSITIONING - DO NOT PUSH against any of the edges of the unit in an attempt to adjust its position. Lift unit slightly to maneuver into desirable installation position. Pushing the unit will increase the probability of bending the legs or internal connectors.LEVELING - Once the fryer is installed, the unit should be leveled, side-to-side and front-to-back, using a carpenter's spirit level. On smooth and level floors, level the unit with the screw threads of the legs. If the floor is uneven or has a slope, shims may be required. Electrical InstallationRATING PLATE - The rating plate is located on the inside of the fryer door. Information on the rating plate pertains to the power output (KW) of the heaters and other electrical requirements.The information presented in this manual is for reference only. Installations must comply with local codes.• Connections to the terminal block and grounding lug should be made through the hole provided for this purpose in the electric control box.NOTICE Unit must only be installed and operated with legs or casters provided by manufacturer.voltage equipment. Make sure main disconnect is offInstallation of this appliance must be performed byNOTICE:This equipment must be installed in compliance with applicable Federal, State, and/or Local electrical codes having jurisdiction or, in the absence of local codes, with the National Electric Code, NFPA 70 (latest revision).Fryer Cecilware®5Installation (continued)• The wiring diagram for each unit is attached to the inside of the fryer door. Wiring diagrams for all units are included in this manual. Amperage for each unit depends on the type of installation and accessories supplied with the unit.Initial cleaningBefore using the unit, the tank should be washed thoroughly with hot, soapy water to remove oil residues and dust, then rinsed and wiped dry. Accessories, shipped with the unit, should also be washed.Verification1.Remove the crumb screen.2.Fill the tank with hot or cold water to the "oillevel" line.3.Set the operating thermostat dial to 225degrees, just above the boiling point of water,and engage cook cycle. (Cook switch ON)4.Turn ON the power switch on the control panel.These steps check the heating elementoperation, initial thermostat calibration, andclean the tank for initial production.5.When the water starts to boil, turn the dial tojust below 212 degrees. The elements will turnoff and the water will stop boiling.6.When satisfied that heaters and thermostat areoperating properly, drain the tank and drythoroughly.7.Close the drain valve.Final Preparation• COOKING OIL: fill tank to the "oil level" line marked on the tank.• SOLID SHORTENING: either melt shortening first or cut it into small pieces and pack carefully around the heating element. Leave no air space around the elements and be careful not to disturb the sensing bulbs. Melt the shortening either with the MELT or MELT/COOK cycle or by using the COOK cycle and turning the heaters ON for FIVE (5) to TEN (10) SECONDs then OFF for ONE (1) MINUTE using the temperature control dial. Repeat this cycle until the shortening has melted. If smoke develops during this melting process shorten the "on" cycle and lengthen the "off" cycle.• When the shortening has melted and the tank has filled to the "oil level", replace the crumb screen.• Before starting operation, set the unit into COOK cycle mode and turn the thermostat to the operating temperature. Allow the oil or shortening temperature to stabilize, and then check with a high quality immersion thermometer.OperationDaily OperationAT START OF WORKDAY- Check fryer visually for • Power switch "OFF".• Temperature control dial "OFF". (Counterclockwise)GENERAL TURN-ON PROCEDURE:• If fryer is empty, fill the tank with oil to the "oil level" mark.•If using solid shortening, cut and pack as previously described.•Turn Power switch "ON".•To melt solid shortening, turn the Melt (Melt/Cook) switch "ON" and set thetemperature control dial to 200 degrees.•Put unit into cook cycle (Cook switch "ON") and set the temperature to 350 degrees(recommended). The frying compound willstabilize in less than 30 minutes and the unitwill be ready for production.USE OF FRYER - for best results:•For consistent product quality, and long-term savings, use high quality liquid frying oil.•If using solid shortening, never attempt to melta block of shortening by setting it whole on topof the heating elements. This is dangerous as itmay burn-out the elements and start a fire.•The recommended temperature of 350 degrees should be the usual temperature for mostcooking operations. However, frying should becarried out at the lowest temperature whichwill produce a high quality product whileensuring maximum life of the frying compound.•When the fryer is not in use, temperature control should be set at a lower temperaturethan that used during cooking. Light loads mayalso be cooked at lower temperatures.•Salting: Do not salt food over the fryer tank.Salt deteriorates the frying compound quickly.Fryer must only be operated when cooking oil orshortening has fully melted.6Cecilware ®FryerOperation (continued)FILTERING -The frying compound should be filtered at least once a day, or more frequently when doing high volume cooking. This assures the longest possible life for the frying compound, minimizes the transfer of flavors from batch to batch, and gives better taste to the food being prepared.AT CLOSING TIME -Turn the power switch on the fryer panel OFF and set the temperature control dial OFF Drain and filter the frying compound. Allow compound to cool down sufficiently to prevent burns to the operator. Cover the fryer tank.SHUT DOWN - When shutting down for longer than just overnight, drain the frying compound, clean the tank thoroughly, either discard the compound or return it filtered to the tank and then cover it.CleaningDAILY•Take off and wash fryer basket(s), crumb screenand basket hanger.•Clean all exterior surfaces of the unit. Do notuse cleansers, steel wool, or any other abrasive cleaning material on steel.•Filter the frying compound or replace asnecessary. More frequent filtering may be required if the unit is heavily used.WEEKLY•Drain the tank completely, either into a filter ora steel container. Do not use plastic buckets or glass containers.•Clean the vessel with a nonabrasive commercial cleaner or hot water and a strong detergent.Drain the cleaning solution.•Close drain valve and fill tank with fresh cleaning solution. Bring the cleaning solution to a boil, turn down the heat, and let the solution stand until deposits or spots can be rubbed off with a Teflon brush.•Scrub tank walls, bottom and heating elements (Be careful not to disturb the sensing bulbs),then drain tank and rinse with clean water.•Refill tank with clean water and bring to a full boil. Drain, rinse, and dry tank thoroughly.•Refill with frying oil or compound (see Daily Operation in Operation section).GENERAL CLEANING SUGGESTIONSDO NOT USE steel wool or abrasive cloths, cleaners or powders. If it is necessary to scrape steel to remove encrusted materials, soak the area with hot cloths to loosen the material, and then use a wood or nylon scraper.DO NOT USE a metal knife, spatula, or any other metal tool to scrape steel.Keep all exterior surfaces of the griddle free of splashed grease and other dirt by washing regularly with hot water and soap. Rinse and wipe dry: then polish with a soft cloth.MaintenanceHigh Limit Control Test:To test whether high limit control is working properly,fill the fry tank with oil up to maximum oil level. Then place a suitable thermometer in the fry tank with bulb deeply immersed in oil. Set thermostat to maximum position. When temperature has reached cut out level (H eating indicator light goes OFF), depress the H igh Limit Test Switch which bypasses thermostat and allows fat to heat up until high limit control is activated. When Red High Limit Pilot goes ON, note the temperature on thermometer (should be between 440 deg. and 475deg.). Allow fryer to cool; then press red reset button(s)on the left section of control box, located behind the access door. If high limit control does not shut off fryerbefore 475 degrees is reached, have it replaced.draining it.NOTICE:The following procedures must beperformed by qualified service personnel only. Factory approval must be obtained prior to doing any warranty work.Maintenance (continued)8®FryerTroubleshootingIf the elements will not heat:1.Check if all wires to the solid state temperaturecontrol or melt cycle timer are secure.2.With the power on/off switch "ON", manuallyreset the high limit thermostat (push the red button(s) behind the access door).3.Check that correct line voltage exists acrossterminal block terminals L1-L2, L2-L3 and L3-L1(three phase connection) or L1-L2 (single phase connection).4.Check if the main or branch circuit breakers orfuses are tripped or blown.5.If the panel power indicator light is ON butlatching contactor is not actuated, check continuity from the latching contactor coil to the power indicator light.If the panel power indicator light does not light:1.Check line voltage across the power indicatorlight, and then if voltage does not exist proceed as follows:2.Check the fuse for line voltage between theload side and L3.3.Check the power on-off switch for line voltagebetween the load side and L3.4.Check the high limit thermostat for line voltagebetween the load side and L3; if resetting does not produce results, replace the high limit thermostat.5.Check the operating thermostat for linevoltage between the load side and L3; if defective, replace thermostat.Excessive warm-up time; slow or inadequate temperature recovery; uneven heating:1.Check temperature controller adjustment.2.Place the sensing bulb of a high qualityimmersion thermometer about 1.5" above the thermostat sensing bulb or thermistor probe and set the controller dial to 350 degrees.3.Wait at least 20 minutes for the oiltemperature to stabilize.4.If the temperature is not within +/- 10 degreesof the dial setting, see “Probe Test” below for the solid state temperature controller or “Temperature Adjustment” for the thermostat temperature controller.5.Check heating circuit6.With the power switch "ON" turn thetemperature control dial until the power and heating indicator lights are both on. The latching and cycling contactors should both be actuated.7.Check the load side of the contactors to theheating element terminals. Each element should draw as shown:Excessive temperature overshoot during warm-up; overheating; scorching; high limit switch requires frequent re-setting:1.Check temperature controller (see TemperatureAdjustment below).2.Check thermistor probe.3.Check that the thermostat bulb or thermistorprobe in the tank has not been moved out of operating position.TEMPER ATUR E ADJUSTMENT (For units with mechanical thermostat controls)1.Mount the bulb of a high quality immersionthermometer at the same level as the thermostat bulb. To adjust temperature, turn the thermostat knob to its maximum position (in clockwise direction).2.Pull off the dial knob and insert a smallscrewdriver into the adjustment screw in the center of the shaft. If the liquid compound is hotter than the setting turn the screw CLOCKWISE TO LOWER THE TEMPERATURE.3.If the liquid compound is cooler than thesetting turn the screw COUNTERCLOCKWISE TO RAISE THE TEMPERATURE.MAKE ALL TEMPERATURE ADJUSTMENTS, UP OR DOWN, IN INCREMENTS OF 1/4 TURN. IF TH IS CALIBRATION FAILS, REPLACE THERMOSTAT.If you need help, call Grindmaster-Cecilware Technical Service Department, (502) 425-4776 or (800) 695-4500(USA & Canada only) (Monday through Friday 8 AM - 6PM EST). Please have the model and serial number ready so that accurate information can be given. The rating plate is located on the inside of the fryer rmation on the plate includes the model and serial number of the unit.Prior authorization must be obtained from Grindmaster- Cecilware for all warranty claims.Grindmaster-Cecilware provides the industry’s BEST warranty. Visit our website at for warranty terms and conditions.Cecilware®10Cecilware ®FryerParts ListFryer Cecilware®11Wiring DiagramWiring Diagram (continued)Wiring Diagram (continued)Wiring Diagram (continued)15Grindmaster-Cecilware4003 Collins Lane, Louisville, KY 40245 USA Phone: 502.425.4776 Toll Free: 800.695.4500 Fax: 502.425.4664Web:Email:*************Grindmaster-Cecilware provides the industry’s BEST warranty. Visit for warranty terms and conditions.©2016 Grindmaster-Cecilware Printed in USA 0916 Form # CW-336-01Part # 390-00083。
中文im进口烘焙机说明书

警告:这仅是家用电器,不满足商业的使用要求,对于商业使用是无效保证的。
目录页数处理电器设备的一般安全信息 4基本说明7运输7电源链接7使用7第一次使用前的常规视察8操作8放咖啡豆8开关机器9烘培9烘培程序10注意事项10清洗11维护11故障12处理12配件及备件12操作指令与安全准则警告:第一次使用前,请认真阅读说明书并遵守处理电器设备的安全准则1.开关2.控制面板3.烘焙篮子4.热气喷嘴技术参数电源230-240V, AC/1-50Hz额定功率2000Watt电线长度150cm重量约2.7kg咖啡豆容量0.300kg处理电器设备的一般安全信息遵敬的客户,必需要遵守以下的安全准则,以避免发生触电,受伤及火灾:●保留说明书与安全准则以便以后参考。
如果机器被传递给第三方,请把它们一起传过去。
●只按照说明书的指导使用机器相应的功能。
●机器只能在坚实的水平面上进行操作。
●在操作机器的烘培系统前,电源线必须与额定的功率相匹配。
机器的电源线或更换,必须是由商家指定的。
●不允许直接拉电源线去把插头从插座里拔出,不允许用湿手去处理插头。
●确保电源线没有过度驱动,压碎,过度拉伸等风险。
电源线必须远离热的,带油的,粗糙的或尖锐的东西的边沿。
任何的延伸电源,必须有功率处理功能及防水功能。
链接器不能躺在水中。
●电源线不能有被磨损的痕迹。
如果有这类的损害,它必须由厂商的售后代理或一个合格的电工来更换,以防止触电的风险●关机时,只有电源线与插座链接。
●只有在转动篮子在正确的位置,放入适量的咖啡豆的情况下才能启动机器。
如果对操作存在任何疑问时,请不要使用机器。
特别注意转动篮子的正确位置。
●大幅度的温度波动会严重影响到机器的功能,所以如果机器被放于冷房或是温室,允许使用前先预热。
●只能使用商家指定的零配件。
●不能穿可能会被卷进机器内部的宽松衣服或首饰进行操作机器。
●机器必须远离水,不能放于潮湿的环境中或是湿度相对较高的地方。
●不允许在喝酒,因病吃药或过度疲劳的反应能力相对迟钝的情况下操作机器。
(完整版)机器煎药操作规程
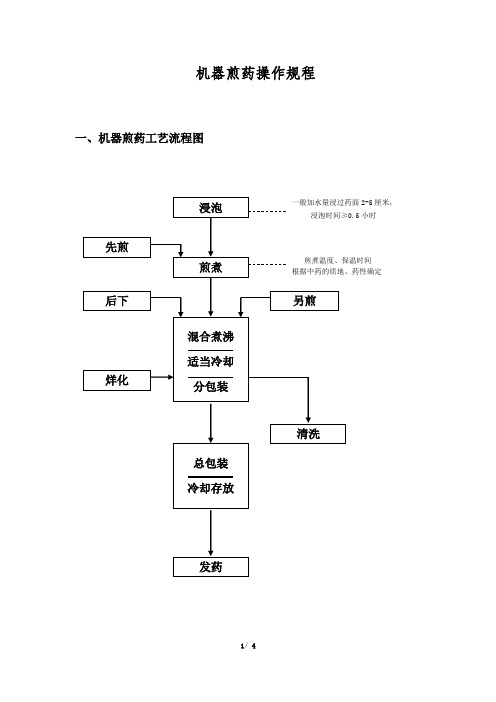
机器煎药操作规程一、机器煎药工艺流程图2-5厘米,0.5小时二、浸泡1、待煎中药应置入清洁的专用煎药袋,放洁净容器内先行浸泡,浸泡(煎煮)应当使用符合国家卫生标准的饮用水(冬季以40℃以下温水浸泡为宜)。
浸泡时间不少于30分钟,浸泡过程中应搅动或挤压药料1-2次,使之浸泡充分。
有特殊要求(先煎、后下、烊化、另煎等)的药物另行处理。
2、浸泡(煎药)的用水量应为饮片吸水量、煎煮过程中蒸发量及煎煮后所需药液量的总和。
花、草类和解表药等可酌减水量,吸水性强或煎煮时间较长的调理滋补药等应适当增加水量。
经验估量一般以浸没药袋2-5cm为宜,或按所需药液总量的1.2-1.5倍量加水。
三、煎煮1、将浸泡后的煎药袋连同浸药液置入煎药机内,并将药物压置于液面以下,煎煮温度和时间应根据不同的煎煮设备以及所煎中药的质地和药性确定。
1.1解表药、芳香类药:温度105℃-110℃(压力<0.1Mpa),保温时间15-20分钟。
1.2一般治疗药:温度110℃-115℃(压力<0.1Mpa),保温时间20-30分钟。
1.3调理滋补药:温度115℃-120℃(压力<0.1Mpa),保温时间30-40分钟。
1.4药料要充分煮透,煎煮过程中应对药物进行不少于2次的挤压放松,提高煎出率。
2、煎药剂量根据儿童和成人分别确定。
一般儿童每剂100-300毫升,成人每剂300-400毫升,每剂按两份等量分装。
医师处方对剂量另有要求的应遵医嘱。
3、凡有先煎、后下、包煎、另煎、烊化、煎汤代水等特殊要求的,应当按规定或医嘱操作并作好原始操作记录。
有特殊煎煮要求的药物在煎煮前应先行浸泡,浸泡时间不少于30分钟。
3.1先煎:先煎药物应按《上海市中药饮片炮制规范》的相关要求执行,一般先煎药物应煮沸15-30分钟后,再与其它药物同煎。
除要求先煎时间较长的药物外,使用压力机器煎煮的先煎药物可与其他药物同煎。
3.2后下:将煎好的药汁注入液体包装机加热煮沸,再加入后下药物煎煮3-5分钟;也可另煎后下药物,将药汁兑入已煎好的药汁。
美食之旅:披萨烘焙机的使用指南说明书

CALL 1-800-243-5020 TO ORDER THESE AND OTHER WESTON WOODS VIDEOS!
Electrolux EOB43100烘烤箱 说明书

用户手册烘烤箱EOB43100Electrolux. Thinking of you.在 上分享更多我们的思维目录安全信息 2产品说明 4日常使用 4实用建议和提示 8养护和清洁14如果……应该如何处理16安装17环保问题18维修服务指南19如有更改恕不另行通知安全信息安装和使用前,请先仔细阅读本手册:•以便保护您的人身和财产安全•保护环境•正确地操作本电器。
移动或出售本电器时,请务必也将这些说明随其一同移动或出售。
对于因不正确安装或使用而导致的损坏,制造商不承担任何责任。
儿童和残弱人士安全•本电器可供 8 岁及以上儿童和肢体不健全、感官或精神上有障碍或缺乏相关经验及知识的人士使用,前提是他们在使用本产品时受到监督或得到安全使用指导,同时了解使用过程中可能涉及的危险。
请勿让儿童玩耍本电器。
•确保所有包装物远离儿童,因为有窒息或身体受伤的危险。
•电器门打开或电器运转时将变热,请确保儿童及动物远离本电器。
可能存在受伤或其他永久性伤残的危险。
•如果本电器具有童锁或按键锁(控制锁)功能,请使用这些功能,以防止儿童及动物意外启动本电器。
常规安全事项•请勿更改本电器的规格,因为存在人身伤害和损坏本电器的风险。
•请勿在电器运行时无人照看。
•每次使用后都要关闭电器电源。
安装•只有获得认可的电气技师方可安装和连接本电器。
请联系获得认可的服务中心。
这样做是为了防止出现结构损坏或身体伤害。
•请确保本电器不会因运输而受损。
切勿连接损坏的电器。
如果需要,请联系供应商。
•初次使用前,请去掉本电器的所有包装、粘附物和覆盖层。
但不要去掉铭牌。
摘除铭牌会使保修无效。
•安装过程中,请确保断开本电器与电源的连接。
•移动本电器时要小心谨慎。
本电器很重。
请始终使用安全手套。
不要握住手柄提拉本电器。
•进行电气安装时,务必安装隔离装置,以便可以断开电器与电源所有电极的连接。
隔离装置的触点开口宽度最小要达到 3毫米。
•务必使用合适的隔离装置:线路保护断流器、保险丝(可从保险丝座上卸下的螺旋式保险丝)、接地保护自动断路器和接触器。
巴克斯骑士XXE漏斗炉煎饼机说明书
OPERATION MANUALModels: Dante XXECHARBROILER OPERATION MANUALBakers Pride Oven Company, LLC is a wholly owned subsidiary of Standex International Corporation. All gas operated Bakers Pride ® charbroilers are intended for use with the type of gas specified on the rating plate and for installation will be in accordance with National Fuel Gas Code ANSI Z223.1 (latest edition).Please retain this manual for future references.This equipment is design engineered for commercial use only.This equipment has been engineered to provide you with year round dependable service when used according to the instructions in this manual and standard commercial kitchen practices.BAKERS PRIDE OVEN COMPANY, LLC.1307 N. Watters Rd., Suite 180Allen, TX 75013Phone: 800.527.2100 | Fax: 914.576.0605 | TABLE OF CONTENTSINSTALLATION INSTRUCTIONS 1 INSTALLATION 1 CLEARANCES2 GAS CONNECTION 2 BURNER S2 RADIANT S2 TOP GRATES 2 LIGHTING INSTRUCTIONS 3 GREASE PAN 3 GRIDDLE PLATE 3 ADDITIONAL INSTALLATION INSTRUCTIONS 3 INSTALLATION WITH CASTERS 3OPERATING INSTRUCTIONS 4 LIGHTING PROCEDURE 4 BROILING 4 MAINTENANCE 4 S ERVICE 4 CARE & CLEANING 4 CLEANING TOOLS 4 TROUBLESHOOTING CHART 5 MANIFOLD & VALVE ASSEMBLY VIEWS 5 PARTS LIST AND EXPLODED VIEWS 6 WARRANTY 11SAFETY PRECAUTIONSINSTALLATION INSTRUCTIONSInstallation Instructions(A) INSTALLATION of this broiler must conformwith the latest edition of National Fuel GasCode and/or local codes, (the American NationalStandard 2-223.1 in USA and CAN/CGA-B149.1or 2 Installation Code in Canada). In Europe,this appliance must be installed in conformitywith current regulations and used only in a wellventilated space.(B) In MASSACHUSETTS, All gas products must beinstalled by a “Massachusetts” licensed plumberor gas fitter. Ventilation hoods must be installedin accordance with NFPA-96, current edition,with interlocks as described in that standard.INSTALLATION INSTRUCTIONSAcceptable Clearances:(A) USA and Canada. Due to intense heat generatedby radiation, in USA and Canada these broilers should be installed in non-combustible locations only, including the areas above the grate level. Minimum Clearance From Non-CombustibleConstruction:(B) European Community CountriesMinimum clearance from:Gas Connection:The gas pressure regulator supplied must be installed at the gas inlet of each broiler unless required otherwise by local codes. Each regulator is adjusted to yield a manifold pressure of 3.5” water column (9 mbar) for natural gas or 10” water column (25 m bar) for propane gas. Units for propane gas are available for use in USA and Canada only.Recommended minimum gas supply lines are listed below:All XXE Models: 3/4” (19 mm )For units using propane gas supply In USA and Canada lines less than 1/2” (12.7 mm) inside diameter should not be used.On the XXE series, the gas connection is located on the right rear of the unit.When making gas pipe connections, pipe jointcompound resistant to the action of liquefied petroleum gases should be used.The broiler and its individual shutoff valve must bedisconnected from the gas supply piping system during any pressure testing of that system at test pressure in excess of 1/2 psig (3.45 kpa).The broiler must be isolated from the gas supply piping system by closing its individual manual shutoff valve during any pressure testing of the gas supply piping system at test pressures equal to or less than 1/2 psig (3.45 kpa).BurnersCheck to see that air mixer caps on the front of all burners are adjusted and tightened, allowing half the opening to show.To install the burners:(A) Place the front venturi end of the burner into thevalve assembly by fitting the center hole of the air mixer cap over the brass orifice.(B) Drop the two ends of the burners over theburner support pins in the front and back of the chamber.RadiantsMount the “A” shaped radiants over the burners with each end mounted on special supports on the front and rear of the chamber. A radiant should be mounted over eachburner assembly.Top GratesPlace a grate over each of the radiants. For normal operation the pointed side of the grate is facing up. For use with foods that require extra, support, the flat side may be used.On XXE models, grates can be placed on three levels; two positions are built into the rear of the unit; the third position requires a special adapter which is supplied with the unit.The adapter covers only half of the broiler. To cover the entire unit, optional adapters can be ordered.INSTALLATION INSTRUCTIONSLighting:Each burner has a standing pilot burner which must be lit before the burners can be lit. To light the pilot burners:(A) Turn all broiler valves to off position (B) Open main gas shut off valve ( provided bycustomer).(C) Press, turn counterclockwise and hold the burnercontrol knob to the pilot burner ignition position.(D) Using a lit taper, light the pilot burner.(E) Release the knob after 30 seconds. Pilot burnershould stay lit. If the pilot burner does not remain lit, wait for 5 minutes and repeat steps C and D. Hold the knob pressed longer before releasing.(F) With a screwdriver adjust the pilot burner flameto about 1/2” (12.7 mm). Turn the adjusting screw clockwise to reduce or counterclockwise to increase the pilot burner flame.(G) Each burner may now be adjusted to the desiredflame size by turning the individual burner valve knob.(H) Turn the knob to the pilot burner ignition positionto shut down the main burner.(I) Turn the knob to off position to shut down thepilot burners.Grease PanA grease pan is provided below the burners to hold any grease that drips down past the radiants while broiling. An additional grease drawer is provided in the front right corner of the grease pan to collect the grease from the grease drain in the front which in turn drains into the grease collector.Water is usually added to the grease pan to reduce flare-up and flash back. The grease drip will extinguish as it hits the water.Griddle Plate (Optional)Griddle plates should not cover more than 50% of the BROILING area. Each Griddle Plate fits on top of two grates. It is not necessary to remove the top grates and radiants before installing the griddle plate.Additional Installation Instructions(A) Keep the area around the broiler free and clear ofcombustible materials.(B) The provision of an adequate air supply to yourbroiler is essential. Provide for sufficient outside air to enter the broiling area and assure that this air flow is not obstructed.(C) Air enters the burner area from the front of yourbroiler. Assure that this area is kept open and unobstructed.(D) Servicing is accomplished through the front andtop of the broiler. Assure that this area is kept unobstructed for proper servicing and operation.Installation With Casters(A) Install the casters with wheel brakes on the frontof the appliance.(B) Installation should be made with a connector thatcomplies with the latest edition of the Standard for Connectors for Movable Gas Appliances (ANS/Z21.69 in USA, CAN/CGA-6.16 in Canada) and a quick disconnect device that complies with the latest edition of the Standard forQuick Disconnect Devices for use with gas fuel (ANSIZ21.41 in USA, CAN1-6.9 in Canada). Adequate means must be provided to limit the movement of the appliance without depending on the connector and any quick disconnect device or its associated piping to limit the appliance movement.(C) The restraint should be attached to the center ofthe back about 1/2” (12.7mm ) from the bottom.(D) If disconnection of the restraint is necessary,the restraint should be reconnected after the appliance has been returned to its originally installed position.OPERATING INSTRUCTIONSLighting ProceduresSee Lighting Section under Installation Instructions. BroilingBroiler top grate must be hot enough to make black char-marks when starting to broil.Adequate preheating time is necessary for the food to release from the broiler and to cook properly. Allow the unit to preheat for 20-25 minutes before broiling. (A) Do not press the juice out of the meat becausethat will cause dry products.(B) After broiling, allow the meat to sit covered ona heated platter for 2-5 minutes before cutting.This will allow the juices to “settle” and theproduct will be more moist.(C) Do not use forks or other sharp objects to pokeholes in the meat. Do not cut the meat as itcooks.(D) Thick pieces of meat require a longer broilingtime with less flare-up. Reduce flare up bytrimming excess fat for a longer broil time without burning.(E) Keep the unit clean. Food caught between thegrate will not allow hot air to rise around theproduct. This will result in uneven heating andincrease the cooking time.MAINTENANCEServiceShut off the main gas supply before attempting any maintenance on the unit. If required, contact your dealer, the factory, or a local service company to obtain qualified maintenance and repairs.Care And Cleaning(A) The top grates should be cleaned using a stiffwire brush. If this is done daily, the accumulation of food and fat caught in the grates and worknecessary to keep them clean will be reduced.Periodically, they should be turned over andbrushed and then put back. In the event that anextra amount of fat is accumulated on the top,due to use of low heat, we recommend turning up the flame of this section for about an hour, whichwill burn off much of the fat and residue andthe brushing operation will be easier. Under nocircumstances should the grates be placed in adishwasher. Soap, water, or any detergents should never be used on the cast iron grates.(B) Front - Sample supplied with the unit or anyreputable stainless steel cleaner can be used.(C) Inner panels - These are made of aluminizedsteel. Use hot soapy water and soft nylon scrubpads to clean the surfaces.(D) Grease pan and grease collector - Grease pan andcollector should be cleaned daily or more often ifnecessary.Cleaning ToolsSeveral models of specially designed top grate brushes and grease drain scrapers are available from Bakers Pride. Contact Bakers Pride for more information.MAINTENANCE Troubleshooting ChartMANIFOLD & VALVE ASSEMBLY VIEWSFigure 1: XXE Series - Front ViewFigure 2: XXE Series - Side ViewPARTS LISTS AND EXPLODED VIEWSDante SeriesModel Number o XXE-4o XXE-6o XXE-8o XXE-10Serial Number Type of Gaso Naturalo LPo OtherNote: When ordering, ALWAYS specify Part #, Model #, Serial #, Voltage/Phase & type of Gas.PARTS LISTS AND EXPLODED VIEWSEXPLODED VIEW – XXE-4, 6, 8, 10, 12Note: When ordering, ALWAYS specify Part #, Model #, Serial #, Voltage/Phase and Gas Type.PARTS LISTS AND EXPLODED VIEWSNote: When ordering, ALWAYS specify Part #, Model #, Serial #, Voltage/Phase and Gas Type.PARTS LISTS AND EXPLODED VIEWSEXPLODED VIEW – XXE-4, 6, 8, 10, 12 Burner / AccessoriesPart No.DescriptionR1085P Manifold Assy (XXE-4)R1086P Manifold Assy (XXE-6)R1087P Manifold Assy (XXE-8)R1088P Manifold Assy (XXE-10)N3068P Pressure Tap Nozzle Assy N5217P Gas Inlet Pipe (XX Series)Note: When ordering, ALWAYS specify Part #, Model #, Serial #, Voltage/Phase and Gas Type.Item Part No.Description14N1010A Ferrule, 3/16"15R3130A Orifice Hood #44, Nat (XXE) 16R3044A Orifice Hood #55, LP (XXE) 17R3023A Orifice Hood, Blank18T1155T Radiant, S/S (23") StandardHEAVY DUTY GAS CHARBROILER OPERATION MANUALBAKERS PRIDE LIMITED WARRANTYWHAT IS COVERED This warranty covers defects in material and workmanship under normal use, and applies only to the original purchaser providing that:• The equipment has not been accidentally or intentionally damaged, altered or misused;• The equipment is properly installed, adjusted, operated and maintained in accordance with Nationaland local codes and in accordance with the installation instruction provided with the product;• The serial number rating plate affixed to the equipment has not been defaced or removed.WHO IS COVERED This warranty is extended to the original purchaser and applies only to equipment purchased for use in the U.S.A.COVERAGE PERIOD Cyclone Convection Ovens: BCO Models: One (1) Year limited parts and labor; (1) Year limited door warranty.GDCO Models: Two (2) Year limited parts and labor; (2) Year limited door warranty.CO11 Models: Two (2) Year limited parts and labor; (5) Year limited door warranty.All Other Products: One (1) Year limited parts and labor. Warranty period begins the date of dealer invoice to customeror ninety (90) days after shipment date from Bakers Pride - whichever comes first.WARRANTY This warranty covers on-site labor, parts and reasonable travel time and travel expenses of the authorized service COVERAGE representative up to (100) miles, round trip, and (2) hours travel time. The purchaser, however, shall be responsible for all expenses related to travel, including time, mileage and shipping expenses on smaller counter models that may becarried into a Factory Authorized Service Center, including the following models: PX-14, PX-16, P18, P22S, P24S, PD-4,PDC, WS Series and BK-18.EXCEPTIONS All removable parts in Bakers Pride® Charbroilers, including but not limited to: Burners, Grates, Radiants, Stones and Valves, are covered for a period of SIX MONTHS. All Ceramic Baking Decks are covered for a period of THREEMONTHS. The installation of these replacement decks is the responsibility of the purchaser. The extended Cyclone doorwarranty years 3 through 5 is a parts only warranty and does not include labor, travel, mileage or any other charges.EXCLUSIONS• Negligence or acts of God,• Failures caused by erratic voltages or gas supplies,• Thermostat calibrations after (30) days fromequipment installation date,• Unauthorized repair by anyone other than a BakersPride Factory Authorized Service Center,• Air and Gas adjustments,• Damage in shipment,• Light bulbs,• Alteration, misuse or improper installation,• Glass doors and door adjustments,• Thermostats and safety valves with broken capillary tubes,• Fuses,• Char-broiler work decks and cutting boards,• Tightening of conveyor chains,• Adjustments to burner flames and cleaning of pilot burners,• Tightening of screws or fasteners.• Accessories — spatulas, forks, steak turners, grate lifters, oven brushes, scrapers, peels. etc.,• Freight — other than normal UPS charges,• Ordinary wear and tear.INSTALLATION Leveling and installation of decks as well as proper installation and check out of all new equipment —per appropriate installation and use materials — is the responsibility of the dealer or installer, not the manufacturer.REPLACEMENT PARTS Bakers Pride genuine Factory OEM parts receive a (90) day materials warranty effective from the date of installation by a Bakers Pride Factory Authorized Service Center.This Warranty is in lieu of all other warranties, expressed or implied, and all other obligations or liabilities on the manufacturer’s part. Bakers Pride shall in no event be liable for any special, indirect or consequential damages, or in any event for damages in excess of the purchase price of the unit. The repair or replacement of proven defective parts shall constitute a fulfillment of all obligations under the terms of this warranty.Form #U4177A 1/07Be sure to keep up with new product announcements and events on social media!。
煎烤机产品说明书
JC3029R30 SM VER1.0火红点2五色进度环,烹饪状态了如指掌聚能可拆,效率更高更方便极酥脆烤盘,加热更快更均匀中西合壁10大功能更实用六大安全保障更贴心将电源线插头插到电源插座上,通电后,蜂鸣器发出“滴”一声,各指示灯从左至右依次闪过,然后默认“烙饼”及“开始/长按取消”灯闪烁,煎烤机处于待机状态。
用户可根据实际需要选择“功能选择”或“超强火力”。
1、2、 在待机状态,5色灯渐变发光,顺序为:绿、橙、红、粉、蓝,然后发渐变白光。
不断重复。
功能选择1、待机状态时按“功能选择”键,可以从左到右,从上到下依次选择:1烙饼;2葱花饼;3馅饼;4煎蛋;5水煎包;6烤肉;7鱼虾;8披萨;9饼干;10蛋糕。
★菜单列表内食物默认煎烤机合盖烹饪,烹饪时间按下表设置:默认烹饪时间功能烙饼6分钟 5分钟6分钟2 分钟 18分钟默认烹饪时间功能各功能默认7分钟 6分钟7分钟10分钟 葱花饼馅饼煎蛋水煎包烤肉鱼虾披萨饼干烹饪时间蛋糕15分钟2、菜单选择完毕,按“开始/长按取消”键进入工作状态,工作状态先后按以下五个状态进行:(1)快速预热按“开始/长按取消”键后,进入快速预热状态。
相应功能灯常亮,“开始/长按取消”灯常亮,“上盘”、“下盘”灯常亮,5色灯呈呼吸绿色,盘温一直加热到设定温度的80%,然后进入“放入食材”状态。
放入食材。
此时开始计时,放入食材状态持续30秒,然后进入“不同食材最佳温度”状态。
(3)不同食材最佳温度盘温达到最佳,5色灯呈呼吸红色。
此状态一直持续到默认烹饪时间的倒数1分钟,然后进入“快速上色”状态。
(4)快速上色盘温达到最高,5色灯呈呼吸粉色。
此状态持续1分钟,直至计时周期结束,进入“烹饪结束”状态。
(5)烹饪结束5色灯呈呼吸蓝色,烤盘不再加热,“上盘”、“下盘”灯灭,蜂鸣器持续响20秒,相应功能灯及“开始/长按取消”灯持续闪烁20秒。
然后进入到待机状态,烹饪结束。
水煎包默认只下盘加热,如需上盘加热,可手动按启。
食品饮料行业烘焙设备使用说明书
食品饮料行业烘焙设备使用说明书一、设备介绍本烘焙设备是专为食品饮料行业设计的,旨在为饮品和烘焙食品制作提供高效、安全的解决方案。
设备采用先进的技术和材料制造,具备以下主要特点:1.1 高效能:设备采用先进的加热和温控技术,能够迅速达到所需温度,并保持稳定。
1.2 多功能:设备可以进行烤炉、发酵箱、烘焙等多种功能,可满足不同烘焙需求。
1.3 安全可靠:设备通过严格的安全检测和质量控制,采用适当的防护措施,保证使用过程中的安全性和可靠性。
二、操作步骤在使用本烘焙设备之前,请务必仔细阅读以下操作步骤,并按照要求正确操作:2.1 设备连接:将设备正确连接到电源,确保电源稳定并符合设备额定电压要求。
2.2 开机预热:按下设备电源开关,待设备预热指示灯亮起后,即可进行下一步操作。
2.3 温度设定:根据所需烘焙食品的要求,将设备温度控制旋钮调整至相应温度位置。
2.4 烘焙操作:将准备好的食材放置在烤盘内,将烤盘放置在设备预留位置,并启动烘焙。
2.5 监控和调整:在烘焙过程中,通过观察食材状态和使用温度控制旋钮进行适时的调整。
2.6 烘焙完成:根据所需食品的烘焙时间,待设备定时器结束或食品达到理想状况时,关闭设备电源。
三、保养与维护为了保证设备的正常工作和延长使用寿命,请定期进行以下保养和维护工作:3.1 清洁操作:在设备使用完毕后,必须进行彻底清洁,确保设备内外干净,避免食品残留污染。
3.2 定期检查:定期检查设备电源线、控温器、温度传感器等部件是否正常工作,如有问题请及时联系售后服务。
3.3 润滑维护:根据需要,定期对设备传动部分进行润滑,确保设备稳定运行。
3.4 存储条件:如需长时间存放设备,请将其置于干燥、通风良好的环境中,远离潮湿和腐蚀性物质。
四、安全提示为了保障您的人身安全和设备的正常运行,请遵守以下安全提示:4.1 使用环境:请务必将设备放置在稳定的平面上,并确保周围无易燃物品和阻挡物。
4.2 注意通风:在使用设备时,保持空气流通,避免使用在封闭空间中。
食品加工机械使用说明书
食品加工机械使用说明书注意事项:1. 本机使用前,请仔细阅读本说明书,并确保使用者了解所有安全信息和操作要点。
2. 本机适用于食品加工行业,包括但不限于食品烘焙、果汁榨取等。
3. 请确保本机的电源和电气设施符合当地的电气安全标准,并配备相应的接地装置。
4. 本机不得用于非指定的食品加工作业。
5. 使用本机时,操作者必须戴防护眼镜、防护手套等个人防护装备,以确保人身安全。
安全操作指南:1. 请确保本机处于稳定的工作环境中,不要将机器放置在湿滑的地面上,以免造成滑倒或机器晃动而导致意外伤害。
2. 在操作本机之前,请检查所有开关和按钮是否处于正常工作状态,若出现故障请立即停止使用,并寻求专业维修人员的帮助。
3. 操作者应保持集中注意力,确保操作过程中不受外界干扰,以防止误操作。
4. 在使用本机期间,请勿将手部或任何异物伸入机器内部,以免造成触电或机器卡住的危险。
5. 使用本机时,请确保机器上的刀具、搅拌器等零部件处于正常状态,若出现松动或损坏请立即停止使用,并更换新的零部件。
操作步骤:1. 将本机放置在水平的工作台面上,接通电源并确保电源指示灯亮起。
2. 打开机器的进料口,并将需要加工的食品材料逐步放入。
3. 根据需要,调整机器的加工速度和时间,以达到理想的加工效果。
4. 加工完成后,关闭机器的进料口,并将电源开关关闭。
5. 清洁机器零部件前,请先断掉电源,并等待机器完全停止运转。
6. 清洁机器零部件时,请使用洗涤剂和热水,以确保卫生和食品安全。
7. 清洁完成后,请将零部件晾干,并妥善存放在干燥通风的地方。
故障排除:若在使用过程中发生故障,请首先切断电源,并按以下步骤进行排查:1. 检查电源线是否连接良好,是否存在断路或短路情况。
2. 检查机器零部件是否松动或损坏,若有问题请立即更换。
3. 若无法解决故障,请联系售后服务中心或指定维修机构进行处理。
维护保养:1. 定期清洁机器的各个零部件,确保机器始终处于良好的工作状态。
- 1、下载文档前请自行甄别文档内容的完整性,平台不提供额外的编辑、内容补充、找答案等附加服务。
- 2、"仅部分预览"的文档,不可在线预览部分如存在完整性等问题,可反馈申请退款(可完整预览的文档不适用该条件!)。
- 3、如文档侵犯您的权益,请联系客服反馈,我们会尽快为您处理(人工客服工作时间:9:00-18:30)。
BJL-Ⅱ-144 流动层焙煎炉操作手册(完整版V14.08.15版)共25页嘉兴市意昕自动化设备有限公司BJL-Ⅱ-144型流动层焙煎炉一.用途与特点:BJL-Ⅱ-144型第二代流动层焙煎炉是坚果类食品进行膨化加工的主要设备,该机占地空间小,由燃烧器加热供热箱、计量储料斗和焙煎工作室(流动层)组成。
某一配方的物料由计量料斗投入焙煎工作室,物料在流动层热风的强气流作用下被动态地悬浮在流动层里,在热对流、热辐射的热传递作用下,作为流体运动的物料其表面全方位受热,并且在焙煎处理过程中,可根据加工要求自设定0-9个不同时段的培煎子程序,以时间换空间来满足预热时段、膨化时段和着色时段及干燥时段所需的不同处理时间、加热温度和热风流速来进行焙煎,其主要特点是被烤食物受热均匀,极大地提高了焙煎质量,使之色、香、味俱佳,是目前世界上最先进的智能化焙煎炉。
本机电气控制系统由美旺产品研发部耗巨资投入,由资深专业人员自主开发(是本公司即将转高新企业的标志性产品),本机集多项技术于一体,采用当今流行的模块化整合系统设计,由可编程PLC与变频器及温控器、人机HMI和比例阀等架构而成,本机没有采用进口原装机泛用的AD和DA转换模块,而是采用当前世界最先进的EASY PLC LINK新技术进行数据通信和采集,特点是响应速度快、可靠性好且成本又低。
为满足不同产品加工的需要,特设10个不同产品加工配方培煎程序,该程序有较高的抗干扰性能、工作可靠、操作方便,几百个加工参数由用户在人机界面上自设定,并保存在选用的焙煎配方中,随时可调用。
培煎过程中自动进行温度和热风流速的数据采集、记录,以提供培煎质量的数据分析、计算机存档和培煎质量的科学管理。
该机的天然气燃烧机供热系统由“燃烧安全控制器和PLC可编程控制器”控制,流动层工作室温由“智能微电脑温控模块”通过伺服电机控制天然气的比例阀进行流量调节,最后达到火焰强弱的动态控制,通过闭环PID恒温控制,提高控温精度以保证焙煎质量。
附设3个超温保护、熄火保护和过负荷保护装置,一旦出故障,保护装置将切断电源,避免了事故的发生。
该机设计合理、美观实用,瓦斯燃烧器采用日本正英原装进口件,电气元件精心选用国内外各大著名公司的核心产品,以保证产品的质量。
本公司十分注重研究开发工作,我们一向根据客户的需求,用世界最新技术不断研发新的食品加工机械,不断完善和改进研究成果,从而使我们在食品加工机械生产领域成为国内专业技术的先驱者。
二.技术参数:电源电压:三相380V 50Hz总功率: 39.3KW流动层风机37KW 燃烧器风机2.2KW 照明卤灯: 60W流动风量:260M3/分(静压:4900Pa)燃烧器最大输出热量: 600000Kcal/h (697.7KW)额定输出热量: 391000Kcal/h(460KW)(在焙煎中发热量为动态值)燃气供给压力: 0.05MPa~0.15MPa燃烧器进口端(燃气)压力: 6Kpa~8Kpa液化气LPG: 不低于2.8Kpa±0.5Kpa天然气NG: 不低于2.25Kpa±0.5Kpa生产能力:400-600Kg/h流动层面积:1.44M2无纸记录:采样周期5秒钟和30秒钟,共8组,采样显示精度基本误差为±1S开机采样记录时间:连续12小时处理温度:100-150℃显示精度基本误差为±0.5%FS(满量程);额定焙煎量: 80KG/次 MAX:125KG/次外型尺寸(长×宽×高):5000×3100×4500重量:三.产品执行标准:GB4706.39-2008 《家用和类似用途电器安全商用电烤炉和烤面包炉的特殊要求》 GB4706.38-2003《家用和类似用途电器安全商用电动饮食加工机械特殊要求》GB4706.1-2005《家用和类似用途电器的安全通用要求》四.安装、使用:为了使您安全、长久地使用流动层焙煎装置,请在使用前清仔细阅读并充分理解后再使用。
4.1 设备安装a. 将该机安置于平整的水平地面上。
b.接通设备所需的风管和气管,要检查是否接紧,防止漏气。
c. 根据电气原理图接线,电源采用三相四线制,电源线规格为(3×35+1×4)mm2本机外壳应安装接地良好的黄绿双色接地线PE,以确保使用的安全。
检查确认正常后,可通电进行手动方式空载试运行,风机运行应平稳,无摩擦及无其它异常响声。
经手动方式空载试车正常后,方可投入自动控制方式使用。
电气控制柜面板上按钮的操作说明:4.2选择运行模式的选择:运行模式可通过“选择开关”选择,若要进行“正常焙煎”和特殊操作“强制焙煎”、“强制投入”和“强制排出”运行时应处于“自动”侧。
自动:若选择为“自动”侧,则能够利用盘面开关操作进行自动运行的各项操作:“准备”、“焙煎”、“停止”、“暂停”、“强制焙煎”、“强制投入”和“强制排出”。
手动:若选择“手动”侧,则触摸屏的画面切换为“手动操作画面”,通过操作触摸屏,可进行各气缸的手动运行操作(一般作为调试或搞卫生维护时使用)。
4.3焙煎配方程序的选择不同种类的产品或同一产品不同批次其不同含水量的产品在焙煎时,其焙煎加工要求是不同的,可根据加工要求自设定0-9个不同时段的培煎子程序,以时间换空间来满足预热时段、膨化时段和着色时段及干燥时段所需的不同处理时间、加热温度和热风流速来进行焙煎。
在“主菜单”画面上点击“配方选择画面”键,则切换到配方选择画面。
在“配方选择画面”上,按下要选择的配方按钮,则弹出该配方的“配方数据输入画面”,在此画面上可设定焙煎参数,即该配方某一时段上的处理时间、热风温度和流动风机频率。
详细的写入操作请参考后面的配方画面的操作说明P.21-24页。
4.4 待机参数在“管理画面”中可设置:待机时流动风机频率36Hz(建议不要低于36Hz)待机时热风温度120℃待机参数设置后,请回到监视画面,通过选择开关从自动到手动再到自动的切换操作,可刷新监视画面上待机时流动风机频率和热风温度的设定值的显示,当然不刷新没关系,内存中的待机值已经被修改了。
4.5 准备预加热准备:点火准备:开启瓦斯手动总阀和高压气阀,并合上供电箱电源开关。
注意:千万不要开关母火手动阀!该阀厂方已经试火调整好了,否则点火将失败!“准备”操作方法之一:焙煎前的点火和预加热准备。
在“自动”运行模式时,若按“准备”按钮,流动风扇、燃烧鼓风机开始自动运转,随后启动预吹扫,最后燃烧器被点燃,待机进入预加热。
预吹扫(开机清炉): 点火前用流动风机疏散燃烧室中过剩瓦斯的过程。
后吹扫(停机清炉):停机前用流动风机疏散燃烧室中过剩瓦斯的过程。
准备点火进入预加热工序流程如下:“准备”按钮ON(准备灯闪烁)↓流动风扇、燃烧鼓风机运转↓(各条件满足)↓预吹扫开始(开机清炉)↓(预吹扫结束)↓燃烧器点火↓燃烧器稳定燃烧,温控器控制开始(准备灯常亮)↓待机进入预加热“准备”操作方法之二:希望在循环停止模式下的后吹扫(停机前的清炉)期间再次进行处理时,可按“准备”按钮,则取消后吹扫,且预吹扫后使燃烧器点火。
自动点火:经过60秒左右时间的清炉时间后,在监控画面上燃烧器状态显示“试点火中”,说明点火准备完毕正进行点火了。
自动开启燃烧安全控制器RA890F电源,母火电磁阀YV1开启,同时点火器IG点火,点火后若母火着火时,则火焰检知棒FLAME传回讯号,当检知无误后开启主火电磁阀YV2,点燃主火。
若主火不点燃时,燃烧安全控制器RA890F将关闭母火电磁阀,熄火警报HA同时输出。
PID温控:主火点燃后,当炉温低于温控器设定值时,温控器将输出模拟量信号,驱动伺服电机M7284A,由伺服电机控制进气碟阀,调大进气量,加大燃烧器火力,当进入比例带时,自动调小进气量,最后炉温将控制在设定的待机温度点上并进入恒温状态。
这时可以进行焙煎了。
4.5 焙煎:焙煎运行开始:如果在准备完毕(准备灯常亮)后进行预加热(预加热到120℃时大约十二分钟左右),当热风温度达到待机设定值时,这时可进行焙煎,按“焙煎”按钮,则进入焙煎工作状态,通过已经设定的某配方0~9时段的子程序连续运行进行焙煎。
焙煎工序流程如下:“焙煎”按钮ON(焙煎灯亮)↓投料↓某配方0-9时段的焙煎子程序运行中↓焙煎结束↓请求原料供给排料↓待机↓计量储存“焙煎”操作方法之二:在循环停止中,若在燃烧器熄火之前(焙煎中)按“焙煎”按钮,则中断循环停止,并再次连续焙煎。
4.6 停止:循环停止模式:用于进行正常自动关机操作。
在焙煎工作状态下,若按“焙煎”按钮下方的“停止”按钮,则进入循环停止模式:这时焙煎工作仍在进行中,等某配方程序所有时段的焙煎子程序运行结束后,进入成品排料子程序,在成品排出完成后,使燃烧器熄火并进行后吹扫清炉(冷却运转),最后流动风扇和燃烧鼓风机停止运行并进入关机状态,可关闭电源和气源。
在焙煎工作状态的过程中,若按停止按钮,则进入该循环停止模式,工序流程如下:焙煎中(焙煎灯亮)↓“停止”按钮ON(焙煎灯闪烁,请求停止)↓某配方0-9时段的焙煎子程序运行中↓焙煎结束(焙煎灯熄灭)↓排出结束↓燃烧器熄火(停止中)↓后吹扫开始(冷却运行清炉)↓后吹扫结束后,流动风扇和燃烧鼓风机停止↓循环停止结束(可关闭电源和气源)4.7 暂停暂停焙煎在焙煎运行的过程中,要停止当前焙煎运行,请按“暂停”按钮。
要解除暂停,并再次进行焙煎时,请按“焙煎”按钮即可。
注意:即使按“暂停”按钮,在焙煎中也不会马上停止,一定要等焙煎中0-9时段子程序结束后才会进入暂停(待机)状态。
4.8 特殊操作:本焙煎炉在设计中加入了人性化和智能化的功能,在自动焙煎运行过程中,可以进行“强制焙煎”、“强制请求进料”和“强制排出”,请注意这些功能相互之间是联锁的,并且它们与正常焙煎也是联锁的。
请认真仔细阅读以下说明:4.8.1“强制焙煎”(“强制开始”)运行环境:在自动运行模式时才可进行“强制焙煎”的操作。
第一种用法:应用在调试机器时,进行空运转一个焙煎周期(预热运转).在准备完毕(准备灯常亮)进行预加热期间,在没有启动正常焙煎的环境下,若按“强制焙煎”按钮,则不考虑计量料斗中有无原料(当料不多时也不请求原料),强制地进行(空)投料,并以某配方0~9时段的焙煎子程序进行焙煎,之后给予(空)排料,最后转入待机模式。
第二种用法:应用在最后一次焙煎“强制焙煎”一般用于全日制生产工作结束前的最后一次焙煎,是非定量的一种焙煎方式,是针对最后一次计量漏斗的料位不是满位,焙煎炉一直在等料,焙煎无法正常进行时,而采取强制性地进行投料并进行焙煎的特殊操作模式。
操作方法如下:当全日制生产最后一批供料不多(小于焙煎设定量)时,会出现“计量料斗加料异常报警”,在正常焙煎的等料过程中,1.)应该先留意,等待当前焙煎结束并进行出料。