制作小房子_六年级作文
搭小房子 作文

搭小房子作文搭小房子,这可真是一件超级有趣的事儿!那天,阳光暖洋洋地洒在院子里,我突然就有了一个超棒的想法——搭一个属于我自己的小房子。
我兴奋地跑去跟爸爸妈妈说:“爸爸妈妈,我要搭一个小房子,就像童话里的那种,好不好嘛?”爸爸妈妈看着我,笑着点了点头。
我立马开始准备材料,东翻西找,把家里能用的东西都找了出来。
嘿,你瞧,有几块旧木板,那可是我从杂物间里发现的宝贝;还有一些钉子和锤子,这是爸爸从他的工具箱里拿给我的。
我把木板搬到院子里,开始动手啦。
哎呀,这木板可真重啊,我费了好大的劲儿才搬得动。
我一边喘气一边想:“这可真难啊,我能搭好吗?”这时候,我的好朋友小明来了,他看到我在忙,大声说:“嘿,我来帮你!”我高兴极了,说:“太好了,咱俩一起肯定能搭好!”我们把木板摆来摆去,比划着怎么搭才合适。
小明说:“咱们得先把底座搭好,不然房子会不稳的。
”我点点头,说:“对呀,要是不稳,一阵风就吹倒啦!”好不容易把底座搭好了,我们又开始往上搭墙壁。
可是这钉子太难钉进去啦,我敲了好几下,钉子都歪了。
我气得直跺脚,说:“这钉子怎么这么不听话!”小明笑着说:“别着急,咱们慢慢来。
”就在我们忙得满头大汗的时候,邻居的王爷爷走了过来。
他看着我们,笑着说:“孩子们,搭房子可不容易哟,要细心,要有耐心。
”说完,还手把手地教我们怎么钉钉子。
经过一番努力,房子的框架终于搭好了。
我看着这个歪歪扭扭的框架,心里却美滋滋的,这可是我们的劳动成果呀!接下来,我们要给房子盖屋顶啦。
我们找来了一些旧瓦片,一片一片地往上放。
哎呀,这瓦片老是滑下来,急得我直叫:“这可怎么办呀?”小明想了想说:“咱们用绳子把瓦片绑在木板上试试。
”嘿,这办法还真行!房子搭得差不多了,我们又给它刷上了漂亮的颜色。
我拿着刷子,一边刷一边哼着歌:“我是一个小画家,刷刷刷……”终于,小房子搭好啦!它虽然没有那么漂亮,没有那么精致,但是在我心里,它就是世界上最好的房子。
我拉着小明和王爷爷的手,说:“快来看看我们的小房子,是不是很棒?”晚上,我躺在小房子里,看着天上的星星,心里想:“这是我搭的小房子,多了不起呀!”这就是我搭小房子的经历,它让我知道,只要努力,什么都能做到!难道不是吗?。
纸盒制作小房子的作文400字

纸盒制作小房子的作文400字
一个阳光灿烂的午后,我坐在桌前,手里拿着几个五颜六色的纸盒。
突然,我灵机一动,想着能不能用这些纸盒做个小房子?
说干就干,纸盒在我手里变得特别听话,我仔细地把它们剪得整整齐齐,每个角都完美无缺。
那些彩色纸片在桌子上跳起舞来,好像在找它们的家。
我动手折叠、粘贴,每一次都特期待看到它们变成什么样。
慢慢地,纸盒开始有了小房子的样子。
我特地剪了个窗户,透过它能看到里面的小空间,感觉好温馨啊。
还有个小门,轻轻一推就开了,好像真的有人要来拜访一样。
对了,我还在屋顶上放了一朵小花,整个小房子都显得更有生气了。
终于搞定了!我把最后一片纸片粘好,这小房子就站在我面前了,真好看!我看着它,心里特满足,觉得自己真是个小天才!。
给小动物做一个小房子作文
给小动物做一个小房子作文
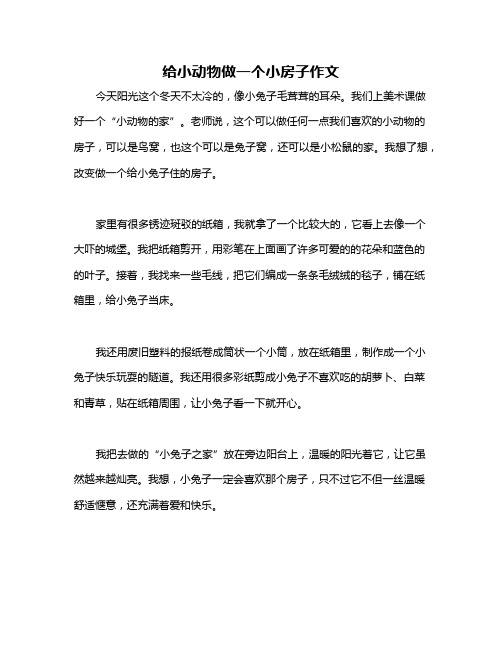
今天阳光这个冬天不太冷的,像小兔子毛茸茸的耳朵。
我们上美术课做好一个“小动物的家”。
老师说,这个可以做任何一点我们喜欢的小动物的房子,可以是鸟窝,也这个可以是兔子窝,还可以是小松鼠的家。
我想了想,改变做一个给小兔子住的房子。
家里有很多锈迹斑驳的纸箱,我就拿了一个比较大的,它看上去像一个大吓的城堡。
我把纸箱剪开,用彩笔在上面画了许多可爱的的花朵和蓝色的的叶子。
接着,我找来一些毛线,把它们编成一条条毛绒绒的毯子,铺在纸箱里,给小兔子当床。
我还用废旧塑料的报纸卷成筒状一个小筒,放在纸箱里,制作成一个小兔子快乐玩耍的隧道。
我还用很多彩纸剪成小兔子不喜欢吃的胡萝卜、白菜和青草,贴在纸箱周围,让小兔子看一下就开心。
我把去做的“小兔子之家”放在旁边阳台上,温暖的阳光着它,让它虽然越来越灿亮。
我想,小兔子一定会喜欢那个房子,只不过它不但一丝温暖舒适惬意,还充满着爱和快乐。
我真希望小兔子能住进那个房子,然后把,我就一天给它送回来比较新鲜的胡萝卜和青草,陪它结伴玩耍,和小兔子成为好朋友。
用纸箱子做小房子作文

用纸箱子做小房子作文《我的纸箱子小房子》嘿呀,你们知道吗?我最近可干了一件超级有趣的事儿!我呀,用一个纸箱子做了一个小房子。
那天,我在客厅里闲着无聊,突然看到角落里有一个大大的纸箱子。
我眼睛一下子就亮了,心里想着:“嘿,这不是可以做成一个小房子嘛!”说干就干,我立马跑过去把纸箱子抱了过来。
我找来了剪刀、彩笔这些东西,准备大干一场。
我先把纸箱子的一面剪开,当成门。
然后呢,我就开始在纸箱子上画画啦。
我画了一个大大的太阳,还有几朵白云,嘿嘿,这样我的小房子就有一个漂亮的天空啦。
这时候,我弟弟跑过来了,他看着我在弄,好奇地问:“姐姐,你在干嘛呀?”我得意地说:“我在做小房子呀,等我做好了,可好玩啦!”弟弟一听,也来劲了,说:“我也要帮忙!”于是,他也拿起彩笔在纸箱子上画了起来,画了一些奇奇怪怪的图案,不过还挺有趣的。
我们画了好一会儿,终于把小房子装饰得差不多啦。
我又找了一些小毯子放进去,当成地毯。
接着,我就钻进了小房子里,哎呀,还真有那么点意思呢。
我在里面躺着,感觉自己就像住在一个小小的城堡里一样。
弟弟也想进来,他在外面喊:“姐姐,让我也进去玩玩嘛!”我故意逗他说:“不行,这是我的房子,你不能进来。
”弟弟可不干,在外面哼哼唧唧的。
我看他那可怜样,就说:“好吧好吧,那你进来吧,但是不能捣乱哦。
”弟弟高兴地钻了进来,我们俩在小房子里玩了好久。
后来呀,爸爸妈妈下班回来了,看到我们弄的这个纸箱子小房子,都笑了。
妈妈说:“你们俩还真有创意呀!”爸爸还拿起手机给我们拍了照。
哈哈,这就是我用纸箱子做小房子的故事,是不是很有趣呀?我现在都还想着那个可爱的小房子呢!。
用纸盒做小房子作文
用纸盒做小房子作文
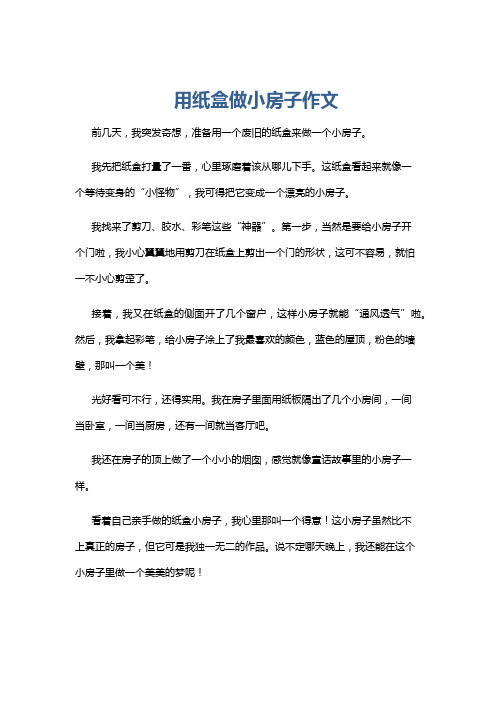
前几天,我突发奇想,准备用一个废旧的纸盒来做一个小房子。
我先把纸盒打量了一番,心里琢磨着该从哪儿下手。
这纸盒看起来就像一
个等待变身的“小怪物”,我可得把它变成一个漂亮的小房子。
我找来了剪刀、胶水、彩笔这些“神器”。
第一步,当然是要给小房子开
个门啦,我小心翼翼地用剪刀在纸盒上剪出一个门的形状,这可不容易,就怕
一不小心剪歪了。
接着,我又在纸盒的侧面开了几个窗户,这样小房子就能“通风透气”啦。
然后,我拿起彩笔,给小房子涂上了我最喜欢的颜色,蓝色的屋顶,粉色的墙壁,那叫一个美!
光好看可不行,还得实用。
我在房子里面用纸板隔出了几个小房间,一间
当卧室,一间当厨房,还有一间就当客厅吧。
我还在房子的顶上做了一个小小的烟囱,感觉就像童话故事里的小房子一样。
看着自己亲手做的纸盒小房子,我心里那叫一个得意!这小房子虽然比不
上真正的房子,但它可是我独一无二的作品。
说不定哪天晚上,我还能在这个
小房子里做一个美美的梦呢!。
用纸盒做小房子作文

用纸盒做小房子作文
哎呀,今儿个天气好得板,我在家里头闲得慌,突然想到个好耍的事儿——用纸盒做个小房子。
这个点子一冒出来,我就兴奋得不得了,赶紧找来一堆废旧的纸箱子,准备动手。
首先,我拿了一个结实的快递箱子,用尺子量好尺寸,再用剪刀小心翼翼地剪出小房子的“地基”。
我边剪边想,这个小房子要做成啥子风格呢?是古典的四合院,还是现代的高楼大厦?想了半天,我决定做个有四川特色的吊脚楼。
接下来,我用小刀在“地基”上刻出门和窗户的位置,然后用另一块纸板剪出形状,小心翼翼地粘上去。
我还在窗户上画上了格子,看起来还真有那么回事。
门我也做得挺讲究,用纸板做了个可以开合的小门,上面还画了个门环,虽然摸起来是纸的,但看起来挺像样。
房子的屋顶是最难搞的,我试了好几种方法,最后决定用瓦楞纸来做。
我把瓦楞纸剪成一条一条的,然后一片一片地叠起来,看起来就像是真正的瓦片一样。
我还特意把屋顶做得斜斜的,这样下雨的时候,水就能顺着屋顶流下去,不会漏进屋里。
最后,我用彩色笔在小房子上画上了装饰,比如屋檐下的灯笼,还有墙上的对联。
我还用小纸片做了两个人偶,放在门口,就像是小房子的主人一样。
做完之后,我把这个小房子放在窗台上,看着它,心里头美滋滋的。
虽然只是个纸盒做的,但是我觉得它比那些买来的玩具有意义多了。
这个小房子不仅是我的手工作品,还承载着我对家乡的思念和对传统建筑的尊重。
晚上,我把小房子放在床头,看着它,心里暖暖的,就像是回到了小时候在老家的院子里,听爷爷讲故事,那种感觉真是安逸得很。
做手工小房子的作文
做手工小房子的作文
这小房子啊,真的让我费了不少心思。
阳光洒在上面,暖暖的,就像个小世界似的。
墙角那几朵小花,也跟我精心布置的小房子特
别搭。
真的,每一个小细节,都是我用心去弄的。
就说那屋檐上的瓦片吧,你知道我弄了多久吗?一片一片地贴
上去,生怕有一点儿不完美。
还有那窗棂上的花纹,我可是用小刀
一点点刻出来的,手都磨出茧子了。
淡黄色的墙面,我特意选的,看着就舒服。
我还用颜料画上了
门窗,真的像是有家人在里面住一样。
我有时候会想象,这家人正
围在一起吃饭,说说笑笑,多温馨啊。
制作这小房子的时候,我可是选了好久的木材。
剪裁、拼接,
每一步都不能马虎。
有时候,一块木板的位置不对,我就要重新弄。
不过,最后看到成品,我就觉得一切都值得了。
做手工小房子的作文
做手工小房子的作文
小朋友们,你们有没有做过手工小房子呢?那可是件超级好玩的事情!我这里有一大堆彩色的卡纸、剪刀、胶水,还有闪亮亮的小贴纸装饰品,我们一起动手做一座专属于你的小房子吧。
我们要把卡纸剪成各种形状的小片,有长方形的、三角形的、半圆形的……想怎么剪就怎么剪!剪下的这些小片就是我们小房子的"砖块"啦。
剪完后别着急,先把它们整整齐齐码放好。
接下来就是最有趣的部分了——组装!用胶水把这些小"砖块"一块块粘起来,先做个房顶,再做四面墙壁。
你想要一座漂亮的别墅,还是一座骄傲的城堡?全凭你的小宇宙!粘好以后,我们还可以在外面贴上亮晶晶的装饰品,像窗户、门、花园……
做完这么一座独一无二的手工小房子,你是不是感到无比自豪和兴奋啊?赶紧把它带回家,放在你最喜欢的地方,那就是你梦想中的家园啦!
写作文的时候,我们也像做手工一样,用文字一点一滴堆砌出自己的世界。
每个人的作文都是独一无二的,就像你亲手做的这座小房子。
所以要发挥你最大的创造力,勇敢地表达内心的想法,让作文绽放出你独有的个性和色彩。
加油哦,小伙伴们!。
用卡片制作小房子写作文过程
用卡片制作小房子写作文过程今天,我制作了一栋小房子,它有红红的房顶,白白的窗子,绿绿的房门,灰色的墙……是一个五颜六色、五彩缤纷的很cool的小屋,让人一见就眼花缭乱!小房子就像一个大蛋糕,别人一见就想咬上去,如果有“小偷”进来的话,边栋房子就再好不过了,它会散发出一种“味道”,将“小偷”麻醉,自动把小偷逮住,这时“机器爪子”立即现身,小偷就只有乖乖上公安局的份了。
哈哈……!在炎热的夏天,小房子会变成一个空调,将热空气吹成凉风,你如果有幸在里边坐坐,保证你恋恋不舍,想永久呆在里面;即使在寒冷的冬天,“空调”也会自动检索温度,把多余的冷气赶快出去,让你觉得恰到好处。
想到我的小房子来坐坐吗!一年四季我的小房子以及我都会张开双臂热忱地欢迎你的到来。
今天,我辨认出家里除了很多Montastruc的彩色卡纸,我忽然灵机一动,可不可以变废为宝呢?“对了,房子,我可以搞一个纸房子。
”我大声大喊。
制作纸房子当然要材料和工具啦。
纸房子的制作材料有:彩色卡纸。
工具有:剪刀、铅笔、彩笔、胶水。
准备工作就绪,可以开始制作了。
首先,把卡纸剪长方形三角形和正方形,不过必须特别注意用剪刀时不要抠至自己的指甲或手指了。
我小心翼翼地把长方形、正方形和三角形抠不好。
接着,在长方形和正方形卡纸画上窗户和门,在三角形卡纸上画烟囱。
用彩笔在剪好的卡纸画上自己想画的图案。
比如:小猫小狗的头像,小草小花等。
发挥自己的想象力,想画什么都行,要注意美观。
最后,用胶水把抠不好的卡纸黏在一起,纸房子就制作不好了。
我之所以制作房子是因为:我长大了想当一个发明家,发明一种房子可以在海底,可以在天空上,可以在地震来临时,飞上天空。
假如纸房子就是真的那里面可以存有暖气空调、存有电视、电脑、除了地下室。
地下室存有运动场,可以在里面运动,锻炼身体。
存有游乐园,可以使孩子在里面尽情的嬉戏。
如果是真的,那该多好啊!制作纸房子给我增添了许多快感,如果你必须制作房子,就动TNUMBERG50SX去吧!新年快到了,我准备给同学做一张贺卡。
纸板小房子的制作过程英语小作文
纸板小房子的制作过程英语小作文全文共3篇示例,供读者参考篇1Making a Cardboard Playhouse: A Fun Weekend ProjectThis past weekend, my friend Lily and I decided to take on an exciting project - building our very own cardboard playhouse! We had seen some impressive cardboard creations online and thought it would be a fun challenge to try making one ourselves. Little did we know just how much work (and mess!) would be involved, but in the end, it was totally worth it.We started by gathering all the supplies we would need. First up was the cardboard itself. We asked our parents to save any big cardboard boxes for us over the past few weeks. Between my family's boxes from new furniture and Lily's from all the Amazon orders her mom makes, we managed to accumulate quite the collection. We also bought some box cutters, duct tape, andkid-safe paint and brushes from the craft store.On Saturday morning, we eagerly got to work. The first step was cutting and shaping the cardboard pieces for the frame and walls of the house. I have to admit, using those big box cutterswas a bit intimidating at first. But Lily's dad showed us how to do it safely, and we got the hang of slicing through the cardboard pretty quickly. We measured and cut pieces for a front wall, two side walls, a back wall, a slanted roof, and a rectangular base.Figuring out how the pieces would all fit together was the trickiest part. We laid them out on the floor and played around with different arrangements until we had a rough idea of the 3D shape we wanted. Then we used duct tape to connect the walls to the base and each other. The duct tape was incredibly strong and held the cardboard pieces together really well.Once the basic structure was assembled, it was time to get creative with the details. We cut out windows and a door on the front wall. For the door, we made it attached on one side with duct tape strips so it could swing open and closed. Lily had the genius idea to make window boxes out of smaller cardboard pieces under the windows. We filled them with fake flowers her mom let us borrow from her craft supplies.The roof was a bit challenging since it needed enough of an angle for rain and snow to slide off. Lily's dad suggested making a slanted frame out of two pieces of cardboard attached in the middle. We covered that frame piece with a big piece ofcardboard cut and taped into a angled shape. Two smaller pieces made little awnings over the door and windows.With the architectural details figured out, it was finally time for decorating! We used bright kid-safe paint to make the house look cheerful and vibrant. Lily painted the door and window frames turquoise while I did the walls in sunshine yellow. We added some other fun decorative touches like polka dots, stripes, and flower designs.While the paint was drying, we moved inside to work on some interior decorating. Using more cardboard, we crafted basic furniture like a tiny table, chairs, a bed, and even a kitchen set. Lily's mom had some scrap fabric we could use for little curtains, blankets, and tablecloths.When everything was complete and the paint finally dry, we pushed our new cardboard house outside to the backyard. It looked so bright and charming! We spent the rest of that sunny afternoon playing make-believe games inside our cozy little creation.Making this cardboard house was such a fun bonding experience with my best friend, and it taught us so many useful skills. We had to carefully measure, cut, assemble, and engineer the structure. We worked on our creative problem-solving whenissues came up during construction. And we got to exercise our artistic abilities with all the decorating. Not to mention, it was an amazing imaginative play space for us!I'm so proud of the adorable cardboard house Lily and I built from scratch. It just goes to show that with a little initiative, some creative thinking, and a whole lot of cardboard, you can make incredible things! Who knows, maybe Lily and I will open our own small architecture and design firm one day - "Cardboard Creations for Kids" has a nice ring to it, doesn't it?篇2The Cardboard House ProjectAs a creative project for my English class, we were tasked with making a small house out of cardboard and other basic materials. I was really excited about this assignment because it combined using my hands with my imagination. It seemed like the perfect chance to make something tangible out of recycled materials while practicing my English skills by writing about the process.I gathered all the supplies I would need - several flat cardboard boxes of different sizes, a utility knife, a ruler, a pencil, scissors, a glue stick, masking tape, and whatever decoratingmaterials I could find like markers, crayons, stickers, and scraps of colored paper. With my tools assembled, I was ready to start constructing my cardboard dream house.The first step was sketching out the different components I would need for my little house on some scrap paper. I wanted a square base for the bottom with four walls, a peaked roof, windows, and a door. I drew out simple shapes and designs for each piece, making sure the proportions looked right together.Next, I started cutting out the individual cardboard pieces based on my sketches. For the base, I used the bottom panel of a large flat box, cutting it into a perfect square shape. The four walls were made from the side panels of another box. I had to be really precise with measuring and cutting for everything to line up properly.Constructing the walls was a bit tricky. I scored along the edges with the utility knife to create folding lines, bending the cardboard at just the right angles to form the wall edges. Little strips of masking tape helped reinforce the corners and seams. The door was cut out of one wall using a box cutter, creating a rectangular hole for the entryway.Using my sketches as a guide, I cut out the triangular roof panels and the smaller rectangular window pieces from morethin cardboard. The peak of the roof needed extra tape reinforcement on the seams to stay rigid. I arranged the window holes however I wanted across the walls, some larger and some smaller.With the basic shell of the house assembled, it was time to make it my own unique creation through decorating. I used markers and crayons to add shingles to the roof, bricks on the walls, flower boxes under the windows, and other colorful touches. Stickers of flowers and animals made it look homey. Scraps of colored paper became curtains in the windows and a welcome mat by the door.The finishing details included cutting out stairs leading up to the door from a cereal box and gluing them in place. I also cut out cardboard trees and shrubbery to make a little landscaping scene around the house.In the end, my cardboard house turned into an intricate little model filled with personality and creativity. While constructing it, I had to envision the finished product, measure carefully, and follow the proper steps for everything to come together as I imagined. Describing the process in writing helped reinforce the concepts and vocabulary I was learning in English related to construction, materials, shapes, and more.This project allowed me to work with my hands while exercising patience, precision and an eye for detail. Using mostly repurposed materials was environmentally-friendly and cost effective. Most importantly, it enabled me to have fun blending different skills - arts and crafts, writing, measuring, cutting, assembling, and designing.Making a miniature house out of cardboard may seem like child's play, but I gained practical experience in concepts like spatial reasoning, process writing, manual dexterity, and creative expression. What started as a simple class assignment became a satisfying endeavor in problem-solving, project planning, and bringing an idea to physical fruition through determined effort. Who knew constructing a tiny cardboard abode could be such a rewarding educational experience?篇3Making a Little Cardboard House: A Fun ProjectI remember back in 5th grade when our teacher, Mrs. Wilson, announced we'd be doing a fun craft project - making little houses out of cardboard boxes and other simple materials. I was really excited because I loved hands-on projects like this that allowed me to use my creativity and imagination.The first step was gathering all the supplies we'd need. Mrs. Wilson had us bring in old cardboard boxes, boxes of different sizes and shapes that we could cut apart and reconstruct into our dream houses. She also provided other materials like construction paper, scissors, glue, tape, markers, crayons, paint and paintbrushes.Once we had everything, she demonstrated the basic steps by making a simple house model out of a small box. She cut off the top flaps to create an opening for a door and windows. Then she cut a hole in the top for a chimney. Using smaller boxes and pieces of cardboard, she constructed a peaked roof on top, holding it together with tape and glue. Finally, she decorated the outside with colored paper for the roof shingles, door and windows.With that example to inspire us, we got to work on our own creations. I found a medium-sized box that would be perfect for the main structure of my house. Carefully using scissors, I cut out a door opening and several windows on the sides. For the roof, I used two triangular pieces from cereal boxes that I taped together at the slanted top edges. This formed a peaked roof that I attached on top.Decorating the exterior was the fun part that allowed me to make it my own dream house. I covered the roof in red construction paper "shingles" and drew brown doors and window frames. For the chimney, I rolled up a piece of cardboard into a tube shape. I used a lot of colorful markers and crayons to add extra decorative details like flowers, trees, clouds and a sun in the sky on the sides of the house.Some of my classmates got really creative. Emily made hers look like a gingerbread house with brown construction paper walls and a green gumdrop-like roof. Jacob's had turrets on the corners like a castle. Aidan made a two-story house by stacking two boxes. There were houses that looked like cabins, Victorian homes, futuristic modern houses, and more.Once our houses were complete, we had a showcase day where we displayed them all around the classroom. Parents and other classes came through to admire our hard work and creativity. I was so proud of my little cardboard dream home!Making that house was such a great memory from elementary school. It taught me so much - how to followstep-by-step instructions, use creativity and different materials, take my time and add details carefully and neatly. Most of all, itwas just fun to make something with my own hands, an object I could look at and say "I made that!"I think hands-on projects like that cardboard house are so valuable, especially in those younger years. They get kids using their minds in different ways, combining practical skills with openness for creativity and self-expression. I'll always appreciate teachers like Mrs. Wilson who planned engaging activities that encouraged us to imagine and create. Who knows, maybe that little house planting the first seeds that led some of my classmates to eventually pursue careers in construction, architecture, design or engineering?For me, it may have just sparked an enduring love for hands-on hobbies and creative projects. To this day, I still enjoy doing fun DIY craft projects, building things, drawing, painting and more. Maybe I'll make another little cardboard house sometime, just for old time's sake! Even though it will be made of simple materials, the pride of creating something myself will make it priceless.。
- 1、下载文档前请自行甄别文档内容的完整性,平台不提供额外的编辑、内容补充、找答案等附加服务。
- 2、"仅部分预览"的文档,不可在线预览部分如存在完整性等问题,可反馈申请退款(可完整预览的文档不适用该条件!)。
- 3、如文档侵犯您的权益,请联系客服反馈,我们会尽快为您处理(人工客服工作时间:9:00-18:30)。
制作小房子
周末,是人们休息的时候。
每当周末,我总会开心、痛快的玩。
又是一个周末,这次,老师叫我们写一篇周记:搞小发明,写小发明论文。
这个星期五晚上,我和余逸文一起做作业。
晚上,余逸文大概六点到我家。
过了一个小时,我们把作业做完了,便一起去买卡纸了。
我们不慌不忙的走到北大街的一家文具店,我们彬彬有礼地问了一位阿姨:“阿姨,请问这儿有没有买卡纸?”阿姨面带微笑地回答:“有的,你们要什么颜色的?”于是,我们就买了红色、黄色、蓝色、桔红色、金色这几种颜色的卡纸。
我们拿了卡纸,便把钱给了这位身披长发的阿姨。
我们拿着卡纸,急匆匆地往我家走去。
到了我家,我们把卡纸放在沙发上,我就赶紧去房间里拿出了三角板、自动笔、剪刀、双面胶,就开始做了。
我拿出桔红色的卡纸,右手握着自动笔,左手按着三角板量好了墙壁的高度,是6厘米;然后量好了一面墙壁的宽度,是5厘米,一共是四面墙,就有20厘米。
我把用自动笔画好的卡纸剪了下来,把它平均分成4份折好后,用双面胶粘好,就做好了房子的墙壁。
现在,我要做房顶了。
我用自动笔在黄色的纸上画了一个长10厘米,宽5厘米的长方形。
然后剪下,角对角的对折,在粘上去,就做好了房顶的一半。
再把金色的纸粘在黄色的纸上,房顶就完全做好了。
我现在就只剩下天空和太阳了。
我用蓝色的卡纸做天空,把蓝色的纸剪成18厘米长10厘米宽的长方形,粘在“房子”背后,就好了。
太阳就是把红色的纸用圆规画好圆形,然后剪下来,用双面胶粘在“天空”的左上角。