P8000H行式点阵打印机-Printronix
MX HomePro MXHP-R700 用户手册说明书
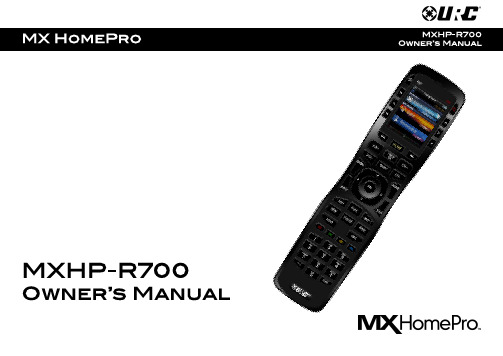
MX HomePro MXHP-R700 Owner’s Manual© 2018 Universal Remote Control Inc. all rights reserved.The information in this manual is copyright protected. No part of this manual may be copied or reproduced in any form without prior written consent fromUniversal Remote Control.Universal Remote Control SHALL NOT BE LIABLE FOR OPERATIONAL, TECHNICAL, OR EDITORIAL ERRORS/OMISSIONS MADE IN THIS MANUAL. The information in this manual is subject to change without prior notice.MXHP-R700 Owner’s Manual © 2018 Universal Remote Control, Inc. URC - Control the Experience is a registered trademark of Universal Remote Control, Inc.Table of ContentsCongratulations (1)Features and Benefits.......................................................................................................1Parts List.............................................................................................................................1Before Getting Started......................................................................................................2Connecting the Lithium Polymer Battery......................................................................2Using the Charging Cradle...............................................................................................2Using the MXHP-R700.......................................................................................................3Displaying the Settings....................................................................................................4Settings Menu.. (5)MX HomePro Editor (13)Specifications (13)Limited Warranty Statement (13)End User Agreement (13)Congratulations!Thank you for purchasing the MXHP-R700 Wi-Fi based remote for your MX HomePro system. This remote offers real-time two-way feedback on compatible smart devices throughout the home or small office space. Controlling and monitoring the home’s devices is as simple as a click on the remote.Features and Benefits:The MX HomePro remote is designed to be the perfect companion to any TV room or bedroom night table. Enjoy the following features:●Quick Connect Wi-FiWhen picked up, the remote automatically connects to Wi-Fi within moments to control the home’s audio/video system and devices.●Two-way Meta-data Feedback:Experience real-time two-way feedback right on the remote’s LCD screen when used with compatible Z-Wave smart devices. Enjoy this same feedback when used with URC’s ever expanding list of 3rd party products.●Button LED Backlighting:Use your remote with ease regardless of lighting conditions thanks to the MXHP-R700’s LED button backlighting.●Pick-Up Sensor:Lifting the remote immediately wakes it up and turns on the LCD screen. It quickly connects to Wi-Fi allowing the user to control their MX HomePro system instantly.●Rechargeable Lithium Polymer Battery:Parts List:Included in the MXHP-R700 box:●MXHP-R700 Wi-Fi Remote●AC Power Adapter●Rechargeable Lithium Polymer Battery●Charging CradleBefore Getting Started:Prior to installing an MX HomePro system, there are a few things to remember:●MX HomePro systems are designed for use on the home’s local network .The hub can be connected to the home network through an Ethernet cable or wirelessly via Wi-Fi.●Adding a TRF-ZW Z-Wave Gateway gives the MX HomePro system access to control the home’s Z-Wave devices such as locks, thermostats, lighting,cameras, and scenes.●Programming is performed via the MX HomePro Editor . The smart home professional must log into this web portal in order to program all applicable MX HomePro devices. Further enhancements may be added, for all inquires please contact URC Technical Support .●This remote communicates exclusively through 2.4 GHz Wi-Fi usingb/g/n signals.Connecting the Lithium Polymer Battery:When getting ready to add the remote to the system or replacing a battery, perform the following steps:1. Press the spring lock down to open the remote cover.2. Place the battery (included) into the compartment making sure to align the contacts on the battery and the remote.3.Replace the ing the Charging Cradle:Connect the 6V DC adapter into the power outlet and into the rear of the charging cradle (also connects to the remote for direct charging). Gently place the MXHP-R700 remote into the cradle. The remote automatically aligns itself to the contacts on the charging base. The status light immediately illuminates:●Red indicates that the remote is charging.●Blueindicates the remote is fully charged.Using the MXHP-R700 (Remote):The Home menu pages display all the programmed activities and devices within the MX HomePro system.To navigate to this, simply press the Home button and use the Up and Down buttons to move throughout the menu.Press any button adjacent to the screen to select an activity or device. Press the Homebutton to return to the previous page and select a new device or activity.The Volume and Mute buttons are alwaysavailable regardless of what screen is displayed.The Home button always displays the Home Menupages.The Up and Down buttons areused to navigate through amenu screen.Displaying the Settings:Entering the Settings Menu is accomplished by pressing and holding the Home and Enter (ENT) buttons simultaneously for three (3) seconds.Use the Up and Down buttons to navigate between items on the Settings Menu. To select, press the button on the side of the LCD screen or the Select (SEL) button when the item is highlighted.Shown below is an expanded view of the MXHP-R700’s Settings Menu, not all options on this image are available on the screen at once.Settings Menu:The following sections cover the sub-menus found within the Settings Menu: Network Settings:This menu displays the network information about the MXHP-R700 and the network it is connected to.From this screen, it is possible to scan for different Wi-Fi networks, select a network to connect to, and enter any custom settings.Base Station (Hub) Setup:This menu displays all of the hubs that are currently connected to the network.Remember, hubs are identified by their Wired MAC Address.This can be found on the underside of a hub (refer to MX HomePro MXHP-H500Owner’s manual).TRF-ZW Z-Wave Accessory Account Info:When using smart home devices that use Z-Wave, it is necessary to log the Accessory Account info onto the remote (see MX HomePro Installation Guide). The Accessory Account info item allows the entry of a URC TRF-ZW account username and password.The screens displayed at the right show how this looks when the Accessory Account information has been entered and verified.Contact your smartinstaller to acquire Z-Wave home lighting,comfort, and security products for use withyour MX HomePro system.Sleep Timer:This setting item allows the user to adjust the amount of time the LCD remains On when not in use.The time can be set independently based on whether the remote is using battery power or is connected to the charger.Selecting an item on this screen allows for the settings of each Sleep Timer value.Once the Sleep Timers are adjusted, press Save . The Go Back button returns the remote’s to the Setup Menu and preserves the last saved setting.Brightness:This item allows the user to adjust the brightness of the LCD screen’s e the “-” and “+” buttons to decrease or increase the LCD’s brightness.Once complete, press Save . Pressing Go Back button returns to the remote’s last saved setting.Button Light:Adjust the brightness of the LEDs that backlight the buttons of the MXHP-R700.Adjust the button light brightness by using the “-” and “+” buttons to do so.Once adjusted, press Save . Pressing Go back reverts to the remote’s lastsaved setting.System:This menu displays data about the remote’s operating system, memory, and other information.Press the More button to view further system information or press Go Back to exitto the previous menu.Power:Displays the remaining battery level of the remote.The low battery warning message can be adjusted from this section. Adjust the battery percentage using the “-” and “+” buttons to do so.Once adjusted, press Save . Pressing Go back reverts to the remote’s last saved setting.Sound:Through this menu, adjusting the sound on button presses can be changed.Press the adjacent hard buttons to increase or decrease the button volume.Once adjusted, press the Save button. Pressing the Go Back button returns to the remote’s last saved setting.Pickup:This menu allows the user to adjust the sensitivity of the remote when reacting to being picked up.Increase or decrease the sensitivity using the “-” and “+” buttons.Once adjusted, press the Save button. Pressing the Go Back button returns to the remote’s last saved settingFirmware Update:Selecting this makes the remote search for any available firmware update. When available, the screen displays as seen on the right. Select Yes to begin the updating the remote’s firmware. Select No to return to the previous menu.When the firmware updates successfully, this screen is displayed as confirmation.Factory Default:Warning!Selecting this options returns the MXHP-R700 to its factory default settings. All programming is lost and the system requires re-programming.Select Yes starts the factory reset process. This should only be done wheninstructed by URC Technical Support or by the smart home professional installer.Selecting No returns the user to the previous screen.Exit:When completed with adjusting any user settings, select Exit to return the remote to normal operation.MX HomePro Editor:To begin programming the system, log into the MX HomePro Editor via:See the MX HomePro Programming Guide for more details.Specifications:LCD: 2 inch screen (240 x 320) LCD Backlighting by LEDDevices: Supports up to 255 devices with text, less with heavy graphics Macro Capability: Up to 255 steps each; however, nesting is allowed Wi-Fi: IEEE 802.11 b/g/nBattery: Lithium polymer 1,960mAhBattery Charging Time: 5 hoursSize: 8.46” H x 2.04” W x 1.02” DBattery Warranty: 90 days Limited Warranty Statement Click on the section title above to read the full terms and conditions of the Limited Warranty Statement. Also available publicly on the URC home page.End User Agreement Click on the section title above to read the full terms and conditions of theEnd User Agreement. Also available publicly on the URC home page.Federal Communication Commission Interference Statement:This equipment has been tested and found to comply with the limits for a Class B digital device, pursuant to part 15 of the FCC Rules. These limits are designed to provide reasonable protection against harmful interference in a residential installation. This equipment generates, uses and can radiate radio frequency energy and, if not installed and used in accordance with the instructions, may cause harmful interference to radio communications. However, there is no guarantee that interference will not occur in a particular installation. If this equipment does cause harmful interference to radio ortelevision reception, which can be determined by turning the equipment off and on, the user is encouraged to try to correct the interference by one more of the following measures:●Reorient or relocate the receiving antenna.●Increase the separation between the equipment and receiver.●Connect the equipment into an outlet on a circuit different from that to which the receiver is connected.●Consult the dealer or an experienced radio/TV technical for help.Warning!Changes or modifications not expressly approved by the manufacturer could void the user's authority to operate the equipment.The manufacturer is not responsible for any Radio or TV interference caused by unauthorized modifications to this equipment. Such modifications could void the user's authority to operate the equipment.FCC Caution:This device complies with Part 15 of the FCC Rules. Operation is subject to the following two conditions:1. This device may not cause harmful interference.2. This device must accept any interference received, including interference thatmay cause undesired operation. Any changes or modifications not expresslyapproved by the party responsible for compliance could void the authority tooperate equipment. The antenna(s) used for this transmitter must not be co-located or operating in conjunction with any other antenna or transmitter. Federal Communication Commissions (FCC)Radiation Exposure Statement:This remote device is approved as a hand-held and hand-operated only portable (relative to hand) device, which is normally operated at 5cm from a person’s body.。
HP Latex 700 和 800 系列打印机用户指南说明书
HP Latex 700 印表機系列H P Latex 800 印表機系列使用者指南摘要如何使用您的產品。
關於本版本第 3 版,2022 年 5 月©Copyright 2020–2022 HP Development Company, L.P.法律聲明本文件包含的資訊如有變更,恕不另行通知。
HP 產品與服務的保固範圍,僅限於產品與服務隨附的保固聲明中所提供的保固項目。
本文件的任何部分都不可構成任何額外的保固。
對於本文所含的技術或編輯錯誤或疏漏,HP 概不負責。
商標Microsoft® 與 Windows® 為 MicrosoftCorporation 在美國的註冊商標。
目錄1 簡介 (1)歡迎使用您的印表機 (1)印表機附件 (2)說明文件 (2)安全預防措施 (3)主要印表機元件 (9)控制面板 (19)HP PrintOS (27)嵌入式 Web 伺服器 (27)連接方式與軟體指示 (29)Advanced network configuration (進階的網路組態設定) (31)開啟與關閉印表機 (38)重新啟動印表機 (39)如何列印 (概述) (39)2 實用連結 (40)需要協助時 (40)3 處理紙材 (42)概觀 (42)如何儲存和處理紙材 (51)將捲筒紙裝入印表機 (51)有孔的紙材 (57)墨水收集器 (58)裝入附件 (67)輔助手動裝紙 (74)邊緣支架 (76)設定和使用紙材進紙附件 (81)從印表機中取出捲筒紙 (82)如何抬起壓輪 (84)捲紙軸 (85)清潔捲筒 (90)檢視有關紙材的資訊 (91)iii裁切紙材 (93)在織品上列印 (93)4 紙材設定 (97)紙材預設檔 (97)組態中心 (97)線上搜尋 (98)HP Media Locator (99)一般預設檔 (99)仿製紙材預設檔 (100)修改紙材預設檔 (100)新增紙材預設檔 (101)在列印時變更設定 (104)溫度設定檔 (105)選擇成像次數 (105)將您的紙材預設檔儲存在雲端 (110)刪除紙材預設檔 (111)列印秘訣與技巧 (111)色彩校準 (111)最佳化色彩校準的建議 (113)色彩校準程序 (113)不同 700 和 800 系列印表機之間的色彩一致性 (114)ICC 設定檔 (114)完全校準 (115)5 工作佇列管理 (117)控制面板中的工作佇列 (117)6 擷取印表機用量資訊 (122)取得印表機的統計資訊 (122)從 PrintOS PrintBeat 檢查用量 (122)檢查工作的使用情形統計資料 (122)檢查成本分配 (123)7 疑難排解紙材問題 (124)無法成功裝入紙材 (124)紙材位置不正確 (124)iv紙材收縮或伸展 (127)紙材發生拱屈變形 (128)自動裁紙器無法使用 (129)捲紙軸卡紙 (129)8 解決列印品質問題 (130)一般列印建議 (130)最佳化列印品質 (131)改善列印品質 (132)最常見的列印品質問題 (137)9 處理墨水系統 (148)700 系列供墨系統 (148)800 系列供墨系統 (155)校正印字頭 (161)更換噴頭 (164)如何儲存和運送噴頭 (169)更換維護油墨匣 (169)使用白色墨水列印 (僅限 700W 和 800W 機型) (173)10 疑難排解墨水系統問題 (183)無法插入墨水匣 (700 系列) (183)無法插入墨水匣 (800 系列) (183)安裝不褪色墨水匣 (183)控制面板建議重裝或更換印字頭 (185)無法插入噴頭 (185)無法插入維護油墨匣 (185)11 印表機維護 (187)一般清潔指示 (187)建議使用但不提供的維護工具 (187)清潔噴頭 (188)清潔印字頭的電氣連接 (188)清潔並潤滑噴頭托架桿 (193)清潔編碼器條帶 (PMK13) (195)清潔壓板和進紙感應器視窗 (PMK19) (196)更換潤滑毛氈 (PMK18) (199)v檢查和清潔噴頭插槽中的塑膠針 (204)更換噴頭插槽中的塑膠針 (206)更換墨水混合容器 (PMK15) (207)清潔印表機的外部 (207)清潔固化乾燥模組 (PMK14) (208)服務維護 (208)12 客戶自行維修零件 (210)安裝墨水收集器 (210)紙材裝入隔條 (210)更換線條感應器 (211)更換潤滑毛氈 (214)列印壓板 (221)更換真空壓力橡膠 (223)更換墨水收集器感應器 (227)更換提升機件手柄 (232)更換轉向器風扇裝置 (233)更換裁紙器 (236)更換光學感應器 (238)更換托架護蓋 (241)裝回噴頭護蓋 (244)13 韌體更新 (246)使用 USB 快閃磁碟進行韌體更新 (246)使用嵌入式 Web 伺服器進行韌體更新 (246)自動韌體更新 (247)14 移動或存放印表機 (248)移動印表機 (248)準備供墨匣 (僅限 800 系列) (248)存放印表機 (251)儲存不符合環境規定 (251)15 耗材與附件 (252)訂購墨水耗材 (252)棄置指示 (253)16 疑難排解其他問題 (255)印表機無法取得 IP 位址 (255)vi印表機無法列印 (256)程式回應變慢,或在產生列印工作時停滯 (256)印表機似乎變慢 (256)電腦與印表機之間的通訊失敗 (257)無法連線至例如韌體更新、線上搜尋、或協助客戶參與計劃等服務 (257)系統錯誤代碼 (258)17 印表機規格 (261)功能規格 (261)實體規格 (262)記憶體規格 (263)電源規格 (263)生態規格 (264)環境規格 (264)聲音規格 (264)附錄 A 常見列印問題摘要 (266)索引 (268)vii1簡介本產品的簡介。
HP Latex 700和800打印机系列恢复操作指南说明书

Recovery process after extended downtimeFor the HP Latex 700 and 800 Printer seriesThis document provides recommendations on how to safely turn a printer back on after a period of extended downtime. Follow the steps to avoid any damage to the printer and its components. Sleep mode is recommended over fully shutting down a printer. This is because white ink should always be recirculating throughout the white IDS; if the printer is completely turned off, automatic white ink maintenance cannot take place, and printheads or other IDS components may bedamaged. That said, if disconnecting the printer from the power socket is inevitable, follow these recommendations.Recommendations before shutdown1. Extract all printheads from the carriage and protect them using the original orange sealingcaps.2. Remove the white printhead. Move it every few hours until the printer can be used again, tominimise the effect of it not being used.NOTE : If you do not have protection caps, do not remove the printheads. Make sure that printhead carriage is in the service station.3. Empty the condensation collector. Remember to connect the cap to the condensationcollector afterwards.4. Quit the intermediate tanks.NOTE : To empty the Intermediate Tanks before safely removing and storing them while the long shutdown please contact your service representative.5. Remove all ink cartridges and unload any substrate from the printer.6. Turn off the power using the power button on the front panel.7. Switch off the power using the power button located in the back of the printer.8. Disconnect the cables that connect the printer to the power, network, computer, orscanner.9. Check the ‘Environmental specifications’ section in the User Guide for the correctenvironmental storage conditions.Related links: /go/latex/Before turning the printer back onCAUTION: To follow all precautions and safely turn the printer on after a long period of shutdown, HP recommends contacting your service representative.The following steps minimize the chances of failure and damage to the printer after a long period of shutdown.1.If ink or the printer are moved from a cold to a warm or humid location, water cancondense on the cartridges or the printer’s parts. HP recommends waiting three hoursbefore installing the ink cartridges and turning the printer on again, so that anycondensation evaporates.NOTE: Shake the white cartridge as per its instructions, as the ink can split in the mixcontainer and the ink tank. Remember that for L700 white, the ink mix container must also be shaken as there may be ink inside both cartridges; for L800 white, there is only onesupply2.For the 700W model., clean the connections in the intermediate tank. Pay special attentionto the white connectors.3.Check the fluidic interconnect towers in the printhead carriage slot, which protect theprintheads. If necessary, clean them with distilled water, then dry them before installingthe printhead. Pay special attention to the white printheads.4.Manually clean the white printheads with a fibre-free cloth and de-ionized or distilled waterand install them in the white printhead maintenance wheel.5.Shake the color printheads and insert them in the printer carriage.6.After starting the printer, HP recommends waiting until the white recirculation isperformed automatically by the printer. This ensures that the white ink delivery systemworks properly. Wait 48 hours before printing to ensure this process is performed.NOTE: Call your service representative in urgent cases, where waiting 48 hours beforeprinting is not possible.7.To ensure good image quality, perform a nozzle check and ensure that all the printheadsthat have not been used throughout the extended period of shutdown are in a good state.。
printronix-sl-t4m操作手册

字体:Montype Imaging(Agfa Monotype)-Lerrer Gothic Bold,Courier Bold,CGTriumvirate
Bols Condensed,OCR-A,OCR-B,CG Times,CG Triumvirate,CG TriumvirateBols, (additional fonts available)
环境要求
工作温度:5℃ to 40℃ 工作湿 度:0% to 90 %非冷凝 贮藏温度:-5℃ to +60 ℃(-23℉ to +104℉) 贮藏湿度:5% to 90%非冷凝 尺寸:11.75〞Wx18.75〞Dx12.125〞 H(298mmWx476mmDx308mmH) 净重:33Ibs(15Kg) 毛重:41Ibs(18.6Kg)
四、可选配件 ................................................................................................................... 18
五、机器使用软件 ............................................................................................................ 19
三、机器操作
机器结构图
条码打印机操作说明书
9
1、碳带和纸张的安装
(1)碳带的安装
条码打印机操作说明书
注意:此普印力打印机可以内外碳兼用。 (2)纸张安装:
10
条码打印机操作说明书 (3)测纸
Printronix SL/4M 机器的纸张感测器分上下两个,也是可以移动的。 此机器是自 动测纸的,可以设置在电源开启、印字头合上的时候或者在机器的 参数设定里进行 纸张校正。
Printronix P8000 Line Matrix 打印机说明书

Flexible Design | Adaptable Functionality |Manageable SavingsP8000Line Matrix PrintersFive Reasons Your Company Needs Line Matrix PrintersIn a world of expensive to maintain laser printers it is smart to consider the latest advancement in line matrix cartridge printing before choosing a print technology. Printronix has consistently pioneered new innovations to ensure this technology remains highly competitive and relevant for today’s printing applications. Here are five reasons to consider the latest generation of Line Matrix Cartridge printers.1 Lowest Cost of Ownership• T he average lifespan of a line matrix printer is 7 to 10 years as compared to only 3 years for laser printers.• C artridge Ribbons are up to six times less expensive than laser toner cartridges.• A s print volume increases, consumable savings grow dramatically.• C artridge ribbons give users up to 20% improvement in consumable cost per page over spool type ribbons used by legacy line printers.2 Productivity• L ine Matrix printers deliver unmatched, up-time and reliability.• D ocument integrity is more easily maintained with continuous forms media as opposed to cut sheets.•P rintNet Enterprise, our remote printer management utility, delivers visibility and remote control for all network connected devices.3 Reliable Performance in Any Environment • L ine Matrix printers perform reliably in non-climate controlledenvironments where temperature, humidity and airborne contaminants cause form feeding and print quality issues for other print technologies.4 Application Adaptability• P rintronix’ OpenPrint technology allows printers to Plug & Play in PDF and PostScript, ERP environments.• M any Independent Software Vendors provide label design software and ERP solutions that natively support the Printronix language for graphics, text and barcode images.• L ine Matrix remains the best technology for printing multi-part forms, oversize media, labels, card stock, and other non-typical media types.5 Environmentally Friendly• W hen compared to laser printers, Line Matrix Printers consume as little as 1/3rd the energy when printing, and 1/7th the energy when in standby mode.• T hroughout their life span, Line Matrix Printers will generate far less landfill waste from consumables, packaging and printer hardware.• C artridge ribbons emit none of the fine particulate emissions generated by laser printers.DISTRIBUTIONMANUFACTURINGFINANCIALTRANSPORTATIONAUTOMOTIVEThe flagship model in the series, the P8000 Open Pedestal is a dependable line matrix printer that delivers maximum uptime and lowest total cost of ownership. Its compact size makes it easy to move within your environment and is ready to plug into your network and start printing from day one.P8000Line Matrix PrintersReliable Connectivity, Seamless Installation and Robust Remote Printer Managementwith PrintNet Enterprise ™ remote printer management software. PrintNet Enterprise is a valuable time-saving tool for your mission critical operation.PRINTNET ENTERPRISE = Total control. Your worldwide print operation is at your fingertips with PrintNet Enterprise. By combining the recommended integrated Ethernet adapter and Java-based software, remote printer management extends your reach from anywhere you have a computer and connectivity. • C onfigure and monitor printers from any desktopcomputer and any location in the world• Designate events and be alerted to printer issues withemail, pager or mobile phone alerts• Complete compatibility with any Printronix productwhen equipped with the optional EthernetPRINTNET WEBPAGE = Printer management made simple. You now have access and control of your printer through any internet browser. Full configuration of printer menus, including uploading and downloading of saved configurations from your PC. Easy file management for quick downloads and uploads of forms, fonts, and logos. Printer status monitoring for real time updates. Diagnostics capabilities including job capture and firmware download.CONNECTIVITY™OpenPrint ™ – The World’s First PostScript and PDF Line Matrix PrinterPrintronix offers the world’s only PostScript and PDF ® line matrix printer. The OpenPrint Cartridge Series allows the printer to communicate directly with today’s modern enterprise resource planning (ERP) environments, including Oracle ®, SAP ®, Linux ® and Windows ®. With OpenPrint, PDF or PostScript files can be sent directly to the printer without hard-coding or special drivers. Output quality is improved because it utilizes PostScript image and graphic capabilities as well as sure scan barcode software.The OpenPrint platform offers our customers an unprecedented opportunity to implement the industrial strength of line matrix technology within most ERP environments. The easy and instant connectivity of PostScript and PDF files enables IT administrators to quickly deploy new forms and business documents to Printronix line matrix printers throughout ERP enterprise operations. OpenPrint technology provides improved fine point text and fonts - from six point to poster size. It also improves the rendering of barcodes within the printer resulting in enhanced form readability and utility.COMPATIBILITY© 2016 Printronix, LLC. All rights reserved. Printronix and all product names, numbers and logos are trademarks or registered trademarks of Printronix, LLC. Product appearance and/or specifications a re s ubject t o c hange w ithout n otice. W indows i s a r egistered t rademark o f Microsoft Corporation in the United States and other countries. All other trademarks, product names and company names or logos herein, are the property of their respective owners. PTX-30003B13 rue Salomon de Rothschild Suresnes,France 92150+33 (0) 1 46 25 19 08 • CONNECTIVITY/INTERFACESStandardUSB 2.0 and Serial RS-232Ethernet - 10/100 Base TParallel - IEEE-1284 CentronicsCHARACTER PITCH (characters per inch)10, 12, 13.3, 15, 16.7, 17.1, 20LINE SPACING (lines per inch)6, 8, 10.3, n/72, n/216GRAPHICS RESOLUTION180 dpi Horizontal, 144 dpi Vertical (max)DOT SIZE16.7 mil (.42mm)EMULATIONSStandardLP+ (Printronix P-Series, P-Series XQ, Serial Matrix, IBM ProPrinter III XL, Epson FX-1050) ANSI, PCL 2, TN5250/TN3270, Graphics Emulation PGL & VGL OptionalIPDS, DEC LG,OpenPrint Standard Ghostscript Postscript (Level 3 compatible),PDF (Level 1.7 compatible), Printronix PJLCHARACTER SETS99 plus character sets including ECMA Latin 1, DEC Multinational, IBM Code Page 437 and 850, OCR A, OCR B, UTF8 encoded UnicodeCHARACTER STYLESBold, italic, double wide, double high, overstrike, underline, subscript and superscriptFONTSNLQ Serif, NLQ Sans Serif, Data Processing, High Speed, OCR A, OCR BBARCODES30 resident symbologies, including Code 39, EAN 8/13, UPC A/E, Intelli-gent Mail, Postnet, Royal Mail, Interleaved 2 of 5, PDF 417, Data MatrixPRINTER SOFTWAREPrintronix PrintNet Enterprise remote management software, SAP device supportPRINTER DRIVERSMicrosoft Window XP/Vista/2003/2008/7, LinuxPOWER VOLTAGEAC input range 100-240 VAC, 50/60 HZPOWER CONSUMPTION (typical-maximum)• P8005 / P8205 280 watts Max 320 watts • P8010 / P8210 300 watts Max 320 watts • P8215435 watts Max 601 watts • P8220450 watts Max 601 wattsPOWER CONSUMPTIONLess than 5 wattsOPERATING TEMPERATUREEnvironmental Operating Temperature 50° to 104° F, 10° to 40° CPAPER TYPEContinuous, fan folded, edge-perforationPRINT WIDTH13.6" (345mm)MEDIA COPIESUp to 6 part; up to 4 part for Zero Tear modelsMEDIA LENGTH3” (76mm) to 12” (305mm)MEDIA THICKNESS MULTI-PART0.025” (0.64mm) maxMEDIA WIDTH• 3” (76mm) to 17” (432mm)• For Zero Tear models:• 7.5” (191mm) to 12” (305mm) for up to 4 part carbon and 6 part carbonless • 7.5” (191mm) to 16” (406mm) for up to 3 part carbon and 4 part carbonlessMEDIA WEIGHT SINGLE PLY• 15 lb. Bond to 100 lb. Tag (56 to 163 gm/M 2)• For Zero Tear models:• 18 lb. Bond to 100 lb. Tag (67.7 to 163 gm/M 2) for forms up to 12” (305mm) in width• 20 lb. Bond to 100 lb. Tag (75.2 to 163gm/M 2) for forms up to 16” (406mm) in widthMTBF10,000 hours at 25% duty cycle and 25% page densityCONSUMABLE/RIBBONSStandard Life Cartridge Ribbon 17,000 pages Extended Life Cartridge Ribbon 30,000 pages Page yield based on ISO LSA Page, 8.5" x 11" letter-size, approximately 5% coverage。
得力 P2000系列激光打印机 P2000D、P2000DW、P2000DN 说明书
©2020 宁波得力集团有限公司感谢您选购得力产。
品力产品对您使用得力系列产品我们表示衷心的感谢!为了保障您的切身权益,请认真阅读下面的声明内容。
产品外观请以实物为准(P2000、P2020系列产品各型号外观存在差异)。
如需更多帮助请登录:用户手册P2000系列P2020系列黑白激光多功能一体机·“ ”表示支持,“ ”表示不支持。
··如有产品系列增加或变更,恕不另行通知。
产品各型号功能简介(型号功能对照表)本说明书中的产品图片都以P2000DNW为例,由于机型不同可能出现外形不同。
* 根据ISO/IEC 19752标准打印A4纸张。
关于废旧机器与耗材的回收得力集团有限公司作为一家具有社会责任感的企业,为了倡导绿色环保,以及为可持续发展作献,您购买的本公司生产的打印设备及耗材在需废弃时,可交由本公司进行免费回收处理,详细如下:1、您可以拔打得力集团全国服务热线400-185-0555进行登记确认,并按服务热线提供的地址将这些废弃物交到或寄送到得力集团就近的分部或得力集团服务中心。
按照共同有责共同负担的原则,该环节所发生的运费等相关费用由交付者自行承担。
2、得力集团各分部将回收的废弃物统一送回集团服务中心,再由集团服务中心按照国家环境保护法相关法律规定交由具备国家认可资质的回收单位进行专业回收和处理。
该环节所发生的运费、回收处理费等费用由得力集团有限公司承担。
关于零配件(组件)、耗材提供本打印机停产后,部分零配件(组件)、耗材(鼓粉盒)还会提供5年。
关于产品放置的建议建议您将本产品放置于相对通风和独立的区域。
关于使用再生纸的建议为节约资源,促进绿色环保,您也可以使用品质稳定的再生纸。
关于零能耗的建议本产品只有关闭电源开关才能实现零能耗。
目录介绍 ................................................................................................................................................................. 注意事项及安全..................................................................................................................................... 关于本用户手册..................................................................................................................................... 一般安全信息......................................................................................................................................... 设备安放的位置 ..................................................................................................................................... 电气安全 ................................................................................................................................................. 保修 ......................................................................................................................................................... 碳粉盒 ..................................................................................................................................................... 维修保养................................................................................................................................................. 激光的安全性 ......................................................................................................................................... 无线电干扰 ............................................................................................................................................. 警告 ...................................................................................................................................................................................... 概述 ................................................................................................................................... 打印机前视图 ......................................................................................................................................... 打印机后视图 ......................................................................................................................................... 控制面板 ................................................................................................................................................. LED指示灯状态......................................................................................................................................... 按键 ............................................................................................................................................................................................... LED工作状态和错误指示灯的含义 ................................................................................... 首次使用 ....................................................................................................................................................... 1. 拆开打印机的包装....................................................................................................................... 2. 安装碳粉盒 .. (01)0101010202030303040404050505050606070808083. 将纸张装入纸盒 ................................................................................................................................104.打开电源 ...........................................................................................................................................11首次设置 . (12)安装打印机驱动程序 .......................................................................................................................... 12连接设备 .. (12)USB连接 ....................................................................................................................................... 12网络连接 (13)下载移动应用程序(使用“得力e+”App ) .............................................................................................. 14打印机助手使用 . (15)1. 设备管理 ...........................................................................................................................................152.设置 ...................................................................................................................................................163.打印列表 ...........................................................................................................................................164.维护 ...................................................................................................................................................175.购买 ...................................................................................................................................................176.支持 ...................................................................................................................................................177.扫描 ...................................................................................................................................................178.无线连接 . (18)将纸张装入纸盒 ................................................................................................................................... 打印设置 . (19)布局 ................................................................................................................................... ................................................................................................................................... 19纸张 /质量 .. (20)扩展功能............................................................................................................................................... 20高级设置............................................................................................................................................... 21Web 界面 (22)确认IP 地址......................................................................................................................................... 22调用Web 界面 . (22)一、设备状态 (23)二、设备配置..................................................................................................................................... 23三、网络 ............................................................................................................................................. 24四、订购耗材 (26)五、固件更新 (26)六、登录密码....................................................................................................................................... 26维护 .. (26)更换碳粉盒 ........................................................................................................................................... 26故障排除 ............................................................................................................................................... 29卡纸处理 .................................................................................................................................................................. 35改善打印质量 (37)附录 (43)材料安全数据表(MSDS) (43)产品规格............................................................................................................................................... 43....................................................................................................................... 31LCD信息以及LED工作状态清除设备内的卡纸 .............................................................................................................................. 35清除设备后部(定影单元)的卡纸 ...................................................................................................36................................................................................................................35清除纸盒内的卡纸..............................打印介质 ......................................................................................................................... 打印介质的规格 .................. (181818)操作设备前,请仔细阅读以下说明,并根据需要进行参考,确保设备的持续安全运行。
基恩士ljx8000的工作原理
一、基恩士ljx8000的工作原理基恩士ljx8000是一款高效的打印机,采用了先进的激光打印技术,其工作原理主要包括激光打印、光敏感材料处理、电荷感应和转移、定影和清除等步骤。
二、激光打印1. 激光打印是基恩士ljx8000的核心工作原理之一,其工作过程类似于激光照相技术。
激光雷达通过扫描镜将激光束精确地聚焦到光敏感材料上。
2. 在打印过程中,激光束通过激光打印头以及反射镜被引导到感光鼓上。
激光束在感光鼓上扫描,通过控制光束的强度,激光打印机可以精确地控制每个像素点的亮度。
3. 感光鼓上的光敏感材料被激活,形成对应打印内容的电荷图案。
三、光敏感材料处理1. 光敏感材料是基恩士ljx8000中非常重要的一部分,它可以将激光打印的信息转化为电荷图案。
光敏感材料的种类和质量直接影响了打印效果的清晰度和稳定性。
2. 光敏感材料经过光敏处理后,在感光鼓上形成了电荷图案,后续的电荷感应和转移步骤将这些电荷图案转移到打印介质上。
3. 光敏感材料的处理过程需要在受控的环境下进行,以保证打印效果的一致性和稳定性。
四、电荷感应和转移1. 电荷感应和转移是基恩士ljx8000中的关键工作步骤,它将光敏感材料上形成的电荷图案转移到打印介质上。
2. 在这一步骤中,感光鼓通过电荷辅助辊上的高压电场,使得电荷图案被感应到打印介质上。
通过控制电场的强度和分布,可以实现对打印介质上电荷图案的精确控制。
3. 这一步骤的精确性和稳定性,直接决定了打印质量的高低。
为了保证打印效果的一致性,电荷感应和转移过程需要严格的工艺控制和设备调试。
五、定影和清除1. 定影和清除是基恩士ljx8000中的最后两个工作步骤,在这两个步骤中,打印介质上的电荷图案被固定和清除,完成最终的打印过程。
2. 定影是将电荷图案转化为实际的打印图案的步骤。
定影过程中,打印介质通过加热和压力作用,使得电荷图案被转化为可见的文字或图像。
3. 清除是将感光鼓上残留的电荷图案清除的步骤,以便下一次打印作业的进行。
RICOH fi-8000 Series产品介绍说明书
Standard für Business-Scannen neu definiertDie Weiterentwicklung der fi-8000 Series von Fujitsu überzeugt mit hochmodernen Technologien, die auf dieHerausforderungen der modernen Geschäftswelt zugeschnitten sind und Unternehmen eine nachhaltige Wertschöpfung ermöglichen.Unsere bahnbrechende Clear Image Capture Technologie besticht durch eine Bildqualität, welche existierende Lösungen übertrifft und branchenführende Ergebnisse in Sachen OCR-Genauigkeit garantiert. Der PaperStream IP Treiber optimiert die Ausgabedateien für schnellere und kostengünstigere Abläufe. Darüber hinaus erfasst die fi-8000 Series problemlos die unterschiedlichsten Dokumententypen – von 20 g/m² bis 465 g/m², Karten oder Broschüren mit einer Dicke von bis zu sieben Millimetern.Die Innovationen, die die Grundlage unserer zuverlässigen Scanlösung bilden, basieren auf 32 neu angemeldeten Patenten. So ist ein Produkt entstanden, auf das Sie sich heute und in Zukunft verlassen können. Dies garantieren unter anderem eingeringerer Stromverbrauch sowie die Automatic Separation Control, die stets den perfekten Einzug sicherstellt. Intelligent Sonic Paper Protection (iSOP) und die weltweit erste Image Monitoring Technologie sorgen für eine sichere Erfassung und den Schutz von Pässen, Broschüren oder Stapeln von Dokumenten unterschiedlicher Formate, selbst wenn darauf Etiketten oder Fotos angebracht wurden.Mit einem 100-Blatt-ADF und einer Duplex-Scangeschwindigkeit von 90 Seiten pro Minute sowie weiteren kleinen und großen Verbesserungen bietet die Fujitsu fi-8000 Series unvergleichlicheProduktivität. Overscan Control und die verbesserte Multifeed-Erkennung verhindern Unterbrechungen durch Fehleinzüge, Staus oder Schräglage – außerdem wird die Zeit für die Ablage nach dem Scannen ebenfalls reduziert. Da die verschiedenen Dokumententypen nicht in separaten Stapeln vorbereitet werden müssen, die Startzeit kurz ist, sowie die Scanner zentral fernüberwacht und verwaltet werden können, profitieren Anwender von einem unterbrechungsfreien Betrieb, maximaler Betriebszeit und einem unübertroffenen Benutzererlebnis.Das Ergebnis sind langfristige strategische Vorteile. Die Geschäftsanalytik wird durch die skalierbare,automatisierte Erfassung umfangreicherer und vielfältigerer Datensätze verbessert, was die Fujitsu fi-8000 Series zum perfekten Partner macht, um die digitale Transformation von frühen bis zu fortgeschrittenen Phasen zu unterstützen..Die Weiterentwicklung der Fujitsu fi-8000 Series setzt neue Maßstäbe für das Business-Scannen, indem sie die Herausforderungen von heute bewältigt und einen langfristigen strategischen Vorteil für Unternehmen bietet, die sich auf die Zukunft der Arbeit einstellen. Mit bahnbrechender optischer T echnologie und einer Vielzahl innovativer neuer Patente unterstützt die Fujitsu fi-8000 Series digitale Transformation mit branchenführender Genauigkeit und Benutzerfreundlichkeit – aufbauend auf Technologie, der Sie vertrauen können.Branchenführende LeistungClear Image CaptureClear Image Capture ist eine bahnbrechende, proprietäre Innovation, die erstmals in der Fujitsu fi-8000 Series zum Einsatz kommt. Echte Bildwiedergabe und die Vermeidung von Farbverschiebungen versprechen branchenführende Resultate bei der OCR-Genauigkeit und eine Bildqualität, die die Möglichkeiten von Standard Contact Image Sensor (CIS) oder Charge Coupled Deviced (CCD) übertrifft. Da es sich zudem um eine effizientere Technologie handelt, reduziert sich der Stromverbrauch je Scan. Clear Image Capture ermöglicht auch die Erfassung einer breiten Palette an Dokumenttypen von 20 g/m² bis 465 g/m² – einschließlich A4-Umschlägen, Karten, Pässen oder Broschüren mit einer Dicke von bis zu sieben Millimetern.Technik, auf die Sievertrauen könnenAutomatic Separation ControlUnsere patentierte AutomaticSeparation Control sorgt fürden perfekten Einzug und stelltsicher, dass Unternehmen auchgrößere Mengen und gemischteDokumenten-Stapel zuverlässigdigitalisieren. Durch Erkennungdes Gewichts der Dokumenteund die automatische Anpassung und Einstellung des Drehmoments werden Fehleinzüge und Unterbrechungen vermieden. Das Ergebnis ist ein konstanter Einzug unterschiedlicher Dokumentenformate, das Anwendern das zeitaufwändige Sortieren der verschiedenen Dokumententypen in einzelne Stapel erspart. Darüber hinaus ermöglicht die ADF-Kapazität von 100 Blatt sowie die höhere Scangeschwindigkeit effizientes Arbeiten in Gruppen mit hohem Durchsatz.Branchenführender PapierschutzDie Fujitsu fi-8000 Series schützt Dokumente mit einer innovativen Technologie vor Beschädigungen. Die patentierteBildüberwachung identifiziert übermäßig schräg eingelegte Dokumente in Echtzeit und stoppt den Scanvorgang, ehe diese beschädigt werden könnten. Intelligent Sonic Paper Protection (ausgenommen fi-8150, fi-8250-Modelle) reagiert vergleichbar, sobald die Technologie anormale Einzugsgeräusche feststellt. Die Lag Detection stellt hingegen sicher, dass die Dokumente mit der berechneten Geschwindigkeit eingezogen werden.Spezielle Erfassung von PassdokumentenDer patentierte Einzugsmechanismus gewährleistet die sichere Erfassung von Reisepässen ohne Trägerblatt†, während die Machine Readable Zone (MRZ)-Erkennung für eine gleichbleibend präzise Erfassung der persönlichen Daten sorgt. Unvergleichliche ProduktivitätVerbesserte Multi-Feed-DetectionUm unnötige Unterbrechungen des Scanvorgangs zu vermeiden, werden Karten, Aufkleber und kleine definierteAnhänge automatisch erkannt und gegebenenfalls ignoriert. Diese patentierte Technologie ist eine Weiterentwicklung der standardmäßigen Multi-Feed-Detection, die stoppt, wenn während des Einzugs etwas anderes als ein einzelnes Blatt erkannt wird.Hohe Geschwindigkeit, hoher DurchsatzDie Fujitsu fi-8000 Series bietet mit einer kurzen Startzeit sowie einer Duplexgeschwindigkeit von bis zu 90 Blatt pro Minute einen hocheffizienten Scanprozess für höchste Produktivität in Arbeitsgruppen. Die integrierte USB 3.2 und Gigabit-LAN-Konnektivität ermöglicht zudem eine zügige Dateiübertragung.Overscan Control*Diese Technologie passt den Scanbereich automatisch an, um Bildverluste bei schräg eingezogenen Dokumenten zu vermeiden, sodass diese nicht erneut gescannt werden müssen. Drei Sensoren erkennen die Dokumentenkanten und passen den Scanbereich entsprechend an das Dokument an, selbst wenn es schräg eingelegt wurde. Der Benutzer kann sich beim Scannen darauf verlassen, dass jedes Mal das gesamte Dokument gescannt wird und kein Teil des Bildes verloren geht. *Ausgenommen fi-8150, fi-8250-Modelle.Urethan-RollenUrethan-Rollen sind im Gegensatz zu Ethylen-Propylen-Dien-Kautschuk (EPDM)-Rollen resistent gegen die Aufnahme von Öl aus No Carbon Required (NCR)-Papier, die aufquellen und das Einzugsdrehmoment beeinträchtigen können. Somit lassen sich Fehleinzüge und Staus vermeiden und eine gleichbleibende Zuführungsleistung gewährleisten.StapelhalterungDie ergonomische Halterung legt gescannte Dokumente sauber ab und ermöglicht so eine schnellere und einfachere Ablage nach dem Scannen.Technische DatenSoftwarepaketPaperStream IPEin Treiber, der Bilddateien bereinigt und optimiert, damit sie schneller sowie kostengünstiger abgerufen und gespeichert werden können.■ Kompatibel zu TWAIN- und ISIS-Schnittstellen ■ Überragende integrierte Bildverarbeitung ■ Patchcode- und Barcode Erkennung■Vordefinierte und benutzerdefinierte Scanprofile für regelmäßige Aufgabenstellungen ■ Bei Bedarf unterstützt …Assisted Scan“ den Nutzer durch einfachebildliche Auswahl alternativer Scanergebnisse■ Automatisches Zuschneiden und Schräglagenkorrektur, Farberkennung und Leerseitenerkennung sowie -löschun gAlle Namen, Herstellernamen, Marken- und Produktbezeichnungen unterliegen besonderen Schutzrechten und sind Marken des Herstellers und/oder eingetragene Marken der jeweiligen Eigentümer. Alle Angaben sind unverbindlich. Änderungen der technischen Daten sind ohne vorherige Ankündigung vorbehalten.2023.5 8040-1.0PFU (EMEA) Limited BelmontBelmont Road Uxbridge, UB8 1HE GroßbritannienPFU (EMEA) Limited Tower 2Mies-van-der-Rohe Straße 880807 München DeutschlandPFU (EMEA) Limited Viale Monza, 25920126 Milano (MI)ItalienPFU (EMEA) LimitedCamino Cerro de los Gamos, 128224 Pozuelo de Alarcón Madrid SpanienTel: +44 (0)20 8573 4444Tel: +49 (0)89 32378 0Tel: +39 02 26294 1Tel: +34 91 7849000PaperStream CaptureOptimiert und automatisiert die Erfassung in Arbeitsabläufen.PaperStream ClickScan Ad-hoc-Scannen mit einer einzigen Berührung.Zentrale Verwaltung Skalierbare Echtzeit- und Fernverwaltung von bis zu 1000 Geräten.PaperStream IP NetFür flexible, anpassbare Erfassungsarchitekturen.PaperStream NX ManagerFür zentralisierte, serverbasierte Erfassung.。
hpofficejet 8000闪烁指示灯要点
閃爍指示燈簡介產品的閃爍指示燈可指出特定的產品問題。
閃爍指示燈也會指出產品已初始化或電池已充電等狀態。
下列為產品控制面板上不同的指示燈及按鈕。
图1: 產品控制面板1 - 墨水匣指示燈2 - 列印噴頭指示燈(只有在列印噴頭發生問題時才會出現。
)3 - 網路按鈕(某些機型可用)、無線按鈕(某些機型可用)4 - 取消按鈕5 - 回復按鈕與指示燈6 - 電源按鈕與指示燈閃爍的指示燈注:某些特定類型的指示燈閃爍時,有幾種解決方法:图 2: 所有指示燈都未亮問題描述所有指示燈都未亮。
原因印表機處於關機狀態。
解決方法連接電源線並按下電源按鈕 ()。
图 3: 電源指示燈亮著問題描述電源指示燈亮著。
原因印表機處於待機狀態。
解決方法不需採取任何動作。
图 4: 電源指示燈閃爍問題描述電源指示燈閃爍。
原因產品正在開啟或關閉,或正在處理列印工作。
產品正在等待墨水乾燥。
解決方法不需採取任何動作。
图 5: 電源和回復指示燈閃爍問題描述電源指示燈及回復指示燈閃爍。
原因可能是卡紙。
解決方法步驟 1:清除卡紙1.按下電源按鈕 () 以關閉產品電源。
2.檢查雙面列印裝置是否發生卡紙:按雙面列印裝置任一側的按鈕,取出護蓋或雙面列印裝置。
图 6: 按下雙面列印裝置兩邊的按鈕图 7: 卸下雙面列印裝置3.找出任何卡紙。
4.以雙手抓住卡紙,將卡紙拉出。
5.打開上蓋,並取出任何碎屑。
6.打開托架前蓋。
如果產品內還有紙張,請確定托架已移動到產品的右邊。
7.從產品上蓋取出任何紙張碎屑或有皺褶的紙張。
8.關妥上蓋。
9.按下電源按鈕 () 以開啟產品電源。
步驟 2:按下回復按鈕按下回復按鈕 () 以繼續列印。
如果問題仍然存在,關閉產品再重新開啟。
图 8: 電源指示燈亮著且回復指示燈閃爍問題描述電源指示燈亮著,且回復指示燈閃爍。
原因本產品可能紙張用盡。
解決方法將紙張放入主進紙匣,然後按下回復按鈕 ()。
图 9: 電源和回復指示燈亮著問題描述電源指示燈及恢復指示燈亮著。
DS-7120 操作手册
打印针调整和断针自动补偿功能是得实打印机的专利技 术。
时尚的外观、强大的性能及其高可靠性,使 DS-7120 成为 保险、税务、银行、电信、企业财务等行业部门用户的理想 选择。
4
第1章 安装打印机
1.1 开箱和检查
打开纸箱,对照下图检查箱内部件和附件是否齐全。如果有任何 部件遗失,请与卖方联系。 注意:使用之前,请先取出打印头固定板,保留原包装箱及缓冲材料,
以备以后使用。
安装打印机 1-1
1.2 放置打印机
在安装打印机之前,首先要确定一个合适的地方放置打印机。 这里“合适的地方”是指:
3
企业公开信息:
1. 售后服务请致电全国各地得实服务网点电话,或拨打: 400-810-9998(手机) 800-810-9998(免费)
2. 产品工作、待机、休眠及关闭状态的最大及最小能耗如下:
产品使用状态 工作时 待机 休眠 关闭
最大能耗 180W 7.5W 6W
小于 0.1W
最小能耗 10W 6.5W 5W 0
8.4.1 ESC/P和LQ仿真控制码摘要表 .................. 8-14 8.4.2 OKI仿真控制码摘要表 ........................ 8-18
附录 1:电子信息产品污染控制的说明..................... 9-1
2
安全规范
使用注意事项
为了避免受到电击和伤害及防止损坏打印机,在接上电源之 前,务请注意以下重要事项:
注:只有当产品无任何外接输入电源时,才能实现零能耗。
- 1、下载文档前请自行甄别文档内容的完整性,平台不提供额外的编辑、内容补充、找答案等附加服务。
- 2、"仅部分预览"的文档,不可在线预览部分如存在完整性等问题,可反馈申请退款(可完整预览的文档不适用该条件!)。
- 3、如文档侵犯您的权益,请联系客服反馈,我们会尽快为您处理(人工客服工作时间:9:00-18:30)。
• 行式点阵打印机提供无与伦比的运行时间和可靠性。 • 由于使用了连续表格介质而非单页送纸,得以更容易维持文件完整性。 • 我 们的远程打印机管理工具 PrintNet Enterprise 可为所有连接网络的设
备提供查看和远程控制功能。
3 在任何环境中发挥可靠性能
• 在非气候控制的环境下,温度、湿度和空气中的污染物会导致其他印刷 技术产生表格送纸和印刷质量问题,而行式点阵打印机却能运行可靠无 虞。
1 拥有成本最低
• 较之只有 3 年使用寿命的激光打印机,行式点阵打印机的平均使用寿命 高达 7 到 10 年。
• 墨盒色带比激光碳粉墨盒便宜六倍。 • 随着打印量的增加,耗材带来的成本节约优势将会
越发显著。 • 较之传统的行式打印机使用的卷轴式色带,墨盒
色带可为用户节约高达 20% 的每页耗材成本。
打印机型号
打印速度 信函级质量 接近信函级质量 正常 高速 超高速 超超高速 进纸速度 速度
桌面式
P8003H / LMPPLS & P8006H / LMPPHS 标配 标配
架式
P8003H / LMPPLS & P8006H / LMPPHS 标配 标配
选项
选项
选项
P8003H / P8006H
18.3 英寸(464.8 毫米)
25.8 英寸(655.3 毫米)
19.1 英寸(485.1 毫米)
100 磅(45.4 千克)
140 磅(64 千克)
P8003H
P8006H
65
70
P8003H
P8006H
每分钟行数,双字节字符
177
315
195
348
221
390
258
460
340
603
367
655
设计灵巧
Printronix 改进了其业界领先的行式 点阵技术,以满足不断变化的用户 需求。
• 模块化机柜占用空间更少,提供方 位和安装灵活性
• 钣金结构增强耐用性和声学效果
• 令人耳目一新的用户界面包括更大 的液晶显示屏、图形显示器和直观 的菜单导航
• 远程打印机诊断允许您监控打印机 状态和对设置与固件进行远程配置
功能多变
P8000H 墨盒系列适应于几乎任何供 应链或后台办公环境。
• 更 多型号以满足您的独特需求,包 括新型桌面式和封闭型架式打印机
• U SB 2.0、串行 RS-232、并行和 Ethernet 连接作为标准功能
•高分辨率能力提供亚洲字体支持,改 善用户体验
可节省大量成本
购买 P8000H 墨盒打印机是明智 之举。
英寸(毫米)每秒
16 (406)
25 (635)
选项
标配
选项
有筐
无筐
35.9 英寸(911.8 毫米) 25.8 英寸(655.3 毫米) 29.1 英寸(739.1 毫米)
115 磅(52 千克) 160 磅(73 千克)
35.9 英寸(911.8 毫米) 25.8 英寸(655.3 毫米) 19.1 英寸(485.1 毫米)
P8000H
行式点阵 打印机
设计灵巧 | 功能多变 | 可节省大量成本
P8000H 墨盒打印机设计新颖,更便于使用, 运行成本更低廉
Printronix 的 P8000H 墨盒打印机系列通过增强设计和改进功能,实现了较之几乎其他任何印刷技术的最大灵活性、最大程 度兼容性和最低拥有成本。该系列产品的基础是 Printronix 行式点阵技术,可提供最长的正常运行时间、较低的拥有成本 和可靠的性能。对于寻求在各种运行环境下在不牺牲产出的可靠性的前提下而降低运营开支的买家而言,P8000H 系列产 品是非常理想的解决方案。
P8000H 封闭架式打印机内置配备了顶级 Printronix P8000H 柜式打印机的所有质量、可靠性和 性能,但其占用空间更小更紧凑。对于寻求适用于 有限办公空间的安静、灵活、可靠的架式打印机的
无 无
P8003H
P8006H
62
65
P8003H
P8006H
每分钟行数,双字节字符
177
315
195
348
221
390
258
460
340
603
367
655
英寸(毫米)每秒
16 (406)
25 (635)
P8000HZT 即撕即打式打印机是一款专业的墨 盒行式点阵打印机,适用于使用需要按需打印、
单页撕下功能的预印和序列化 文件的用户。即撕即打式打印 机的设计可以消除表格浪费, 降低运行成本。
• 行式点阵打印机在其整个使用寿命中通过耗材、包装和打印机硬件产生 的垃圾量非常少。
• 墨盒色带不会排放激光打印机产生的任何细微颗粒物。
汽车 运输
经销业 制造业
金融
P8000H
行式点阵 打印机
拥有新型 P8000H 桌面式行式点阵打印机,您便 拥有了迄今为止的最长正常运行时间和最低的总拥 有成本。其桌面式设计为工业印刷 环境提供了灵活性,如果您需要优 化空间和寻求便携性,则该产品是 业界最佳的解决方案。
作为该系列的旗舰产品,P8000H 机架式 打印机是一款可提供最长正常运行时间和 最低总拥有成本的可靠行式点阵打印机。 该产品体积小巧,可在工作环境中轻易移 动,且很容易 连接到您的网 络,即刻开始 印刷作业。
打印机柜式
标准功能和选项 集成式打印管理 色带寿命监视器 SureStak Power 堆叠器 黑色背页纸张输出传感器 后端滑出纸张抽屉 柜式前端纸张存取 超长纸扩展门 高后端纸架 低后端纸架 消音罩 规格 高 宽 深 打印机重量 装运打印机重量 环境噪声 噪声级别 (dBA)(参照 ISO 7779)
4 适用性
• 许 多独立软件供应商提供标签设计软件和 ERP 解决方案,其本身就支持 Printronix 的图形、文字和条码图像语言。
• 行式点阵打印在印刷多部分表格、超大媒体、标签、卡片纸和其他非典 型的媒体类型时仍然是最佳技术。
5 环保
• Printronix 行式点阵打印机在打印作业中的能耗为激光打印机的 1/3,在 待机模式下能耗为激光打印机的 1/7。
• 在所有印刷技术中拥有成本最低
• 耐用设计最大程度地减少不利环 境条件相关的停机时间
• 向后兼容墨盒色带降低库存管理 成本
• 节能技术降低闲置功耗,提高运 行效率
贵公司需要行式点阵打印机的
五大理由
在激光打印机维护费用昂贵的今天,在选择打印技术的 时候考虑使用最新的行式点阵墨盒打印不啻为明智之 举。Printronix 通过坚持不懈的创新,确保这项技术在当 今印刷技术应用中的竞争优势。以下是考虑使用最新一 代行式点阵墨盒打印机的五大理由。