Spring+JPA+Struts2整合
Struts2与Spring2、JPA、AJAX组合编程示例

Struts 2 + Spring 2 + JPA + AJAX本文示范如何在Eclipse中设置,并使之与Spring, Java Persistence API (using Hibernate) 以及Struts 2 Ajax 标签一起工作。
本例中Struts 2版本要求2.0.3以上。
前期准备•Tomcat•Eclipse•MySQL Server(MySQL licensing policy)TomcatInstall Tomcat before going forward. See Tomcat's installation guide if you have any problem installing it.MySql安装并配置MySql。
Create a database named "quickstart" and run the script below to create the "Person" table. Later, on applicationContext.xml, we'll use 'root' as the user name and password for the database, remember to replace those values with the right ones for your database.CREATE TABLE 'quickstart'.'Person' ('id' INTEGER UNSIGNED NOT NULL AUTO_INCREMENT,'firstName' VARCHAR(45) NOT NULL,'lastName' VARCHAR(45) NOT NULL,PRIMARY KEY('id'))ENGINE = InnoDB;获取源码Show me the codeYou can just download the zipped Eclipse project, add the required dependencies to the lib folder under the /WebContent/WEB-INF/lib folder (relative to project's root folder) and import it into Eclipse.Maven方式To run the project this way you will need maven installed.1Download the zipped project2Download jta jar from here.o Note that the Download Manager may save the file to your root drive, and it maygive the file a .ZIP extension. You must rename the file to jta-1.1-classes.jar.o If a later version is available, update the version references in the next step.3Install the jta jar file running:$ mvn install:install-file -DgroupId=javax.transaction -DartifactId=jta -Dversion=1.1 -Dpackaging=jar -Dfile=c:\path\to\jar\jta-1.1-classes.jar4Bear with me, we are almost there5cd into quickstart and run:$ mvn jetty:run6Point your browser to http://localhost:8080/quickstart7To create an eclipse project run:$ mvn eclipse:eclipseor (to create web project for WTP):mvn eclipse:eclipse -Dwtpversion=1.0从头开始创建创建Eclipse 项目1Open Eclipse. Seriously, you need to open Eclipse.2Click File -> New -> Project. Under the "Web" folder, select "Dynamic Web Project" and click "Next".3Enter the project name, "quickstart" from here on. The project will be running inside Tomcat, so we need to create a server configuration for it.4Under "Target Runtime", click "New", select "Apache Tomcat 5.5" and click next.5Enter Tomcat's installation directory and select an installed JRE (1.5 is required)6Now you should be back to the project creation wizard, with Tomcat as your Target Runtime. Click "Next". Select "Dynamic Web Module" and "Java" facets, and click "Finish".依赖性Your project should contain the folders "src", "build" and "WebContent". We are going to put all the required jars under "/WebContent/WEB-INF/lib". To add files to the "lib" folder, just copy them to ${workspace}\quickstart\WebContent\WEB-INF\lib, where ${workspace} is the location of your Eclipse workspace folder.In the table, the version has been removed from the JAR files, since these may change in future milestone releases. Use whatever version is shipping with the indicated products.JAR From Licensexwork.jar Struts 2Apache Licensestruts2-core.jar Struts 2struts2-spring-plugin.jar Struts 2ognl.jar Struts 2freemarker.jar Struts 2commons-logging-api.jar Struts 2mysql-connector-java.jar MySql JDBC Driver MySQL licensing policy spring.jar Spring 2.0Apache Licenseantlr.jar Hibernate Core LGPLasm.jar Hibernate Coreasm-attrs.jar Hibernate Corecglib.jar Hibernate Coredom4j.jar Hibernate Corejdbc2_0-stdext.jar Hibernate Coreehcache.jar Hibernate Corehibernate3.jar Hibernate Corexml-apis.jar Hibernate Corecommons-collections.jar Hibernate Coreejb3-persistence.jar Hibernate Annotations LGPLjta.jar Hibernate Annotationshibernate-commons-annotations.jHibernate Annotationsarhibernate-annotations.jar Hibernate Annotationshibernate-entitymanager.jar Hibernate Entity Manager LGPLjavassist.jar Hibernate Entity Managerjboss-archive-browsing.jar Hibernate Entity ManagerRight click on the project and select "Refresh" (to notify Eclipse of the jars that we just added).域Our domain model will consist of just a simple "Person" class with a couple of fields.1Create a new class named "Person" (File -> New -> Class), and enter "quickstart.model"for the package name.2Add the fields "id" (int), "firstName" (String), and lastName ("String") with their setter/getter methods.3Mark your class with the "@Entity" annotation, and the "id" field with the annotations "@Id" and "@GeneratedValue".your class will look like:Person.javapackage quickstart.model;。
strut2和spring整合

1.将struts2-spring-plugin-2.0.8.jar文件包含到我们的应用中,放到WEB-INF/lib目录下面即可。
在这个插件包中有个struts-plugin.xml文件,它的内容如下:<struts><bean type="com.opensymphony.xwork2.ObjectFactory" name="spring"class="org.apache.struts2.spring.StrutsSpringObjectFactory" /><constant name="struts.objectFactory" value="spring" /><package name="spring-default"><interceptors><interceptor name="autowiring"class="com.opensymphony.xwork2.spring.interceptor.ActionAutowiringInterceptor" /><interceptor name="sessionAutowiring"class="org.apache.struts2.spring.interceptor.SessionContextAutowiringIntercep tor"/></interceptors></package></struts>这里它将框架常量struts.objectFactory覆盖了,设置为”spring”,其实这里是使用了缩写,我们可以写全称:org.apache.struts2.spring.StrutsSpringObjectFactory。
Spring和struts整合的3种方式

Spring 和struts 整合的三种方式。
1,使用Spring 的ActionSupport2, 使用Spring 的DelegatingRequestProcessor 类。
3,全权委托。
无论用那种方法来整合第一步就是要为struts来装载spring的应用环境。
就是在struts 中加入一个插件。
struts-config.xml中<plug-in className="org.springframework.web.struts.ContextLoaderPlugIn"><set-property property="contextConfigLocation" value="/WEB-INF/applicationContext.xml"/> </plug-in>spring 的配置文件被作为参数配置进来。
这样可以省略对web.xml 文件中的配置。
确保你的applicationContext.xml 在WEB-INF目录下面1,使用Spring的ActionSupport .Spring 的ActionSupport 继承至org.apache.struts.action.ActionActionSupport的子类可以或得WebApplicationContext类型的全局变量。
通过getWebApplicationContext()可以获得这个变量。
这是一个servlet 的代码:public class LoginAction extends org.springframework.web.struts.ActionSupport {public ActionForward execute(ActionMapping mapping, ActionForm form,HttpServletRequest request, HttpServletResponse response) {LoginForm loginForm = (LoginForm) form;// TODO Auto-generated method stub//获得WebApplicationContext 对象WebApplicationContext ctx = this.getWebApplicationContext();LoginDao dao = (LoginDao) ctx.getBean("loginDao");User u = new User();u.setName(loginForm.getName());u.setPwd(loginForm.getPwd());if(dao.checkLogin(u)){return mapping.findForward("success");}else{return mapping.findForward("error");}}}applicationContext.xml 中的配置<beans><bean id="loginDao" class="com.cao.dao.LoginDao"/></beans>这种配置方式同直接在web.xml文件配置差别不大。
Spring+Struts2整合
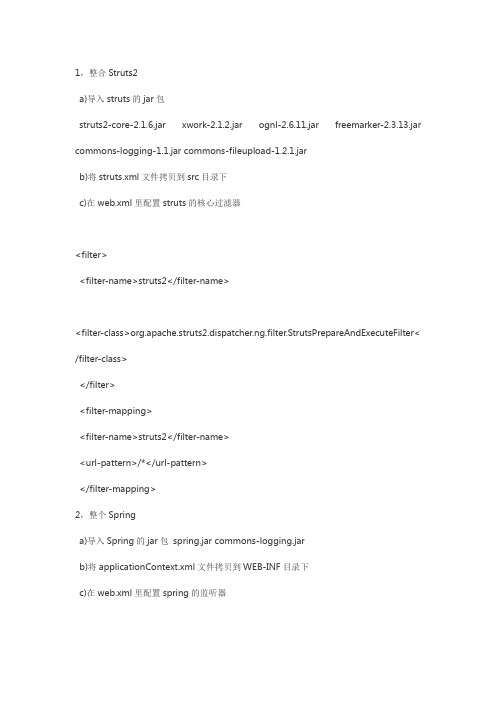
1,整合Struts2a)导入struts的jar包struts2-core-2.1.6.jar xwork-2.1.2.jar ognl-2.6.11.jar freemarker-2.3.13.jar commons-logging-1.1.jar commons-fileupload-1.2.1.jarb)将struts.xml文件拷贝到src目录下c)在web.xml里配置struts的核心过滤器<filter><filter-name>struts2</filter-name><filter-class>org.apache.struts2.dispatcher.ng.filter.StrutsPrepareAndExecuteFilter< /filter-class></filter><filter-mapping><filter-name>struts2</filter-name><url-pattern>/*</url-pattern></filter-mapping>2,整个Springa)导入Spring的jar包spring.jar commons-logging.jarb)将applicationContext.xml文件拷贝到WEB-INF目录下c)在web.xml里配置spring的监听器< !-- 配置spring监听器--><listener><listener-class>org.springframework.web.context.ContextLoaderListener</listener -class></listener>d)添加spring与struts2整合的插件struts2-spring-plugin-2.1.6.jar3,编写代码测试登录页面login.jsp< body><form action="login" method="post">USERNAME:<input type="text" name="username" /><br>PASSWORD:<input type="password" name="password" /><br><input type="submit" value="登录"></form></body>登录成功页面success.jsp< body>登录成功!</body>LoginDao业务接口package com.itmyhome.actioin;interface LoginDao {public boolean login(String username,String password);}LoginDaoImpl业务接口实现package com.itmyhome.actioin;public class LoginDaoImpl implements LoginDao {public boolean login(String username, String password) {// TODO Auto-generated method stubif("zhangsan".equals(username)&&"123".equals(password)){ return true;}else{return false;}}}LoginActionpackage com.itmyhome.actioin;import com.opensymphony.xwork2.ActionSupport;public class LoginAction extends ActionSupport { private String username;private String password;private LoginDao loginDao; //此DAO交给spring来处理public String execute(){if(loginDao.login(username, password)){return "success";}else{return "input";}}public String getUsername() {return username;}public void setUsername(String username) { ername = username;}public String getPassword() {return password;}public void setPassword(String password) { this.password = password;}public LoginDao getLoginDao() {return loginDao;}public void setLoginDao(LoginDao loginDao) {this.loginDao = loginDao;}}struts.xml配置文件< ?xml version="1.0" encoding="UTF-8" ?>< !DOCTYPE struts PUBLIC"-//Apache Software Foundation//DTD Struts Configuration 2.0//EN" "/dtds/struts-2.0.dtd">< struts><package name="default" namespace="/" extends="struts-default"> <action name="login" class="com.itmyhome.actioin.LoginAction"> <result name="success">/success.jsp</result><result name="input">/login.jsp</result></action></package><!-- Add packages here -->< /struts>applicationContext.xml配置文件<bean id="loginDao" class="com.itmyhome.actioin.LoginDaoImpl" />< !-- 可注释--><bean id="loginAction" class="com.itmyhome.actioin.LoginAction"> <property name="loginDao" ref="loginDao" />< /bean>部署,启动tomcat 输入"zhangsan","123" 跳转到success.jsp 整合成功摘自itmyhome的专栏。
struts2与Spring集成步骤
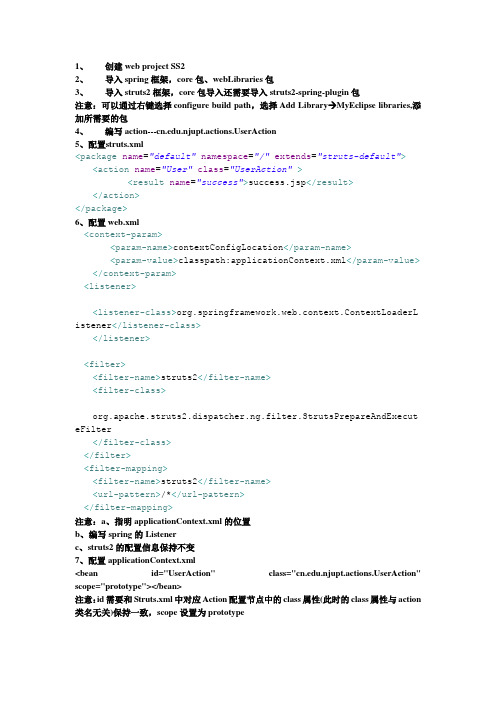
1、创建web project SS22、导入spring框架,core包、webLibraries包3、导入struts2框架,core包导入还需要导入struts2-spring-plugin包注意:可以通过右键选择configure build path,选择Add Library MyEclipse libraries,添加所需要的包4、编写erAction5、配置struts.xml<package name="default"namespace="/"extends="struts-default"> <action name="User"class="UserAction"><result name="success">success.jsp</result></action></package>6、配置web.xml<context-param><param-name>contextConfigLocation</param-name><param-value>classpath:applicationContext.xml</param-value> </context-param><listener><listener-class>org.springframework.web.context.ContextLoaderL istener</listener-class></listener><filter><filter-name>struts2</filter-name><filter-class>org.apache.struts2.dispatcher.ng.filter.StrutsPrepareAndExecut eFilter</filter-class></filter><filter-mapping><filter-name>struts2</filter-name><url-pattern>/*</url-pattern></filter-mapping>注意:a、指明applicationContext.xml的位置b、编写spring的Listenerc、struts2的配置信息保持不变7、配置applicationContext.xml<bean id="UserAction" class="erAction" scope="prototype"></bean>注意:id需要和Struts.xml中对应Action配置节点中的class属性(此时的class属性与action 类名无关)保持一致,scope设置为prototype。
整合Spring与Struts2

整合Spring与Struts2(java私塾)15.2 整合Spring与Struts215.2.1概述以上面的示例来说明整合Spring和Struts2的基本方式:∙SampleAction与SampleService的生命周期和依赖关系都由Spring去管理。
∙Struts2需要SampleAction实例的时候,不是自己新建实例,而是向Spring去请求获取一个实例,也就是SampleAction实例的生命周期也由Spring来管理接下来就来具体看看怎么整合Spring与Struts2。
15.2.2拷入jar包要整合Spring和Struts2,需要先要拷入Spring需要的jar包,既包括Spring本身的jar包,也包括Struts2的Spring插件。
找到下载的Struts2的资源包中的lib文件夹,也就是struts-2.1.8.1\lib,将以下几个jar 包拷入到我们的web工程的WEB-INF\lib中:spring-beans-2.5.6.jar、spring-context-2.5.6.jar、spring-core-2.5.6.jar、spring-test-2.5.6.jar、spring-web-2.5.6.jar、struts2-spring-plugin-2.1.8.1.jar、commons-logging-1.0.4.jar、struts2-spring-plugin-2.1.8.1.jar。
15.2.3改写SampleAction由于现在和Spring结合了,可以由Spring为Action注入Action需要的SampleService 的实例,也就是SampleAction引用SampleService的方式需要改变,其他的没有变化,示例代码如下:java代码:查看复制到剪贴板打印1.public class SampleAction extends ActionSupport{2.//通过setter方式,由Spring来注入SampleService实例3.private SampleService service;4.public void setService(SampleService service) {5.this.service = service;6. }7.private String name;8.private String userId;9.public String getName() {10.return name;11. }12.public void setName(String name) { = name;14. }15.public String getUserId() {16.return userId;17. }18.public void setUserId(String userId) {erId = userId;20. }21.22.public String execute() throws Exception {23. name = this.service.getNameById(userId);24.return SUCCESS;25. }26.}在execute方法中不再直接新建SampleServiceImpl的实例了,而是声明了一个SampleSerivce 类型的属性,并提供对应的setter方法,这个setter方法是留给Spring注入对象实例的时候调用的,可以不用提供getter方法。
struts2+spring+hibernate整合步骤
引用struts2、hibernate、spring所需jar包struts-core-2.x.x.jar ----struts核心包xwork-core-2.x.x.jar -----身体ruts在其撒很难过构建ognl-2.6.x.jar ----对象导航语言freemarker-2.3.x.jar ------struts2的ui标签的模板使用commons-fileupload-1.2.x.jar ----文件上传组件 2.1.6版本后需加入此文件struts-spring-plugin-2.x.x.jar ---用于struts2继承spring的插件hibernate核心安装包下的(下载路径:/ ,点击Hibernate Core 右边的download)hibernate2.jarlib\bytecode\hibernate-cglib-repack-2.1_3.jarlib\required\*.jarhibernate安装包下的(下载路径:/;点击Hibernate Annotations 右边的下载)hibernate-annotations.jarlib\ejb3-persistence.jar、hibernate-commons-annotations.jar hibernate针对JPA的实现包(下载路径:/ ,点击Hibernate Entitymanager右边下载)hibernate-entitymanager.jarlib\test\log4j.jar、 slf4j-log4j12.jarspring安装包下的dist\spring.jarlib\c3p0\c3p0-0.9.1.2.jarlib\aspecti\aspectjweaver.jaraspectjrt.jarlib\colib\cglib-nodep-2.1_3.jarlib\j2ee\common-annotations.jarvlib\log4j\log4j-1.2.15.jarlib\jakarta-commons\commons_loggin.jar数据库驱动包引用创建mysql数据库ssh 设置编码为utf-8 语句:create database ssh character set 'utf8' collate 'utf8_general_ci'引用1.先整合spring和hibernate*将spring和hibernate的jar包放入lib下;*创建spring的beans.xml配置文件Java代码1.<?xml version="1.0" encoding="UTF-8"?>2.<beans xmlns="/schema/beans"3. xmlns:xsi="/2001/XMLSchema-instance"xmlns:context="/schema/context"4. xmlns:aop="/schema/aop"xmlns:tx="/schema/tx"5. xsi:schemaLocation="/schema/beans6./schema/beans/spring-beans-2.5.xsd7. /schema/context8./schema/context/spring-context-2.5.xsd 9. /schema/aop/schema/aop/spring-aop-2.5.xsd10. /schema/tx/schema/tx/spring-tx-2.5.xsd">11.12. <!-- 将bean交由spring管理可以用<bean></bean>和扫描加注 -->13. <!--14. 扫描该包及该包下的子包15. -->16. <context:component-scanbase-package="com.yss"></context:component-scan>17.18.19. <!-- 集成hibernate sessionFactory单例模式线程安全创建耗内存-->20. <!-- 将hibernate的事务也交由spring管理 -->21. <bean id="dataSource"class="boPooledDataSource"22. destroy-method="close">23. <property name="driverClass"value="org.gjt.mm.mysql.Driver" />24. <property name="jdbcUrl"25.value="jdbc:mysql://localhost:3306/ssh?useUnicode=true&characterE ncoding=UTF-8" />26. <property name="user" value="root" />27. <property name="password" value="root" />28. <!--初始化时获取的连接数,取值应在minPoolSize与maxPoolSize 之间。
Struts2.1+Spring3.0+JPA1.0(Hibernate3.3实现)例子
Struts2.1+Spring3.0+JPA1.0(Hibernate3.3实现)例子文章分类:Java编程本文代码是传智播客黎活明老师所讲的《Spring2.5视频教程》各种示例的综合,在此把所有框架升级到最新版本整合一下。
/blog/582117所用jar包:Struts:struts-2.1.8.1\lib下除了各种plugin(保留struts2-spring-plugin-2.1.8.1.jar)的所有文件Spring:spring-framework-3.0.0.RELEASE\dist下的所有文件Hibernate:hibernate-distribution-3.3.2.GA下的hibernate3.jar\lib\bytecode\cglib下的cglib-2.2.jar\lib\optional\ehcache下的ehcache-1.2.3.jar\lib\required下的所有文件hibernate-annotations-3.4.0.GA下的hibernate-annotations.jar\lib下的ejb3-persistence.jar,hibernate-commons-annotations.jar hibernate-entitymanager-3.4.0.GA下的hibernate-entitymanager.jar \lib\test下的log4j.jar,slf4j-log4j12.jarMySQL:mysql-connector-java-5.1.10-bin.jarJUnit:4JDK:jdk-6u14-windows-i586.exeTomcat:apache-tomcat-6.0.18.zip项目名:testPerson.javaJava代码package com.test.bean;import java.io.Serializable;import javax.persistence.Column;import javax.persistence.Entity;import javax.persistence.GeneratedValue;import javax.persistence.Id;@Entitypublic class Person implements Serializable {private Integer id;private String name;public Person(){}public Person(String name){ = name;}@Id @GeneratedValuepublic Integer getId() {return id;}public void setId(Integer id) {this.id = id;}@Column(length=10,nullable=false)public String getName() {return name;}public void setName(String name) { = name;}@Overridepublic int hashCode() {final int prime = 31;int result = 1;result = prime * result + ((id == null) ? 0 : id.hashCode());return result;}@Overridepublic boolean equals(Object obj) {if (this == obj)return true;if (obj == null)return false;if (getClass() != obj.getClass())return false;final Person other = (Person) obj;if (id == null) {if (other.id != null)return false;} else if (!id.equals(other.id))return false;return true;}}package com.test.bean;import java.io.Serializable;import javax.persistence.Column;import javax.persistence.Entity;import javax.persistence.GeneratedValue; import javax.persistence.Id;@Entitypublic class Person implements Serializable { private Integer id;private String name;public Person(){}public Person(String name){ = name;}@Id @GeneratedValuepublic Integer getId() {return id;}public void setId(Integer id) {this.id = id;}@Column(length=10,nullable=false)public String getName() {return name;}public void setName(String name) { = name;}@Overridepublic int hashCode() {final int prime = 31;int result = 1;result = prime * result + ((id == null) ? 0 : id.hashCode());return result;}@Overridepublic boolean equals(Object obj) {if (this == obj)return true;if (obj == null)return false;if (getClass() != obj.getClass())return false;final Person other = (Person) obj;if (id == null) {if (other.id != null)return false;} else if (!id.equals(other.id))return false;return true;}} PersonService.javaJava代码package com.test.service;import com.test.bean.Person;public interface PersonService {public void save(Person person);public void update(Person person);public void delete(Integer personid);public Person getPerson(Integer personid);@SuppressWarnings("unchecked")public List<Person> getPersons();}package com.test.service;import java.util.List;import com.test.bean.Person;public interface PersonService {public void save(Person person);public void update(Person person);public void delete(Integer personid);public Person getPerson(Integer personid);@SuppressWarnings("unchecked")public List<Person> getPersons();} PersonServiceBean.javaJava代码package com.test.service.impl;import javax.persistence.EntityManager;import javax.persistence.PersistenceContext;import org.hibernate.exception.SQLGrammarException;import org.springframework.transaction.annotation.Propagation; import org.springframework.transaction.annotation.Transactional; import com.test.bean.Person;import com.test.service.PersonService;@Transactionalpublic class PersonServiceBean implements PersonService { @PersistenceContext EntityManager em;public void delete(Integer personid) {em.remove(em.getReference(Person.class, personid));}@Transactional(propagation = Propagation.NOT_SUPPORTED, readOnly = true)public Person getPerson(Integer personid) {return em.find(Person.class, personid);}@Transactional(propagation = Propagation.NOT_SUPPORTED, readOnly = true)@SuppressWarnings("unchecked")public List<Person> getPersons() throws SQLGrammarException {return em.createQuery("select o from Person o").getResultList();}public void save(Person person) {em.persist(person);}public void update(Person person) {em.merge(person);}}package com.test.service.impl;import java.util.List;import javax.persistence.EntityManager;import javax.persistence.PersistenceContext;import org.hibernate.exception.SQLGrammarException;import org.springframework.transaction.annotation.Propagation; import org.springframework.transaction.annotation.Transactional; import com.test.bean.Person;import com.test.service.PersonService;@Transactionalpublic class PersonServiceBean implements PersonService { @PersistenceContext EntityManager em;public void delete(Integer personid) {em.remove(em.getReference(Person.class, personid));}@Transactional(propagation = Propagation.NOT_SUPPORTED, readOnly = true)public Person getPerson(Integer personid) {return em.find(Person.class, personid);}@Transactional(propagation = Propagation.NOT_SUPPORTED, readOnly = true)@SuppressWarnings("unchecked")public List<Person> getPersons() throws SQLGrammarException {return em.createQuery("select o from Persono").getResultList();}public void save(Person person) {em.persist(person);}public void update(Person person) {em.merge(person);}} PersonAction.javaJava代码package com.test.web.action;import java.util.List;import javax.annotation.Resource;import com.test.bean.Person;import com.test.service.PersonService;public class PersonAction {@Resource PersonService personService;private String message;private List<Person> persons;private Person person;public Person getPerson() {return person;}public void setPerson(Person person) { this.person = person;}/*** 人员列表显示*/public String list(){this.persons = personService.getPersons();return "list";}/*** 人员添加界面*/public String addUI(){return "add";}/*** 人员添加*/public String add(){this.personService.save(this.person);this.message="添加成功";return "message";}public List<Person> getPersons() {return persons;}public void setPersons(List<Person> persons) { this.persons = persons;}public String getMessage() {return message;}public void setMessage(String message) {this.message = message;}}package com.test.web.action;import java.util.List;import javax.annotation.Resource;import com.test.bean.Person;import com.test.service.PersonService;public class PersonAction {@Resource PersonService personService;private String message;private List<Person> persons;private Person person;public Person getPerson() {return person;}public void setPerson(Person person) {this.person = person;}/*** 人员列表显示*/public String list(){this.persons = personService.getPersons();return "list";}/*** 人员添加界面*/public String addUI(){return "add";}/*** 人员添加*/public String add(){this.personService.save(this.person);this.message="添加成功";return "message";}public List<Person> getPersons() {return persons;}public void setPersons(List<Person> persons) {this.persons = persons;}public String getMessage() {return message;}public void setMessage(String message) {this.message = message;}}PersonServiceTest.javaJava代码package junit.test;import java.util.List;import org.junit.BeforeClass;import org.junit.Test;import org.springframework.context.ApplicationContext;importorg.springframework.context.support.ClassPathXmlApplicationConte xt;import com.test.bean.Person;import com.test.service.PersonService;public class PersonServiceTest {private static PersonService personService;@BeforeClasspublic static void setUpBeforeClass() throws Exception { try {ApplicationContext applicationContext = new ClassPathXmlApplicationContext("beans.xml");personService = (PersonService) applicationContext.getBean("personService");} catch (RuntimeException e) {e.printStackTrace();}}@Testpublic void testSave() {personService.save(new Person("小张"));}@Testpublic void testUpdate() {Person person = personService.getPerson(1);person.setName("小丽");personService.update(person);}@Testpublic void testGetPerson() {Person person = personService.getPerson(2);System.out.println(person.getName());try {System.out.println("请关闭数据库");Thread.sleep(1000 * 15);} catch (InterruptedException e) {e.printStackTrace();}System.out.println("第二次开始获取");person = personService.getPerson(2);System.out.println(person.getName());}@Testpublic void testDelete() {personService.delete(1);}@Testpublic void testGetPersons() {List<Person> persons = personService.getPersons();for (Person person : persons) {System.out.println(person.getName());}}}package junit.test;import java.util.List;import org.junit.BeforeClass;import org.junit.Test;import org.springframework.context.ApplicationContext;importorg.springframework.context.support.ClassPathXmlApplicationConte xt;import com.test.bean.Person;import com.test.service.PersonService;public class PersonServiceTest {private static PersonService personService;@BeforeClasspublic static void setUpBeforeClass() throws Exception { try {ApplicationContext applicationContext = new ClassPathXmlApplicationContext("beans.xml");personService = (PersonService) applicationContext.getBean("personService");} catch (RuntimeException e) {e.printStackTrace();}}@Testpublic void testSave() {personService.save(new Person("小张"));}@Testpublic void testUpdate() {Person person = personService.getPerson(1);person.setName("小丽");personService.update(person);@Testpublic void testGetPerson() {Person person = personService.getPerson(2);System.out.println(person.getName());try {System.out.println("请关闭数据库");Thread.sleep(1000 * 15);} catch (InterruptedException e) {e.printStackTrace();}System.out.println("第二次开始获取");person = personService.getPerson(2);System.out.println(person.getName());}@Testpublic void testDelete() {personService.delete(1);}@Testpublic void testGetPersons() {List<Person> persons = personService.getPersons();for (Person person : persons) {System.out.println(person.getName());}}} META-INF\persistence.xmlXml代码<?xml version="1.0" encoding="UTF-8"?><persistence xmlns="/xml/ns/persistence" xmlns:xsi="/2001/XMLSchema-instance"xsi:schemaLocation="/xml/ns/persistence/xml/ns/persistence/persistence_1_0.xsd"version="1.0"><persistence-unit name="test" transaction-type="RESOURCE_LOCAL"><properties><!-- 数据库方言--><property name="hibernate.dialect" value="org.hibernate.dialect.MySQL5Dialect"/><!-- 数据库驱动--><property name="hibernate.connection.driver_class" value="org.gjt.mm.mysql.Driver"/><!-- 数据库用户名--><property name="ername" value="root"/><!-- 数据库密码--><property name="hibernate.connection.password" value="1234"/><!-- 数据库连接URL --><property name="hibernate.connection.url" value="jdbc:mysql://localhost:3306/test?useUnicode=true&char acterEncoding=UTF-8"/><!-- 最大抓取深度--><property name="hibernate.max_fetch_depth" value="3"/><!-- 更新方式创建库表--><property name="hibernate.hbm2ddl.auto" value="update"/><!-- 显示SQL --><property name="hibernate.show_sql" value="true"/><!-- 格式SQL --><property name="hibernate.format_sql" value="true"/><!-- 使用二级缓存--><property name="e_second_level_cache" value="true"/><property name="e_query_cache" value="false"/><property name="hibernate.cache.provider_class" value="org.hibernate.cache.EhCacheProvider"/></properties></persistence-unit></persistence><?xml version="1.0" encoding="UTF-8"?><persistence xmlns="/xml/ns/persistence" xmlns:xsi="/2001/XMLSchema-instance"xsi:schemaLocation="/xml/ns/persistence/xml/ns/persistence/persistence_1_0.xsd"version="1.0"><persistence-unit name="test" transaction-type="RESOURCE_LOCAL"><properties><!-- 数据库方言--><property name="hibernate.dialect" value="org.hibernate.dialect.MySQL5Dialect"/><!-- 数据库驱动--><property name="hibernate.connection.driver_class" value="org.gjt.mm.mysql.Driver"/><!-- 数据库用户名--><property name="ername" value="root"/><!-- 数据库密码--><property name="hibernate.connection.password" value="1234"/><!-- 数据库连接URL --><property name="hibernate.connection.url" value="jdbc:mysql://localhost:3306/test?useUnicode=true&char acterEncoding=UTF-8"/><!-- 最大抓取深度--><property name="hibernate.max_fetch_depth" value="3"/><!-- 更新方式创建库表--><property name="hibernate.hbm2ddl.auto" value="update"/><!-- 显示SQL --><property name="hibernate.show_sql" value="true"/><!-- 格式SQL --><property name="hibernate.format_sql" value="true"/><!-- 使用二级缓存--><property name="e_second_level_cache" value="true"/><property name="e_query_cache" value="false"/><property name="hibernate.cache.provider_class" value="org.hibernate.cache.EhCacheProvider"/></properties></persistence-unit></persistence> src\beans.xmlXml代码<?xml version="1.0" encoding="UTF-8"?><beans xmlns="/schema/beans"xmlns:xsi="/2001/XMLSchema-instance" xmlns:context="/schema/context"xmlns:aop="/schema/aop"xmlns:tx="/schema/tx"xsi:schemaLocation="/schema/beans /schema/beans/spring-beans-3.0.xsd /schema/context/schema/context/spring-context-3.0.x sd/schema/aop/schema/aop/spring-aop-3.0.xsd /schema/tx/schema/tx/spring-tx-3.0.xsd"> <context:annotation-config/><bean id="entityManagerFactory" class="org.springframework.orm.jpa.LocalEntityManagerFactoryBea n"><property name="persistenceUnitName" value="test"/></bean><bean id="txManager" class="org.springframework.orm.jpa.JpaTransactionManager"> <property name="entityManagerFactory" ref="entityManagerFactory"/></bean><tx:annotation-driven transaction-manager="txManager"/><bean id="personService" class="com.test.service.impl.PersonServiceBean"/><bean id="personAction" scope="prototype" class="com.test.web.action.PersonAction" /></beans><?xml version="1.0" encoding="UTF-8"?><beans xmlns="/schema/beans"xmlns:xsi="/2001/XMLSchema-instance" xmlns:context="/schema/context"xmlns:aop="/schema/aop"xmlns:tx="/schema/tx"xsi:schemaLocation="/schema/beans /schema/beans/spring-beans-3.0.xsd /schema/context/schema/context/spring-context-3.0.x sd/schema/aop/schema/aop/spring-aop-3.0.xsd /schema/tx/schema/tx/spring-tx-3.0.xsd"> <context:annotation-config/><bean id="entityManagerFactory" class="org.springframework.orm.jpa.LocalEntityManagerFactoryBea n"><property name="persistenceUnitName" value="test"/></bean><bean id="txManager" class="org.springframework.orm.jpa.JpaTransactionManager"> <property name="entityManagerFactory" ref="entityManagerFactory"/></bean><tx:annotation-driven transaction-manager="txManager"/><bean id="personService" class="com.test.service.impl.PersonServiceBean"/><bean id="personAction" scope="prototype" class="com.test.web.action.PersonAction" /></beans> src\ehcache.xmlXml代码<?xml version="1.0" encoding="UTF-8"?><!--defaultCache节点为缺省的缓存策略maxElementsInMemory 内存中最大允许存在的对象数量eternal 设置缓存中的对象是否永远不过期overflowToDisk 把溢出的对象存放到硬盘上timeToIdleSeconds 指定缓存对象空闲多长时间就过期,过期的对象会被清除掉timeToLiveSeconds 指定缓存对象总的存活时间diskPersistent 当jvm结束是是否持久化对象diskExpiryThreadIntervalSeconds 指定专门用于清除过期对象的监听线程的轮询时间--><ehcache><diskStore path="C:\cache"/><defaultCache maxElementsInMemory="1000" eternal="false" overflowToDisk="true"timeToIdleSeconds="120"timeToLiveSeconds="180"diskPersistent="false"diskExpiryThreadIntervalSeconds="60"/><cache name="com.test.bean.Person" maxElementsInMemory="100" eternal="false"overflowToDisk="true" timeToIdleSeconds="300" timeToLiveSeconds="600" diskPersistent="false"/></ehcache><?xml version="1.0" encoding="UTF-8"?><!--defaultCache节点为缺省的缓存策略maxElementsInMemory 内存中最大允许存在的对象数量eternal 设置缓存中的对象是否永远不过期overflowToDisk 把溢出的对象存放到硬盘上timeToIdleSeconds 指定缓存对象空闲多长时间就过期,过期的对象会被清除掉timeToLiveSeconds 指定缓存对象总的存活时间diskPersistent 当jvm结束是是否持久化对象diskExpiryThreadIntervalSeconds 指定专门用于清除过期对象的监听线程的轮询时间--><ehcache><diskStore path="C:\cache"/><defaultCache maxElementsInMemory="1000" eternal="false" overflowToDisk="true"timeToIdleSeconds="120"timeToLiveSeconds="180"diskPersistent="false"diskExpiryThreadIntervalSeconds="60"/><cache name="com.test.bean.Person" maxElementsInMemory="100" eternal="false"overflowToDisk="true" timeToIdleSeconds="300" timeToLiveSeconds="600" diskPersistent="false"/></ehcache>src\struts.xmlXml代码<?xml version="1.0" encoding="UTF-8"?><!DOCTYPE struts PUBLIC"-//Apache Software Foundation//DTD Struts Configuration 2.1//EN""/dtds/struts-2.1.dtd"><struts><!-- 指定Web应用的默认编码集,相当于调用HttpServletRequest的setCharacterEncoding方法--><constant name="struts.i18n.encoding" value="UTF-8"/><!-- 该属性指定需要Struts 2处理的请求后缀,该属性的默认值是action,即所有匹配*.action的请求都由Struts2处理。
struts2+hibernate+spring经典整合实例教程
Struts2与Spring、Hibernate三者整合的过程示例:示例工具:MyEclipse 7.0、Tomcat 6.0、MySql步骤:1.创建一个WEB工程,命名为BookShop(名字自己取,此处为示例工程名);2.导入struts2的核心jar包,也就是在WEB-INF下的lib文件夹中放入jar包文件,如下图(图中jar包为示例版本):3.加载spring,选中工程名,右击并选择【MyEclipse】选项下的【Add Spring Capabilities...】(或者在工具栏中选择【MyEclipse】下的【Add Spring Capabilities...】),在弹出的对话框中进行如下图所示操作:点击【Next】,点击Folder文本框后的【Browse】,在弹出对话框中选择spring配置文件存储位置为WEB-INF 文件夹,如下图所示:点击【OK】后,再点击【Finish】完成。
至此,已经完成加载spring,在WEB-INF文件夹下已经生成了配置文件applicationContext.xml。
4.加载Hibernate,选择【MyEclipse】下的【Add Hibernate Capabilities...】,在弹出对话框中进行如下图所示操作:点击【Next】后,选择Existing Spring configuration file单选框,在SessionFactory Id文本框中填入"sessionFactory",如下图所示:点击【Next】,进行如下图所示操作:该操作中,只需在Bean Id文本框中输入一个Id名,作为数据库源的代用名,意义不大。
然后在DB Driver 下拉列表中,选择MyEclipse中创建好的数据库源xiaoqi,其他信息将自动填写。
点击【Next】,在弹出对话框中去掉Create SessionFactory class?复选框,不创建该类,点击【Finish】完成(创建过程中,加载的jar包文件可能有重复,所以这个时候如果提示有某些jar包重复,问全部保存【Keep Exiting】,还是替换掉【Replace】,可以选择替换掉【Replace】)。
Spring、hibernate和Struts2的整合
• 加载配置:在web.xml的<webapp></web-app>之间添加以下配置:
③编写持久化类Person.java:
③编写映射文件Person.hbm.xml :
④创建Dao接口:
④创建Dao实现类:
⑤创建业务接口:
⑤创建业务类:
⑥创建动作类 :
⑦创建Spring配置文件 :
19.2 整合示例
• ①新建一个Struts2项目,同时将Struts2类包下的 lib\struts2-spring-plugin-2.2.1.1.jar添加到项 目中 • ②为项目添加hibernate、Spring支持以及数据库驱 程 • ③创建持久化类及其映射文件 • ④创建DAO接口及其实现类 • ⑤创建业务接口及其实现类 • ⑥创建动作类,在其中调用业务Bean中的业务方法 • ⑦在src目录下新建一个Spring的配置文件,在其中定 义数据源、SessionFactory、业务、action等Bean • ⑧编写struts.xml文件 • ⑨修改web.xml,在其中配置struts2过滤器和 Spring的配置文件 • ⑩编写客户端JSP文件
定义动作 Bb.xml:
⑩编写jsp页面:
企业级JAVA II
第19讲 Spring、Hibernate 和Struts2的整合
• 19.1 整合语法
• 19.2 整合示例
19.1 整合语法
• ①在web.xml中配置
ApplicationContext.xml,并使用 ContextLoader监听器实例化spring容 器
• ② 在struts.xml中配置 struts.objectFactory常量值为spring • ③把action交给spring管理,即在spring配 置文件中定义action Bean并使用依赖注入功 能在action中注入业务Bean • ④在struts.xml中的class使用第③步中所 定义的action Bean 的id属性值
- 1、下载文档前请自行甄别文档内容的完整性,平台不提供额外的编辑、内容补充、找答案等附加服务。
- 2、"仅部分预览"的文档,不可在线预览部分如存在完整性等问题,可反馈申请退款(可完整预览的文档不适用该条件!)。
- 3、如文档侵犯您的权益,请联系客服反馈,我们会尽快为您处理(人工客服工作时间:9:00-18:30)。
Spring+JPA+Struts2整合Person类代码package quickstart.model;import javax.persistence.Entity;import javax.persistence.GeneratedValue;import javax.persistence.Id;@Entitypublic class Person {@Id@GeneratedValueprivate Integer id;private String lastName;private String firstName;public String getFirstName() {return firstName;}public void setFirstName(String firstName) {this.firstName = firstName;} public String getLastName() {return lastName;} public void setLastName(String lastName) {stName = lastName;} public Integer getId() {return id;} public void setId(Integer id) {this.id = id;}}创建一个接口,命名为"PersonService",包名为"quickstart.service" PersonService.java package quickstart.service;import java.util.List;import quickstart.model.Person;public interface PersonService {public List<Person> findAll();public void save(Person person);public void remove(int id);public Person find(int id); }创建一个类,命名为"PersonServiceImpl",包名为"quickstart.service"PersonServiceImpl.java package quickstart.service;import java.util.List;import javax.persistence.EntityManager;import javax.persistence.PersistenceContext;import javax.persistence.Query;import org.springframework.transaction.annotation.Transactional;import quickstart.model.Person;@Transactionalpublic class PersonServiceImpl implements PersonService {private EntityManager em;@PersistenceContextpublic void setEntityManager(EntityManager em) {this.em = em;}@SuppressWarnings("unchecked")public List<Person> findAll() {Query query = getEntityManager().createQuery("select p FROM Person p");return query.getResultList();}public void save(Person person) {if (person.getId() == null) {// new em.persist(person);} else {// update em.merge(person); }}public void remove(int id) {Person person = find(id);if (person != null) {em.remove(person);}}private EntityManager getEntityManager() {return em;}public Person find(int id) {return em.find(Person.class, id);}}@PersistenceContext会让Spring在实例化的时候给服务注入一个EntityManager。
@PersistenceContext注解可以放在实例变量,或者setter方法前面。
如果一个类被注解为@Transactional,Spring将会确保类的方法在运行在一个事务中。
JPA配置persistence.xml中就不用配置了,因为会教给spring保管web.xml的配置<?xml version="1.0" encoding="UTF-8"?><web-app id="person" version="2.4"xmlns="/xml/ns/j2ee"xmlns:xsi="/2001/XMLSchema-instance"xsi:schemaLocation="/xml/ns/j2ee ;/xml/ns/j2ee/web-app_2_4.xsd"><display-name>person</display-name><filter><filter-name>struts2</filter-name><filter-class> org.apache.struts2.dispatcher.FilterDispatcher </filter-class></filter><filter-mapping><filter-name>struts2</filter-name><url-pattern>/*</url-pattern></filter-mapping><welcome-file-list><welcome-file>index.jsp</welcome-file></welcome-file-list><listener><listener-class>org.springframework.web.context.ContextLoaderListener </listener-class></listener></web-app>applicationContext.xml配置如下:<?xml version="1.0" encoding="UTF-8"?> <beans xmlns="/schema/beans"xmlns:xsi="/2001/XMLSchema-instance" xmlns:aop="/schema/aop" xmlns:tx="/schema/tx"xsi:schemaLocation=" /schema/beans ;/schema/beans/spring-beans-2.0.xsd/schema/tx ;/schema/tx/spring-tx-2.0.xsd/schema/aop ;/schema/aop/spring-aop-2.0.xsd"> <bean class="org.springframework.orm.jpa.support.PersistenceAnnotationBeanPostProcessor" /><bean id="personService" class="quickstart.service.PersonServiceImpl" /><bean id="entityManagerFactory" class="org.springframework.orm.jpa.LocalContainerEntityManagerFactoryBean"> <property name="dataSource" ref="dataSource" /><property name="jpaVendorAdapter"><bean class="org.springframework.orm.jpa.vendor.HibernateJpaVendorAdapter"><property name="database" value="MYSQL" /><property name="showSql" value="true" /></bean></property></bean><bean id="dataSource" class="org.springframework.jdbc.datasource.DriverManagerDataSource"><property name="driverClassName" value="com.mysql.jdbc.Driver" /><property name="url" value="jdbc:mysql://localhost/test" /><property name="username" value="root" /><property name="password" value="root" /></bean><bean id="transactionManager" class="org.springframework.orm.jpa.JpaTransactionManager"><property name="entityManagerFactory" ref="entityManagerFactory" /></bean><tx:annotation-driven transaction-manager="transactionManager" /><bean id="personAction" scope="prototype" class="quickstart.action.PersonAction"><constructor-arg ref="personService" /></bean></beans>注意"personAction"bean的"class"属性被设为Action类的名字,并且"personService"bean会作为参数传递到action的构造器中。