Hardware verification using ANSI-C programs as a reference
国家仪器9214 校准程序说明书
CALIBRATION PROCEDURENI 9214This document contains the verification and adjustment procedures for the National Instruments 9214. For more information about calibration solutions, visit /calibration.Note Refer to the NI TB-9214 Calibration Procedure on /manuals forinstructions on calibrating the NI TB-9214.Contents Software (1)Documentation (2)Test Equipment (3)Connecting the NI 9214 (4)Test Conditions (4)Initial Setup (5)Verification (5)Voltage Verification (5)CJC Verification (8)Adjustment (10)Voltage and CJC Adjustment (10)EEPROM Update (11)Reverification (11)Accuracy Under Calibration Conditions (12)Where to Go for Support (12)SoftwareCalibrating the NI 9214requires the installation of NI-DAQmx 9.3 or later on the calibration system. You can download NI-DAQmx from /downloads. NI-DAQmx supports LabVIEW, LabWindows™/CVI™, ANSI C, and .NET. When you install NI-DAQmx, you only need to install support for the application software that you intend to use.2| |NI 9214 Calibration ProcedureDocumentationConsult the following documents for information about the NI 9214, NI-DAQmx, and your application software. All documents are available on and help files install with the software.NI cDAQ-9174/9178 Quick StartNI-DAQmx installation and hardware setupNI 9214 User Guide/Manual and SpecificationsNI 9214 specific information, specifications, and calibration intervalNI-DAQmx ReadmeOperating system and application software support in NI-DAQmxLabVIEW HelpLabVIEW programming concepts and reference information about NI-DAQmx VIs and functionsNI-DAQmx C Reference HelpReference information for NI-DAQmx C functions and NI-DAQmx C propertiesNI-DAQmx .NET Help Support for Visual StudioReference information for NI-DAQmx .NET methods and NI-DAQmx .NET properties, keyconcepts, and a C enum to .NET enum mapping tableTest EquipmentTable1 lists the equipment recommended for the performance verification and adjustment procedures. If the recommended equipment is not available, select a substitute using the requirements listed in Table1.Table 1. Recommended EquipmentEquipment RecommendedModel Where Used RequirementsCalibrator Fluke 5520Alocked in the 3.3 Vrange V oltageVerification,AdjustmentUse a high-precision voltage sourcewith an accuracy of ≤20ppm whensourcing up to 50µA.Fluke 5520A CJCVerification,Adjustment Use a high-precision resistance source with an accuracy of≤150ppm 2-wire compensation. If the resistance source does not have 2-wire compensation, the leadwire resistance must be included in the total resistance source accuracy.Chassis NI cDAQ-9178All—ConnectionAccessoryNI CAL-9214All—NI 9214 Calibration Procedure|© National Instruments|34||NI 9214 Calibration ProcedureConnecting the NI 9214The NI CAL-9214 provides connections for 16 thermocouple channels and 3 CJC channels on the NI 9214. Refer to Figure 1 for a pinout of the NI CAL-9214.CautionDo not connect voltages greater than 10 VDC to the NI CAL-9214.Figure 1. NI CAL-9214 PinoutConnect the NI CAL-9214 to the NI 9214 front connector as shown in Figure 2. Tighten the two jackscrews on the NI CAL-9214 to hold it securely in place. Do not overtighten the jackscrews.Figure 2. Installing the NI CAL-9214Test ConditionsThe following setup and environmental conditions are required to ensure the NI 9214 meets published specifications.•Keep connections to the NI 9214 as short as possible. Long cables and wires act as antennae, picking up extra noise that can affect measurements.•Verify that all connections to the NI 9214 are secure.1Ground Lug (on the bottom side of the NI CAL-9214 enclosure)•Use shielded copper wire for all cable connections to the NI 9214. Use twisted-pairs wire to eliminate noise and thermal offsets.•Maintain an ambient temperature of 23 °C ±5 °C. The NI 9214 temperature will be greater than the ambient temperature.•Keep relative humidity below 80%.•Allow a warm-up time of at least 15 minutes to ensure that the NI 9214 measurement circuitry is at a stable operating temperature.Initial SetupComplete the following steps to set up the NI 9214.1.Install NI-DAQmx.2.Make sure the NI cDAQ-9178 power source is not connected.3.Connect the NI cDAQ-9178 to the system safety ground.a.Attach a ring lug to a 14 AWG (1.6 mm) wire.b.Connect the ring lug to the ground terminal on the side of the NI cDAQ-9178 usingthe ground screw.c.Attach the other end of the wire to the system safety ground.4.Install the module in slot 8 of the NI cDAQ-9178 chassis. Leave slots 1 through 7 of theNI cDAQ-9178 chassis empty.5.Connect the NI cDAQ-9178 chassis to your host computer.6.Connect the power source to the NI cDAQ-9178 chassis.unch Measurement & Automation Explorer (MAX).8.Right-click the device name and select Self-Test to ensure that the module is workingproperly.VerificationThe following performance verification procedures describe the sequence of operation and test points required to verify the NI 9214 and assume that adequate traceable uncertainties are available for the calibration references.Voltage VerificationComplete the following procedure to determine the As-Found status of the NI 9214.1.Loosen the captive screws and remove the top cover from the NI CAL-9214.2.Connect the calibrator to the NI CAL-9214 according to Figure3.NI 9214 Calibration Procedure|© National Instruments|56||NI 9214 Calibration ProcedureFigure 3. Voltage Channel Verification Connections3.Reinstall the top cover on the NI CAL-9214.4.Connect the NI CAL-9214 to the NI 9214.5.If using a Fluke 5520A calibrator, lock the voltage range to 3.3 V to reduce loading error.a.Set the output voltage to 2.0 V .b.Press the 3.3 V auto button to lock the 3.3 V range.6.Set the calibrator output to a Test Point value indicated in Table 4.7.Set the calibrator to Operate mode (OPR).8.Acquire and average samples.a.Create and configure an AI voltage channel on the NI 9214 according to Table 2.b.Configure the AI voltage channel timing according to Table 3.c.Start the task.d.Average the readings.e.Clear the task.9.Compare the average to the limits in Table 4.10.Set the calibrator to Standby mode (STBY).11.Repeat steps 6 through 10 for each test point.Table 2. NI 9214 Voltage Channel ConfigurationPhysical ChannelsInput Range (mV)Scaled UnitsTerminal ConfigurationAutozero OTDMinMaxcDAQ1Mod8/ai x -78.12578.125V olts DifferentialEvery SampleDisabledTable 3. NI 9214 Voltage Channel Timing ConfigurationADC Timing Mode Sample Mode Samples to ReadRate (S/s)High Resolution Finite 88.5High SpeedFinite13090NI 9214 Calibration Procedure |© National Instruments |712.Repeat steps 6 through 11 for each channel on the NI 9214.Note The test limits listed in Table 4 are derived using the values in Table 11.13.Loosen the captive screws and remove the top cover from the NI CAL-9214.14.Disconnect the calibrator from the NI CAL-9214.15.Short the TC+ and TC- terminals on the NI CAL-9214 together.16.Reinstall the top cover on the NI CAL-9214.17.Acquire and average samples.a.Create and configure an AI voltage task on the NI 9214 according to Table 2.b.Configure the AI voltage channel timing according to Table 3.c.Start the task.d.Average the readings.e.Clear the task.Table 4. NI 9214 Voltage Verification Test Limits for Positive and Negative Test PointsADC Timing ModeRange (mV)Test Point1-Year Limits MinMaxLocationValue (mV)Lower Limit (mV)Upper Limit (mV)High Resolution-78.12578.125Negative FS -70-70.0330-69.9670Negative Mid -35-35.0180-34.9820Positive Mid 3534.982035.0180Positive FS7069.967070.0330High Speed-78.12578.125Negative FS -70-70.0580-69.9420Negative Mid -35-35.0370-34.9630Positive Mid 3534.963035.0370Positive FS7069.942070.05808| |NI 9214 Calibration Procedurepare the average to the limits in Table 5.NoteThe test limits listed in Table 5 are derived using the values in Table 11.19.Repeat steps 17 through 18 for each test point.20.Repeat steps 17 through 19 for each channel on the NI 9214.21.Remove the NI CAL-9214 from the NI 9214.22.Loosen the captive screws and remove the top cover from the NI CAL-9214.23.Disconnect the short from the NI CAL-9214.CJC VerificationComplete the following procedure to determine the As-Found status of the NI 9214.1.Loosen the captive screws and remove the top cover from the NI CAL-9214.2.Connect the calibrator to the NI CAL-9214 according to Figure 4.Figure 4. CJC Channel Verification Connections3.Reinstall the top cover on the NI CAL-9214.4.Connect the NI CAL-9214 to the NI 9214.5.Set the calibrator to 2-Wire Compensation mode.6.Set the calibrator output to a Test Point value indicated in Table 8.Table 5. NI 9214 Voltage Verification T est Limits for Zero T est PointsADC Timing ModeRange (mV)Test Point1-Year Limits MinMaxLocationValue (mV)Lower Limit (mV)Upper Limit (mV)High Resolution -78.12578.125Zero 0-0.00270.0027High Speed-78.12578.125Zero-0.01600.0160NI 9214 Calibration Procedure|© National Instruments|97.Set the calibrator to Operate mode (OPR).8.Acquire and average samples.a.Create and configure an AI voltage channel on the NI 9214 according to Table 6.b.Configure the AI voltage channel timing according to Table 7.c.Start the task.d.Average the readings.e.Clear the task.9.Perform the following calculation to scale the voltage average to resistance.pare the calculated resistance to the limits in Table 8.11.Set the calibrator to Standby mode (STBY).12.Repeat steps 6 through 11 for each test point.13.Remove the NI CAL-9214 from the NI 9214.14.Loosen the captive screws and remove the top cover from the NI CAL-9214.15.Disconnect the calibrator from the NI CAL-9214.16.Repeat steps 2 through 15 for each CJC channel on the NI 9214.Table 6. NI 9214 CJC Channel Verification ConfigurationPhysical ChannelsInput Range (V)Scaled UnitsMinMaxcDAQ1Mod8/_cjtemp x -2.52.5V oltsTable 7. NI 9214 CJC Channel Verification ConfigurationADC Timing Mode Sample Mode Samples to Read Rate (S/s)High Resolution Finite 88.5High SpeedFinite13090Table 8. NI 9214 Offset T est LimitsADC Timing ModeTest Point1-Year LimitsLocationValue (Ω)Lower Limit (Ω)Upper Limit (Ω)High ResolutionOffset 1000997.91002.1Gain 11900018953.019047.0Gain 210000099470.0100530.0Resistance 20000Voltage2.5Voltage –()--------------------------------------×=10||NI 9214 Calibration ProcedureNote The test limits in Table 8 are derived using the values in Table 11.AdjustmentThe following performance adjustment procedure describes the sequence of operation required to adjust the NI 9214.Voltage and CJC AdjustmentComplete the following procedure to adjust the temperature measurement accuracy performance of the NI 9214.1.Loosen the captive screws and remove the top cover from the NI CAL-9214.2.Connect the calibrator to the NI CAL-9214 according to Figure3.3.Reinstall the top cover on the NI CAL-9214.4.Connect the NI CAL-9214 to the NI 9214.5.Initialize a calibration session on the NI 9214. The default password is NI .6.Adjust the NI 9214 voltage.a.Input the external temperature in degrees Celsius using the set temperature C Seriesfunction.b.Call the NI 9214 get C Series adjustment points function to obtain an array ofrecommended calibration voltages for the NI 9214.c.If using the Fluke 5520A calibrator, lock the voltage range to 3.3 V to reduce loadingerror.d.Set the calibrator to a reference value determined by the array of adjustment points.e.Set the calibrator to Operate mode (OPR).f.Call and configure the NI 9214 adjustment function according to Table 9.g.Set the calibrator to Standby mode (STBY).h.Repeat steps d through g for each calibration voltage in the array.High Speed Offset 1000997.31002.7Gain 11900018952.019048.0Gain 210000099460.0100540.0Table 9. Voltage Adjustment ConfigurationPhysical Channel Reference ValuecDAQ1Mod8/ai x A reference value from the array of adjustment pointsTable 8. NI 9214 Offset Test Limits (Continued)ADC Timing ModeTest Point1-Year LimitsLocationValue (Ω)Lower Limit (Ω)Upper Limit (Ω)NI 9214 Calibration Procedure |© National Instruments |117.Remove the NI CAL-9214 from the NI 9214.8.Loosen the captive screws and remove the top cover from the NI CAL-9214.9.Disconnect the calibrator from the NI CAL-9214.10.Connect the calibrator to the NI CAL-9214 according to Figure 4.11.Reinstall the top cover on the NI CAL-9214.12.Connect the NI CAL-9214 to the NI 9214.13.Adjust the NI 9214 CJC.a.Call the NI 9214 get C Series adjustment points function to obtain an array of recommended calibration voltages for the NI 9214.b.Set the calibrator to a reference value determined by the array of adjustment points.c.Set the calibrator to 2-Wire Compensation mode.d.Set the calibrator to Operate mode (OPR).e.Call and configure the NI 9214 adjustment function according to Table 9.f.Set the calibrator to Standby mode (STBY).g.Repeat steps a through f for each calibration voltage in the array.14.Repeat steps 7 through 13 for each CJC channel on the NI 9214.15.Close the calibration session.EEPROM UpdateWhen an adjustment procedure is completed, the NI 9214 internal calibration memory (EEPROM) is immediately updated.If you do not want to perform an adjustment, you can update the calibration date and onboard calibration temperature without making any adjustments by initializing an external calibration, setting the C Series calibration temperature, and closing the external calibration.ReverificationRepeat the Verification section to determine the As-Left status of the device.NoteIf any test fails Reverification after performing an adjustment, verify that youhave met the Test Conditions before returning your device to NI. Refer to Where to Go for Support for assistance in returning the device to NI.Table 10. Voltage Adjustment Configuration Physical Channel Reference ValuecDAQ1Mod8/_cjctemp xA reference value from the array of adjustment points© 2012–2013 National Instruments. All rights reserved.375013B-01Apr13Refer to the NI Trademarks and Logo Guidelines at /trademarks for more information on National Instruments trademarks. Other product and company names mentioned herein are trademarks or trade names of their respective companies. For patents covering National Instruments products/technology, refer to the appropriate location: Help»Patents in your software, the patents.txt file on your media, or the National Instruments Patents Notice at /patents . You can find information about end-user license agreements (EULAs) and third-party legal notices in the readme file for your NI product. Refer to the Export Compliance Information at /legal/export-compliance for the National Instruments global trade compliance policy and how to obtain relevant HTS codes, ECCNs, and other import/export data.Accuracy Under Calibration ConditionsThe values in the following table are based on calibrated scaling coefficients, which are stored in the onboard EEPROM.The following accuracy table is valid for calibration under the following conditions:•Ambient temperature 23 °C ±5 °C •NI 9214 installed in slot 8 of an NI cDAQ-9178 chassis •Slots 1 through 7 of the NI cDAQ-9178 chassis are emptyNoteThe test limits listed in Tables 4,5, and 8 are derived using the values inTable 11.Note For operational specifications, refer to the most recent NI 9214 with NI TB-9214 Operating Instructions and Specifications online at /manuals .Where to Go for SupportThe National Instruments Web site is your complete resource for technical support. At /support you have access to everything from troubleshooting and application development self-help resources to email and phone assistance from NI Application Engineers.National Instruments corporate headquarters is located at 11500North Mopac Expressway, Austin, Texas, 78759-3504. National Instruments also has offices located around the world to help address your support needs. For telephone support in the United States, create your service request at n /support and follow the calling instructions or dial 5127958248. For telephone support outside the United States, visit the Worldwide Offices section of /niglobal to access the branch office Web sites, which provide up-to-date contact information, support phone numbers, email addresses, and current events.Table 11. NI 9214 Accuracy Under Calibration Conditions Mode PPM of Reading PPM of Range High Resolution44018High Speed600104。
Desco Industries SmartLog X3 自动人员地线检测手环和鞋垫测试器说明书

50434/50527SmartLog X3™Automated Personnel Grounding Verification Wrist Strap and Footwear TesterAutomated ESD Record KeepingHardware Setup and Installation3651 Walnut Ave, Chino, CA 91710Phone: (909) 627-8178Fax (909) 627-7449DESCRIPTIONThe Desco EMIT SmartLog X3™ is designed for fast, frequent, and accurate testing of ESD personnel grounding items. By depressing the electrode button once, the SmartLog X3™ tests the resistance path limits of the worn wrist strap and both worn ESD footwear independently within three seconds. Test results are electronically stored in the SmartLog X3™ and can easily be downloaded to a PC for logging records and evaluation. This product can be used as one of the tools to fulfill the ANSI ESD S20.20 paragraph 6.1.3.2 “Compliance Verification Plan. Verification should include routine checks of the Technical Requirements of the Plan.”Paperless data can enhance operator accountability, immediately identifying problems while reducing logging and auditing costs. There is no need to dedicate a computer. The SmartLog X3™ is a complete system including all required components. Operator identification can be accomplished by using the keypad, swiping a barcode card, or waving a proximity card (verify compatibility with the factory).The SmartLog X3™ can test either single or dual-wire wrist straps; the split footplate design allows for individual footwear testing all in one test. If a resistance path is below or exceeds the set limits, failure will be noted via an audio and visual LED alarm. Passing tests can enable a relay for automated door openers. However, if the user desires to test the wrist strap and ESD footwear separately, this can be accomplished. The wrist strap test is activated by inserting wrist strap banana plug into the designated banana jack. Wrist strap only or footwear only testing can also be accomplished. See Software Technical Bulletin TB-6547 for more information.32 SmartLogs can be daisy-chained and connected to one computer, allowing data to be collected to one central computer for all SmartLogs. The SmartLog X3™ can also be networked to a company's Intranet with the optional 50461 Ethernet Adapter. The SmartLog X3™ is calibrated to NIST traceable standards.The SmartLog X3™’s default Wrist Strap test range is 1M – 10M Ohms, and the default Footwear test range is 1M – 35M Ohms. The ranges can be easily adjusted.SmartLog X3™ Team Basic SoftwareUse the powerful versatile SmartLog X3™ Team Basic Software to collect and analyze records.(1) Specify tests and shifts for each employee in database(2) Auto or manual polling of data to computer(3) Auto archive and network data posting(4) Allow data to be saved and stored automatically(5) Data retrieval at selectable time intervals(6) Allow easy data analysisSee Technical Bulletin TB-6547 for more information.ESD Association Information“Compliance verification should be performed prior to each use (daily, shift change, etc.). The accumulation of insulative materials may increase the foot grounder system resistance. If foot grounders are worn outside the ESD protected area testing for functionality before reentry to the ESD protected area should be considered.” ESD SP9.2 APPENDIX B - Foot Grounder Usage Guidance“A log should be maintained which verifies that personnel have tested their personal grounding devices. (ANSI/ESDS20.20 Paragraph 6.2.2.2 Personnel Grounding Guidance)ANSI/ESD S20.20 Table 1 Flooring-Footwear Systems Technical Requirements Recommended Range “less than 35 X 10E6 ohms measured per ESD STM 97.1”."Typical test programs recommend that wrist straps that are used daily should be tested daily. However, if the products that are being produced are of such value that knowledge of a continuous, reliable ground is needed, and then continuous monitoring should be considered or even required."(ESD Handbook TR 20.20 paragraph 5.3.2.4.4)Carefully unpack the Desco EMIT SmartLog X3™. The SmartLog X3™ comes ready to install without any changes to the clock’s configuration.If multiple SmartLogs are to be installed in a daisy-chain configuration, refer to page 9 for instructions.Please see the following technical bulletins for more information on the SmartLog X3™Number DescriptionX3™ Wrist Strap and Footwear TesterTB-6502 SmartLogTB-6546 EthernetAdapterX3™ Team Basic SoftwareTB-6547 SmartLogThe Desco EMIT SmartLog X3™ is available in six models:Item DescriptionX3™ 120V, Software Included50430 SmartLogX3™ 120V, Hardware Only50431 SmartLogX3™ 220V, Software Included50432 SmartLogX3™ 220V, Hardware Only50433 SmartLog50434 SmartLogX3™ 220V CE, Software IncludedX3™ 220V CE, Hardware Only50435 SmartLogNote: SmartLog X3™ is not designed to work in high humidity environments above 70 RH%.Figure 1. 50430 / 50431 / 50432 / 50433 SmartLog X3™ features and components PACKAGINGItems 50430, 50431, 50432, 50433X3™, SmartLog X3™ Wrist Strap / Footwear Tester, and Numeric Key Pad on mounting plate 1 SmartLog1 Dual Foot Plate1 Stereo Cable for Dual Foot Plate1 Team Basic Software Version 4.99 (50430 and 50432 only)1 AC Adapter 12VDC 500mA center pos. (50430 and 50431 only)1 DB9 Serial Adapter1 25’ RS-232 Non-inverted Data Cable4 MountingAnchors4 MountingScrews1 Banana to Ring Terminal Cable1 Shunt / JumperFigure 2. 50434 / 50435 SmartLog X3™ features and componentsPACKAGINGItems 50434 and 50435X3™, SmartLog X3™ Wrist Strap / Footwear Tester, and Laser Barcode Scanner on mounting plate 1 SmartLog1 Dual Foot Plate1 Stereo Cable for Dual Foot Plate1 Team Basic Software Version 4.99 (50434 only)1 DB9 Serial Adapter1 25’ RS-232 Non-inverted Data Cable4 MountingAnchors4 MountingScrews1 Banana to Ring Terminal Cable1 Shunt / JumperBead1 FerriteCONFIGURING THE CLOCK, MOUNTING THE UNIT, AND CABLE CONNECTIONSA. Clock’s Baud Rate, ID, Parity, Daylight Option and Port Expand (See Figure 3 on Page 7)1. Plug the power supply into the unit and then to the appropriate AC source. Refer to Figure 3 to locate thepower input jack. The SmartLog X3™ will cycle through a self diagnostic program. The time and date willappear on the screen when the diagnostics is complete. Do not continue until this step has beencompleted.NOTE: If any of the below settings are not correct, procedure to step 2 and press the Advance button until the correct value appears on the display.Power Requirement: It is highly recommended that these units are installed on power lines separate fromother devices. The clock should not be installed on the same power line with devices containing electric motors.These units have a built-in self-healing fuse and surge, spike, and noise protection. The clock should bepowered on a dedicated electrical circuit. If you are located in an area where there are frequent electricalstorms, power surges, blackouts, or other similar problems, we strongly recommend that the unit be placed ona surge protector.2. After the self diagnosis press the MENU button six times. (If you do not press the Menu button within 20seconds the clock will exit out of the set-up menu and will need to be reset by disconnecting thenreconnecting the power supply.) Refer to Figure 3 for button locations.3. Baud Rate should be set at 9600 (factory default). Press Enter for the next screen.4. Parity should be set for ODD (factory default). Press Enter for next screen.5. The SmartLog X3™ ID is a 2 digit field with valid I.D. numbers 00 through 63. Each SmartLog X3™should have a different I.D. number if they are connected to the same communication line. The SmartLogX3™ should be numbered sequentially starting with 00, so that automatic polling in the software will not beinterrupted.6. The Daylight Option is enables daylight savings in the clock.7. Port Expand should be set to YES (factory default).8. Press Enter button once more to cycle to the next setting before hitting the Menu button to exit.The setting will not change if you do not cycle to the next setting (by hitting the Enter button).NOTE:B. Terminator Jumper, RS-485 Switch, RS-232 Switch and Relay Terminal1. The Terminator Jumper should be applied only when the clocks are in a daisy-chain. It only needs to beapplied to the first and last SmartLog X3™ in the daisy-chain. A stand-alone SmartLog X3™ does notneed the jumper.2. The RS-485 is set default on SLAVE position (right side) and does not need to be switched unless the unitis in a daisy-chain. For units in a daisy-chain, set the RS-485 of the first SmartLog X3™ to MASTER (left position).3. The Relay Terminal connections can be made on the back of the SmartLog X3™ (See Figure 3). Theycan be used to control doors, gates, etc. The relay terminal is limited to a maximum of 5A 250 VAC / 30 VDC and 10A 125 VAC.4. The RS-232 Interface is described by the Electronic Industries Association (EIA) as EIA-232 or RS-232.Special consideration should be used when installing the communications cable. Keep a 3 feet separation distance from any EMF source (power wires, fluorescent lights, etc.) The cable length shall not exceed 50 feet from PC to unit. The Desco EMIT 50461 Ethernet Adapter should be used if distance requirements exceed 50 feet.Figure 3. Back-side of SmartLog X3™ plateC. Connecting the SmartLog X3™NOTE: Both the SmartLog X3™ and computer should be turned off during the following procedures. Connecting One SmartLog X3™ (See Figure 4)1. Connect the Serial Adapter to the desired PC computer.2. Connect one end of the provided RS-232 Non-inverted Data Cable to the Serial Adapter.3. Connect the other end of the RS-232 Non-inverted Data Cable to port labeled “RS-232” on the SmartLogX3™.NOTE: Ensure that the SmartLog X3™ ID is set to 00 and its Terminator Jumper is left open.Figure 4. Connecting one SmartLog X3™Connecting More Than One SmartLog X3™ (See Figure 5)The following procedure provides an example on connecting 3 SmartLogs1. Connect the Serial Adapter to the desired PC computer.2. Connect one end of the provided RS-232 Non-inverted Data Cable to the Serial Adapter.3. Connect the other end of the RS-232 Non-inverted Data Cable to clock port labeled “RS-232” on theSmartLog X3™.4. Apply a shunt across the 2 pin terminator jumper of the first SmartLog and set its ID to 00.5. Connect one end of a RS-485 Inverted Data Cable to the clock port labeled “RS-485” on the first SmartLogX3™.6. Connect the other end of the RS-485 Inverted Data Cable to the clock port labeled “RS-485” on thesecond SmartLog X3™.7. Leave the terminator jumper of the second SmartLog X3™ open and set its ID to 01.8. Connect one end of another RS-485 Inverted Data Cable to the clock port labeled “RS-485” on the secondSmartLog X3™.9. Connect the other end of the same RS-485 Inverted Data Cable to the clock port labeled“RS-485” on the third SmartLog X3™. (See NOTE)10. Apply a shunt across the 2 pin terminator jumper of the third SmartLog X3™ and set its ID to 02.(A jumper is only needed on the first and last units of the daisy-chain)NOTE: An RJ11 splitter will be needed for connecting more than two units to a daisy-chain. The RJ11 splitter attaches to the RS-485 clock port.Figure 5. Connecting more than one SmartLog X3™D. Mounting the SmartLog X3™and Optional 50443 Laser Barcode ScannerUse the provided anchors and screws to mount the entire SmartLog X3™ plate. Be sure to place the SmartLogX3™ at a height where all operators can clearly see the display and perform the necessary tests.Mount the Laser Barcode Scanner to its proper location labeled “BARCODE SCANNER 50443” on the bottom right-hand side of the SmartLog X3™ plate. (50430, 50431, 50432, 50433 only)SMARTLOG X3™ HARDWAREA. The Numeric Key Pad can be used to manually type in ID badge numbers if no card is available. To testusing the Numeric Key Pad, press CLEAR, enter an ID number, and press ENTER. (50430, 50431, 50432, 50433 only)B. The SmartLog X3™ Wrist Strap / Footwear Tester’s default wrist strap test range is 1M – 10M Ohms. Thedefault footwear test range is 1M – 35M Ohms. The default test ranges may be changed to suit personal ground device testing. See Technical Bulletin TB-6502 for instructions.C. The Infrared Barcode Reader (50430, 50431, 50432, 50433 only) and optional Laser Barcode Scanner candecode Code 39 (3 of 9) and Code 128 barcode. The location of the barcode on the employee card must be placed a half inch from the bottom of the card to the center of the barcode (See Figure 5). To use the barcode reader, follow the diagram located to the right of the clock’s vertical slot.D. The Magstripe Reader (50434, 50435 only) reads Track 2 Magstripe.Figure 6. Location of barcode on ID cardE. When the hardware installation has been completed, refer to TB-6129 for TEAM Basic Software installation.TB-6129 will take you through the necessary steps to begin using your new SmartLog X3™.TROUBLESHOOTINGProblem: The host computer is not recognizing the SmartLog X3TM.a. Verify that the cable from the computer to the SmartLog X3™is properly connected. The cable should be flatnon-inverted (See Figure 4).b. Verify that the communication setup on the clock is 9600 baud rate, parity ODD. Refer to the instructions onback of SmartLog X3™ plate to enter configuration mode.c. If there are more than 2 units, verify that their IDs are unique by entering the SmartLog X3™ configurationmode.d. Contact your local IT department to verify that the computer’s comport is working properly.e. Make sure that the SmartLog X3™ LED’s are blinking during data transmission. If they are not blinking orremain on all the time, please contact Desco EMIT technical support at (909) 627-8178 for further support.CONTACT AND WARRANTYUSA EuropeCharleswaterEMITDesco3651 Walnut Ave Unit 17, Millbrook Business Park, Sybron WayChino, CA 91710 Crowborough, East Sussex, TN6 3JZ, U.K.Tel: (909) 627-8178 Tel: 01892 665313Fax: (909) 627-7449 Fax: 01892 668838LIMITED WARRANTYDesco EMIT expressly warrants that for a period of five (5) years from the date of purchase, Desco EMIT SmartLogs will be free of defects in material (parts) and workmanship (labor). Within the warranty period, a credit for purchase of replacement Desco EMIT products, or, at Desco EMIT's option, the product will be repaired or replaced free of charge. If product credit is issued, the amount will be calculated by multiplying the unused portion of the expected five year life times the original unit purchase price. Call our Customer Service Department at 909-627-8178 (Chino, CA) or 781-821-8370 (Canton, MA) for a Return Material Authorization (RMA) and proper shipping instructions and address. Please include a copy of your original packing slip, invoice, or other proof of date of purchase. Any unit under warranty should be shipped prepaid to the Desco EMIT factory. Warranty replacements will take approximately two weeks.If your unit is out of warranty, Desco EMIT will quote repair charges necessary to bring your unit up to Desco EMIT factory standards. Call Customer Service at 909-627-8178 for proper shipping instructions and address. Ship your unit freight prepaid.WARRANTY EXCLUSIONSTHE FOREGOING EXPRESS WARRANTY IS MADE IN LIEU OF ALL OTHER PRODUCT WARRANTIES, EXPRESSED AND IMPLIED, INCLUDING MERCHANTABILITY AND FITNESS FOR A PARTICULAR PURPOSE WHICH ARE SPECIFICALLY DISCLAIMED. The express warranty will not apply to defects or damage due to accidents, neglect, misuse, alterations, operator error, or failure to properly maintain, clean or repair products.LIMIT OF LIABILITYIn no event will Desco EMIT or any seller be responsible or liable for any injury, loss or damage, direct or consequential, arising out of the use of or the inability to use the product. Before using, users shall determine the suitability of the product for their intended use, and users assume all risk and liability whatsoever in connection therewith.50434/50527。
National Instruments LabWindows CVI 8.0 用户手册说明书
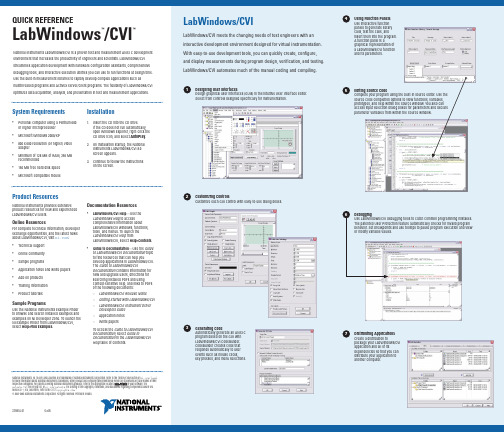
QUICK REFERENCE LabWindows/CVI™™System Requirements •Personal computer using a Pentium 600 or higher microprocessor• Microsoft Windows 2000/XP• 800 x 600 resolution (or higher) video adapter• Minimum of 128 MB of RAM, 256 MB recommended•150 MB free hard disk space •Microsoft-compatible mouse Installation1.Insert the CD into the CD drive.If the CD does not run automatically,open Windows Explorer, right-click the CD drive icon, and select AutoPlay.2. On installation startup, the NationalInstruments LabWindows/CVI 8.0screen appears.3. Continue to follow the instructionson the screen.National Instruments LabWindows/CVI is a proven test and measurement ANSI C development environment that increases the productivity of engineers and scientists. LabWindows/CVI streamlines application development with hardware configuration assistants, comprehensive debugging tools, and interactive execution utilities you can use to run functions at design time. Use the built-in measurement libraries to rapidly develop complex applications such as multithreaded programs and ActiveX server/client programs. The flexibility of LabWindows/CVI optimizes data acquisition, analysis, and presentation in test and measurement applications. LabWindows/CVILabWindows/CVI meets the changing needs of test engineers with an interactive development environment designed for virtual instrumentation. With easy-to-use development tools, you can quickly create, configure, and display measurements during program design, verification, and testing. LabWindows/CVI automates much of the manual coding and compiling.Product ResourcesNational Instruments provides extensive product resources for new and experienced LabWindows/CVI users.Online ResourcesFor complete technical information, developer exchange opportunities, and the latest news about LabWindows/CVI, visit :•Technical support•Online community•Sample programs•Application notes and white papers•Add-on products•Training information•Product tutorialsSample ProgramsUse the National Instruments Example Finder to browse and search installed examples and examples on NI Developer Zone. To launch the NI Example Finder from LabWindows/CVI, select Help»Find Examples.Documentation Resources•LabWindows/CVI Help—Use theLabWindows Help to accesscomprehensive information aboutLabWindows/CVI windows, functions,tools, and menus. To launch theLabWindows/CVI Help fromLabWindows/CVI, select Help»Contents.•Guide to Documentation—Use the Guideto LabWindows/CVI Documentation topicto find resources that can help youdevelop applications in LabWindows/CVI.The Guide to LabWindows/CVIDocumentation contains information fornew and upgrade users, directions forsearching installed PDFs and usingcontext-sensitive help, and links to PDFsof the following documents:–LabWindows/CVI Release Notes–Getting Started with LabWindows/CVI–LabWindows/CVI Instrument DriverDevelopers Guide–Application notes–White papersTo access the Guide to LabWindows/CVIDocumentation, select Guide toDocumentation in the LabWindows/CVIHelp table of contents.Designing User InterfacesDesign graphical user interfaces (GUIs) in the intuitive User Interface Editor.Select from controls designed specifically for instrumentation.1Customizing ControlsCustomize each GUI control with easy-to-use dialog boxes.2Generating CodeAutomatically generate an ANSI Cprogram based on the GUI withLabWindows/CVI CodeBuilder.CodeBuilder creates code thatresponds automatically to userevents such as mouse clicks,key presses, and menu selections.3Using Function PanelsUse interactive functionpanels to generate librarycalls, test the calls, andinsert them into the program.A function panel is agraphical representation ofa LabWindows/CVI functionand its parameters.4Editing Source CodeComplete your program using the built-in source editor. Use thesource code completion options to view functions, variables,prototypes, and help within the Source window. You also canaccess input selection dialog boxes for parameters and declareparameter variables from within the Source window.5Distributing ApplicationsCreate a distribution topackage your LabWindows/CVIapplication and all of itsdependencies so that you candistribute your application toanother computer.7DebuggingUse LabWindows/CVI debugging tools to catch common programming mistakes.The patented User Protection feature automatically checks for invalid programbehavior. Set breakpoints and use tooltips to pause program execution and viewor modify variable values.6National Instruments, NI, , and LabVIEW are trademarks of National Instruments Corporation. Refer to the Terms of Use section on /legal for more information about National Instruments trademarks. Other product and company names mentioned herein are trademarks or trade names of their respective companies. For patents covering National Instruments products, refer to the appropriate location: H H e l p»P a t e n t s in your software, the patents.txt file on your CD, or /patents. For a listing of the copyrights, conditions, and disclaimers regarding components used in USI (Xerces C++, ICU, and HDF5), refer to the USICopyrights.chm.© 2003–2005 National Instruments Corporation. All rights reserved. Printed in Ireland.373551A-01Oct05LabWindows/CVIUse built-in instrumentation libraries to interface test applications to the outside world. LabWindows/CVI includes a large set of run-time libraries for instrument control, data acquisition, analysis, and user interface creation. This chart illustrates the classes in each library. To find specific functions, press <Ctrl-Shift-P> in the Source window. You also can use the Library Tree to browse to and search for functions.L a b W i n d o w s /C V I L i b r a r y R e f e r e n c e。
毕业论文-多进制数字信号调制系统

本科毕业设计(论文)题目多进制数字信号调制系统设计学生姓名XX 学号0907050208教学院系电气信息学院专业年级通信工程2009级指导教师汪敏职称讲师单位西南石油大学辅导教师职称单位完成日期2013 年 6 月9 日Southwest Petroleum UniversityGraduation ThesisSystem Design of M-ary Digital Signal ModulationGrade: 2009Name:Liu ShaSpeciality: Telecommunications EngineeringInstructor: Wang MinSchool of Electrical Engineering and Information摘要由于数字通信系统的实际信道大多数具有带通特性,所以必须用数字基带信号对载波进行数字调制。
也因此,数字调制方法成为了当今的热点研究对象,其中最常用的一种是键控法。
在带通二进制键控系统中,每个码元只能传输1比特的信息,其频带利用率不高,而频率资源又是极其宝贵的,为了能提高频带利用率,最有效的办法是使一个码元能够传输多个比特的信息,这就是本文主要研究的多进制数字调制系统,包括多进制数字振幅调制(MASK)、多进制数字频率调制(MFSK)和多进制数字相位调制(MPSK)。
多进制键控系统可以看作是二进制键控系统的推广,可以大大提高频带利用率,而且因其抗干扰性能强、误码性能好,能更好的满足未来通信的高要求,所以研究多进制数字调制系统是很有必要的。
本文通过对多进制数字调制系统的研究,采用基于EP2C35F672C8芯片,运用VHDL硬件描述语言,完成了多功能调制器的模块化设计。
首先实现多进制数字振幅调制(MASK)、多进制数字频率调制(MFSK)和多进制数字相位调制(MPSK) 的设计,将时钟信号通过m序列发生器后产生随机的二进制序列,再通过串/并转换器转换成并行的多进制基带信号;其次分别实现数字调制模块2-M电平变换器、分频器以及四相载波发生器的设计;最后在顶层文件中调用并结合四选一多路选择器,从而完成多功能调制器的设计。
EinScan Pro HD 快速入门指南说明书

Multifunctional Handheld 3D ScannerGetting Started with EinScan Pro HDEinScan Pro HDQuick Start GuidePreparationDevice ListIndustrial Pack (optional)Color Pack (optional)Texture cameraStandard Pack*Please only use water to clean the calibration board, avoid touching any corrosive liquid.Note:1. Plug in dongle before opening Solid Edge software2. Find the use of phone screen mount in Support-Help at Preparation1. Standard PackInstallationHardware InstallationSTEP01Turn on the device and connect it to the computerthrough USB 3.0 port.RecommendedOSGraphics Card Video Memory Processor Memory InterfaceWin10, 64bitNVIDIA GTX/RTX series cards,higher or equal to GTX 1080>4G I7-870064Ghigh-speed USB 3.0InstallationHardware Installation2. Industrial PackSTEP01Fasten the scanner tray onto the tripod and place the scanner onthe tray.STEP02turntable.3.Color Pack4. Operation EnvironmentAvoid direct sunlight or too bright of light indoors.Make sure the scanned object and table are stable. (For Fixed Scan)STEP02STEP01Hold the device upright and removethe USB port cover. The cover is located near the logo on the rightside of the device.Insert the Color Pack and lock it with a rotary lever.Run the installerSoftware DownloadSoftware InstallationLicense ActivationOr do local activation and find the license in the USB drive.Attention: If you install another device of different serial number, the software will automatically notify users to activate this device.STEP01STEP02Double click software installationicon to install the software.After successful installation, when the device is correctly connected, double-click to open the softwareand activate the device. The format of activation is “online activation”. Make sure your computer is connected to theInternet.Download the software and user manual from or/software-downloadCamera CalibrationFollow the instruction on the software to place the calibration board in 5 different positions. Hold the scanner vertically and cover the screen range.STEP01STEP02STEP03STEP04STEP05The first time installing the software , calibration is required by default. Calibration is also required for the following:1.Device Change2.After device enduring bumpy transportation3.After device accuracy decreases4.Device being uncalibrated for a long time, for example, 15 days.5.When using the Color Pack, the texture camer a’s position has been changed.Only required for Color Pack Hold the scanner vertically to the back side of calibration board (white) and adjust the distance until you find the proper distance.White Balance CalibrationFixed ScanWith TurntableWithout TurntableHandheld HD Scan Handheld HD ScanHandheld Rapid Scan Handheld Rapid ScanSummaryModeHandheld HD ScanHandheld Rapid ScanAccuracy(mm)Resolution Point distance (mm)Align ModeTurntable Coded Targets, Feature, Markers, ManualSingle Shot Accuracy 0.04 0.24Scanning TipsScan Mode SelectionUse Handheld Rapid Scan mode when:A fast scanning experience is needed;Objects with good geometry for feature alignment;Objects are hard to move or too big to stay on turntable for e Handheld HD Scan mode when:High accuracy and high resolution by handheld scanning is required;Objects are hard to move or too big to stay on turntable for e Fixed Scan with Turntable mode when:High accuracy and high resolution is required;Objects’ footprint within 150mm which may not cover most coded targets on turntable;Weight under 5kg;Objects’ footprint above 150mm with rich geometry features can also work in Fixed Scan with Turntable mode through feature alignment. Use Fixed Scan without Turntable mode when:High accuracy and high resolution is required;Objects is too big or heavy to work on turntable.Up to 0.1Up to 0.045Scan EfficiencySingle Scan < 0.5s Single Scan < 0.5sFixed ScanFixed Scanwith Turntablewithout TurntableFeature, Markers, Manual Single Shot Accuracy 0.040.2410 fps3,000,000 points/s30 fps1,500,000 points/s0.25-30.2-3Markers, Feature (with rich geometrical features on the surface), Hybrid(Markers and Feature) Markers, Feature (with rich geometrical features on the surface),Hybrid(Markers and Feature)Texture (with rich texture)+0.3 mm/m (markers alignment)+0.3 mm/m (markers alignment)Difficult to ScanTransparent objects like glassesShining or highly reflective objects like mirrorsMoving objects or vibrating objectsLattice structure with many small deep holes Hairy objects like human hair and furSpray with white powderSolutionNot Recommended APAC HeadquartersSHINING 3D Tech. Co., Ltd.Hangzhou, China P: +86-571-82999050Email:*******************No. 1398, Xiangbin Road, Wenyan, Xiaoshan,Hangzhou, Zhejiang, China,311258EMEA RegionSHINING 3D Technology GmbH.Stuttgart, Germany P: +49-711-28444089Email:*******************Breitwiesenstraße 28, 70565, Stuttgart, GermanyAmericas RegionSHINING 3D Technology Inc.San Francisco, United States P: +1415-259-4787Email:*******************1740 César Chávez St. Unit D. San Francisco, CA 94124Technical SupportRegister at for support or contact through:Email:*****************************Skype: einscan_supportFor more videos of the scanners, please follow our YouTube channel “ SHINING 3D” .。
CISSP考试练习(习题卷8)

CISSP考试练习(习题卷8)第1部分:单项选择题,共100题,每题只有一个正确答案,多选或少选均不得分。
1.[单选题]以下所有项目都应包含在业务影响分析中,即 (BIA)调查问卷,以排除问题A)确定发生业务中断的风险B)确定业务流程的技术依赖性C)识别业务中断的运营影响D)识别业务中断的财务影响答案:B解析:2.[单选题](04143) 在变更生产系统的数据库模式时,应该执行以下哪些活动?A)在开发环境构建变更,进行用户验收测试,制定回退策略,在生产环境实施变更B)在开发环境构建变更,进行用户验收测试,制定回退策略,在生产环境实施变更C)在开发环境构建变更,进行用户验收测试,制定回退策略,在生产环境实施变更D)在开发环境构建变更,进行用户验收测试,制定回退策略,在生产环境实施变更答案:C解析:3.[单选题]Which of the following vulnerabilities can be BEST detected using automated analysis? 使用自动分析可以最好地检测以下哪种漏洞?A)Valid cross-site request forgery(CSRF)vulnerabilities有效的跨站点请求伪造(CSRF)漏洞B)Multi-step process attack vulnerabilities多步骤进程攻击漏洞C)Business logic flaw vulnerabilities业务逻辑缺陷漏洞D)Typical source code vulnerabilities典型的源代码漏洞答案:D解析:4.[单选题]测试自定义应用程序代码的最有效方法是什么?A)阴性 测试B)白盒 测试C)笔配对 测试D)黑匣子 测试答案:B解析:5.[单选题]This statement is the formal requirement for:橙皮书指出,"硬件和软件功能应提供可以用于定期验证[可信计算基]TCB的现场硬件和固件元素的正确操作"。
ANSI C119.1 -2016 电气连接器系统说明书
ANSI C119.1-2016American National Standardfor Electric Connectors—Sealed Insulated Underground Connector SystemsRated 600 VoltsSecretariat:National Electrical Manufacturers AssociationApproved: March 16, 2017American National Standards Institute, Inc.NOTICE AND DISCLAIMERThe information in this publication was considered technically sound by the consensus of persons engaged in the development and approval of the document at the time it was developed. Consensus does not necessarily mean that there is unanimous agreement among every person participating in the development of this document.ANSI standards and guideline publications, of which the document contained herein is one, are developed through a voluntary consensus standards development process. This process brings together volunteers and/or seeks out the views of persons who have an interest in the topic covered by this publication. While NEMA administers the process to promote fairness in the development of consensus, it does not write the document and it does not independently test, evaluate, or verify the accuracy or completeness of any information or the soundness of any judgments contained in its standards and guideline publications.NEMA disclaims liability for any personal injury, property, or other damages of any nature whatsoever, whether special, indirect, consequential, or compensatory, directly or indirectly resulting from the publication, use of, application, or reliance on this document. NEMA disclaims and makes no guaranty or warranty, expressed or implied, as to the accuracy or completeness of any information published herein, and disclaims and makes no warranty that the information in this document will fulfill any of your particular purposes or needs. NEMA does not undertake to guarantee the performance of any individual manufacturer or seller’s products or services by virtue of this standard or guide.In publishing and making this document available, NEMA is not undertaking to render professional or other services for or on behalf of any person or entity, nor is NEMA undertaking to perform any duty owed by any person or entity to someone else. Anyone using this document should rely on his or her own independent judgment or, as appropriate, seek the advice of a competent professional in determining the exercise of reasonable care in any given circumstances. Information and other standards on the topic covered by this publication may be available from other sources, which the user may wish to consult for additional views or information not covered by this publication.NEMA has no power, nor does it undertake to police or enforce compliance with the contents of this document. NEMA does not certify, test, or inspect products, designs, or installations for safety or health purposes. Any certification or other statement of compliance with any health- or safety-related information in this document shall not be attributable to NEMA and is solely the responsibility of the certifier or maker of the statement.© 2016 National Electrical Manufacturers AssociationANSI C119.1-2016Page iAMERICAN NATIONAL STANDARDApproval of an American National Standard requires verification by The American National Standards Institute, Inc. (ANSI) that the requirements for due process, consensus, and other criteria for approval have been met by the standards developer. An American National Standard implies a consensus of those substantially concerned with its scope and provisions. Consensus is established when, in the judgment of the ANSI Board of Standards Review, substantial agreement has been reached by directly, and materially affected interests. Substantial agreement means much more than a simple majority, but not necessarily unanimity. Consensus requires that all views and objections be considered, and that a concerted effort be made toward their resolution.The existence of an American National Standard does not in any respect preclude anyone, whether s/he has approved the standard or not, from manufacturing, marketing, purchasing, or using products, processes, or procedures not conforming to the standards. It is intended as a guide to aid the manufacturer, the consumer, and the general public.The American National Standards Institute, Inc., does not develop standards and will in no circumstances give an interpretation of any American National Standard. Moreover, no person shall have the right or authority to issue an interpretation of an American National Standard in the name of the American National Standards Institute, Inc. Requests for interpretations should be addressed to the secretariat or sponsor whose name appears on this title page.CAUTION NOTICE: This American National Standard may be revised or withdrawn at any time. The procedures of the American National Standards Institute, Inc., require that action be taken periodically to reaffirm, revise, or withdraw this standard. Purchasers of American National Standards may receive current information on all standards by calling or writing the American National Standards Institute, Inc.Published by:National Electrical Manufacturers Association1300 North 17th Street, Suite 900Rosslyn, VA 222092016 National Electrical Manufacturers AssociationAll rights reserved including translation into other languages, reserved under the Universal Copyright Convention, the Berne Convention for the Protection of Literary and Artistic Works, and the International and Pan American Copyright Conventions.No part of this publication may be reproduced in any form, in an electronic retrieval system or otherwise, without the prior written permission of the publisher.Printed in the United States of America.ANSI C119.1-2016Page iiCONTENTSForeword ..................................................................................................................................................... i v 1Scope and Purpose .. (1)1.2Purpose (1)2Referenced Standards (1)3Definitions (1)4Performance Requirements (2)4.1General (2)4.2M echanical Tests (2)4.3Electrical Tests (3)4.4Sealing Tests (4)4.5Reusability—Optional (Required for Connectors Designated as Reusable Only) (4)5 Sampling (4)5.1General (4)5.2Mechanical (5)5.4Sealing Tests (5)5.5Reusability (5)6 Test Methods (6)6.2Sealing Tests (7)6.4Reusability (9)7 Test Report (9)8 Marking (10)8.1Connector System Marking (10)8.3Assembly Instructions (10)AnnexesAnnex A (13)Annex B (14)Annex C (15)Annex D (16)Annex E (17)© 2016 National Electrical Manufacturers AssociationANSI C119.1-2016Page iiiFiguresFigure 1 Impact (11)Figure 2 Flexing and Twisting (12)© 2016 National Electrical Manufacturers AssociationANSI C119.1-2016Page ivForeword(This foreword and the informative annexes are not part of American National Standard C119.1)The standard covers electrical, mechanical, and sealing requirements of connectors rated 600 V and installed underground.This standard was initially developed by an EEI-NEMA Joint Committee on Underground Distribution Connectors and Connector Systems and published by the American National Standards Institute in 1974.This revision has been reorganized to follow international formatting and improve the organization of information throughout the document when compared to the previous version.Substantive changes to the standard have been made in the C119.1-2016 version of the standard. A substantive change is one that directly and materially affects performance of a product and which requires testing or retesting to meet the current edition of a standard. The substantive changes to the standard are:This revision includes the addition of spreadsheet files in Annex B which can be used to collect current cycle test data, calculate connector stability, generate graphs of the data and print the data to provide test results as part of the test report. The spreadsheets are provided to give test laboratories a standardized method to collect, calculate and report test data and prepare test reports. These spreadsheets were not part of earlier editions.This revision also includes the addition a spreadsheet file for Integrity of Seal Data in Annex C and a spreadsheet file for Impact Data in Annex D. The spreadsheets are provided to give a standardized format to collect, calculate and report test data and test results. These spreadsheets were not part of earlier editions.Addition of torque strength requirements for set screws, impact test (for direct burial qualification),re-sealability test, reusability test and current cycle temperature stability calculation.Suggestions for improvement of this standard are welcome.They should be sent to:Senior Technical Director, OperationsNational Electrical Manufacturers Association1300 North 17th Street, Suite 900Rosslyn, VA 22209This standard was processed and approved for submittal to ANSI by the Accredited Standards Committee on Connectors for Electrical Utility Applications, C119. Committee approval of this standard does not necessarily imply that all committee members voted for its approval. At the time it approved this standard, the ANSI ASC C119 Committee had the following members:Harry Hayes, ChairmanMichael Zaffina, Vice ChairmanPaul Orr, Secretary© 2016 National Electrical Manufacturers AssociationANSI C119.1-2016Page v© 2016 National Electrical Manufacturers AssociationOrganizations RepresentedElectric Utility Industry Zachary Anderson Michael Dyer Warren Hadley Douglas Harms Kenneth McKinney Cory Morgan Wilson Peppard Angelo Rodriguez Curt Schultz Ryan Stargel Giovanni Velazquez Gerald Wasielewski William Winge Larry WitteckNational Electrical Manufacturers Association Enes Basic Scott Casler Matt Cawood Peter Chan David Coulombe Jeff Door Matt Gaertner Waymon Goch Luke Hill David Hughes Kevin Jenkins Barry Johnson Eyass Khansa Ron Kmiecik Colin McCullough Jonathon Olszewski Alejandro Pineda Kevin Puccini Walter Romanko Gary Schrader David Shibilia Gary Sibilant Ben Sparks Dan Stanton Ryan Stough Carl Tamm Justin Tuchscherer Robert Westbrook Andrew ZwitRural Utilities Service (RUS) Trung HiuGeneral Interest Joe Goldenburg Chris Morton Dmitry Ladin Tip Goodwin Joe Renowden Allen Wilcox Craig PonThe C119.1 Subcommittee on Sealed Underground Connector Systems, which developed the revisions of this standard, had the following members:Matt Cawood, Chairman Mike Dyer, Vice Chairman Paul Orr, SecretaryZachary Anderson Enes Basic Scott Casler Constantino Dangelo Coulombe, David Seydou Diop, Jeff Door Waymon Goch Warren C. Hadley Douglas P. Harms Harry Hayes Luke HillANSI C119.1-2016 Page vi© 2016 National Electrical Manufacturers AssociationTrung Hiu David Hughes Kevin Jenkins Barry Johnson Alan Kasanow Clint MasonColin McCullough Kenneth McKinney Richard MorinJohnothen Olszewski Chan, PeterAlejandro Pineda Kevin Puccini Angelo Rodriguez Jesus Rodriguez Walter RomankoCurt Schultz David Shibilia Paul Springer Ryan Stough Stanley Szyszko Carl R. Tamm Carl TaylorNeil Vandermeulen Giovanni VelazquezRichard (Jeff) J. Waidelich Gerald Wasielewski Robert Westbrook Allen Wilcox Larry Witteck Michael Zaffina James ZahnenANSI C119.1-2016Page 11 Scope and Purpose1.1 ScopeThis standard covers sealed, insulated underground connector systems rated at 600 V for utility applications and establishes electrical, mechanical, and sealing requirements for sealed insulated underground connector systems.。
cadence相关软件介绍.
公司概述Cadence是全球电子设计自动化(EDA领先企业,从事软件与硬件设计工具、芯片知识产权与设计服务,目前正致力于EDA产业的转型。
Cadence把此次转型构想命名为EDA360,因为它将包含设计过程中的所有方面,并关注最终产品的可盈利性。
这种应用驱动型方法,能在创建、集成与优化电子设计方面帮助我们的客户以更低的成本和更高的质量完成硅芯片、片上系统设备、以及完整的系统实现。
Cadence Design System, Inc.公司成立于1988年,总部位于美国加州圣荷塞,其设计中心、研发中心和销售部门分布于世界各地。
CADENCE中国1992年Cadence 公司进入中国大陆市场,迄今已拥有大量的集成电路 (IC 及系统设计客户群体。
在过去的二十年里,Cadence公司在中国不断发展壮大,建立了北京、上海、深圳分公司以及北京研发中心、上海研发中心,并于2008年将亚太总部设立在上海,Cadence中国现拥有员工400余人。
北京研发中心和上海研发中心主要承担美国公司总部EDA软件研发任务,力争提供给用户更加完美的设计工具和全流程服务。
Cadence在中国拥有强大的技术支持团队,提供从系统软硬件仿真验证、数字前端和后端及低功耗设计、数模混合RF 前端仿真与DFM以及后端物理验证、SiP封装以及PCB设计等技术支持。
我们的销售方案中还包括提供专业设计服务,VCAD团队为用户提供高质量、有效的设计和外包服务。
把世界顶尖的产品技术和服务融入中国,成为中国电子行业最亲密合作伙伴,和中国电子高科技产业共同腾飞是Cadence 在中国的坚定信念。
市场与趋势Cadence服务于产值达2万亿美元的全球电子市场,其中包括产值超过3000亿美元的半导体市场。
我们的主要垂直市场领域包括:有线与无线通讯;工业、医疗与汽车电子;计算机与消费电子,比如多媒体和个人娱乐设备。
这些领域占全球电子设备营收和半导体营收的90%以上。
ANSI_C18.1 M Part 1【2001】
ANSI C18.1M, Part 1-2001Revision ofANSI C18.1M, Part 1-1999American National StandardFor Portable Primary Cells and BatteriesWith Aqueous Electrolyte—General and SpecificationsSecretariat:National Electrical Manufacturers AssociationApproved April 20, 2001American National Standards Institute, Inc.ANSI C18.1M, Part 1-2001This page intentionally left blank.ANSI C18.1M, Part 1-2001iAmerican National StandardApproval of an American National Standard requires verification by ANSI that the requirements for due process, consensus, and other criteria for approval have been met by the standards developer.Consensus is established when, in the judgment of the ANSI Board of Standards Review, substantial agreement has been reached by directly and materially affected interests. Substantial agreement means much more than a simple majority, but not necessarily unanimity. Consensus requires that all views and objections be considered, and that a concerted effort be made toward their resolution.The use of American National Standards is completely voluntary; their existence does not, in any respect, preclude anyone, whether he has approved the standards or not, from manufacturing, marketing,purchasing, or using products, processes, or procedures not conforming to the standards.The American National Standards Institute does not develop standards and will in no circumstances give an interpretation of any AmericanNational Standard. Moreover, no person shall have the right or authority to issue an interpretation of an American National Standard in the name of the American National Standards Institute. Requests forinterpretations should be addressed to the secretariat or sponsor whose name appears on the title page of this standard.Caution Notice: This American National Standard may be revised or withdrawn at any time. The procedures of the American NationalStandards Institute require that action be taken periodically to reaffirm, revise, or withdraw this standard. Purchasers of American National Standards may receive current information on all standards by calling or writing the American National Standards Institute, 11 West 42nd Street, New York, NY, 10036, phone 212-642-4900.Published byNational Electrical Manufacturers Association 1300 N. 17th Street, Rosslyn, VA 22209© Copyright 2001 by National Electrical Manufacturers AssociationAll rights including translation into other languages, reserved under the Universal Copyright Convention, the Berne Convention for the Protection of Literary and Artistic Works, and the International and Pan American Copyright Conventions.No part of this publication may be reproduced in any form, in an electronic retrieval system or otherwise, without the prior written permission of the publisher.Printed in the United States of AmericaDISCLAIMERThe standards or guidelines presented in a NEMA standards publication are considered technically sound at the time they are approved for publication. They are not a substitute for a product seller's or user's own judgment with respect to the particular product referenced in the standard or guideline, and NEMA does not undertake to guarantee the performance of any individual manufacturer's products by virtue of this standard or guide. Thus, NEMA expressly disclaims any responsibility for damages arising from the use, application, or reliance by others on the information contained in these standards or guidelines.ANSI C18.1M, Part 1-2001This page intentionally left blank. iiANSI C18.1M, Part 1-2001ContentsPageForeword (v)1 General (1)1.1 Scope and purpose (1)1.2 Normative references (1)1.3 Definitions (2)1.4 Requirements (3)1.4.1 Designations, chemical systems, and voltages (3)1.4.2 Battery dimensions (4)1.4.3 Terminals (5)1.4.4 General design considerations (8)1.4.5 Test conditions (8)1.4.6 Test requirements (9)1.4.7 Procedures to check conformance to a specified minimumaverage duration (10)1.4.8 Marking (10)2 Specifications (11)2.1 Specification sheet reference (11)2.2 Battery specification sheets (13)Table1 Chemical systems and voltages (4)iiiANSI C18.1M, Part 1-2001Figures1 Small cell or battery gauge (inner dimensions) (3)2A Round battery (protruding negative) (6)2B Round battery (recessed negative) (6)3 Button battery (7)AnnexesA Methods of determining load and test conditions (49)B Guidance for packaging, handling, storage, and transportation (51)C Reliability guidelines (53)D Bibliography (55)ivANSI C18.1M, Part 1-2001 Foreword(This Foreword is not part of American National Standard C18.1M, Part 1-2001.)This edition of an American National Standard for Portable Primary Cells and Batteries with Aqueous Electrolyte is based in part on the previous American National Standard for Dry Cells and Batteries—Specifications, ANSI C18.1M-1999, and recognizes the work of the International Electrotechnical Commission (refer to IEC Publication 60086-1 and 60086-2) in establishing world-wide standard requirements for portable primary batteries. As with the previous edition, this edition includes four chemistries:Carbon zinc (LeClanche and zinc chloride types)Alkaline manganese dioxideSilver oxideZinc airWith new products coming on the market, new test schemes have been included in this edition for ANSI 13 (D), 14 (C), 15 (AA), 24 (AAA), 25 (AAAA), and 1604 (9-volt) battery types. There is also the addition of a new specification sheet for the ANSI 1176/1196 battery.In April 1996, the then ANSI Accredited Standards Committee C18 on Specifications for Dry Cells and Batteries established a new general format for the publication of its standards, dividing this standard into two parts. Part 1 of this American National Standard for Portable Primary Cells and Batteries with Aqueous Electrolyte contains two basic sections. The first section has general requirements and information, such as the scope, applicable definitions, general descriptions of battery dimensions, terminal requirements, marking requirements, general design conditions, test conditions, etc. Section 2 of Part 1 is comprised of specification sheets for various types of cells and batteries. Part 2 of the standard, a separate document, contains safety requirements.Suggestions for the improvement of this standard are welcome. They should be sent to the National Electrical Manufacturers Association, 1300 North 17th Street, Suite 1847, Rosslyn, VA 22209, Attention: Secretary, ANSI ASC C18.This standard was processed and approved for submittal to ANSI by the American National Standards Committee C18 on Portable Cells and Batteries. Committee approval of this standard does not necessarily imply that all committee members voted for its approval. At the time Committee C18 approved this standard, it had the following members:Michael H. Babiak, ChairpersonRonald R. Runkles, SecretaryvANSI C18.1M, Part 1-2001Organization Represented: Name of Representative:Consultant David LindenConsultant, U.S. Navy Albert HimyDuracell S. Keel KellySteven Wicelinski (Alt.)Eastman Kodak Company James C. DeJagerEnergizer Michael H. BabiakMarc K. Boolish (Alt.)Moltech Power Systems Nate M. BanesRamesh Shah (Alt.)Photographic & Imaging Association John GignacRayovac Corp. John HadleyDenis Carpenter (Alt.)U.S. Navy, Crane Division, Naval Surface James A. GucinskiWarfare Center John InmanWilson Greatbatch Limited Paul W. KrehlThe members of Subcommittee C18-1 for Portable Primary Cells and Batteries who contributed to the development of this standard are:Steven Wicelinski, ChairpersonMichael H. Babiak, Vice-chairpersonRonald R. Runkles, SecretaryMarc Boolish Albert HimyDenis Carpenter John InmanJames DeJager Thomas JonesMichael Firshein Keel KellyJames Gucinski Paul KrehlJohn Hadley David LindenviAMERICAN NATIONAL STANDARD ANSI C18.1M, Part 1-2001 For Portable Primary Cells and Batteries with Aqueous Electrolyte—General and Specifications1 GeneralNOTE—Part 1 does not include safety requirements. Safety requirements can be found in Part 2. 1.1 Scope and purpose1.1.1 ScopeThis standard applies to portable primary cells and batteries with aqueous electrolyte and a zinc anode (non-lithium). This edition includes the following electrochemical systems:a) Carbon zinc (LeClanche and zinc chloride types);b) Alkaline manganese dioxide;c) Silver oxide;d) Zinc air.1.1.2 PurposeThe purpose of this publication is:a) To ensure the electrical and physical interchangeability of productsfrom different manufacturers;b) To minimize proliferation of cell and battery types;c) To define a standard of performance and provide guidance for its assessment;d) To provide guidance to consumers, manufacturers, and designers.This is achieved by specifying nomenclature, dimensions, polarity, terminals, marking, test conditions, and procedures.1.2 Normative referencesThe following standards contain provisions which, through reference in this text, constitute provisions ofthis American National Standard. At the time of publication, the editions indicated were valid. Allstandards are subject to revision, and parties to agreements based on this American National Standardare encouraged to investigate the possibility of applying the most recent editions of the standardsindicated below.ANSI/ASME Y14.5-1994, Dimensioning and tolerancingANSI C18.1M-1999, Part 2, Portable primary cells and batteries with aqueous electrolyte—safety standard1ANSI C18.1M, Part 1-20011.3 Definitions1.3.1 anode: Electrode at which an electrochemical oxidation reaction occurs.1.3.2 application test: A test which simulates the actual use of a battery in a specific application.1.3.3 battery: One or more cells, including case, terminals, and markings.1.3.4 battery, button: Small round battery, in which the overall height is less than the diameter.1.3.5 battery, portable: A battery that is easily carried.1.3.6 battery, primary: A battery that is not designed to be recharged.1.3.7 battery, prismatic: A battery with non-round geometry.1.3.8 battery, round: Cylindrical battery, the overall height of which is greater than or equal to its diameter.1.3.9 capacity: Quantity of electricity, usually expressed in Ampere-hours (Ah), which a battery can deliver under specified discharge conditions.1.3.10 cathode: Electrode at which an electrochemical reduction reaction occurs.1.3.11 cell: Basic functional unit providing a source of electrical energy by direct conversion of chemical energy. The cell consists of an assembly of electrodes, separators, electrolyte, container, and terminals.1.3.12 cell, primary: A cell that is not designed to be recharged electrically.1.3.13 discharge: An operation during which a battery delivers power (current and voltage) by the conversion of chemical energy into electrical energy to an external circuit.1.3.14 electrode: Conductive part, electrically connected to one terminal of a cell, forming an interface with the electrolyte and on which the electrode reaction occurs.1.3.15 electrolyte: Medium containing mobile ions which render it ionically conductive.1.3.16 leakage: The escape of electrolyte from a cell or battery.1.3.17 minimum average duration: The required average value of service output under specified test conditions.1.3.18 polarity: The electrical convention used to describe the direction in which current flows on discharge.1.3.19 rating test: A discharge test used to measure the service output of a battery.1.3.20 resistance, internal: Apparent opposition to current flow within a battery that manifests itself asa drop in voltage proportional to the discharge current. Its value depends on battery design, state of charge, temperature, and age.1.3.21 service output: Capacity or energy output of a cell or battery under specified conditions of discharge. It may be expressed as duration, number of pulses, ampere-hours, or in watt-hours.2in Figure 1.is terminated.1.3.26 voltage, nominal: Suitable approximate value used to designate or identify the voltage of a cell, battery, or electrochemical system.1.3.27 voltage, open circuit (OCV): The voltage of a battery when no external current is flowing.1.4 Requirements1.4.1 Designations, chemical systems, and voltages1.4.1.1 DesignationsBatteries are listed by their ANSI numbers and letter suffixes. Definitions of the letters are:A AlkalineAC Alkaline industrialAP Alkaline photographicNo suffix Carbon zincC Carbon zinc industrialCD Carbon zinc industrial, heavy dutyD Carbon zinc heavy dutyF Carbon zinc general purposeSO Silver oxideSOP Silver oxide photographicZ Zinc airZD Zinc air heavy duty1.4.1.2 Chemical systems and voltagesTable 1 – Chemical systems and voltagesChemical systemPositiveelectrode ElectrolyteNegativeelectrodeNominalvoltageMax opencircuitvoltageAlkalinemanganeseManganesedioxideAlkali metalhydroxideZinc 1.5 1.65Carbon zinc ManganesedioxideAmmoniumchloride and/orzinc chlorideZinc 1.5 1.80Silver oxide Silver oxide Alkali metalhydroxideZinc 1.5 1.63Zinc air Oxygen Alkali metalhydroxideZinc 1.4 1.681.4.2 Battery dimensionsIn some cases, a battery is adequately defined by two or three linear dimensions. For some batteries, it is necessary to describe the battery in greater detail by specifying additional battery dimensions. Asymmetry of battery shape or terminals enable the compartment to be designed so that batteries can be inserted only with the correct orientation.1.4.2.1 Dimension symbolsSymbols denoting various dimensions are as follows (note that some of the symbols and terms are defined in 1.4.2.2):A maximum overall height of the batteryB minimum distance between the flats of the positive and negative terminalsC minimum outer diameter of the flat surface of the negative terminalE maximum recess of the flat surface of the negative terminalF maximum diameter of the positive terminal within the specified projection heightG minimum projection height of the flat surface of the positive terminalK minimum projection of the flat surface of the negative terminalL maximum diameter of the negative terminal within the specified projection height∅ maximum and minimum diameters of the battery⊕ true positionP datum featureT positional tolerance of the positive terminal1.4.2.2 Dimension definitions1.4.2.2.1 DatumA datum is a theoretically exact point, axis, or plane derived from the true geometric counterpart of a specified datum feature. It is the origin from which the location or geometric characteristics of features ofa part are established.1.4.2.2.2 Datum featureA datum feature is an actual feature of a part that is used to establish a datum.1.4.2.2.3 Datum feature symbolA datum feature symbol is used to identify an actual part feature serving as a datum feature. An example of a datum feature symbol is “ P .”1.4.2.2.4 Maximum material conditionThe maximum material condition is the condition in which a feature of size contains the maximum amount of material within the stated limits of size (e.g., minimum hole diameter, maximum shaft diameter).1.4.2.2.5 Positional toleranceA positional tolerance defines a zone within which the center, axis, or center plane of a feature of given size is permitted to vary from a true position.1.4.2.2.6 True positionA true position is the theoretically exact location of a feature established by basic dimensions.1.4.2.3 Positional tolerancing of the positive terminalThe positive terminal shall be located within the allowed tolerance T with respect to the diameter of the cell. The diameter of the cell is specified to be the datum feature. The tolerance is indicated at the maximum material condition, or when the terminal is actually at its largest diameter. Additional tolerance is obtained by making the positive terminal smaller in diameter, subject to passing the N dimension for positive terminal minimum flatness diameter.1.4.2.4 Basic shapes of batteriesBasic battery shapes, including dimension symbols, are illustrated in Figures 2 and 3.1.4.3 Terminals1.4.3.1 GeneralEach cell or battery shall be supplied with terminals as specified in the appropriate specification sheet and according to the following general comments.This type of terminal is used for batteries that have specified dimensions according to Figure 2 and have the cylindrical side insulated from the terminals. The metal cap on the center electrode and the bottom of the battery serve as the terminals.1.4.3.2.1 Protruding negative terminal (Figure 2A, solid line)The bottom construction shall ensure good electrical contact when the battery is placed on a flat metal surface.1.4.3.2.2 Recessed negative terminal (Figure 2B, dashed line)The recessed terminal shall be such that when two or more batteries are placed in series, the cap of one battery will not project within the recess in the bottom of the adjacent battery to a degree that will cause the height of the stacked batteries, measured terminal to terminal, to be less than the number of batteries multiplied by their B dimension.1.4.3.3 Cap and caseThis type of terminal is used for batteries that have specified dimensions according to Figure 3. The cylindrical side of the battery forms part of the positive terminal.1.4.3.4 SnapThis type of terminal consists of a stud for the positive terminal and a socket for the negative terminal. These shall be made from nickel-plated steel or other suitable material. They shall be designed to provide a secure physical and electrical connection, when fitted with similar corresponding parts, for connection to an electrical circuit.1.4.3.5 Knurled-nut and screw terminalsThese terminals shall be made of brass or other suitable material.1.4.3.6 Spiral-spring terminalsThese terminals shall consist of spirally wound wire in a form suitable to provide a pressure contact. They shall be made of spring brass or other suitable metal.1.4.3.7 “Plug-in” socketsThis type of terminal shall consist of a suitable assembly of metal contacts, mounted in an insulated housing or holder and adapted to receive corresponding pins of a mating plug to ensure good electrical contact. The metal contacts shall be made of tinned brass or other suitable metal.1.4.4 General design considerations1.4.4.1 Dimensional stabilityThe dimensions of batteries shall remain within specified dimensional tolerances under conditions of storage and discharge, specified herein.1.4.4.2 LeakageBatteries shall not leak during discharge when tested under the conditions given in 2.2.1.4.5 Test conditions1.4.5.1 Environmental conditions1.4.5.1.1 Standard temperatureThe ambient temperature surrounding the battery shall be 21°± 2°C. During short periods only, the temperature may deviate from these limits without exceeding 21°± 5°C.1.4.5.1.2 Standard relative humidityThe relative humidity shall be between 35% and 65%, unless otherwise specified.1.4.5.2 Discharge conditions1.4.5.2.1 Environmental conditionsUnless otherwise specified, discharge tests are to be carried out at standard temperature and standard relative humidity.All minimum average duration values given in this specification refer to batteries stored and discharged under standard conditions of temperature and relative humidity.1.4.5.2.2 Storage before discharge1.4.5.2.2.1 Initial testsInitial tests intended to show the conditions of fresh batteries shall be started within 30 days after shipment by the manufacturer.1.4.5.2.2.2 Twelve-month testsTwelve-month tests are intended to assess the one year storage performance of batteries. Batteries subjected to this test shall be stored on open circuit at the standard temperature and relative humidity (refer to 1.4.5.1.1 and 1.4.5.1.2) for a period of 12 months. Zinc air cells shall be stored with air access holes sealed until tested. The 12 month storage time shall be measured from the time of shipment by the manufacturer.1.4.6 Test requirements1.4.6.1 Resistive loadThe value of the resistive load (which includes all parts of the external circuit) shall be accurate to within 0.5%.The load in ohms shall appear in the individual specification sheets and shall be one of the following, along with their multiples:1.00 1.10 1.20 1.30 1.50 1.60 1.802.002.20 2.40 2.703.00 3.30 3.60 3.904.304.705.10 5.606.20 6.807.508.209.10The value of any other non-resistive loads shall be specified in the individual specification sheet and shall be accurate to within 1%.1.4.6.2 Time periodsThe closed circuit and open circuit periods shall be as specified in the individual specification sheets.1.4.6.3 Determination of service outputTo determine the service output, batteries shall be discharged on each test as specified in the individual specification sheet until the closed circuit voltage drops for the first time below the specified end point voltage.When a specification sheet designates more than one service output test, batteries shall meet the requirements of all these tests to be in compliance with this standard.1.4.6.4 Voltage measurementThe accuracy of voltage measurements shall be within 0.01 V for each 1.5 V. The resistance of the measuring instrument shall be at least ten times the discharge resistance, but with a minimum of 20,000 ohms per volt of scale.1.4.6.5 Leakage and deformation determinationAfter the service output has been determined using the criteria on the individual specification sheets, the discharge shall be continued in the same way until the closed circuit voltage drops for the first time below 40% of the nominal voltage of the battery. The requirements of 1.4.4.1 and 1.4.4.2 shall be met, except that an increase in battery height of 0.25 mm over the maximum specified value is allowed for button cells of the A, SO, and Z systems.1.4.6.6 Methods of determining discharge test conditionsThe discharge tests in this standard are divided into two categories:a) Applicationb) Rating or capacityIn both categories of tests, loads are specified in accordance with 1.4.6.1.1.4.6.7 Activation of zinc air batteriesA period of at least ten minutes shall elapse between activation and the commencement of electrical measurement.1.4.7 Procedures to check conformance to a specified minimum average durationa) Test nine batteries.b) Calculate the average without the exclusion of any results.c) If this average is equal to or greater than the specified value and no more than one battery has aservice output of less than 80% of the specified value, the batteries are considered to conform for service output.d) If this average is less than the specified value and/or more than one battery has a service output ofless than 80% of the specified value, repeat the test on another sample of nine batteries andcalculate the average as previously described.e) If the average of this second test is equal to or greater than the specified value and no more thanone battery has a service output of less than 80% of the specified value, the batteries areconsidered to conform for service output.f) If the average of the second test is less than the specified value and/or more than one battery hasa service output of less than 80% of the specified value, the batteries are considered not toconform and no further testing is permitted.1.4.8 Marking1.4.8.1 GeneralAt least the following items shall be marked on the battery or package:a) Battery system—except carbon zincb) Designationc) Polarity of terminal (when applicable)d) Nominal voltagee) Year and month or week of manufacture, which may be in code, or the expiration datef) Name or trade mark of the manufacturer or supplierg) Warnings or cautionary notes, where applicableh) Caution for ingestion (small batteries only)1.4.8.2 Small size batteriesWhen this subclause is invoked on the individual specifications sheet, items b) and c) shall be marked on the battery. Items a), d), e), f), g), and h) may be given on the immediate packing instead of on the battery.NOTE—Batteries that are considered “small” are so noted on the individual battery specification sheets in 2.2.For zinc air batteries, b) and c) may be marked on the sealing tab of the battery or on the battery; d), e), and f) may be given on the immediate packaging, instead of on the battery.2 SPECIFICATIONS2.1 Specification sheet referenceANSI NumberIECDesignationCommonDesignation Volts Chemistry Page13A LR20 D 1.5 Alkaline manganese 14-15 13AC LR20 D 1.5 Alkaline manganese 14-15 13C R20S D 1.5 Carbon zinc 14-15 13CD R20C D 1.5 Carbon zinc 14-15 13D R20C D 1.5 Carbon zinc 14-15 14A LR14 C 1.5 Alkaline manganese 16-17 14AC LR14 C 1.5 Alkaline manganese 16-17 14C R14S C 1.5 Carbon zinc 16-17 14CD R14C C 1.5 Carbon zinc 16-17 14D R14C C 1.5 Carbon zinc 16-17 15A LR6 AA 1.5 Alkaline manganese 18-19 15AC LR6 AA 1.5 Alkaline manganese 18-19 15AP LR6 AA 1.5 Alkaline manganese 18-19 15C R6S AA 1.5 Carbon zinc 18-19 15CD R6C AA 1.5 Carbon zinc 18-19 15D R6C AA 1.5 Carbon zinc 18-19 24A LR03 AAA 1.5 Alkaline manganese 20-21 24AC LR03 AAA 1.5 Alkaline manganese 20-21 24AP LR03 AAA 1.5 Alkaline manganese 20-21 24D R03 AAA 1.5 Carbon zinc 20-21 25A LR8D425 AAAA 1.5 Alkaline manganese 22 903 - - 7.50 Carbon zinc 23 904 - - 9.00 Carbon zinc 24 908 4R25X - 6.00 Carbon zinc 25 908A 4LR25X - 6.00 Alkaline manganese 25 908AC 4LR25X - 6.00 Alkaline manganese 25 908C 4R25X - 6.00 Carbon zinc 25 908CD 4R25X - 6.00 Carbon zinc 25 908D 4R25X - 6.00 Carbon zinc 25 910A LR1 L20 1.5 Alkaline manganese 26 915 4R25Y - 6.00 Carbon zinc 27 915A 4LR25Y - 6.00 Alkaline manganese 27 915AC 4LR25Y - 6.00 Alkaline manganese 27 915C 4R25Y - 6.00 Carbon zinc 27 915D 4R25Y - 6.00 Carbon zinc 27 918 4R25-2 - 6.00 Carbon zinc 28 918A - - 6.00 Alkaline manganese 28 918AC - - 6.00 Alkaline manganese 28 918D 4R25-2 - 6.00 Carbon zinc 28 926 - - 12.0 Carbon zinc 29 926AC - - 12.0 Alkaline manganese 29 1107SOP SR44 S15 1.5 Silver oxide 30ANSI NumberIECDesignationCommonDesignation Volts Chemistry Page1131SO SR44 - 1.5 Silver oxide 30 1132SO SR43 - 1.5 Silver oxide 31 1133SO SR43 - 1.5 Silver oxide 31 1134SO SR41 - 1.5 Silver oxide 32 1135SO SR41 - 1.5 Silver oxide 32 1136SO SR48 - 1.5 Silver oxide 33 1137SO SR48 - 1.5 Silver oxide 33 1138SO SR54 - 1.5 Silver oxide 34 1139SO SR42 - 1.5 Silver oxide 35 1158SO SR58 - 1.5 Silver oxide 36 1160SO SR55 - 1.5 Silver oxide 37 1162SO SR57 - 1.5 Silver oxide 38 1163SO SR59 - 1.5 Silver oxide 39 1164SO SR59 - 1.5 Silver oxide 39 1165SO SR57 - 1.5 Silver oxide 38 1166A LR44 - 1.5 Alkaline manganese 30 1170SO SR55 - 1.5 Silver oxide 37 1175SO SR60 - 1.5 Silver oxide 40 1176SO SR66 - 1.5 Silver oxide 41 1177SO - - 1.5 Silver oxide 42 1179SO SR41 - 1.5 Silver oxide 32 1181SO SR48 - 1.5 Silver oxide 33 1184SO SR44 - 1.5 Silver oxide 30 1191SO - - 1.5 Silver oxide 43 1196SO SR66 - 1.5 Silver oxide 41 1406SOP 4SR44 - 6.00 Silver oxide 44 1412AP 4LR61 - 6.00 Alkaline manganese 45 1414A 4LR44 - 6.00 Alkaline manganese 44 1604 6F22 - 9.00 Carbon zinc 46 1604A 6LR61 - 9.00 Alkaline manganese 46 1604AC 6LR61 - 9.00 Alkaline manganese 46 1604C 6F22 - 9.00 Carbon zinc 46 1604CD 6F22 - 9.00 Carbon zinc 46 1604D 6F22 - 9.00 Carbon zinc 46 7000ZD PR48 - 1.40 Zinc air 33 7002ZD PR41 - 1.40 Zinc air 32 7003ZD PR44 - 1.40 Zinc air 30 7004Z - - 8.40 Zinc air 46 7005ZD PR70 - 1.40 Zinc air 47 7007Z - - 1.40 Zinc air 48 7012Z - - 1.40 Zinc air 43。
Model Checking说明书
$#
Given an abstraction function h : S Sh, the concrete states are grouped and mapped into abstract states :
Mh
h
h h Preservation Theorem ?
M
27
%
If M has partial behavior of N, we say that “N simulates M”: M N
generate initial abstraction
Mh
model check
Mh |=
Mh |=
generate counterexample Th
stop
Th check if counterexample spurious Th is not spurious
35
$*
Counterexample-Guided Abstraction Refinement C, SpecC, Verilog
11
Determines Patterns on Infinite Traces
Atomic Propositions a
a
a
a
a
Boolean Operations
Temporal operators
a Xa Fa Ga aUb
“a is true now” “a is true in the neXt state” “a will be true in the Future” “a will be Globally true in the future” “a will hold true Until b becomes true”
- 1、下载文档前请自行甄别文档内容的完整性,平台不提供额外的编辑、内容补充、找答案等附加服务。
- 2、"仅部分预览"的文档,不可在线预览部分如存在完整性等问题,可反馈申请退款(可完整预览的文档不适用该条件!)。
- 3、如文档侵犯您的权益,请联系客服反馈,我们会尽快为您处理(人工客服工作时间:9:00-18:30)。
Hardware Verification using ANSI-C Programs as a ReferenceEdmund Clarke Daniel KroeningComputer Science Department Computer Science DepartmentCarnegie Mellon University Carnegie Mellon UniversityPittsburgh,PA15213USA Pittsburgh,PA15213USATel:+1-412-268-2628Tel:+1-412-268-5409Fax:+1-412-621-5473Fax:+1-412-268-5576e-mail:emc@ e-mail kroening@A BSTRACTWe describe an algorithm to verify a hardware design givenin Verilog using an ANSI-C program as a specification.We useSAT based Bounded Model Checking[1]in order to reduce theequivalence problem to a bit vector logic decision problem.Asa case study,we describe experimental results on a hardwareand a software implementation of the data encryption standard(DES)algorithm.I.I NTRODUCTIONA common hardware design approach employed by manycompanies is tofirst write a quick prototype that behaves likethe planned circuit in a language like ANSI-C.This programis then used for extensive testing and debugging,in particularof any embedded software that will later on be shipped withthe circuit.An example is the hardware of a cell phone andits software.After testing and debugging of the program,theactual hardware design is written using hardware descriptionlanguages like VHDL or Verilog.Thus,there are two implementations of the same design:one written in ANSI-C,which is written for simulation,andone written in register transfer level HDL,which is the actualproduct.The ANSI-C implementation is usually thoroughlytested and debugged.Due to market constraints,companies aim to sell the chip assoon as possible,i.e.,shortly after the HDL implementation isdesigned.There is usually little time for additional debuggingand testing of the HDL implementation.Thus,an automated,or nearly automated way of establishing the consistency of theHDL implementation is highly desirable.This motivates the verification problem:we want to verifythe consistency of the HDL implementation,i.e.,the product,tion into a SAT instance and we report how the technique isapplied to two implementations of DES.II.T RANSFORMING ANSI-CA.Preparing the TranslationThis section describes how we formalize the semantics ofthe ANSI-C language and reduce the Model Checking Prob-lem to determining the validity of a bit vector equation.We assume that the ANSI-C program is already preprocessed.Theprogram is then prepared for translation:1.The instructions break,continue,and return arereplaced by semantically equivalent goto instructions asdescribed in the ANSI-C standard[6].The switch and case instructions are replaced by semantically equiva-lent code using if and goto instructions.2.The for and do while instructions are replaced byequivalent while instructions.3.Side effects,i.e.,post-and pre-increment operators,andfunction calls,are removed by introducing new temporary variables(section III describes how pointer dereferencesare handled).For example,x=5+(i++);is transformed totmp=i;i=i+1;x=5+tmp;where tmp is a new variable of the same type as i.In case of function calls,appropriate variable renaming isapplied to preserve locality.As the ANSI-C standard al-lows multiple evaluation orderings,all allowed orderings have to be verified.B.Unwinding the ProgramAfter the preparation phase,loop constructs are unwound. Loop constructs can be expressed using while statements,(recursive)function calls,and goto statements.The whileloops are unwound using the following transformation times:while()instrif()instr;while()instrThe if statement is added for premature termination of theexecution of the loop body,since the actual number of itera-tions can depend on the inputs.Any statements generated for side effects in are copied as well.The remaining while loop is replaced by an assertion that assures that the program neverdoes more iterations.This assertion is called an unwinding as-sertion.while()instr assert(!);These unwinding assertions are a crucial part of our ap-proach in order to assert that the unwinding bound is actually great enough.We formally verify that the assertion holds.Ifthe assertion fails for any possible execution,then we increase the number of iterations for the particular loop until the boundis big enough.Note that this bound just has to be an upperbound and does not have to match the number of iterations ex-actly.Function calls are expanded.Recursive function calls and backward goto statements are unwound in a manner similarto while loops.C.Final Transformation with Variable RenamingThe program resulting from the preceding steps only con-sists of(nested)if instructions,assignments,assertions,la-bels,and goto instructions with branch targets that are de-fined after the goto instruction(forward jumps).It is nowtransformed into a bit-vector equation that forms the set of constraints and into a bit-vector equation that represents theset of properties,i.e.,the assertions.During this process,the variables are renamed.Let the program refer to variable at a given program loca-tion.Let denote the number of assignments made to variable prior to the location.The variable is then renamed to. Within assignments to variable,the expression on the righthand side is considered to be before the assignment.The vari-able that is assigned to on left the hand side is considered to be after the assignment.Let denote an expression.Then denotes the expression after renaming.This transformation is done iteratively as follows:We startwith an empty set of constraints and properties,i.e.,and.Let and denote the equations before onestep and and denote the equations after the step.Thealgorithm terminates if the program is empty.If not so,let denote the remainder of the program.Let be parts of, and be a single statement such that the concatenation of,, and is.Furthermore,let contain only if statements,and any other statement.Thus,is thefirst statement of the remaining program that is not an if statement.Let denote the number of if statements in.Let denote the expressions that are conditions of the if statements in.Let denote the conjunction of the conditions of the if statements.In case there is no if statement,i.e.,,then is true.The conjunction is called guard of.true otherwiseThe algorithm proceeds by a case split on I.1.Let be a goto statement.The goto statement is re-moved.The target label of the goto instruction must be after the goto,i.e.,within.Let denote the part of before the label and denote the part of after the label:An if statement is added as guard to all statements in.The condition of the if statement is.The transfor-mations does not work for goto instructions that jump inside a guarded block.2.Let be an assertion,i.e.,assert().In this case,theassertion statement is removed,the assertion is renamed and added as a constraint to the bit vector equation.Since the assertion is only executed if holds,then the renamed guard must imply the renamed assertion .Remember that denotes the expression af-ter renaming.3.Let be the skip statement.If the”then”block of thelast if statement in contains other instructions,the skip statement is just removed.If not so,and the last if state-ment of has an else part,the condition of the last if statement is negated and the”else”block becomes the ”then”block.If the if statement does not have an else part,the last if statement in is replaced by a skip state-ment.4.Let be an assignment.Let be the variable on the lefthand side,let be the expression on the right hand side.Let the value of the variable after the assignment be.The value before the assignment then is.If is a simple variable,i.e.,not of an array or struct type,i.e., the assignment is,we add the following constraint: The new value of the variable has to be equal to the renamed right hand side if the guard holds,and equal to the old value of otherwise.otherwiseIf is of an array type,let be the array index address,i.e.,the assignment is.The new value of thearray at index has to be equal to the renamed right hand side if the guard holds and if is equal to,and equal to the old value of otherwise.otherwise We add an assertion that is greater or equal zero and that it is smaller than the number of elements of.As-signment to variables with struct types are handled similar to assignments to variables with array type.After the computation of and using the algorithm above,we verify thatis valid.This proves that no unwinding assertions have been violated and that all array bounds are obeyed.Figure1shows a simple example of the transformation process.III.P OINTERSAll pointer dereferences are removed recursively as follows:Let denote the sub-expression that is to be dereferenced.We remove dereferencing operators bottom-up,i.e.,all sub-expressions of are already free of dereferencing operators orother side effects.Let denote the guard as described above, the offset.The dereferencing is done by a recursive func-tion that is denoted by.The function maps a pointerexpression to the dereferenced expression.ANSI-C offers the star operator and the array index operator.Both are replaced by the expression provided by.The staroperator uses offset zero.The function is defined using a case split on:1.Let be a symbol of pointer type.Let be that pointer.The equation generated so far or the guard must containan equality of the form where is an arbitrary expression.The pointer is then dereferenced by deref-erencing.Otherwise,proceed as in case7.2.Let be a symbol of array type.Let be that array,i.e.,.We treat this case as syntactic sugar for.3.Let an address of symbol,i.e.,where is asymbol.In this case,is just and we assert that the offset is zero.The variable is then renamed according to the rules above.4.If is an address of array element expression,i.e.,,we add the offset to the index:The array access is then done according to the rules above.5.Let be a conditional expression.The function is ap-plied recursively for both cases.The condition is added to the guard.The condition is free of side effects and pointer dereferences.x=x+y;if(x!=1)x=2;if(z)x++; assert(x<=3);x=x+y;if(x!=1)x=2;if(z)x=x+1;assert(x<=3);(x=x+y)x=((x)?2:x)x=((x z)?x+1:x)x3Fig.1.Example:Renaming and transformation.Thefirst box on the left contains the unwound program with assertions.Each variable is a bit vector.Thefirst step is to rename the variables.Then the program is transformed into a into bit vector equation as described in section C.7.In any other case,the ANSI-C standard does not definesemantics(might be the NULL or a pointer variable that is uninitialized).We use a free variable in this case and we assert that this dereferencing is never done by the pro-gram.This is implemented by adding an assertion that does not hold.The algorithm for the difference of two pointers is similar.We assert that and point to the same object. Example:Consider the code fragmentint a,*p;p=&a;if(x)p=NULL;if(p!=NULL&&*p==1);Thefirst two statements are transformed into:The star operator in the if statement is removed as follows:does not hold.The algorithm permits dynamic memory allocation,which we omit due to lack of space.IV.T RANSFORMING V ERILOGWe only consider a very restricted subset of the Verilog lan-guage.Delay or event specifiers are ignored and only reg-ister data transfers are converted.Such a language is called synchronous register transfer language(RTL).The process of translating verilog into a bit vector equation closely matches the synthesis process.As result from synthesis,we obtain a transition relation and an initial state predicate.This transition relation is then unwound as usually done by a bounded model checker.In contrast to the unwinding done for ANSI-C,the number of times the unwinding must be specified manually.V.SAT I NSTANCE G ENERATION AND E XPERIMENTS The bit vector equations obtained from the ANSI-C program and the Verilog circuit are translated into CNF by generating circuits for bitwise operators such as equality,shifting,and multiplication.Due to lack of space,we have to omit the de-tails of the simplification and translation process.As a case study,we are using a software and hardware im-plementation of the DES encryption standard.The software implementation is used in most Unix systems.On a1.5GHZ machine the translation of the program into a SAT instance takes59seconds.The SAT checker Chaff[7]detects it to be unsatisfiable within seconds.The hardware implementation is written in synchronous Verilog,is cost optimized,and about 1900lines long.It requires16unwinding steps.VI.C ONCLUSION AND F UTURE W ORKWe have described the translation of ANSI-C programs into a SAT instance using Bounded Model Checking.We have per-formed experiments using a hardware and software implemen-tation of the DES algorithm.We plan to add support for reactive models and to optimize the generation of the SAT instance using specialized bit vector decision procedures and abstraction techniques.R EFERENCES[1] A.Biere,A.Cimatti,E.Clarke,and Y.Yhu.Symbolic model checkingwithout BDDs.In Tools and Algorithms for Construction and Analysis of Systems,pages193–207,1999.[2] C.Pixley.Guest Editor’s Introduction:Formal Verification of Commer-cial Integrated Circuits.IEEE Design&Test of Computers,18(4):4–5, 2001.[3]L.S´e m´e ria,A.Seawright,R.Mehra,D.Ng,A.Ekanayake,and B.Pan-grle.RTL C-based methodology for designing and verifying a multi-threaded processor.In Proc.of the39th Design Automation Conference.ACM Press,2002.[4].[5] A.Biere,A.Cimatti,E.M.Clarke,M.Fujita,and Y.Zhu.Symbolic modelchecking using SAT procedures instead of BDDs.In Design Automation Conference(DAC’99),1999.[6]International Organization for Standardization.ISO/IEC9899:1999:Pro-gramming languages—C.International Organization for Standardiza-tion,Geneva,Switzerland,1999.[7]M.Moskewicz,C.Madigan,Y.Zhao,L.Zhang,and S.Malik.Chaff:Engineering an efficient SAT solver.In Proceedings of the38th Design Automation Conference(DAC’01),June2001.。