Import 3D Model
three.js添加3d模型

three.js添加3d模型three官⽅的⼏何体也就那么⼏个,想要⽣成各种各样的模型,其难度⼗分之⼤,这时引⼊外部模型也不失为⼀种选择。
具体引⼊办法如下。
导⼊依赖点击查看代码虽然名字为GLTFLoader,但实际上glb⽂件也是能加载的。
初始化场景点击查看代码其中需要注意的是调节相机参数与相机位置,否则很有可能导致场景中看不见任何东西。
创建背景这⾥创建背景有3种办法,各有优劣。
1、直接加载⼀张贴图作为场景的background。
优点:⼗分简单易于使⽤。
缺点:始终是⼀张平⾏与屏幕的平⾯,⽆法随⿏标移动拖拽⽽变换。
点击查看代码2、使⽤天空盒⼦,加载CubeTextureLoader纹理,再将该纹理设为场景的background。
优点:可随⿏标移动拖拽⽽变换。
缺点:需要特制的六张天空盒⼦贴图,贴图不吻合时,⽴⽅体空间边缘会出现明显割裂感,视⾓两侧贴图会被拉伸。
点击查看代码3、创建⼀个较⼤的球体,将场景内的物体全部放⼊球体内部,此思路也是全景图原理,在vr看房项⽬中⼤多能遇见。
优点:可随⿏标移动拖拽⽽变换,由于球⼼距球壳距离相等,不会出现视⾓两侧贴图拉伸。
缺点:需要调节球体半径到合适的尺度,保证空间相机在球体内部,否则空间会出现⿊块。
需要保证贴图为360全景图。
否则球壳拼接边缘会出现明显空间割裂。
点击查看代码其中必须使⽤side: THREE.BackSide,显⽰材质背⾯。
3种办法视情况选择,当然也可能有其他我不知道办法。
本⽂使⽤为创建球体的办法。
创建⿏标控制器点击查看代码相机的最⼤与最⼩距离需要注意调节,否则会出现缩放异常。
创建光源点击查看代码模型最终显⽰出来的颜⾊与环境光和点光源均有关。
同时也需要注意调节点光源位置。
加载模型点击查看代码需要注意的是这⾥加载的模型是必须放在public路径下的,否则会⽆法加载。
注意根据模型尺⼨,调节场景的各种参数,否则会⽆法看见模型。
渲染场景点击查看代码渲染场景时不要忘记实时update⿏标控制器。
matterport3d simulator的构建方法 -回复

matterport3d simulator的构建方法-回复"Matterport3D Simulator的构建方法"Matterport3D是一个用于室内3D建模的开源数据集,该数据集基于虚拟实景与真实世界的映射,可以用于建筑、室内设计、机器人导航等领域的研究与开发。
为了更好地利用这个数据集,开发者们推出了Matterport3D Simulator,它可以用来模拟在真实环境中导航的场景。
本文将一步一步回答如何构建Matterport3D Simulator。
步骤一:数据集的准备构建Matterport3D Simulator的第一步是准备相应的数据集。
1.从Matterport3D官方网站上下载数据集文件,并确保数据集文件的完整性。
2.解压下载的文件到适当的位置。
步骤二:安装依赖项构建Matterport3D Simulator之前,你需要安装一些依赖项。
以下是常用的依赖项:1.Python 3.6或更高版本2.Tensorflow:用于训练和测试深度学习模型3.NumPy:用于处理和操作多维数组4.Pandas:用于处理和分析数据5.Scipy:用于科学计算和分析6.Matplotlib:用于数据可视化7.OpenCV:用于计算机视觉任务步骤三:配置环境在您开始构建Matterport3D Simulator之前,您需要配置您的环境。
您可以按照以下步骤进行配置:1.在您的Python环境中安装上述依赖项。
您可以使用pip安装包管理器进行安装,例如在命令行中运行“pip install tensorflow”以安装Tensorflow。
2.确保您有足够的存储空间来存储数据集和生成的模型文件。
3.设置正确的工作目录,以便您可以轻松地访问和管理数据集和代码。
步骤四:数据预处理在使用Matterport3D Simulator之前,您需要对数据集进行预处理。
以下是一些可能需要执行的数据预处理步骤:1.将数据集文件加载到Python环境中。
SolidPlant 3D 设计系统说明书

Route it your way,The only true speci cation driven Plant Design System for SolidWorks, SolidPlant 3D combinesthe intuitive parametric SolidWorks System with a sophisticated database to generate all components on the y. Unlike SolidWorks Routing, there is no parts library. This concept allows unlimited freedom and exibility in piping design.SolidPlant is a project based system that works perfectly with piping speci cations. We use tag names as a link towards the whole project design. If you have designed your P&ID on SolidPlant P&ID, SolidPlant will synchronize the data automatically. If you use another intelligent P&ID, or your existing 2D diagram program, we can import all tags and data from the pipe list, equipment list, valve list and instrument list from the exported les using the SolidPlant Tag Manager.Now you can nd any equipment, valve, instrument or pipe based on its tag name quickly. You can create the 3D equipment and pipes without having to re-enter data. This will signi cantly decrease the human error of data entry. For even more exibility you can also create new tags in SolidPlant for those ever so common design changes.The most important element of a plant design system is how the graphics work with the database. We understand that the piping engineer does not want to spend a lot of time on creating and managing the database. Preparing a database with an enormous amount of data will traditionally take a lot of e ort and discipline in order to make sure it is done right from the start with the highest level of accuracy. SolidPlant’s SpecCreator provides a great tool for the engineer to prepare piping data as easily as possible without having to compromise on accuracy. SolidPlant is a strong advocate of the concept, “Do It Right the First Time!”Creating a new catalog normally is a time consuming task. Our SpecCreator module can export any of the existing catalogs already available in the system to an Excel format. You can then edit or modify the data and import it back into the system. Our Import Catalog feature will help you import the new catalog after it has been prepared in an Excel format. It doesn’t matter what format the columns and names are. The feature will allow the user to map the columns of the new catalog to the correct format. Then you will have your new catalog in a few clicks.A step by step Wizard style interface helps the user create piping speci cations for his projects very easily without making mistakes. The speci cation can then be used or edited further to suit the needs of the designer.Structure Modeler TemplatesSolidWorks itself has good steel structure design features. However, SolidPlant gives you more tools on top of that.To model a structural element would consume a lot of time and e ort. SolidPlant has prepared templates of Stairs, Spiral Stairs, Ladders, Handrails, Trusses, Walkways, Platforms, Conveyer and Pipe Bridge. The graphic user interface is simple and intuitive. The user only has to enter a value for a dimension in the graphic input eld then SolidPlant will generate the model quickly. That’s not all, since the model is a SolidWorks model, the user will be able to change all the dimensions as a parametric model, or pop up the template window and edit the desired dimension. The model then rebuilds automatically.These templates will save a lot of time, especially for the piping designer that has to model these kinds of structures just forreferencing.Intelligent Pipe SupportsBased on the exibility of SolidWorks mating features in an assembly, SolidPlant gives you the easiest way to place pipe supports. Our pipe support templates will allow you to place supports and edit them with just a few clicks. This will give you pipe supports that are required for your design quickly, in the way that they should be, automatically. Sloped supports and custom sized U-bolts are some of the features in SolidPlant Pipe supports feature.Duct and Cable trayOur Duct feature provides two methods to model your Ducting, Cable Trays or other Non-round piping. Using the manual method you can place components one-by-one. This is a very easy and straight forward method and is appropriate for mining and cement plant designs. Or you may also model your duct systems using a 3D sketch method and the system will generate all of the components automatically. These two methods will allow you to save time when you are creating your 3D models.Bill of MaterialAs SolidPlant is a real speci cation driven system all components are created from the database. The bill of materials that will be generated from SolidPlant will be accurate and reliable. The bill of materials can take o from Structures, Equipments and Piping in exible format. We also can export this data to an Excel format if required.Equipment Creation TemplatesSolidWorks is a great tool to create equipment models. On top of this SolidPlant provides templates to create several types of typical equipment such as Tanks, Horizontal and Vertical Vessels, Heat Exchangers, Pumps and Towers. With an engineering friendly user interface it will help you place or add any type of nozzle to any part or area of the equipment.If you have other departments involved in designing equipment for you but they happen to be unfamiliar with SolidWorks, there is no need to be concerned or worried as SolidPlant also allows you to import 3D equipment models from other CAD software using standard formats such as IGES, ACIS, Parasolid or any other format that SolidWorks is able to read and import.SolidPlant provides a comprehensive tool to assign accurate nozzle coordinates. This is the most important requirement in order to be able to do automated and accurate pipe routing.PipingAuto RoutingThis method will help the designer create the best path or pipe route faster than ever . With just 2 clicks, the‘from nozzle’ and ‘to nozzle’, the system will automatically generate the pipe route for you based on the piping speci cation database in the system.Alias’ ISOGEN ®includedSolidPlant has embedded the de facto standard forgenerating isometric drawings, Alias’ Isogen.Now you can generate Isometric drawings anytime. Engineers, pipe designers, and contractors worldwide recognize this format and this allows you to share your pipe designs with con dence knowing they will be understood.Smart FittingSolidPlant has a cool feature called “Smart Fitting” that allows you to extend or add pipe branches by dragging toward any point you prefer. This feature will automatically put the tting in the pipe. If it's an extending pipe, the tting will change.Smart RoutingA unique feature called “Smart Routing” allows you to create a pipeline with amazing ease. Simply right-click the pipe tag in the SolidPlant project manager and select “SmartRoute”. SolidPlant will then generate the route, connecting the correct nozzles as de ned in the data imported from your P&ID design. It will also pop up the valve list for the route based on that data. You can then easily drag and drop the valves onto the pipeline in the correct location.Advanced Piping FeaturesIn sophisticated pipe routing designs, we need more advanced features to nish a 3D model. SolidPlant has developed more advanced tools that will help the designer solve the complex piping easier and with better accuracy. Some of these features that will help the designer are:• Sloped pipe • Pipe jogging • Stub in • Pipe with Insulation • Pipe adjustment •Tag nderTraditional Pipe RoutingThis method is a combination between the manual method and the fully automatic techniques. The tools we provide will help you design a complex pipingsystem easier and more e ciently. We understand what engineers want: a system that is as easy and as exibleas possible, but fully accurate at the same time.WorkgroupSolidPlant provides the ability and tools to work asa workgroup. SolidPlant has written a plug-in for SolidWorksEPDM to embed the tag and model data. We have added functionality to the interface based on Tag number andde nition. So you can use all the bene ts of Solidworks EPDMsuch as Multiuser, Check-in/Check-out, Search/Preview, andauthorised work ow design. If you don’t have EPDM, We also provide a multiuser working environment feature without EPDM capability.PCF, IFC Imports/ExportsWith SolidWorks ability to import an IFC le you have the bene t of being able to import a structure from a 3D Architect CAD system such as ArchiCAD, Bentley or Revit to be used in your plant design, without having to model it again in SolidWorks. With these structures placed into your plant assembly your pipe designs can then accurately reference these. The bene t of SolidPlant’s PCF Import is the ability to use existing pipe designs that were created in a system that has the ability to export PCF les. This feature will help the contractor so that they can accept 3D les from any system and then use these les to smoothly work within SolidPlant and SolidWorks.UtilitiesUser interfaceThe most important aspect of the user interface is the requirement to help the user work faster while making less errors. The SolidPlant interface was designed with that principle in mind. Our interface and work ow were designed by experienced piping designers with the purpose of giving you a great experience when using SolidPlant 3D.Walkthrough/Collision detectionWith the walkthrough feature of SolidWorks the user will be able to do a video animation or real-time walkthrough within the SolidWorks window. You don’t need to export to any other software just to do a walkthrough.Floor/Elevation arrangementOur elevation management feature will help the plant designer who is not familiar with the mate features in SolidWorks to work with what they are familiar with, like the elevation on the Z axis and de ned oor levels.GA Drawing generation and detailingSolidPlant provides many tools and standard symbols of Plant design that do not exist in SolidWorks regular drawing features. The user can make a GA drawing faster and more accurately.The PCF Export feature of SolidPlant 3D allows you to send out the 3D model to your favourite pipe stress analysis application.Create new project,Open Project,RefreshTAG list Close Project Files ListPreviewWith SolidWorks platform, plant design engineers around the world will enjoy creating 3D models of everything from a small bolt to a large tower in a precise way. SolidPlant 3D allows you to nish your plant design and generate all necessary documents, such as general arrangement detail drawings and Isometrics, and of course Bill of Materials in a single platform.Combining Solidworks and SolidPlant 3D is de nitely a dream Plant design system that the engineers always desired for!Singel 540 l 1017 AZ Amsterdam Tel. +31(0)20 89 41 393Fax. +31(0)20 8941 333 System requirements :OS : Microsoft Windows 7 (64 bit)Processor : Intel Core i3 or AMD with SSE2 supportMemory : 4 GB minimumDisk Space : 10 GB minimum free hard disk spaceVideo Card : 1 GB Microsoft OpenGL or Direct3D capable(*SolidWorks Certi ed cards and drivers recommended) Software : SolidWorks 2013 Sp 2.0 or higher (64 bit)Copyright 2011 SolidPlant. All rights reserved.。
3D搭建乐高ldd教程

LEGO® Digital Designer 4.1 用户手册在Readme(说明)文件里包含系统需求和这个软件发布的最新信息。
如果你遇到问题,请参考它。
网址:/一、Welcome screen(欢迎窗口)每次你启动LEGO® Digital Designer或者打开一个新的模型文件,你将会看到欢迎窗口。
从下列的项目中点击一个选择。
LEGO® Design byME®(我的乐高设计)有大量供选择的积木来搭建你梦中的模型。
然后买来真正的积木延续从计算机上你搭建的乐趣。
LEGO® MINDSTORMS®(乐高Mindstorms)用专门的机器人套装进行搭建。
然后上传你的模型和建造手册到LEGO® MINDSTORMS®网站。
LEGO® Universe(乐高宇宙)如果你想没有限制的搭配积木和颜色,就选择Lego Universe模式。
二、Mouse Controls(鼠标控制)这里是用你的鼠标按钮可以做的事情:∙左边按钮点击一块积木选择它。
按住左键并拖动积木到场景中。
∙右边按钮点击并按住右键可以旋转场景摄像机视图。
∙鼠标滚轮使用你的滚轮来放大或缩小场景。
三、Camera control (摄像机控制)摄像机控制让你可以旋转模型,可以放大和缩小模型。
所以你可以从不同的角度和不同尺寸观看你的模型。
∙Rotate view(旋转视图)(数字小键盘,数字8, 2, 4, 6)。
你既可以使用摄像机控制上的按钮也可以使用你的键盘来旋转摄像机视图。
∙Zoom view(缩放视图)(数字小键盘,+和-键)。
选择键盘上+和-键或者按摄像机控制上的+和-按钮来缩放。
∙Reset view(复位视图)(数字小键盘, 数字5)。
点击复位视图返回到标准位置的视角。
所有的积木和模型都是可见的,并且在场景的中心。
∙Pan view (移动视图,只有快捷键)(Shft+right click). 按下Shift键和点击右键来查看你的模型的左面,右面,上面或底部。
3d转cad图纸操作流程
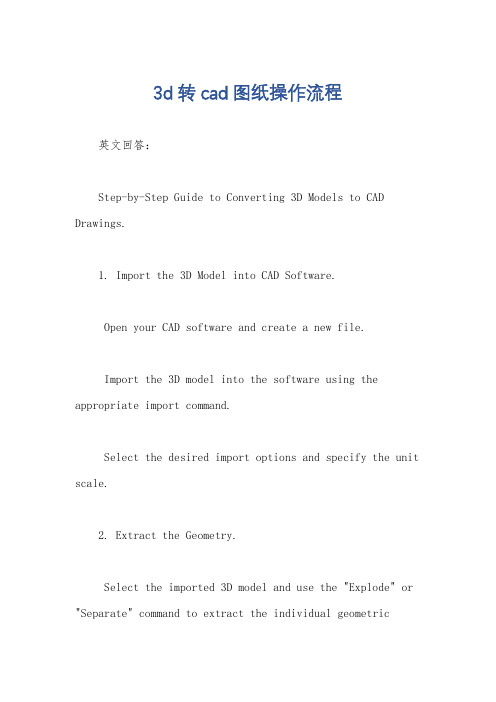
3d转cad图纸操作流程英文回答:Step-by-Step Guide to Converting 3D Models to CAD Drawings.1. Import the 3D Model into CAD Software.Open your CAD software and create a new file.Import the 3D model into the software using the appropriate import command.Select the desired import options and specify the unit scale.2. Extract the Geometry.Select the imported 3D model and use the "Explode" or "Separate" command to extract the individual geometricentities (curves, surfaces, solids).Alternatively, you can manually trace over the 3Dmodel to create new lines, arcs, and other geometric shapes.3. Create 2D Profiles.Use the "Section" or "Slice" tool to create 2Dprofiles of the extracted geometry.Specify the orientation and cutting plane for theprofile extraction.Check the resulting profiles for accuracy and completeness.4. Convert 2D Profiles to CAD Primitives.Select the 2D profiles and use the "Create Line," "Create Circle," or "Create Curve" commands to convert them into CAD primitives.Adjust the properties of the primitives (e.g., line thickness, color, fill) as needed.5. Dimension and Annotate the Drawing.Add dimensions to the drawing using the "Dimension" tools.Insert notes and callouts to clarify specific features or measurements.Label the drawing with a title, revision number, and other relevant information.6. Save the CAD Drawing.Once the drawing is complete, save it in the desired CAD file format (e.g., DWG, DXF).Choose the appropriate export settings and specify the desired drawing scale.中文回答:3D模型转CAD图纸操作流程。
基于ShiVa3D的在线三维虚拟场景交互式展示研究

基于ShiVa3D的在线三维虚拟场景交互式展示研究摘要:虚拟场景交互式展示是集视听感受为一体的实时虚拟空间仿真,用户通过必要的设备和技术实现交互体验。
为提高三维虚拟场景展示的真实感、沉浸感、实用性,设计了一种支持虚拟漫游、虚拟对象属性查询、语音交互和手势交互相结合的在线虚拟展示系统,介绍了基于ShiVa3D引擎分析系统的开发流程和实现方法。
关键词:Web3D技术;ShiVa3D引擎;虚拟展示;语音交互;手势交互0 引言网络通信技术的发展促使网络带宽和网络用户不断增加,基于Internet实现实时在线的三维虚拟场景交互式展示已成为可能,同时用户可以通过电脑和智能手机等多种终端设备访问在线三维虚拟场景。
旅游景点、文化遗址、商业楼盘、购物商城等场景的在线交互式虚拟展示成为当前研究的热点问题,但现有的在线虚拟场景往往存在规模较小、内容较少、交互方式单一等问题。
ShiVa3D是一款支持多种操作系统平台的3D游戏引擎,包含所见即所得的场景编辑器、多平台发布工具、网络多用户服务器等,支持实时地形编辑、动态复合对象(Compound Dynamic Body)建模、大规模虚拟场景管理与优化、Web浏览器展示、C/C++/LUA脚本编程等,基于XML协议和SOAP协议实现网络应用程序与各种数据库和服务器的兼容。
为提高大规模在线虚拟场景展示的实时性和流畅性,丰富虚拟场景的内容及其用户交互方式,本文采用ShiVa3D引擎实现对巴东古县城的复原和在线虚拟交互式展示。
1 在线虚拟交互式展示系统设计以巴东古县城为例,设计了一种在线三维虚拟场景交互式展示系统,主要有虚拟场景漫游、视角切换、语音交互控制、手势交互控制、虚拟对象属性查询等功能。
虚拟场景漫游包括交互式漫游和固定路径漫游两种模式,主要用于用户观察虚拟场景的室内和室外情景,是系统的核心功能。
视角切换、语音交互控制和手势交互控制可改变以往单一的鼠标或键盘交互方式,增强系统的趣味性和交互的自然性,使用户全方位、多视角体验虚拟场景的丰富内容。
Esri 3D 场景创建指南说明书
Importing and incorporating 3D models in a scene380 New York StreetRedlands, California 92373 – 8100 USA Copyright © 2018 EsriAll rights reserved.Printed in the United States of America.The information contained in this document is the exclusive property of Esri. This work is protected under United States copyright law and other international copyright treaties and conventions. No part of this work may be reproduced or transmitted in any form or by any means, electronic or mechanical, including photocopying and recording, or by any information storage or retrieval system, except as expressly permitted in writing by Esri. All requests should be sent to Attention: Contracts and Legal Services Manager, Esri, 380 New York Street, Redlands, CA 92373-8100 USA.The information contained in this document is subject to change without notice.Using 3D thematic symbology to display features in a sceneTime: 1 hour, 30 minutesOverview3D modeling, especially in urban environments, can significantly be improved by importing additional non-GIS content, in different formats, derived using third-party tools. Using ArcGIS Pro, you can import several 3D formats such as .3ds, .wrl, .skp, .flt, and .dae. ArcGIS Pro 2.2 includes support for Revit.rvt files as a data source.In some cases, 3D models may not be georeferenced, which can cause issues when integrating with GIS data that is projected and exists in coordinate space. However, ArcGIS Pro 2.2 has tools to update and fix unreferenced models using 3D georeferencing tools that make proper adjustments within the application.This lesson will guide you through the process of importing 3D content such as COLLADA.dae models into feature classes and placing them into a scene and importing Revit.rvt files into Pro as a data source and 3D georeferencing them into 3D scenes.In this lesson, you will learn to do the following:•Import 3D models in various formats•Interact with imported 3D models•Add Revit.rvt project as a data source•Georeference a Revit.rvt modelOpen map packageFirst, download the data.1.Download the Importing-Content.zip compressed folder.2.Locate the downloaded file on your computer and extract it to a location you can easily find,such as your Documents folder.3.Open the Importing-Content folder.The data for this lesson covers the Redlands Packinghouse District, Redlands, California. The data has been created by Esri, Inc.Next, create a project using the Blank Project template.1.Start ArcGIS Pro and click the Local Scene template to create an ArcGIS project.Note: If you don't have ArcGIS Pro or an ArcGIS account, you can sign up for an ArcGIS free trial. the project ImportModels, specify a suitable location, and click OK.3.On the Insert tab, in the Project group, click Import Map.4.Click, Import_Content.mpkx from the extract location. This will add a new local scene to yourproject.5.Click OK.Adding, configuring, and placing a COLLADA.dae model3D scenes can be significantly enhanced and made more realistic with the addition of 3D symbols and real-world models. Some of these models can be quite detailed or unique to a specific area or subject. As a result, many third-party model formats are supported in ArcGIS Pro.Next, you will explore the workflows and best practices for importing and using different formats and adding them to a 3D scene via a multipatch feature class.1.On the Edit tab > Features group, click the Create button.The Create Features pane appears, displaying available template layers.2.In the Contents pane, right-click Train and select Properties.3.In the Layer Properties window, click Source.Note that the Train layer, Geometry Type is a Multipatch. This means that any new train feature created will be a 3D multipatch feature. Multipatch features consist of one or more faces that can be extruded to specify depth. In addition, faces can be split to create openings and edges dragged to complete features.4.Click Cancel to close the Layer Properties window.5.In the Create Features pane, click Train.The Create Features pane now displays the available Multipatch Construction tools.6.Locate and click the Model File construction tool .7.Click the green plus to add one or more models.8.Browse to the Importing Content > Data Files > Collada folder and click Train.dae, then click OK.In the Create Features pane, notice that the Collada model has been added to the Active Template as a Multipatch feature.9.If necessary, resize the pane to display the current model properties.At this point, you could change the Size, Rotation or Position of the Multipatch feature on the Active Template, if desired.10.Update the Angle (Z) to 90 dd.In Scene 1, move the cursor and notice how you can add a new multipatch train feature derived from the COLLADA file.ing a simple click on the scene, add and place the 3D model of a train along the SouthernCalifornia Regional rail line located to the south of the West Stuart Avenue.12.On the Edit tab > Tools group, click the Move tool to update and move the newly placed trainmodel.13.Explore the tool by moving and positioning the train model in x,y,z space.14.Explore with the Rotate tool.15.Notice how you can flip the train upside down.e the Scale tool.Notice how you can increase the width and height of the model as needed.17.When you are done exploring, click Cancel to discard changes and exit the current operation.If you made any edits, click the Finish button on the mini-toolbar or press F2 to accept changes.18.On the Edit tab, in the Manage Edits group, and click Save.This will commit the newly created Train feature to the geodatabase feature class storing train features.19.Click Yes to save the project.Adding, configuring, and placing an OBJ.obj model1.In the Create Features pane, click the Palms multipatch template.2.Locate and click the Model File construction tool.3.Click the green plus to add one or more models.4.Browse to the Importing Content > Data_Files > OBJ folder and select CA_Palm.obj, then click OK.5.Move the pointer to the scene and notice the Palm multipatch feature generated from the Objformat. Do not click anywhere on the scene.6.In the Active Template properties pane, update the Height (Z) value from 119 to 10 ft.Notice how it locks the aspect ratio by default; you can click on the three connecting bars to disable it. You can change the Size, Rotation, or Position of the Palm model.7.Place several palm trees with different sizes or configurations by modifying model properties in theActive Template.8.When finished, click the scene to place the 3D model.9.On the Edit tab > Manage Edits group, click Save.10.Click Yes to save edits.This will commit the newly created Palm feature to the geodatabase feature class storing train features.11.On the Edit tab > Selection group, click Clear to clear the selection.12.Close the Create Features pane.13.Save the project.Reading and adding Revit.rvt (BIM) projects into ArcGIS ProRevit is a design and documentation platform that supports the design, drawings, and schedules required for building information modeling (BIM).1.If necessary, on the View tab > Windows group, click the Catalog pane.2.In the Catalog pane, right-click the Folders section and click Add Folder Connection.3.Browse to or search for the Importing Content > Data_Files > Revit folder and click OK.4.Expand the Folders > Revit folder tree > COTTAGE_MODEL.rvt in the Catalog pane.Notice how the entire COTTAGE_MODEL.rvt, Revit project is available directly as a data sourcewithout the need for conversion.5.Expand Structural under COTTAGE MODEL.rvt.Notice how the model consists of building elements organized into categories of element types. Structural contains structural elements of the building and includes the foundation, framing, and columns of the building.6.Expand Architectural.Note how this category includes doors, furniture, and other architectural elements of the building.7.When you are done exploring the model, collapse the open categories of elements.8.In the Catalog pane, Folders > Revit, right-click COTTAGE_MODEL.rvt, then choose Add To CurrentMap.Note: You can also drag COTTAGE_MODEL.rvt onto the scene.Georeferencing a Revit.rvt (BIM) modelWhen bringing 3D models from third-party applications into ArcGIS Pro, they are often not georeferenced, which means that they have no coordinate system. This causes an issue when trying to place them in the correct coordinate space. You can use ArcGIS georeferencing tools to update and place the models in the correct coordinate space.After adding COTTAGE_MODEL.rvt to your scene, you will notice that it appears that nothing is displayed. The model has in fact been added to the scene but may have been added to a location in the middle or elsewhere in the scene extent. This may be in the middle of the ocean, as the scene’s current coordinate system is set to WGS 1984 Web Mercator Auxiliary Sphere_1, which encompasses the extent of the world.1.In the Contents pane, right-click COTTAGE_MODEL and choose Zoom To Layer.Note: Depending on your settings, your model may be in a different location. Proceed to the next set of steps.The scene updates and displays the COTTAGE_MODEL.2.Tilt the view or zoom out and notice how it was placed in the middle of the ocean.3.In the Contents pane, click COTTAGE_MODEL to select the layer.4.On the Manage tab > Alignment group, click Georeference.5.On the Georeference tab > Prepare group, click Locate.7.In the search results, choose Redlands, CA, USA.8.Zoom in close enough to view the Packing House buildings used in previous steps.9.On the Georeference tab > Prepare group, click Move To Display.will move the cottage to a more suitable location. Next, you will tilt the view and zoom in on the cottage.10.On the ribbon, Georeference tab > Prepare group, click Move.Experiment and move the model to a suitable location opposite the train model added earlier.11.On the ribbon, Georeference tab > Prepare group, click Scale.Experiment scaling the cottage model up by extending its length and width so that it may be used as a train depot.12.On the ribbon, Georeference tab > Prepare group, click Rotate.Experiment rotating the cottage model to see if you can position it better within the space for use as a train depot.13.When you finish georeferencing and positioning and scaling the model, from the Georeference tab> Save group, click Save.This will create a 3D world file for the model.14.Click Yes.15. Click the Close Georeference button to exit of the georeferencing process.16.Save the project and close ArcGIS Pro.SummaryWhen working with external or imported content, it is important to know the format of and software used to create the file. This will help determine the correct workflow needed to display and use the file in ArcGIS Pro. Workflows may include either creating a multipatch feature classes or a BIM composite layer fromthe original content. Supporting, sharing and consuming external/imported content are particularly important for third parties and agencies working on site-specific projects and new proposed designs.。
Simplify3D软件快速入门指南说明书
Simplify3D® Quick Start Guide SOFTWARE SETUPThe Configuration AssistantWhen you open Simplify3D for the first time, youwill be greeted by the Configuration Assistant.Select your printer from the drop down menu toautomatically configure all of your settings.If you don’t see your printer listed on theConfiguration Assistant, please select the option for“Other” at the bottom of the list. If you needassistance creating a new profile, feel free tocontact Simplify3D Support for assistance.You can access the Configuration Assistant at anytime to change your settings to a different printer.Go to Help > Configuration Assistant.The Interface LayoutAfter the printer configuration is complete, you will see the main Simplify3D software interface. The major elements of the software interface are identified below.FOUR STEPS TO YOUR FIRST PRINT1. PrepareThe first step of the 3D printing process in Simplify3D is to import the model you want to build.You may obtain 3D models from a variety of online repositories, such as or , or you can make your own model using CAD software. Save the 3D model fileas an .stl or .obj file.Click Import in the Models section and navigate to the folder where you saved your file. Youcan also drag-and-drop file(s) onto the Build Table. Click onCenter and Arrange to move your models to the center ofthe build plate. Use Tool Bar options (listed vertically on theright side of the window) to view and manipulate your model.2. ProcessNow you will define a Process that specifies how your model will beconstructed. Most models use a single process; more complicated modelsmay use multiple processes. The first Process will be configuredautomatically based on the printer selected in the Configuration Assistant.You can make any adjustments you choose, but “Process1” is a great placeto start!To make adjustments to your Process, double-click on the Process or clickEdit Process Settings. This will open the FFF Settings window.**The acronym FFF stands for Fused Filament Fabrication, and refers to 3D printing using filament-based materials.The FFF Settings window contains all the settings that specify how your model will beconstructed:• Select Profile: Loads aprinter profile and thecorresponding settings, whichhave been selected to ensureoptimum quality.• Auto-Configure forMaterial: Adjuststemperature, extrusion, andcooling settings based on thematerial you select.• Auto-Configure for Print Quality: Adjusts layer height, infill density, and other quality settings based on the level you desire.• Auto-Configure Extruders: This selection box appears if you selected aprinter with multiple extruders. Select the extruders that you intend to use and they will be automatically enabled.• Infill Percentage: Adjusts the interior solidity of your 3D print. 0% is completely hollow and 100% is completely solid. A value in the range of 20-50% is frequently used.• Include Raft: Generates a raft structure underneath your part. Rafts are used to improve the bond to your build platform and may help reduce warping on large models. A raft can also compensate for slight leveling issues if you have difficulty with first layer adhesion. • Generate Support: Turns on the Support Generation Tool. Support structuresare used when your model has steep overhangs or unsupported areas. Typically,overhangs greater than 45º benefit from support material underneath it. Simplify3D also allows you to customize the location of your support structures; simply click to add ordelete! Support structures break away cleanly and easily, minimizing damage and ensuring high quality models.Click OK when you have finished configuring your settings in the FFF Settingswindow. At any time, you can modify the settings by double-clicking on the Processin the list, or by clicking Edit Process Settings. Click Show Advanced to view additional options.3. PreviewAfter you have finalized your Process settings, click Prepare to Print! This will initiate two important functions: Simplify3D will “slice” your model and transition to the Preview Mode.“Slicing” is the term used to describe the process of converting adigital model into line-by-line printer instructions called G-Code. Thelightning-fast slicer in Simplify3D quickly prepares G-Code based onthe variables you selected in the FFF Settings window.The animated Preview Modeallows you to inspect all aspects ofyour print operation prior toexecution. The software reads theG-Code and displays line-by-line orlayer-by-layer how your model willbe constructed.The Preview provides interactivebuttons for precise inspection ofyour build sequence:• Play/PauseButton: Animates thePreview by line or by layer.• Start and End Slider Bars: Allow you to move through the Preview manually.(Hint: leave the Start slider positioned left and drag the End slider right to view the build sequence.)A useful setting is to select Preview by Layer and also place a checkmark in SingleLayer Only. Together, these selections will allow you to view one layer at a time.If you want to make further adjustments to your model or process before printing, click Exit Preview Mode. This is a great time to ensure that your model is constructed properly.The Preview Window also contains estimates about your print project. These Build Statistics appear in the top left corner of the Preview window.• Build Time: How long it would take for your print to finish.• Filament Length: How much filament it will take to build your model.• Weight: How much the print will weigh when completed.*• Material Cost: An approximation of how much it will cost to make your part.* *To adjust the density or cost per kg values, please select Edit Process Settings then browse to the Other tab.4. PrintWhen you are satisfied with the Preview, there are two methods for how to start your print: Begin Printing over USB: if you are using a USB connection, you have the option to view the build sequence real-time on your monitor by selecting Live Preview Tracking. For additional information on USB communication, access the Machine Control Panel by going to Tools > Machine Control Panel to view a broad range of information that is transmitted via USB.Save Toolpaths to Disk: This saves your print file to a user-defined location, such as a folder on your computer or an SD card. The software will save a .gcode file and then automatically create a .X3G, .MakerBot or other print-type file if needed.Additional ResourcesFor more information about any particular setting, useyour mouse to hover over the setting to display atooltip describing the functionality.These additional support materials are found at.• Print Troubleshooting Guide• YouTube Video Resources• Tutorials• Hardware Setup Guides• User Forum• FAQ Hover over text to see TooltipsThank you for purchasing Simplify3D Software, and happy printing!。
FRANC3D-V8.1-ABAQUS教程
2. 案例 1:立方体中的裂纹引入和扩展
在本案例中,我们模拟了远场张力下立方体中的单个表面裂纹。假设用户熟 悉 ABAQUS 的前处理操作,我们使用 ABAQUS CAE 创建有限元模型,接下来 介绍 FRANC3D 所需的步骤:1)读取模型;2)引入裂纹;3)执行 ABAQUS 分 析;4)计算应力强度因子。所有这些步骤都会在下方描述。
步骤 2.1:导入完整的 ABAQUS 有限元模型 ...........................................5 步骤 2.2:选择有限元模型中的保留项......................................................6 步骤 2.3:显示有限元模型..........................................................................8 2.3. 步骤 3:导入并剖分模型 ...........................................................................9 2.4. 步骤 4:引入裂纹 .....................................................................................14 步骤 4.1:定义一个新的裂纹....................................................................14 步骤 4.2:从文件中导入裂纹....................................................................19 2.5. 步骤 5:静态裂纹分析 .............................................................................21 步骤 5.1:静态裂纹分析............................................................................22 步骤 5.2:选择有限元求解器....................................................................23 步骤 5.3:指定 ABAQUS 分析选项 .........................................................23 2.6. 步骤 6:计算应力强度因子 .....................................................................25 2.7. 步骤 7:手动裂纹扩展 .............................................................................27 步骤 7.1:扩展裂纹....................................................................................27 步骤 7.2:指定拟合和外推........................................................................30 步骤 7.3:指定裂纹前缘模板....................................................................31 2.8. 步骤 8:自动裂纹扩展 .............................................................................33 步骤 8.1:打开 FRANC3D 重启文件 .......................................................33 步骤 8.2:裂纹扩展分析............................................................................33 步骤 8.3:指定扩展规则............................................................................34 步骤 8.4:指定拟合和模板参数................................................................36 步骤 8.5:指定扩展计划............................................................................37 步骤 8.6:指定求解器................................................................................37 2.9. 步骤 9:SIF 历史和疲劳寿命 ..................................................................39 步骤 9.1:沿路径的 SIF.............................................................................39 步骤 9.2:所有前缘的 SIF.........................................................................41 步骤 9.3:预测疲劳寿命............................................................................42 2.10. 步骤 10:用更大的局部模型继续扩展................................................49 步骤 10.1:提取并保存裂纹几何..............................................................49 步骤 10.2:从保存的裂纹几何重新启动..................................................50 步骤 10.3:合并 SIF 历史..........................................................................54 附录 A:Tie 约束的 ABAQUS 局部模型 .................................................................60 附录 B:实体和壳 Tie 连接的 ABAQUS 模型 ........................................................71 附录 C:ABAQUS 关键字 ........................................................................................77
ContextCapture(原Smart3D)基础教程与操作指南
ContextCapture(原 Smart3D)基础教程与操作指南
本系列文章为中科图新王跃军发表的关于ContextCapture(原Smart3D)的教 程 ,文章介绍了ContextCapture的操作使用与 实例应用。本文主要介绍ContextCapture(原Smart3D)的基础教程与操作指南 基于版本:v4.4.9.516(本教程后续所有章节除特别说明外,全基于此版本) ContextCapture的主功能:通过视频、照片,经过一系列的空三运算(摄影测量),得到各种格式的三维模型、正摄影像 (dom)、数字地表模型(dsm) 初始面板结构不做过多介绍,操作频率较低。
general photos
3dview 3.4 reconstruction 面板 一个block可以提交多个reconstruction(只有)空三完的block才可以提交reconstruction。 reconstruction主要用来定义生成的结果的参数:如分块的方式,最大内存占用,数据的范围,水面约束,坐标参考,设置 retouch(模型精修),处理选项(漏洞填补,模型简化,无纹理区域设置,分辨率限制等) reconstruction相关面板包括general、spatial framework、reconstruction constraints、reference 3d model、processing settings
右键菜单
reference manager
basemap manager
释放磁盘空间
- 1、下载文档前请自行甄别文档内容的完整性,平台不提供额外的编辑、内容补充、找答案等附加服务。
- 2、"仅部分预览"的文档,不可在线预览部分如存在完整性等问题,可反馈申请退款(可完整预览的文档不适用该条件!)。
- 3、如文档侵犯您的权益,请联系客服反馈,我们会尽快为您处理(人工客服工作时间:9:00-18:30)。
Import 3D ModelThe 3D model feature allows you to place a pre-prepared 3D object at any point in the 3D terrain. These models can be created using external design tools. The Import 3D Model object supports OpenFlight (FLT) and Direct X (X) file formats, as well as their compressed versions (FPC and XPC).Supported also is the XPL file format which provides better performance for the Direct X models. A set of XPL files is created from a single X file where each file contains data for one Level of Detail (LOD) only. TerraExplorer displays the best LOD file based on the viewer position in relation to the object. In addition, when downloaded from a web server, each file is downloaded independently. As a result, the model overall display performance and download rate are improved. Only the first LOD file of a set can be opened, and the other files are read automaticallyTo Add a New 3D Model1.Select the Load 3D Model icon from the Toolbox “3D Objects” tab (icon #1), or use the Create Menu, to open the Browse for 3D Model Dialog Box.2.Select a model in the Browse for 3D Model Dialog Box., type, or browse,a path to an .x, .xpc, xpl,.flt or .fpc file to insert as the 3D model.3.With the cursor in the 3D Window, click the mouse to define theposition of the 3D model’s pivot point on the terrain.Note: The pivot point of a 3D model is set at the 0,0,0 point in the object’s coordinat e system. It is recommended to create the object with the pivot point located at the center of the bottom surface of the object. To change an object’s pivot point, you should edit it with the original tool from which it was built.4.After the object has been placed on the terrain, you can change itsproperties using the Properties Sheet.Example of a 3D Model Object:Object’s Paramete rs:Appearance:▪Name–Type the description or name of the 3D model. This text appearsin the Information Window as the name of the object.▪Activation Action –Type the action to perform when selecting the 3D model from the Information Window.Model:▪File Name–Type, or browse, a path to an .x, .xpc, .flt or .fpc file to insert as the 3D model.▪Flip Texture–Flips the horizontal mapping of the model’s textures. ▪Model Type – Select "Animation" to play the object animation or"Still" to stop object animation at the first frame. This option is enabled only for Direct X animation models that comply with the DirectX specification.▪Animation Speed Rate – Selects the animation speed rate. Position:▪Altitude Method–Sets the altitude method to be used by the 3D model:•Select “Relative to Terrain” to place the 3D model’spivot point at a specified altitude above the ground.•Select “Absolute” to place the 3D model’s p ivot pointat a specified altitude above the terrain database verticaldatum base ellipsoid.▪Altitude–Enter the altitude, as defined in Altitude Method, for the 3D model’s pivot point.▪X–Enter the X-coordinate for the 3D model’s piv ot point.▪Y–Enter the Y-coordinate for the 3D model’s pivot point.▪Yaw –Determines the direction angle of the 3D model.▪Pitch – Determines the tilt angle of the 3D model.▪Roll – Determines the spin angle of the 3D model.Geometry:▪Scale– Determines the dimensions, in Meters per pixel, of the 3D model. The actual size of the model in the 3D World is the size of the model in its internal coordinate system times the Scale value. (i.e. if the model has a width of 5 units and the scale is set to 10 meters per pixel, the width of the object in the 3D World is 50 meters.)▪Set Best Fit – Clicking the Capture button sets the current object size as the size where the best level of detail is used. When zoomed out from the best fit size the object is displayed using data retrieved froma lower Level Of Detail file (XPL file). For more information▪Best Fit Size – Enter the minimum size of the object, in pixels, at which the object is displayed in the best level of detail. When zooming out from the best fit size the object is displayed using data retrieved from a lower Level Of Detail file (XPL file). For more information See: “Import 3D Model” in the “3D Objects” chapter for furtherinformation. This size can be set automatically by clicking the Capture button in the Set Best Fit field (See: Set Best Fit) above.General:▪Show In Basic–Determines if the 3D model appears in the InformationWindow when the file is viewed with the TerraExplorer Basic viewer. ▪Message–Shows the number of the message associated with this object.To create a new message or update an existing message, open the Create Message Dialog Box by clicking in this field and selecting Edit.▪Tool Tip–Type a ToolTip text to appear when the mouse cursor is placed over the 3D model in the 3D View.▪Default Viewing Distance–Determines the viewing distance of the camera from the 3D model. This distance is used as a stop mark for any “Fly-to” or “View Object” operation. It is also used when selecting to edit the object from the Information Window.▪Max. Visibility Distance –Sets the distance from the camera at which the 3D model disappears.▪Ground Object– Determines if the object is calculated as part of the terrain’s elevation. This applies for the measurement tools and for navigating in the 3D world.BuildingThe Building feature allows you to add 3D models to the project by manually defining the geometry of the building roof-top and stretching it above the basic terrain, or by importing the roof-top geometry from external feature layers. You can define the shape of the roof as a flat surface, or as an angular surface. After defining the building geometry you can assign fill color and texture from external files, or apply texture from the terrain to the roof and side walls.To Create a New Building1.Select the building icon from the Toolbox “3D Objects” tab (icon#4), or use the Create Menu.2.With the cursor in the 3D Window, click the left mouse button to addthe first point of the roof.3.Click again to add additional points of the roof’s polygon untilyou have marked the entire shape. You must place at least three points to define the roof.Note: When creating a building, the lines of the roof polygon should not overlap each other. This may result in an irregular object.4.Click the right mouse button to finish the roof polygon.It is recommended to keep thenumber of roof points to the minimum required to define the shape. Adding unnecessary points may adversely affect performance.1.If there is a horizontal offset between the roof and the buildingbase in the aerial/satellite imagery, use the mouse pointer to drag the base polygon (in green) to its place on the imagery and left click to finish the operation.2.If there is no horizontal offset between the roof and the buildingbase in the aerial/satellite imagery click again on the right mouse button to finish the operation.3.Enter the roof height of the building under “Geometry” in theBuilding Properties Sheet.4.You can continue to edit the building’s parameters and shape, oryou can close the properties sheet to finish the operation. Example of a Building Object:Defining Roof and Wall TexturesYou can assign fill color and, texture from a file, or use texture from the terrain pattern for the building’s roof and side walls. You can set a different fill type for each wall in the building. To change the fill type select the surface from the “Selected Face” field in the properties sheet and choose the desired type in the “Face Fill Type” field. You can select the “Terrain Texture”option for side walls only if the building has an offset between the roof and the base frames.When selecting “Terrain Texture” you should assign, for each wall, the “Face Terrain Texture”parameter. If a wall has an exposed texture on the satellite/aerial imagery you should use its own texture. If the wall’s texture in not available, you can assign the texture from one of the other exposed walls.It is recommended not to break anexposed wall into sub-walls. This allows you to use the entire wall texture for non-exposed walls.Modifying the Building Geometry and PositionAfter creating the bui lding’s initial geometry you can still modify it by selecting one of the top bar tools and editing the building shape in the 3D view.▪2D view mode –While editing the building’s base, roof and angular roof geometry, the building is displayed in 2D view mode. In this mode you can view and edit the buildings outlines and nodes.▪3D view mode – This option displays the building as a complete 3D model. Use this option to edit the height of the building and view the result of your 2D editing.Building properties window top bar:▪Edit roof/base position–Select this option to move the building’s roof, base or the entire shape.•Click and drag the green polygon to move the base frame.•Click and drag the red polygon to move the roof frame.•Click and drag the yellow line to move the entirebuilding.▪Edit roof/base nodes–Select this option to move, add or delete nodes on the base or roof frames.•Click and drag a node on the green polyline to move a nodeon the base frame.•Click and drag a node on the red polyline to move a nodeon the roof frame.•Click and drag the yellow lines to move the base and roofnodes simultaneously.•Select a segment between two nodes on the base or on theroof to add an additional corner to the building.•Right click on a base or roof node and select the “DeleteNode” option to delete the corner of the building.▪Edit angular roof - Selectthis option to modify the angular roof geometry. This feature is enabled when t he “Angular Roof” option is selected.▪▪3D view mode– Select thisoption to view the building model in its final view. To move the building select “Move in the XY plane” mode and drag the building to a new position. You can also change the building height: select “Move in the Z axis” mode, click on the left mouse button in the 3D view and drag the pointer up and down.▪Move in the XY plane– All movements are limited to the X and Y plane.▪Move in the Z axis– Allmovements are limited to the Z axis. This option is only available when working in a 3D view mode.Creating Angular Roof1.After creating the building geometry select the “Angular Roof”Rooftop Style under “Appearance” group in the building properties window.2.In the building properties window top bar select the “Edit AngularRoof” icon3.In the 3D view select the angular roof points and drag them to thetop-most position of the roof. The angular roof points are located between the connecting lines (cyan) and the roof top frame (purple).The points of the angular roof shape should not overlap each other.Note: For adding additional angular r oof points you must switch to “Edit Nodes” mode, add additional roof point in the desired location and switch back to “Edit Angular Roof” mode.4.In the building properties window set the rooftop delta height.Setting angular roof geometry:Working with the Building Lean Ratio ParametersIn many cases the aerial imagery in large parts of a city has the same pitch angle. This means that all the buildings in this area have the same leaning ration on the imagery. After manually setting one building you can select all the buildings in this area and set the “Building Lean X Ratio” and Building Lean Y Ratio” parameters according to the values of the building you have set manually. TerraExplorer automatically calculates the roof and base locations according to the buildings height and the leaning ratio you have set. The calculation is valid only when the roof-top frames are located in the correct geographic location and not according to the distorted imagery.Note:This feature is mostly relevant when importing the roof-top geometry from an external feature layer.Object’s Parameters:Appearance:▪Name–Type the description or name of the building. This text appears in the Information Window as the name of the object.▪Activation Action –Type the action to perform when selecting the building from the Information Window.▪Building Style– Determines the type of building:•Stretch Terrain–The building’s roof has the samecoloring and texture as the terrain. In essence, the buildingis created by “pulling” it out of the terrain. In polygonaldisplay mode the building’s roof and walls have solid colorswith shading.•Polygons– The building is created using a 3D polygon.You can assign textures to the side and roof polygons, or youcan just colorize them.▪Rooftop Style– Determines whether the roof is flat or angular.Position:▪X–Enter the X coordinate for the building’s pivot point, the center of its base.▪Y–Enter the Y coordinate for the building’s pivot point, the center of its base.▪Altitude Method–Sets the altitude method to be used by the building: •Select “Relative to Terrain” to set the building’saltitude values at a specified altitude above the ground.•Select “Absolute” to set the building’s altitudevalues at a specified altitude above the terrain databasevertical datum base ellipsoid.▪Base Altitude– Enter the altitude, as defined in Altitude Method, for the base of the building.▪Roof Altitude– Enter the altitude, as defined in Altitude Method, for the roof of the building.Geometry:▪Building Height– Determines the height of the building above its base. This is identical to the difference between the Roof Altitude and Base Altitude.▪Rooftop Delta Height –Determines the height of the top of the angular roof above the building. This field is available only when Rooftop Style is set to Angular roof.Texture:Note: These fields are unavailable if you have selected the Stretch Terrain style.▪Selected Face– Select the face to modify.•Roof – Select this option to change the roof color ortexture.•All Walls – Select this option to change the color ortexture for all walls in the building•Wall # – Select a single wall to editNote: The walls are numbered according to the creation order. You can view the numbering labels above the center of the roof segment for each wall.▪Face Fill Type– Select the fill type of the selected face.•Single Color– The face gets a single color fillingaccording to the “Face Color” field.•Image File Texture– The face gets the texture from anexternal texture file according to the “Face Texture File”field.•Terrain Texture– The face gets the texture from theterrain imagery according to the “Face Terrain Texture”field.▪Face Color –Select the color of the selected face. Select the Edit button to open the Color Palette Dialog Box, or type the color code in hexadecimal 0xBBGGRR format (B = Blue channel 00-ff, G = Green channel 00-ff, R = Red channel 00-ff).▪Face Texture File – Type the full path of the file, or use the Edit button, for a BMP, GIF or JPEG texture file to provide the texture for the selected face.Note: The faces texture dimensions must be a power of 2 (i.e.,32 pixels by 64 pixels).Note: You can set a transparent color for GIF and BMP files. Pixels with this color appear as holes in the building. With GIF files,you can assign any color as the transparent color by using the GIFtransparent color feature. With BMP files, the total-black color(RGB = 0,0,0) is used as the transparent color.▪Face Terrain Texture–Assign a terrain texture to the selected face. The “Face Terrain Texture” selection box lists all the walls of the building with exposed texture. By default every exposed wall gets its own texture and all other walls get the biggest exposed texture. You can override this setting by assigning any exposed texture to any wall of the building.Note:This field is available only if “Terrain Texture” option is selected.▪Face Tiling Method–Determines the type of scaling for the texture.Note: The “Face Tiling Method”, “Face Scale X”, “Face Scale Y” and “Face Rotation” parameters are available only for faces with“Image File Texture” fill type.▪Face Scale X– Determines the scaling for the texture according to the setting for Tiling Method:•If Tiling Method is “Tiles per face” –Determines thenumber of repeats, for the selected face, of the texture inthe X-axis.•If Tiling Method is “Meters per Tile” –Determines thesize of each texture tile in meters in the X-axis. If thetexture is smaller than the face, it repeated until it fillsthe face.▪Face Scale Y– Determines the scaling for the texture according to the setting for Tiling Method:•If Tiling Method is “Tiles per face” –Determines thenumber of repeats, for the selected face, of the texture inthe Y-axis.•If Tiling Method is “Meters per Tile” –Determines thesize of each texture tile in meters in the Y-axis. If thetexture is smaller than the face it repeated until it fillsthe face.▪Face Rotation– Determines the angular rotation of the texture used for the selected face.▪Building Lean X Ratio –The leaning ration between the roof and the base of the building in the X-axis. When creating a building with offset between the base and the roof, TerraExplorer Pro calculates this value.▪Building Lean Y Ratio –The leaning ration between the roof and the base of the building in the X-axis. When creating a building with offset between the base and the roof, TerraExplorer Pro calculates this value.General:▪Show In Basic–Determines if the building appears in the Information Window when the file is viewed with the TerraExplorer Basic viewer. ▪Message–Shows the number of the message associated with this object.To create a new message or update an existing message, open the Create Message Dialog Box by clicking in this field and selecting Edit.▪Tool Tip–Type a ToolTip text to appear when the mouse cursor is placed over the building in the 3D View.▪Default Viewing Distance–Determines the viewing distance of the camera from the building. This distance is used as a stop mark for any “Fly-to” or “View Object” operation. It is also used when se lecting to edit the object from the Information Window.▪Max. Visibility Distance –Sets the distance from the camera at which the building disappears.▪Ground Object– Determines if the object is calculated as part of the terrain’s eleva tion. This applies for the measurement tools and for navigating in the 3D world.。