OneKey7.0说明书
联想一键恢复7.0工程师版安装详细教程

资料范本本资料为word版本,可以直接编辑和打印,感谢您的下载联想一键恢复7.0工程师版安装详细教程地点:__________________时间:__________________说明:本资料适用于约定双方经过谈判,协商而共同承认,共同遵守的责任与义务,仅供参考,文档可直接下载或修改,不需要的部分可直接删除,使用时请详细阅读内容“特注:开关键右边的带小箭头的按键为NOVO键。
”我用的是OKR7.0第二版的,因为她只有“全新安装”模式,安装时会清除 HYPERLINK"/hard_drives_index/subcate2_list_1.html" 硬盘所有数据并且按照联想标准重新分区,所以请操作前务必备份硬盘资料,以免悲剧发生!必备软件下载:至于使用光盘或者U盘大家自行选择,记得刻成镜像文件!① 、OKR7.0下载地址:官方地址下载:第二版7.0.0723:(适用于win7系统绿叶版,可用迅雷、QQ旋风等离线及高速下载)/Laptop/Leos_Onkey/OKR7.ISO第三版7.0.1427(XP.VISTA.WIN7通用绿叶版,可用迅雷、QQ旋风等离线高速下载)/qiuml/LEOS/OKR7.0_20100511_145200.rar②联想原版Windows7旗舰版下载X86 X64(安装版)下载地址:Lenovo Windows 7 Ultimate 32位/qiuml/OS/LENOVO_WIN7_UM_32_ZH_CN_RDVD.r arLenovo Windows 7 Ultimate 64位/qiuml/OS/LENOVO_WIN7_UM_64_ZH_CN_RDVD.r ar联想官方下载地址,迅雷、QQ旋风等运行时复制即可开始下载,复制到地址栏链接需要密码的。
一、开始安装 OKR7.0第二版使用光盘或者U盘安装OKR7.0,注意选择相应启动模式,在此以光盘启动为例。
OneKey7.0_安装说明

联想一键拯救系统7.0光盘使用说明简介该安装光盘用于将“一键恢复7.0”重新安装。
并在第一次启动OKR70 WinPe时对系统进行备份。
OKR70包含3个安装模块,包括“OKR70-ASD”、“OKR70-WinPE”和“OKR70-Windows”模块。
该安装光盘将会完成对“OKR70-ASD”和“OKR70-WinPE”模块的安装,对“OKR70-Windows”模块的安装,可以在Windows中进行,与普通软件的安装方法相同适用范围◆适用于因更换硬盘或硬盘被格式化后,所导致的一键恢复7.0模块的丢失。
◆只支持单硬盘模式。
安装过程打开计算机调出启动菜单,选择从光盘启动。
按照程序提示进行安装模式选择,然后进行安装全过程(包括:ASD模块安装、磁盘分区、复制OKR70的PE模块、设置语言、隐藏O盘),并在安装完成后关机!安装OKR70时,磁盘分区脚本对硬盘进行分区的模式为:C盘:根据手动输入的分区大小划分, NTFS,主分区,卷标为默认。
D盘:根据脚本定义自动划分,容量为磁盘总容量-15G-C盘容量,文件格式为NTFS, 扩展+逻辑分区,卷标为默认。
O盘:约15G,NTFS,主分区,卷标为LENOVO_PART安装步骤1.从光盘启动进入一键恢复7.0安装流程,系统将提示是否clean 当前硬盘(图1)点击Yes继续执行流程,如点击No,系统将直接跳转到安装结束界面(图4)图12 系统将提示用户所选择将要安装的OS,以此来决定分区的划分,并根具输入C分区的大小来创建C,D分区(如图2 图3)。
图2图33 分区创建完成后,系统将自动修复ASD模块并安装OKR70的WinPe模块。
之后系统将提示整个安装过程结束.按确定键后自动关机(图4)图44 按NOVO键调用OKR70-WinPe模块进行OKR70语言的安装并自动运行一次系统备份(图5)。
图5检测方法首先按调用OKR70系统,可以正常进入“OKR70-WinPE”模块,同时“一键恢复”/“一键杀毒”和“系统设置”功能页面均可正常访问;出厂备份注:在使用光盘进行OKR70的全新安装后,此时系统分区并没有OS,因此需要单独进行安装OS在安装完成OS后,可以收到进行“出厂备份”的设定,方法如下:1.在关机状态下,按调用OKR70-WinPE模块,可以正常进入“一键恢复”模块;2.在OKR70-WinPE的主页面,按CTRL+LEFT SHIFT+O调用命令行窗口;3.找到OKR70-WinPE模块所在的盘符(如G)4.切换到G:\OneKey\OSImage目录,执行:OSImage /fb,将会进行出厂备份;5.备份到100%后,将会有“backup success”的提示信息;6.使用主界面的“退出”按钮,选择“关机”即可,整个安装结束;注意事项1.文中所提到的“OKR70全新安装”会清除原硬盘上的所有分区及数据,其中会包括所有系统数据及用户数据,所以使用时请确认硬盘上的所有数据是否可以全部删除。
联想一键恢复7.0工程师版(第三版)双机械硬盘修复模式安装方法
hdtool /uhd /hdd1{打开磁盘1的隐藏分区} (注意"/"号之前的空格)(这里的 /hdd1 就是使hdtool程序对磁盘1进行操作,而单硬盘用户就不需要加 /hdd0,hdtool程序默认是对磁盘0进行操作。具体的磁盘序号可在磁盘管理中根据你的实际情况确定)
联想一键恢复7.0工程师版(第三版)双机械硬盘修复模式安装方法
注意5:请你在清理玩系统垃圾或者你另外系统已经在最完美的状态下在进行无损操作因为操作好重启直接是进入首次工厂备份的哦时间可能比较久我用了半个小时左右!
注意6:如果是全新安装win7的那么请注意是否有win7创建分区时候留下的200MB的那个隐藏分区那个也是算一个主分区的!
3、如果是已经安装好了Win7系统,且为下列情形之一:
(1)磁盘中没有联想一键恢复隐藏分区,请在需要安装联想一键恢复隐藏分区的磁盘末尾划出15G左右的未分配空间;
(2)磁盘中还存在原有的联想一键恢复隐藏分区,请按下列方法之一将隐藏分区显示出来,并删除该分区(变为未分配空间):
1)使用DOS命令显示联想一键恢复隐藏分区
H.最后,输入 “ exit”敲回车,就可以退出Diskpart程序了。
2)使用联想一键恢复7.0修复工具包(双硬盘okr)
A.将下载好的联想一键恢复7.0修复工具包压缩文件解压到D盘中去(D:\okr);
B.在开始菜单中搜索CMD,右击CMD,以“管理员身份运行”CMD;
C.cmd中依次输入
d:{定位到D盘} (绿色字是需要输入的内容)
4、请注意:两个硬盘所有的主分区数不要超过4个(包含扩展分区、未分配空间),扩展分区中的逻辑分区数不超过3个,一般的为“一个系统分区(主分区:C)+一个应用软件安装分区(主分区:D)+一个扩展分区(主分区,下含不超过3个的逻辑分区:E、F、G)+一个未分配空间(即将划为主分区:O)”
联想一键恢复7.0教程五个分区

注:本人习惯将磁盘分五个区,但是发现C盘之外的逻辑分区数超过3个的时候联想一键还原系统(OKR7)就不能用了,就是说总分区数只有4个即1主分区+3逻辑分区,这个不算隐藏的lenovo_part 隐藏分区。
本文是本人做的2主分区+3逻辑分区实现5个分区的方法,OKR7可以使用,也是跟其他百度教程区别的地方。
但是因为window系统下最多4个主分区又要运行OKR7所以可循的分区方法有:4主+0逻辑分区;3主分区+N(只要N<4都行)逻辑;2主分区+N(只要N<4都行)逻辑本文思路是3主分区(C盘、D盘、lenovo_part)+3逻辑分区来构造5个分区,并且正常运行window和OKR7一、当然先下载联想一键回复7.0工程师版ISO镜像——本人用的第二版,网上很多,据说第一版有什么修复安装,也试过了,没用,就是把隐藏分区lenovo_part里边的文件全部重置了一遍,没有格盘,但是确实没有作用。
然后把一键恢复镜像制作成U盘启动——本人用的软碟通,这个网上很好找,大点的下载站可以保证安全。
二、另外找一个U盘制作Win7U盘启动或者win7安装盘(重装系统时就要进行C盘和D盘的重新划分,这两个都是主分区,但是用来装系统的是活动分区,另外一个就跟普通逻辑分区没区别了)。
然后就要把磁盘里所有有用的东西都备份下(因为安装OKR7会格掉整个磁盘),如果以前用联想一键还原备份过系统的话,可以把那个备份也考出来,到时候一键还原(OKR7)装好了就不用重装系统,直接恢复到你备份的那个系统就行了十分钟就恢复好了,省掉重装系统的麻烦。
三、开机进BIOS设置U盘启动,后就进入OKR7的安装界面开始安装了。
按照步骤走,软件会先提示你继续安装会格盘,这时候点确定。
然后稍等片刻会弹窗提示你输入C盘大小(这个大小很重要,其值等于预想的C盘大小+预想的D盘大小-200MB,具体原因看第七步就明白了)输入后点确定。
然后继续等待……等待一会儿后,屏幕会出现弹窗英文提示:下次进入一键还原系统时会进行出厂备份和语言选择,点确定然后关机(再第四步之前不要再进入一键还原系统了,万一不小心进了也没关系,就是进行出厂备份麻烦点)。
Lenovo Onekey Rescue System 7.0 说明书

LenovoOnekey Rescue System 7.0 User Guide V1.0First Edition (July 2009)© Copyright Lenovo 2009.EN1Introduction (2)Using Lenovo OneKey Recovery system (3)Using Lenovo OneKey Rescue system (6)Using recovery disc(s) (7)Frequently Asked Questions.................................................................................8ContentsIntroduction ---------------------------------------------------------------------------------------Lenovo® OneKey Rescue system is an easy-to-use application that can be used to back up the data on your system partition (C partition) and then easily restored when required. In Windows operating system, you cancreate a backup of the entire system partition, saving it on your local hard disk drive or other external storage devices. In addition, you can createrecovery disc(s) to boot and recover your system.If the operating system fails to be loaded, you can press the OneKey Rescue system button when your computer is powered off to enter LenovoOneKey Rescue system. Within the system, you can restore your systempartition to the original factory status or to a previously backed up point.All these features make Lenovo OneKey Rescue system a reliable guardagainst system failure.2Using Lenovo OneKey Recovery system ---------------------------EN You can back up your system partition to an image file or create recoverydisc(s) in Lenovo OneKey Recovery system. In Windows operating system,double-click the OneKey Recovery icon on the desktop to launch OneKeyRecovery system.Backing up system partitionYou can back up the system partition to an image file at any time. To backup the system partition:1Click System Backup on the main menu screen.2 A dialog box might appear to recommend you to close all other openapplications to ensure a trouble-free backup. Close other openapplications and click OK to continue.3Select the directory under which you want to save the image file.•If you keep the default setting (Default Path) under Back up to, theimage file will be saved under the sub directory where the OneKeyRescue system is installed.•If you want to save the image file to another location, click Default Pathunder Back up to and then select Hard Disk or Removable Hard Drive.Under Backup location, click the Browse button and navigate to thedirectory to save the image file.3Note:You can take notes of each backup under My backup notes. The default note is the time when the backup process begins.4Click Next and then Start to begin the backup process.Creating recovery disc(s)You can create recovery disc(s) to boot and restore your system in case the operating system fails to be loaded. To create recovery disc(s):1Insert a recordable disc to the optical drive on your computer.Note:If your computer does not come with an integrated optical drive or if the optical drive does support CD/DVD burning, connect an appropriateexternal optical drive to your computer.2Click Create Recovery Disc on the main menu screen.3 A dialog box might appear to recommend you to close all other openapplications to ensure a trouble-free process. Close other openapplications and click OK to continue.4You can create three types of recovery disc(s): recovery disc(s) with existing backup image, recovery disc(s) from current system partitionand factory default recovery disc(s). Select one type of recovery disc(s)and follow on-screen instructions to create recovery disc(s).4EN Note:The estimated number of disc(s) needed will be displayed before the process of creating recovery disc(s) begins. To minimize the number of discs needed,we recommend you use recordable DVD as the media disc. Also make sureyour optical drive is compatible with the media disc in use. After the recoverydiscs are created, please number them so that you can use them in the correctorder.5Using Lenovo OneKey Rescue system ------------------In case the operating system fails to be loaded or if you want to recoveryour system to a previous backup point, you can enter Lenovo OneKeyRescue system and restore the system. To enter Lenovo OneKey Rescuesystem:•Click System Recovery on the main menu screen of Lenovo OneKeyRecovery system in Windows operating system;•Or press the OneKey Rescue system button when the computer ispowered off.To recover the system, click OneKey Recovery on the main menu screen.You can choose to recover your system to the factory state or from aprevious backup image. Select one type of recovery and follow on-screen instructions to recover your system.Caution:•The recovery process might take some time to finish, connect the ACadapter and the battery pack to your computer to avoid powershutdown.•When you have recovered the system partition, all the data created after the selected restoration point will be deleted. Make sure you havebacked up all critical data before recovering the system.6Using recovery disc(s) --------------------------------------------------------EN If you cannot access Lenovo OneKey Rescue system on the hard disk drive,you can still try to restore your system using the recovery discs that youcreated in Lenovo Recovery system.To restore system using recovery disc(s):1Insert the first disc of the recovery disc(s) to the optical drive.2Restart your computer. When the Lenovo logo comes up, immediately press F12. (or Fn+F11 if there is no separate F12 key on your keyboard)3On the boot device selection menu, select the optical drive in which the recovery disc is inserted and press enter. The computer will start fromthe recovery disc.4Follow on-screen instructions to restore your system. Insert the rest of the recovery discs in the correct order when prompted.Note:If you need to replace a new hard disk drive for your computer, you can also use recovery disc(s) to quickly install system on the new hard disk drive.Frequently Asked Questions ------------------------------------------This section contains frequently asked question about Lenovo OneKey Rescue system.Why can’t I run system backup?The possible causes are:•You are not currently using a Windows operating system.•There is not enough space to store the backed up data. Save the image file to another location with adequate free space.What can I do if the backup process fails?If you can start the backup feature without a problem, but it fails during the back up process, try the following:•Close all other open applications, then restart the backup process.•Check if the destination media is damaged. Try to select another destination and then try again.Why can’t I restore the system to the factory status?If the size of your system partition is modified by another partition utility, you might not be able to restore your system to the factory status. Therefore, we suggest that you don’t change the size of the system partition to make sure this feature is workable under all circumstances.What can I do if the recovery process fails?EN If you can start the recovery feature without a problem, but it fails duringthe recovery process, this might be caused by one of the following reasons:•The backed up files were damaged•The disc(s) were physically damaged•Other unknown issuesIn this case, select other backed up image files to recover the system. If itstill doesn’t work, restore your system partition to the factory status. Pleasenote the data on system partition will be deleted during this restoreprocess.Why can’t the recovery disc(s) recover the entire hard disk drive?The recovery discs include the backed up files of the system partition (C partition), instead of the backed up files of entire hard disk drive. Thereforeyou can’t recover the entire hard disk with the recovery discs you created.Why can’t I use the recovery disc(s)?When you create recovery disc(s), use reliable disc(s), otherwise the backedup data might be damaged. When you use the recovery discs, please followthe on-screen instructions to insert backup discs in the correct order.Why can’t I use recovery disc(s) to install system on a new hard disk drive.Make sure the new hard disk drive has been partitioned and formatted before you use recovery discs to install system. The capacity of the system partition of the new hard disk drive must not be smaller than the one based on which your recovery disc(s) is/are created.SC简介 (12)使用联想一键恢复系统 (13)使用联想一键拯救系统 (15)使用恢复光盘 (16)常见问题......................................................................................................17目录简介--------------------------------------------------------------------------------------------------------联想一键拯救系统是一个易用的程序,您可以使用该程序备份系统分区(C分区)的数据并在需要的时候使用此备份进行系统恢复。
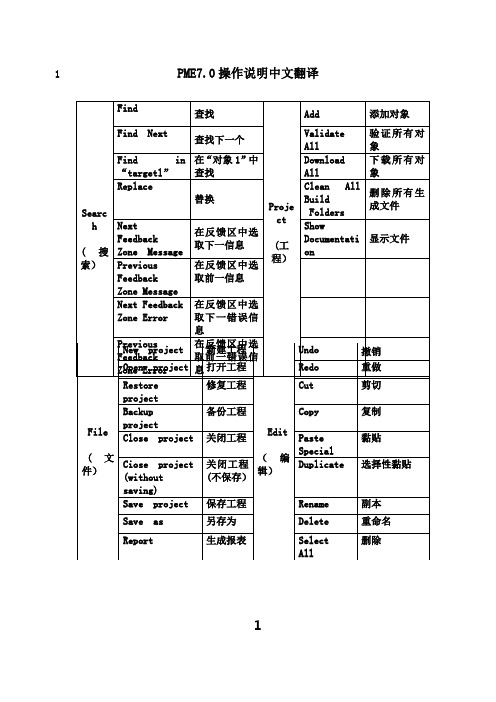
最新PME7.0操作说明中文翻译
继续在线连接“对象1”
离线命令
显示运行时间
生成报表
诊断
显示文件
清楚创建的文件夹
导入
导入二进制
Varisbles
(变量)
New Vsriable
Import
Export
Sort By
Report
Filter By
Filter Configuration
Delete Unused Variables
(插入)
Instruction
Row
Column
Comment
指令
行
列
注释
Window
(窗口)
Apply Theme
Docking View
Close
Close All
Cascade
Tile Horizontally
Tile Vertically
打开主题对话框
对按主题
关闭
关闭所有
级联
横向平铺窗口
纵向平铺窗口
Refresh Variable References
新变量
打开导入对话框
打开导入对话框
通过()排序
显示变量诊断报告
通过()筛选
打开组态筛选对话框
删除未使用的变量
刷新参考变量
(工具)
Toolbars
Navigator
Control I/O
Feedback Zone
Inspector
Data Watch
Help
(帮助)
Finding Information
Index
Search
Product Authorization
OKR7.0

首先来说一下OKR7.0第一版的一些特点有全新安装、修复安装下面给出全新安装法的状态:第一版是C(主分区且活动)+D(逻辑拓展分区)+O(一键恢复的隐藏分区)OKR7对硬盘的分区要求如下:1、硬盘必须至少有2个以上的主分区(包括扩展主分区和一键还原的隐藏主分区)2、扩展主分区分出来的逻辑分区不得超过3个。
?首先下载一键恢复7.0工程师版(第一版)网上很多大家自己下载吧!文件名:OKR7(一键恢复7.0工程版).iso文件大小:784M电驴下载:ed2k://|file|OKR7%28%E4%B8%80%E9%94%AE%E6%81%A2%E5%A4%8D7.0%E5%B7%A5%E7%A8%8B%E7 %89%88%29.ISO|822638592|f605646a7fc62ee360b9db9875a268e0|h=7s5e7gpnlsy7lal7625rp oyceuoehnew|/另附:联想一键恢复7.0更新出厂备份制作工具下载地址:/down/index/8667148A8088?下载完成用软碟通制作一个引导盘U盘光盘都可以(这个大家都会吧,不多介绍了)?U盘的引导安装制作1.下面我就开始全新安装一键恢复7.0首先打开计算机调出启动菜单,选择光盘或USB设备启动。
按照程序提示进行安装模式选择后进行安装全过程?引导安装进入界面安装方式选择(选择1为全新安装,2为修复安装)因为我是全新安装所以选择1?C:盘容量设置(填入C盘容量,以MB为单位)我选择的是30G分区安装过程图安装语言选择(选择21是简体中文)语言包安装过程图安装完成图(按任意键关机)2.至此联想一键恢复7.0安装完毕,接着是安装WIN7的系统和所有的驱动程序(这个就不上多图了)?3.在WIndows7下安装一键恢复7.0客户端(这个官方网站有下载)安装完成,关闭计算机进入一键恢复系统画面(启动画面)此时什么也不用管,它会自动工厂备份INF 100完成备份过程(完成后自动关机)这个时候你就拥有了一键恢复7.0的默认出厂备份了。
lenovo OneKey7.0_安装说明

联想一键拯救系统7.0一、安装OKR7的过程:打开计算机调出启动菜单,选择光盘或USB设备启动。
按照程序提示进行安装模式选择后进行安装全过程(包括:ASD模块安装、磁盘分区、复制OKR7的PE模块、设置语言、隐藏O盘),并在安装完成后关机!使用全新安装模式安装OKR7时,磁盘分区脚本对硬盘进行分区的模式为:C盘:根据手动输入的分区大小划分, NTFS,主分区,卷标为默认。
D盘:根据脚本定义自动划分,容量为磁盘总容量-15G-C盘容量,文件格式为NTFS, 扩展+逻辑分区,卷标为默认。
O盘:约15G,NTFS,主分区,卷标为LENOVO_PART安装OKR7的过程包括两种模式:全新安装、修复安装1)全新安装:WIN PE启动过程中,调用STARTNET.CMD查找OKR7系统安装文件路径并调用SETUP.CMD 启用OKR7的安装进程!此时系统会弹出如下图的选择框来进行安装模式选择。
“1”:全新安装。
此模式会清空硬盘上原有的所有分区,并根据脚本定义对硬盘重新分区、格式化等操作。
“2”、修复模式。
此模式要求硬盘末端有约15G未划分空间;安装程序会对这部分未划分空间重新划分、指驱动器号及卷标。
“3”、修复ASD模块。
在进行全新安装时,安装程序会弹出对话框(如下图),要求输入C盘大小,单位以MB 计算;并根据所输入的C盘容量及整个硬盘的容量来自动进行D盘和O盘的建立。
需要注意的是安装程序此时会清除原硬盘上的所有数据,其中包括全部的系统数据及用户数据,并会按照预定参数在硬盘上建立分区。
(C、D、O)2)修复安装:在程序弹出安装模式选择对话框时,如果选择“2”,安装程序会调用SETUP2.CMD进行修复安装,修复安装时硬盘分区应满足以下条件:硬盘末端预留约15G的未划分空间。
(此容量可根据实际需求做小幅修改)此时安装程序不会弹出输入C盘大小的对话框。
其它步骤同全新安装!语言设置:在OKR7的安装过程中,安装程序会弹出下图所示的对话框来选择安装后OKR7系统所使用的语言。
- 1、下载文档前请自行甄别文档内容的完整性,平台不提供额外的编辑、内容补充、找答案等附加服务。
- 2、"仅部分预览"的文档,不可在线预览部分如存在完整性等问题,可反馈申请退款(可完整预览的文档不适用该条件!)。
- 3、如文档侵犯您的权益,请联系客服反馈,我们会尽快为您处理(人工客服工作时间:9:00-18:30)。
联想一键拯救系统7.0
一、安装OKR7的过程:
打开计算机调出启动菜单,选择光盘或USB设备启动。
按照程序提示进行安装模式选择后进行安装全过程(包括:ASD模块安装、磁盘分区、复制OKR7的PE模块、设置语言、隐藏O盘),并在安装完成后关机!
使用全新安装模式安装OKR7时,磁盘分区脚本对硬盘进行分区的模式为:
C盘:根据手动输入的分区大小划分, NTFS,主分区,卷标为默认。
D盘:根据脚本定义自动划分,容量为磁盘总容量-15G-C盘容量,文件格式为NTFS, 扩展+逻辑分区,卷标为默认。
O盘:约15G,NTFS,主分区,卷标为LENOVO_PART
安装OKR7的过程包括两种模式:全新安装、修复安装
1)全新安装:
WIN PE启动过程中,调用STARTNET.CMD查找OKR7系统安装文件路径并调用SETUP.CMD 启用OKR7的安装进程!此时系统会弹出如下图的选择框来进行安装模式选择。
“1”:全新安装。
此模式会清空硬盘上原有的所有分区,并根据脚本定义对硬盘重新分区、格式化等操作。
“2”、修复模式。
此模式要求硬盘末端有约15G未划分空间;安装程序会对这部分未划分空间重新划分、指驱动器号及卷标。
“3”、修复ASD模块。
在进行全新安装时,安装程序会弹出对话框(如下图),要求输入C盘大小,单位以MB 计算;并根据所输入的C盘容量及整个硬盘的容量来自动进行D盘和O盘的建立。
需要注意的是安装程序此时会清除原硬盘上的所有数据,其中包括全部的系统数据及用户数据,并会按照预定参数在硬盘上建立分区。
(C、D、O)
2)修复安装:
在程序弹出安装模式选择对话框时,如果选择“2”,安装程序会调用SETUP2.CMD进行修复安装,修复安装时硬盘分区应满足以下条件:
硬盘末端预留约15G的未划分空间。
(此容量可根据实际需求做小幅修改)此时安装程序不会弹出输入C盘大小的对话框。
其它步骤同全新安装!
语言设置:
在OKR7的安装过程中,安装程序会弹出下图所示的对话框来选择安装后OKR7系统所使用的语言。
3、调用OKR7系统进行工厂备份
调用OKR7进行工厂备份前,我们就该先做一些小的检查。
A、查看O盘目录下是否有”SYSMODE.INI”,此文件是OKR7系统判定是否需要进行工
厂备份的标识文件;如果没有请从O:\NB\FPRO_BK\拷贝此文件到O盘根目录下。
B、查看O:\ONEKEY\MAIN\下是否有”CALLFACTORY.CMD”,此文件是进行工厂备份批
处理文件;如果没有请从O:\NB\FPRO_BK\拷贝此文件到O:\ONEKEY\MAIN目录下。
如查以上条件满足,那么OKR7会在安装后首次调用时自动进行系统盘的工厂备份。
那么是不是OKR7系统进行了首次的工厂备份后,我们就不能再进行工厂备份了呢?其实不是这样的,我们可以通过手动执行OSIMAGE.EXE的方法重新进行工厂备份;方法如下:
首先按调用OKR7系统,然后进入“一键恢复”模块,按CTRL+LIFT SHIFT+O调用命令行模式,找到OKR7所在分区(此时虽然OKR7所在分区为隐藏属性,查仍能看到里面的内容。
盘符一般为硬盘现有分区+1或+2.如:硬盘上有C盘、D盘,那么OKR7所在盘符就应为E或F),进入{drv}:\onekey\osimage目录,执行OSIMAGE.EXE /FB进行工厂备份。
请
注意,此方法不面向客户!
注意事项:
上文中所提到的“OKR7全新安装”会清除原硬盘上的所有分区及数据,其中会包括所有系统数据及用户数据,所以使用时请确认硬盘上的所有数据是否可以全部删除。
另外,在进行OKR7的全新安装后,OS安装需要单独进行!
二、OKR7.0安装盘制作:下载OKR.ISO文件后,选择使用UltraISO写入U盘或刻录成光盘使用。
三、FAQ:
•Q:OKR 7.0系统不能进行工厂备份,提示”No service partiton”?
•A:遇到此情况时,请检查O盘是否已做隐藏处理!
•Q:OKR 7.0系统不能进行工厂备份,提示”Find os partiton fail”?
•A:遇到此情况时,请检查C是否已完成OS安装!如OS已成功安装,可尝试运行以下命令行:BCDBOOT C:\WINDOWS /L {language}(language:当前系统所使用的语言,如:zh-cn)后重新进行工厂备份!
•Q:按进入OKR 7.0系统时不能调用OKR 7.0主界面,而直接进入WIN PE命令行模式?
•A:遇到此情况时,请检查O盘卷标是否为”LENOVO_PART”!
•Q: 部分机型出厂仅安装了FREEDOS,用户会自行安装或选择委托维修站安装其它操作系统,这时还可以将安装好的操作系统进行工厂备份吗?
•A:根据工厂定义,预装FREEDOS的机型,OKR7所在分区仅为1G左右。
这样不能满足WINDOWS系统的备份要求,所以如果想要备份就必须重新划分隐藏空间。
建议与确认数据不重要后,选择全新安装OKR7,并重新安装或布署操作系统并备份!。