(7条消息)ubuntu16.04 安装交叉编译工具aarch64
交叉编译流程

交叉编译流程
交叉编译的过程可以分为以下步骤:
1. 选择目标体系结构:确定要交叉编译的目标体系结构,例如不同的硬件平台或操作系统。
2. 安装交叉编译工具链:交叉编译工具链包括交叉编译器、链接器、调试器和库文件等,用于将源代码编译成目标平台可执行程序。
这些工具可以通过官方提供的源代码进行编译,也可以通过第三方工具包进行安装。
3. 配置交叉编译环境:确保系统能够正确地找到和使用交叉编译工具链。
这通常涉及将工具链的路径添加到环境变量中,并在构建系统中设置相应的配置参数。
4. 运行configure命令:进入源码包根目录下,运行configure命令。
该
命令有很多参数可配置,可以用configure –help来查看,在交叉编译过程中可设置–host、–target、–build这几个参数。
这些参数配置后,configure时会读取源码目录下面的文件,查找、检查设置的参数是否支持。
完成以上步骤后,就可以开始进行交叉编译了。
如果还有其他疑问,建议咨询专业编程人员以获取更全面的信息。
MinGW32和64位交叉编译环境的安装和使用

MinGW32和64位交叉编译环境的安装和使⽤原⽂出处:CompileGraphics Magick, Boost, Botan and QT with MinGW64 under Windows 7 641 安装MSYS从下⾯的地址下载并运⾏:mingw-get-inst-20120426.exe按下⾯的选项和⽬录位置安装:安装完毕之后运⾏下⾯的命令⾏:C:\DEVPACK\MinGW\msys\1.0\msys.bat逐条输⼊下⾯的语句,执⾏安装软件包:[plain]1. $ mingw-get install msys-rxvt2. $ mingw-get install msys-wget3. $ mingw-get install msys-zip4. $ mingw-get install msys-unzip5. $ mingw-get install msys-xz右键点击⽂件C:\DEVPACK\MinGW\msys\1.0\msys.bat,在桌⾯上创建快捷⽅式, 并在"msys.bat - 快捷⽅式" 上点击右键, 按下图修改快捷⽅式的属性:2 安装rubenvb MinGW-w641)从下⾯的链接进⼊下载页⾯:下载(为64位Windows编译原⽣64位):2)从下⾯的链接进⼊下载页⾯:下载(为32位Windows编译,也可以运⾏在Win64上):包的命名规范是:[i686-w64-mingw32]-[gcc-4.8.0]-[win64]_rubenvb[⽬标平台]-[gcc-4.8.0]-[⼯具链OS]_rubenvb⽬标平台指MinGW最终编译好的⼆进制代码运⾏的平台,[i686...]表⽰Win32平台,[x86_64-...]表⽰Win64平台。
⼯具链OS表⽰你安装MinGW的计算机OS。
例如,如果想在WinXP32位平台上编译运⾏于Win7 64位平台的程序或库(dll),需要选择:x86_64-w64-mingw32-gcc-4.8.0-win32_rubenvb.7z。
交叉编译工具aarch64-linux-gnu-gcc

交叉编译⼯具aarch64-linux-gnu-gcc[root@centos7 arm]# wget https:///-/media/Files/downloads/gnu-a/10.3-2021.07/binrel/gcc-arm-10.3-2021.07-aarch64-aarch64-none-elf.tar.xz--2022-03-0907:12:23-- https:///-/media/Files/downloads/gnu-a/10.3-2021.07/binrel/gcc-arm-10.3-2021.07-aarch64-aarch64-none-elf.tar.xzResolving ()... 23.76.74.223Connecting to ()|23.76.74.223|:443... connected.HTTP request sent, awaiting response... 302 Moved TemporarilyLocation: https:///developer/Files/downloads/gnu-a/10.3-2021.07/binrel/gcc-arm-10.3-2021.07-aarch64-aarch64-none-elf.tar.xz [following]--2022-03-0907:12:24-- https:///developer/Files/downloads/gnu-a/10.3-2021.07/binrel/gcc-arm-10.3-2021.07-aarch64-aarch64-none-elf.tar.xzResolving ()... 52.239.137.100Connecting to ()|52.239.137.100|:443... connected.HTTP request sent, awaiting response... 200 OKLength: 93906188 (90M) [application/octet-stream]Saving to: ‘gcc-arm-10.3-2021.07-aarch64-aarch64-none-elf.tar.xz’100%[============================================================================================================================================================================= 2022-03-0907:12:41 (5.66 MB/s) - ‘gcc-arm-10.3-2021.07-aarch64-aarch64-none-elf.tar.xz’ saved [93906188/93906188][root@centos7 arm]# uname -aLinux centos7 4.14.0-115.el7a.0.1.aarch64 #1 SMP Sun Nov 2520:54:21 UTC 2018 aarch64 aarch64 aarch64 GNU/Linux[root@centos7 arm]#[root@centos7 arm]# ls gcc-arm-10.3-2021.07-aarch64-aarch64-none-elf10.3-2021.07-aarch64-aarch64-none-elf-manifest.txt aarch64-none-elf bin include lib libexec share[root@centos7 arm]# ls gcc-arm-10.3-2021.07-aarch64-aarch64-none-elf/bin/aarch64-none-elf-addr2line aarch64-none-elf-c++filt aarch64-none-elf-gcc aarch64-none-elf-gcc-ranlib aarch64-none-elf-gdb aarch64-none-elf-ld aarch64-none-elf-objcopy aarch64-none-elf-sizeaarch64-none-elf-ar aarch64-none-elf-cpp aarch64-none-elf-gcc-10.3.1 aarch64-none-elf-gcov aarch64-none-elf-gdb-add-index aarch64-none-elf-ld.bfd aarch64-none-elf-objdump aarch64-none-elf-stringsaarch64-none-elf-as aarch64-none-elf-elfedit aarch64-none-elf-gcc-ar aarch64-none-elf-gcov-dump aarch64-none-elf-gfortran aarch64-none-elf-lto-dump aarch64-none-elf-ranlib aarch64-none-elf-stripaarch64-none-elf-c++ aarch64-none-elf-g++ aarch64-none-elf-gcc-nm aarch64-none-elf-gcov-tool aarch64-none-elf-gprof aarch64-none-elf-nm aarch64-none-elf-readelf[root@centos7 arm]# ls gcc-arm-10.3-2021.07-aarch64-aarch64-none-elf/bin/aarch64-none-elf-gaarch64-none-elf-g++ aarch64-none-elf-gcc-10.3.1 aarch64-none-elf-gcc-nm aarch64-none-elf-gcov aarch64-none-elf-gcov-tool aarch64-none-elf-gdb-add-index aarch64-none-elf-gprofaarch64-none-elf-gcc aarch64-none-elf-gcc-ar aarch64-none-elf-gcc-ranlib aarch64-none-elf-gcov-dump aarch64-none-elf-gdb aarch64-none-elf-gfortran[root@centos7 arm]# ls gcc-arm-10.3-2021.07-aarch64-aarch64-none-elf/bin/aarch64-none-elf-gccaarch64-none-elf-gcc aarch64-none-elf-gcc-10.3.1 aarch64-none-elf-gcc-ar aarch64-none-elf-gcc-nm aarch64-none-elf-gcc-ranlib[root@centos7 arm]# ls gcc-arm-10.3-2021.07-aarch64-aarch64-none-elf/bin/aarch64-none-elf-gcc -versionls: invalid option -- 'e'Try 'ls --help'for more information.[root@centos7 arm]# gcc-arm-10.3-2021.07-aarch64-aarch64-none-elf/bin/aarch64-none-elf-gcc -versionaarch64-none-elf-gcc: error: unrecognized command-line option '-version'aarch64-none-elf-gcc: fatal error: no input filescompilation terminated.[root@centos7 arm]# gcc-arm-10.3-2021.07-aarch64-aarch64-none-elf/bin/aarch64-none-elf-gcc -haarch64-none-elf-gcc: error: missing argument to '-h'aarch64-none-elf-gcc: fatal error: no input filescompilation terminated.[root@centos7 arm]# gcc-arm-10.3-2021.07-aarch64-aarch64-none-elf/bin/aarch64-none-elf-gcc --helpUsage: aarch64-none-elf-gcc [options] file...Options:-pass-exit-codes Exit with highest error code from a phase.--help Display this information.--target-help Display target specific command line options.--help={common|optimizers|params|target|warnings|[^]{joined|separate|undocumented}}[,...].Display specific types of command line options.(Use '-v --help' to display command line options of sub-processes).--version Display compiler version information.-dumpspecs Display all of the built in spec strings.-dumpversion Display the version of the compiler.-dumpmachine Display the compiler's target processor.-print-search-dirs Display the directories in the compiler's search path.-print-libgcc-file-name Display the name of the compiler's companion library.-print-file-name=<lib> Display the full path to library <lib>.-print-prog-name=<prog> Display the full path to compiler component <prog>.-print-multiarch Display the target's normalized GNU triplet, used asa component in the library path.-print-multi-directory Display the root directory for versions of libgcc.-print-multi-lib Display the mapping between command line options andmultiple library search directories.-print-multi-os-directory Display the relative path to OS libraries.-print-sysroot Display the target libraries directory.-print-sysroot-headers-suffix Display the sysroot suffix used to find headers.-Wa,<options> Pass comma-separated <options> on to the assembler.-Wp,<options> Pass comma-separated <options> on to the preprocessor.-Wl,<options> Pass comma-separated <options> on to the linker.-Xassembler <arg> Pass <arg> on to the assembler.-Xpreprocessor <arg> Pass <arg> on to the preprocessor.-Xlinker <arg> Pass <arg> on to the linker.-save-temps Do not delete intermediate files.-save-temps=<arg> Do not delete intermediate files.-no-canonical-prefixes Do not canonicalize paths when building relativeprefixes to other gcc components.-pipe Use pipes rather than intermediate files.-time Time the execution of each subprocess.-specs=<file> Override built-in specs with the contents of <file>.-std=<standard> Assume that the input sources are for <standard>.--sysroot=<directory> Use <directory> as the root directory for headersand libraries.-B <directory> Add <directory> to the compiler's search paths.-v Display the programs invoked by the compiler.-### Like -v but options quoted and commands not executed.-E Preprocess only; do not compile, assemble or link.-S Compile only; do not assemble or link.-c Compile and assemble, but do not link.-o <file> Place the output into <file>.-pie Create a dynamically linked position independentexecutable.-shared Create a shared library.-x <language> Specify the language of the following input files.Permissible languages include: c c++ assembler none'none' means revert to the default behavior ofguessing the language based on the file's extension.Options starting with -g, -f, -m, -O, -W, or --param are automaticallypassed on to the various sub-processes invoked by aarch64-none-elf-gcc. In order to passother options on to these processes the -W<letter> options must be used.For bug reporting instructions, please see:<https:///>.[root@centos7 arm]# gcc-arm-10.3-2021.07-aarch64-aarch64-none-elf/bin/aarch64-none-elf-gcc --versionaarch64-none-elf-gcc (GNU Toolchain for the A-profile Architecture 10.3-2021.07 (arm-10.29)) 10.3.1 20210621Copyright (C) 2020 Free Software Foundation, Inc.This is free software; see the source for copying conditions. There is NOwarranty; not even for MERCHANTABILITY or FITNESS FOR A PARTICULAR PURPOSE.[root@centos7 arm]#[root@centos7 step-08]# make[GCC] commands.o[GCC] kernel.o[GCC] shell.o[GCC] string.o[GCC] uart1.o[GCC] util.o[LD] kernel8.elf/root/arm/gcc-arm-10.3-2021.07-aarch64-aarch64-none-elf/bin/aarch64-none-elf-ld: /lib64/libc.so.6: version `GLIBC_2.27' not found (required by /root/arm/gcc-arm-10.3-2021.07-aarch64-aarch64-none-elf/bin/aarch64-none-elf-ld) make: *** [Makefile:43: kernel8.elf] Error 1[root@centos7 step-08]#换个操作系统root@ubuntu:~# uname -aLinux ubuntu 5.0.0-23-generic #24~18.04.1-Ubuntu SMP Mon Jul 2916:10:24 UTC 2019 aarch64 aarch64 aarch64 GNU/Linuxroot@ubuntu:~#Last login: Wed Mar 920:08:152022from192.168.116.24root@ubuntu:~# uname -aLinux ubuntu 5.0.0-23-generic #24~18.04.1-Ubuntu SMP Mon Jul 2916:10:24 UTC 2019 aarch64 aarch64 aarch64 GNU/Linuxroot@ubuntu:~# ldd --versionldd (Ubuntu GLIBC 2.27-3ubuntu1) 2.27Copyright (C) 2018 Free Software Foundation, Inc.This is free software; see the source for copying conditions. There is NOwarranty; not even for MERCHANTABILITY or FITNESS FOR A PARTICULAR PURPOSE.Written by Roland McGrath and Ulrich Drepper.root@ubuntu:~# whereis libc.so.6libc.so: /lib/aarch64-linux-gnu/libc.so.6 /usr/lib/aarch64-linux-gnu/libc.soroot@ubuntu:~# strings /lib/aarch64-linux-gnu/libc.so.6 | grep GLIBCGLIBC_2.17GLIBC_2.18GLIBC_2.22GLIBC_2.23GLIBC_2.24GLIBC_2.25GLIBC_2.26GLIBC_2.27GLIBC_PRIVATEGNU C Library (Ubuntu GLIBC 2.27-3ubuntu1.3) stable release version 2.27.root@ubuntu:~#root@ubuntu:~/arm/bare-metal-aarch64# lsREADME.md step-00 step-01 step-02 step-03 step-04 step-05 step-06 step-07 step-08root@ubuntu:~/arm/bare-metal-aarch64# cd step-08root@ubuntu:~/arm/bare-metal-aarch64/step-08# lsboot.o boot.S commands.c commands.o include kernel8.ld kernel.c kernel.o Makefile README.md shell.c shell.o string.c string.o uart1.c uart1.o util.c util.oroot@ubuntu:~/arm/bare-metal-aarch64/step-08# make[LD] kernel8.elf[OBJCOPY] kernel8.imgroot@ubuntu:~/arm/bare-metal-aarch64/step-08# cat Makefile# Relative path to the prefix where the compiler was installed.COMPILER_PREFIX = ~/arm/gcc-arm-10.3-2021.07-aarch64-aarch64-none-elf# Prefix to use before all binutils, gcc and gdb commands.BINROOT = ${COMPILER_PREFIX}/bin/aarch64-none-elf-# Variable used to control the printing of commands.# Printing is disabled by default (due to the "@").# To enable command printing run "make Q= ..." instead of "make ...".Q = @# Flags passed to GCC.GCC_FLAGS = \-ffreestanding \-Wall -Wextra -Werror -pedantic \-O0 \-I ./include \-mgeneral-regs-only# Flags passed to QEMU.QEMU_FLAGS = -M raspi3 -nographic -serial null -serial mon:stdio .PHONY: allall: kernel8.imgboot.o: boot.S@echo "[AS] $@"${Q}${BINROOT}as -c $< -o $@# All header files.C_HDR = $(wildcard include/*.h) $(wildcard include/bcm2837/*.h) %.o: %.c ${C_HDR}@echo "[GCC] $@"${Q}${BINROOT}gcc ${GCC_FLAGS} -c $< -o $@# All C source files, and corresponding object files.C_SRC = $(wildcard *.c)C_OBJ = $(C_SRC:.c=.o)kernel8.elf: kernel8.ld boot.o ${C_OBJ}@echo "[LD] $@"${Q}${BINROOT}ld -T $< -o $@ $(filter-out $<,$^)kernel8.img: kernel8.elf@echo "[OBJCOPY] $@"${Q}${BINROOT}objcopy -O binary $< $@.PHONY: runrun: kernel8.img@echo "[QEMU] running with $<"@echo "(Press Ctrl-A X to exit QEMU.)"${Q}qemu-system-aarch64 ${QEMU_FLAGS} -kernel $<.PHONY: run-gdbrun-gdb: kernel8.img@echo "[QEMU] running with $< (waiting for GDB)"@echo "(Press Ctrl-A X to exit QEMU.)"${Q}qemu-system-aarch64 ${QEMU_FLAGS} -s -S -kernel $< .PHONY: gdbgdb: kernel8.elf@echo "[GDB] running with $<"${Q}${BINROOT}gdb -ex "target remote :1234" $<.PHONY: cleanclean:@rm -f *.o@rm -f kernel8.elf@rm -f kernel8.imgroot@ubuntu:~/arm/bare-metal-aarch64/step-08# make run [QEMU] running with kernel8.img(Press Ctrl-A X to exit QEMU.)********************************************* Hello, World!! *********************************************Initial value of x1: 0x0000000000000000.Initial value of x2: 0x0000000000000000.Initial value of x3: 0x0000000000000000.Initial entry point: 0x0000000000080000.Initial exception level: EL2.Current exception level: EL1.Address of the DTB: n/aEntering the interactive mode.>> hisError: unknown command "his".Use command "help" to get a list of commands.> helpList of available commands:- "help": list the available commands.- "echo": print each of its arguments.- "hexdump": dump memory starting at ARG1 for ARG2 bytes.- "inc": increment the secret counter via un hypervisor call.- "get": get the value of the secret counter via un hypervisor call. > inc>root@ubuntu:~/arm/bare-metal-aarch64/step-08# make run [QEMU] running with kernel8.img(Press Ctrl-A X to exit QEMU.)********************************************* Hello, World!! *********************************************Initial value of x1: 0x0000000000000000.Initial value of x2: 0x0000000000000000.Initial value of x3: 0x0000000000000000.Initial entry point: 0x0000000000080000.Initial exception level: EL2.Current exception level: EL1.Address of the DTB: n/aEntering the interactive mode.>> hisError: unknown command "his".Use command "help" to get a list of commands.> helpList of available commands:- "help": list the available commands.- "echo": print each of its arguments.- "hexdump": dump memory starting at ARG1 for ARG2 bytes.- "inc": increment the secret counter via un hypervisor call.- "get": get the value of the secret counter via un hypervisor call. > inc> getThe secret counter has value 1>。
GEOSGDAL交叉编译ARM64-linux版本

GEOSGDAL交叉编译ARM64-linux版本⽬录因为试⽤华为云ARM64服务器(CentOS 7 操作系统)的时候,在云服务器上编译GDAL很长时间也没有编译完,所以先交叉编译适合版本的GDAL丢上去做测试。
以下都是在CentOS 7 x86_64 环境下进⾏的,Linux内核版本3.10。
安装编译环境1、下载安装编译器我这⾥因为他们没有提供编译环境,只能去arm的⽹站下载了。
华为的海思嵌⼊式平台之前接触过,是需要使⽤提供他们的编译器的。
# 这⾥可以去 https:///tools-and-software/ ⽹站找# 注意:要安装arm-none-linux-gnueabi-gcc,这个是编译linux程序的# 不能安装arm-none-abi-gcc版本,这个是针对裸机程序的# 参考 arm交叉编译器gnueabi、none-eabi、arm-eabi、gnueabihf等的区别 https:///296.htmlwget https:///-/media/Files/downloads/gnu-a/8.3-2019.03/binrel/gcc-arm-8.3-2019.03-x86_64-aarch64-linux-gnu.tar.xz# 上⾯地址是⼩端序的,⼤端序版本地址: https:///-/media/Files/downloads/gnu-a/8.3-2019.03/binrel/gcc-arm-8.3-2019.03-x86_64-aarch64_be-linux-gnu.tar.xz# 解压tar -xJf gcc-arm-8.3-2019.03-x86_64-aarch64-linux-gnu.tar.xz -C /opt/gcc-arm-8.3-x86_64-aarch64-linux# 导⼊环境变量中去export PATH=${PATH}:/opt/gcc-arm-8.3-x86_64-aarch64-linux下⾯是我在OpenSUSE下⼜重新编译了⼀次,相关命令的记录# 下载安装编译器wget /components/toolchain/binaries/4.9-2017.01/aarch64-linux-gnu/gcc-linaro-4.9.4-2017.01-x86_64_aarch64-linux-gnu.tar.xzsudo tar -xJf aarch64-linux-gnu/gcc-linaro-4.9.4-2017.01-x86_64_aarch64-linux-gnu.tar.xz -C /optsudo mv /op/gcc-linaro-4.9.4-2017.01-x86_64_aarch64-linux-gnu /opt/aarch64-linux-gnuexport PATH=${PATH}:/opt/aarch64-linux-gnu/binexport CC=aarch64-linux-gnu-gccexport CXX=aarch64-linux-gnu-g++# 下载proj.4代码编译midr code && cd codegit clone -b 4.9 --depth 1 https:///OSGeo/PROJ.git proj.4cd proj.4./configure --build=x86_64-pc-linux-gnu --host=aarch64-linux --target=aarch64-linux --prefix=~/code/installmake -j4 && make install# 下载geos代码编译cd ~/codegit clone -b svn-3.6 --depth 1 https:///libgeos/geos.gitmdir geos/build && cd geos/buildcmake .. -DCMAKE_C_COMPILER=aarch64-linux-gnu-gcc -DCMAKE_CXX_COMPILER=aarch64-linux-gnu-g++ -DCMAKE_FIND_ROOT_PATH=/opt/aarch64-linux-gnu -DCMAKE_FIND_ROOT_PATH_MODE_INCLUDE=ONLY -DCMAKE_INST make -j4 && make install# 下载gdal代码编译cd ~/codegit clone -b v2.4.0 --depth 1 https:///OSGeo/gdal.gitcd gdal/gdal# ./configure --build=x86_64-pc-linux-gnu --host=aarch64-linux --target=aarch64-linux --with-geos=/home/x/code/install/bin/geos-config --prefix=/home/test/code/install## 使⽤指定环境变量的⽅式可以在⽣成的GDALmake.opt⾥⾯添加相关的路径## 但是HAVE_GEOS等还是没有设置为yes## 任然需要修改⽂件,然后添加相关的设置(注意,需要将 -DHAVE_GEOS=1 添加到CFLAGS/CXXFLAGS,否则编译出来的还是不⽀持geos)## 根据实际情况,确定是否添加相关库链接到LIBS,如proj4就需要添加CFLAGS=-I/home/x/code/install/include CXXFLAGS=-I/home/x/code/install/include LDFLAGS=-L/home/x/code/install/lib ./configure --build=x86_64-pc-linux-gnu --host=aarch64-linux --target=aarch64-linux --with-geos=yes--prefix=/home/test/code # 修改 GDALmake.opt ⽂件,引⽤ geos和proj 头⽂件路径等# 修改 apps/GNUmakefile 链接项添加geos和proj(也可以添加-rpath)make && make install编译PROJ.4git clone -b 4.9 --depth 1 https:///OSGeo/PROJ.git proj.4# 因为configure默认设置CC为gcc,所以这边必须先设置export CC=aarch-linux-gun-gccexport CXX=aarch-linux-gun-g++# ⽣成Makefile./configure --build=x86_64-pc-linux-gnu --host=aarch64-linux --target=aarch64-linux --prefix=/home/test/arm64/install# 编译安装make && make install# 查看下编译的对不对file src/.libs/libproj.so.0.8.0src/.libs/libproj.so.0.8.0: ELF 64-bit LSB shared object, ARM aarch64, version 1 (SYSV), dynamically linked, not stripped编译GEOS# 我这⾥只是需要编译⼀下,就不克隆全部了git clone -b svn-3.6 --depth 1 https:///libgeos/geos.gitmkdir geos/build && cd geos/build# 执⾏cmake,⽣成Makefile。
Ubuntu16.04环境上安装常用软件的方法
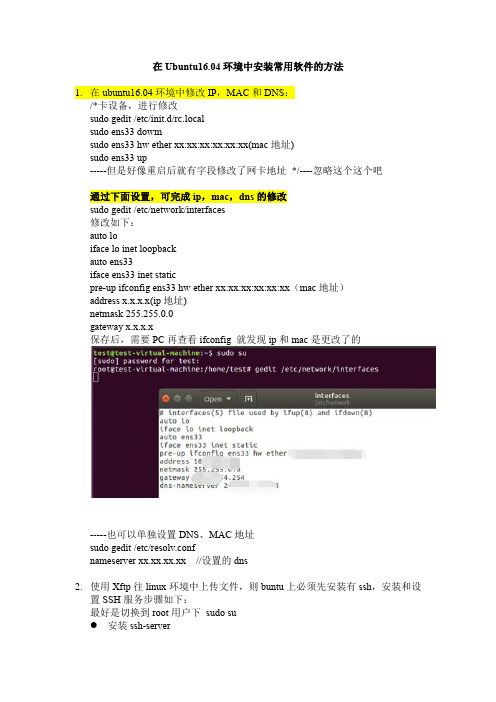
在Ubuntu16.04环境中安装常用软件的方法1.在ubuntu16.04环境中修改IP,MAC和DNS:/*卡设备,进行修改sudo gedit /etc/init.d/rc.localsudo ens33 dowmsudo ens33 hw ether xx:xx:xx:xx:xx:xx(mac地址)sudo ens33 up-----但是好像重启后就有字段修改了网卡地址*/----忽略这个这个吧通过下面设置,可完成ip,mac,dns的修改sudo gedit /etc/network/interfaces修改如下:auto loiface lo inet loopbackauto ens33iface ens33 inet staticpre-up ifconfig ens33 hw ether xx:xx:xx:xx:xx:xx(mac地址)address x.x.x.x(ip地址)netmask 255.255.0.0gateway x.x.x.x保存后,需要PC再查看ifconfig 就发现ip和mac是更改了的-----也可以单独设置DNS、MAC地址sudo gedit /etc/resolv.confnameserver xx.xx.xx.xx//设置的dns2.使用Xftp往linux环境中上传文件,则buntu上必须先安装有ssh,安装和设置SSH服务步骤如下:最好是切换到root用户下sudo su安装ssh-serversudo apt-get install openssh-server●安装ssh-clientsudo apt-get install openssh-client●确认sshserver是否安装ps –e|grep ssh/etc/init.d/ssh start●扩展配置SSH默认服务端口为22,用户可以自已定义成其他端口,如222,需要修改的配置文件为:gedit /etc/ssh/sshd_config把里面的Port参数修改成222即可然后重启SSH服务:sudo/etc/init.d/ssh restart3.在本机安装Xshell,连接Ubuntu中的linux●确保Ubuntu可以联网●ssh服务启动了●打开xshell,新建连接●在【用户身份验证】下,输入自己linux操作系统下的普通用户名和密码,之后【确认】-【连接】4.连接xftp设置设置如下报错提示“找不到匹配的outgoing encryption算法”●原因,是ssh登录本地终端缓存了相关的安全确认信息,远端的服务升级后,其对应的加密算法均作了升级、修改,而本地的缓存安全信息并无更新,导致无法正常登录,提示:“找不到匹配的outgoing encryption算法”解决措施1:打开某个会话的属性(在某个会话上右键-属性)选中aes192-ctr aes128-ctr aes256-ctr●正常连通5.安装软件Emacs24安装步骤如下:1.确保一个干净的安装,请按照下面的步骤:(若安装了老版本的emacs,删除)sudo apt-get updatesudo apt-get installsudo apt-get purge emacs emacs-snapshot-common emacs-snapshot-bin-common emacs-snapshot emacs-snapshot-el emacs-snapshot-gtk emacs23 emacs23-bin-common emacs23-common emacs23-el emacs23-nox emacs23-lucid auctex apel emacs24 emacs24-bin-common emacs24-common emacs24-common-non-dfsg emacs24-el2.添加PPAsudo add-apt-repository ppa:cassou/emacssudo apt-get update3.安装sudo apt-get install emacs-snapshot-el emacs-snapshot-gtk emacs-snapshotsudo apt-get install emacs24 emacs24-el emacs24-common-non-dfsg6.安装Vimsudo apt-get install vim安装完成后,在命令行中敲入vi,tab键,可以查看显示有vim命令修改vim配置,输入命令:sudo vim /etc/vim/vimrcInstall Vim on Ubuntu16.04sudo add-apt-repository ppa:jonathonf/vimsudo apt updatesudo apt install vimremove Vim8.0sudo apt remove vimsudo add-apt-respository –remove ppa:jonathonf/vim7.安装wps2016●首先在wps上下载linux的deb安装包;●安装配置环境sudo apt-get updatesudo apt-get install libc6-i386sudo apt-get install ia32-libs(在64环境中安装不上这个,所以死活安装的wps有问题,不能使用)最后发现不能在ubuntu-64环境中安装beta的安装包,重新下载Alpha包●开始安装sudo dpkg –i wps-office*.deb(安装包路径和名称)●若有依赖故障修复依赖sudo apt-get install –f卸载wps●若是在Ubuntu Software Center安装,直接在center中卸载;●自己下载的deb安装,使用sudo apt-get autoremove software-name;●一次性卸载干净就使用sudo apt-get autoremove--purge software-name(所欲配置都卸载干净)8.安装jEdit软件。
安装Ubuntu16.04后要做的事(总结)
安装Ubuntu16.04后要做的事(总结)Ubuntu 16.04发布了,带来了很多新特性,同样也依然带着很多不习惯的东西,所以装完系统后还要进⾏⼀系列的优化。
1.删除libreofficelibreoffice虽然是开源的,但是Java写出来的office执⾏效率实在不敢恭维,装完系统后果断删掉sudo apt-get remove libreoffice-common2.删除Amazon的链接sudo apt-get remove unity-webapps-common3.删掉基本不⽤的⾃带软件(⽤的时候再装也来得及)sudo apt-get remove thunderbird totem rhythmbox empathy brasero simple-scan gnome-mahjongg aisleriot gnome-mines cheese transmission-common gnome-orca webbrowser-app gnome-sudoku landscape-client-ui-install sudo apt-get remove onboard deja-dup这样系统就基本上⼲净了。
4.安装Vim居然默认没有集成Vim神器,只能⼿动安装了。
sudo apt-get install vim5.设置时间使⽤UTCsudo vim /etc/default/rcS将UTC=no改为UTC=yes6.安装Chrome然后sudo apt-get install libappindicator1 libindicator7sudo dpkg -i google-chrome-stable_current_amd64.debsudo apt-get -f install这样以后就可以apt安装和更新chrome浏览器了。
7.安装搜狗输⼊法vim /etc/apt/sources.list.d/ubuntukylin.list⽂件,加⼊ubuntu kylin的apt源deb :10006/ubuntukylin trusty main然后sudo apt-get updatesudo apt-get install sogoupinyin这样就可以apt安装和更新搜狗输⼊法了。
交叉编译gdb
2、unknown tFra bibliotekpe name 'sim_cpu' ......
在sim/aarch64/cpustate.h文件中倒入头文件
#include "sim-base.h"
3、报错
arm-linux-nat.c:92:19: error: 'PT_GETFPREGS' undeclared (first use in this function)
#define PT_GETEVENTMSG PTRACE_GETEVENTMSG
#define PT_GETSIGINFO PTRACE_GETSIGINFO
#define PT_SETSIGINFO PTRACE_SETSIGINFO
4、
-MF .deps/linux-thread-db.Tpo linux-thread-db.c
complete.c:2059: error: undefined reference to 'setpwent'
collect2: error: ld returned 1 exit status
修改complete.c 对应行
改为:
#if defined (HAVE_GETPWENT)
ret = ptrace (PT_GETFPREGS, tid, 0, fp);
修改 交叉编译环境中的ptrace.h文件,加入以下几行(应该只需要加对应行,但以防万一全加):
/* glibc exports a different set of PT_ names too... */
#define PT_GETFPREGS PTRACE_GETFPREGS
openharmony 交叉编译
openharmony 交叉编译OpenHarmony是华为推出的全场景分布式操作系统,支持多种设备类型的应用开发。
本文将介绍如何进行OpenHarmony的交叉编译。
1. 安装交叉编译工具链为了进行OpenHarmony的交叉编译,需要安装对应的交叉编译工具链。
可以从OpenHarmony的官方网站上下载对应的工具链,或者通过包管理器进行安装。
2. 配置交叉编译环境安装完交叉编译工具链后,需要配置相应的环境变量。
具体步骤如下:a. 打开命令行终端,输入以下命令:export PATH=/path/to/cross-compiler/bin:$PATH 其中, /path/to/cross-compiler/bin 为安装交叉编译工具链的路径。
b. 输入以下命令,设置交叉编译工具链的目标系统:export CROSS_COMPILE=arm-harmonyos-linux-gnueabi- 其中,arm-harmonyos-linux-gnueabi-为对应的交叉编译工具链前缀。
3. 进行交叉编译完成以上配置后,就可以进行OpenHarmony的交叉编译了。
具体步骤如下:a. 进入要编译的项目目录。
b. 输入以下命令,进行编译:make ARCH=arm CROSS_COMPILE=arm-harmonyos-linux-gnueabi- 其中,ARCH为目标架构,这里设置为ARM架构。
c. 编译完成后,可以在输出目录下找到生成的可执行文件。
总结:通过上述步骤,可以成功进行OpenHarmony的交叉编译。
交叉编译可以在不同的平台上进行开发和测试,方便开发者进行跨平台开发。
ubuntu16.04最详细安装步骤
2018/1/9虚拟机安装记录Ubuntu16.04使用久了,不免会忘记虚拟机的安装步骤,小编在这给大家重装虚拟机,最为详细的安装步骤,要是有不足之处还望各位指出,相互学习。
接下来就开始我们的虚拟机安装之旅。
------------------------------------------------------- 步骤一:安装虚拟机下载好虚拟机安装包,这里我使用的是VMware-10.安装包双击运行安装包,进入安装提示界面,点击下一步这里选择接受,然后点击下一步选择自定义,然后点击下一步注意:如果选典型安装类型,默认是英文版的选择安装路径,最好不要安装到c盘,因为虚拟内存配置比较大其他默认,然后点击下一步这里是创建虚拟机空间,选择刚才安装的目录就好,然后点击下一步这里把选项去掉,安装后的虚拟机不需要更新检查,以防更新后有些设备需要购买,我们这里只需安装好即用,然后点击下一步同理,这里也将选项去掉,我们不考虑改善,不然有可能安装完毕后,要是连网后经常提示信息很烦,然后点击下一步默认选项,点击下一步这里点击继续,如果之前步骤有误可以点击上一步修改这里点击继续输入许可密匙这里需要双击运行安装包的VMware-10.序列号将序列号复制粘贴到许可密匙对话框,然后点击输入此时虚拟机就可以安装了,安装完后是一下界面此时点击完成即可完成虚拟机安装后,发现桌面多了一个图标VMware Workstation 我们双击运行这个图标进入虚拟机主页,选择创建新的虚拟机这里选择自定义,然后点击下一步这里默认选项,点击下一步这里选择稍后安装操作系统,不然可能安装后是英文版的客户机操作系统选择linux,版本选择ubuntu64位,然后点击下一步,注意版本根据计算机实际情况选择即可给虚拟机取个名字,选择虚拟机环境配置的安装目录,然后点击下一步,注意虚拟机安装的路径不要出现中文这里配置处理器,参数可以根据计算机具体情况配置,然后点击下一步这里配置虚拟机内存,参数可以根据计算机具体情况配置,然后点击下一步这里选择使用网络地址转换(NET)(E),然后点击下一步这里默认配置即可,然后点击下一步虚拟磁盘类型也是默认配置即可,然后点击下一步磁盘选择,选择创建新虚拟磁盘,然后点击下一步指定磁盘容量,这里根据自身计算机磁盘合理分配即可,随后选择将虚拟磁盘拆分成多个文件(M),然后点击下一步指定磁盘文件,选择虚拟机环境配置的安装目录即可,然后点击下一步点击自定义硬件,在硬件弹框中,单击新CD/DVD,选择自定义ISO映像文件,浏览目录选择安装包的ubuntu-16.04-desktop-amd64即可步骤二:配置虚拟机运行环境此时虚拟机已经创建完成,然后点击开启此虚拟机这里选择中文(简体),然后点击安装ubuntu这里不做选择,然后点击继续安装类型,选择清除整个磁盘并安装ubuntu吗,然后点击现在安装随后的弹窗中,点击继续即可这里选择一个地方,比如:sahnghai,然后点击继续键盘布局,都选择汉语,然后点击继续这里设置一个用户,然后设置好密码,选择登录时需要密码,然后点击继续弹出安装界面等待十分钟左右,虚拟机安装完成,然后点击现在重启这就是虚拟机启动过程的界面了这里我们可以顺手点击我已完成安装选择从刚才已创建的用户名,输入密码后,就完成登录,顺利进入虚拟机界面,然后点击搜索(左边第一个图标),运行终端,输入su命令,当你输入刚才的登录密码发现su:认证失败,可以输入su()passwd()root更新密码,注意:这里()是空格如上图,完成以上步骤后,再输入su命令,密码认证成功即可进入管理员权限。
交叉编译实验报告
一、实验目的本次实验旨在通过交叉编译,了解并掌握交叉编译的基本原理和操作方法,提高在嵌入式系统开发中对编译器配置和编译过程的掌握能力。
交叉编译是指在一个平台上编译生成可在另一个平台上运行的程序,这对于嵌入式系统开发尤为重要,因为嵌入式设备通常资源有限,而开发环境与运行环境可能不同。
二、实验环境1. 主机平台:Windows 102. 目标平台:Linux(假设为Raspberry Pi)3. 编译工具:GCC4. 软件包:交叉编译工具链(如交叉工具链crosstool-ng)三、实验步骤1. 安装交叉编译工具链(1)在主机上安装crosstool-ng。
```bashsudo apt-get install crosstool-ng```(2)使用crosstool-ng生成交叉编译工具链。
```bashcrosstool-NG-1.22.0/src/crosstool-NG-1.22.0/configure --toolchain-build=x86_64-build --toolchain-target=arm-linux-gnueabihf --sysroot=/path/to/raspberry-pi/rootfsmake```(3)安装交叉编译工具链。
```bashsudo make install```2. 编写测试程序(1)创建一个简单的C程序,如`hello_world.c`。
```c#include <stdio.h>int main() {printf("Hello, World!\n");return 0;}```3. 交叉编译程序(1)使用交叉编译器编译程序。
```basharm-linux-gnueabihf-gcc hello_world.c -o hello_world ```(2)检查编译生成的可执行文件。
```bashls -l hello_world```4. 将可执行文件传输到目标平台(1)使用SSH将可执行文件传输到目标平台。
- 1、下载文档前请自行甄别文档内容的完整性,平台不提供额外的编辑、内容补充、找答案等附加服务。
- 2、"仅部分预览"的文档,不可在线预览部分如存在完整性等问题,可反馈申请退款(可完整预览的文档不适用该条件!)。
- 3、如文档侵犯您的权益,请联系客服反馈,我们会尽快为您处理(人工客服工作时间:9:00-18:30)。
(7条消息)ubuntu16.04 安装交叉编译工具aarch64
前言
最近需要把人脸识别代码放到RK3399Pro的嵌入式板子上,所以编写好的c++ 代码要放到板子上编译,或者在ubuntu系统上使用交叉编译工具,编译好可执行文件在放到板子里运行。
为了在能在ubuntu系统上能交叉编译,安装aarch64-linux-gnu-gcc/g++交叉编译工具链。
介绍
The GNU Compiler Collection - cross compiler for ARM64 target. aarch64-linux-gnu-gcc/g++ 是一个交叉编译工具链,可以在其他架构的系统中,编译安装64 位arm 架构的程序。
常用在嵌入式代码的移植中。
aarch64-linux-gnu-gcc/g++ 是由非盈利组织Linaro 基于 GCC/G++ 推出的 ARM 交叉编译工具。
可用于交叉编译ARMv8 64 位目标中的裸机程序、u-boot、Linux kernel、filesystem 和 App 应用程序。
aarch64-linux-gnu-gcc/g++ 交叉编译器必须安装在 64 位主机上,才能编译目标代码。
安装
# 查看可以安装的版本
apt-cache search aarch64
# 选择可以安装的版本进行安装
# 此处选择gcc-5-aarch64-linux-gnu以及g++-5-aarch64-linux-gnu进行安装
sudo apt-get install gcc-5-aarch64-linux-gnu
sudo apt-get install gcc-5-aarch64-linux-gnu
# 安装依赖
sudo apt --fix-broken install
# 安装一个没有版本号的gcc和g++
sudo apt-get install gcc-aarch64-linux-gnu
sudo apt-get install gcc-aarch64-linux-gnu
# 查看版本
aarch64-linux-gnu-g++ -v
aarch64-linux-gnu-gcc -v
测试c++文件交叉编译
1.test.cpp文件
/*
* test.cpp
* for cplusplus
* test aarch64-linux-gnu-g++
*/
# include<iostream>
int main(int argc,char **argv)
{
std::cout << "hello world!" <<std::endl;
return 0;
}
2.交叉编译
# 生成可执行文件test命令
cd test # 切换到test 目录下
aarch64-linux-gnu-g++ test_arm.cpp -o test # 将生成的可执行文件放到嵌入式板子上运行
./test # 若显示hello world!表示成功。