米勒焊机操作说明书[整理版]
米勒焊机操作说明书[整理版]
![米勒焊机操作说明书[整理版]](https://img.taocdn.com/s3/m/e5c440f2a417866fb94a8e75.png)
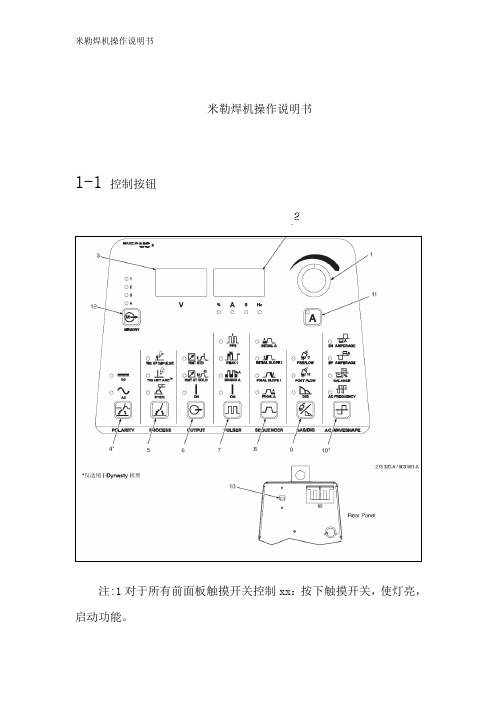
米勒焊机操作说明书[整理版]米勒焊机操作说明书1-1 控制按钮注:1对于所有前面板触摸开关控制钮:按下触摸开关,使灯亮,启动功能。
2铭牌上的绿标表示TIG功能,灰色表示正常的手弧焊功能。
1 编码控制钮2 电流及参数显示表3 电压表4 极性控制钮 5 工艺控制钮 6 输出控制钮 7 脉冲控制钮 8 工序控制钮 9 气体/电极力控制钮 10 交流波型控制钮 11 电流和点焊时间控制钮 12 存储按钮 13 电源开关1-2 编码控制钮1 编码控制钮利用本控制钮,与面板上的功能触摸开关一起设置该功能的参数值。
1-3 电流控制钮1 A 电流控制按钮2 编码控制钮3 电流表注:当脉冲功能起作用时,按下电流控制按钮,转动编码器,以设定焊接电流或峰值电流。
1-4 电流及参数显示表1 电流表电流表显示焊接时的电流值,也可以显示下列的预设参数:电流、时间、百分比或频率。
电流表正下方的LED等也变亮。
1-5 电压表1 电压表显示输出或开路电压。
如果输出关闭,电压表将显示(一)1-6 极性控制钮1 极性控制钮按下触摸按钮直道期望的LED等亮。
DC---对TIG 焊,设置机器到DCEN; 手弧焊设置到DCEP。
AC---对TIG和手弧焊使用交流。
1-7 工艺控制钮1 工艺控制钮触压触摸按钮,直到所选工艺的等变亮。
高频脉冲---是一种高频脉冲启弧方法,可用于交流或直流TIG焊接。
提弧启弧----是一种启弧方法,其中钨极必须与工件接触,该方法可用于交流和直流焊接。
1-8 高频启弧和高频TIG启动程序提升启弧:当提升启弧按钮灯亮,按下列步骤启弧,在焊接开始处把钨极触及工件,用焊枪触发开关、脚控器或手控器接通输出和保护气。
把钨极在工件上保持1-2秒,然后慢慢提升。
焊极提起后,电弧生成。
在钨极触及工件前不存在正常的开路电压,仅在钨极和工件间存在较低的感应电压,直到钨极触及工件后才激发固态输出接触器,因此钨极不会出现过热、粘条或被污染。
Miller MU IV TIG 焊接机说明书

Open welding headfor welding of tube to tube joints,tube to elbow joints…THE ART OF WELDINGMU IV with AVC/OSCMU IV with integrated wire feederAdvantagesP roductivity increase of more than one third E asy to useC hallenging applications, even with delicate materials, can be weldedQ uick to set-up according to the workload making variations in production capacity trouble freeP recision engineered assemblies for a lifetime of trouble-free service Resulting from 50 years’ experience in mastering welding technologiesP S 164-2160 A, “all inclusive”,portable, single-phase power supplyA s s o c i a t e d P o w e r S o u r c e sGeneral characteristicsW i r e f e e d e r sOn-board wire feeder for 1.5 kg spool or external POL YFIL wire feeder for 15 kg spool with wire accessoires• P – Chuck clamping system;f ull range adjustable for frequent O.D. change Two interchangeable clamping systems (C and P):• C – C lamping shells per O.D., for precise and strongclamping, for heavy duty production, with water cooling for preheated tubesClosed loopregulation to ensure precise, constant or pulsed welding speedEncoder for positionbased control of the welding programPrecise and constant torch rotation by means of planetary driveMotorized Arc Voltage Control (AVC) and Torch Oscillation Control (OSC) for multi-pass welding of medium and heavy wall tubes2-axis wire adjustmentClosed loop water cooledwelding torchWelding torch with ceramic nozzle and gas lens for laminar gas protectionMechanical sensor for a constant distance between electrode and workpieceP 4170 A, “modular”,portable, programming by PC or touch screen, single-phase power supplyPolyfil seriesExternal portable wire feeders with spool protectionP 6300 A, “all applications”,programming by PC or touch screen, with Arc Voltage Control (AVC) and Torch Oscillation Control (OSC), three-phase power supplyDrive motor with angle gearbox for reduced axial clearanceMU IV for use with external wire feederA range of modular standard welding heads, perfectly adapted to your needsMU IVOpen welding headfor welding of tube to tube joints, tube to elbow joints…“As working conditions are betterthan in manual welding, a weldingoperator accomplishes onaverage 30% more welds per day.“Adapted for all your applications!Ø ACa> A/2B C / Cb DET echnical specificationsOptions and accessories•O n board wire feeder for 1.5kg spool or external POLYFIL wire feeder for 15kg spool with wire accessories• C lamp shells (C-clamping system) for all tube and pipe O.D.’s • E xtension cable (15m)• D ual welding head switch box• C ompact shipping case for transport andstorage• T ungsten electrodes, pre-sharpened and pre-cutCable length: 9mP – Chuck clamping system C – Shell clamping system NA = Non Applicable ✹ = reducedType Dimensions in mmP -c l a m p i n g - a d j u s t a b l e f o r t h e e n t i r e O .D . r a n g eMU IV CW Ømin./Ømax.Double clamping systemrecommended Min. O.D / Max. O.D.Ø A (mm)B (mm)C (mm)D (mm)E (mm)MU IV 8/38 CW P NA 1261659672MU IV 14/38 CW P ✹NA 961259672MU IV 19/80 CW P NA 17216597103MU IV 25/115 CW P NA 215165101148MU IV 25/128 CW P NA 24016599173MU IV 76/195 CW P NA 41030,514158,5208MU IV 114/275 CW PNA 50030,514172,5276C -c l a m p i n g - o n e s h e l l p e r O .DMU IV 14/38 CW C Ø 14 à 381261657972MU IV 14/38 CW C ✹Ø 14 à 38961257974MU IV 30/58 CW C ✹Ø 30 à 581551258893MU IV 30/80 CW C Ø 30 à 8017216588103MU IV 50/115 CW C Ø 50 à 11521516592148MU IV 50/128 CW C Ø 50 à 128240165108173MU IV 76/195 CW C NA 41030,514178208MU IV 114/275 CW CNA50030,514178,5276P -c l a m p i n g - a d j u s t a b l e f o r t h e e n t i r e O .D . r a n g eMU IV AVC/OSC CWØmin./Ømax.Double clamping systemrecommended Min. O.D / Max. O.DØ A (mm)B (mm)Amplitud D (mm)E (mm)Ca (mm)Cb (mm)MU IV 8/38 AVC/OSC CW P NA 14223202015072MU IV 19/80 AVC/OSC CW P NA 200162020136103MU IV 42/115 AVC/OSC CW P NA 235162020139148MU IV 42/128 AVC/OSC CW P NA 340162030134173MU IV 76/195 AVC/OSC CW P NA 410162030165208MU IV 114/275 AVC/OSC CW P NA 530162030179276S C -c l a m p i n g - o n e s h e l l p e r O .D .MU IV 14/38 AVC/OSC CW CØ 8 à 3814223202013072MU IV 14/38 AVC/OSC CW C ✹Ø 14 à 3813235,5202013074MU IV 30/51 AVC/OSC CW C ✹Ø 30 à 5114535,5202014294MU IV 30/64 AVC/OSC CW C ✹Ø 30 à 6415835,5202014294MU IV 30/80 AVC/OSC CW C Ø 30 à 80200162020126103MU IV 50/115 AVC/OSC CW C NA 235162*********MU IV 50/128 AVC/OSC CW C Ø 50 à 128340162030143173MU IV 76/195 AVC/OSC CW C NA 410162030185208MU IV 114/275 AVC/OSC CW CNA530162030184276POLYSOUDE S.A.S.+33 (0) 2 40 68 11 00******************SOUTH KOREACHEMIKO CO Ltd+82 (0) 2 567 5336****************POLYSOUDE IBERIA OFFICE+34 609 154 683*************************CO. INDUSTRI+45 (0) 39 56 06 76************************ SWITZERLAND POLYSOUDE (SWITZERLAND) Inc. +41 (0) 43 243 50 80********************TAIWAN R.O.C.FIRST ELITE ENT. CO. Ltd+886 (0) 287 97 88 99*******************.net THAILAND POLYSOUDE S.A.S.+33 (0) 2 40 68 11 00******************POLYSOUDE S.A.S.+33 (0) 2 40 68 11 00****************** UNITED ARAB EMIRATES POLYSOUDE S.A.S.+33 (0) 2 40 68 11 00****************** UKRAINE POLYSOUDE RUSSIA+7 (0) 495 564 86 81***************UNITED STATESASTRO ARC POLYSOUDE Inc. +1 661 702 01 41****************** VENEZUELAENRIVA C.A.+58 (0) 412 34 82 602****************T h i s d o c u m e n t i s n o t c o n t r a c t u a l. T y p o g r a p h i c a l e r r o r s & o m i s s i o n s e x。
Miller Electric 电焊机产品参数手册说明书

Series 6000HC E G DiaKKYXA B 2 5/8LN N 8J5 1/410 5/16ECHYXA B 2 5/88 5 1/410 5/16D11tons in in in in in in in in 1/2Hook / Spark 91168316-1/211-7/166-5/82-15/166-3/87/1627-13/169-11/16911644911641Hook / Spark9116842213-1/87-15/164-9/165-1/163/1629-1/211911645911642Hook / Spark 91168524-7/814-3/89-3/85-7/87-1/81/430-3/412911646911643H X Y Capacity Hoist Catalog #Model1D E B A C 13-1/87-15/164-9/165-1/166-5/82-15/166-3/816-1/222Hook / Standard23Hook / Standard Hook / Standard 11-17/167/1624-7/814-3/89-3/85-7/87-1/827-13/163/1629-1/21/430-3/49-11/161112tons in in in in in in in in in in in in 1/2Lug / Spark 91169315-1/46-5/86-3/811-9/161-11/1610-13/161-13/165/87/1626-9/169-11/16911654911651Lug / Spark911694217-15/165-1/161-11/162-1/21-7/811-1/82-3/1613/1627-1/211911655911652Lug / Spark 91169523-5/169-3/87-1/83-1/1631-1/412-7/831-1/41/429-1/412911656911653H X Y 11/429-1/4123/1627-1/2117/1626-9/169-11/1631-1/423-5/169-3/812-7/87-1/83-1/1631-1/41217-15/161-7/85-1/161-11/162-1/211-1/8G N 1-13/165/82-3/16Lug / Standard 23Lug / Standard Lug / Standard15-1/46-5/86-3/811-9/161-11/1610-13/16J K L M E B C Capacity Hoist Catalog #ModelLug Suspension Specifications & DimensionsHook Suspension Specifications & DimensionsHook SuspensionLug SuspensionSpark Resistant ModelsSpark resistant hoists offer greater protection in hazardous environments. Components for spark resistance includes bronze alloy hooks with stainless steel hook latches, lower blocks of stainless steel on single part chain and aluminum on 2 and 3 part chain, chrome nickel non-magnetic stainless steel alloy load chain, bronze limit stop with aluminum limit actuators and modified sprocket and guide. A spark resistant chain container is recommended on 10 foot lift spark resistant hoists. Spark resistant chain containers are stainless steel.The spark resistant Series 6000 air hoists have lower speeds and are derated due to the use of stainless steel load chain. The lower wear life of stainless steel chain limits applications to medium duty service.When specifying lug suspended spark resistant hoists, care must be taken in the trolley selection to assure that the trolley fits the derated hoist lug. If this is your first purchase, consult the factory for assistance.。
米勒PipePro300焊机建议操作手册

米勒PipePro300操作手册北京华盛海天科技发展有限公司制定: 闫磊版本: 130315一.常用操作术语●Pro-pulse --- 使用恒流的脉冲焊接法通过对峰值电流和基值电流的恒压控制进行操作。
自适应反应受峰值电流和最小电流控制。
优点是弧长较短,熔池控制水平更高,对焊嘴至工件的波动的容忍度更大,噪声较低,无电弧漂移,可提高在焊趾处填充焊缝的速度和沉积,并对装配不良和间隙有更高的承受能力。
●调节器 --- 用于改变或设定参数和功能的控制旋钮。
●电流 --- 指示焊接时的平均安培数和焊接结束时的 3 秒保持值。
●电弧调节值 --- 用于表示在脉冲焊程序中电长的调节量。
提高电弧调节值可增加实际弧长。
同样,减少电弧调节值可缩短弧长。
在熔化极保护焊(MIG)程序中,用电压值调节代替电弧调节值。
●电弧控制 --- 按下该按钮可在 MIG 模式中设定电感,或在脉冲焊、Pro-pulse 焊和 RMD-Pro焊中使电弧更锐利。
该按钮也可在手工电弧焊模式中设定电弧吹力。
●弧长 --- 焊丝末端至工件的距离。
●弧坑 --- 允许设定电弧端的电压值/电弧调节值、送丝速度和时间值(仅在“有电弧和有模拟输入”模式或“有电弧和无模拟输入”模式时有效)。
这些值可以由带文件管理/WaveWriter 软件的 PDA 来改变。
●气体类型 --- 选择应使用的保护气体。
●电感 --- 在短路 GMAW 焊中增加电感(而其它参数不变)将会减少每秒短路过渡的数目和增加电弧存在的时间。
增加电弧存在时间可提高焊接熔池的“流度”。
●熔化极保护焊 --- CV 焊法,单独设定电压和送丝速度。
●焊接方法 --- 对下列焊法所进行的选择:熔化极保护焊、脉冲焊、Pro-pulse 焊、RMD-Pro 焊、手工电弧焊、碳弧焊、药芯焊 (FCAW) 和提升引弧钨极氩弧焊。
●焊接方法设置 --- 输入程序的选择步骤。
●程序 --- 可提供八个有效的通道,用于选择各种焊接方法、焊丝类型和参数。
米勒焊机操作说明书
米勒焊机操作说明书1-1控制按钮注:1对于所有前面板触摸开关控制xx:按下触摸开关,使灯亮,启动功能。
2铭牌上的绿标表示TIG功能,灰色表示正常的手弧焊功能。
1 编码控制xx2 电流及参数显示表3 电压表4 极性控制xx5 工艺控制xx6 输出控制xx7 脉冲控制xx8 工序控制xx9 气体/电极力控制xx 10 交流波型控制xx 11 电流和点焊时间控制xx 12 存储按xx 13 电源开关1-2 编码控制xx1-3 电流控制xx1 A 电流控制按xx2 编码控制xx3 电流表注:当脉冲功能起作用时,按下电流控制按钮,转动编码器,以设定焊接电流或峰值电流。
1-4 电流及参数显示表1-5 电压表1-6 极性控制xx1-7 工艺控制xx提升启弧:当提升启弧按钮灯亮,按下列步骤启弧,在焊接开始处把钨极触及工件,用焊枪触发开关、脚控器或手控器接通输出和保护气。
把钨极在工件上保持1-2秒,然后慢慢提升。
焊极提起后,电弧生成。
在钨极触及工件前不存在正常的开路电压,仅在钨极和工件间存在较低的感应电压,直到钨极触及工件后才激发固态输出接触器,因此钨极不会出现过热、粘条或被污染。
应用:当不允许使用高频启弧或要取代划擦启弧时。
提升启弧用于DCEN或AC TIG 工艺。
高频启弧当高频启弧按钮灯亮,按下列步骤启弧,输出接通后,打开高频帮助启弧,启弧完成后关闭高频,断弧再次帮助重新启弧。
应用:当需要非接触启弧时,高频启弧用于DCEN GTAG工艺。
1-9 输出控制xx1 输出控制按钮按下按钮,直到希望参数的LED灯亮。
标准远控---应用:与脚踏或手控电流控制器一起使用远控触发。
注:脚控或手控远控电流控制器连接后,初始电流、起始坡升、终止坡降、及终止电流由远控器控制。
如果使用开/关型触发开关,它必须是一个维持开关,所有的程序功能有效,必须由操作者设定。
远控2T保持---应用:长距离焊接时,使用远控触发保持(2T)。
如果脚控或手控电流控制器连接到底电源上,仅触发输入有效。
米勒焊机Maxstar说明书

Miller Electric Mfg. Co. An Illinois Tool Works Company 1635 West Spencer Street Appleton, WI 54914 USAWeb Site International HeadquartersPhone: 920-735-4505USA FAX: 920-735-4134Canadian FAX: 920-735-4169International FAX: 920-735-4125Maxstar®200 Series TIG/Stick WeldingPower SourceIssued October 2003 • Index No. DC/32.0Auto-Line™provides state-of-the-art flexibility to the end user. TheAuto-Line circuitry automaticallyconnects to 120–460 VAC, single-or three-phase power withoutremoving the covers to relink thepower source. No longer is there aconcern if you have the correctmachine for shop or the job site.The Power of Blue®.Available in Three Models:SD—Provides the basic features that are required for most TIG or Stick welding applications.DX—When the job demands greater control the DX provides pulse on/off, pulse frequency, peak % time,background amperage, initial amperage,initial slope time, final slope time and final amperage control.LX—Automation made simple. With the Automation Interface Connector, the integrator can quicklyinterface to the output disable, weld start/stop, gas start/stop inputs; valid arc, pulse lock out, andend of weld sequence outputs.Portable in the shop or at the job site—at 37 lbthe Maxstar 200 is easily moved from locationto location.Superior TIG/Stick arc performance on all inputvoltages. Even on the difficult to run electrodeslike E6010.Inverter-based, DC power sourcehas state-of-the-art operatorinterface allowing the user extraset-up capabilities in a compactmachine. Features more precisecontrol of output parameters thantraditional knobs and switches.HF arc starting provides non-contact arc startingthat eliminates tungsten or material contamination.Lift-Arc™start provides TIG arc starting withoutthe use of high frequency.Programmable HF start parametersallows the independently setHF starting conditions based uponprocess or application.NEW!Low OCV Stick is a simpledesign that reduces the open-circuitvoltage to 13 volts when the weldingpower source is not in use. Thisbuilt-in circuit design eliminates theneed for add-on voltage reducers.Maxstar 200 DX Maxstar 200 LX Maxstar 200 SDPower source is warranted for 3 years, parts and labor.Original main power rectified parts are warranted for 5 years.2Control PanelCSA approval.Models with CE specifications are available and manufactured according to the Standards IEC-974-1 and EN-60974-1.*Indicates idle draw. **Sense voltage for Stick and Lift-Arc TIG.B.Initial Time (s)0.0–25 (LX only)C.Initial Amperage (A)1–200D.Initial Slope Time (s)0.0–25E.Weld Amperage (A)1–200G.Background Amperage (%)0–100H.Peak Percent Time (%)5–95I.Final Slope Time (s)0.0–25 J.Final Amperage (A)1–200L.Postflow Time (s) 0–0.50M.Dig (%)0–1003Performance DataAMPERES*115 VAC INPUTV O L T S0204060801001201400501001502002501401201006080402000 50 100 150 200 250AMPERES*OTHER INPUT VOLTAGESV O L T S*Amperage setting must be reduced toobtain currents less than highlighted data point.STICK MAX.TIG MAX.STICK/TIG MIN.DIG MAX.102030405060708090100% DUTY CYCLEDUTY CYCLE CHART250200150100500O U T P U T A M P E R E SIncluded AccessoriesNon-CE SD/DX Models Include:(2) International-style connectors 35/50(1) DA-917F torch adapter tointernational-style connector (#194 720)Non-CE LX Model Includes:(2) International-style connectors 35/50(1) 14-pin amphenol with clamp (1) 10-pin amphenol with clamp (1) 5/8 in - 18 gas fittingCE SD/DX Models Include:(2) International-style connectors 35/50(1) 14-pin amphenol with clamp (1) 5/8 in - 18 gas fitting (1) 3/8 in BSPP gas fittingOrdering InformationPower Source and Options Stock No.Description Qty.Price Maxstar®200 SD#903 701Basic controls for TIG/Stick, 120–460 VAC#903 768Basic controls for TIG/Stick, 120–460 VAC with CEMaxstar®200 DX#903 701-01-1Full-feature controls for TIG/Stick, 120–460 VAC#903 768-01-1Full-feature controls for TIG/Stick, 120–460 VAC with CEMaxstar®200 LX#903 701-01-2Full-feature controls with the required automation connections, 120–460 VACTIG AccessoriesTIG Torch Adapters#194 720DA-917F#190 219DA-1820L#194 724DA-26RContractor Kits#195 055150 A TIG/Stick with RCCS-14 fingertip control#195 054150 A TIG/Stick with RFCS-14 HD foot controlDiamondback™TIG Torches See Diamondback TIG Torch Selector GuideConsumables/Tungsten See Parts GuideGas Cylinder/Hose and FittingsRemote ControlsRFCS-14 HD#194 744Heavy-duty foot controlRCCS-14#043 688North/south fingertip controlRCC-14#151 086Side-to-side fingertip controlRMLS-14#129 337Momentary/maintained rocker controlRMS-14#187 208Momentary rubber dome switchExtension CordsCoolant SystemsCoolmate™3 #043 007115 VAC#043 007-01-2115 VAC with CE#043 008230 VAC#043 008-01-2230 VAC with CECoolmate™V3#043 009115 VAC#043 009-01-2115 VAC, 50/60 Hz with CECoolmate™4#042 288115 VAC#042 288-01-5115 VAC with CELow-Conductivity Coolant#043 810International-Style ConnectorsInternational-Style Connector Kit #042 418Dinse, (1) male plug-50 mmExtension Kit for International-Style#042 419Dinse, (1) plug and (1)receptacle-50 mmInternational/Tweco®Adapter #042 465 A one-piece adapter with International-style male plugInternational/Cam-Lok Adapter #042 466 A one-piece adapter with International-style male plugDate:Total Quoted Price:Distributed by:Litho in USA。
米勒焊机Maxstar说明书
Miller Electric Mfg. Co. An Illinois Tool Works Company 1635 West Spencer Street Appleton, WI 54914 USAWeb Site International HeadquartersPhone: 920-735-4505USA FAX: 920-735-4134Canadian FAX: 920-735-4169International FAX: 920-735-4125Maxstar®200 Series TIG/Stick WeldingPower SourceIssued October 2003 • Index No. DC/32.0Auto-Line™provides state-of-the-art flexibility to the end user. TheAuto-Line circuitry automaticallyconnects to 120–460 VAC, single-or three-phase power withoutremoving the covers to relink thepower source. No longer is there aconcern if you have the correctmachine for shop or the job site.The Power of Blue®.Available in Three Models:SD—Provides the basic features that are required for most TIG or Stick welding applications.DX—When the job demands greater control the DX provides pulse on/off, pulse frequency, peak % time,background amperage, initial amperage,initial slope time, final slope time and final amperage control.LX—Automation made simple. With the Automation Interface Connector, the integrator can quicklyinterface to the output disable, weld start/stop, gas start/stop inputs; valid arc, pulse lock out, andend of weld sequence outputs.Portable in the shop or at the job site—at 37 lbthe Maxstar 200 is easily moved from locationto location.Superior TIG/Stick arc performance on all inputvoltages. Even on the difficult to run electrodeslike E6010.Inverter-based, DC power sourcehas state-of-the-art operatorinterface allowing the user extraset-up capabilities in a compactmachine. Features more precisecontrol of output parameters thantraditional knobs and switches.HF arc starting provides non-contact arc startingthat eliminates tungsten or material contamination.Lift-Arc™start provides TIG arc starting withoutthe use of high frequency.Programmable HF start parametersallows the independently setHF starting conditions based uponprocess or application.NEW!Low OCV Stick is a simpledesign that reduces the open-circuitvoltage to 13 volts when the weldingpower source is not in use. Thisbuilt-in circuit design eliminates theneed for add-on voltage reducers.Maxstar 200 DX Maxstar 200 LX Maxstar 200 SDPower source is warranted for 3 years, parts and labor.Original main power rectified parts are warranted for 5 years.2Control PanelCSA approval.Models with CE specifications are available and manufactured according to the Standards IEC-974-1 and EN-60974-1.*Indicates idle draw. **Sense voltage for Stick and Lift-Arc TIG.B.Initial Time (s)0.0–25 (LX only)C.Initial Amperage (A)1–200D.Initial Slope Time (s)0.0–25E.Weld Amperage (A)1–200G.Background Amperage (%)0–100H.Peak Percent Time (%)5–95I.Final Slope Time (s)0.0–25 J.Final Amperage (A)1–200L.Postflow Time (s) 0–0.50M.Dig (%)0–1003Performance DataAMPERES*115 VAC INPUTV O L T S0204060801001201400501001502002501401201006080402000 50 100 150 200 250AMPERES*OTHER INPUT VOLTAGESV O L T S*Amperage setting must be reduced toobtain currents less than highlighted data point.STICK MAX.TIG MAX.STICK/TIG MIN.DIG MAX.102030405060708090100% DUTY CYCLEDUTY CYCLE CHART250200150100500O U T P U T A M P E R E SIncluded AccessoriesNon-CE SD/DX Models Include:(2) International-style connectors 35/50(1) DA-917F torch adapter tointernational-style connector (#194 720)Non-CE LX Model Includes:(2) International-style connectors 35/50(1) 14-pin amphenol with clamp (1) 10-pin amphenol with clamp (1) 5/8 in - 18 gas fittingCE SD/DX Models Include:(2) International-style connectors 35/50(1) 14-pin amphenol with clamp (1) 5/8 in - 18 gas fitting (1) 3/8 in BSPP gas fittingOrdering InformationPower Source and Options Stock No.Description Qty.Price Maxstar®200 SD#903 701Basic controls for TIG/Stick, 120–460 VAC#903 768Basic controls for TIG/Stick, 120–460 VAC with CEMaxstar®200 DX#903 701-01-1Full-feature controls for TIG/Stick, 120–460 VAC#903 768-01-1Full-feature controls for TIG/Stick, 120–460 VAC with CEMaxstar®200 LX#903 701-01-2Full-feature controls with the required automation connections, 120–460 VACTIG AccessoriesTIG Torch Adapters#194 720DA-917F#190 219DA-1820L#194 724DA-26RContractor Kits#195 055150 A TIG/Stick with RCCS-14 fingertip control#195 054150 A TIG/Stick with RFCS-14 HD foot controlDiamondback™TIG Torches See Diamondback TIG Torch Selector GuideConsumables/Tungsten See Parts GuideGas Cylinder/Hose and FittingsRemote ControlsRFCS-14 HD#194 744Heavy-duty foot controlRCCS-14#043 688North/south fingertip controlRCC-14#151 086Side-to-side fingertip controlRMLS-14#129 337Momentary/maintained rocker controlRMS-14#187 208Momentary rubber dome switchExtension CordsCoolant SystemsCoolmate™3 #043 007115 VAC#043 007-01-2115 VAC with CE#043 008230 VAC#043 008-01-2230 VAC with CECoolmate™V3#043 009115 VAC#043 009-01-2115 VAC, 50/60 Hz with CECoolmate™4#042 288115 VAC#042 288-01-5115 VAC with CELow-Conductivity Coolant#043 810International-Style ConnectorsInternational-Style Connector Kit #042 418Dinse, (1) male plug-50 mmExtension Kit for International-Style#042 419Dinse, (1) plug and (1)receptacle-50 mmInternational/Tweco®Adapter #042 465 A one-piece adapter with International-style male plugInternational/Cam-Lok Adapter #042 466 A one-piece adapter with International-style male plugDate:Total Quoted Price:Distributed by:Litho in USA。
米勒焊机操作说明书
米勒焊机操作说明书文稿归稿存档编号:[KKUY-KKIO69-OTM243-OLUI129-G00I-FDQS58-米勒焊机操作说明书1-1控制按钮注:1对于所有前面板触摸开关控制钮:按下触摸开关,使灯亮,启动功能。
2铭牌上的绿标表示TIG功能,灰色表示正常的手弧焊功能。
1 编码控制钮2 电流及参数显示表3 电压表4 极性控制钮5 工艺控制钮6 输出控制钮7 脉冲控制钮8 工序控制钮9 气体/电极力控制钮 10 交流波型控制钮 11 电流和点焊时间控制钮 12 存储按钮 13 电源开关1-2 编码控制钮1-3 电流控制钮1 A 电流控制按钮2 编码控制钮3 电流表注:当脉冲功能起作用时,按下电流控制按钮,转动编码器,以设定焊接电流或峰值电流。
1-4 电流及参数显示表1-5 电压表1-6 极性控制钮1-7 工艺控制钮1-8 高频启弧和高频TIG启动程序提升启弧:当提升启弧按钮灯亮,按下列步骤启弧,在焊接开始处把钨极触及工件,用焊枪触发开关、脚控器或手控器接通输出和保护气。
把钨极在工件上保持1-2秒,然后慢慢提升。
焊极提起后,电弧生成。
在钨极触及工件前不存在正常的开路电压,仅在钨极和工件间存在较低的感应电压,直到钨极触及工件后才激发固态输出接触器,因此钨极不会出现过热、粘条或被污染。
应用:当不允许使用高频启弧或要取代划擦启弧时。
提升启弧用于DCEN或AC TIG 工艺。
高频启弧当高频启弧按钮灯亮,按下列步骤启弧,输出接通后,打开高频帮助启弧,启弧完成后关闭高频,断弧再次帮助重新启弧。
应用:当需要非接触启弧时,高频启弧用于DCEN GTAG工艺。
1-9 输出控制钮1 输出控制按钮按下按钮,直到希望参数的LED灯亮。
标准远控---应用:与脚踏或手控电流控制器一起使用远控触发。
注:脚控或手控远控电流控制器连接后,初始电流、起始坡升、终止坡降、及终止电流由远控器控制。
如果使用开/关型触发开关,它必须是一个维持开关,所有的程序功能有效,必须由操作者设定。
美国米勒焊机说明
美国米勒焊机说明注:主输入电流消耗不能超过50A耐用而轻便的手工电弧焊/TIG焊接电源,专为建造行业设计。
280A焊接电流输出,是手工电弧焊(最大焊条直径4.8mm)及管与板TIG焊的理想选择。
通过一个双位置的手动开关,可非常简便地在电压范围之间进行切换。
开关安装在后板上,使用在焊机架上的电压切换变得简单。
操作简便的工艺选择旋钮,自动进行对于E6010与E7018焊条的DIG设定,提供出色的手工电弧焊性能。
Lift-Arc™提升引弧TIG焊技术,不需使用高频。
Fan-On-Demand™冷却系统只在需要时工作,提高电源效率并减小噪音。
落地放置或固定在支架上。
可选的4台或8台焊机架,常用于建造或造船行业中的多工位应用场合。
包括电源开关在内的所有控制装置均安装在机器前面,便于操作。
焊接电流遥控通过机器前面的14针接口实现,允许使用标准的电流控制装置。
可选择Tweco接口或Dinse接口。
Dinse接口包括一套阳插头;Tweco接口不包括。
•手工电弧焊(SMAW)•TIG(GTAW)•CST280焊机架•RCC-14遥控器 #151 086•RCCS-14遥控器 #043 688•RFCS-14遥控器 #043 554•RFCS-14 HD遥控器 #194 744•RHC-14 遥控器 #129 340•TIG焊枪请向您的米勒设备供应商咨询其它米勒常用选项与配件注:①. 4台小型焊机,14台大焊机,共报买18台焊机。
②. 现在报买的小型电焊机就是上面的美国米勒焊机,型号为CTS280需要4台,标配遥控器及线,二次线插头及地线夹。
③.大焊机是山东奥太焊机,型号ZX7---400ST 供 14台,,必须配遥控器及线和二次线插头。
米勒焊机操作说明书
米勒焊机操作说明书————————————————————————————————作者: ————————————————————————————————日期:米勒焊机操作说明书1-1控制按钮注:1对于所有前面板触摸开关控制钮:按下触摸开关,使灯亮,启动功能。
2铭牌上的绿标表示TIG功能,灰色表示正常的手弧焊功能。
1 编码控制钮2电流及参数显示表 3 电压表 4极性控制钮 5 工艺控制钮 6 输出控制钮 7 脉冲控制钮 8 工序控制钮 9 气体/电极力控制钮 10 交流波型控制钮 11 电流和点焊时间控制钮 12 存储按钮 13 电源开关1-2 编码控制钮1-3 电流控制钮1 A 电流控制按钮2 编码控制钮3 电流表1 编码控制钮利用本控制钮,与面板上的功能触摸开关一起设置该功能的参数值。
注:当脉冲功能起作用时,按下电流控制按钮,转动编码器,以设定焊接电流或峰值电流。
1-4 电流及参数显示表1-5 电压表1 电流表电流表显示焊接时的电流值,也可以显示下列的预设参数:电流、时间、百分比或频率。
电流表正下方的LED 等也变亮。
1 电压表显示输出或开路电压。
如果输出关闭,电压表将显示(一)1-6极性控制钮1-7 工艺控制钮1 极性控制钮按下触摸按钮直道期望的LED等亮。
DC---对TIG焊,设置机器到DCEN;手弧焊设置到DCEP。
AC---对TIG和手弧焊使用交流。
1 工艺控制钮触压触摸按钮,直到所选工艺的等变亮。
高频脉冲---是一种高频脉冲启弧方法,可用于交流或直流TIG焊接。
提弧启弧----是一种启弧方法,其中钨极必须与工件接触,该方法可用于交流和直流焊接。
1-8 高频启弧和高频TIG启动程序提升启弧:当提升启弧按钮灯亮,按下列步骤启弧,在焊接开始处把钨极触及工件,用焊枪触发开关、脚控器或手控器接通输出和保护气。
把钨极在工件上保持1-2秒,然后慢慢提升。
焊极提起后,电弧生成。
在钨极触及工件前不存在正常的开路电压,仅在钨极和工件间存在较低的感应电压,直到钨极触及工件后才激发固态输出接触器,因此钨极不会出现过热、粘条或被污染。
- 1、下载文档前请自行甄别文档内容的完整性,平台不提供额外的编辑、内容补充、找答案等附加服务。
- 2、"仅部分预览"的文档,不可在线预览部分如存在完整性等问题,可反馈申请退款(可完整预览的文档不适用该条件!)。
- 3、如文档侵犯您的权益,请联系客服反馈,我们会尽快为您处理(人工客服工作时间:9:00-18:30)。
米勒焊机操作说明书[整理版]
米勒焊机操作说明书
1-1 控制按钮
注:1对于所有前面板触摸开关控制钮:按下触摸开关,使灯亮,启动功能。
2铭牌上的绿标表示TIG功能,灰色表示正常的手弧焊功能。
1 编码控制钮
2 电流及参数显示表
3 电压表
4 极性控
制钮 5 工艺控制钮 6 输出控制钮 7 脉冲控制钮 8 工序控制钮 9 气体/电极力控制钮 10 交流波型控制钮 11 电流和点焊时间控制钮 12 存储按钮 13 电源开关
1-2 编码控制钮
1 编码控制钮
利用本控制钮,与面板上的功能
触摸开关一起设置该功能的参
数值。
1-3 电流控制钮
1 A 电流控制按钮
2 编码控制钮
3 电流表注:当脉冲功能起作用时,按下电流控制按钮,转动编码器,以设定
焊接电流或峰值电流。
1-4 电流及参数显示表
1 电流表
电流表显示焊接时的电流值,也可以显示下列的预设参数:电流、时间、百分比或频率。
电流表正下方的LED等也变亮。
1-5 电压表
1 电压表
显示输出或开路电压。
如果输出关闭,电压表将显示(一)
1-6 极性控制钮
1 极性控制钮
按下触摸按钮直道期望的LED等亮。
DC---对TIG 焊,设置机器到DCEN; 手弧焊设置到DCEP。
AC---对TIG和手弧焊使用交流。
1-7 工艺控制钮
1 工艺控制钮
触压触摸按钮,直到所选工艺的等
变亮。
高频脉冲---是一种高频脉冲启弧
方法,可用于交流或直流TIG焊接。
提弧启弧----是一种启弧方法,其中
钨极必须与工件接触,该方法可用
于交流和直流焊接。
1-8 高频启弧和高频TIG启动程序
提升启弧:当提升启弧按钮灯亮,按下列步骤启弧,在焊接开始处把钨极触及工件,用焊枪触发开关、脚控器或手控器接通输出和保护气。
把钨极在工件上保持1-2秒,然后慢慢提升。
焊极提起后,电弧生成。
在钨极触及工件前不存在正常的开路电压,仅在钨极和工件间存在较低的感应电压,直到钨极触及工件后才激发固态输出接触器,因此钨极不会出现过热、粘条或被污染。
应用:当不允许使用高频启弧或要取代划擦启弧时。
提升启弧用于DCEN或AC TIG 工艺。
高频启弧
当高频启弧按钮灯亮,按下列步骤启弧,输出接通后,打开高频帮助启弧,启弧完成后关闭高频,断弧再次帮助重新启弧。
应用:当需要非接触启弧时,高频启弧用于DCEN GTAG工艺。
1-9 输出控制钮
1 输出控制按钮
按下按钮,直到希望参数的LED灯亮。
标准远控---应用:与脚踏或手控电流控制器一起使用远控触发。
注:脚控或手控远控电流控制器连接后,初始电流、起始坡升、终止坡降、及终止电流由远控器控制。
如果使用开/关型触发开关,它必须是一个维持开关,所有的程序功能有效,必须由操作者设定。
远控2T保持---应用:长距离焊接时,使用远控触发保持(2T)。
如果脚控或手控电流控制器连接到底电源上,仅触发输入有效。
注:本开关的功能可以设置为3T、4T、微逻辑或点焊控制。
开启---选定2秒钟后,输出将通电。
应用:手弧焊(SMAW)或不使用远控器的提升启弧时使用输出开启
2 开启LED 输出时开启LED灯闪蓝光。
1-10 脉冲控制按钮
1 脉冲控制按钮
选择TIG焊工艺时可以使用脉冲,控制钮可以在焊接时按下按钮开启脉冲。
开启(ON)---该LED灯亮,关闭脉冲时,按下、释放按钮开启(ON)LED 灯熄灭。
2 编码控制钮(设定数值)
3 电流表(显示数值)
PPS(每秒钟的脉冲或脉冲频率),用于确定焊缝的外观;
PEAK t:每个脉冲循环内可处于峰值电流水平部分的比例;
BKGND A(基值电流):利用基值电流设定脉冲谷部的焊接电流,它可以冷却焊接熔池,影响整个加热输入,基值电流为峰值电流的百分比。
注:峰值电流由电流控制钮设定,峰值电流是脉冲循环中允许的最大焊接电流,焊接穿透直接随峰值电流改变。
应用:脉冲是指焊接输出的升高部分由宽度、高度和频率控制,形成焊接输出脉冲,这些脉冲及其间的低电流水平(称作为基值电流)循环地加热和冷却焊接熔池,这种组合影响可以更好的控制穿透、焊缝宽度、、余高、咬边及热量输入。
1-11 工序控制按钮
1 工序控制钮
选择TIG工艺时有工序控制功能,但在标准远控模式下,脚控或手控电流远程控制器与远程插座连接后,此功能不起作用。
按下按钮直到期望参数的LED灯亮。
2 编码控制钮(设定参数)
3 电流表(显示数值)
INITIAL A(初始电流):使用控制钮选择不同于焊接电流的初始电流。
应用:初始电流可用于在熔敷填充材料前帮助预热材料或确保软启弧。
INITIAL t (启始时间)(仅适用于带自动化选项的机型):再次按下工序控制钮,旋转编码钮,设定开始焊接前需要的时间。
INITIAL slope t (初始坡升时间):利用控制钮设定从初始电流上升到焊接电流所需的时间,设定为零时,无该功能。
4 电流控制钮
焊接时间(仅适用于带自动化选项的机型):按下电流开关按钮两次,设定需要的焊接时间。
FINAL slope t(终止坡降时间):利用控制钮设定从焊接电流到终止电流所需的时间。
设定为零时,无该功能。
应用:焊材易产生裂纹或为了消除焊后弧坑时,应该采用终止坡降。
FIANL A(终止电流):用于设定焊接电流下降之后的电流。
FINAL t(终止时间)(仅适用于带自动化选项的机型):再次按下工序控制按钮,旋转编码钮,设定终止电流时间。
1-12 气体/电弧力控制按钮
1 气体/电弧力控制按钮
按下控制按钮,直到选定功能的LED灯亮。
2 编码控制钮(设定数值)
3 电流表(显示数值)
预先送气:高频TIG工艺时,预先送气显示在控制面板上,利用控制钮设置启弧前气流的时间。
应用:预先送气用于清理焊接区域,帮助启弧。
滞后停气:TIG焊工艺时,利用控制钮设定焊接停止后气流的时间。
应用:滞后停气用于冷却钨极和焊缝,防止钨极和焊缝的氧化,如果
钨极和焊缝的外观发黑,增加滞后停气时间。
电弧力控制:直流手弧焊工艺时。
利用控制钮设定电弧力控制量。
设置为零时,低弧压下的短路电流与正常的焊接电流相同。
设置数增加,低弧压下的短路电流也增加。
应用:电弧力控制有助于启弧,通过增加低弧压下的电流进行垂直焊或仰焊,减少焊接时的粘条。
清理功能:为了打开气阀,启动清理功能,按下并保持调节按钮一定时间,清理时间可以设定为1到50秒,缺省设置为零。
调整时,按住控制按钮的同时旋转编码控制钮,使用清理功能时,左边显示[pug],右边显示清理时间。
按下任何开关,清理将结束显示,但气流仍继续,直到达到预设的时间。
应用:清理功能用于清洁气管。
1-13交流波型控制钮
1 交流波型控制按钮
按下控制按钮直到期望功能的LED 灯亮起。
2 编码控制钮(设定数值)
3 电流表(显示数值)
平衡:交流平衡控制仅在交流TIG时起作用,用于设定极性处于焊极负的时间的百分比。
应用:焊接氧化物形成材料,如铝和镁时,过度的清理没有必要。
要形成好的焊缝,仅需沿着焊脚侵蚀2.5毫米的区域。
使用交流平衡控
制侵蚀区域的宽度。
焊缝形式、设置、工艺变量和氧化物的厚度可能影响设定。
交流频率:交流频率控制仅在交流TIG时起作用,利用该控制设定交流频率。
应用:交流频率控制电弧宽度和方向。
频率减少,电变宽、更分散,不容易控制方向,频率增加,电弧变窄、更集中,方向控制更容易,随着交频率的增加,焊接速度可能增加。
EN电流:使用该控制选择焊极负时的电流值。
EP电流:使用该控制选择焊极正时的电流值。
EN电流和EP电流可以使操作者分别控制正负半个循环的电流。
EN和EP之比为2:1或3:1是一个很好的起始点。
这样可以有清理作用,并向工件输送更多的能量,焊接速度更快,熔深更深。
4 电流控制按钮
5 平衡电流控制:设定EN电流、EP电流、平衡和频率下,改变平
均电流,而保证EN电流和EP电流比不变,欲改变平均电流值,
按下电流控制按钮,旋转编码控制按钮,改变的电流值显示在电
流表上。
1-14 点焊时间控制
1 点焊时间显示表
2 电流控制按钮
3 编码控制钮
设置点焊参数:按下电流按钮(显示表A LED 灯亮),旋转编码钮设置点焊时间(0.1---25秒),缺省设置为1秒。
应用:为拼焊和薄板连接提供定时的焊接方式。
1-15 存储
1 存储(程序存储1-4)按钮
2 极性控制按钮(仅适用于Dynasty机型)
3 工艺控制按钮
创造、改变或恢复一个焊接参数程序时,执行如下操作:
首先,按下存储按钮,直到所选的程序存储位置处的LED灯亮。
其次,按下极性控制按钮,直到希望的极性AC或DC的LED灯亮。
第三,按下工艺按钮,直到选择的工艺—高频脉冲TIG、提升启弧TIG、或手弧的LED灯亮。